


OFFICAL PEDE THREAD
 05-28-2009, 12:35 PM
#9426
Senior Member
My Feedback: (2)

Join Date: Dec 2008
Location: boca raton ,
FL
Posts: 1,105
Likes: 0
Received 0 Likes
on
0 Posts
true but its ment to twist, not break.
also had a rusty for a while and i think the reason the servo breaks more on the pede is cuz on impact all the force goes to the servo saver where as in a rusty/bandit/slash the bell crank takes a bit of the abuse.
 05-28-2009, 07:15 PM
#9429
Senior Member
Join Date: Mar 2008
Location: by the lake,
ON, CANADA
Posts: 2,447
Likes: 0
Received 0 Likes
on
0 Posts
i bought a futaba digital S9451 (metal gear)have had it for a good 2 years, its gone thru tight bellcranks, tight locked servo savers, directly to the links and i bend metal turnbuckles and snap plastic but this servo still turns 120 degrees with no prob, no hesitation, no grinding and no clicking, just that digital hummm
05-29-2009, 05:15 AM
#9431
Senior Member
Join Date: Feb 2009
Location: Laguna Niguel,
CA
Posts: 380
Likes: 0
Received 0 Likes
on
0 Posts
I looked up the model number for the Futaba you mention but only found the casing and gear replacements on Tower Hobbies. Where did you get yours?
EDIT :nevermind, I found what replaced it
http://www3.towerhobbies.com/cgi-bin...&I=LXRWS9&P=ML
EDIT :nevermind, I found what replaced it
http://www3.towerhobbies.com/cgi-bin...&I=LXRWS9&P=ML
05-30-2009, 03:20 AM
#9432
Senior Member
Join Date: Feb 2009
Location: Laguna Niguel,
CA
Posts: 380
Likes: 0
Received 0 Likes
on
0 Posts
Good news. I had it set up with the large Kimbrough servo saver with a fresh H adapter insert. I adjusted the steering range with the EPA feature on my Futaba so that it doesn't oversteer and strain the saver. Drove it in some mud since we finally got some rain. The #124Kimbrough servo saver held! Took a few front bumps but not really hard.But it didn't seem to do anything to the steering. I just did one runwith a NIMH pack.
The steering range is lesser now but still enough for what I do.It seems like steering is a little slower but maybe that was because ofthe mud. I'll try it with my Lipo pack next time. That seems to also make my steering more crisper.
The steering range is lesser now but still enough for what I do.It seems like steering is a little slower but maybe that was because ofthe mud. I'll try it with my Lipo pack next time. That seems to also make my steering more crisper.
05-31-2009, 04:07 AM
#9433
Senior Member
Join Date: Feb 2009
Location: Laguna Niguel,
CA
Posts: 380
Likes: 0
Received 0 Likes
on
0 Posts


Finally got some rain but not a lot. But enough for some semi mud. It got the tires nice and dirty but not much more than that. I still await some heavier rain that will leave even more mud.
Still there was mud and Ieven got it on my wheelie bar wheels.


The next day:
Stock VXL blue body cover with some of it covered with black spray paint.
Masher 2000 tires. Rears are not taped so they balloon.
2s Lipo.
Aaaaaaand my large Kimbrough servo saver survived all that.

 06-01-2009, 10:04 AM
#9438
Senior Member
Join Date: Feb 2009
Location: Laguna Niguel,
CA
Posts: 380
Likes: 0
Received 0 Likes
on
0 Posts
The tape is to cut down on heavy scratches on the body because they can accumulate and form holes. They already did on the rear corners on my stock body cover. So I usually put tape on the corners and edges that touch and scrape the ground the most.
There are two short strips of black tape on each side of the rear. That's there to be under the body pins. The pins have already dug right through the plastic of the cover from bumps and crashes. So I reinforced it with plastic underneath and Gorilla tape above with some Goop in between. So far it's holding.
The yellow Dust Storm cover is the one I think Traxxas made for the Nitro Stampede. It's the only Traxxas one I could find that comes clear so I got it. I'm surprised it's still usable to this day but glad because it's still my favorite. I'm determined to make it last as long as possible. If Ido the right maintenance for the body post holes(trickiest part for me), it should last indefinitely unless it complete dents and tears or something.
I tried to shrink the photo smaller but still can't get it to 7kb, the limit file size for avatar pics. I dunno how I'm supposed to do that. I even shrunk it down to 60x60 pixels.
06-01-2009, 10:28 AM
#9439
Senior Member
My Feedback: (2)
Join Date: Dec 2008
Location: boca raton ,
FL
Posts: 1,105
Likes: 0
Received 0 Likes
on
0 Posts
if you take care of it it should last, i still have the original pede body (the front half atleast
 )
) do you use a photo hosting site? photobucket is good and you can resize it to fit the required dimensions
06-02-2009, 09:57 PM
#9441
Senior Member
Join Date: Feb 2009
Location: Laguna Niguel,
CA
Posts: 380
Likes: 0
Received 0 Likes
on
0 Posts
I use Photoshop to resize it and will either upload it here or to Photobucket. If it's on Photobucket like the one above, usually it's because I also showed it on the Traxxas forums.
As for suggested upgrades:
RPM arms front and rear
You may have to use a file or a Dremel(very carefully) to carve a little at any part of the arms that are rubbing against the half shafts(rear). If you use 2.2 inch rims, see if the inner edge hits the front arms when turning.
RPM bumper
Probably the most common upgrade or the first upgrade people do with a new Stampede. The Traxxas bumper is a joke after seeing the RPM one.
Different tires
Pro-line makes excellent tires. Mash 2000 is a nice tire that really makes the Stampede that is classified as a monster truck stand out as a monster truck. It's heavy but I seem to get good stability front and back because of that. Kind of offsets the tallness of the tires which makes the truck just a bit more top heavy. On pavement if I turn fast, I'll flip over. On dirt, that somehow doesn't happen as much.
Pro-line's Badlands tires are my favorites. Soft and light and will grip the offroad ground like fingers. I even notice more battery runtime when I use them compared to the Masher 2000 tires.
2.2 inch rims
You'll need rims this size to fit the tires mentioned above(although I think they're available for 2.8 inch rims too, but not sure). I used to use the blue Claws by RPM but switched to the black Revolver by RPM.Ialso carve a little of the inner edge of the rims so they don't rub against the front arms. Also on the rear to avoid rubbing against the black plastic end of that linkage there. WhatI mean by inner edge is the side of the rim facing into the truck, not the side on the outside of the rim. And the 45 degree angle edge of the inner side facing the arms, not the edge that touches and attaches to the rubber tire with tire glue.
If you use chrome painted rims like the Claws, you'll need to use a file or Dremel(VERYcarefully) to sand off the chrome paint on the top tip of the walls that reach past the lip of the tire and touch the divet or flat of the tire below the tire lip. You'll see what I mean if you do this. If you don't then the chrome will peel off and you'll have to reglue that part and you'll have a tire-glue-chrome paint-glue-rim sandwich.
Stronger caster blocks and bearing carriers for the wheels front and rear
The caster blocks are on the front only. The stock plastic ones are alright and offer flex, but break easily. I may have heard or read that the RPM ones have stronger plastic. I spent the money to get the Traxxas aluminum ones. I haven't had a problem with them. STRC makes them in aluminum too if you're into using parts from other companies(I'm into that). Someone at a LHS did say they may bend but didn't say that about the Traxxas ones. He wasn't specifically saying the Traxxas ones are stronger. Probably just talking about aluminum in general. But it will be really hard to bend these.
Aluminum bulk head
It's a part that doesn't require any flex to protect other parts. It's just a thick solid piece. I've heard of people breaking the stock bulk head but that's really hard to do. The good thing about the aluminum bulk head is that it is one part where you can have fun with aluminum and not risk the consequencess(other parts taking the damage or permanent bending). A practical advantage is that the two thick screws that attach it to the chassis can go in with threadlock. So that would be two more screws you don't have to worry about. It's something I considered. Use blue threadlock/locktite.
I would avoid using an aluminum chassis or arms.
Aluminum shock caps and teflon tape
I needed these. I got the aluminum shock caps made by Traxxas. They fit tighter which is good. Oil still came through it. I used teflon tape. Problem solved. I use two layers of teflon tape in the threading. I think someone said to wrap it counclockwise but it came off when I put the cap on. I just wrap two layers clockwise tight, put the cap on, screw it on all the way and avoid overtightening, and it's set.
Upgraded Traxxas shock shafts
The metal rods the shocks use. I have bent a back one and front one. So I use the upgraded one. I think it's coated in some kind of titanium allow or something,. I dunno. But I use them and have never had a problem with them. They stay straight. I rotate them and it's still a perfectly straight line.
Reinforce the body post holes on the body cover
I just took engineering plastic which is basically a flat sheet of plastic. The material should be strong and can be as thick as the material of the body cover. I cut a small piece and put duct tape over it overlapping on the sides. I used a hole puncher and put a hole through the plastic and tape. And put it on the underside of the body cover at the body post holes. I used more tape to secure it.It may be tricky if the body cover around the hole is a little curved so don't make the plastic piece too big.
The hole from the hole punch will be slightly smaller than the holes on the stock body cover. That's a good thing. If the truck crashes and the body post is gonna break or stretch the hole, the plastic will take the abuse first before the body cover itself. It's easier and cheaper to replace the plastic than to repair or replace the body cover itself.
I also put duct tape on the outer side along two sides of the hole. That way the body post pin will rest on top of it and the sharp end is less likely to dig and tear right into the body cover. I also use two pairs of pliers to bend the sharp end of the body pin up a little so it's pointed away from the body cover. Just a little so I can still push it through the hole in the post.
Futaba 3PM radio or any digital/2.4ghz
It's good so you don't have frequency issue if other people are running RC's. I personally have been to a spot where at least two people with Spektrums have had slight frequency loss at a certain part of the dirt field. But the ones with Futaba's had no issues. I then decided on a Futaba. It also has features to adjust things like steering which is important.
Hitec 645mg servo for the steering
I upgraded to this like many have. It can handle just about anything you would do with the Stampede. What is important to know is that it may reverse the steering. I had to switch it on my Futaba.
What's also important to know is that it has more steering range. You should first center the steering with the steering trim. Then go to EPA which is End Point Adjustment if you use a Futaba. Then carefully steering to one side and adjust so it doesn't oversteer. Then repeat on the other side. If you let it oversteer, the servo will keep going no matter what. The link that connects the servo saver to the steering block will play tug of war and what will happen is the servo saver will get stripped.
If you get this I suggest getting an extra supply of screws, the one that attaches the servo saver to the output shaft. It's available from Hitec at stores or probably Tower Hobbies. What I did was order a bunch of 2.6x8mm allow screws from Micro Fasteners so that I can use a hex driver instead of a Philips driver.
Kimbrough servo saver
I started with the large and kept stripping it. Then I found out it was because the Hitec was oversteering and figured out how to adjust it. Now I have no problems at all and I expect it to last as long as I read about other people who use this set up. I did use a medium Kimbrough too and it also works. With the large I use the H insert adapter, H for Hitec. If you keep the steering range reasonable, it should work fine for you.
I didn't do all these at once.I did them little by little as I figured out how to solve issues that came about. Itry to explain what I did so others who are using the same things I'm using can hopefully save some time by getting a solution right away. I don't mind repeating what I've figured out.
There are more suggestions that others here can give. Here's something else I did. It's a little overkill in terms of cost but I chose to do it and I'm glad I did.
I got the STRC rear aluminum shock tower. I don't usually do 30 ft high jumps or stuff like that so I'm not really concerned about it bending permanently.
There are two pieces that go through the holes in the shock caps. Instead of using it on the rear tower, I use it on my front RPM shock tower. I remove the screws on the other side that connect the body post to the front shock tower.
Then I put one long 40mm(35mm will do I think) through all three things: shock cap, shock tower, and body post. Iactually start behind through the body post so the remainder of the long screw is on the front.
On the body post side I use wide washers to simulate the wide head of the screws that attach the body post. Then I simply put a nut on the remainder of the long screw and tighten it down. I use a little bit of blue threadlock. That solved the issue I had before which is the shock cap screws coming loose while driving. Instead the head of the long screw with the washer and the nut on the other side hug everything together. I have this set up and it has never come loose. Now when I drive, that's two more screws I don't ever have to check after each run. I don't even think about it except at home doing a full inspection.
For the rear, I use the regular shock screws but with four regular Traxxas screw washers to simulate the forward offset the stock rear shock tower has. And since both the screw and the tower is non-plastic, I use threadlock on it too. I don't think about it when I drive because I don't have to. I wish the shock screws were long enough to put a nut on the other side but it hasn't been necessary for me. So that's actually four screws Idon't have to worry about coming loose.
06-02-2009, 11:32 PM
#9442
Senior Member
Join Date: Feb 2009
Location: Laguna Niguel,
CA
Posts: 380
Likes: 0
Received 0 Likes
on
0 Posts
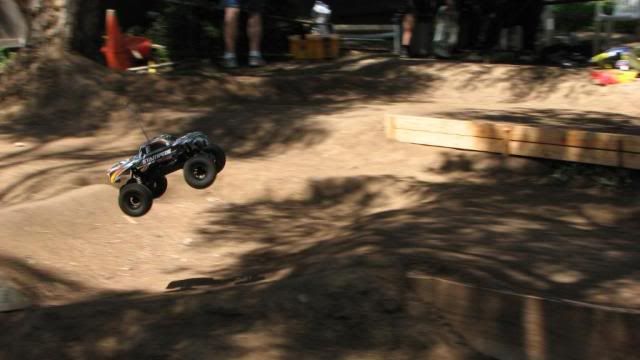
Some more shots from today. I've been very much into taking action shots of the Stampede throwing dirt behind it. It may not throw as much dirt as other larger, heavier RC's. But it will do it and I find it fun.

There's a nice curve of dirt dust in this shot. I used Talons on the rear to intentionally lose some traction and kick up dirt. And Mashers in the front to grip the ground so the truck doesn't travel too much. And a 7cell NIMH battery pack.

In this shot the truck actually surrounded itself in a cloud of dirt.

I then switched to my yellow Dust Storm body cover. It's called that because of the idea of this type of driving. Just kick up dirt as much as I can everywhere I can. I also switched to a 2s Lipo at this point.
In that shot I like how the dirt and small rocks right behind the rear tires are frozen in their movement in the photo. I don't have a professional digital camera but the Canon Powershot I have is decent for what I do for now.

I found this to be a nice all around shot. This was when there was more shade because it was getting later in the day.

One thing I've been wanting to do is punch the throttle with the steering to one side and spin out a number of times to create a big cloud of dust around the Stampede. Then quickly brake to a stop and immediately punch the throttle straight forward and do a wheelie out of that cloud. I may have had it here if I was in front of the truck for this shot.
A dream shot would be to get the dust being pushed aside as the truck goes through it and the photo showing that the dirt is obviously being blown aside. Or even footage of it with a good video camera so I can slow it down to really see that.
I'd also like to run the truck through some dry ice fog.

Just kicking up dirt into the air. It even says "Dust Storm" on the side. I used a 2s Lipo. I used Talon tires on the rear to slide around and intentionally lose traction to kick up lots of dirt. I used Mashers in the front to grip the ground more to keep the truck in place.

Same shot with a close up of the truck.
What I may try is figure out a way to stiffen one or both front tires so the truck doesn't travel too much. That way it will kick up more dirt and stay in place so I can take a picture or record footage.
There's a nice curve of dirt dust in this shot. I used Talons on the rear to intentionally lose some traction and kick up dirt. And Mashers in the front to grip the ground so the truck doesn't travel too much. And a 7cell NIMH battery pack.
In this shot the truck actually surrounded itself in a cloud of dirt.
I then switched to my yellow Dust Storm body cover. It's called that because of the idea of this type of driving. Just kick up dirt as much as I can everywhere I can. I also switched to a 2s Lipo at this point.
In that shot I like how the dirt and small rocks right behind the rear tires are frozen in their movement in the photo. I don't have a professional digital camera but the Canon Powershot I have is decent for what I do for now.
I found this to be a nice all around shot. This was when there was more shade because it was getting later in the day.
One thing I've been wanting to do is punch the throttle with the steering to one side and spin out a number of times to create a big cloud of dust around the Stampede. Then quickly brake to a stop and immediately punch the throttle straight forward and do a wheelie out of that cloud. I may have had it here if I was in front of the truck for this shot.
A dream shot would be to get the dust being pushed aside as the truck goes through it and the photo showing that the dirt is obviously being blown aside. Or even footage of it with a good video camera so I can slow it down to really see that.
I'd also like to run the truck through some dry ice fog.
Just kicking up dirt into the air. It even says "Dust Storm" on the side. I used a 2s Lipo. I used Talon tires on the rear to slide around and intentionally lose traction to kick up lots of dirt. I used Mashers in the front to grip the ground more to keep the truck in place.
Same shot with a close up of the truck.
What I may try is figure out a way to stiffen one or both front tires so the truck doesn't travel too much. That way it will kick up more dirt and stay in place so I can take a picture or record footage.
06-03-2009, 10:13 AM
#9443
Senior Member
My Feedback: (2)
Join Date: Dec 2008
Location: boca raton ,
FL
Posts: 1,105
Likes: 0
Received 0 Likes
on
0 Posts
great job flux, that was pretty comrehensive, as far as brushless systems go, their are a ton of systems out there, castle creations, traxxas, novak, lrp, the list goes on. there are also alot of parts on the market that you can use to make your pede into a totaly unique car, you can also do mods with stuff you have laying around the house, you can for example, extend your pede with a peice of roughly 2mm x 4cmx3cm aluminum.
06-03-2009, 03:21 PM
#9444
Senior Member
Join Date: Mar 2008
Location: by the lake,
ON, CANADA
Posts: 2,447
Likes: 0
Received 0 Likes
on
0 Posts
Nice pics!, im going to run out and get some action of mine here in a few, pics and possibly video tonight!, lets see how many pede pics we can get, everybody post pics and or videos!, the nice weather is hereat 70f
06-04-2009, 12:29 PM
#9445
Senior Member
My Feedback: (2)
Join Date: Dec 2008
Location: boca raton ,
FL
Posts: 1,105
Likes: 0
Received 0 Likes
on
0 Posts
hey fuse, i saw you said there was a new vxl pede, can you get pics? im selling my nitro stuff and want a slash, but ill have enough left over to revive the truggy-pede project with a new pede chassis and was hoping that if the vxl is water proff ill pick it up in a second!
id post new vids & pics but its raining and my pede isnt very pede like anymore
id post new vids & pics but its raining and my pede isnt very pede like anymore
06-06-2009, 11:35 AM
#9446
Senior Member
Join Date: Mar 2008
Location: by the lake,
ON, CANADA
Posts: 2,447
Likes: 0
Received 0 Likes
on
0 Posts
Yesterday i let my friend drive my stampede, he got it up to 3/4 throttle altest 35-40mph, my big chisle tires rolled somewhat under the rim, and send the noob driver right into the curb, atleast 15-20 barrel rolls till it lost its momentum, then was back on its wheels to drive again!
06-08-2009, 02:53 PM
#9447
Senior Member

Join Date: Aug 2006
Location: Bristol, UNITED KINGDOM
Posts: 3,444
Likes: 0
Received 0 Likes
on
0 Posts
Sweet pics there flux loving the dust too managed to take my pede out the weekend found a nice little offroad carpark my vxl esc still giving me probs but wasgood on theday got 3 full batterys in and enjoyed every minute of it lol grabbed a bit of video too got the missus on cam duty hehe
www.clipshack.com/Clip.aspx
grabbed a bit of video too got the missus on cam duty hehewww.clipshack.com/Clip.aspx
06-08-2009, 10:49 PM
#9448
Junior Member
My Feedback: (13)
Join Date: Oct 2008
Location: El Cajon,
CA
Posts: 24
Likes: 0
Received 0 Likes
on
0 Posts
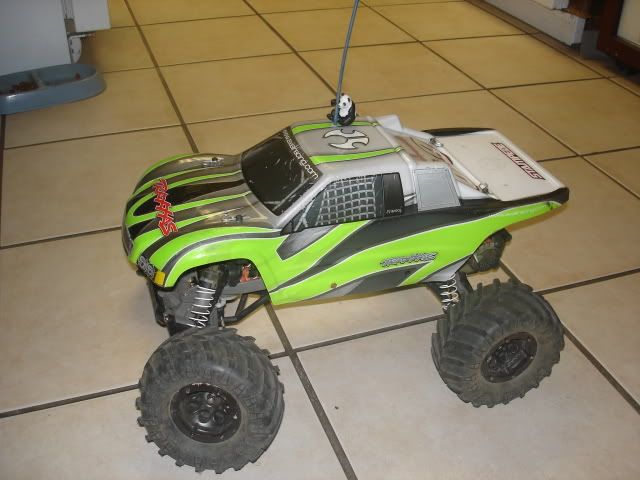
I dont think I have posted my Pede here....Introducing the AxialPede
Started as an XL-5....now it has
Novak SS 5800 BL system (soon to be Sidewinder/5700)
Upgraded to VXL tranny
Towerpro 995 steering servo w/ Kimbrough servo saver
Masher 2000's on Axial beadlocks
RPM rear arms and motor guard
Slash front bumper
Axial RTR body
Some pics....
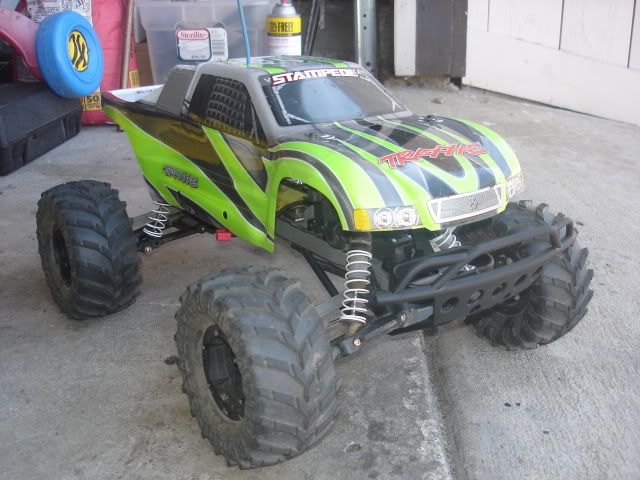
on the track with the old body
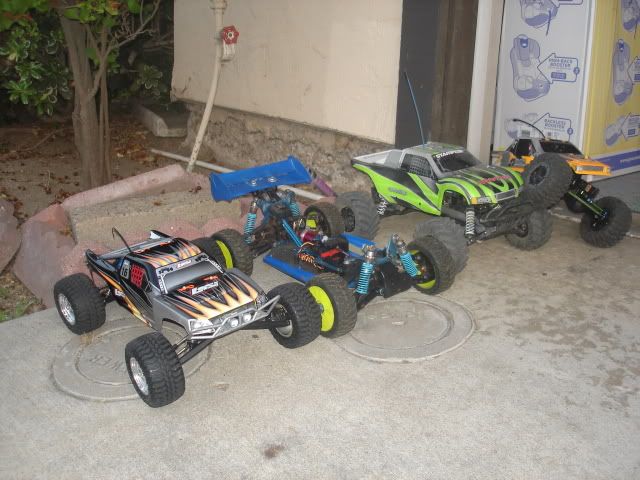
The fleet...
Started as an XL-5....now it has
Novak SS 5800 BL system (soon to be Sidewinder/5700)
Upgraded to VXL tranny
Towerpro 995 steering servo w/ Kimbrough servo saver
Masher 2000's on Axial beadlocks
RPM rear arms and motor guard
Slash front bumper
Axial RTR body
Some pics....
on the track with the old body
The fleet...
06-09-2009, 11:45 AM
#9449
Senior Member

Join Date: Feb 2004
Location: FORT WORTH,
TX
Posts: 1,386
Likes: 0
Received 0 Likes
on
0 Posts
Here are some pics of my Pede. Nothing special but I have added RPM arms, bumper and gear cover. Some bling here and there as well. When I got my 8 cell batteries in the mail I had to modify the reciever mount. Seems to be holding up pretty good. Love this truck.. Just recieved a Losi XXX-T CR today. Gonna build it to race when I get back. I will go easy on it and BASH the Pede!