Hot section paint help.
 07-07-2014 | 06:33 PM
#1

Thread Starter

My Feedback: (12)
Joined: Dec 2001
Posts: 297
Likes: 0
Received 0 Likes
on
0 Posts
From: Davenport,
IA
Can someone give me a run down on the steps on using BVM's HOT SECTION PAINT. I want a little blue with the gold in a couple of spots and what Ive done Isnt looking like evryone elses.
I dont know what the steps are as in...does the gold go on the transparent blue.....does it get buffed like a metalizer to give it that shiny look.
Hopefully someone can get me headed in a better direction.
Thanks
Scott
I dont know what the steps are as in...does the gold go on the transparent blue.....does it get buffed like a metalizer to give it that shiny look.
Hopefully someone can get me headed in a better direction.
Thanks
Scott
 07-08-2014 | 08:11 AM
#2


My Feedback: (22)
This isn't using BVM's hot section kit, but I think the process is probably close to the same. It's a tutorial I did a while back on doing a hot section. Hope it helps:
http://www.rcuniverse.com/forum/rc-j...ction-how.html
http://www.rcuniverse.com/forum/rc-j...ction-how.html
07-08-2014 | 08:23 AM
#3


My Feedback: (11)
I'm in nowhere near the category that Jeremy and Greg are, those guys are topgun material painters, but I used $5 in Tamiya water based acrylic (metallic gold and metallic blue) with a rustoleum clear and my trusty badger airbrush for my hot section. It literally took me about an hour.
http://www.tamiyausa.com/items/paint...ic-paint-59000
I'm sorry, but that just couldn't be beat in my good ole college try to paint my own jet.
My apologies to even post in a thread where the paint masters are imparting knowledge.

http://www.tamiyausa.com/items/paint...ic-paint-59000
I'm sorry, but that just couldn't be beat in my good ole college try to paint my own jet.
My apologies to even post in a thread where the paint masters are imparting knowledge.
 07-08-2014 | 01:02 PM
#4
Thread Starter
My Feedback: (12)
Joined: Dec 2001
Posts: 297
Likes: 0
Received 0 Likes
on
0 Posts
From: Davenport,
IA
Thanks Jeremy...That definately gets me heading in the right direction. The instructions dont really give an application example to achieve the different levels of burn.
I've heard you over lap the paints then sand off allowing the under layer to come through. The instructions dont mention that at all.
I've heard you over lap the paints then sand off allowing the under layer to come through. The instructions dont mention that at all.
07-08-2014 | 11:57 PM
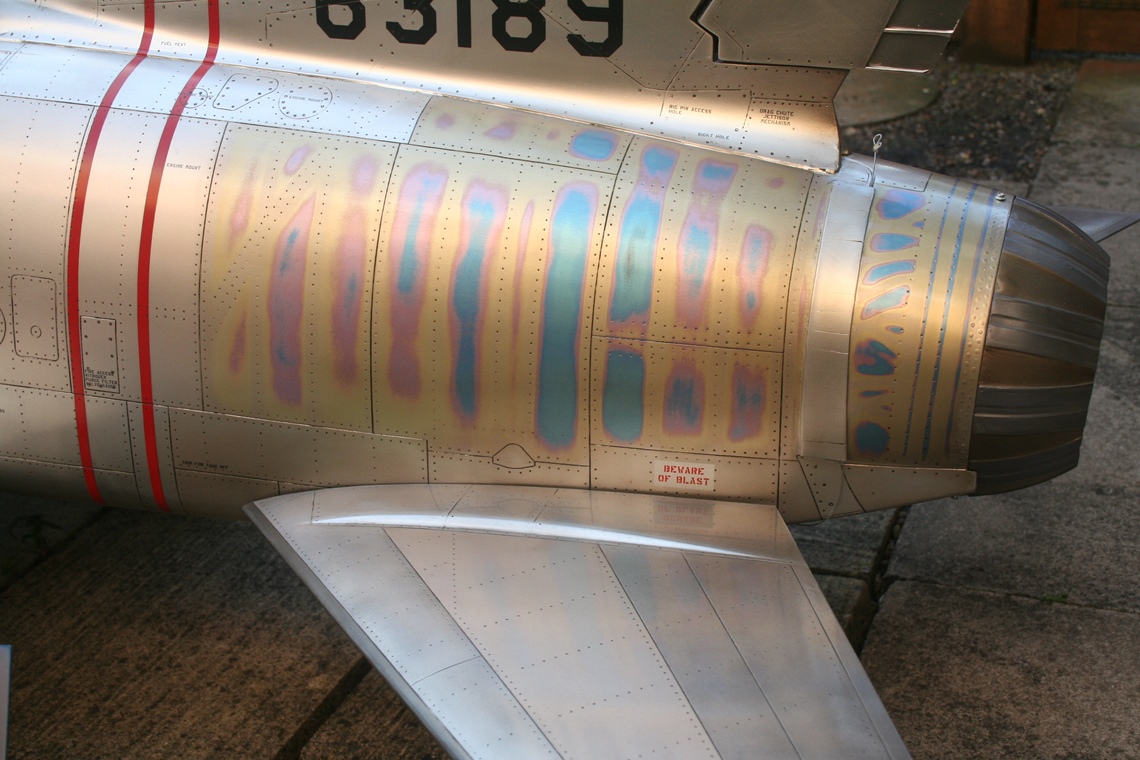
#5
My Feedback: (1)
I haven't used the BVM stuff but have used tints from tailormadedecals.com mixed into metallic paint. The colours need to be metallic otherwise it looks like paint not metal. You layer the different colours and then carefully rub down through to expose each layer. The first i.e. bottom colour is the hottest colour usually blue, work your way up to the coolest colour usually yellow and finally topcoat with the aircraft normal colour. Then rub down as required to get the colour you need. It will be fringed with the layers of cooler colours as if the heat has spread outwards from the hottest spot. The result, using 7 different heat colours is shown below on my F-100.