


Tony Nijhuis Vulcan bomber
 01-18-2017, 11:13 AM
#76

Join Date: Mar 2007
Location: BiggleswadeBeds, UNITED KINGDOM
Posts: 35
Likes: 0
Received 1 Like
on
1 Post
Hi
I have ordered the full pack. Really looking forward to the build. Gonna have to sort my shed out to make room. Will need a bigger building board. It's around a month for delivery so plenty of time.
I will add pictures of my progress.
Regards,
John
I have ordered the full pack. Really looking forward to the build. Gonna have to sort my shed out to make room. Will need a bigger building board. It's around a month for delivery so plenty of time.
I will add pictures of my progress.
Regards,
John
 01-20-2017, 01:27 PM
#77
Hi,
I e mailed Tony Nijhuis about board size before I started and he said he used one 1200mm x 800mm which is what I have made. Fine so far!
Is anyone using a JetCat P100 turbine? If so what size thrust tube are you using??
Regards
Dave
I e mailed Tony Nijhuis about board size before I started and he said he used one 1200mm x 800mm which is what I have made. Fine so far!
Is anyone using a JetCat P100 turbine? If so what size thrust tube are you using??
Regards
Dave
01-29-2017, 10:10 AM
#78
Join Date: Mar 2007
Location: BiggleswadeBeds, UNITED KINGDOM
Posts: 35
Likes: 0
Received 1 Like
on
1 Post
Hi,
The planpack turned up much quicker than expected so I have sorted the shed and got a new building board.
I have made a start on the fuselage - seems to go together very well.
I am adding temporary braces to try and keep things as square and true as possible.
I can see this kit getting me in trouble with the misses as it is very enjoyable to build without having to cut out all the formers and ribs. Hard to walk away from.
Haven't thought about a turbine yet but like the look of the jetmunts vt80 as it is packaged together. I own two wren 80s that have been flawless. Reading this thread makes me think that a P100 might be the better choice as I intend to fly it off grass. Would also want some vertical performance so I can perform the wingover manoeuvre
I would post a picture but it says im logged out when I'm not!
Regards
John
02-01-2017, 02:49 PM
#79
Hi,
Build is coming on nicely. there is a lot of planking on the front and back isn't there!!
I've been thinking about retracts. Despite being told brakes are not required, my Vulcan will be flown mainly off hard runways and I want brakes. Having brakes on the main gear is fraught with difficulties so I decided to fit brakes on the twin nose wheels. The small wheel size limits the choice of brakes but I realised I had some nice wheels with pneumatic brakes but the diameter was 68mm. I turned down the tyres in the lathe to 57mm and recut the tread. The leg is Beheotec I believe and the lower leg was modified to take the brakes either side on a solid 6mm spindle. I made a small block to split the brake air to the two brakes meaning only one pipe is needed onto the leg.
having air brakes it only made sense to use air retracts to and Behotec C36/2 were recommended by Dave Wilshire at Motors and Rotors so these are being used. The nose leg bearers needed a little packing to take the retract unit. Looking forward to making the main gear bogies, details on these as and when.....
regards
Dave
02-04-2017, 11:47 AM
#80
Junior Member
Join Date: Sep 2015
Location: Bedfordshire. England
Posts: 22
Likes: 0
Received 0 Likes
on
0 Posts
Hi All,
Its been a while. had some time off from building.
Nearly finished. just completed on the primer filler stage. it's been sitting around for the last couple of months waiting for the courage to hook up the control surface hinges and to warm up a bit. This really is my least favourite job as there isn't much clearance.
The glassing stage was really easy in the end. It was my first attempt at this. The key was lots of surface prep to the balsa skinning. A long 2ft permagrit block makes a real difference for a smooth surface prep. The smaller block was invaluable. I cannot recommend these highly enough for building.
For the glass skinning I used the skinning resin from fighter aces. Worked really well. Weigh out the resin and hardener as per instructions and don't mix too much. This resin takes a long time to go off so just mix more if you need it. do the wings first. One glass sheet for top and another for the bottom. The fus you need to do in pieces.
After a a while you get really confident using glass and resin. I gave up on the abs dummy engines and made mould to produce the 4 required.
After that that I used spray filler primer. Cans will work out really expensive, so I used automotive and a spray gun. just remember that you need to sand most of it back off. But after wet sanding with wet and dry you can get a really good finish. Will post some pics tomorrow.
the question on building board came up. I used one of the low cost doors you get from B&Q. Thin ply and card board core. Cheap and light and flat. This sat on two workmates or you could use tressels. afterwards it's now used as a shelf to sit the fus on.
The next stage is to start on final painting. Lots of wiring in this one as well. With all of the lighting and bits. I recon there will be over 60ft in servo and lighting cables. If you make your own, buy a good ratchet crimp tool!
John S. look like you are quite close to me. If you want to get in touch. We can meet up as we are quite close.
John R
 02-05-2017, 10:24 AM
#83
Join Date: Mar 2007
Location: BiggleswadeBeds, UNITED KINGDOM
Posts: 35
Likes: 0
Received 1 Like
on
1 Post
Hi,
Thanks to Dave B for the board size. I just bought some 18mm mdf and screwed it to my workbench, checking for flatness.
I'm just sheeting the top of the fuselage - I see what you guys mean about keeping things straight. I find myself double checking all the time.
The finish that you have got John R looks amazing. I live in Biggleswade so hoping it's not too far from you as I'm sure I could learn from your building skills.
Will keep you all updated with pictures when I get a bit further.
Regards
John
02-05-2017, 01:03 PM
#84
Hi All,
John R, that finish looks great and what you said about glassing has made me feel a lot better about doing my first glassing job I can tell you! Would be interested to hear more about the moulding process to create the dummy engines, the ABS does look a bit of a nightmare.
I have not finished sheeting the underside yet. I stopped just forward of the turbine hatch and started again just before the 'shoulders' at the front. the reason for this was that I have not finalised the fuel tank mountings yet and working through the hatches was going to be difficult. It will also help having access from the rear when fitting the intake 'tubes' as well I think and this section of sheeting can be added anytime even after fitting the wings if necessary.
My canopy is also going to be removable. the position I have split the nose in is right underneath the front of the canopy, but also I wanted another access point to quickly get to switches etc without actually taking off the nose. I plan to put much of the electronics and both batteries in the front under the removable nose so I guess it is going to get quite busy in there. having the break a bit further back also gives a bigger internal diameter so more room to work.
Regards
Dave
03-05-2017, 10:47 AM
#85
Junior Member
Join Date: Sep 2015
Location: Bedfordshire. England
Posts: 22
Likes: 0
Received 0 Likes
on
0 Posts
Progress on finishing all of the gear doors over the weekend. All made separately as glass sheet and then curved with a warm air gun, braced and then glassed again. Stiff and light.
This weekend end saw them finally fitted. Some were a real pig. Especially the door behind the main legs which required a sliding guide, but all done now.
Initial tests with a retract sequencer look promising, see uploaded video. Next job is to take them all off for priming before painting. Just the hatches to do then I can start on the main painting.
https://youtu.be/A4fLVDvQF1E
John S, I dropped you a PM email with my contact details.
John
03-09-2017, 03:15 AM
#87
Junior Member
Join Date: Sep 2015
Location: Bedfordshire. England
Posts: 22
Likes: 0
Received 0 Likes
on
0 Posts
I got bored working on the finishing side so decided to make a small liner tray for the nose gear. As I mainly fly from grass, I didn't want to keep filling the the ineterior with grass and mud and this should keep the worst of it out. The main gear shouldn't be so much of a problem, but the nose gear has pretty well open access to most of the interior and it should stop small pieces being sucked towards the engine as well.
All made in one piece from Plasticard it comes out easily and will have just a few retaining screws round the edge. The card is the template. Made things much easier as well.


All made in one piece from Plasticard it comes out easily and will have just a few retaining screws round the edge. The card is the template. Made things much easier as well.
03-18-2017, 12:13 AM
#88
Join Date: Mar 2007
Location: BiggleswadeBeds, UNITED KINGDOM
Posts: 35
Likes: 0
Received 1 Like
on
1 Post
Hi all,
I boxed in the nose wheel well before sheeting the nose as I wanted to stop dirt entering the fuselage.
I've been working on the turtle decking - not frustrating at all!
Pics attached,
John


I boxed in the nose wheel well before sheeting the nose as I wanted to stop dirt entering the fuselage.
I've been working on the turtle decking - not frustrating at all!
Pics attached,
John
03-20-2017, 12:00 AM
#89
Junior Member
Join Date: Sep 2015
Location: Bedfordshire. England
Posts: 22
Likes: 0
Received 0 Likes
on
0 Posts
Thats coming on nicely, a lovely job so far. It gets really awkward when you get to the next stage after building the wing frame as you end up as once piece of wing and fuz combined. Manoeuvring this can be a real pain. Good luck.
04-14-2017, 11:50 AM
#90
Hi,
I have been working on the fin and it is almost ready for glassing before fitting the rudder and servo. Making this removable has taken some time but is well worth it especially as my work space is not huge so moving the airframe around would be much harder as one piece.
working on finishing the underside now getting the tank mountings in before finishing the lower sheeting.
Best regards
Dave
04-24-2017, 01:09 PM
#91
Junior Member
Join Date: Sep 2015
Location: Bedfordshire. England
Posts: 22
Likes: 0
Received 0 Likes
on
0 Posts
Hi Dave. Nice job on the fin. Looks like it works fine.
Its surprising how how long it takes. I think I spent about 3-4 weeks making mine. Really glad I did as I am sure I would have broken it of just moving it around during building.
Have fun fun with the final sheeting.
John
Its surprising how how long it takes. I think I spent about 3-4 weeks making mine. Really glad I did as I am sure I would have broken it of just moving it around during building.
Have fun fun with the final sheeting.
John
06-05-2017, 04:42 AM
#92
Junior Member
Join Date: Sep 2015
Location: Bedfordshire. England
Posts: 22
Likes: 0
Received 0 Likes
on
0 Posts
Nice to see lots of work progressing on the various builds.
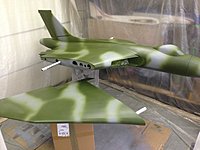
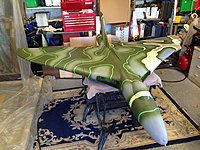
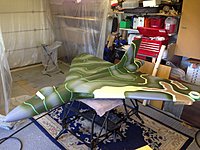
Slowly getting there on the painting stage. Its taken me ages as I am still learning how to spray paint.
A couple of pics with the green finished and masking up for the grey. The masking took hours, but its done now.
Should get the grey coat on this week before the big reveal when I take to masking off and hopefully not the green underneath
07-25-2017, 11:18 AM
#93
Join Date: Mar 2007
Location: BiggleswadeBeds, UNITED KINGDOM
Posts: 35
Likes: 0
Received 1 Like
on
1 Post
Hi all,
i know you are all much further on in the build but I've just started on the wings. Can any of you remember if you pinned the ribs flat between the rear spar and the trailing edge? Seems to me that the ribs don't want to sit flat.
Hoping you have good memories
Regards
John
i know you are all much further on in the build but I've just started on the wings. Can any of you remember if you pinned the ribs flat between the rear spar and the trailing edge? Seems to me that the ribs don't want to sit flat.
Hoping you have good memories
Regards
John
07-27-2017, 06:27 AM
#94
Junior Member
Join Date: Sep 2015
Location: Bedfordshire. England
Posts: 22
Likes: 0
Received 0 Likes
on
0 Posts
HI John,
Wait till you add the wing tubes. One of them has the hole misaligned and needs opening up. Both Dave and I had the same problem. initially I thought I had the rib in upside down, but no, one of them needs some fettling.
I did my wings a year ago, but Dave was working on his recently. when you add the trailing edge it all pulls together. I just went for the best alignment front and rear spars and it seemed to work out fine. just watch for the wing tube issue as it pushes of the ribs out of vertical alignment.
John
08-12-2017, 12:22 PM
#95
Hi All,
i just got my second wing cut off now the big sanding starts. i did have problems with the ribs/trailing edge on both wings as there is a fault in some of the cut ribs. the ribs should have a flat bottom between the rear spar and the trailing edge as both of these are supposed to be pinned flat on the board. Some of the ribs have a curve on top AND bottom so the height at the trailing edge is wrong. i used the top edge of the rib aligned with the top of the TE which left a gap at the bottom. when it came to sheeting, i stuck a shaving of wood on the rib to fill the gap and sanded so that the bottom of all the ribs were parallel, not difficult. I also tacked a straight edge across the leading edges of the ribs to make sure they are all in line while the rear spar and TE are glued.
Main spar tube does not fit without fettling the hole in W6.
good luck
dave
08-29-2017, 05:46 AM
#96
Junior Member
Join Date: Sep 2015
Location: Bedfordshire. England
Posts: 22
Likes: 0
Received 0 Likes
on
0 Posts
It Flies!!! 
After 20 months of effort and support XM607 (small version) finally made it into the sky on Saturday.
Having spent a lot of time flying my Xcalibur, this is nothing like that to fly. It feels much heavier and you have to think a bit more ahead. saying that, it lifted off in about 70% of the strip length with the same Jetcat 100.
It genuinely didn't need any trim changes (lucky guess) but I had moved the C of G forward a touch. will move it backwards with a bit of experimentation. In the end only 150gm lead in the nose but 4 large LiPo batt packs as well.
Will need to spend time getting used to this, but it rigs in the same time as the Xcalibur, just takes up more room in the car. Will post a few more flying shots shortly.
It weighs over 16Kg wet, so just make sure your retracts are upto it. Mine were fully compressed when full of fuel, so will need stronger springs to do any good.
 08-29-2017, 09:55 AM
#98
Join Date: Mar 2007
Location: BiggleswadeBeds, UNITED KINGDOM
Posts: 35
Likes: 0
Received 1 Like
on
1 Post
Well done John. I can really appreciate all the effort you have put in as I am struggling through my build - fantastic achievement!
Looking forward to seeing it myself one day. You can always fly it at my club :-)
I have only just read the last two replies - must of missed the notification email. Sorry about that. My wing tube is also tight on one of the ribs and a couple of the ribs didn't sit flat on the board so it seems I'm having the same issues as you two. A bit rubbish really. I used the tube as a way of lining up the ribs, so I have errors already - very annoying!
i bet you're chuffed John!
Kind regards
John
09-27-2017, 01:43 PM
#99
Hi All,
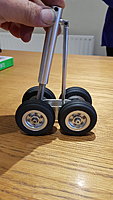
been working on the main gear recently. the problems of the spring units on the main seem to be many. the travel needs to be enough to move the wheel bogy full down from full up plus it needs to accommodate all the OLEO movement. John R reported problems with the spring units so i got to thinking, what is needed is a sprung bogy that does not rely on the spring being fixed to the top part of the OLEO. the result was a pair of torsion springs one each side behind the forward wheel. a few trials with springs made from piano wire and i had the basis of the design. the finished article works a treat. the rear wheels are carried on a bogy that swivels around the front axle and is pushed down very well so when retracted the rear wheels are pushed up into the fuselage very well and won't bounce down hitting the doors.
the 'spring units' behind the OLEO is simply two thin wall tubes that slide on each other with no spring. like the rear wheels (which carry no weight anyway) they are only there for the ride and all the load is carried on the front wheels. Behotec OLEO's were used and only needed a slight modification. Wheels are "Jet wheels" from Hobbyking. following successful installation, the next job is to fully disassemble and reassemble with Loctite.
One more leading edge to install and sand then begin making the control surfaces.
Cheers Dave
12-21-2017, 02:26 PM
#100
Hi All,
Almost finished glassing the wings, final stages of rubbing down thin coats of finishing resin. Been working on the wings for ages it seems and the only diversion was to make a rig to test the retracts in the correct position and all 3 together. Unfortunately the C36/2 Behotec main units don't have the grunt to raise the main legs with their 4 wheel bogies with less than 85psi even in still air. With the forward airspeed they may well not retract fully. Lots of experimentation and testing other makes of pneumatic retract units courtesy of Dave at Motors and Rotors i found a unit by Jet1A to have all the power i need. Waiting for 2 main units now. The nose leg is easily operated by the Behotec C36/2 so that is remaining.
Cheers!