


New big Ripmax Xcalibur (Xcalibur+)
 12-21-2015, 05:16 AM
#351
Senior Member
Join Date: May 2011
Location: brookfieldvictoria, AUSTRALIA
Posts: 154
Likes: 0
Received 0 Likes
on
0 Posts
hi dave underneath the model there should be wing decals the finish the bird off. I see aquaskiman has posted. I have one and a customer also he complained about it today. ken
 12-21-2015, 10:45 AM
#353

Join Date: Nov 2005
Location: FL
Posts: 14
Likes: 0
Received 0 Likes
on
0 Posts
Kingtech K120G? 27 pound thrust. I know it is a small block turbine......... Any updated thoughts? I know earlier in the year it was said small block turbines will not perform well for this application. I am not trying to fly fast or have unlimited vertical performance. Mostly I fly from paved surfaces and sometimes grass fields if I go meet with friends north of me. Planning to use Futaba servos.....S3071HV.
12-22-2015, 12:04 AM
#354

Thread Starter
TurboFan
Even with a small case 120N turbine the Plus will fly great, its very lightly loaded, with the smaller turbine there is a chance you won't end up with any weight in the nose (battery and tail servo weights aside)
Even on grass the 120 will be fine
Dave
Even with a small case 120N turbine the Plus will fly great, its very lightly loaded, with the smaller turbine there is a chance you won't end up with any weight in the nose (battery and tail servo weights aside)
Even on grass the 120 will be fine
Dave
12-23-2015, 10:34 AM
#355
Join Date: Nov 2005
Location: Easley,
SC
Posts: 145
Likes: 0
Received 0 Likes
on
0 Posts
A buddy of mine has about 8 flights on his with a 30 lbs turbine. It has plenty of power and takes off from grass very easily. Speed is not crazy, guessing in the 150 mph range. We had to add almost 2 pounds to the nose. I feel like a 27 lbs turbine would be fine and if you don't have to add a bunch of nose weight even better.
12-24-2015, 05:08 AM
#357
Join Date: Nov 2005
Location: Easley,
SC
Posts: 145
Likes: 0
Received 0 Likes
on
0 Posts
Didn't weight the actual block we put in the front but had 24 ounces of lead and it was not enough so replaced with a block of lead I had laying around. The batteries are light weight LIFE and fairly small LIPO for ECU. Motor is a JC Super Eagle which is not tiny. He put tons of flights on the smaller Xcalibur and this one flies even better.
12-25-2015, 12:06 PM
#358
My Feedback: (41)
Join Date: May 2003
Location: boca raton FL,
FL
Posts: 96
Likes: 0
Received 0 Likes
on
0 Posts
Just received my Xcalibur+ from Global Jet and the kit looks pretty nice!
� I do have an issue on the canopy fit that I d like to toss out to fellow owners� I am having quite a difficult time getting a clean 'snap on snap off ' fit to the fuse� way too much fussing to get it to go on! � there is too much flex on the canopy( no support to keep it rigid) � I know that this will be a problem for me once I am ready to fly and have the turbine fired up� sitting there playing to fit the canopy back onto the fuse should be a quick and simple process especially at the time you are ready to taxi out w/ turbine running� it apparently will not be so� how have other owners dealt with this issue or do I have a bad misfit?
Thanks all!
-paul.
12-26-2015, 03:14 AM
#359
Thread Starter
Paul
the canopy is layer up nice and lights so it does flex. I sanded/filed the hooks so there are no sharp corners, the lower curved edge is chamfered so that it leads into the slots. But laying some loops of carbon inside the canopy in three places and fixing the canopy in position to dry will help if you.
i feed the rear pair into the slots holding the canopy at 30 degrees and then holding the canopy midway along pop those in the slots.
Dave
12-26-2015, 08:08 AM
#360
My Feedback: (41)
Join Date: May 2003
Location: boca raton FL,
FL
Posts: 96
Likes: 0
Received 0 Likes
on
0 Posts
Thank you Dave! Much appreciated- I 'll follow your lead.... just have to work on the wing tube fit into the wings which are way too tight... then it is a gem!
Paul
the canopy is layer up nice and lights so it does flex. I sanded/filed the hooks so there are no sharp corners, the lower curved edge is chamfered so that it leads into the slots. But laying some loops of carbon inside the canopy in three places and fixing the canopy in position to dry will help if you.
i feed the rear pair into the slots holding the canopy at 30 degrees and then holding the canopy midway along pop those in the slots.
Dave
the canopy is layer up nice and lights so it does flex. I sanded/filed the hooks so there are no sharp corners, the lower curved edge is chamfered so that it leads into the slots. But laying some loops of carbon inside the canopy in three places and fixing the canopy in position to dry will help if you.
i feed the rear pair into the slots holding the canopy at 30 degrees and then holding the canopy midway along pop those in the slots.
Dave
12-26-2015, 03:32 PM
#361
My Feedback: (41)
Join Date: May 2003
Location: boca raton FL,
FL
Posts: 96
Likes: 0
Received 0 Likes
on
0 Posts
Dave, the suggested reply for the canopy have made a huge difference for me. Thank you! I'm now struggling with the anti rotation tubes creating havoc to get the wings on and off. Would you think that cutting them down and making them shorter in length would assist in making a easier fit? I do not see why they need to be as long as they are. Once you get the tubes an inch or so into the wing hole the purpose of the tube is achieved - or am I missing something? To my way of thinking, a shorter tube means less fighting to make the fit. Or???
12-27-2015, 01:36 AM
#362
Thread Starter
I've not seen the problem yet. If you put a boom onto the wing root with the tubes is the anti rotation peg square and free? Then do the wing onto the fuselage without the boom. I guess the fuselage is out.
The peg is long because of the wing fixing clamp, the tube is long so the wing can be out an inch and still be on the pegs.
id get a 3/8 round file or permagrit and ease the hole square, cutting the tube shorter might help, but it's not the fix.
Dave
The peg is long because of the wing fixing clamp, the tube is long so the wing can be out an inch and still be on the pegs.
id get a 3/8 round file or permagrit and ease the hole square, cutting the tube shorter might help, but it's not the fix.
Dave
12-27-2015, 04:51 PM
#363
My Feedback: (30)
Join Date: Mar 2010
Location: Norfolk, NE
Posts: 375
Likes: 0
Received 0 Likes
on
0 Posts
So is there anyone in the midwest area that would want to build mine for me. I just got swamped at work and we are not going to be slowing down anytime soon. It also doesn't help when we are down a person. I want to get it done but just not going to have the time to commit right now getting it built and finished. Everything is still in the box and unstarted. Let me know if you or you know someone that is a builder and would like to take it on.
Jason
Jason
12-27-2015, 10:18 PM
#364

Dave,
Just performed an initial CG check.
Here too a lot of lead had to be added: 490 grams!
Model is not fully completed yet, but the most significant parts I placed at their required position, Hopper is fwd but empty so I added some extra weight to simulate it was full. Gear was DOWN.
I did not change anything aft of the CG, only added a small beacon light of maybe 10 grams on the stab
Power is a WREN 160 which is not the lightest in the scene, but all the way fwd are three 2S/3600 Lipo's plus one 2S.1700 for lights. Receiver is the BIG 12-22 from Weatronic at 270 grams, all the way forward.
I have a few more remarks/suggestions for improvements, I will provide here when the plane is ready to go.
Wishes U all a safe and many good flights in 2016
12-28-2015, 12:54 AM
#365
Thread Starter
Which tail servos?
I have 2 x 3900 2s Li-Po and 1 x 5000 2s for Turbine on the nose plate.
Its a light model for the size, what ever you add! My Boomerang Torus had 890g of nose weight and weighed more to start with, still flew great! Most important thing is to balance as required, after that nothing to worry about on this model :-)
Dave
12-28-2015, 01:59 AM
#366
Dave, I had "lost" a few pages on this thread, had not gotten notices about new postings. Reading backwards I now see many more readers report this.
I agree with Your statements that in view of the all up weight, it may even be of an advantage. Most jets I fly are "loaded" and that is very much stabilising the flight characteristics.
In fact most planes I fly have a good wing loading, and I prefer that over a too light a plane with kite-like behaviour, like a leaf in the wind. Even gliders like a good wing loading, otherwise they cannot "penetrate" enough and have a bad gliding ratio.
Nevertheless, attention to the weight in the tail during manufacturing would be an improvement and a customer then can decide whether he loads up the plane with weight around the CG. Now we are forced to use nose weight.
Ha, indeed, as reported before: let the builders use more glue ahead of the CG
First remark about an improvement would be:
Please have the servo mounts of BOTH the ailerons AND the rudders aligned 90 degrees to the hinge line. It is now awkward.


There was a question about how to balance bigger models. I use this proven method which can be done on most models that have removable wings. You only need to make some wooden tools:
Take two strips of cheap plywood or the likes. Take the CG as the middle of the strip(as to create no additional weight difference), and make sure both the main and the front spar are covered.
Drill holes where the spar(s) are feeding through. Make two small aluminium strips with two holes in it and screw these to each of the strips. Mount the wooden strips between fuse/taiboom/wing.
Attach ropes to the strips and lift the model. Nice if You have a sturdy pulley mounted to the roof! (I use a winch, but I need that to stow models on my partly attic.)
Sorry for my messy workbench, I could not sleep tonight (too late coffee..) and was working like a zombi. (also the reason for mounting the wings wrong side and wrong side up, haha...not of any influence for the CG)
The stab is just lying loosely on the tail, so forget about the incidence...


Note that I could have mounted pump, ECU and valves further to the front but I have once read that in order to have quicker throttle response You have to avoid long fuel lines between pump and engine, so I keep'm close together.
I agree with Your statements that in view of the all up weight, it may even be of an advantage. Most jets I fly are "loaded" and that is very much stabilising the flight characteristics.
In fact most planes I fly have a good wing loading, and I prefer that over a too light a plane with kite-like behaviour, like a leaf in the wind. Even gliders like a good wing loading, otherwise they cannot "penetrate" enough and have a bad gliding ratio.
Nevertheless, attention to the weight in the tail during manufacturing would be an improvement and a customer then can decide whether he loads up the plane with weight around the CG. Now we are forced to use nose weight.
Ha, indeed, as reported before: let the builders use more glue ahead of the CG
First remark about an improvement would be:
Please have the servo mounts of BOTH the ailerons AND the rudders aligned 90 degrees to the hinge line. It is now awkward.
There was a question about how to balance bigger models. I use this proven method which can be done on most models that have removable wings. You only need to make some wooden tools:
Take two strips of cheap plywood or the likes. Take the CG as the middle of the strip(as to create no additional weight difference), and make sure both the main and the front spar are covered.
Drill holes where the spar(s) are feeding through. Make two small aluminium strips with two holes in it and screw these to each of the strips. Mount the wooden strips between fuse/taiboom/wing.
Attach ropes to the strips and lift the model. Nice if You have a sturdy pulley mounted to the roof! (I use a winch, but I need that to stow models on my partly attic.)
Sorry for my messy workbench, I could not sleep tonight (too late coffee..) and was working like a zombi. (also the reason for mounting the wings wrong side and wrong side up, haha...not of any influence for the CG)
The stab is just lying loosely on the tail, so forget about the incidence...
Note that I could have mounted pump, ECU and valves further to the front but I have once read that in order to have quicker throttle response You have to avoid long fuel lines between pump and engine, so I keep'm close together.
12-28-2015, 05:46 AM
#367

I just finished mine and my balance is at 200mm (5mm back from recommended) with no weight. I am thinking about flying it at 200mm I am sure it will be fine. Wings were tight, it took some work on the tube and the left rotation bin needed some alignment. Temp is 5 deg here now so hope to get it in the air next week.
12-28-2015, 10:29 AM
#368
Three more mods.
First the NACA style fuel tank vent. Works great on my other jets, nothing protrudes from the bottom, cannot break or bend accidentally. It is a small plastic part which is normally in use as a cooling opening for e-motors.
Other picture how it looks inside, I have a tube bender to get a wrinkle free bend in tubing.


Next I covered the underside of the stab with lightweight alu tape. You can start a discussion whether this is actually needed, however I have witnessed enough wet starts to know they can fry parts of Yr plane in no time. Especially unprotected plastic covering....
Work from the back to the front to get correct overlaps. By pulling at it when applying, You can reduce the number of wrinkles, but completely w/o I also cannot get done. I had it turn around the leading edge, to get some nice effect and the airflow cannot loosen it. A previously applied tape 10-155 past the leading edge, till where the alu should go, gave me a good straight guide for a sharp knife to get a nice straight cut.


The last but most expensive was a lighting system. As I have good experience with products from www.unilight.at (Austrian guy, who is exceptionally good at service if You run into a problem) I chose for this system again. EXTREMELY bright as You can choose double LED units like the Nav lights and flashers.
An easily programmable small controller that can handle 4 functions: Flashing Beacon on top, two or three steady navigation lights (I skipped the white one on my Xcal), a flashing "anti collision light" at the bottom and two landing lights in each nose of the tailbooms.
The last ones I cannot show as I made a stupid mistake with them and they are on their way to Austria.for repairs.
If they are back I will get some video of the functioning system.


See how the small controller compares to the BIG Weatronic receiver! With these biggies You never again need Y-cables or double receivers, and as it has a built in power regulator, You can skip the powerbox etc. Plug directly into a 2S Lipo.
First the NACA style fuel tank vent. Works great on my other jets, nothing protrudes from the bottom, cannot break or bend accidentally. It is a small plastic part which is normally in use as a cooling opening for e-motors.
Other picture how it looks inside, I have a tube bender to get a wrinkle free bend in tubing.
Next I covered the underside of the stab with lightweight alu tape. You can start a discussion whether this is actually needed, however I have witnessed enough wet starts to know they can fry parts of Yr plane in no time. Especially unprotected plastic covering....
Work from the back to the front to get correct overlaps. By pulling at it when applying, You can reduce the number of wrinkles, but completely w/o I also cannot get done. I had it turn around the leading edge, to get some nice effect and the airflow cannot loosen it. A previously applied tape 10-155 past the leading edge, till where the alu should go, gave me a good straight guide for a sharp knife to get a nice straight cut.
The last but most expensive was a lighting system. As I have good experience with products from www.unilight.at (Austrian guy, who is exceptionally good at service if You run into a problem) I chose for this system again. EXTREMELY bright as You can choose double LED units like the Nav lights and flashers.
An easily programmable small controller that can handle 4 functions: Flashing Beacon on top, two or three steady navigation lights (I skipped the white one on my Xcal), a flashing "anti collision light" at the bottom and two landing lights in each nose of the tailbooms.
The last ones I cannot show as I made a stupid mistake with them and they are on their way to Austria.for repairs.
If they are back I will get some video of the functioning system.
See how the small controller compares to the BIG Weatronic receiver! With these biggies You never again need Y-cables or double receivers, and as it has a built in power regulator, You can skip the powerbox etc. Plug directly into a 2S Lipo.
12-28-2015, 01:32 PM
#369
The last one for tonite...
I always hate those tanksealing misery consisting of the rubber stops and narrow tubing You have to press trough an area of two square cms, You have to bend tubing, they will leak sooner or later.
I have a friend who is more active on the lathe and he made me a few items.
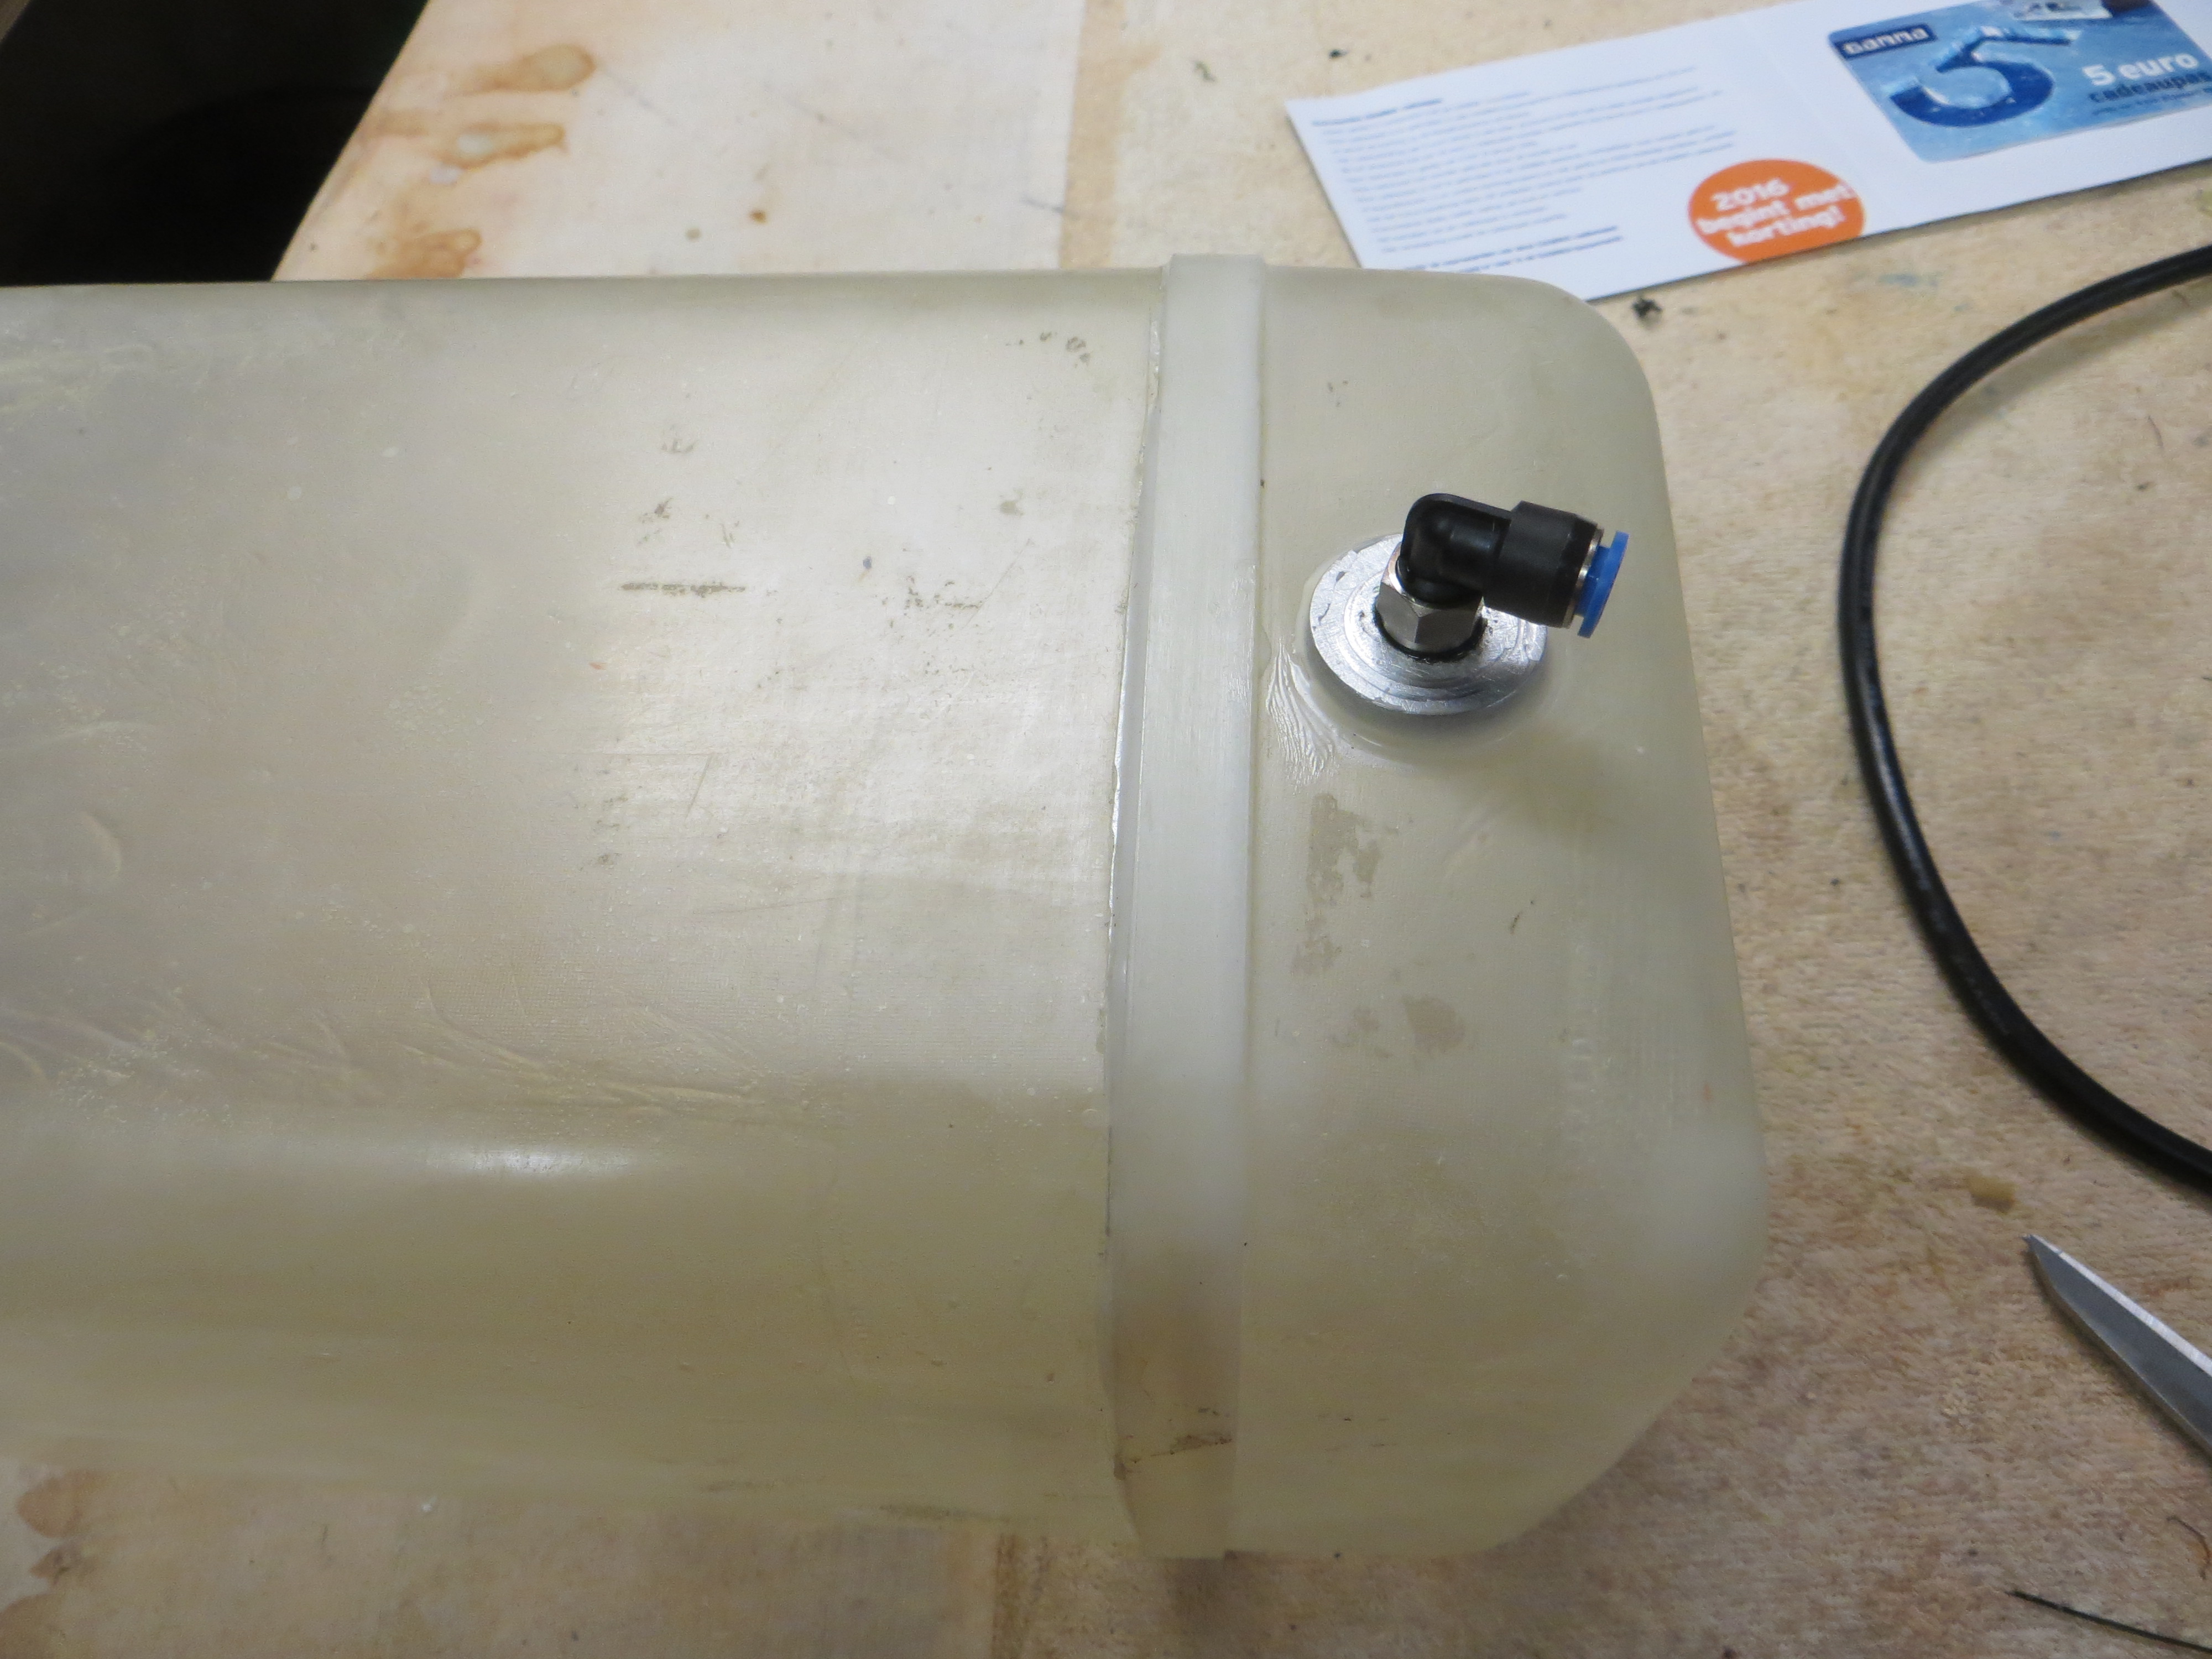
First a simple round alu plate with a M7 threaded hole, that is my vent and I epoxy glue it on top. In it I put a swivelling FESTO coupler with M7 at on one side and the other one the connection for 6mm tubing (remember to use 6mm all the way till the pump).
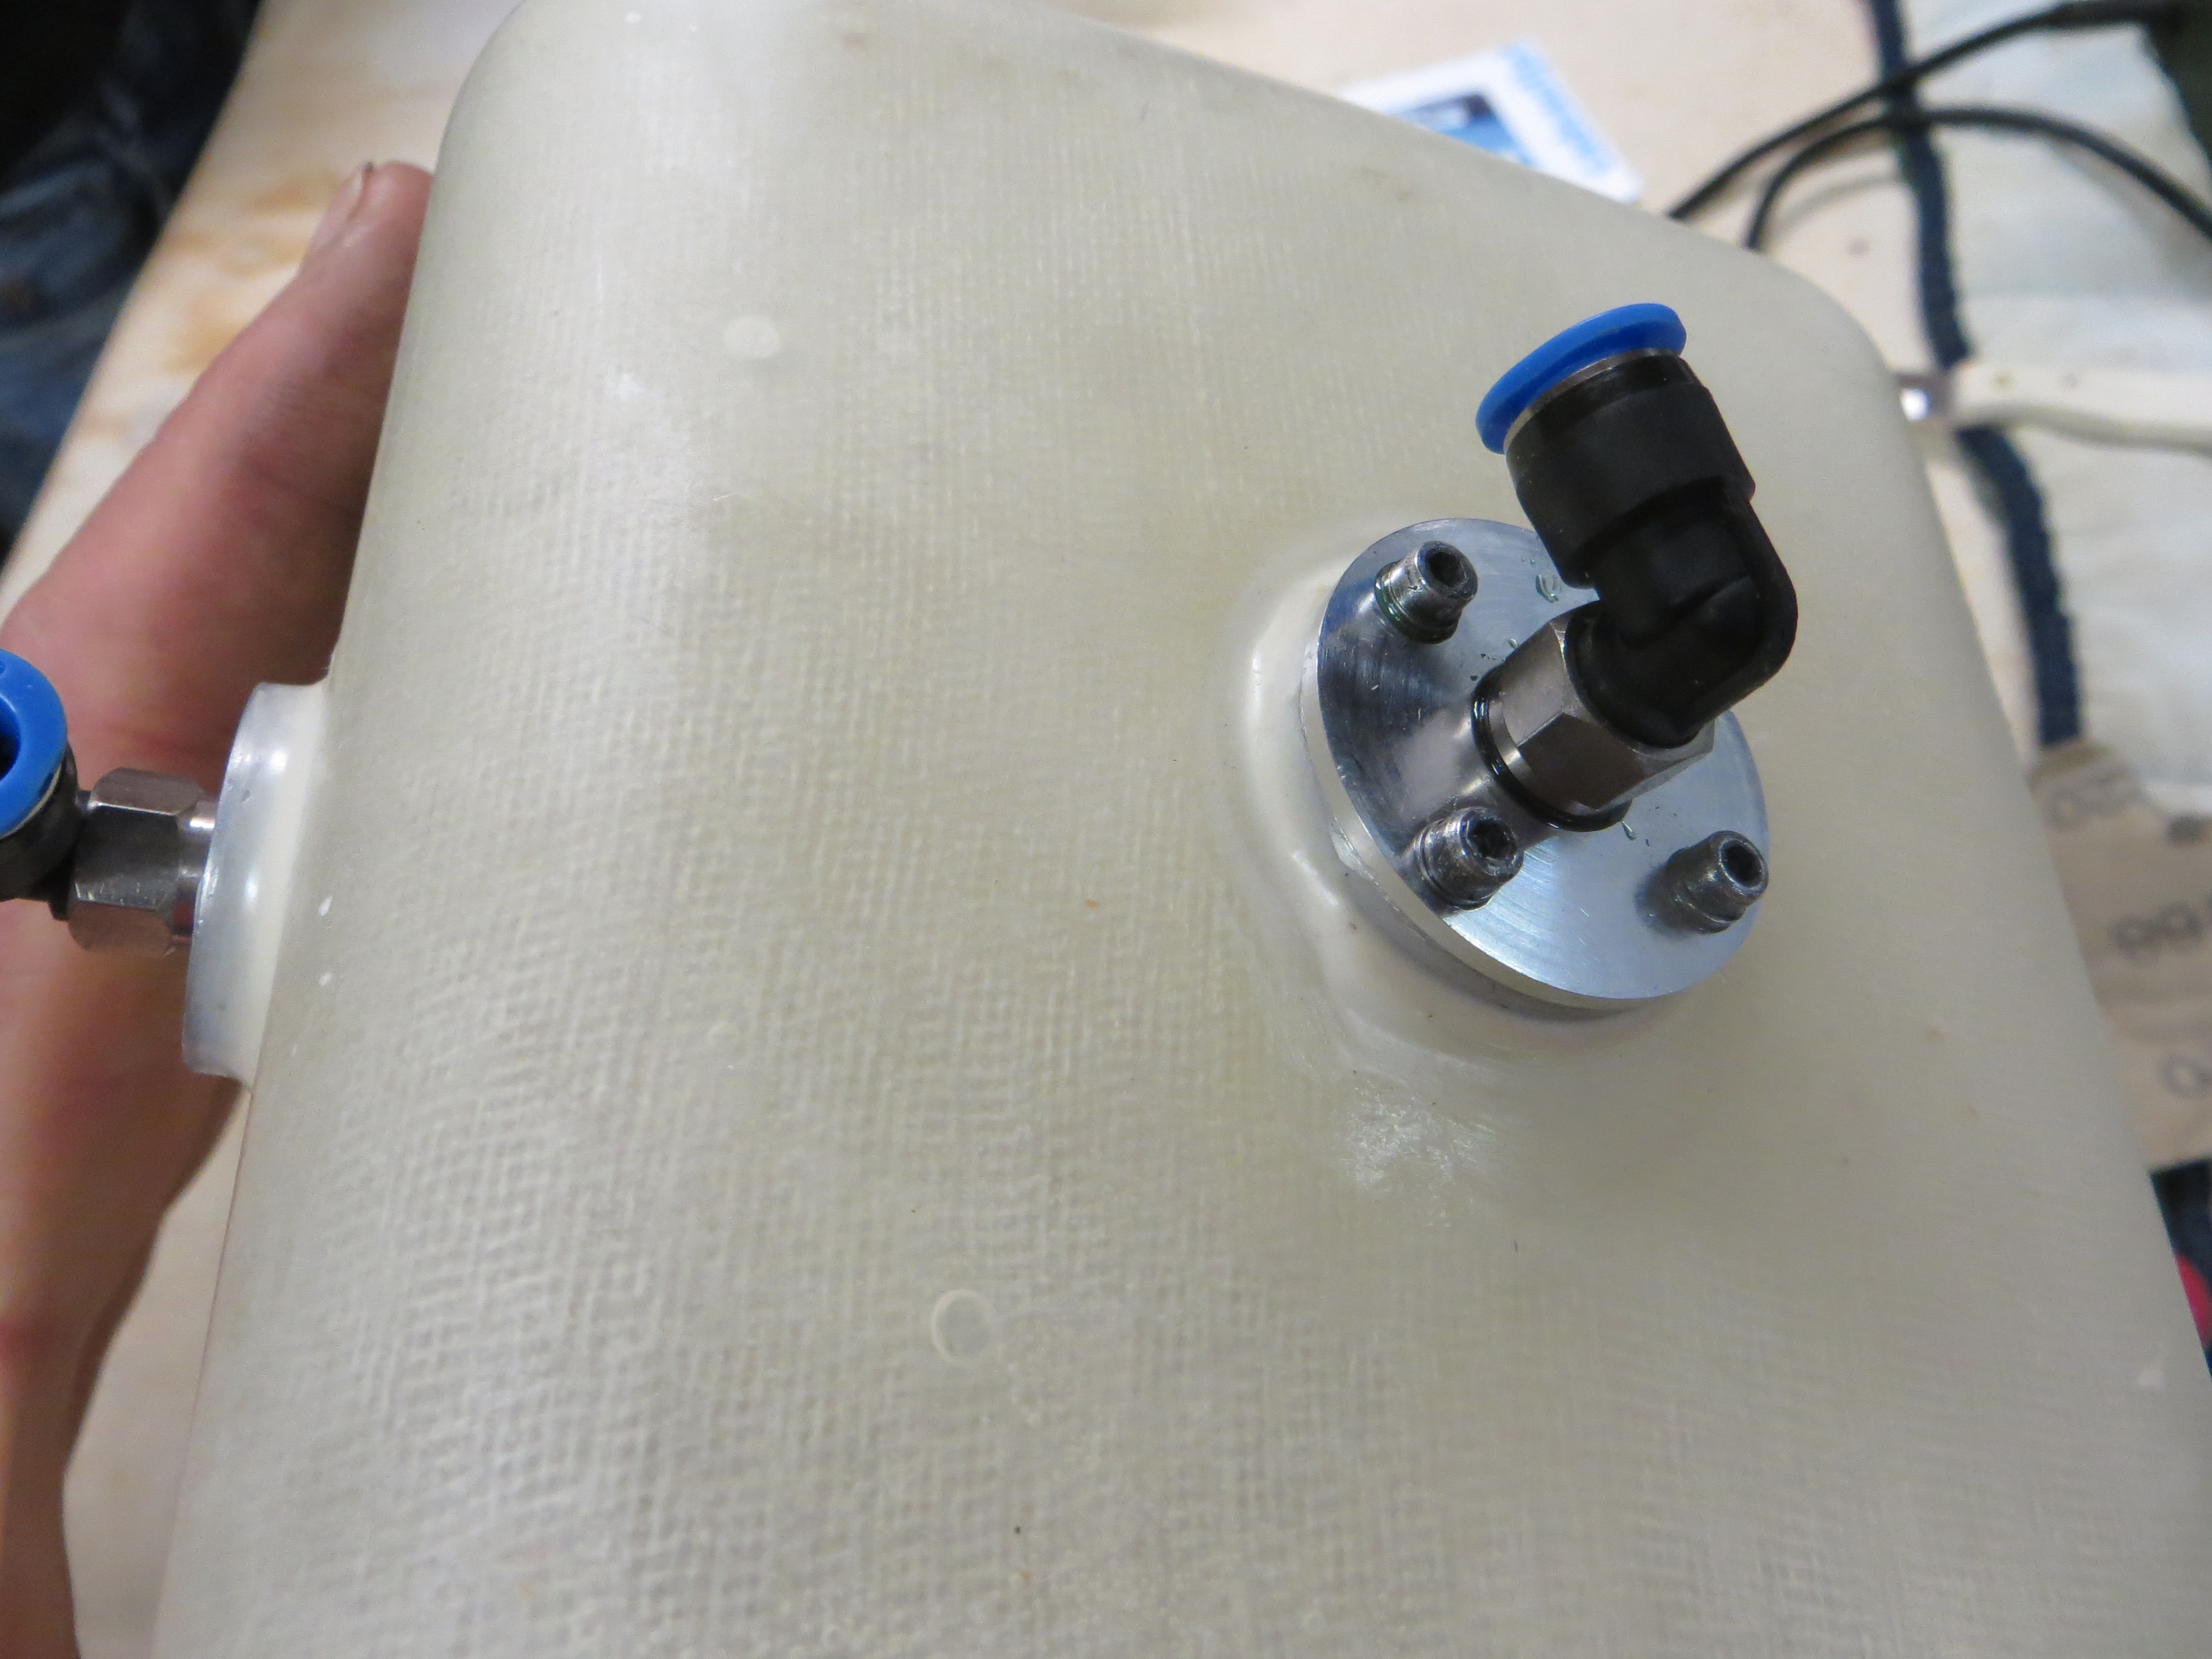
The most important one is the central unit which consists of one part that is glued to the tank and a removable part, like a lid. In that last part is also an M7 threaded hole all the way through. From the front side I put a same FESTO coupler as above.
Beforehand I made a short piece of tube which I kinda draped with the remnants of an M7 screw, which I drilled out conform the thickness of the tube. I solder that in place on the tube. So I end up with a short piece of tubing with one side M7 thread.
That part I screw into the backside of the "lid", using thread locking fluid (also on the FESTOs.)
When all set I connect the internal fuel tubing with already has a metal clunk fitted (do NOT use a filtered clunk!), lower that all into the tank and finally use 4 little screws to screw the lid to the fixed part.
It thereby compresses an O-ring and I have a leak free connection, which I can swivel 360 degrees.


I always hate those tanksealing misery consisting of the rubber stops and narrow tubing You have to press trough an area of two square cms, You have to bend tubing, they will leak sooner or later.
I have a friend who is more active on the lathe and he made me a few items.
First a simple round alu plate with a M7 threaded hole, that is my vent and I epoxy glue it on top. In it I put a swivelling FESTO coupler with M7 at on one side and the other one the connection for 6mm tubing (remember to use 6mm all the way till the pump).
The most important one is the central unit which consists of one part that is glued to the tank and a removable part, like a lid. In that last part is also an M7 threaded hole all the way through. From the front side I put a same FESTO coupler as above.
Beforehand I made a short piece of tube which I kinda draped with the remnants of an M7 screw, which I drilled out conform the thickness of the tube. I solder that in place on the tube. So I end up with a short piece of tubing with one side M7 thread.
That part I screw into the backside of the "lid", using thread locking fluid (also on the FESTOs.)
When all set I connect the internal fuel tubing with already has a metal clunk fitted (do NOT use a filtered clunk!), lower that all into the tank and finally use 4 little screws to screw the lid to the fixed part.
It thereby compresses an O-ring and I have a leak free connection, which I can swivel 360 degrees.
12-28-2015, 01:38 PM
#370
If You are interested see http://www.rcuniverse.com/forum/rc-j...thread-16.html item 388 and 389 where I made the same system with my MB339, however with 3 main tanks and one hopper it is more complicated.
It works flawless.
It works flawless.
12-28-2015, 02:18 PM
#371
Thread Starter
Oh.Could not disagree with you more! Always use a felt clunk, never had a tank bung leak, assembled as designed (but I always add barbs) Never add tube on the clunk line, never use Festo connectors like that....Oh and ask around to see if I've had a flameout in the last 10 years...you'll struggle to find someone. :-)
But everyone to their own ;-)
Dave
But everyone to their own ;-)
Dave
12-28-2015, 02:43 PM
#372
Dave You are right, everyone uses the system You feel best with. Most of the time based on a long history with ups and downs. Here is my reason for using this system.
The filtered clunk:
I use clean fuel for a start. It is odor poor petroleum You can use in a stove inhouse. Sort of Zibro but has another name.
When taking fuel from the canister it passes a felt clunk and further downstream is an automotive filter.
In the plane I use the hopper as the final filter, nothing more. Over the years I removed all the clunk filters, they just restrict the fuel flow too much. Skydiving does not get any safer with more than one reserve chute, on the contrary.
The tube in the clunk line is to block the long fuelline doubling with the clunk facing forward. It can swivel upwards but not all the way to the front to get stuck there.
Most of the jetpilots I know use FESTO for all kind of connections, YES, do NOT use them directly on Tygon. I use the std FESTO 6mm here. My MB339 suffered two engine flame outs when I still had the old system in use and after the mod is runs perfect and I am slowly recovering from the insecure feeling those events gave me.
The only FESTO part that failed several times on me was in the air system using those quick disconnect units (with a sleeve that can be pushed backwards) For the rest I am very happy with those products.
That is what I like about this hobby! So many ways to find the holy Grail! (as long as we don't start a religious fight about it, haha.)
01-05-2016, 01:07 PM
#373
Sometimes.....
Is "hangar rash" not as bad as You think.
When installing the rudder horns I did not have a good feeling, these little screws that only grab the outer skin of the control surface.
"Luckily" I bumped a few days ago into one of the rudders, while it was already connected to the servo. My "bump" wasn't very forceful.
The half round plywood part on which the control horn is fixed completely detached from the rest of the rudder. Exactly as I feared for.
It might be one-off with a bad glue joint, but I decided to modify all horn fixations.
I drilled 3mm holes, all the way through. At the other side I fixed counter sink nuts (don't know the exact English name for those). 20mm M3 screws were just long enough (at least for the rudders).
As the opposite side did not look very nice like this, I covered it with a 5mm balsa triangle, and covered it again.
5 more horns to go!
This is a new model, things like this can happen, You have to be more careful as a model that has been in production for Years. In fact I like this better than walking on a proven path!
01-11-2016, 06:22 PM
#374
My Feedback: (30)
Join Date: Mar 2010
Location: Norfolk, NE
Posts: 375
Likes: 0
Received 0 Likes
on
0 Posts
Just wondering if you guys feel like posting some pictures of your set ups. For some reason I am drawing or having a brain fart on what to use as far as batteries, regulators, etc... I fly Futaba and was thinking about trying the SBus system, but after some thinking, I am going to stick with the old "if it isn't broke, why fix it" logic. So, I am going to use my 14 channel R6014 receiver (not high voltage) so I will need some sort of power system/regulators for the receiver. The servos I bought however are high voltage capable. So, just curious what you guys are using and how your set ups look. Thanks.
Jason
Jason
01-11-2016, 10:27 PM
#375
Last Sunday we maidened the Xcal+. A dream to fly, notwithstanding the strong wind and resulting turbulence. Due to the cold we limited it to one flight so these are the first impressions.
One click on the elev trim, that was it.
Large speed range, right in the first flight we did stall tests which were a no brainer, zero flap fully stalled with full UP elev a slight tendency to drop the left wing, but VERY benign, not vicious.
Stall with the flap (speedbrake?) extended full, it even went slower and no wing drop, at full elev it mushed slowly down with the nose pitching gracefully up and down.
As It is a partly balsa built up structure it has its limits regarding high speed (which there are warnings written for in the manual) so we did not overdo that part, Power comes from a healthy WREN 160, which is at the top end of allowed engines.
Normal flight was at 1/3 throttle stick and verticals were effortless at full power. I estimate full power in level flight will be already too much, power dives are a nono with this engine power. (it was cold so even more power available than in summer).
Rolls, loops and inverted flying were all OK, however my son (who did this flight) reprted quite some "DOWN" elev needed
The model is way better to see than its smaller predecessor, You can fly normal jetplane distances. However I think the Thunderbirds colour scheme is the most advantageous of the available options with regard to visibility.
The geometry of the design gives a good clue in all attitudes and bank angles, not like "confusing" planes like an F16.
The angle of the engine looks like it is spot on, there were hardly pitch moments to be felt during power changes. But as said, it was turbulent, so the really fine effects one only can see at still air.
As was written in this thread it required some down elev during flap extension I blended in some elev DOWN compensation before the flight (which I normally do only AFTER the first fight), but it proved nearly perfect.
The light system of www.Unilight.at was very effective, even in daylight. Due to a small hiccup the "landing lights" in the forward part of the tailbooms were not yet connected.
All other systems like gear and fuel system worked flawless, no leaks, nothing.
Landing in the turbulent wind was like a "trainer" should do, piece of cake.
We flew over 10 minutes, however with limited use of full power and there was at least 1/4 fuel left.
I never had one maiden flight that did not generate a list of improvements, even no changes to the transmitter software.
Only a few small items that I needed to do anyhow, Like to make some protection on the underside of the wing tips and lower back parts of the tail booms, as we fly off a military concrete runway which is quite rough.
In all I have a good feeling about the Xcal+, hope this models stay a long time to enjoy its flying.
There are a few tips I want to share, will write here in due time.
Greetings from The Netherlands:
Last edited by richbran; 01-11-2016 at 10:33 PM.