


SM Cougar - how did you fit the cockpit?
 02-11-2015, 03:42 PM
#1

Thread Starter

Join Date: Jun 2006
Location: Gold Coast, Queensland, AUSTRALIA
Posts: 1,469
Received 26 Likes
on
24 Posts
Hi guys,
I have just received my big Cougar and I am a bit disappointed with it overall. The two biggest issues are the over sized gaps on the aileron hinging and the cockpit.
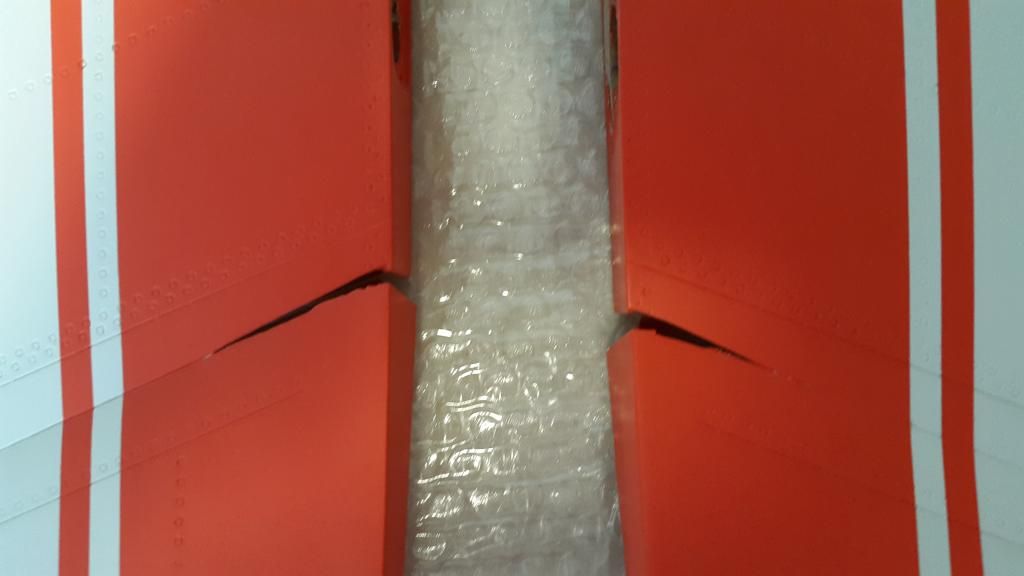
These are the gaps when the ailerons are up by 15mm as per the manual. Why on earth did they make them that size - and not even the same size??? I will be able to reduce the big gaps (which I think Anton should sort out with his OEM supplier for future kits), by inserting some flexible material from the bottom.
However, the cockpit fit is going to be a major PITA. Please can anyone of you that have suffered this agony already, share your gained wisdom with me.
Much appreciated.
Jan
Last edited by Springbok Flyer; 02-12-2015 at 12:06 AM.
 02-11-2015, 11:45 PM
#2

If it is the 1/5 SM Cougar then I have also just received mine. I have a friend who built his last summer and he told me the cockpit instal was not easy and he would show me how he did his. Stand by for news! I will mention this thread to him in case he can chime in here for you or post some pics.
02-12-2015, 12:17 AM
#3
Thread Starter
Join Date: Jun 2006
Location: Gold Coast, Queensland, AUSTRALIA
Posts: 1,469
Received 26 Likes
on
24 Posts
If it is the 1/5 SM Cougar then I have also just received mine. I have a friend who built his last summer and he told me the cockpit instal was not easy and he would show me how he did his. Stand by for news! I will mention this thread to him in case he can chime in here for you or post some pics.
It will be fantastic if we can get some photo's of the cockpit install and final positioning. Unfortunately Alex (Little Jet Company) did not record his struggle during this build He did for a customer.
Cheers,
Jan
02-12-2015, 05:02 AM
#4

Jan does this not have flaps?
https://www.youtube.com/watch?v=5INCZWTT5Ak
Maybe if you do FB there is something there.
https://www.youtube.com/watch?v=5INCZWTT5Ak
Unfortunately Alex (Little Jet Company) did not record his struggle during this build He did for a customer.
Last edited by In the Haze; 02-12-2015 at 05:29 AM.
02-12-2015, 11:09 AM
#5

Gents, will try get some pictures up for how Alex did the cockpit in my Cougar , he made up some rails so the tub sits on top and is screwed down from above, one side section of the tub is separate on mine, I'm guessing its the same with yours ?
See https://www.facebook.com/TheLittleJetCompany
Toby
See https://www.facebook.com/TheLittleJetCompany
Toby
02-12-2015, 12:35 PM
#6

Gents, will try get some pictures up for how Alex did the cockpit in my Cougar , he made up some rails so the tub sits on top and is screwed down from above, one side section of the tub is separate on mine, I'm guessing its the same with yours ?
See https://www.facebook.com/TheLittleJetCompany
Toby
See https://www.facebook.com/TheLittleJetCompany
Toby
In my cougar, everything is in the nose section (I expanded mine significantly) or in the engine bay. Nothing under the cockpit
Cockpit is not easy to install, but nothing that a nigh of thinking and modelling won't solve
Pics later
Jack
02-12-2015, 01:18 PM
#7
Thread Starter
Join Date: Jun 2006
Location: Gold Coast, Queensland, AUSTRALIA
Posts: 1,469
Received 26 Likes
on
24 Posts
Hi Neville,
Yes it has two big ones in the fuse section.
....and Toby and Jack,
I have had a look at all the photo's that Alex posted om FB, but there is not much to help with the cockpit. So if you guys can post a few it will be great. Jack, please post some of the nose and engine bay too.
Cheers,
Jan
Yes it has two big ones in the fuse section.
....and Toby and Jack,
I have had a look at all the photo's that Alex posted om FB, but there is not much to help with the cockpit. So if you guys can post a few it will be great. Jack, please post some of the nose and engine bay too.
Cheers,
Jan
Last edited by Springbok Flyer; 02-12-2015 at 01:25 PM.
