


Jeti DS-12
 10-30-2020, 12:04 PM
#401
One thing I noticed at the last jet meet I attended ( Fresno ) the increasing quantity of jet guys that have switched to fly with Jeti radio systems, one of the guys flying the XL F-16 was switching it to Jeti on our last day.
Don't be left behind, jump the fence soon 😁😁
Don't be left behind, jump the fence soon 😁😁
Last edited by CARS II; 10-30-2020 at 12:10 PM.

 11-03-2020, 04:47 PM
#403
Ok, this is a guide for those that are looking how to start their first set up, it will be a bit different from modeler to modeler depending on their needs and choices.
Continuing with the learning process, here is my basic set up for a new model, my 3 jets set up are identically, I'm highlighting the key points, the details of the steps I do by memory, I figured out I only need the steps/functions as a guide to do the set up, after you have read all you can read and watched all the vids, learning how others have done their set up and why they like it that way is the next step on the learning ladder.
Reminder, there is more than one way how to get the same results.
New model
Basic properties
Bind receiver
Calibrate receiver
Add functions ( steer, brakes, smoke, Gyro OFF, Gyro Gain, Gyro FL Mode )
Functions menu
Remove flap switch
Assign P3 to steer
Assign SC to Gear
Assign SD to brakes
Assign SB to smoke
Assign P6 to Gyro OFF
Assign trim Tr6 to Gyro Gain
Assign SA to Gyro Mode
Dual rates/expo
Assign SF to Ail, Elev
Assign SC to Steer
Digital trim
Remove trim from Rudd
X trim controls
Assign P7 to Tr6
Tr6 mode to "S"
Throttle to -100% steps
Assign center to Elev
Assign thro-Low to Throttle
Elev, Ail mode to "S"
FL Modes
Add 2 FL Modes
Name: Cruise, TO, Land
Slow to 1.5 sec
Assign SA to cruise, TO, Land
Flaps
Butterfly/Crow
Assign Log Max control
Mode to "S"
Servo set up
Adjust Ail via Ail Differential
Adjust Elev via Ailevator
Last edited by CARS II; 11-04-2020 at 03:21 PM. Reason: spell
11-05-2020, 08:59 AM
#407

The Voltario T60 is a high performance digital dual redundant battery switch with advanced telemetry features and touch switch functionality. It combines a backup battery charging circuit and telemetry with Touch w/LED (Included), optional Sliding, Wireless (R3/RSW) or mechanical switch functionality in a single device.
The T60 is ideal for mid-size models where high-voltage servos are used without voltage stabilization. It provides telemetry and monitors Voltage/V, Capacity/mAh, and Current/A (Dual Rx Batteries, or BEC w/Backup Battery) of both power inputs.
Specifications and Features
- Intelligent dual battery backer/multiplexer with configurable voltage switchover threshold.
- Touch switch function (Included), Optional Mechanical, Sliding or Wireless (R3/RSW).
- Duplex EX, Futaba S.Bus2, Multiplex MSB, Graupner Hott telemetry support.
- Optional charging of the secondary/backup battery with capacity protection limits.
- Remembers the last operating state if the battery is accidentally disconnected.
https://www.espritmodel.com/elite-el...ba-s-bus2.aspx


 11-06-2020, 04:34 PM
#410
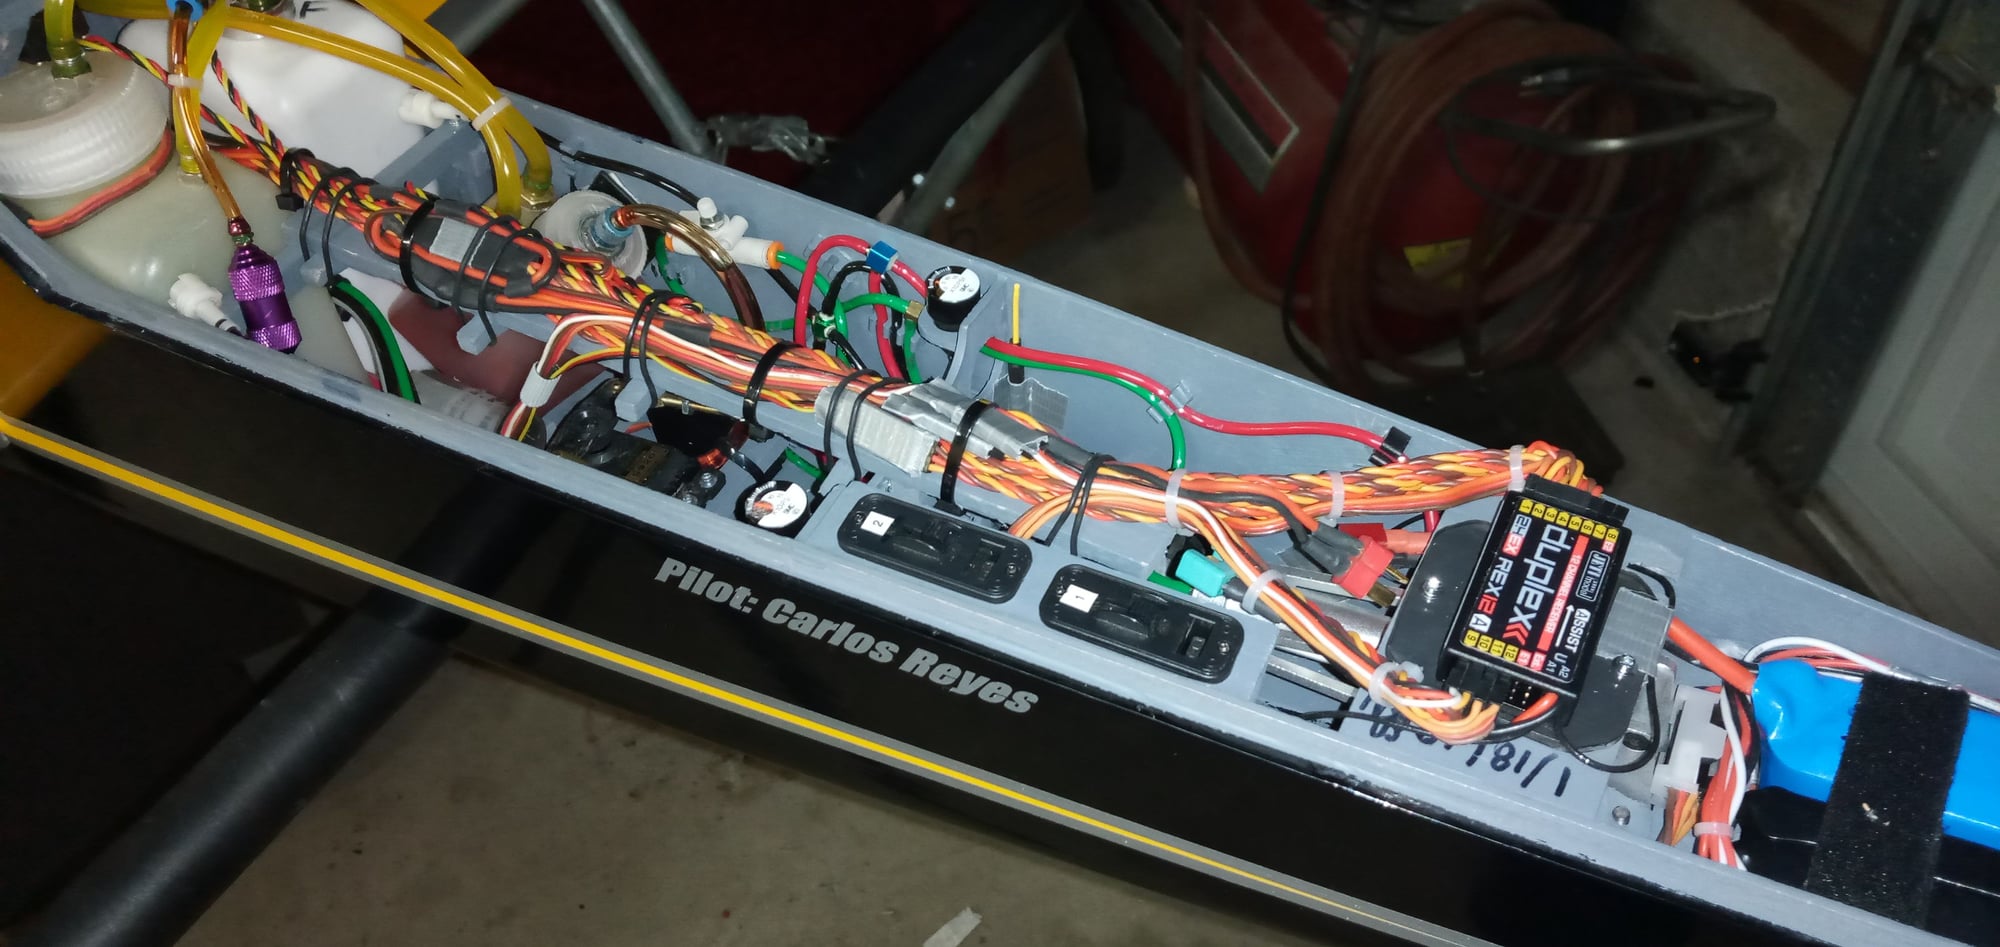
The Re-maiden of the Reaction with Jeti is done!
All went well, after all the proper checks, including the acustic checks on all 3 axis, the acustic check didn't produce any significant vibrations, hardly any and it was done with the gyro up to +100% ( per Harry's recommendations ) the control surfaces were also observed during the test and that also didn't produce any movement of the surfaces.
First, the trim flight, on the ground the main chls were re-learned and we prepared for the gyro on flight, the gyro on flight was excellent, I will have to increase the gyro sensitivity as I get more flights in.
All in all, I have been having an excellent experience with the Jeti receives with the Assist gyro build in.
Big thanks to my friend Nick for swinging by the field after work to help me with the re-maiden.
Last edited by CARS II; 11-06-2020 at 09:06 PM.
11-06-2020, 06:23 PM
#412

The Re-maiden of the Reaction with Jeti is done!
All went well, after all the proper checks, including the acustic checks on all 3 chls, the acustic check didn't produce any significant vibrations, hardly any and it was done with the gyro up to +100% ( per Harry's recommendations ) the control surfaces were also observed during the test and that also didn't produce any movement of the surfaces.
First, the trim flight, on the ground the main chls were re-learned and we prepared for the gyro on flight, the gyro on flight was excellent, I will have to increase the gyro sensitivity as I get more flights in.
All in all, I have been having an excellent experience with the Jeti receives with the Assist gyro build in.
Big thanks to my friend Nick for swing by the field after work to help me with the re-maiden.
11-11-2020, 11:21 AM
#415


I'm going to give an Assist receiver a try on my next model, however, it has flaperons (ailerons also function as flaps). Will I lose aileron stabilization when the flaps extend? I'm thinking it might if the assist rx sees the "aileron" movement as a "stick" input and reduces stabilization due to "stick priority" settings. Hoping Harry sees this and can comment.
Thanks......Craig
Thanks......Craig
11-11-2020, 02:22 PM
#418
Been fooling around a little programming the new jet and was surprised to find Jeti does not have a "Flaperon" option in the wing type menu. Figured out a way to do it (I think) in the Butterfly/Flaps menu but it wasn't easy. None of Harry's or the Espirit videos (that I could find) address specifically how to do it with a 3-position (i.e. flap) switch. I'm going to want fixed/different gain values for each flap position (after I find good gain settings), but again, can't seem to find specifically how to do that in Harry's videos. I'm sure there is a way to do it but may need help from the experts.
11-11-2020, 04:44 PM
#423

Been fooling around a little programming the new jet and was surprised to find Jeti does not have a "Flaperon" option in the wing type menu. Figured out a way to do it (I think) in the Butterfly/Flaps menu but it wasn't easy. None of Harry's or the Espirit videos (that I could find) address specifically how to do it with a 3-position (i.e. flap) switch. I'm going to want fixed/different gain values for each flap position (after I find good gain settings), but again, can't seem to find specifically how to do that in Harry's videos. I'm sure there is a way to do it but may need help from the experts.
1) Create Flap based flight modes such as Normal, Half and Full (the name isn't important) selected by the desired 3 position switch.
2) Make Butterfly flight mode specific by changing it from G to S.
3) In the Butterfly menu set the switch field to LOG_MAX, which is located at the very bottom of the logical switch choice in the switch selection menu. This is important as the switch field value scales the Butterly function output. For example, if you select a 3 position switch with values of -100,0,+100 then ONLYthe +100% position will allow the ailerons to be moved as flaps because 0% or a negative %
results in no movement no matter what value you provide in the Aileron field of the butterfly menu. LOG_MAX always evaluates to +100% so by setting the switch field to that you can set a value for each flight mode that will result in the correct movement.
4) Select each flight mode and adjust the Aileron field in the Buttefly menu for the desired flap deflection for that flight mode.
Done.
That is a fairly high level description off the top of my head so I may have mssed something. Just look things over and if something doesn't make sense feel free to ask.
Also, as for the Assit receiver with flaperons, I haven't personally tried it but I think you should be fine. As far as the Assist is concerned only has Ailerons and there is no need to have an actual flap function. One thing to remember, is when you move the sticks associated with each control axis select the highest rate for each function during stick calibration to ensure that the stick priority works properly.
Last edited by wfield0455; 11-11-2020 at 04:50 PM.
11-12-2020, 04:24 AM
#424
My Feedback: (1)
Join Date: Feb 2002
Location: private, UNITED KINGDOM
Posts: 3,672
Likes: 0
Received 26 Likes
on
16 Posts
I have just had a play with the Assist, it is clever enough to recognise the difference between aileron control and flaperon control, so even at 100% flaperon travel it does not apply the stick priority, and still gives full stabilisation as ailerons.
11-12-2020, 04:29 AM
#425
The Butterfly menu should work fine for flaperons. Here is a list ot the things I'd to to get it working with a 3 position switch.
1) Create Flap based flight modes such as Normal, Half and Full (the name isn't important) selected by the desired 3 position switch.
2) Make Butterfly flight mode specific by changing it from G to S.
3) In the Butterfly menu set the switch field to LOG_MAX, which is located at the very bottom of the logical switch choice in the switch selection menu. This is important as the switch field value scales the Butterly function output. For example, if you select a 3 position switch with values of -100,0,+100 then ONLYthe +100% position will allow the ailerons to be moved as flaps because 0% or a negative %
results in no movement no matter what value you provide in the Aileron field of the butterfly menu. LOG_MAX always evaluates to +100% so by setting the switch field to that you can set a value for each flight mode that will result in the correct movement.
4) Select each flight mode and adjust the Aileron field in the Buttefly menu for the desired flap deflection for that flight mode.
Done.
That is a fairly high level description off the top of my head so I may have mssed something. Just look things over and if something doesn't make sense feel free to ask.
Also, as for the Assit receiver with flaperons, I haven't personally tried it but I think you should be fine. As far as the Assist is concerned only has Ailerons and there is no need to have an actual flap function. One thing to remember, is when you move the sticks associated with each control axis select the highest rate for each function during stick calibration to ensure that the stick priority works properly.
Thanks again for the help........Craig