


Wind RC Rafale
 03-26-2024 | 07:14 AM
#1
For the last couple of months I have been working on assembling a Wind RC Rafale scale turbine. I picked up this airframe, along with a Wind RC Viper, late last year from Chief Aircraft. I have been contacted from one other buyer who is waiting on his Rafale to arrive. Since I have been taking photos, notes, etc. about the assembly that may of use to others, I'd like to post my results and comments here. First, I'm a regular RC flyer of all types, for the last 20 years or more mostly of large scale gas IMAC types and, since 2021, turbines. The Rafale is my third turbine, the first being a Krill AreS XL, second the Wind RC Viper. I'm still learning the ropes of assembling and flying turbines and look to your informed responses to help me with a few issues. I owe most of my turbine tutorage to the esteemed Wayne Mathews and Dan Baker of long time IMAC acquaintance. These guys are championship level F3S jet aerobatics pilots and great friends to have on my team.
For those that might look at Chief's website, this is their description (with a few incorrect items that I'll note):
My intent with this thread is not to be a "build thread" as such but more of a posting of my photos, comments, likes, gripes, and questions. Here's a few photos to start:
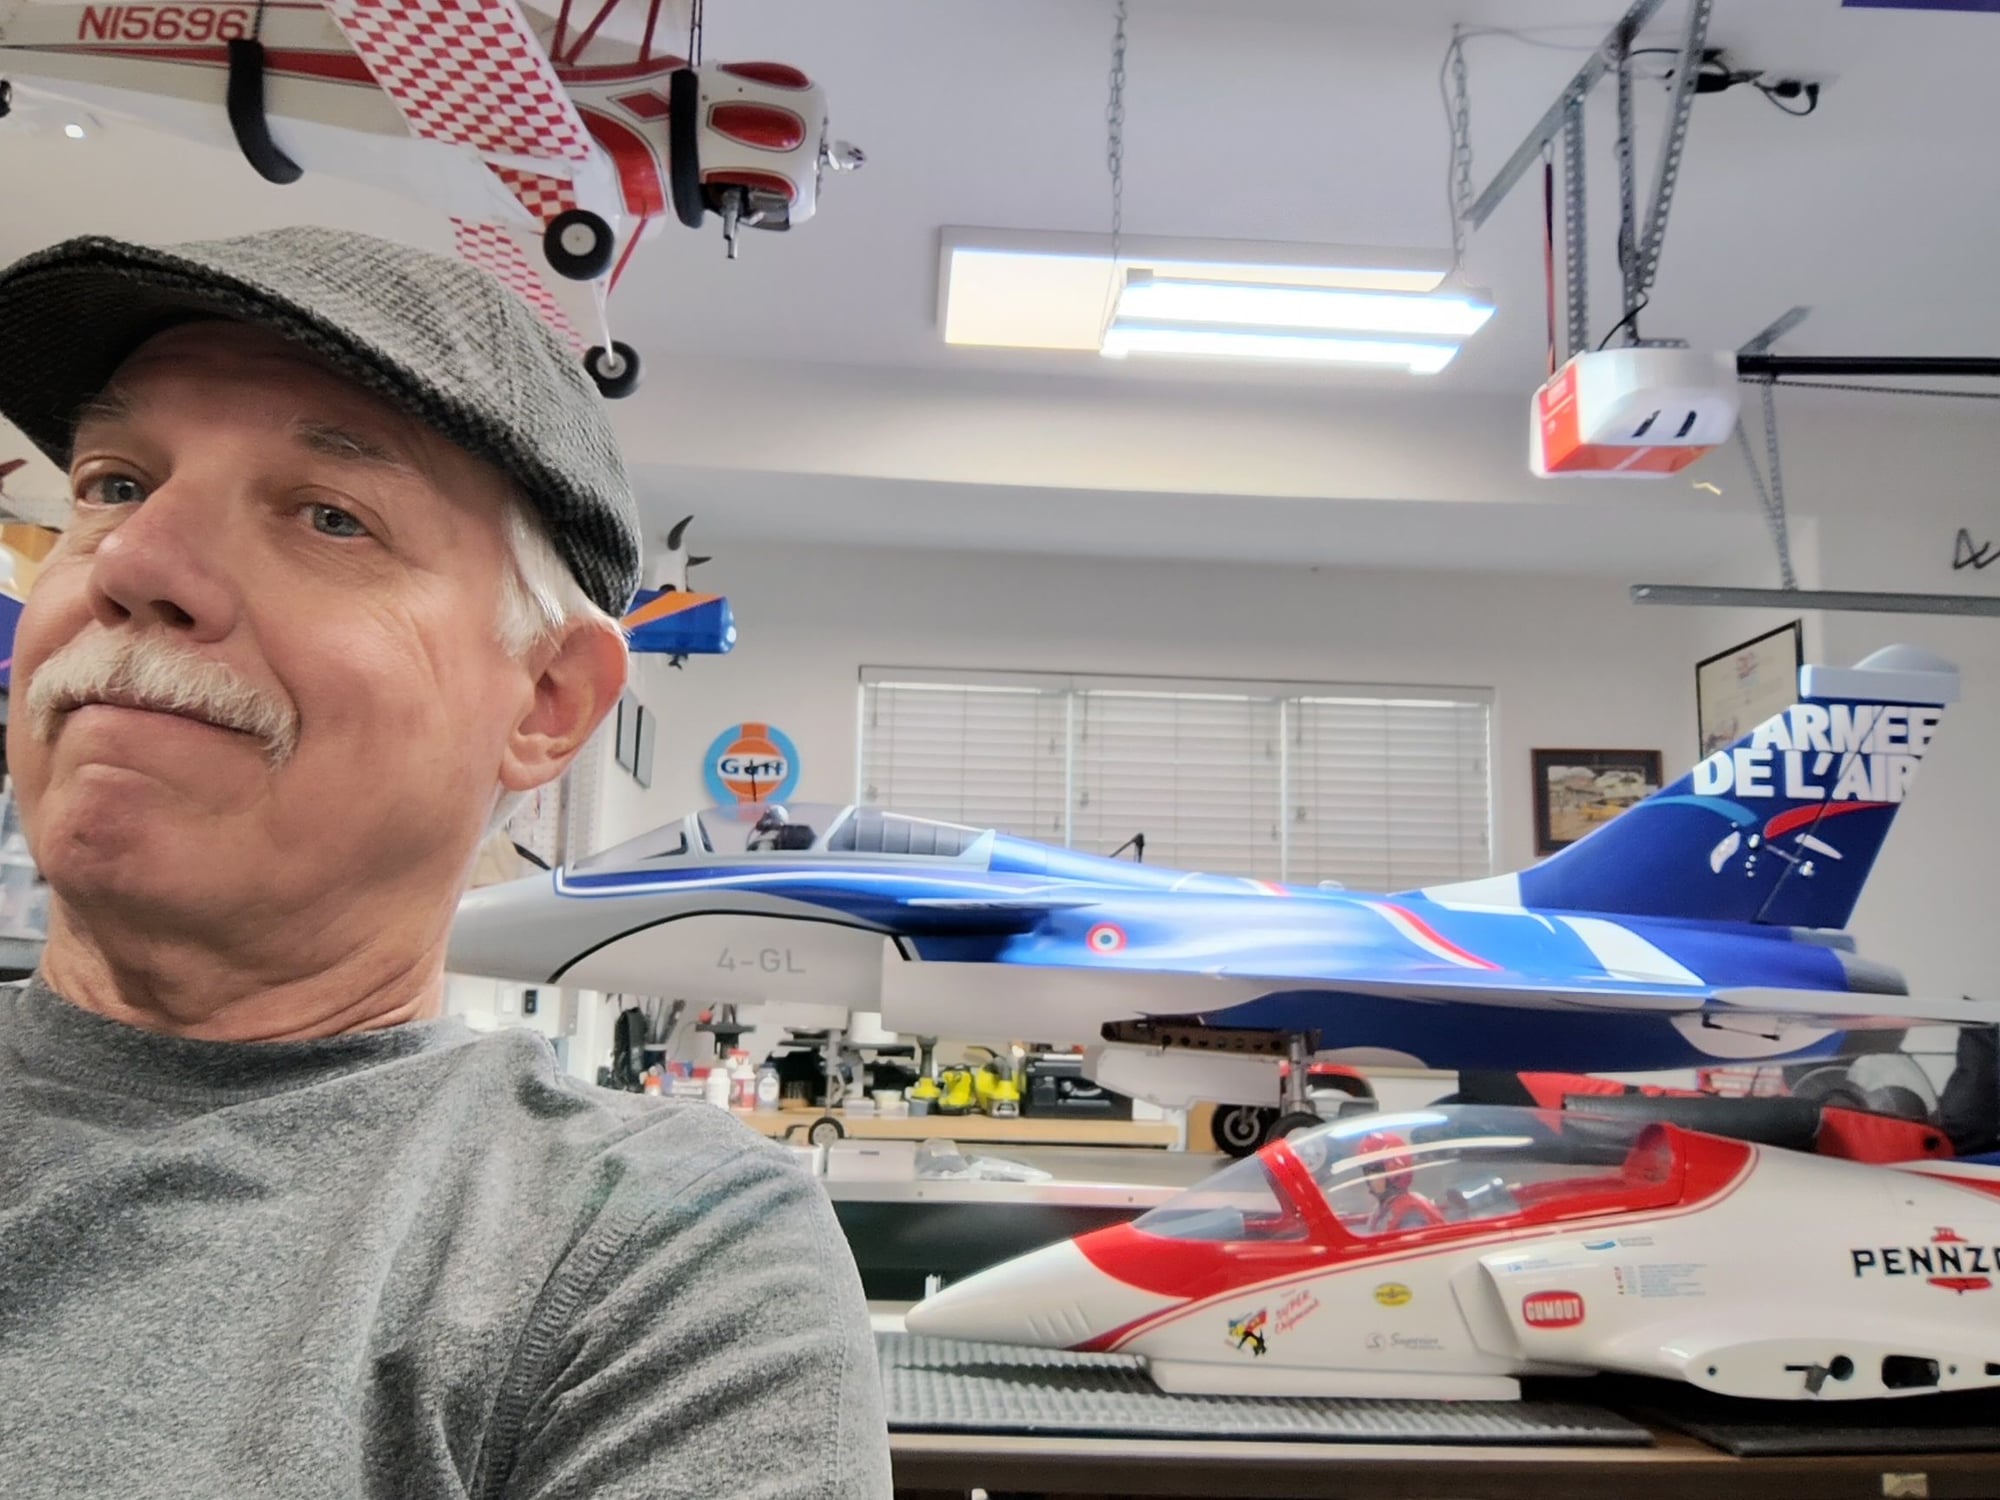
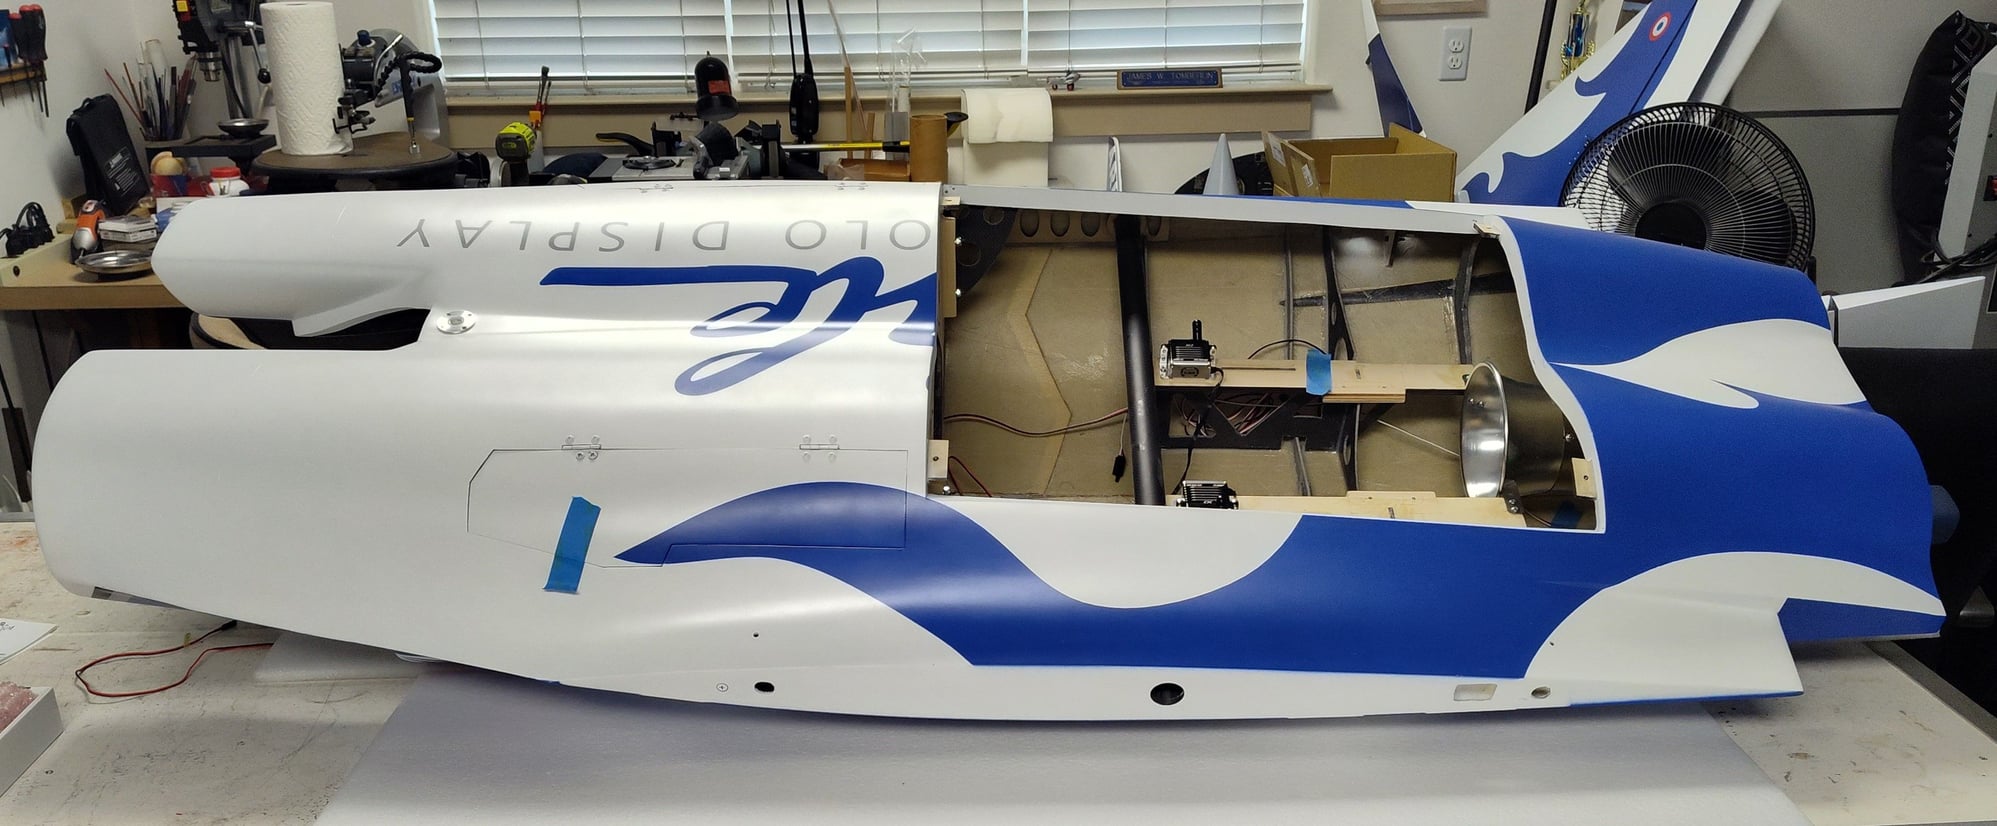
Mugging in the shop.
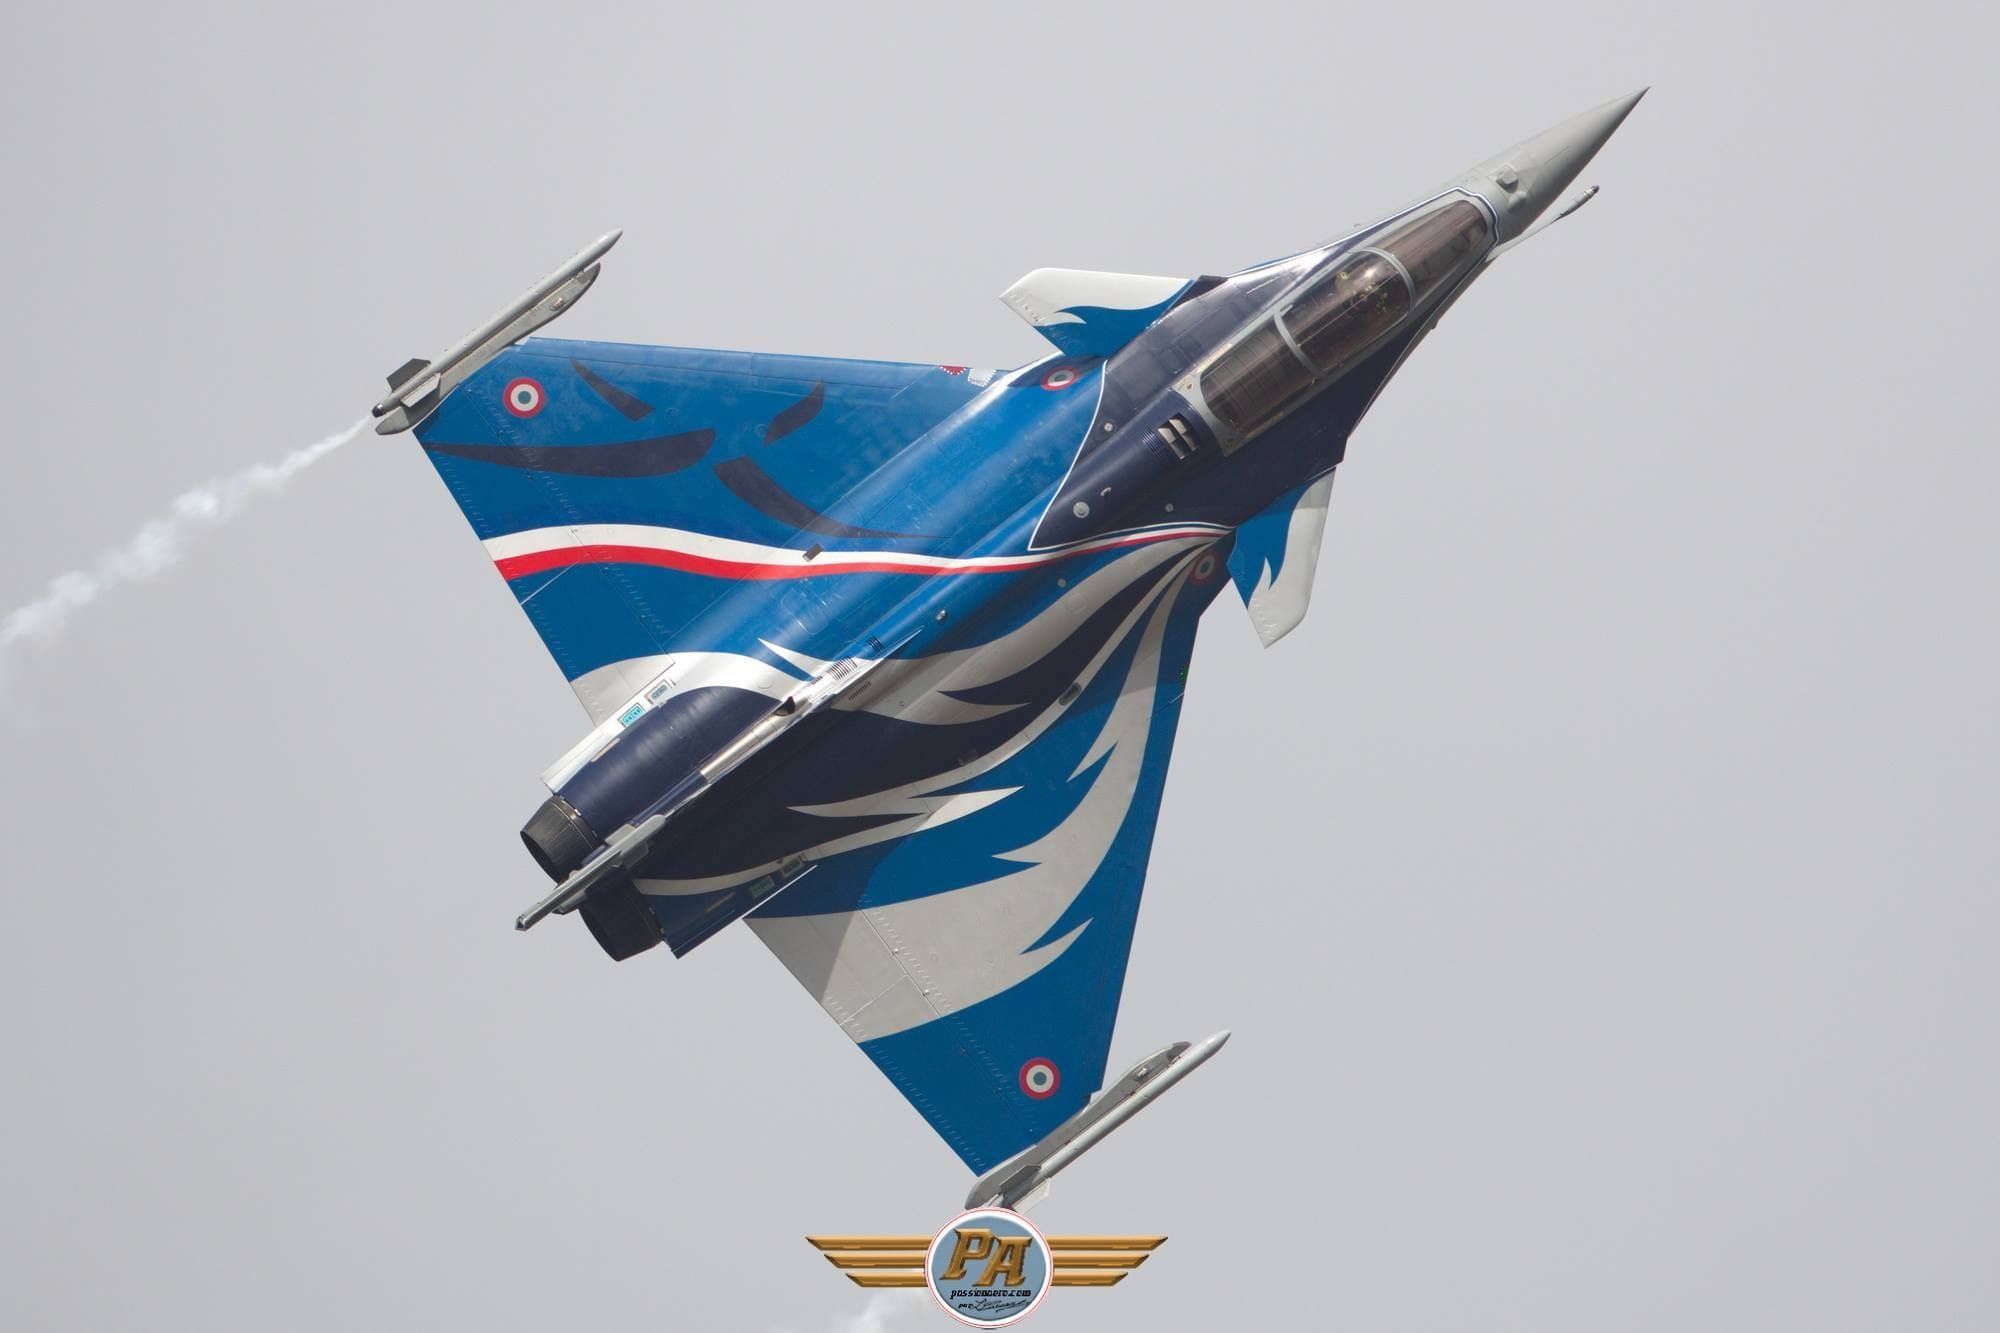
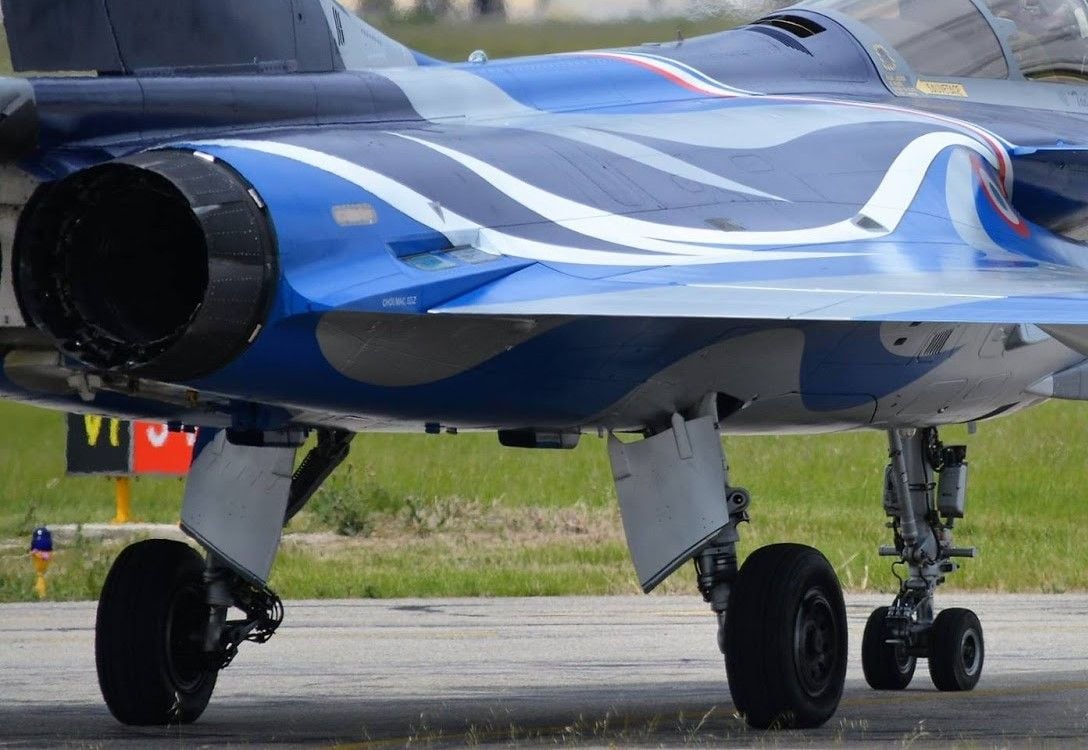
Full Scale 2017 Demo
For those that might look at Chief's website, this is their description (with a few incorrect items that I'll note):
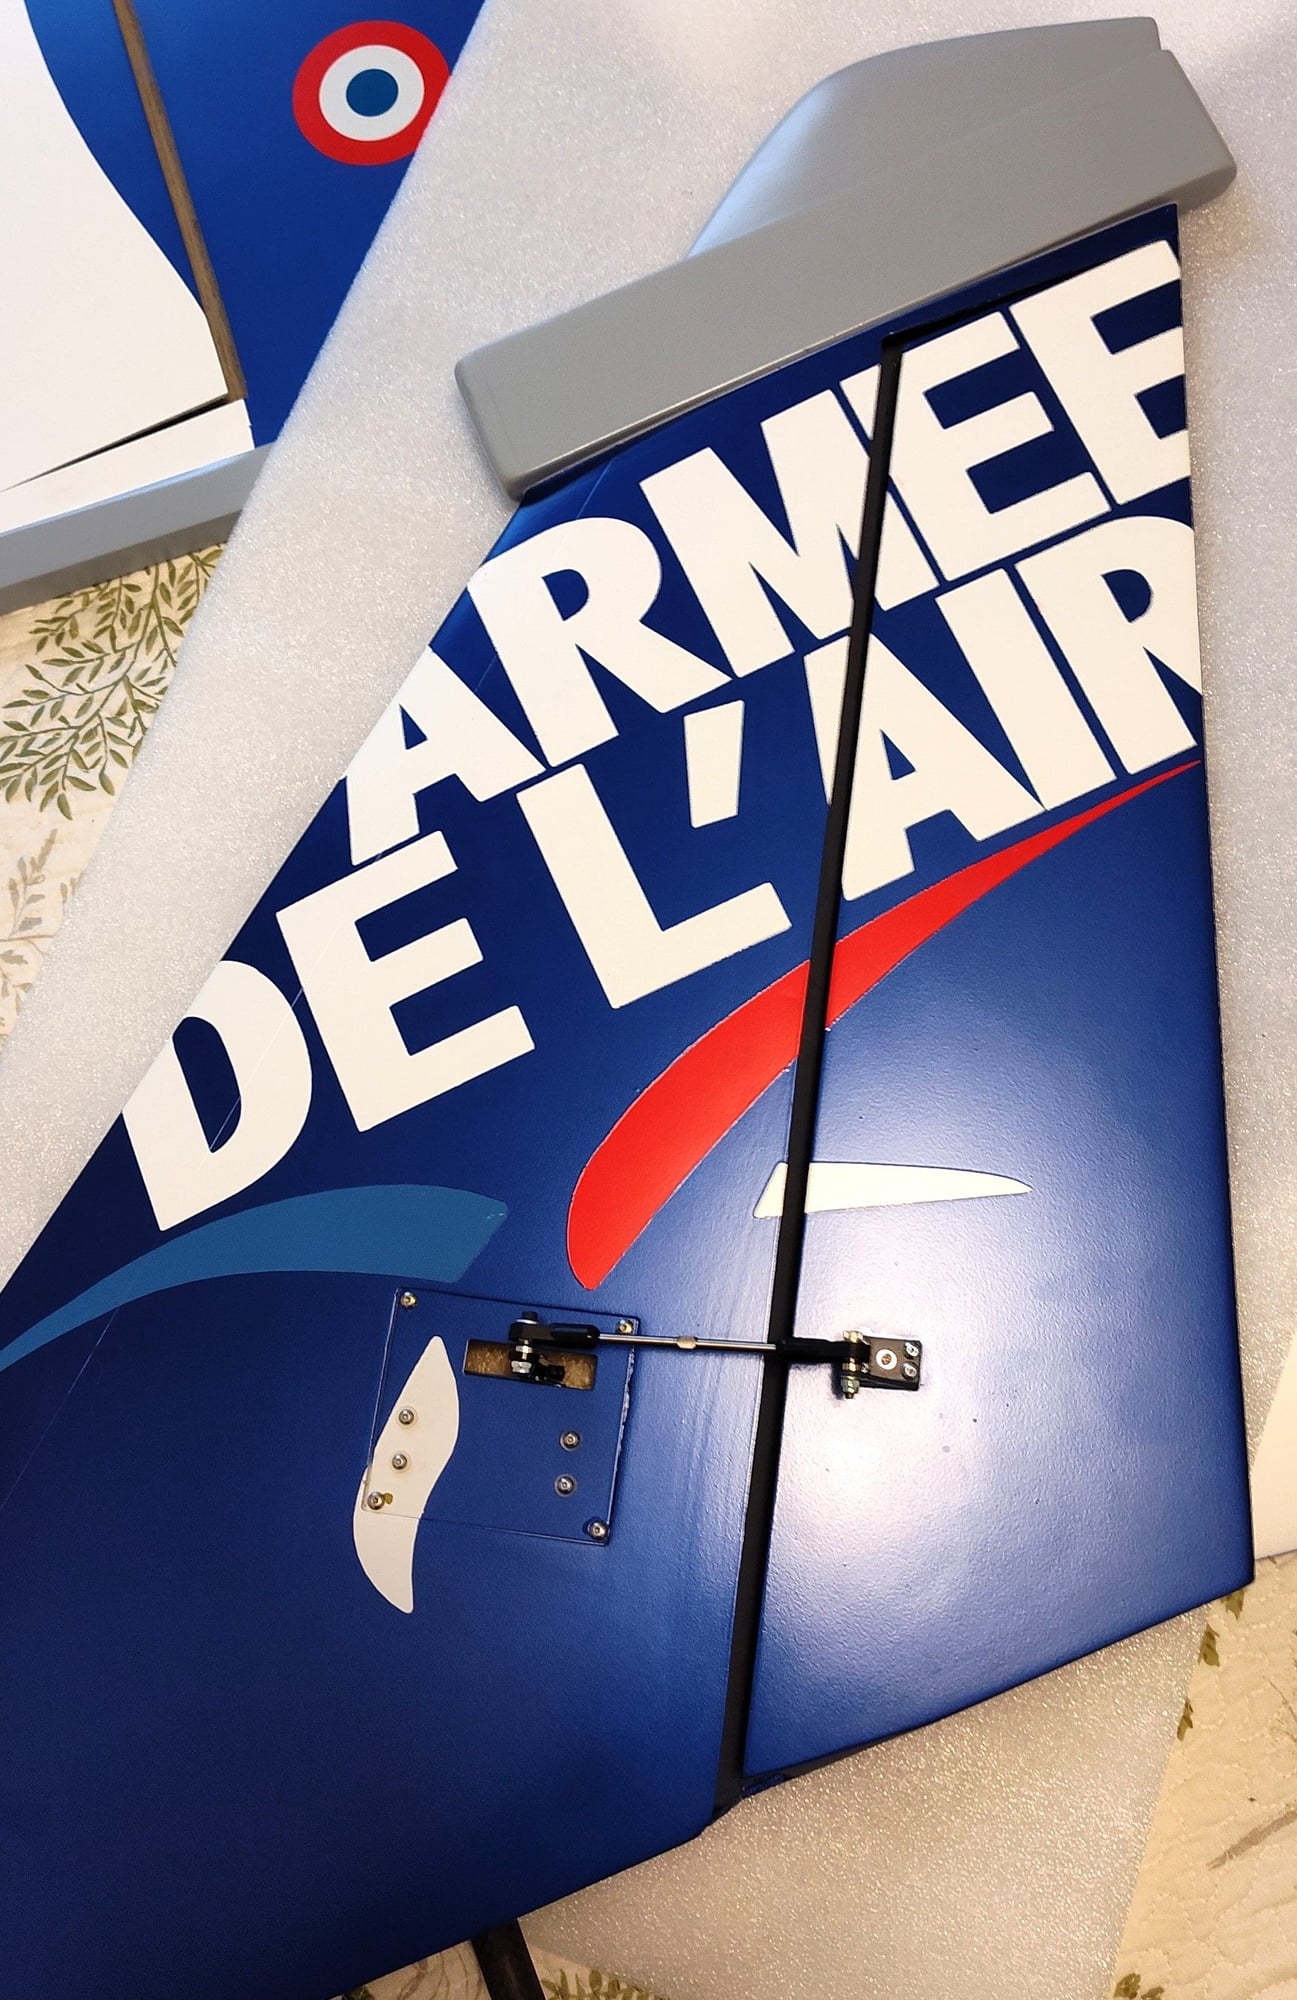
2.7m Rafale PNP, single engine setup with thrust vectoring pipe configuration. (PNP in this case means servos, wiring, gear and lighting controllers, hardware included but NOT installed. A twin engine version can be special ordered)
Factory installed landing gear and doors (Correct but needed attention)
Large kevlar fuel/smoke tank with fittings (No, the tank is a large but very sturdy plastic "jug"; no smoke tank but a plastic UAT is included)
Complete hardware kit (Sort of but a lot of questionable bits as is typical of ARF hardware)
Factory installed lighting kit option with afterburner light ring (Not an option, included wing nav lights, fuselage top strobe, 2 nose gear landing lights, but no afterburner ring(s) included)
Scale Cockpit Included (Correct, actually pretty nice and scale correct)
Drop tank option available (Not optional, was included)
Custom scheme option is available for an extra fee
- Wingspan: 79" (2003mm)
- Length: 109" (2786mm)
- Weight: ~34.2 lbs (15.5kg) (Engine Dependent) [Note: from Wind RC website - 21-23 kg (46 - 51 lbs.).
Turbine Size: Single engine with Thrust Vectoring: P250 or P300 or equivalent
My intent with this thread is not to be a "build thread" as such but more of a posting of my photos, comments, likes, gripes, and questions. Here's a few photos to start:
Mugging in the shop.
Full Scale 2017 Demo
 03-26-2024 | 01:04 PM
#3
The model comes with one piece main gear doors that must remain open with the gear down. I wanted to make these scale-like where the main doors close after the gear comes down so I cut off the rear part of the doors. I can leave the small openings as is or hinge the small remaining doors like scale to fold rearward as the mains deploy. I'd like to design a spring activated closing rather than adding two more door servos. But, since the rear doors have to overcome the airstream to close, the springs may have to be pretty strong and may interfere with the gear deployment. I'll likely wait until after the first few flights to do anything more (tired of fooling with gear doors!).
I'll get some more photos ready and have comments on the model build and finish quality soon.
I'll get some more photos ready and have comments on the model build and finish quality soon.
Last edited by GoldenEagle1; 03-26-2024 at 01:10 PM.
03-26-2024 | 02:58 PM
#4
My general impression of this Wind RC product is that it generally is of better than average quality in design, construction, and finish.
I have owned only a few other composite airframes: a CARF Extra 260 from about 2006, a Krill Ultimate, a Krill AreS XL, and the Wind RC Viper. I'd place the Krill products in first place; they were excellent designs (Seba Silvestri) with lightweight but sturdy structure, good bonding, nice parts fit, and a decent finish (painted in the mold with the usual visible seams and some small trim line misses). Both of the Krills were easy builds with moderate interior equipment mounting work required. I especially liked that the AreS has all control surfaces center hinged and no live (molded in) hinges. Live hinging is a sore spot for me as you'll see in following comments. The CARF Extra was from another era and I was disappointed that for the price the quality was lacking in many areas. What I've seen of the current CARF airframes are a lot nicer.
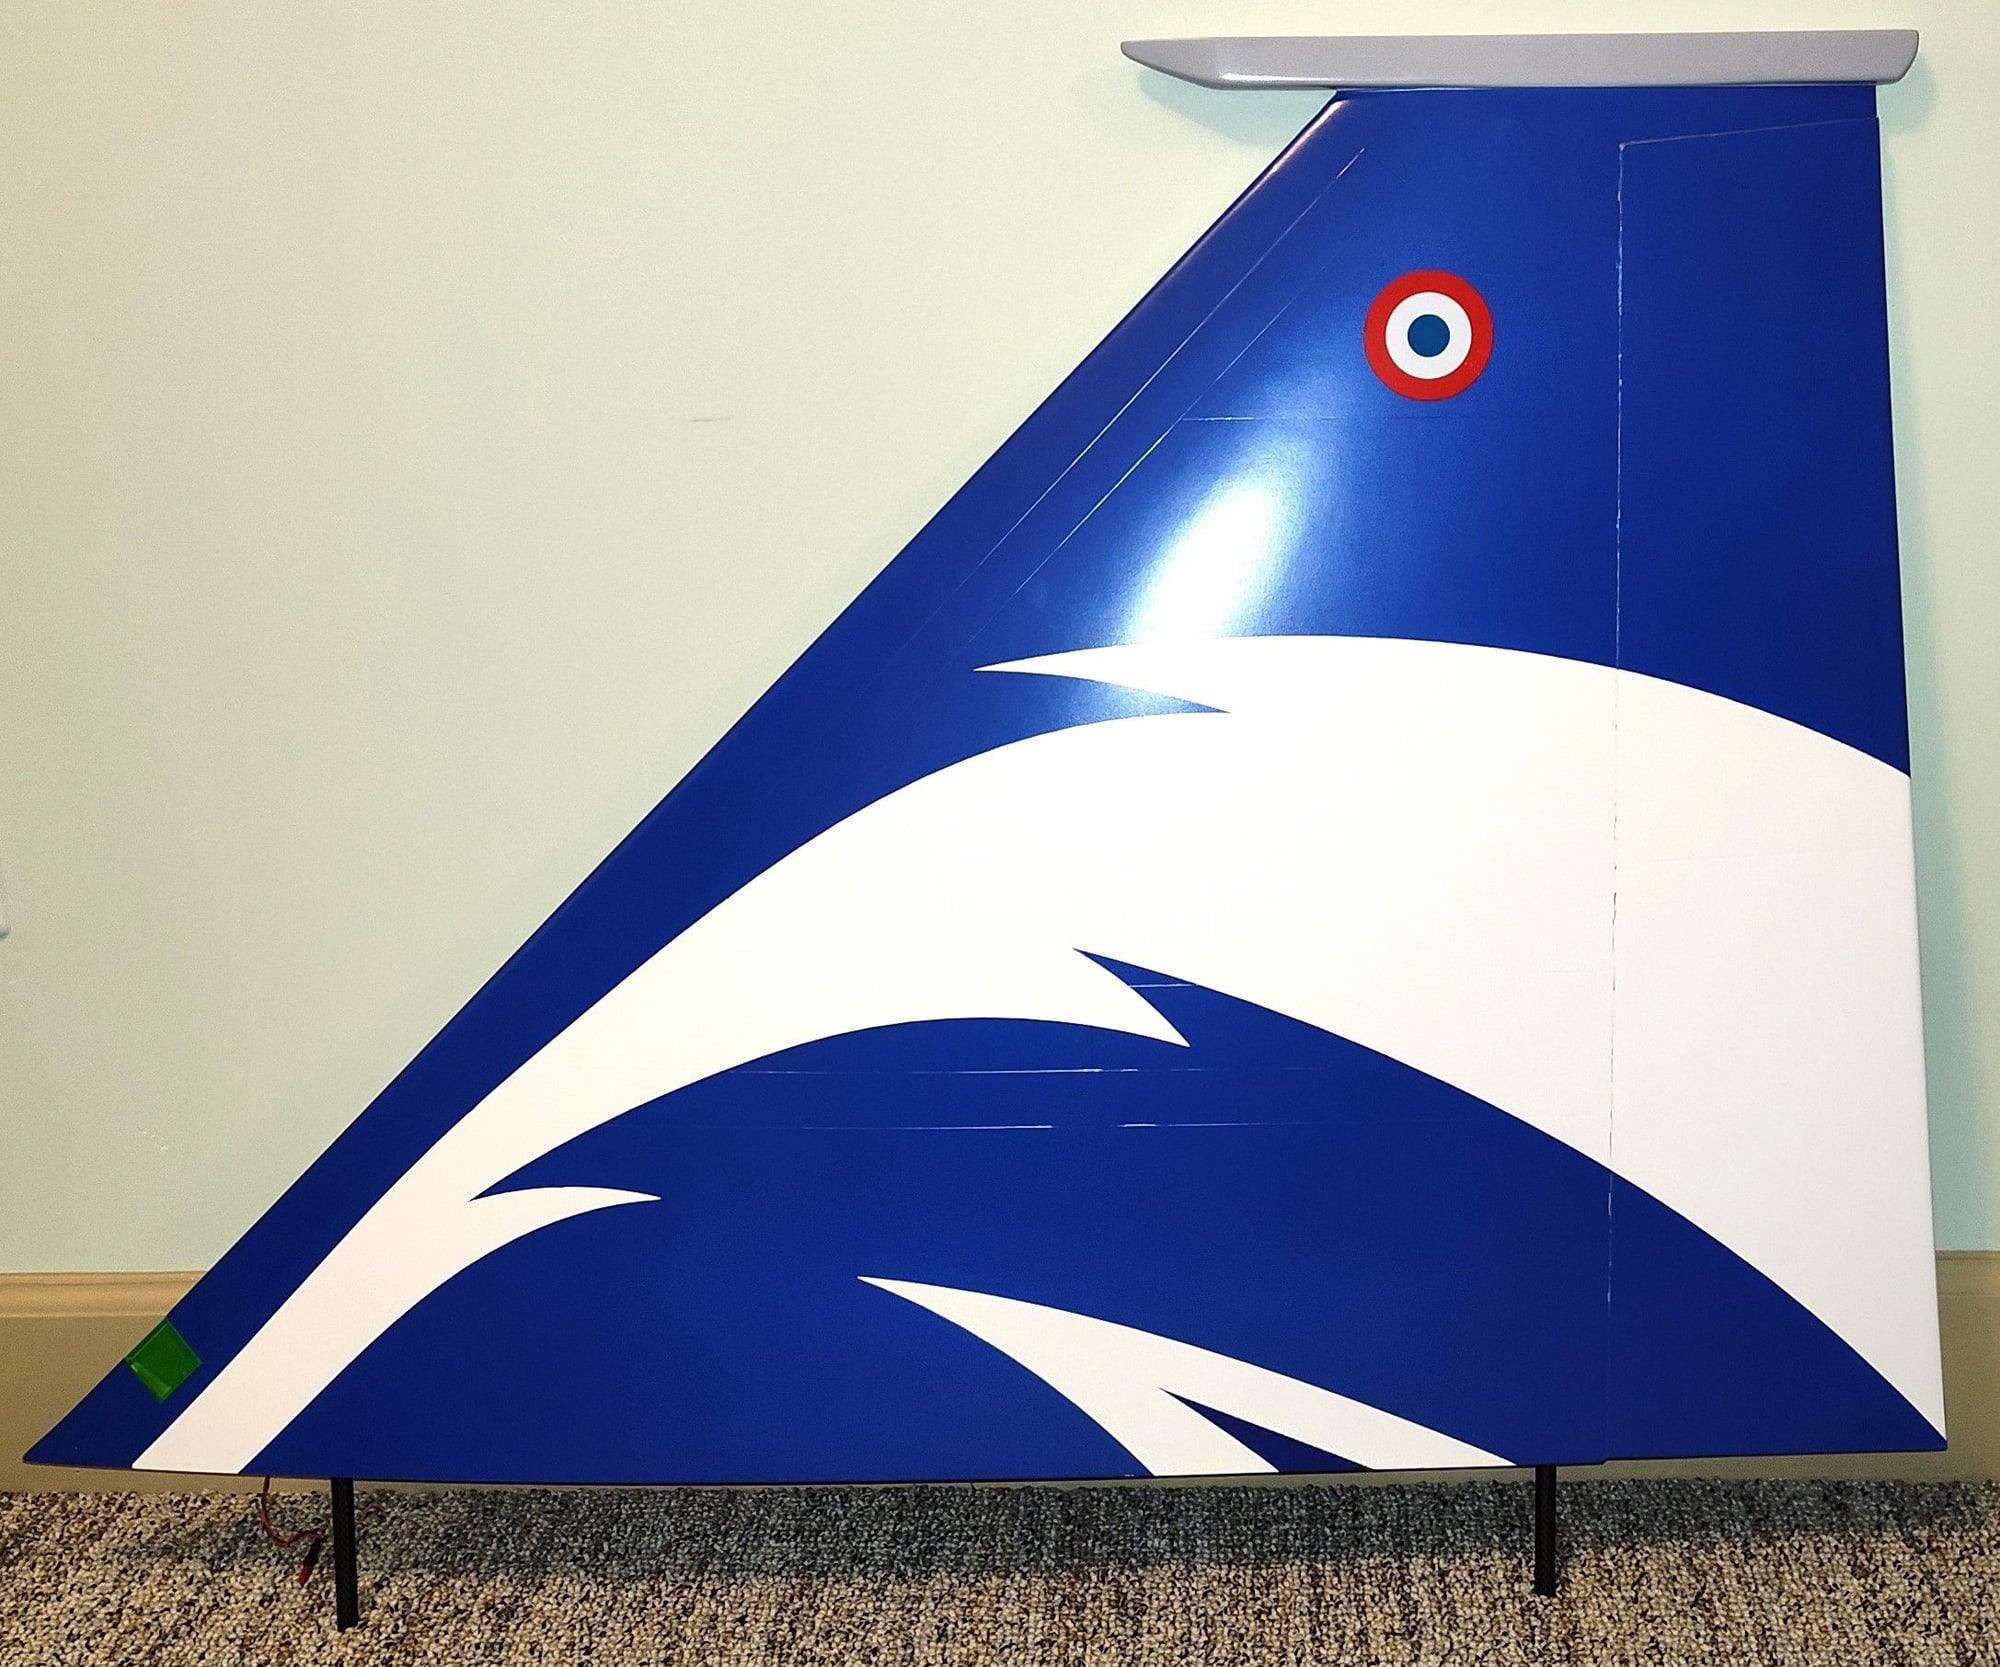
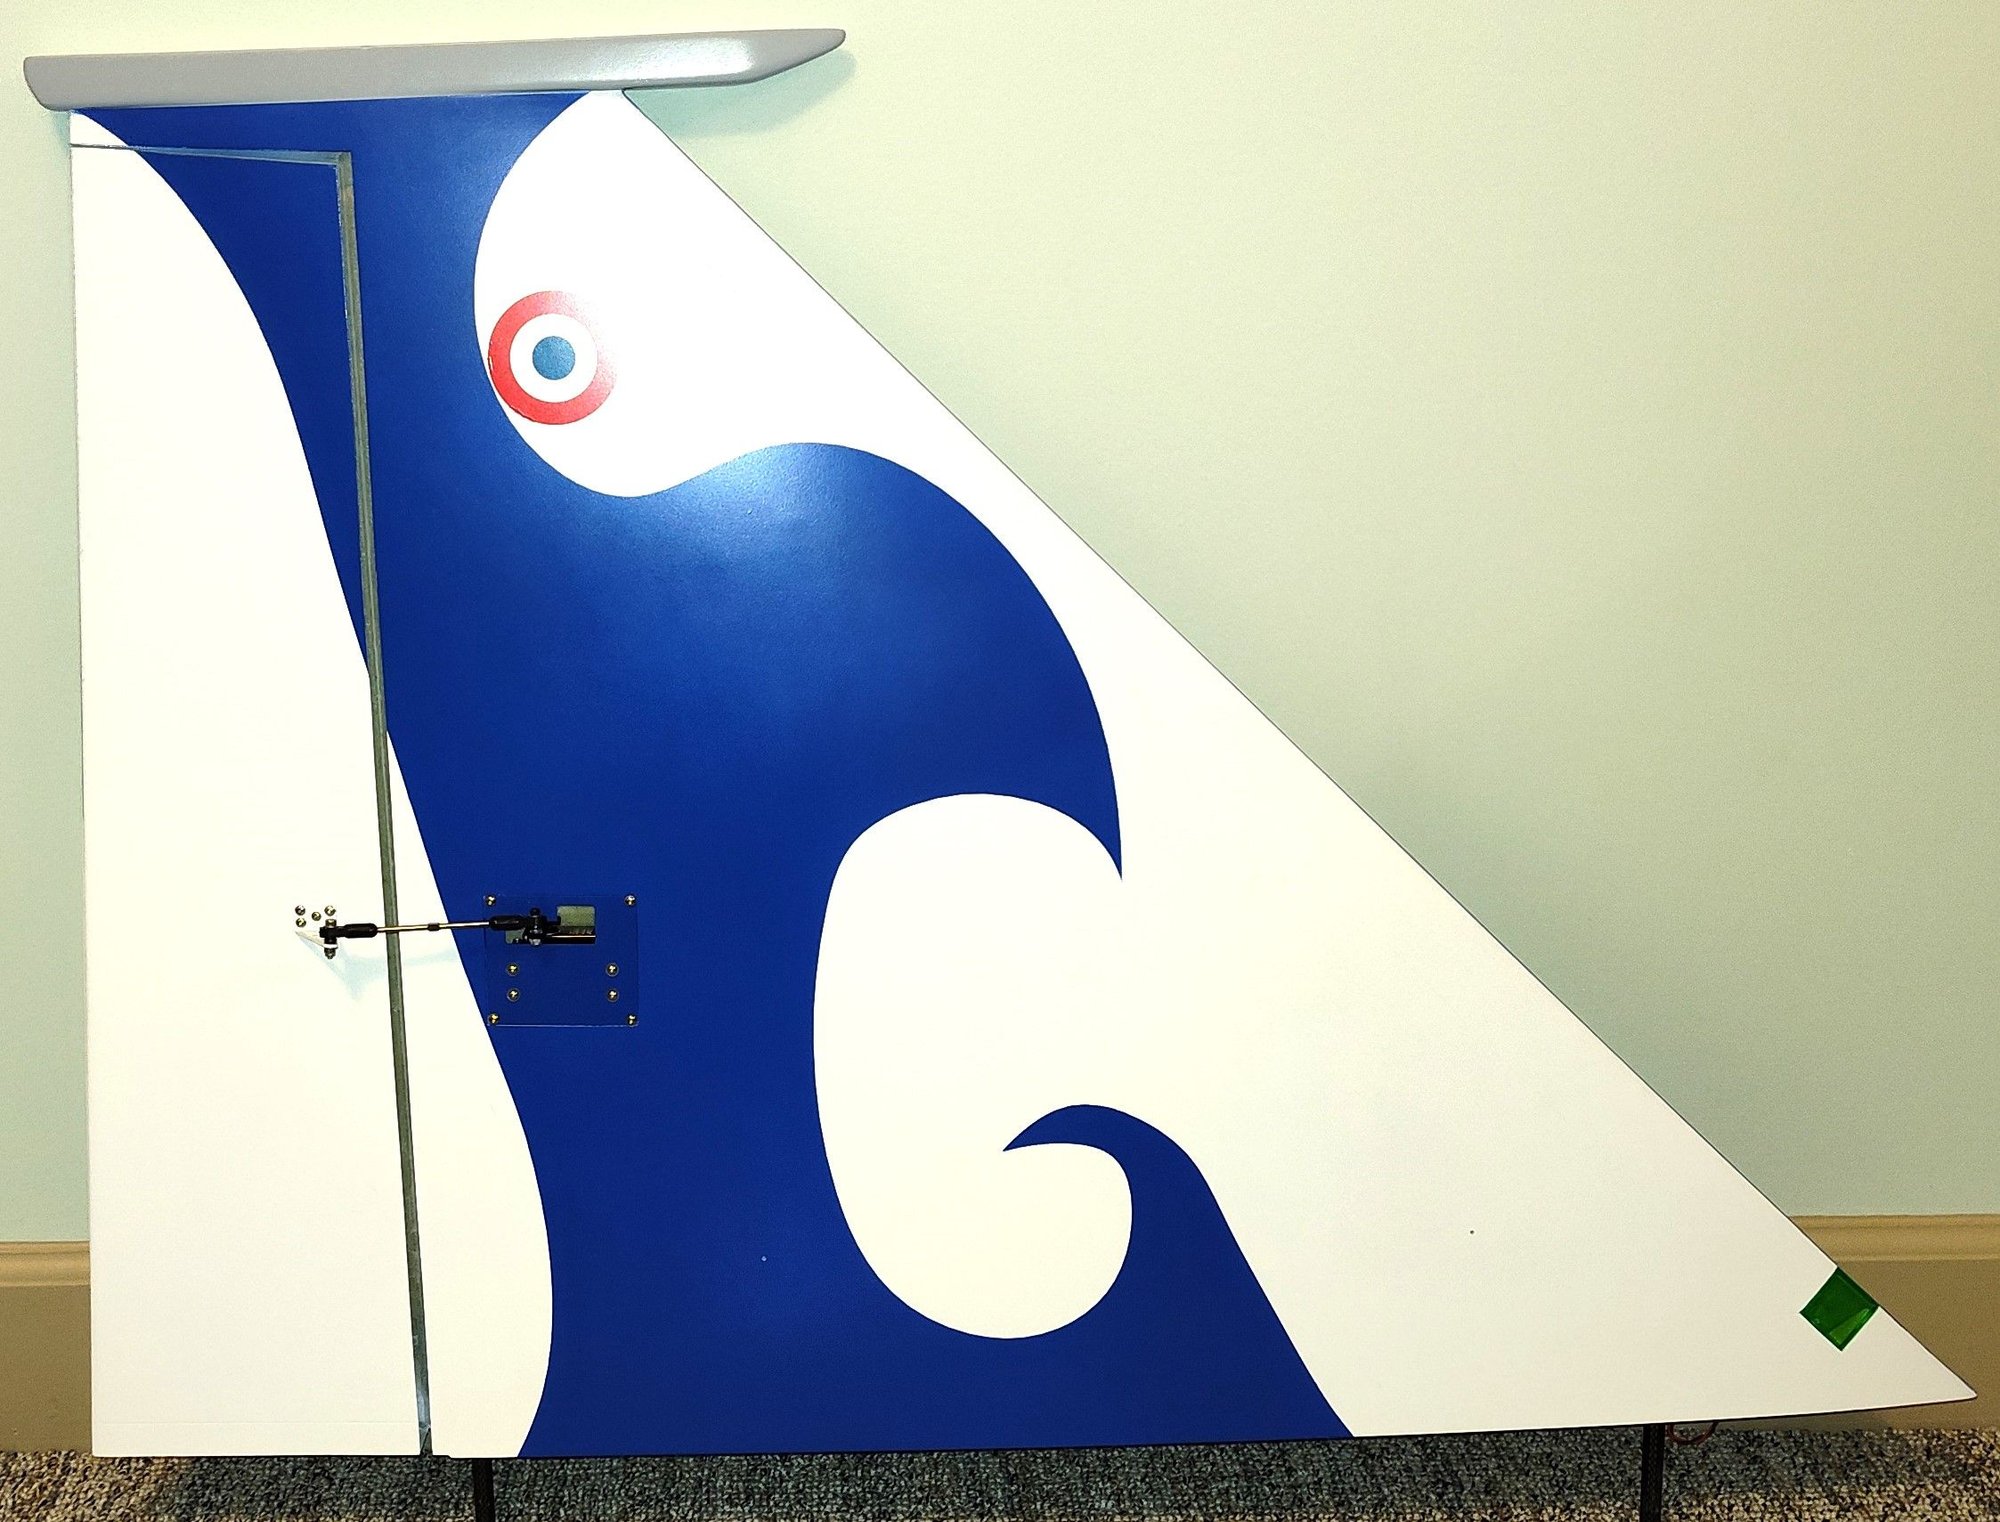
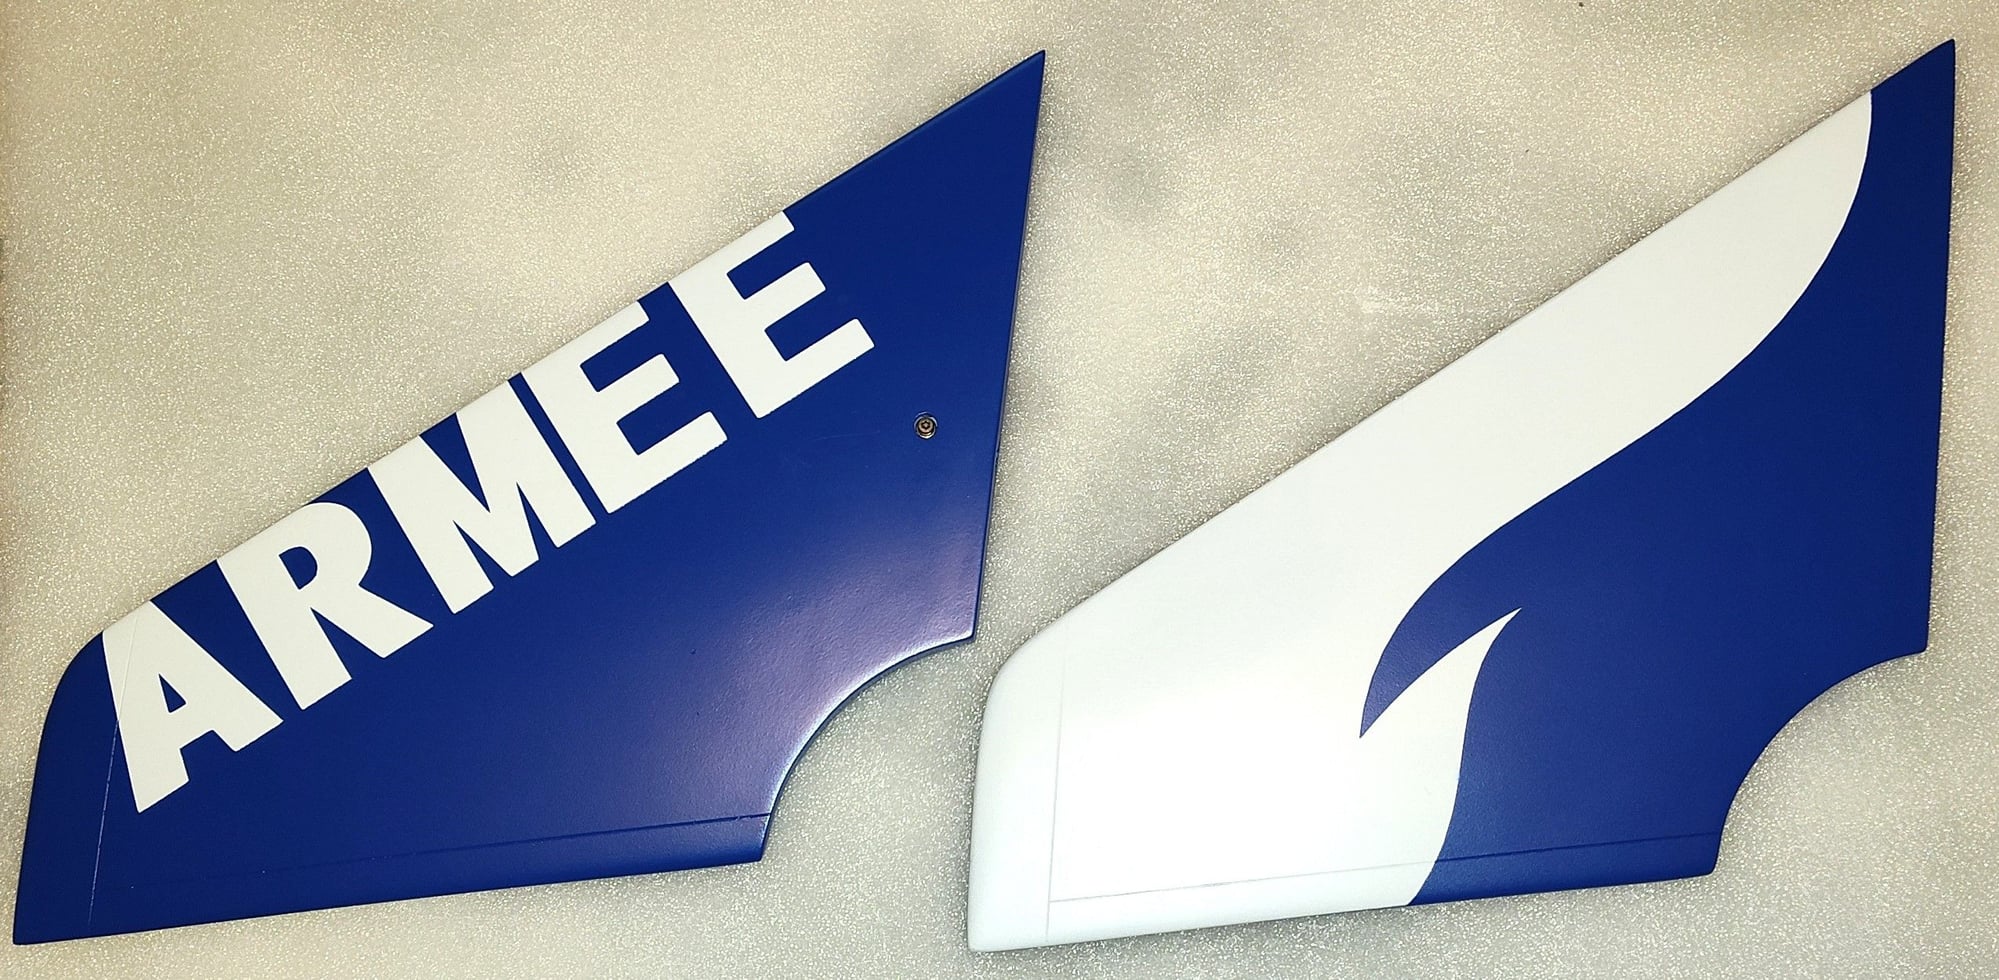
The Rafale has a very sturdy structure of primarily fiberglass skins over plywood formers. It is a noticeably heavier structuring compared to the more lightweight Krills. It's evident that Seba's competitive aerobatic influence is more favored in the Krills over Wind's sport scale airframes. There are carbon fiber laminated formers and CF laminated to the skin in the higher stressed areas. Bonding of parts appears to be good overall with me adding a bit of epoxy here and there for "feels good" but no major gaps. There are plenty of interior mounting plates and platforms for all the equipment but as is my usual, I changed some up a bit. The nose cone is removable for battery mounting as far forward as possible. The turbine access is through a huge belly panel only and no fuselage access panel on top (cleaner looking but a pain). The fuselage is in two sections joined right behind the canopy and canards; I wouldn't count on disassembly for travel but the airframe is not that overly large. The wings, vertical fin/rudder, and canards are joined by CF tubes and concealed aluminum clamps. There is a CF wing tube included. The landing gear appear to JP units with molded plastic scale-like strut sleeves.
The finish is painted after molding and bonding and is a very good representation of the full scale Rafale 2017 Solo Demo aircraft. There's a few small blems from sticky fingers and such but you really have to look hard. Not this subject but the Wind RC Viper's finish was excellent (except for the d....d live hinges)! My biggest complaint is that the live hinges are painted over and as soon as they are flexed the paint cracks and flakes. Can't take that much factory effort to place a 1/16" masking tape on the hinge lines so that there's a clean flexing without paint damage! The canopy was pretty clean with some light scratches that I polished out. The clear canopy was factory bolded to the frame, not too sloppy inside but I could have done better. I'm so-so about factory bonded canopy frames (CARF makes you do it yourself) since I really hate dealing with clear canopies. When you go scale...hey.
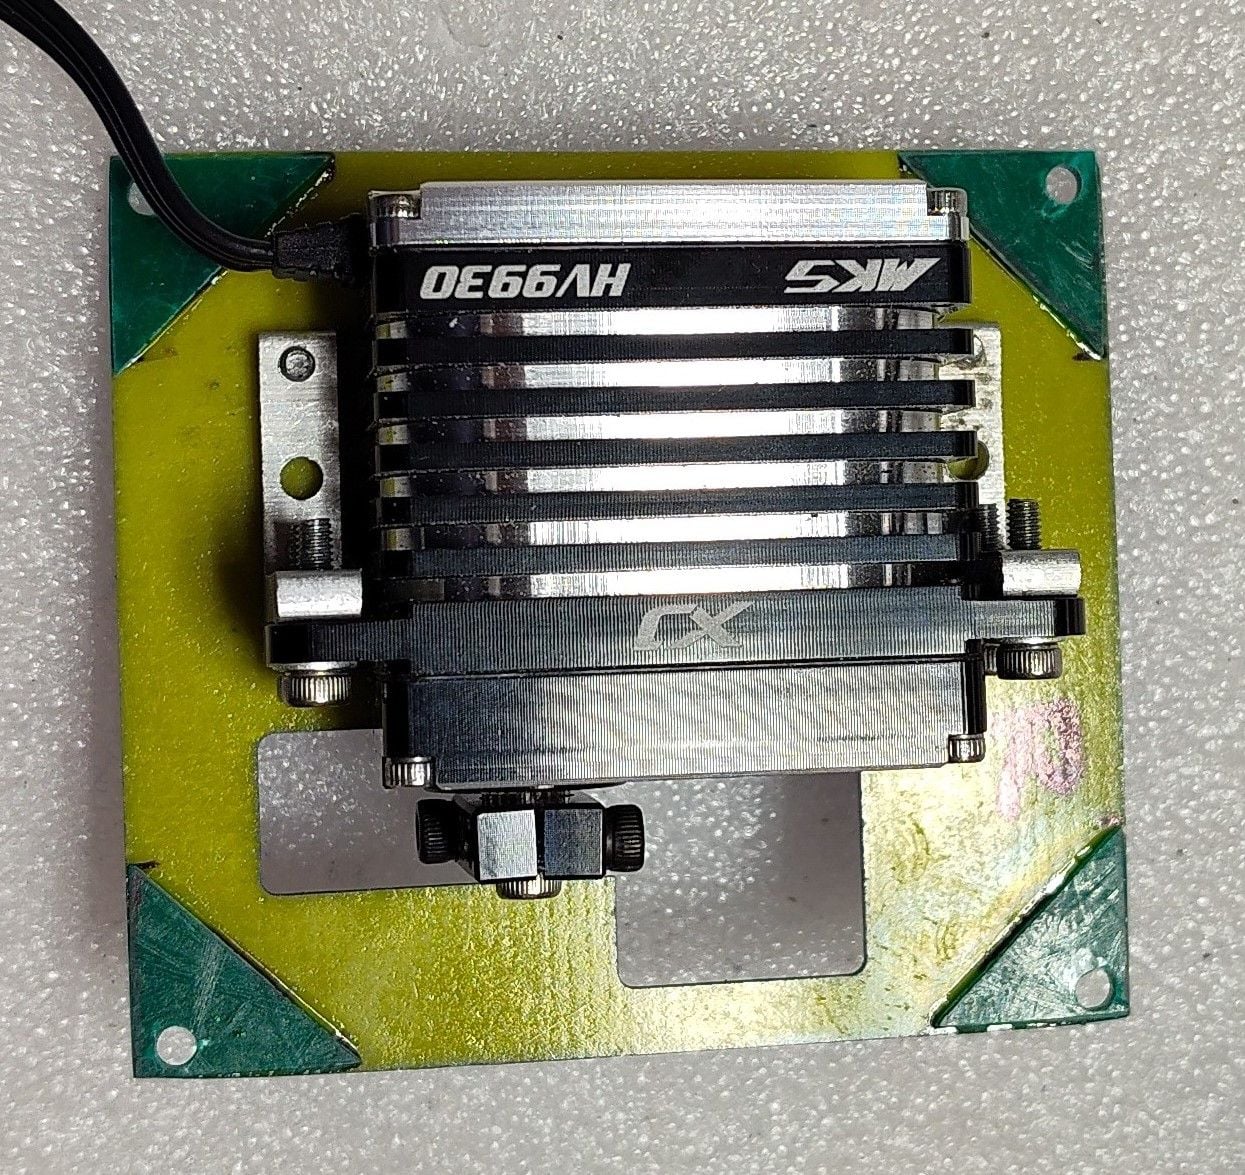
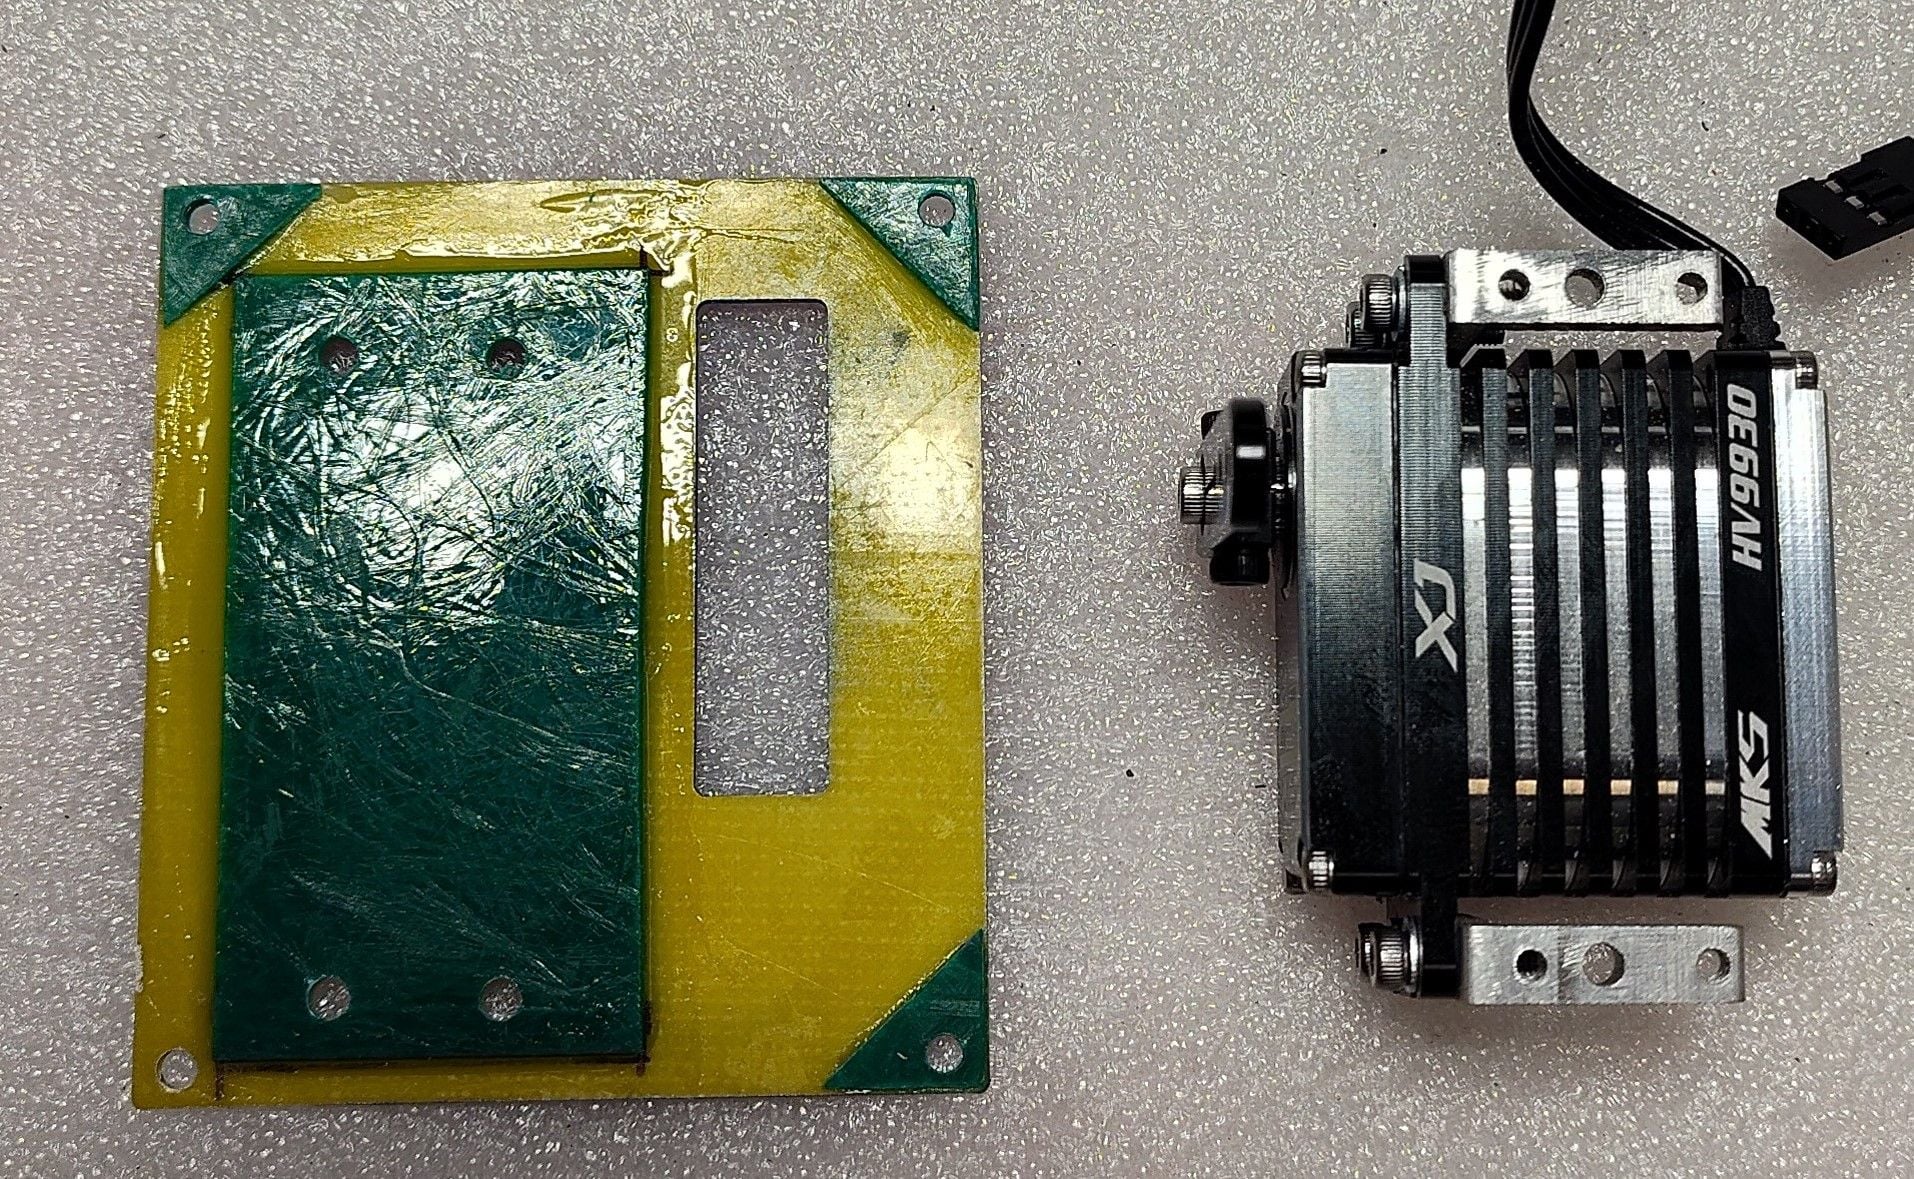
Biggest gripe so far is that there is no manual that I can find or get Wind RC to provide. It took repeated requests to get the recommended CG (a CG drawing is now on their website) and but they will not reply when asked about control throws. I understand a little that us turbine guys are all supposed to be experienced complex aircraft modelers but some basic setup info would be nice. Upon getting home from Chief I found that several servos were missing as were the gear and lighting control boxes. Freddie at Chief was very helpful in getting the missing parts sent from Wind but it took a while to get here. I previously listed the discrepancies in Chief's online description so beware if you order. The servos provided are from GDW that I know nothing about. I used the GDW's in my Viper so far with good results. I instead went with MKS HV9930's on the Rafale's control surfaces and thrust vectoring for more peace of mind. I did use the GDW's for the gear doors.
I'll post more photos and comments later.
I have owned only a few other composite airframes: a CARF Extra 260 from about 2006, a Krill Ultimate, a Krill AreS XL, and the Wind RC Viper. I'd place the Krill products in first place; they were excellent designs (Seba Silvestri) with lightweight but sturdy structure, good bonding, nice parts fit, and a decent finish (painted in the mold with the usual visible seams and some small trim line misses). Both of the Krills were easy builds with moderate interior equipment mounting work required. I especially liked that the AreS has all control surfaces center hinged and no live (molded in) hinges. Live hinging is a sore spot for me as you'll see in following comments. The CARF Extra was from another era and I was disappointed that for the price the quality was lacking in many areas. What I've seen of the current CARF airframes are a lot nicer.
The Rafale has a very sturdy structure of primarily fiberglass skins over plywood formers. It is a noticeably heavier structuring compared to the more lightweight Krills. It's evident that Seba's competitive aerobatic influence is more favored in the Krills over Wind's sport scale airframes. There are carbon fiber laminated formers and CF laminated to the skin in the higher stressed areas. Bonding of parts appears to be good overall with me adding a bit of epoxy here and there for "feels good" but no major gaps. There are plenty of interior mounting plates and platforms for all the equipment but as is my usual, I changed some up a bit. The nose cone is removable for battery mounting as far forward as possible. The turbine access is through a huge belly panel only and no fuselage access panel on top (cleaner looking but a pain). The fuselage is in two sections joined right behind the canopy and canards; I wouldn't count on disassembly for travel but the airframe is not that overly large. The wings, vertical fin/rudder, and canards are joined by CF tubes and concealed aluminum clamps. There is a CF wing tube included. The landing gear appear to JP units with molded plastic scale-like strut sleeves.
The finish is painted after molding and bonding and is a very good representation of the full scale Rafale 2017 Solo Demo aircraft. There's a few small blems from sticky fingers and such but you really have to look hard. Not this subject but the Wind RC Viper's finish was excellent (except for the d....d live hinges)! My biggest complaint is that the live hinges are painted over and as soon as they are flexed the paint cracks and flakes. Can't take that much factory effort to place a 1/16" masking tape on the hinge lines so that there's a clean flexing without paint damage! The canopy was pretty clean with some light scratches that I polished out. The clear canopy was factory bolded to the frame, not too sloppy inside but I could have done better. I'm so-so about factory bonded canopy frames (CARF makes you do it yourself) since I really hate dealing with clear canopies. When you go scale...hey.
Biggest gripe so far is that there is no manual that I can find or get Wind RC to provide. It took repeated requests to get the recommended CG (a CG drawing is now on their website) and but they will not reply when asked about control throws. I understand a little that us turbine guys are all supposed to be experienced complex aircraft modelers but some basic setup info would be nice. Upon getting home from Chief I found that several servos were missing as were the gear and lighting control boxes. Freddie at Chief was very helpful in getting the missing parts sent from Wind but it took a while to get here. I previously listed the discrepancies in Chief's online description so beware if you order. The servos provided are from GDW that I know nothing about. I used the GDW's in my Viper so far with good results. I instead went with MKS HV9930's on the Rafale's control surfaces and thrust vectoring for more peace of mind. I did use the GDW's for the gear doors.
I'll post more photos and comments later.
The following users liked this post:
yeahbaby (03-26-2024)
03-27-2024 | 07:44 AM
#8
https://www.rc-network.de/threads/ki...le-jet.753790/
Lots of talk there ..google translator helps.
Main thing is that they move turbine forwards and get an extension for the pipe and save a lot of noseweight.
I still would like to buy one but I dont have transportation for it. Just too big.
Lots of talk there ..google translator helps.
Main thing is that they move turbine forwards and get an extension for the pipe and save a lot of noseweight.
I still would like to buy one but I dont have transportation for it. Just too big.
03-27-2024 | 12:35 PM
#9
Ceeray: Looked through the link and I don't really recognize the two(?) Rafales being discussed. Aviation Jets is mentioned for one - it definitely has a lot of differences with the Wind RC. The other looks familiar and I saw one mention of JMB; that seems to be the old owner or old name of Wind RC. The manual I found online for the Viperjet (not provided by Wind) was labeled JMB but the photo on the cover showed a Viper with "Wind RC" on it. So I guess the JMB is related to my Wind RC Rafale somehow.
I don't have a problem with balance on mine with the turbine in the factory position; I've installed a Kingtech 260 with two Powerbox flight batteries in the nose, retract battery mid-cockpit, and the turbine battery at the very rear end of the cockpit equipment tray. Additional nose weight that the guys needed in the link was likely because of bigger/heavier turbines or twin turbines they installed. Didn't like the implications of cutting the main wing tube to move the engine forward. The fuselage at the wing roots is not reinforced enough to take the resulting concentrated g loads (at least the airframe I have). The non-JMB Rafale I noticed had an access hatch on top for the fuel tank in addition to the one on the bottom.
I don't have a problem with balance on mine with the turbine in the factory position; I've installed a Kingtech 260 with two Powerbox flight batteries in the nose, retract battery mid-cockpit, and the turbine battery at the very rear end of the cockpit equipment tray. Additional nose weight that the guys needed in the link was likely because of bigger/heavier turbines or twin turbines they installed. Didn't like the implications of cutting the main wing tube to move the engine forward. The fuselage at the wing roots is not reinforced enough to take the resulting concentrated g loads (at least the airframe I have). The non-JMB Rafale I noticed had an access hatch on top for the fuel tank in addition to the one on the bottom.
Last edited by GoldenEagle1; 03-27-2024 at 12:38 PM.
03-27-2024 | 12:56 PM
#10
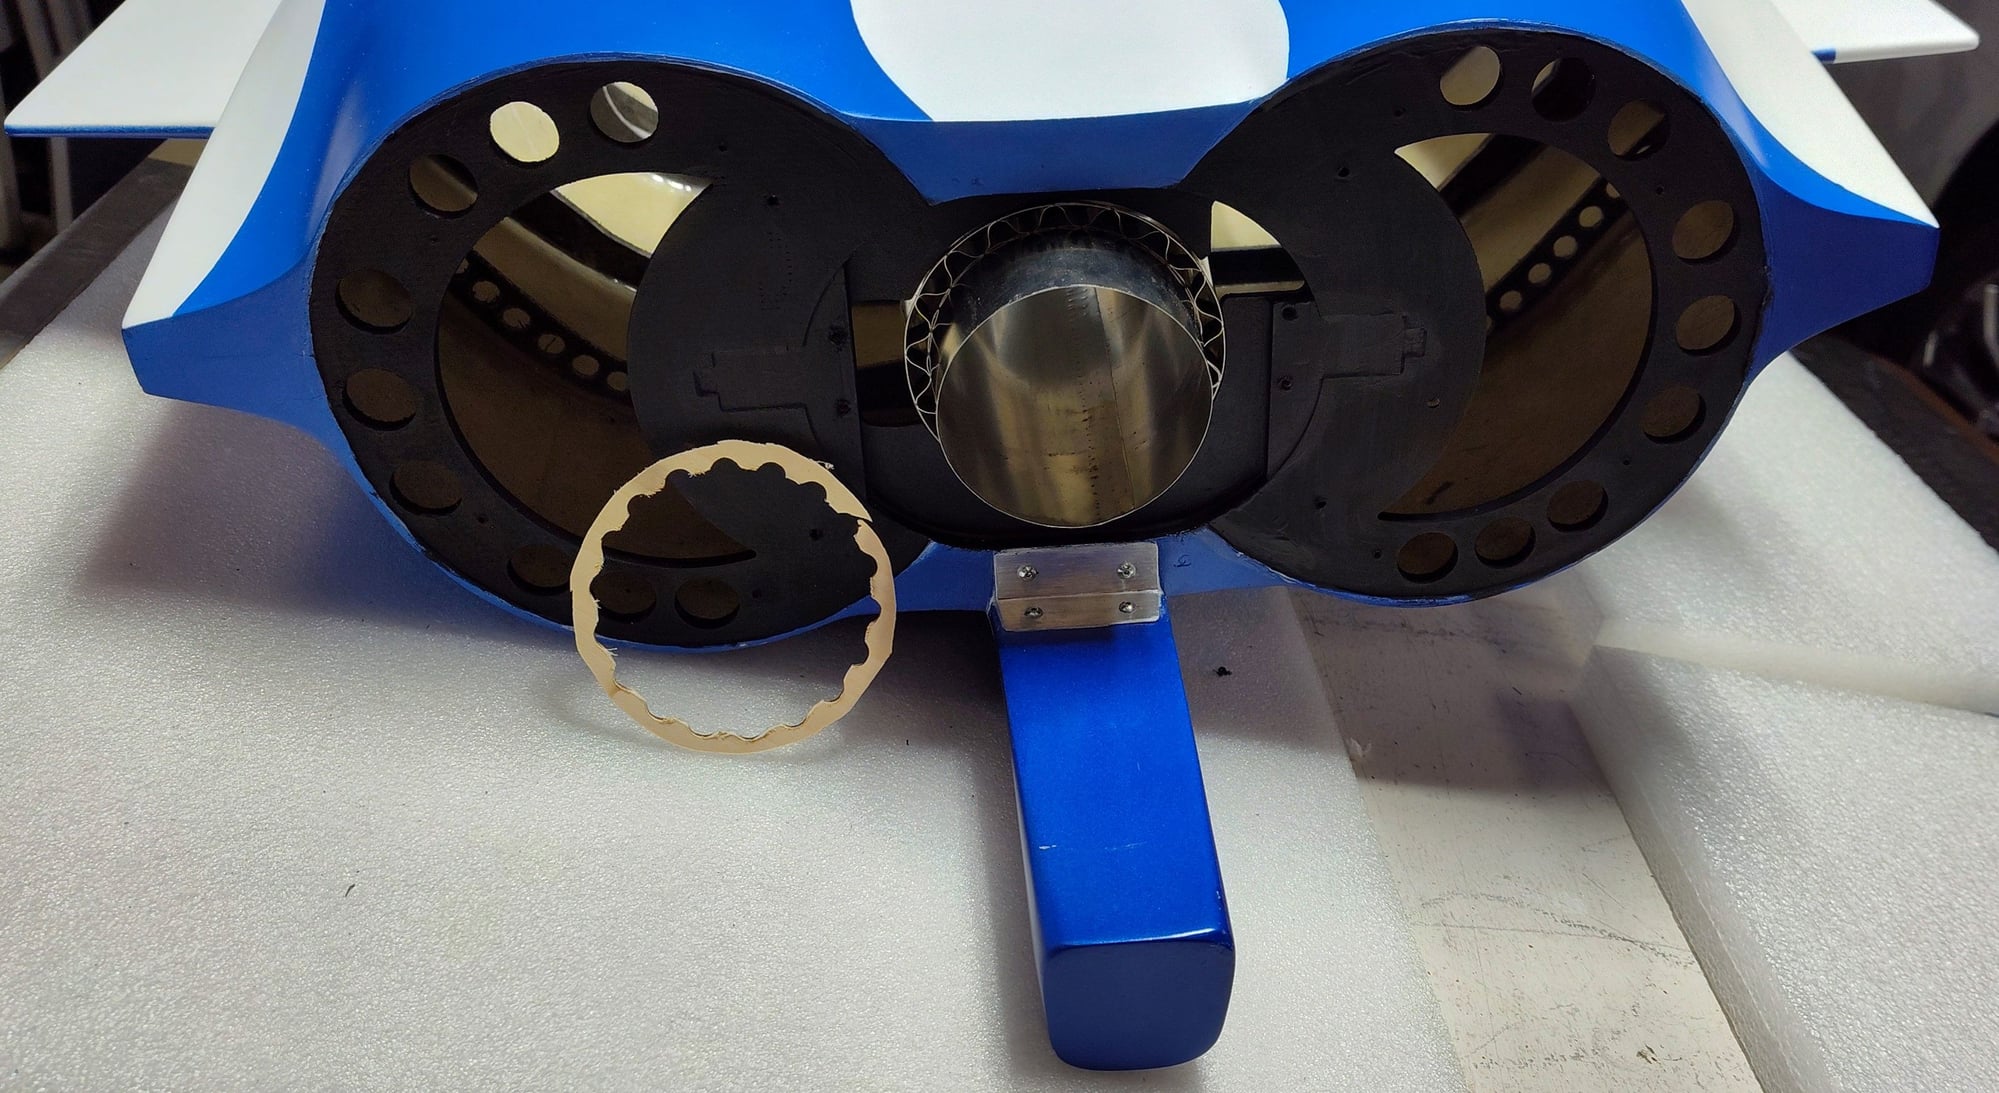
Fuselage bottom hatch - kinda' looks like a hydroplane at this point! Plenty of room for twin turbines if you wanted. Hatch is all carbon fiber so is really stiff.
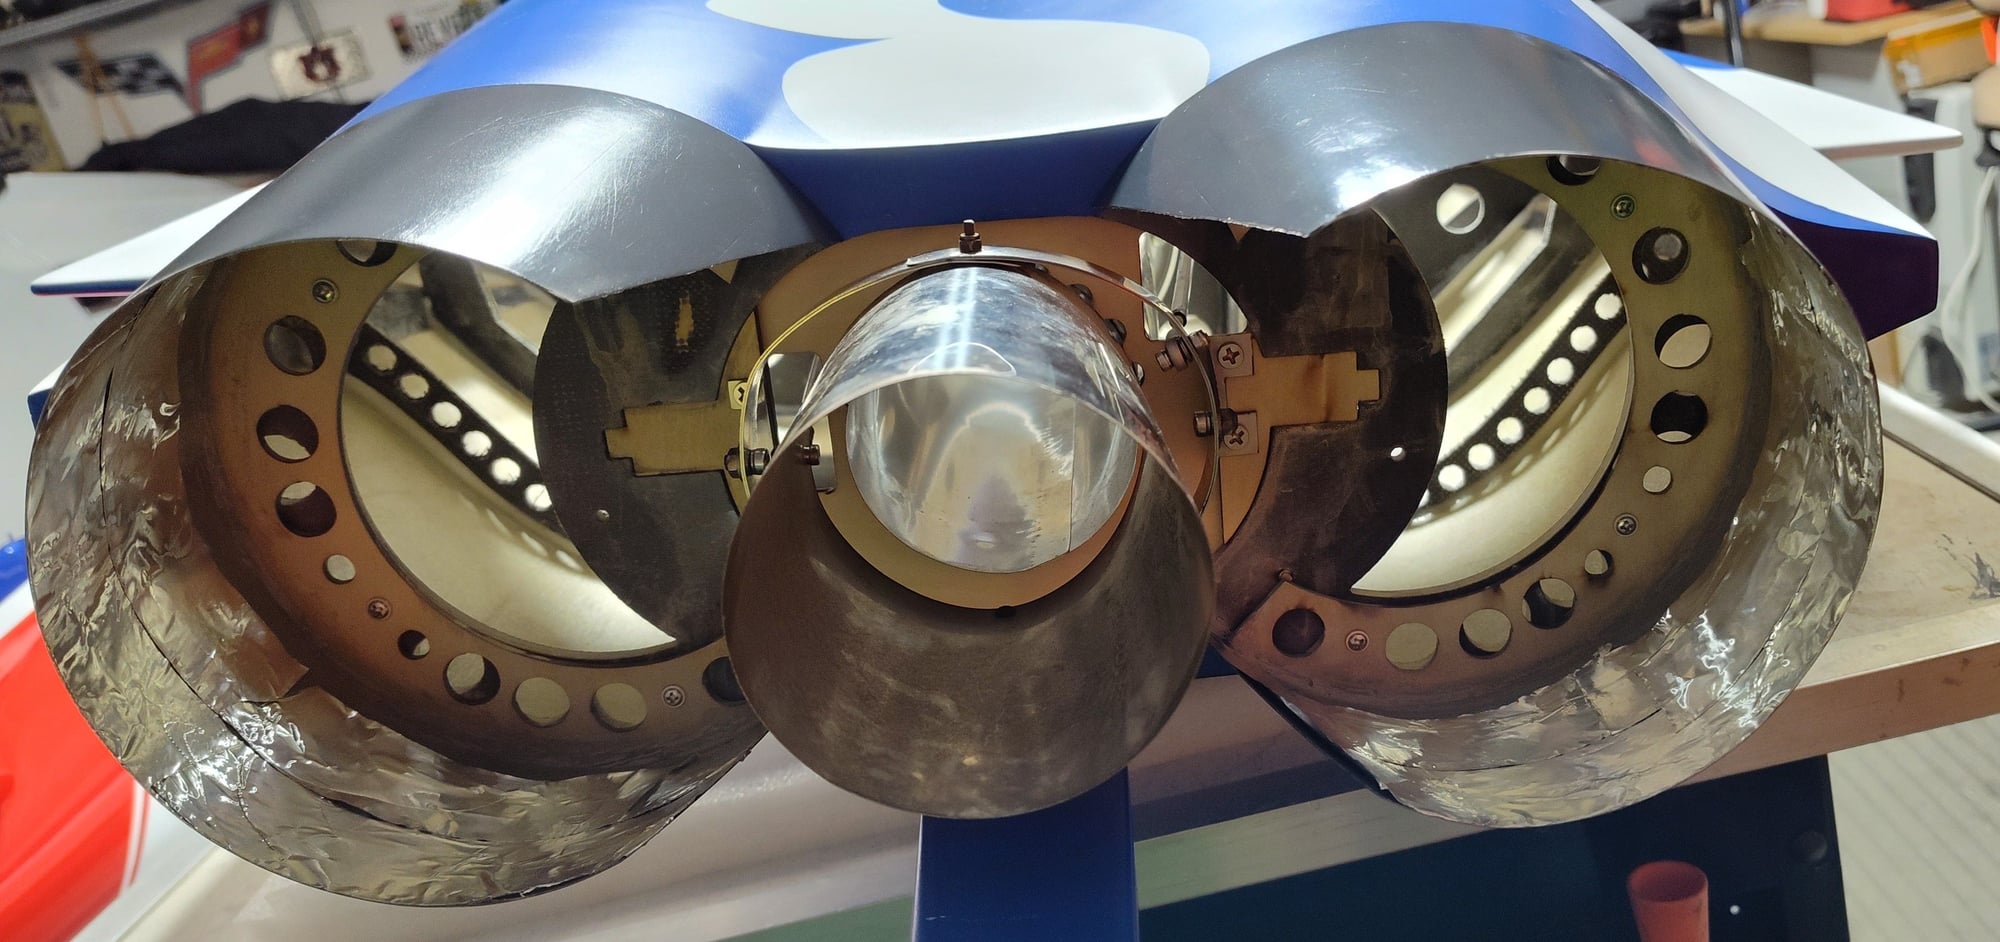
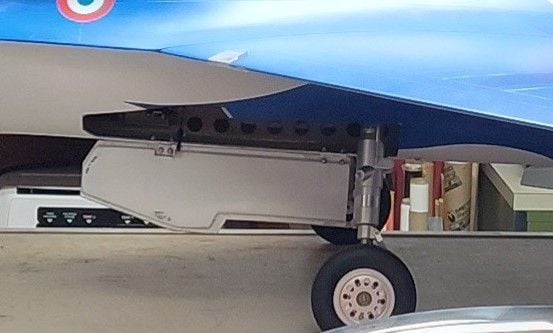
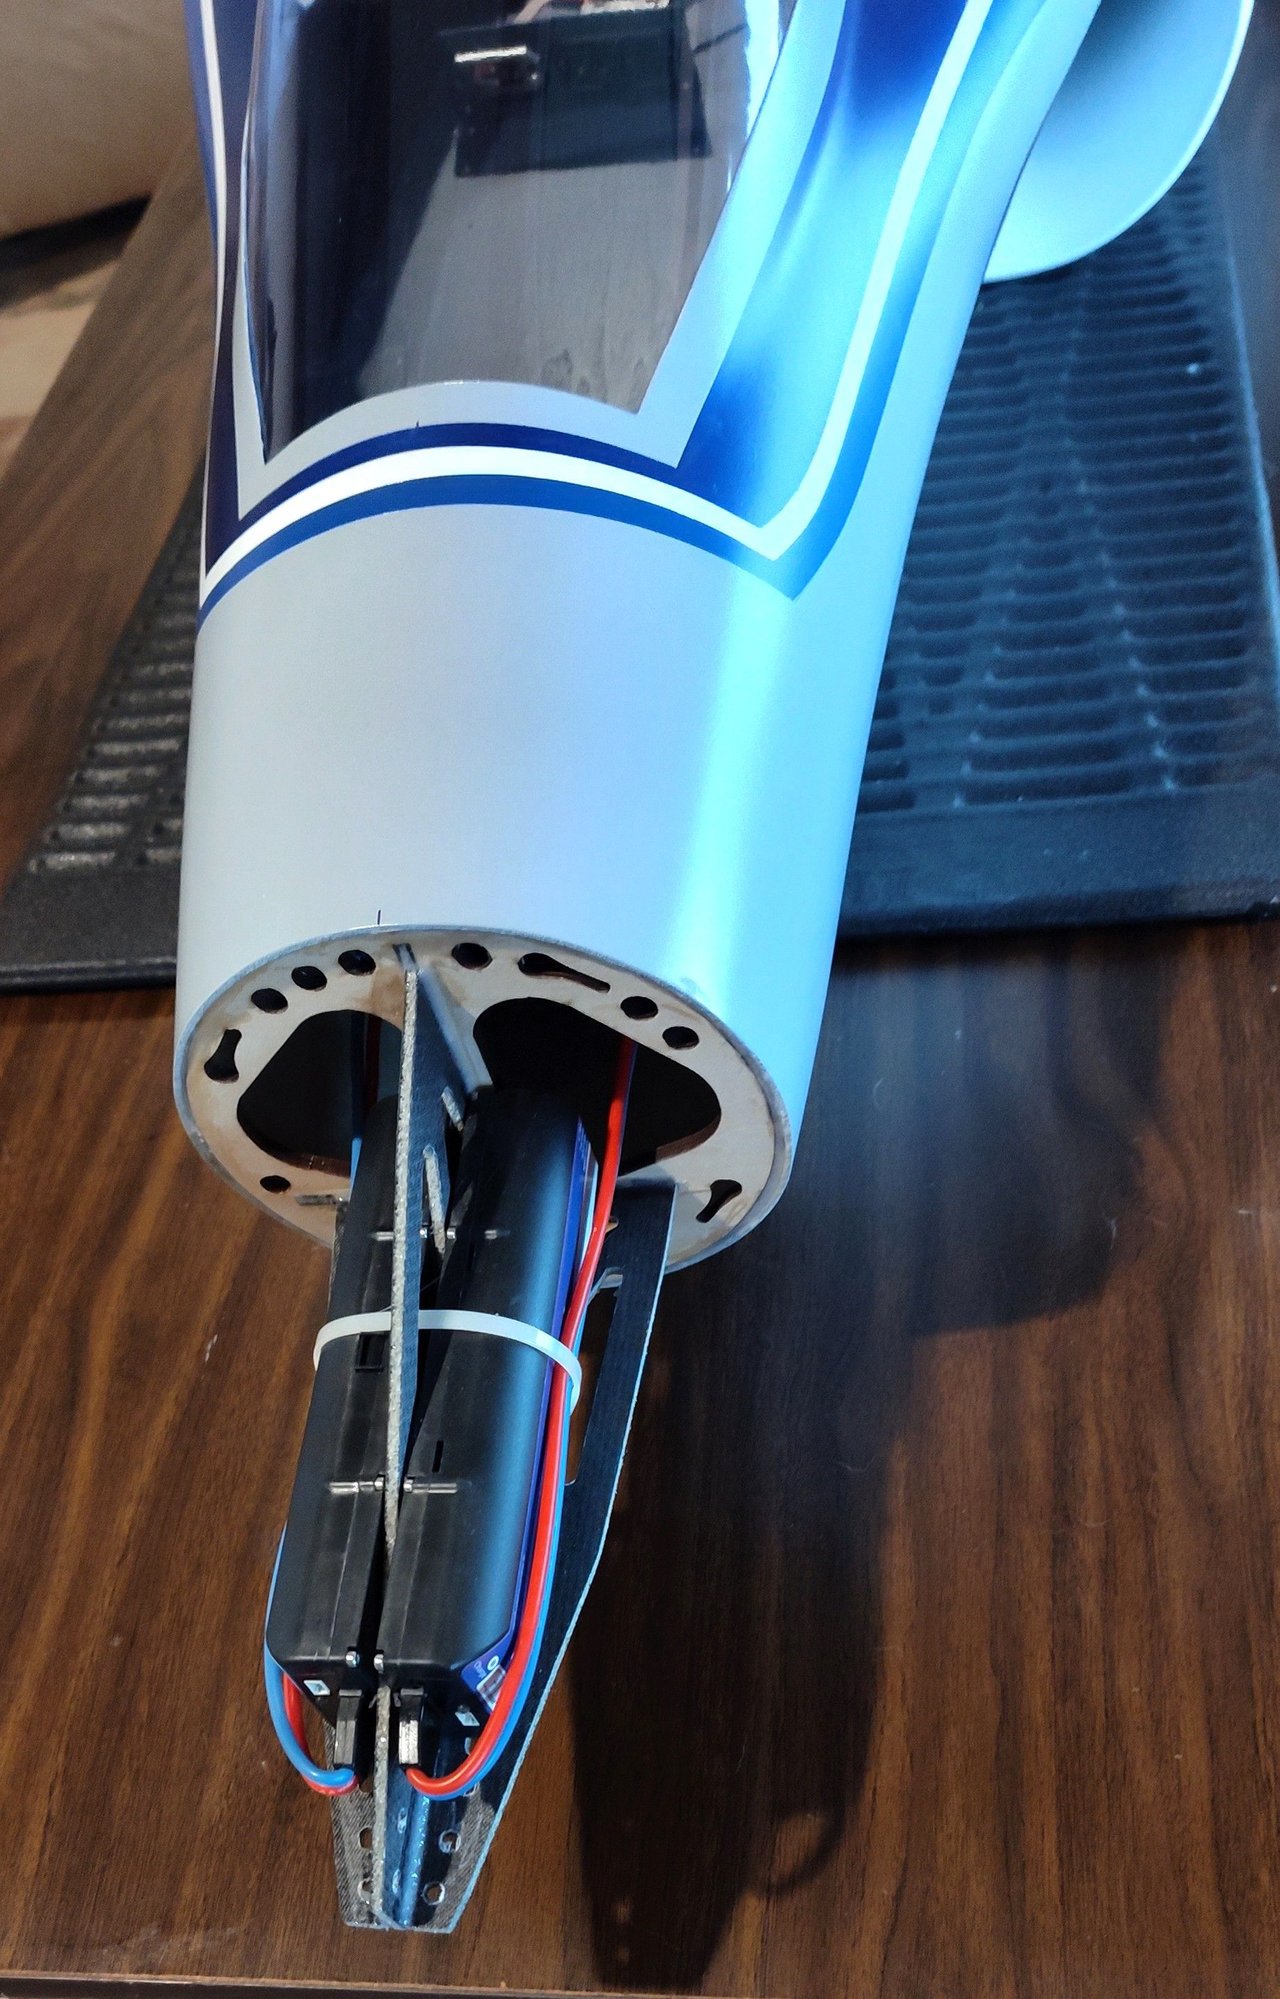
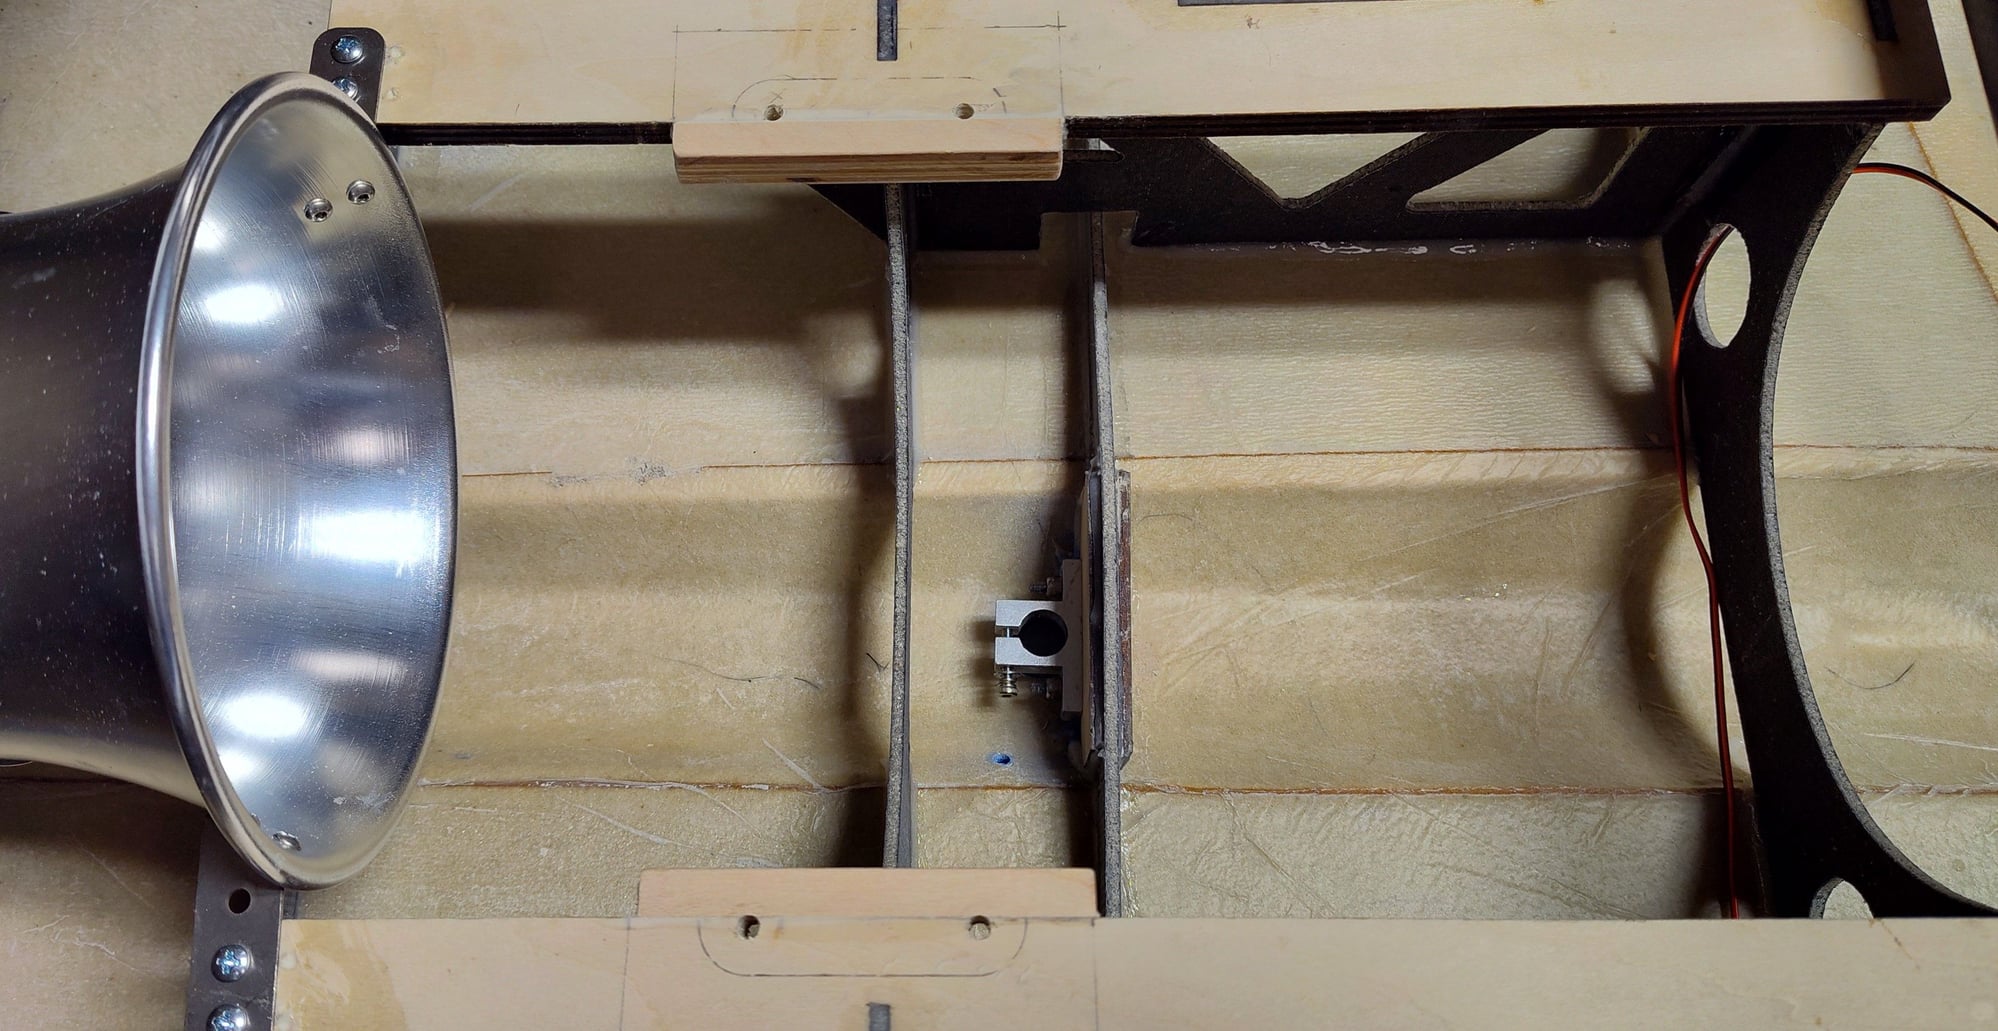
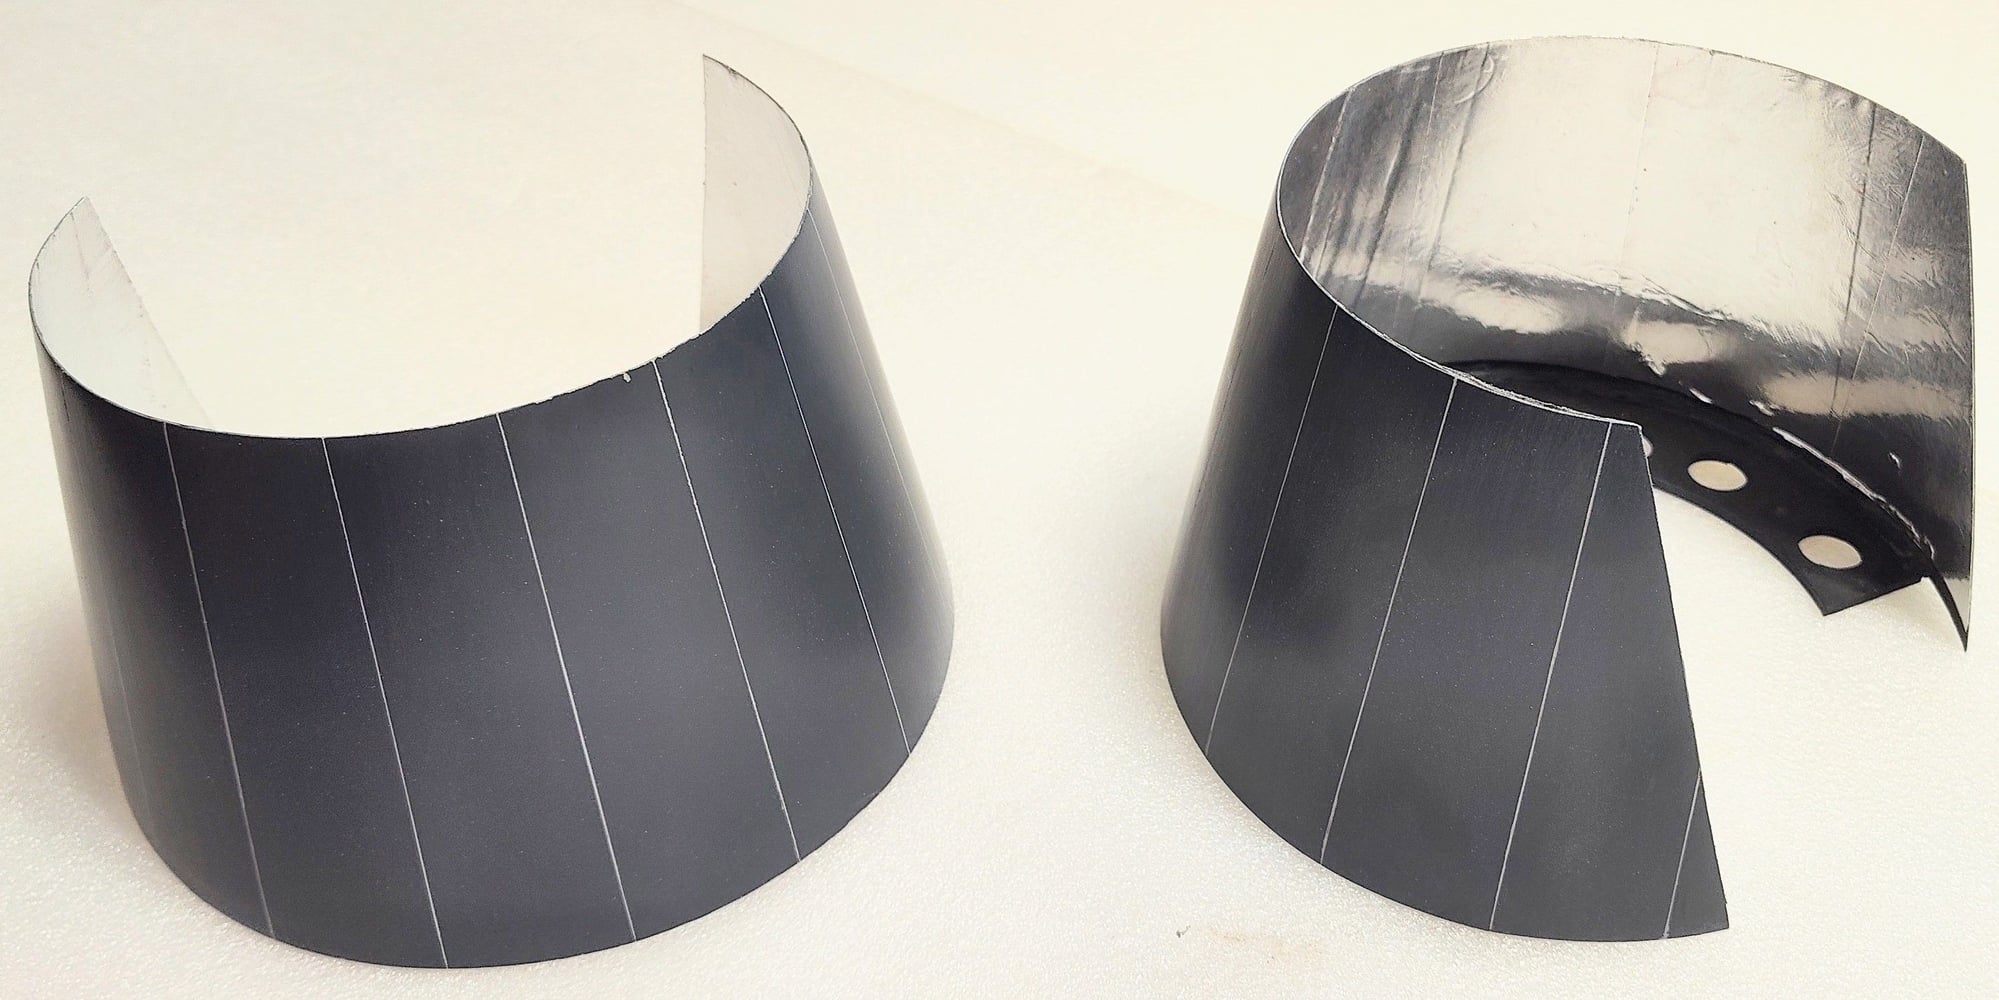
TV tailpipe and scale nozzles. A couple of problems here: The tailpipe outer wall stops inside the wood former opening placing the single wall touching the wood. I'll show my mod in a following post. Aluminum tape sloppily applied in the side nozzles.
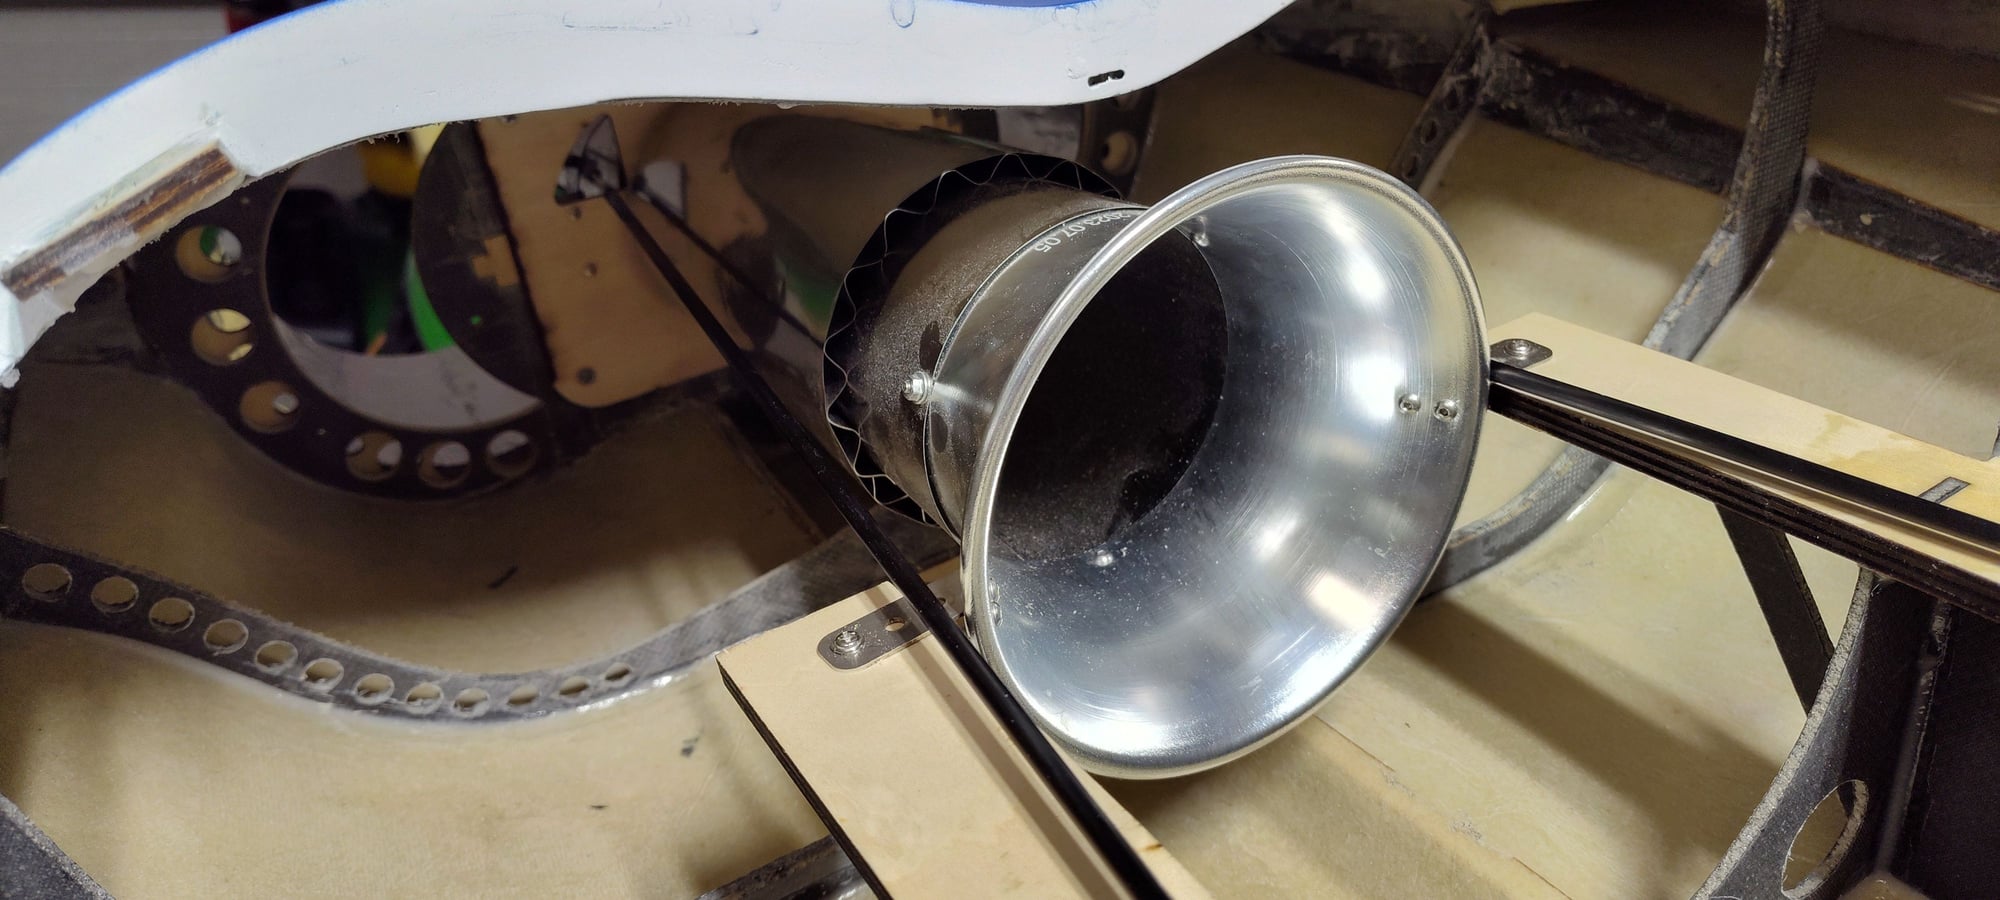
Turbine tailpipe Bell and mounting rails. TV pushrods visible each side. I'll post photo of this area with the installed stuff.
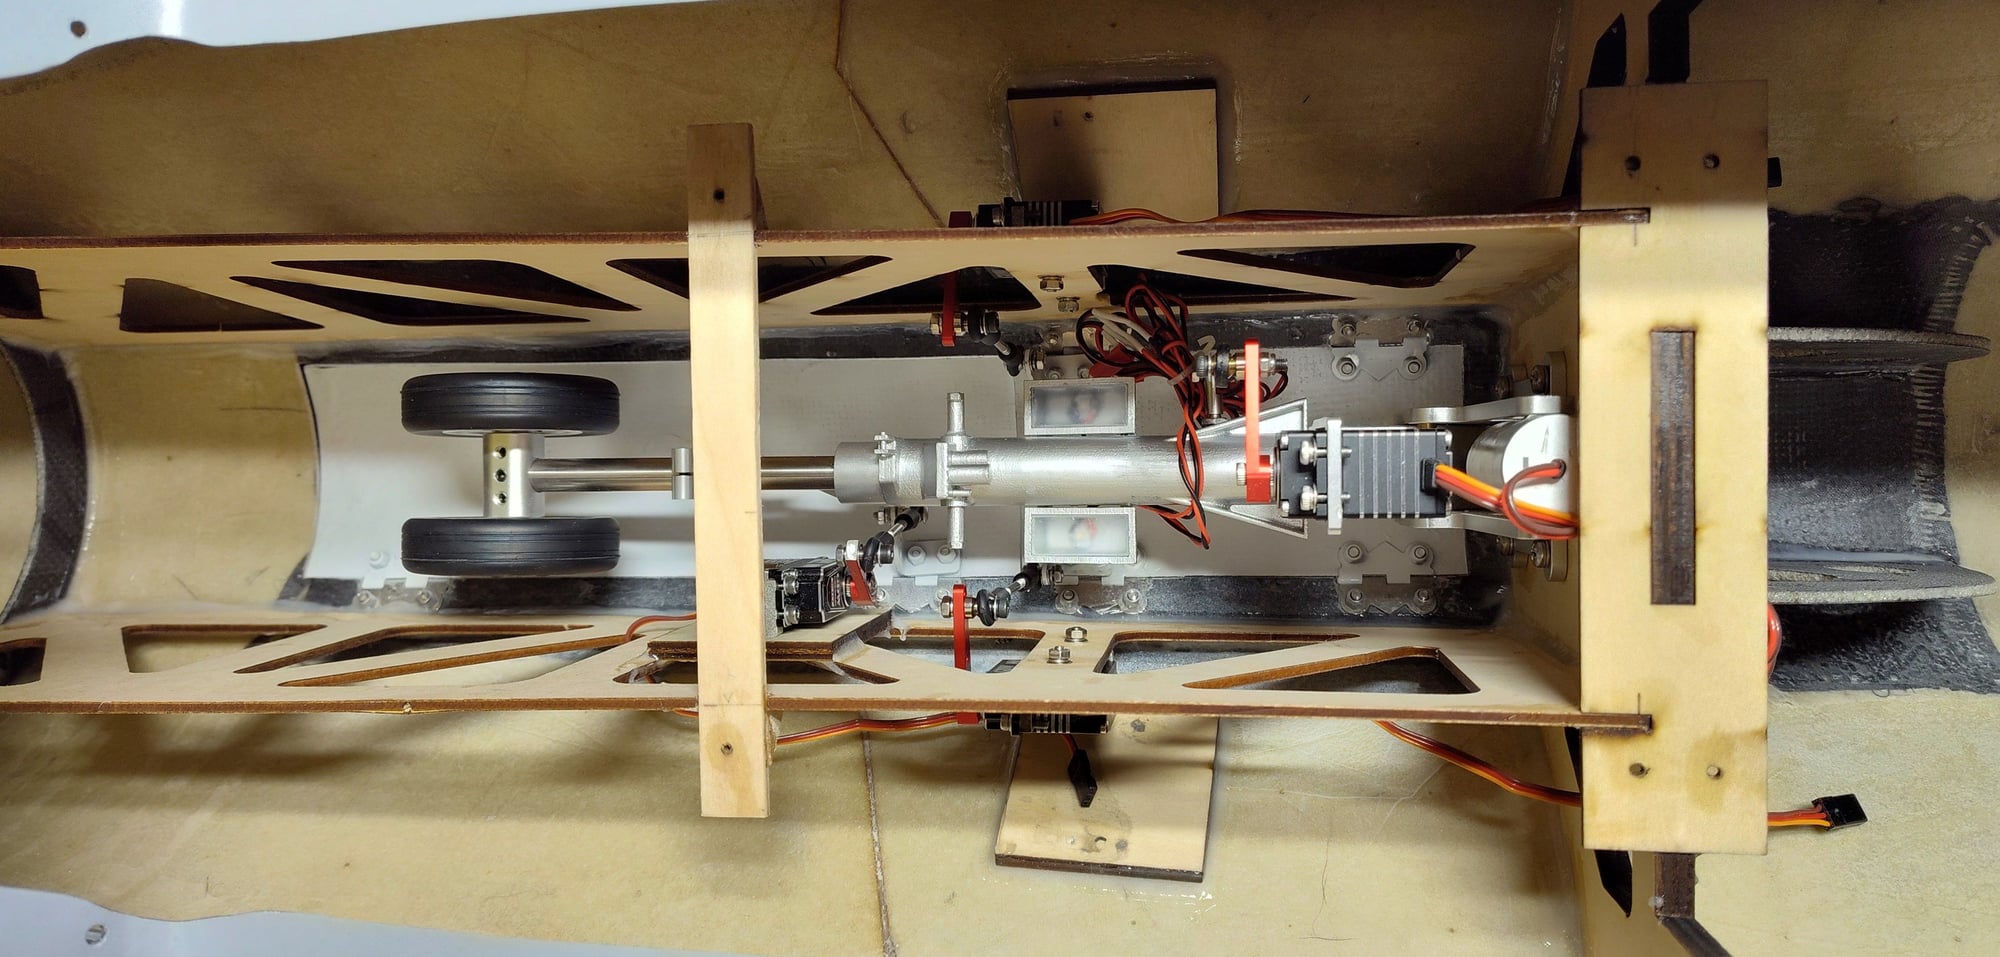
Nosewheel well: 3 gear door servos - two rear ones are mounted on the vertical frames rather than the pads glued to the fuse skin. Added the center cross brace to stiffen frames for servo forces and to add a couple more screws at the cockpit floor.
03-27-2024 | 01:17 PM
#11
Nose cone battery location works nicely - just rotate to remove and charge my batts. Room to add other batts behind the bulkhead but not necessary for my cg.
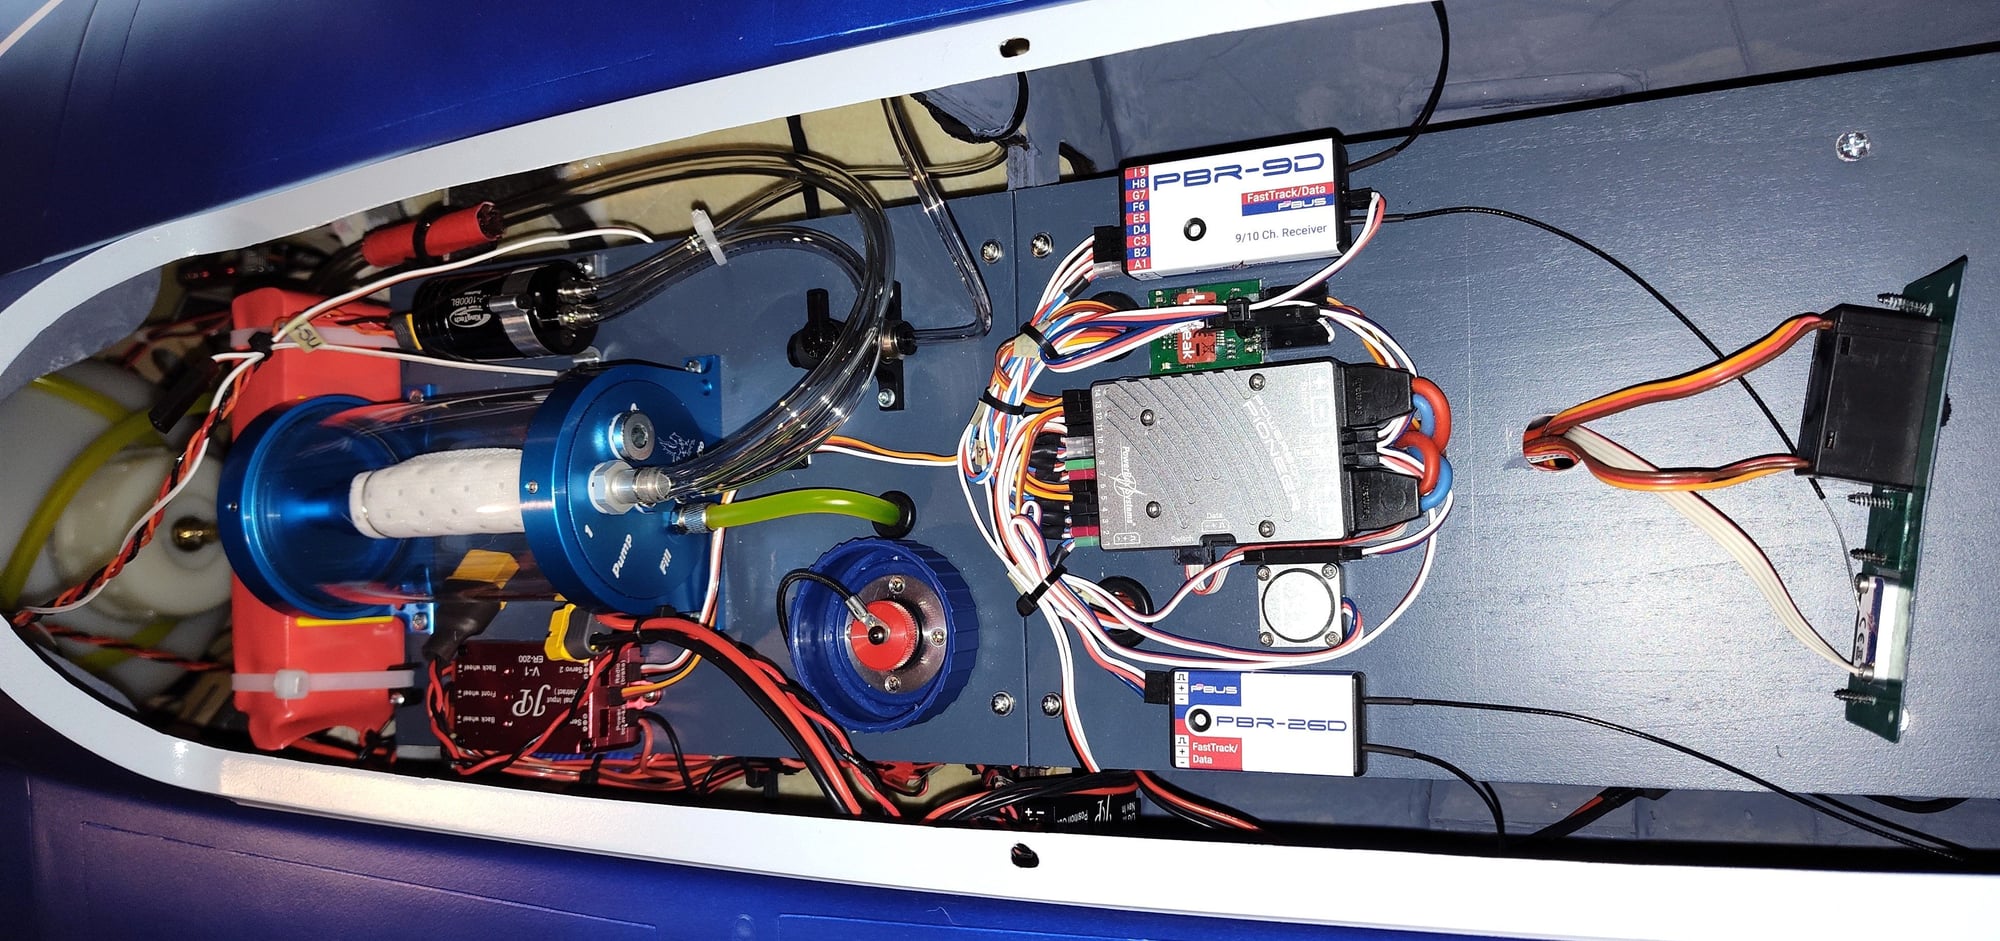
Equip tray aft of the cockpit seat: Powerbox gear, V-speak Telem, fuel filler, valve, pump UAT, gear controller. ECU battery behind the UAT. Power and retract switches to the right will be mounted in the back of the seat box. Can barely see the fuel tank in the back - Turbine ECU mounted on a tray in front of tank. This is all concealed with the canopy in place.
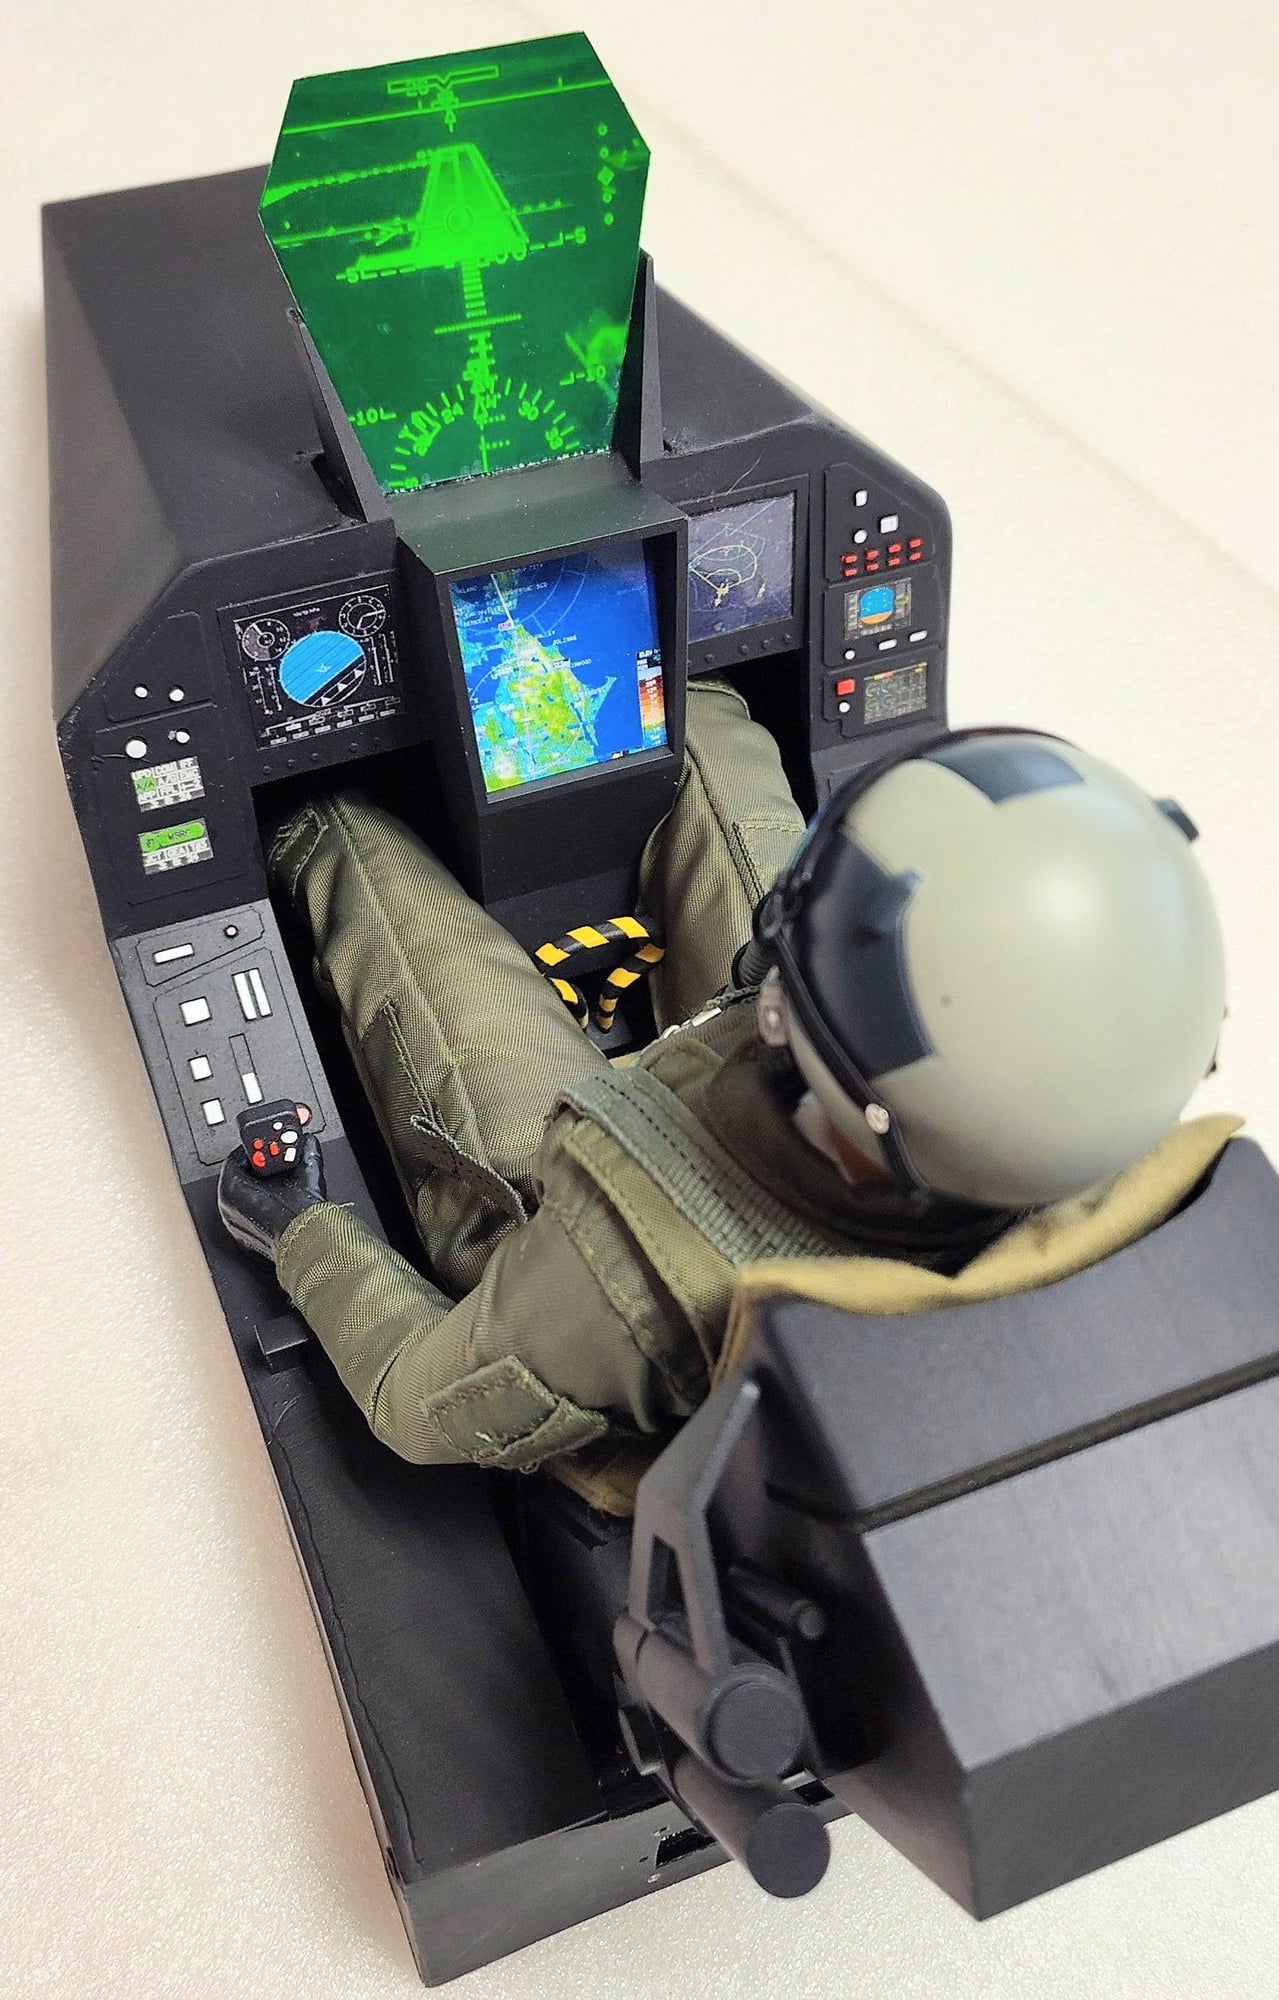
Nice provided cockpit unit but instrument faces were very poor. Found the full scale correct images online and printed / laminated to fit. HUD plate was not provided so I made one again from an online image. I'll be glad to send these to anyone who asks.
 03-28-2024 | 04:54 AM
#13

My Feedback: (1)
Nice work! Thanks for starting this thread. I have always been curious about these kits and their quality. One thing I noticed is that you are using a fuel cap that I think has been intended for a vent. (see pic attached). The one you want to use doesn't have a screw on top that might cause an air leak and is black. If a leak occurs on the fill line you will flameout... In fact, some of us install a manual valve on the fill line to add one more level of safety there. Other than that consider adding safety wires to your fuel lines. I learned the hard way that delta jets don't glide very well after a flame out 
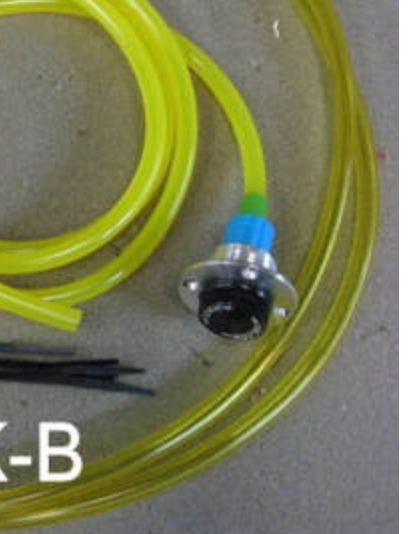
Last edited by acw; 03-28-2024 at 04:57 AM. Reason: Attaching pic
03-28-2024 | 06:22 AM
#14


My Feedback: (21)
Don’t know how you intend to transport but I recommend checking engine install bolts / screws after a long drive or even a short bumpy drive to the field. Vibration down the road could create wear and tear on the threads and eventually loosen the bolts / screws, especially in this configuration where engine is mounted inverted etc. just a friendly reminder.
03-28-2024 | 06:45 AM
#15
The red filler cap with a lanyard is an alternate provided in the Jersey Modeler jet kit. The vent plug is 'T' shaped with a "Remove Before Flight" flag. Been using the same filler cap on my AreS XL for about 100 flights with no problems. All fuel lines are safety wired except for where the tygon line from the filler cap goes into the UAT where it has a screw-on clamping sleeve.
Last edited by GoldenEagle1; 03-28-2024 at 07:14 AM.
03-28-2024 | 07:14 AM
#16
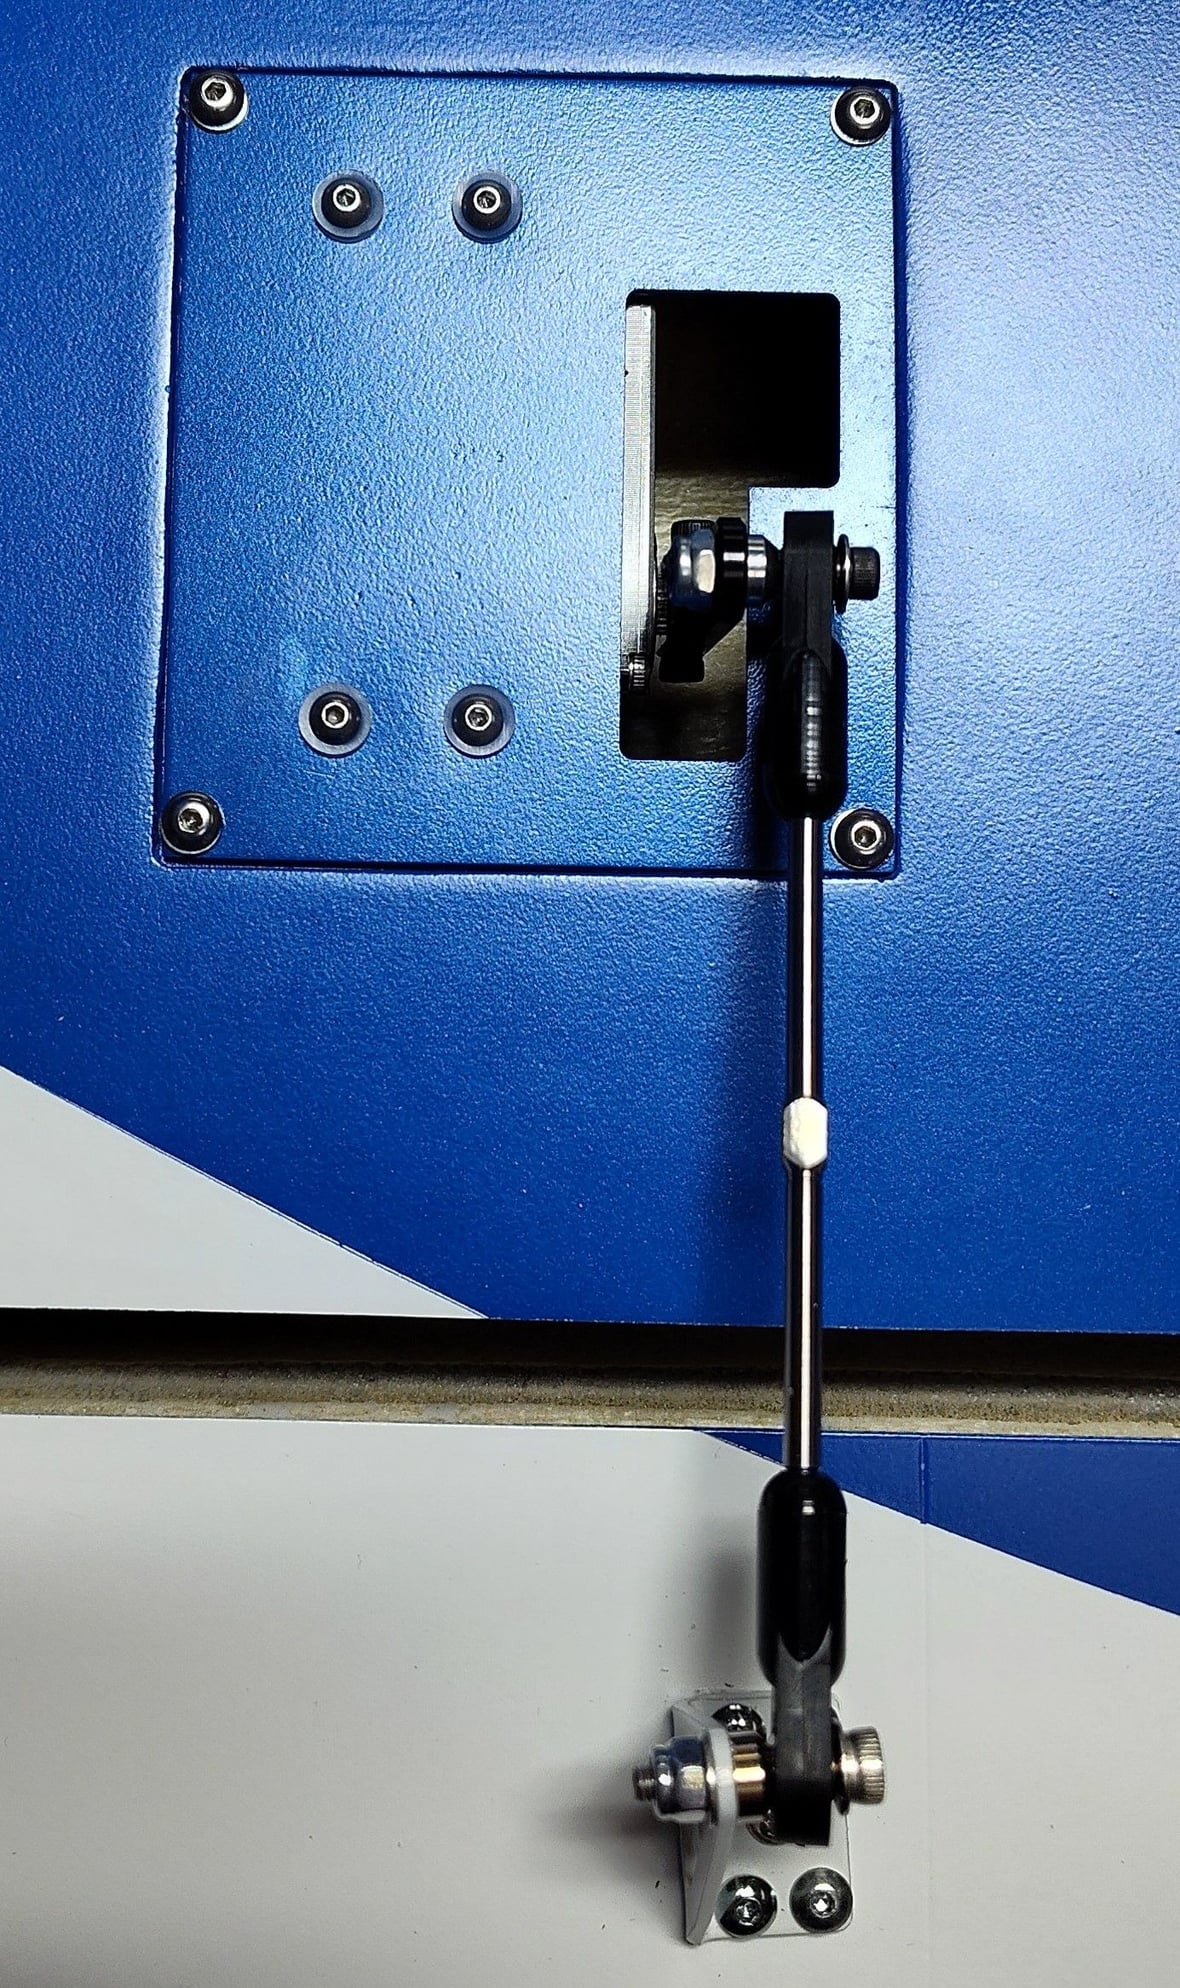
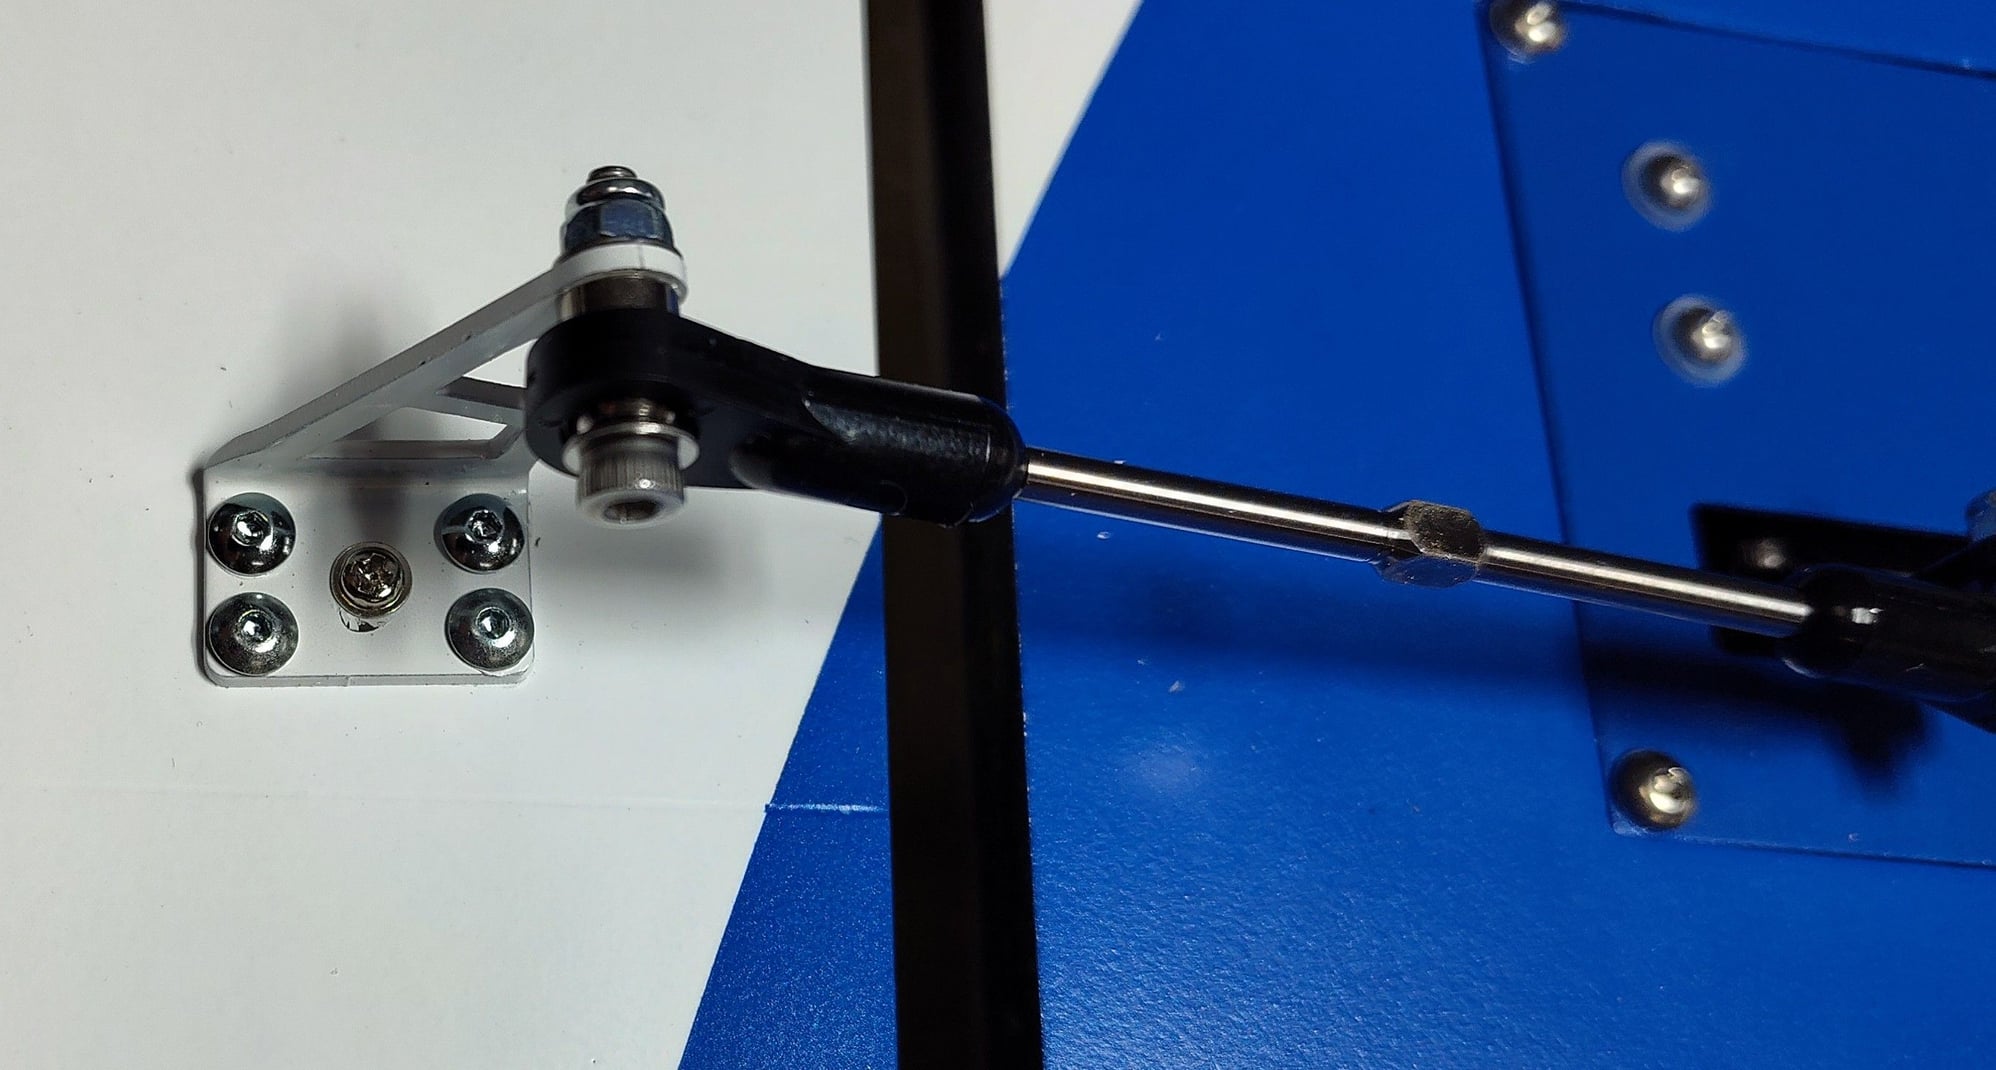
Added laminated ply engine mounting rails that lap under the existing rails. Below that you can see the typical clamp that holds one of the rudder posts. I added a washer and lock washer to each of the machine screws for safety. There are two at the rudder, two each at the wings, and one each at the canards. Checked all the screws where the clamps are attached to the structure; some were loose.
I cut the opening in the rear former to allow the outer insulated tailpipe to pass through. See the aluminum brace I added at the "stinger". With nothing installed in the fuse I picked the rear up by the stinger and it broke off. I epoxied it back on and added the reinforcement because I knew I couldn't resist grabbing it again someday. The TV mounting blocks were loose and needed epoxy and plywood reinforcement from the inside. I added black paint.
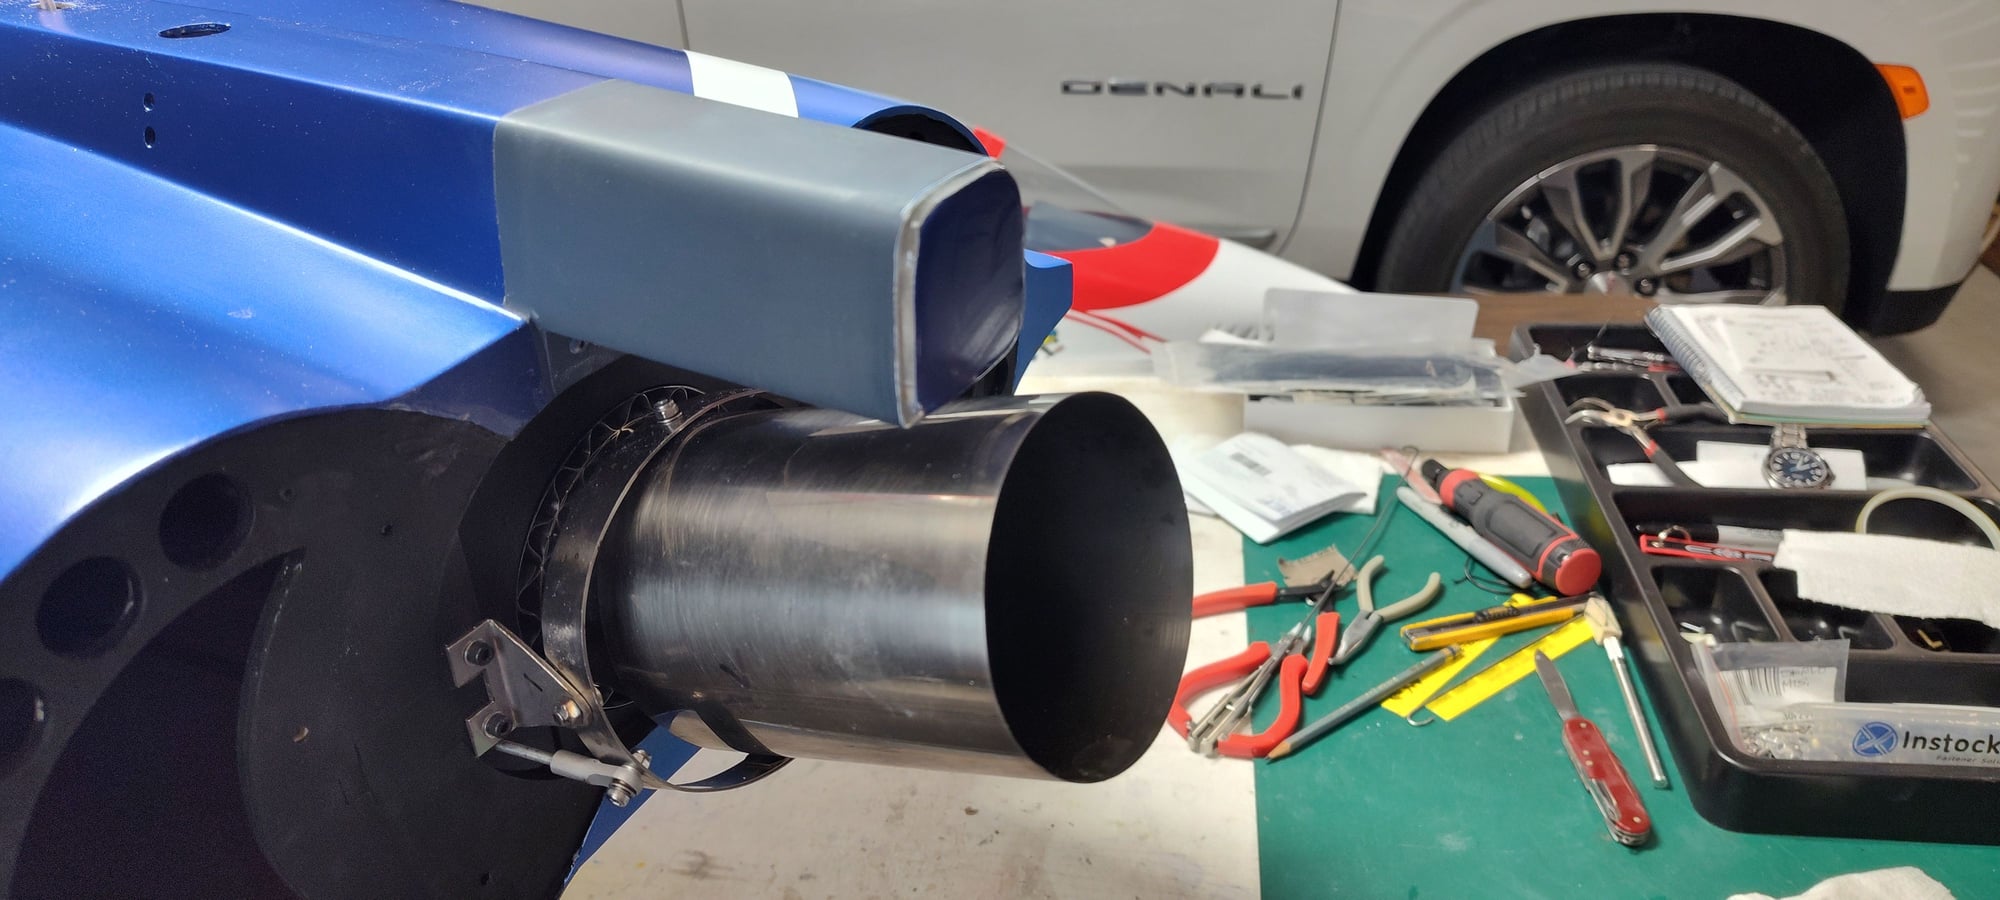
TV pipe installed (need some bending and tweaking to get it centered). The original stinger length really blocked the upward travel of the TV so I cut it about 1 1/2" shorter and bonded the end cap back in place. Will add some aluminum tape on the underside after painting.
Nozzles were a shiny dark gray paint so I scrubbed them with a scotchbrite pad to make them more scale-like. The vane lines were extremely faint under the paint so I scribed the lines to emphasize. Black paint on the mounting rings and lined with aluminum tape. I'm looking at some EDF "Centerburner" LED's for these.
03-28-2024 | 07:18 AM
#17
Yeahbaby: Thanks - good advice. I use machine screws with locknuts on the engine mounts and most everywhere else. Locktite every other machine screw. Still good practice to check once in a while. Generally I replaced every wood screw with thru-bolts and locknuts everywhere there was access to the back of a mounting.
Last edited by GoldenEagle1; 03-28-2024 at 08:43 AM.
03-28-2024 | 07:26 AM
#18

Why couldn't they have painted the inside of the nav light recesses before gluing the lens in place!!?
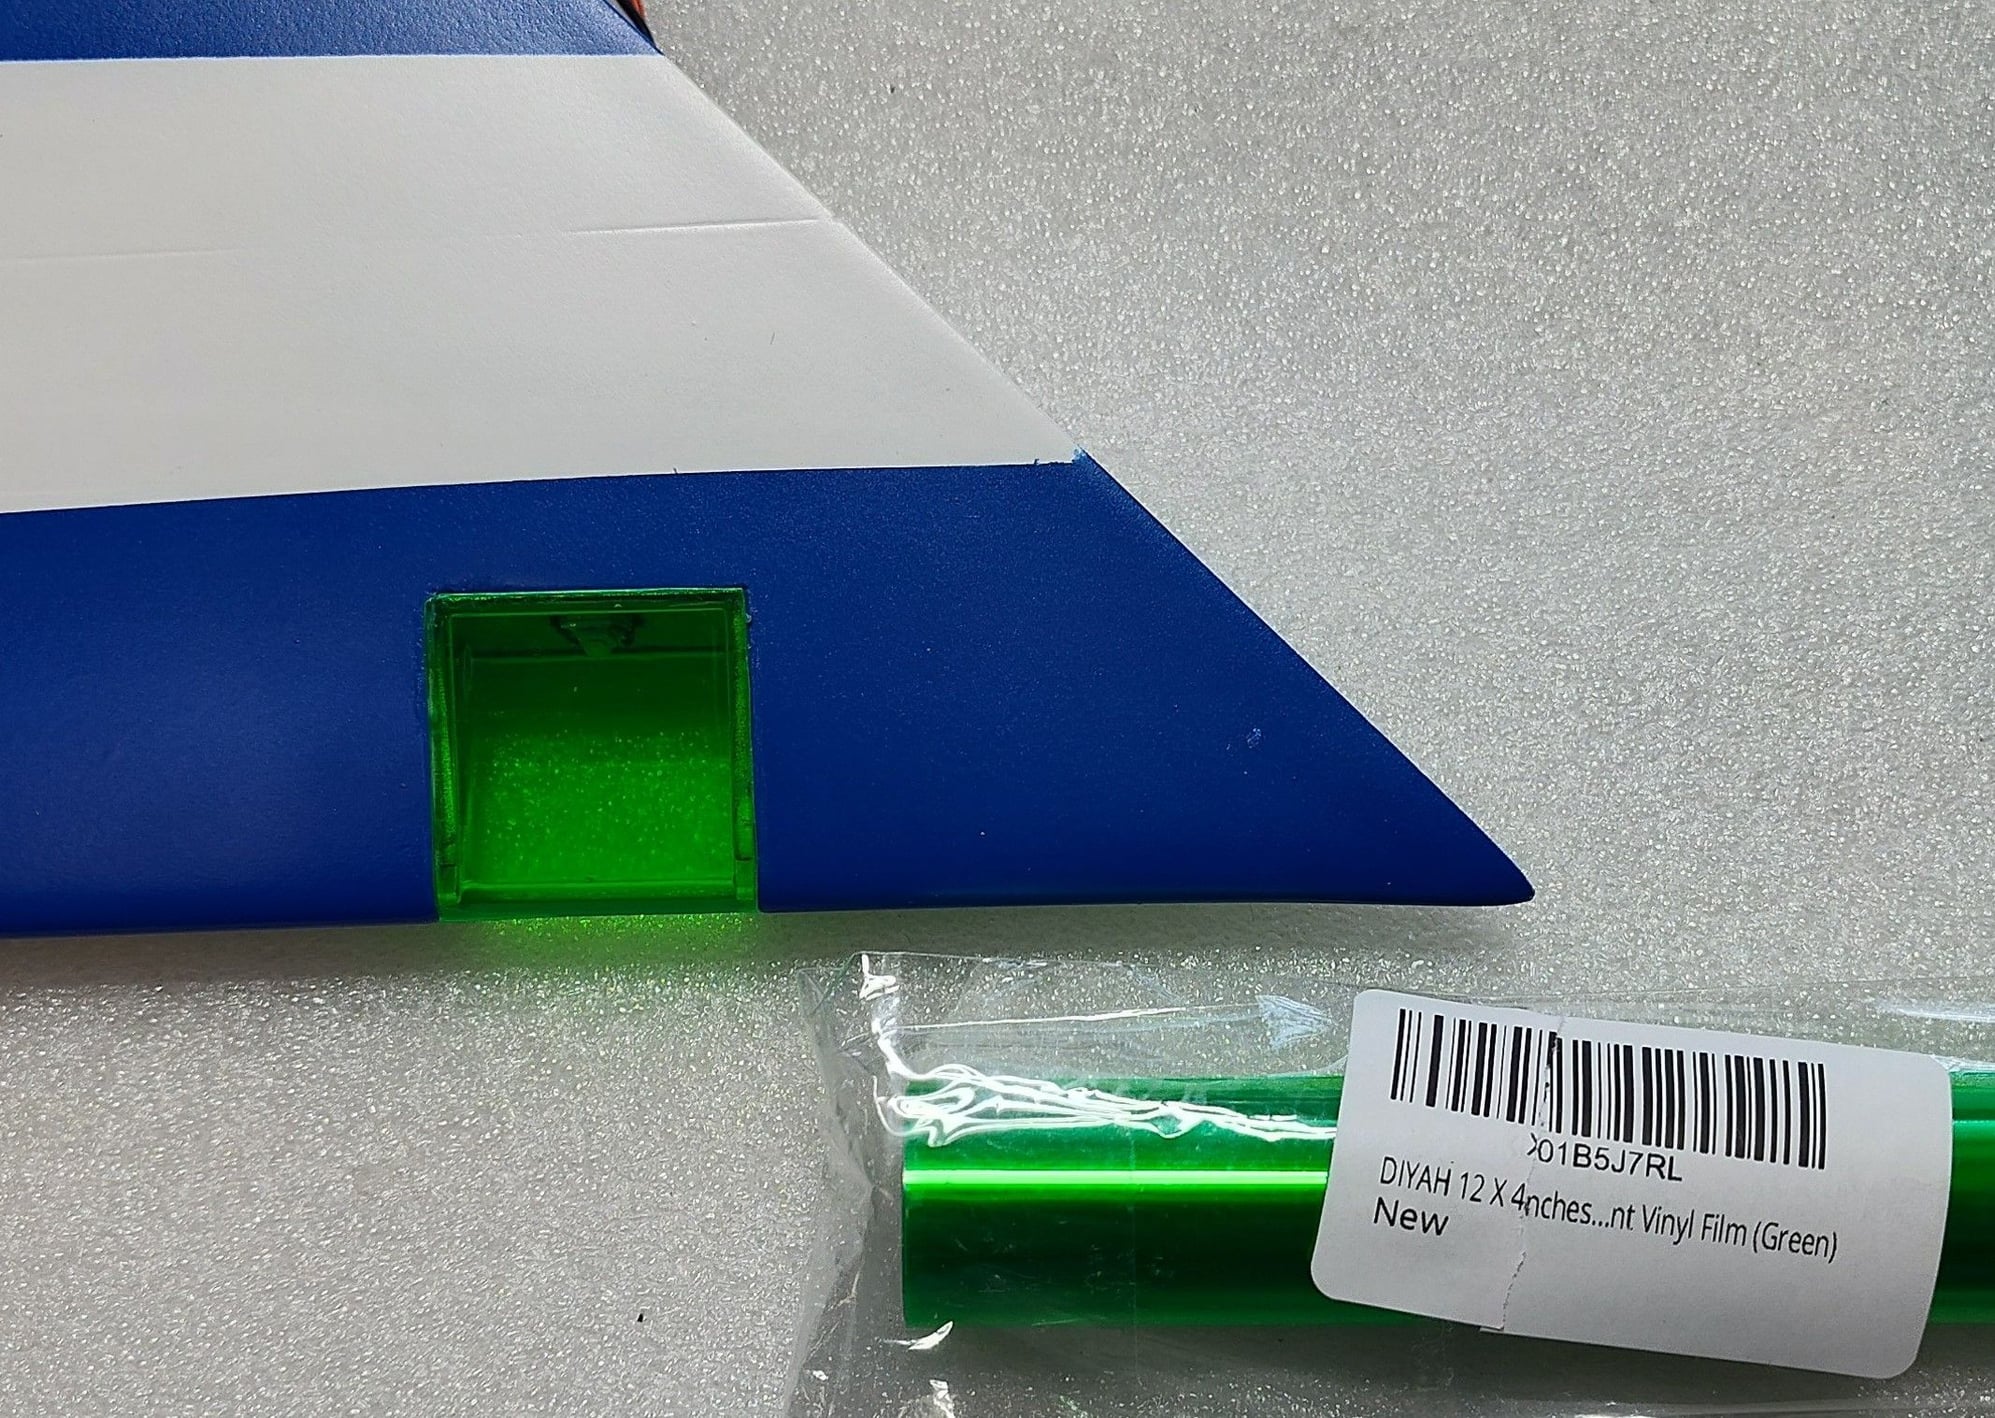
Amazon provided the solution - found these tinted films in red and green.
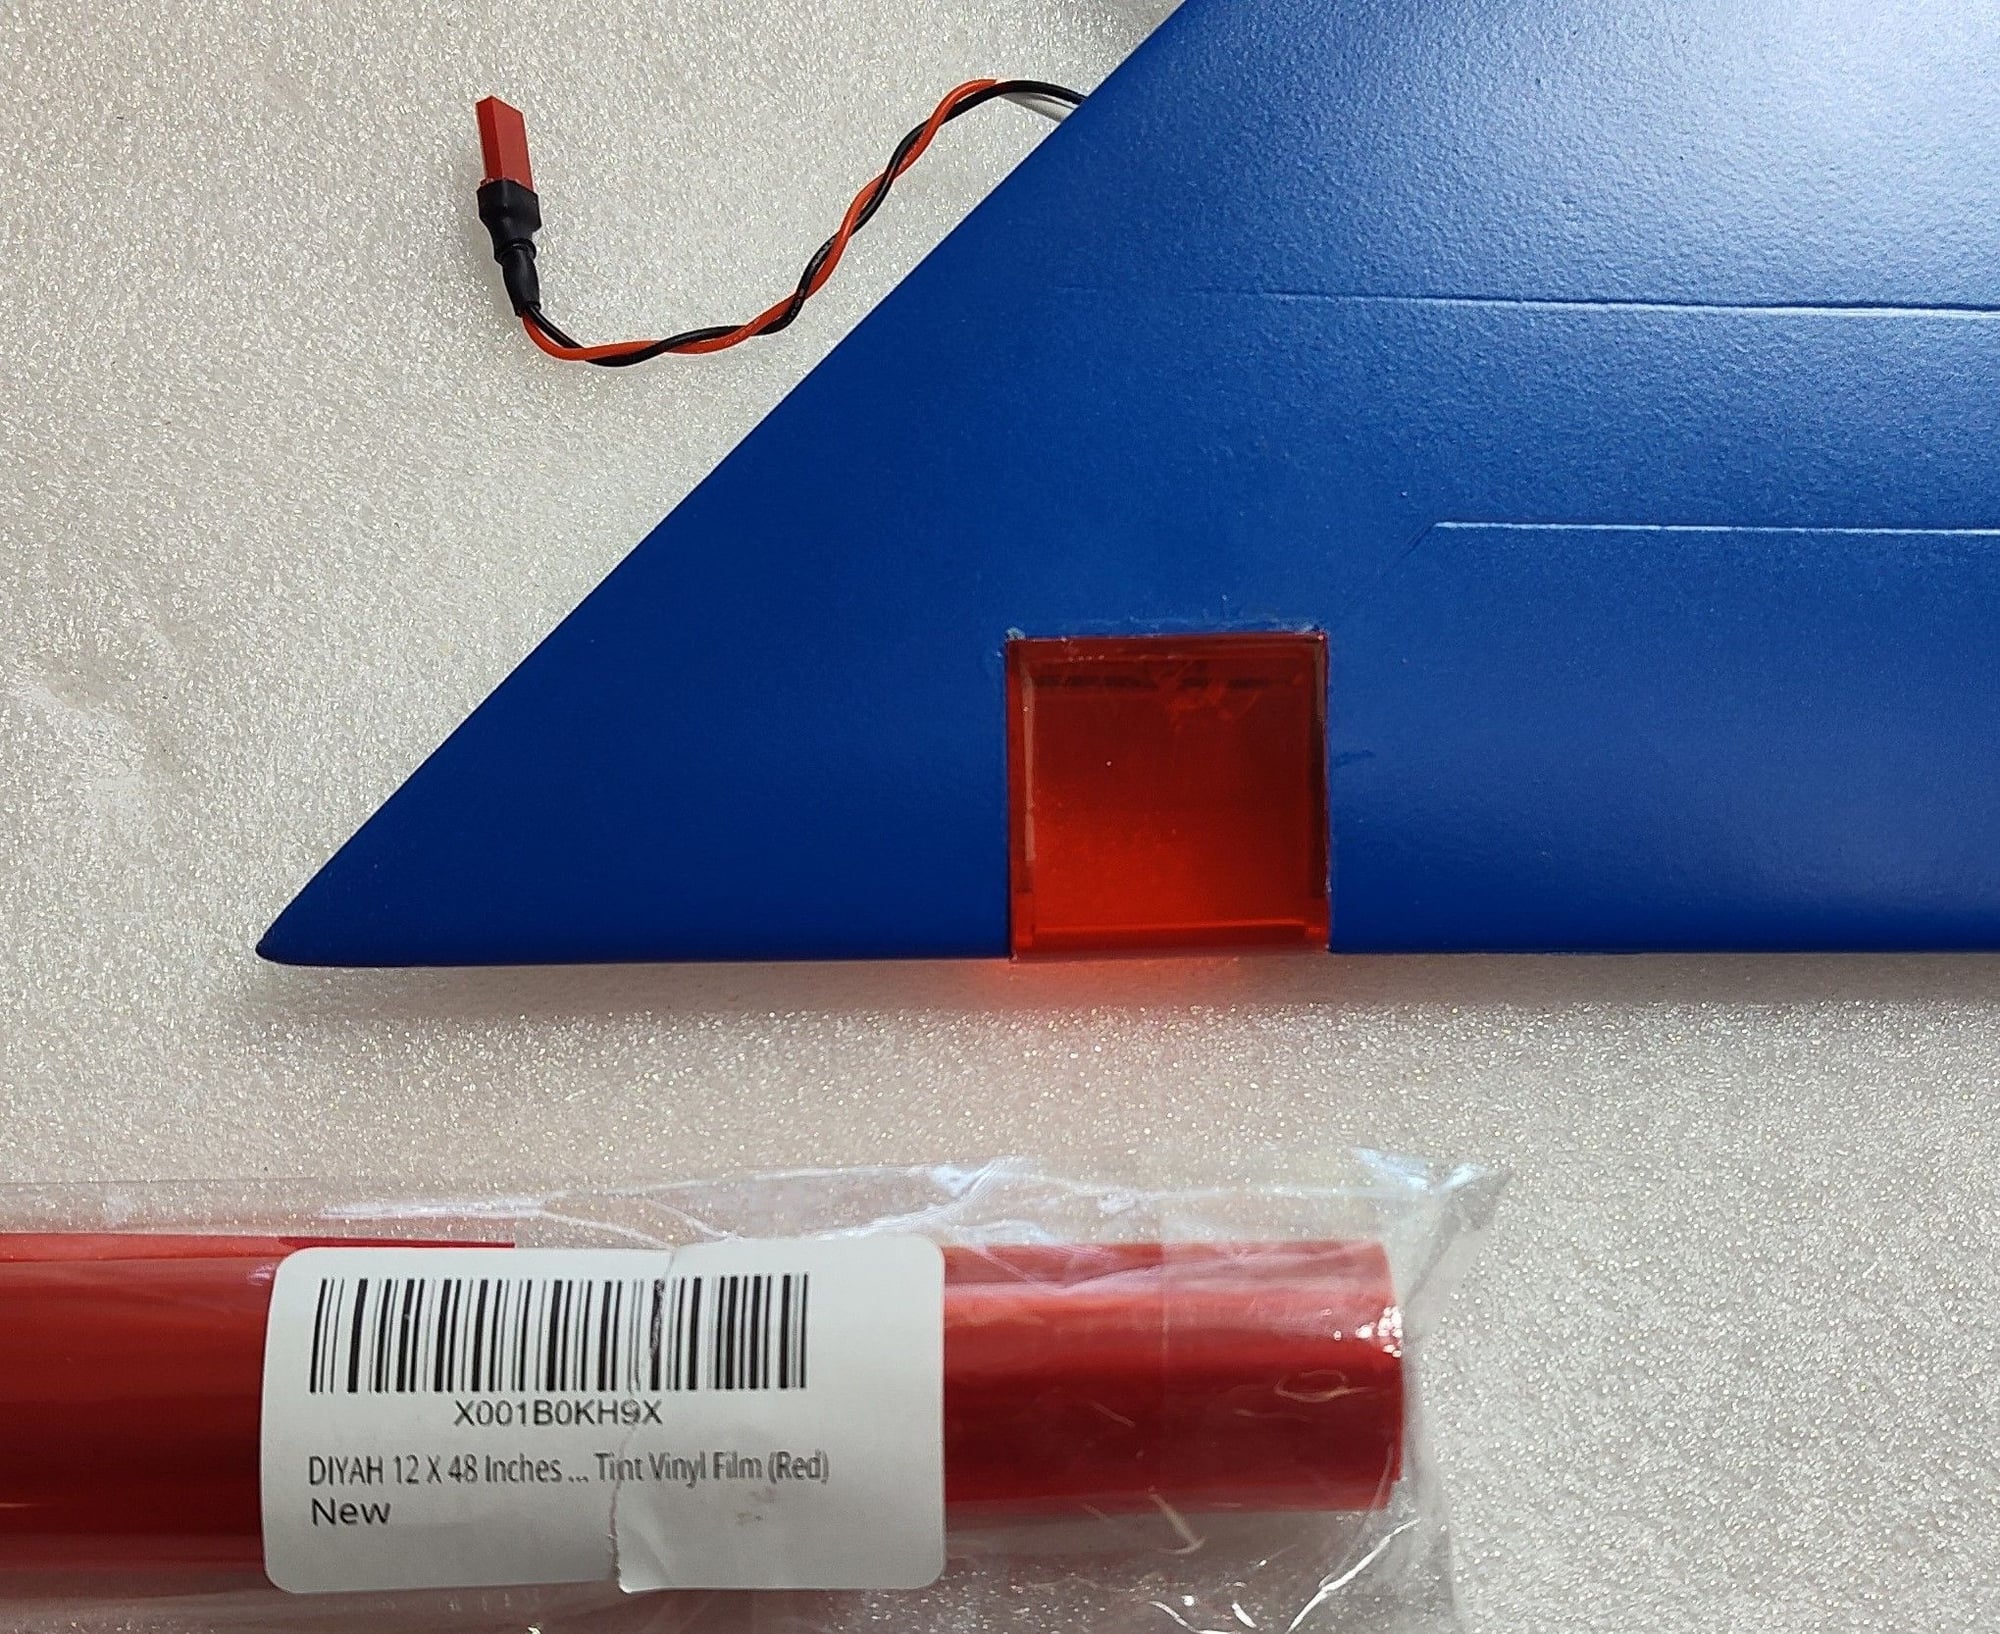
Not bad if I say so myself.
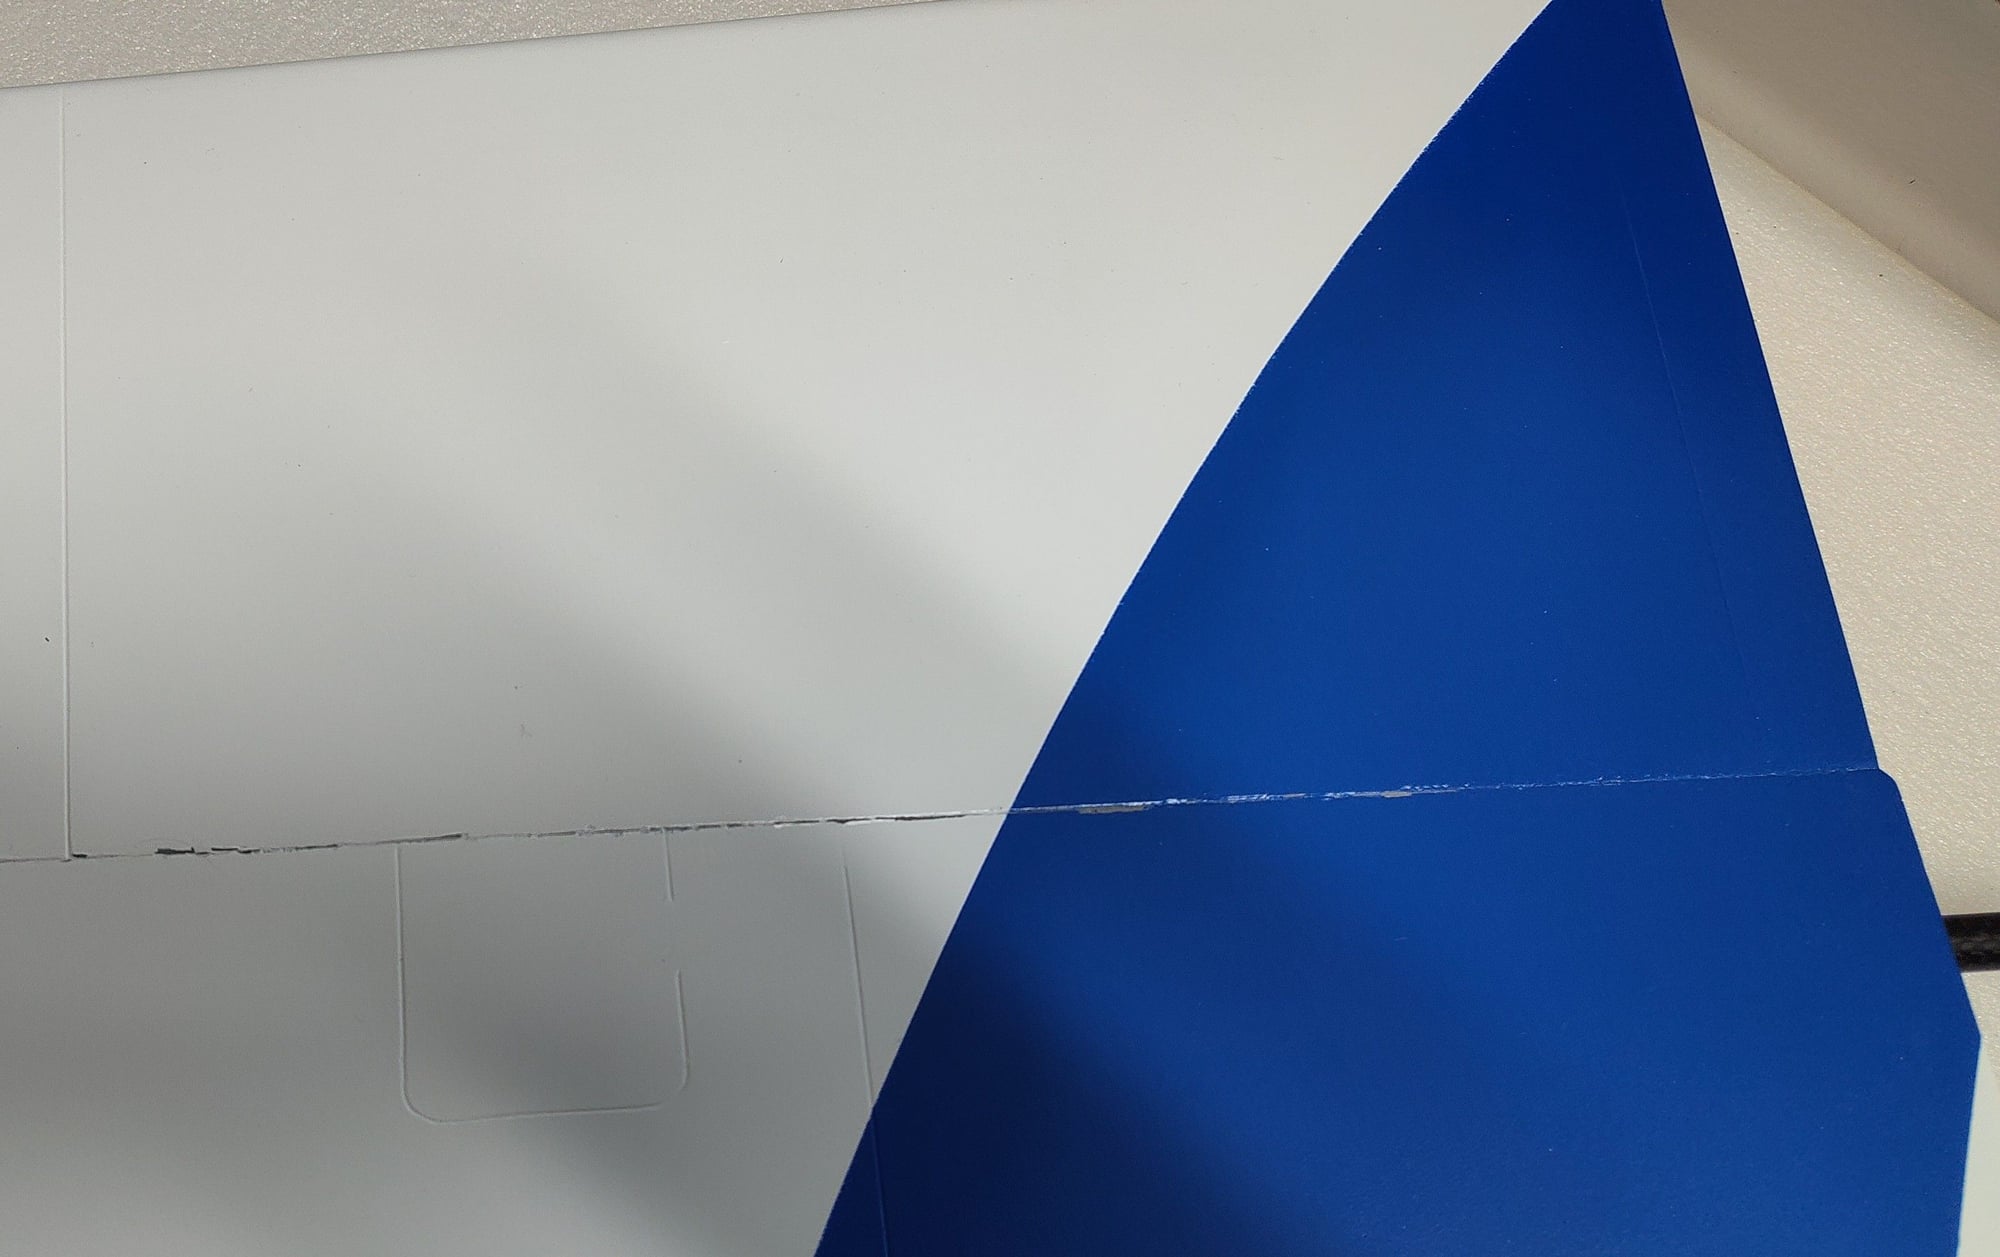
Cracking paint at the damn live hinges. Anybody have a way to clean these up without damaging the hinge? On other airplanes have masked and lightly sanded a tight line but still looks like crap.
03-28-2024 | 07:59 AM
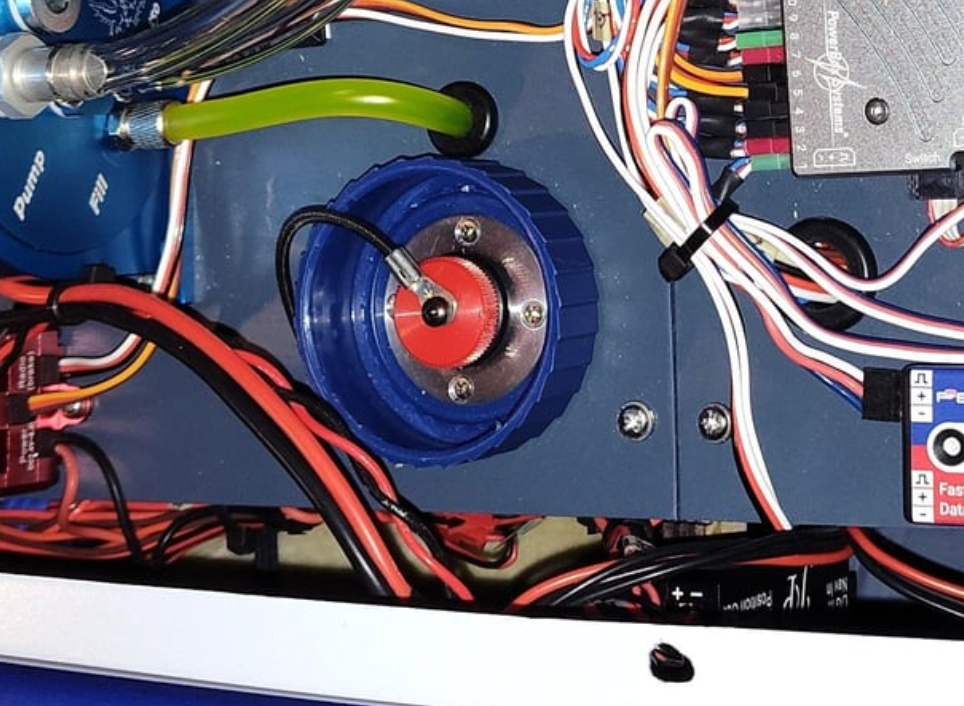
#19
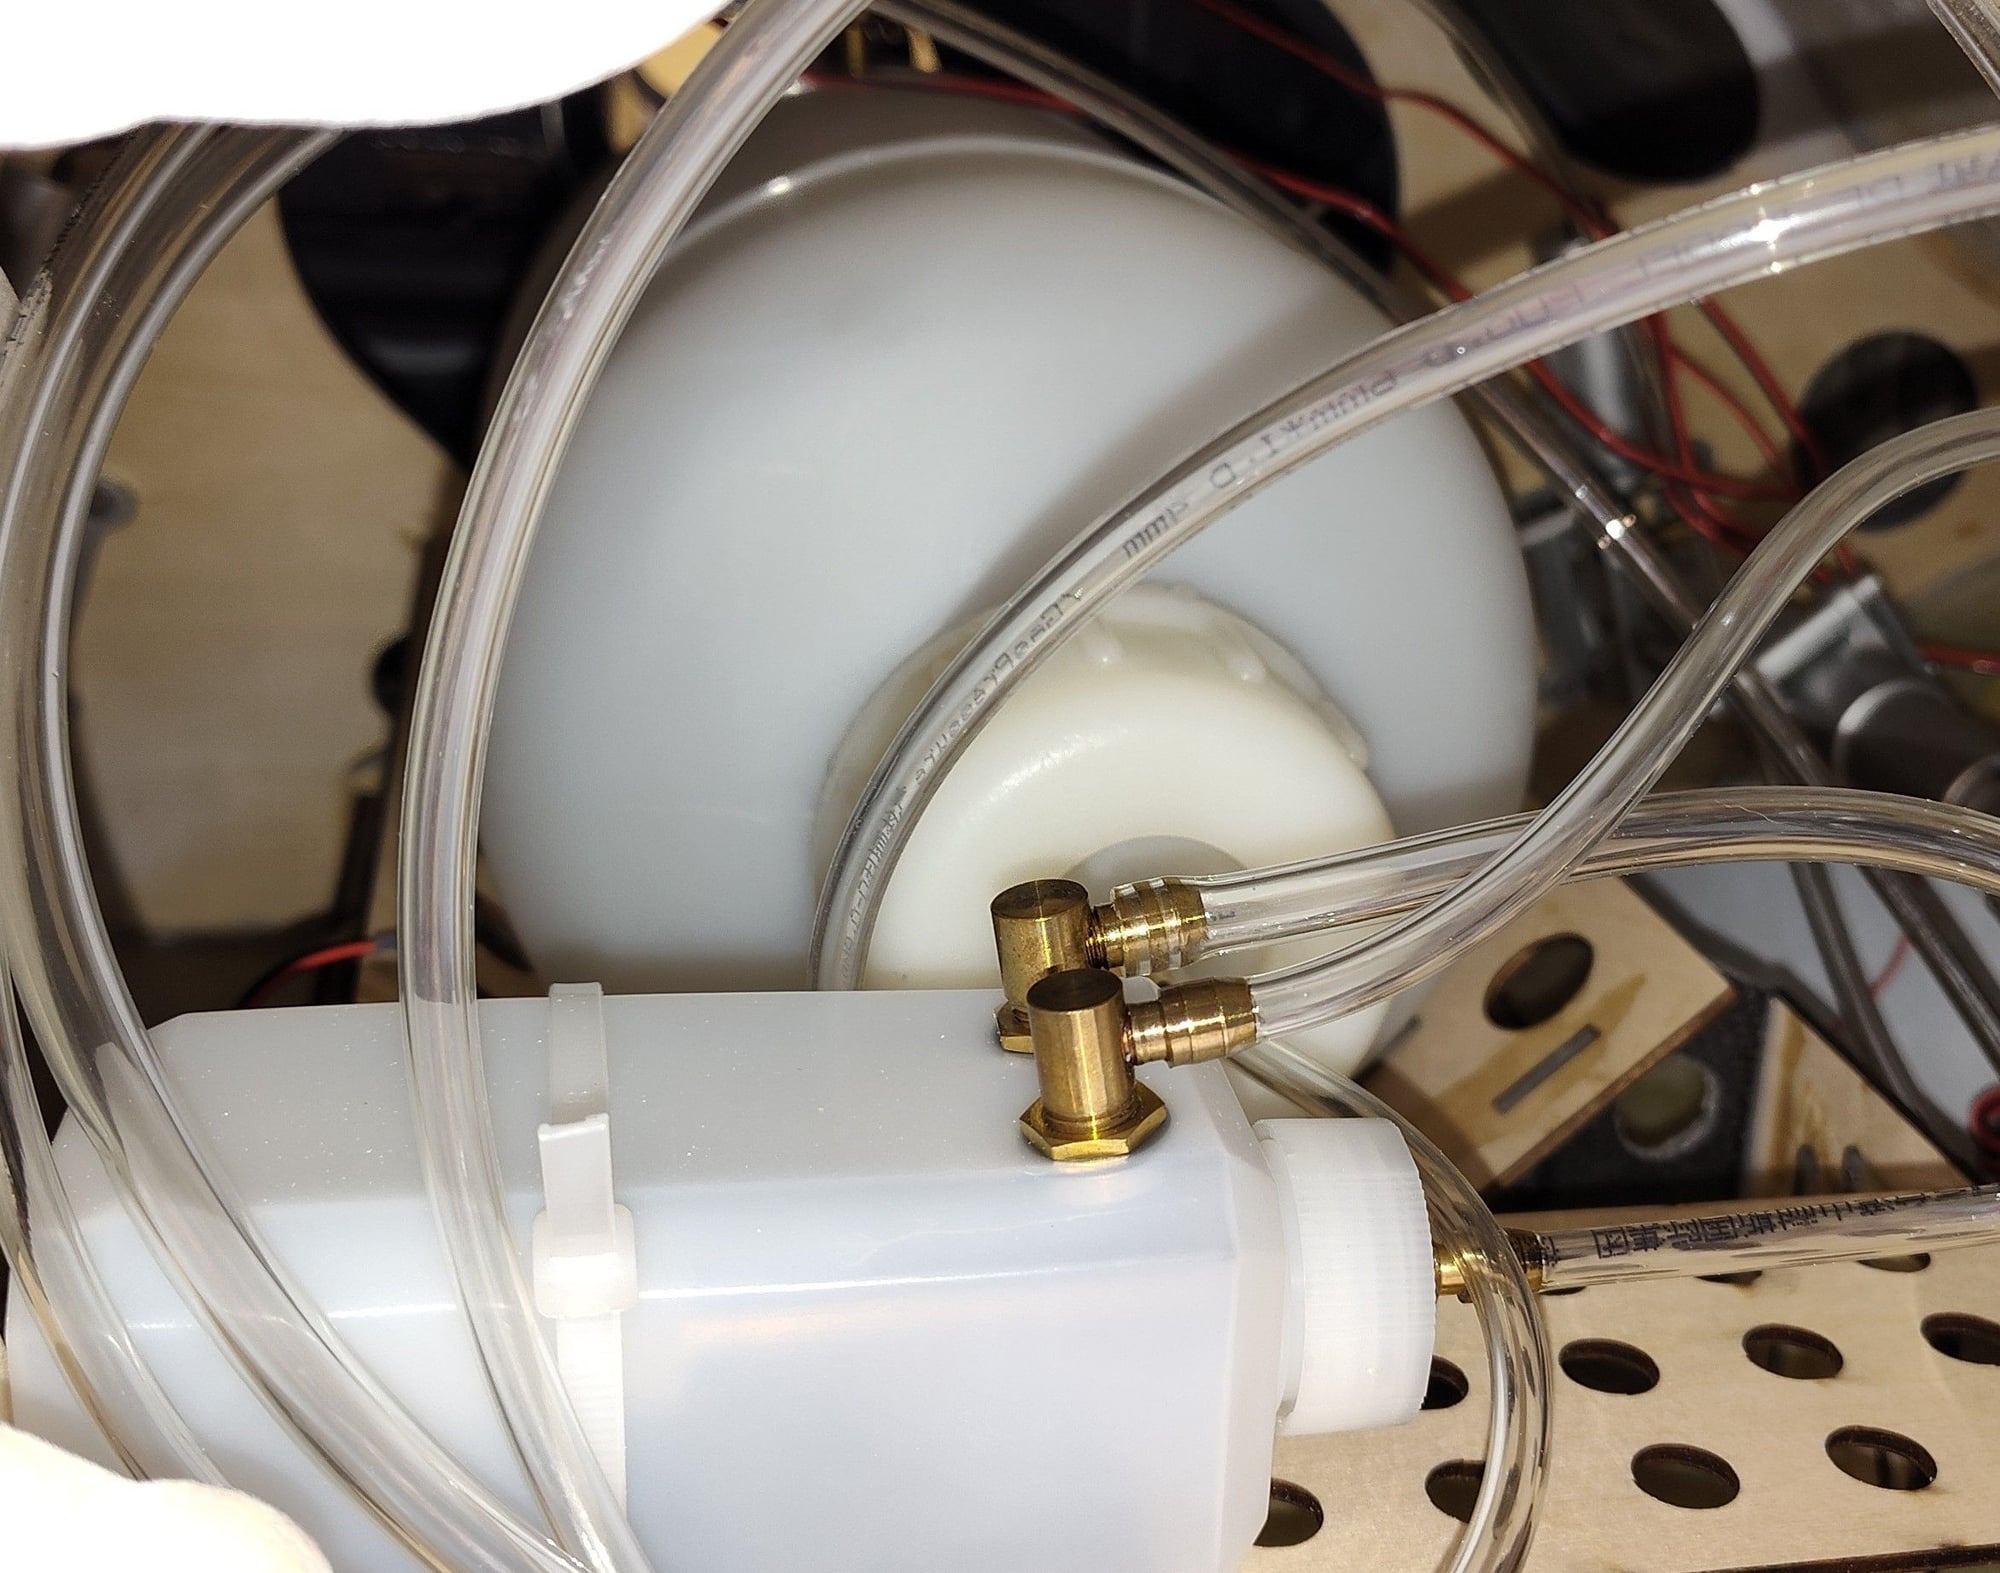
Tank and UAT as provided. I removed the tank to inspect and install my own fittings as those provided were too small in my opinion. The tank is really stout and no leaks after pressure testing. I've only used fiberglass/kevlar tanks before but this one might be better. Forgot to check the capacity before buttoning everything up but will verify later. Tossed the plastic UAT for the Digitech I installed.

Digitech 8mm clunk with heavy walled viton tubing - no brass tube. Replaced all the tank fittings with 8mm - was 6mm from the factory.
03-28-2024 | 08:24 AM
#20
Aileron servo mounting. Changed to button head machine screws for all. Using Dubro Monster links with Hangar 9 titanium pushrods. The factory provided provided links were machined aluminum with brass inserts; these varied wildly in tolerances with balls falling out and pushrod threads very loose - toss in the trash! Used the two best aluminum links on the outer TV pushrod ends.
The control horns are steel (I painted) screwed to internal blocks. The screws provided were tiny and only two at each horn. I added the four larger button head wood screws in the outer holes.
The servo L mounts were provided and work OK. When in place the servo plates sat lower than the wing skin so I added 1 mm fiberglass at the corners - a lot stronger too.
Again, tiny little screws were provided to attach the servo plates. I replaced with 4-40 button head screws and t-nuts, lock-tited of course.
The rudder servo provided was a mini but I'm using a standard size MKS. Plate was already drilled so I added 1mm FG on the back, filled the holes and redrilled. Fin was plenty deep to fit the standard servo.
Last edited by GoldenEagle1; 03-29-2024 at 04:49 AM.
03-28-2024 | 08:34 AM
#21
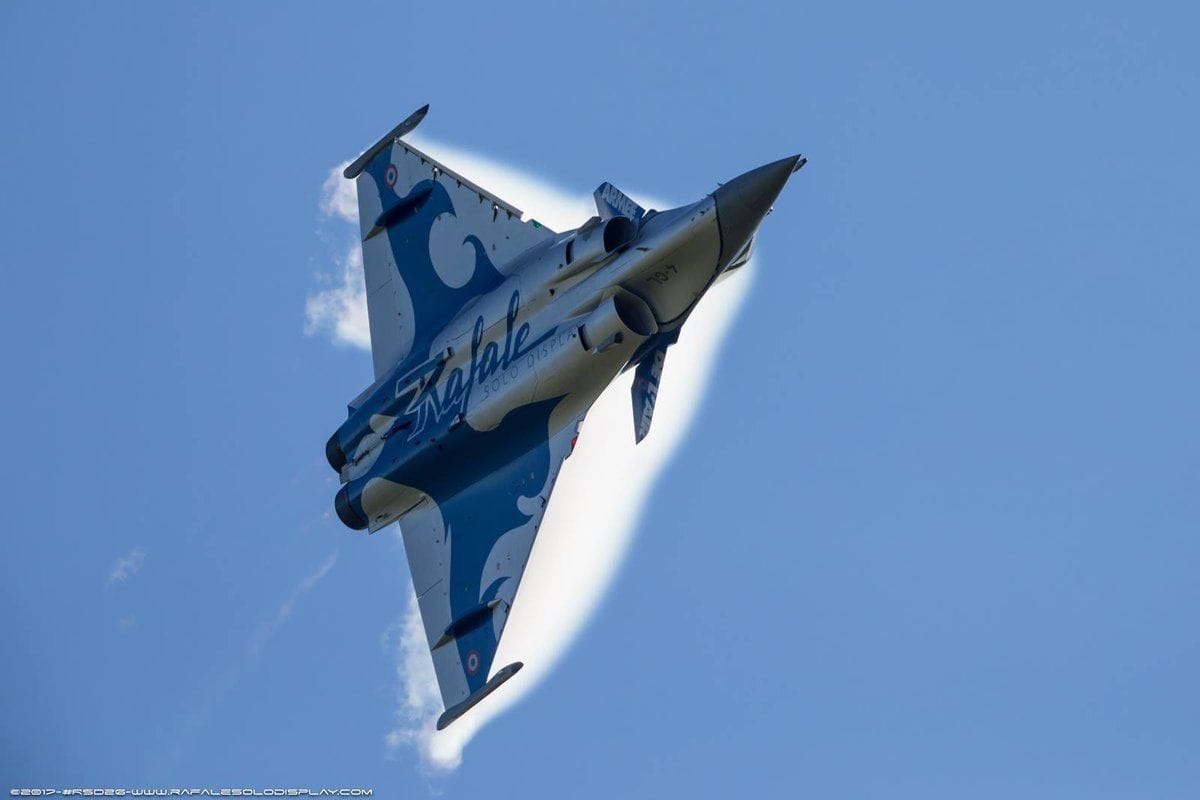
Best video of the 2017 Solo Demo Rafale:
This is the one that finalized my decision to buy this airplane. Got to practice replicating that final maneuver to landing at the end!!
This is the one that finalized my decision to buy this airplane. Got to practice replicating that final maneuver to landing at the end!!
The following 2 users liked this post by GoldenEagle1:
jcterrettaz (11-19-2024),
JETFLIER60 (02-16-2025)
 03-28-2024 | 06:12 PM
#23
I've sometimes felt that way about most every ARF and kit I've built and that's a lot over a lifetime of flying models. I'm sure you could just accept every negative I've pointed out and still assemble a decent flying airplane with this one. I'm also no particular maker's fanboy or rep so I'll not spew a glowing report about any airframe just to prove I got a great deal. I'll fix or modify anything that bugs me; I'm just more anal about my airplanes than most. Perfection may be out there somewhere for many thousands more bucks but I'll get a lot of enjoyment out of flying my hard work.
Anybody got any recommendations for the perfect airplane?
Anybody got any recommendations for the perfect airplane?
The following users liked this post:
Fred-WindRC (03-29-2024)
03-28-2024 | 06:18 PM
#24
My Feedback: (1)
The red filler cap with a lanyard is an alternate provided in the Jersey Modeler jet kit. The vent plug is 'T' shaped with a "Remove Before Flight" flag. Been using the same filler cap on my AreS XL for about 100 flights with no problems. All fuel lines are safety wired except for where the tygon line from the filler cap goes into the UAT where it has a screw-on clamping sleeve.
The following users liked this post:
GoldenEagle1 (03-28-2024)
03-28-2024 | 07:33 PM
#25
Wind-rc produces the plane, JMB is the European retailer. Originally this was sold under Aviation Jets name ( also by PafificJets) and the plane has gone thru a couple of revisions I think .
But were talking about the same plane still.
But were talking about the same plane still.
The following users liked this post:
Fred-WindRC (03-29-2024)

