


How was your first time?
 05-01-2008 | 05:01 PM
#1
Thread Starter

My Feedback: (1)
Joined: Jul 2002
Posts: 5,193
Likes: 0
Received 1 Like
on
1 Post
From: SevenoaksKent, UNITED KINGDOM
Using Flite Metal guys!!!!
Am thinking of using Flite Metal on my project rather than the complexities and cost of silver/chrome paint etc but wondered if it is a bit of a black art. When you see the quality of models such as Joe Grice's F86 and F100 then you can't help be in awe of the finish of flite metal. However, is this like watching a professional 'anything' making it look simple until you try it? [)]
I wouldn't expect a finish like Joe's first time but am I kidding myself that it will end up anything near it or will it just look like I have covered by model in tin foil [&:]
So, how well did your first attempt at Flite Metal come out? Was it easier than you thought? Harder? Wish you never started etc?? Never bother with 'silver' paint again? Pics too would be great if you're proud enough!!
Thanks,
Mark
 05-02-2008 | 08:36 AM
#2

My Feedback: (8)
Joined: Jan 2002
Posts: 346
Likes: 0
Received 0 Likes
on
0 Posts
From: Lubbock,
TX
Mark,
I had all those concerns you are expressing before I tried my first application of Flite Metal, too. I had placed Flite Metal access panels and raised panels on painted surfaces for years, but never had done a full metal finish. I decided to do a C-ARF MiG 15, and wanted to do a natural aluminum finish. I debated BVM Metal Kote (even bought a kit), vs Flite Metal. I intended to put Flite Metal on the top surfaces and then paint BV Flite Kote on the bottom until I saw the difference. I finally took the plunge and covered the MiG 15 top and bottom with Flite Metal. I had a few goofs in some areas, but it actually turned out much easier, faster, and cleaner than aluminum paint. I'm now working on a set of wing tanks for the bird, and am irritated that I will have to paint them instead of putting Flite Metal on them. The reason? not enough seam lines on the full scale tanks to make Flite Metal feasible, and the full scale tanks are painted with silver paint anyway.
My point? Go ahead and take the plunge it really is much easier than you think. Another advantage to doing Flite Metal, is if you goof, just peel it off and re-do the panel again. It really does stretch around compound curves, and can be embossed with all kinds of surface detail. The only critical thing is to keep your base surface clean because anything you trap under the foil will show through, so make sure your surface is prepared properly.
FM is a lot of work, but less than paint, doesn't smell, easy cleanup, and can be repaired very easily after you start flying the bird. For example, any time damage occurs (usually dragging wing tips), it is very easy to peel off the damaged metal, repair the damage, and the put a new piece of Flite Metal back on the panel - never shows the damage. I'm pretty well sold on it over aluminum paint.
One other factor since FM is real aluminum, it weathers just like the real thing. In fact, the more it is handled, the more realistic it looks. You will need to do panels so the seams will match, but it just adds more realism to your project.
Hope this inspires you to give it a try.
Regards, Les
05-03-2008 | 10:27 PM
#3
My Feedback: (8)
I have only done it once on a BVM 60" F-86. It looks just great! I can echo Les' comments about applying the stuff.
There are a couple of downsides though. It shows fingerprints everywhere it is touched. The aluminum is so soft that it is easily marred. I had to remove my watch and wedding ring while I was applying the FM.
You cannot get paint to stick to it unless you use a special etching primer made for aluminum. I painted stripes on mine so wherever I painted, I peeled the Flite Metal away from that area.
I went for the polished aluminum look with only some minor sanding on panels on the wings.
A bit of advice. Order at least 50% more of the FM than you think you will need. It takes so long to get the FM that you want to be absolutely sure you don't run out before completing the covering.
05-04-2008 | 11:03 AM
#4

Mark:
Documentation is the most important element to a successful Flite-Metal project. Documentation
provides the level of expectation to which you work surface appearance of your project. It must
parallel the level of finishing you desire to be observed from...X feet or X inches away.
Replicating surface finishing documentation is not as difficult as creating the many mechanical
attributes found on our customer's aircraft. For the best results, replicating the surface of any
project's documentation is best achieved off of the model...on an aluminum plate so there is a
consistant surface texture and patina.
After achieving replication of the documentation the application process typically takes between
30 sec and 1 minute. There are areas that require more and those requiring less time. By far a
majority of the panels take less than one minute to apply after identification of the contact patch.
As is always the case, its how and not how much that provides the greatest speed of application
be it paint or real aluminum.
Joe Gice's, George Maiorana's, and Terry Nitsch's projects are typically thought of as more OCD
than the normal modeler. In reality these are artists with everything they use in their projects.
Each is not afraid to explore and experiment in replicating documentation.
Taping a length of Flite-Metal to a smooth aluminum plate with 3M Painter's Tape at each end is
going to permit you to quickly replicate your documentation. Wet sanding the surface using 400
grit wet/dry mounted on a hardwood sanding block for 15 seconds wet then moving to 600 grit
wet/dry will work harden the surface of Flite-Metal rapidly.
All aluminum has surface grain it acquires during the linear calendaring process of reducing its
thickness from the pig or ingot it started from. The surface grain "scale" and patina contribute
to matching your documentation. The finer the grit used in wet dry sanding results in a harder
surface and a darker patina.
This appearance would be considered a natural war weary condition as exemplified by Joe's
F-100, and George's AEW Tu-4 or his new Tu-95. Permitted to naturally oxidize this looks as
it is a neglected airframe. Here again, your task is to match documentation.
On the other end of the scale is Flite-Metal applied right off the roll to replicate documentation.
Two examples of that are found in Rod Snyder's F-100 at Top Gun and the World Jet Meet and
Ted Zaborski's L-19, both of which are featured in our gallery. Both replicated documentation
to achieve their personal mind's eye level of expectation.
Looking across our gallery you quickly come to realize every model looks "different". If you
were to compare each to documentation it looks like the modeler wanted it to. This is one of
the most important elements in a decision to use paint or the real thing.
Les, is very experienced with the traditional lacquer, epoxy, and poly urethane routines that
come close to looking like aluminum...but are paint. The closest you will come to replicating
a metal surface with paint is with Bob's excellent MetalKote II product. Here again, the end
result is an expression of modeling skill as much as it is baseline product attribute.
Finger prints are not an issue with use of a ph adjusted cleaner like Simple Green and use
of a proper polish that instantly removes smudges and finger prints in addition to retarding
tarnish on a polished airframe like Terry Nitsch's F-100. Terry's F-100 sat in his basement
over the winter before he took it to Top Gun where it won along with Scale Masters and AMA
NATs that year. All Terry did was wipe off the dust and the mirror polished F-100 was good
to go.
Preparing the surface of aluminum to receive paint is typically a wet sanding task or using a
Scotch Brite pad. In rare cases, use of a rattle can metal primer bought at Home Depot or
Lowe's is chosen before the application of paint. 100% of our gallery is composed of painted
projects.
Hope this has helped explain how to apply and finish "any" adhesive backed aluminum foil.
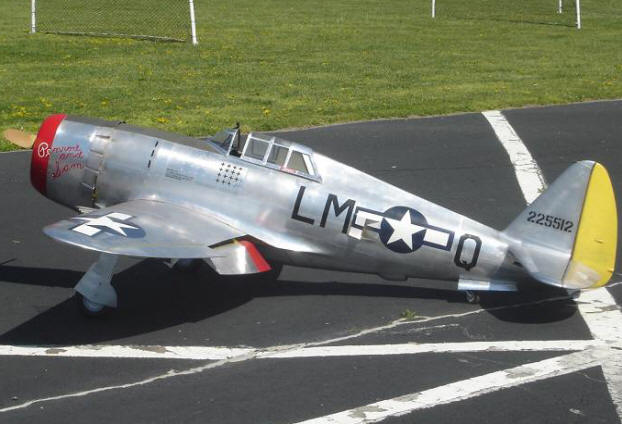
Richard McFarland's P-47 post within RCU has just shown wing repair after he had a landing
mishap with his Flite-Metal covered P-47.
Documentation is the most important element to a successful Flite-Metal project. Documentation
provides the level of expectation to which you work surface appearance of your project. It must
parallel the level of finishing you desire to be observed from...X feet or X inches away.
Replicating surface finishing documentation is not as difficult as creating the many mechanical
attributes found on our customer's aircraft. For the best results, replicating the surface of any
project's documentation is best achieved off of the model...on an aluminum plate so there is a
consistant surface texture and patina.
After achieving replication of the documentation the application process typically takes between
30 sec and 1 minute. There are areas that require more and those requiring less time. By far a
majority of the panels take less than one minute to apply after identification of the contact patch.
As is always the case, its how and not how much that provides the greatest speed of application
be it paint or real aluminum.
Joe Gice's, George Maiorana's, and Terry Nitsch's projects are typically thought of as more OCD
than the normal modeler. In reality these are artists with everything they use in their projects.
Each is not afraid to explore and experiment in replicating documentation.
Taping a length of Flite-Metal to a smooth aluminum plate with 3M Painter's Tape at each end is
going to permit you to quickly replicate your documentation. Wet sanding the surface using 400
grit wet/dry mounted on a hardwood sanding block for 15 seconds wet then moving to 600 grit
wet/dry will work harden the surface of Flite-Metal rapidly.
All aluminum has surface grain it acquires during the linear calendaring process of reducing its
thickness from the pig or ingot it started from. The surface grain "scale" and patina contribute
to matching your documentation. The finer the grit used in wet dry sanding results in a harder
surface and a darker patina.
This appearance would be considered a natural war weary condition as exemplified by Joe's
F-100, and George's AEW Tu-4 or his new Tu-95. Permitted to naturally oxidize this looks as
it is a neglected airframe. Here again, your task is to match documentation.
On the other end of the scale is Flite-Metal applied right off the roll to replicate documentation.
Two examples of that are found in Rod Snyder's F-100 at Top Gun and the World Jet Meet and
Ted Zaborski's L-19, both of which are featured in our gallery. Both replicated documentation
to achieve their personal mind's eye level of expectation.
Looking across our gallery you quickly come to realize every model looks "different". If you
were to compare each to documentation it looks like the modeler wanted it to. This is one of
the most important elements in a decision to use paint or the real thing.
Les, is very experienced with the traditional lacquer, epoxy, and poly urethane routines that
come close to looking like aluminum...but are paint. The closest you will come to replicating
a metal surface with paint is with Bob's excellent MetalKote II product. Here again, the end
result is an expression of modeling skill as much as it is baseline product attribute.
Finger prints are not an issue with use of a ph adjusted cleaner like Simple Green and use
of a proper polish that instantly removes smudges and finger prints in addition to retarding
tarnish on a polished airframe like Terry Nitsch's F-100. Terry's F-100 sat in his basement
over the winter before he took it to Top Gun where it won along with Scale Masters and AMA
NATs that year. All Terry did was wipe off the dust and the mirror polished F-100 was good
to go.
Preparing the surface of aluminum to receive paint is typically a wet sanding task or using a
Scotch Brite pad. In rare cases, use of a rattle can metal primer bought at Home Depot or
Lowe's is chosen before the application of paint. 100% of our gallery is composed of painted
projects.
Hope this has helped explain how to apply and finish "any" adhesive backed aluminum foil.
Richard McFarland's P-47 post within RCU has just shown wing repair after he had a landing
mishap with his Flite-Metal covered P-47.


