


1/7th F-14D Scratch build thread *building started*
 03-04-2014, 09:27 AM
#1376

My Feedback: (12)

Join Date: Aug 2002
Location: Scottsdale, AZ
Posts: 4,462
Likes: 0
Received 0 Likes
on
0 Posts
All valid reasons!! I just know that when I mill that G10 its pretty hard on bits so I tried to keep my machine time as low as possible. Looking good Thomas, its coming together nicely.
 03-13-2014, 10:49 PM
#1377
My Feedback: (33)
Join Date: Feb 2002
Location: Chicago, IL
Posts: 469
Likes: 0
Received 0 Likes
on
0 Posts
"Once i get the basic airframe completed, ill go back into CAD and draw up the details that are seen on the underside of the spoilers and then machine the plugs for that. Those will then be a very lightweight fiberglass molding that will get glued to the Spoiler panels"
Will just the prototype have the totally milled spoilers and any subsequent kits have fiberglass two part spoilers?
Will just the prototype have the totally milled spoilers and any subsequent kits have fiberglass two part spoilers?
03-13-2014, 10:53 PM
#1378


"Once i get the basic airframe completed, ill go back into CAD and draw up the details that are seen on the underside of the spoilers and then machine the plugs for that. Those will then be a very lightweight fiberglass molding that will get glued to the Spoiler panels"
Will just the prototype have the totally milled spoilers and any subsequent kits have fiberglass two part spoilers?
Will just the prototype have the totally milled spoilers and any subsequent kits have fiberglass two part spoilers?
The lower speed brake boards will also be milled as well.
03-30-2014, 02:59 AM
#1379
Join Date: Jun 2011
Location: Virginia Beach, VA
Posts: 39
Likes: 0
Received 0 Likes
on
0 Posts
Thomas
6 years wow how time flies and you had a photo of your plug
i believe when your son was just born and now look at him he
is ready to take over and become a hot shot jet pilot
Michael
6 years wow how time flies and you had a photo of your plug
i believe when your son was just born and now look at him he
is ready to take over and become a hot shot jet pilot
Michael
04-23-2014, 04:58 PM
#1380
Well,
The F14 hasnt seen much love lately mostly bc of the Bandit, but also bc i have been building the pair of V173's. Neither the bandit or the 173's are done yet, but a few more custom parts for the F14 arrived.
The wing actuators utilize an injection molded plastic clevis end for attachment. I dont like the idea of plastic even though it is designed for 150lbs of force to break it, but the main reason for replacing them with custom units is bc the bolt hole wasnt far enough from the base flange to fit my actuator attach brakets on the wings.
So here is the new aluminum upgrade part beside the stock plastic piece:

And the new piece mounted in the actuator. I had the threaded end extended .100" so as to allow the clevis end to fully seat in the actuator, that way if it needed a 1/4 turn or so to get the ends parallel, the threaded end could be filed down to get a perfect fit!

 04-28-2014, 04:28 PM
#1383
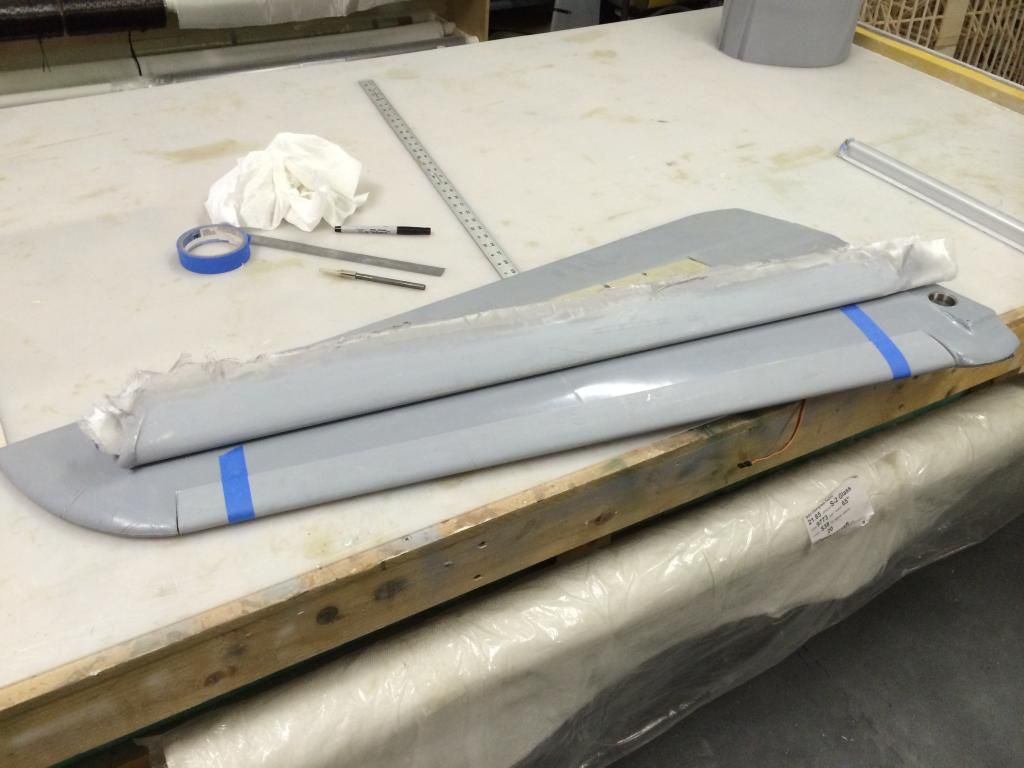
Now three layers of 3oz glass is epoxied to the leading edge slat area and about 1-2" aft as well. Peel ply is then put on to save me some sanding.

Once that all cures, ill pull the peel ply off and start building up the area with balsa strips. The strips will then be sanded to match the leading edge of the wing, then glassed once again. Then they get primed, sanded and detailed and then they will be molded!

Once that all cures, ill pull the peel ply off and start building up the area with balsa strips. The strips will then be sanded to match the leading edge of the wing, then glassed once again. Then they get primed, sanded and detailed and then they will be molded!


") , Great work Thomas.
04-29-2014, 03:10 PM
, Great work Thomas.
04-29-2014, 03:10 PM
#1389
Now that it is all dry, the balsa is razor planed to rough shape, then 80grit paper on a block is used to get it closer. Once it is what appears to be fairly close, body filler is mixed and placed along the trailing edges of the LE slat on the top and bottom so it can be feathered into a perfect blend of the upper and lower wing surfaces. This is going to suck to mold, but it will be an amazingly precise slat with no "ledge" like you see on others. The Slat is also sized correctly in chord and span, unlike others. Like they say, if your going to do it, do it right!


 04-30-2014, 11:34 AM
#1391
After a couple hours of sanding, filling, sanding and filling, the slat plugs are shaped and glassed with the requisite layer of peel ply applied. I actually have to work tomorrow, but im going to atleast try and get one coat of primer on the plugs.


 05-01-2014, 02:47 PM
#1394
I got home early so it was time to do something productive. First up I sanded the primer in both slats. There are just a few small little spots to fill in before i can flitemetal and detail the slats. Soooo....i popped the first slat off and cut/sanded it to shape to give i nice fit to the wing panel. Here is a shot with it on the wing and the "raw" slat for the other wing.

Once the slats are cut to the proper dimensions, the trailing edges are sanded to a nice thin edge so they seat as close to perfect fit to the wings. They arent perfect, but they are pretty dang close and I am happy with that!
Top:

Bottom:

And here is a shot of the backside of the slats. This area will also be molded into the slat bc i feel this is a very important part of keeping "smooth" airflow going through the slat.
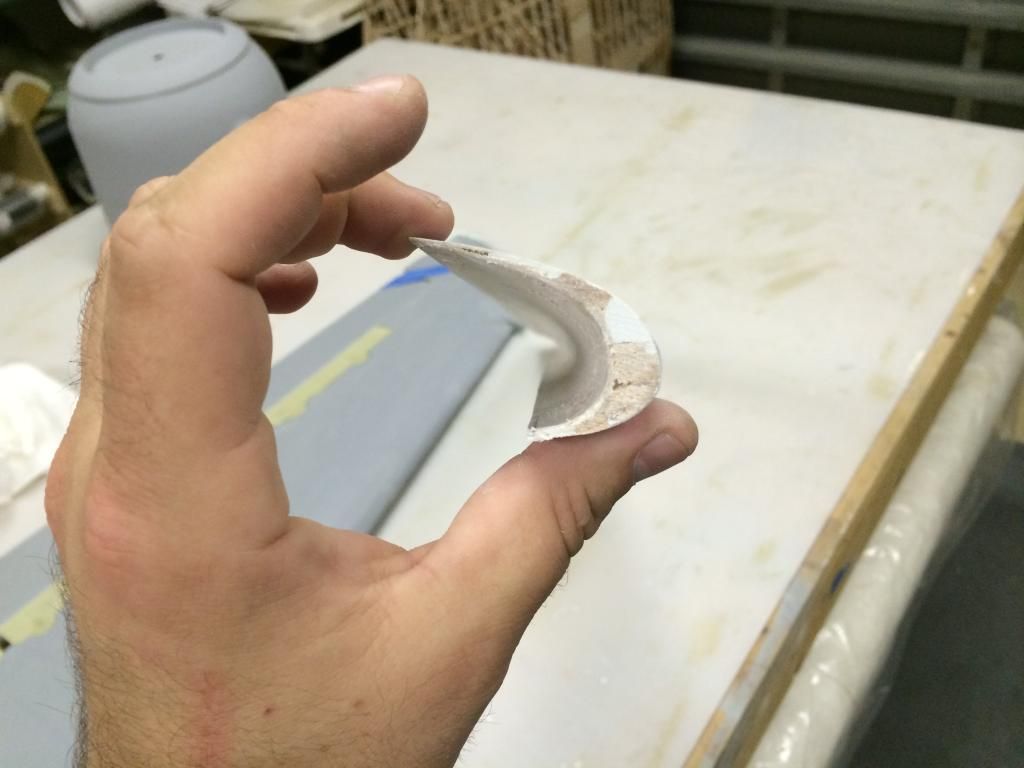


