


How about a step-by-step tutorial??
 04-09-2008, 06:38 PM
#1
Senior Member
Thread Starter
Join Date: Feb 2008
Location: Brunswick, OH
Posts: 137
Likes: 0
Received 0 Likes
on
0 Posts
How about someone who has a few moments free that is wanting to start a body that has done some awesome 3D type paint work before do a step-by-step thread? I am not a pro, done a body that was pretty simple...

on my Traxxas Rustler 2.5...
Now, I can do basics but some of the bodies look absolutely amazing like...
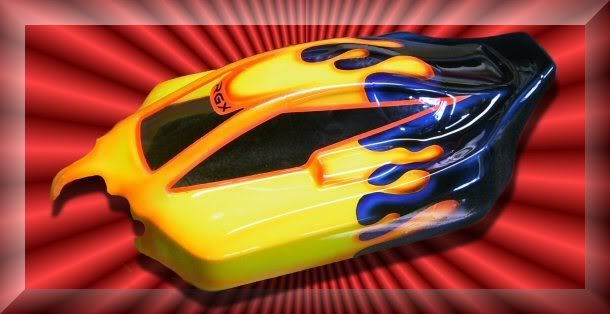
(Courtesy of the "Post Your Works" Thread and RGX Blade)
I've not ever really airbrushed much before but want to learn how to do neat 3D designs like this instead of 2D so-so stuff... When do you do the colors? which colors? all free-hand? I ended up designing the drips in mine in Photoshop, printing it out, tracing it from the outside-in, masking, cutting, painting, peeling... all without the 3D effect... Anyone help?
on my Traxxas Rustler 2.5...
Now, I can do basics but some of the bodies look absolutely amazing like...
(Courtesy of the "Post Your Works" Thread and RGX Blade)
I've not ever really airbrushed much before but want to learn how to do neat 3D designs like this instead of 2D so-so stuff... When do you do the colors? which colors? all free-hand? I ended up designing the drips in mine in Photoshop, printing it out, tracing it from the outside-in, masking, cutting, painting, peeling... all without the 3D effect... Anyone help?
 04-09-2008, 06:48 PM
#2
Senior Member

Join Date: Feb 2007
Location: Laconia, NH
Posts: 1,157
Likes: 0
Received 0 Likes
on
0 Posts
Heres a very lengthy [link=http://www.rctech.net/articles/painting_hauntedmyst.shtml]tutorial[/link] Ill see what else i can dig up.
04-09-2008, 10:01 PM
#3
Senior Member
Join Date: Aug 2003
Location: anaheim,
CA
Posts: 182
Likes: 0
Received 0 Likes
on
0 Posts
Ill tell you why yours looks flat. You had the right idea on the drips, but the paint you used was wrong. If you wanted the drips to be a basecoat of pearl purple, then i would have used a candy or transparent paint to create the reflective light you tried to accomplish. for one, pearls or metallics, especially Acrylic paints such as Createx, Faskolor, or AutoAir will be too thick to do details work with. That is why the silver in your drips were too thick and the graphic remained looking flat. I would have used a basecoat white then over reduces it to give it better flow and worked in small, very light layers to achieve the look i want. Another thing to think about, is giving your light source direction;preferably from an angle and not directly above. This gives teh illusion of motion when a light source is shown coming from an angle. See image. Another option is changing your Background color and making the drops smoother..and no jagged edges. I showed how when having a darker graphic, a lighter background will give you more options of having the 3D look by adding simple dropshadows. Anyway, i I have a lesson/tutorial on achieving the 3d look as well as knowing light sources. Just look for the "Project CFX" thread at www.cfxpaintworks.com

