


Airflow visualisation
 09-02-2013 | 10:53 AM
#51


My Feedback: (2)
Joined: Jan 2002
Posts: 630
Likes: 0
Received 0 Likes
on
0 Posts
From: Ossining,
NY
Just a humble opinion form a pilot who still needs to learn a ton.
Marcelo Velez[/QUOTE]
Marco, thank you for sharing your experience. It is great to see more honest opinions so we can all learn. Watching several pilots who returned to YS at this years nationals raised my curiosity. I have no interest in dealing with YS hassles again but boy would I love to take one for a ride. Wish I had the cash to get the Kimbros to part with one of their bipes.
To the OP this is great information inspiring great discussion.
Another pilot with a ton to learn,
 09-07-2013 | 11:19 AM
#52

Senior Member
My Feedback: (1)
Alex,
I followed with great interest your airflow tests on pattern planes. Brilliant idea to use those new micro cameras and tufts, and send the plane through the classic manoeuvres.
As I read about the knife edge situation, and the discussion to attach some "fences" along the sides of the fuselage it came to my mind that I bought about 15 years ago an old, used and well worn pattern plane fuselage for very little money. Once it was shipped to me, during unpacking I recognized it had just such fences integrated to the fuse sides. I forgot about that until few days ago!
Obviously, some other guy had the same idea as it is discussed here. I still have no idea what was the name of that plane, nor do I know who was the designer and if there has been any report if those fences worked well.
I will post some pics later tonight.
Hope to read more here from your very intersting investigation!
Dominik
09-08-2013 | 06:41 AM
#54
Thread Starter

Interesting plane, looks like a classic pattern model. I wonder why they added the fuselage fences, were they flying KE maneuvers back then?
I tested the fin fences and canalizer this weekend and got some interesting results. It clearly shows how the fences and canalizer work, their advantages and drawbacks, and how a simple change in shape may lead to radically different results. I just need some time to prepare the images, upload the videos, etc.
I tested the fin fences and canalizer this weekend and got some interesting results. It clearly shows how the fences and canalizer work, their advantages and drawbacks, and how a simple change in shape may lead to radically different results. I just need some time to prepare the images, upload the videos, etc.
09-09-2013 | 02:03 AM
#57
What will you learn with a (potentially) more refined set-up? I think that in this instance, tufting is going to give a very valid picture as to what is going on. Every method will have it's drawbacks, and this seems to be a excellent way of getting great results in airflow viz relatively cheaply and easily. In fact Airbus are currently using tufting on their A350 prototype, even though BL effects would be much more critical in their case.
09-09-2013 | 08:17 AM
#59
Senior Member
Joined: Sep 2009
Posts: 110
Likes: 0
Received 0 Likes
on
0 Posts
From: Manizales, COLOMBIA
I am not sure about this, maybe an aerodynamics expert can correct me, but as far as I remember boundary layer only modifies speed as a function of the distance from the surface (0 speed at the contact point and increasing as the distance increases from the surface), but the speed vector direction remains the same along the boundary layer. Maybe not the speed but the direction is the same across the whole boundary layer.
Please somebody who can confirm.
Marcelo
Please somebody who can confirm.
Marcelo
09-09-2013 | 12:14 PM
#60
Thread Starter
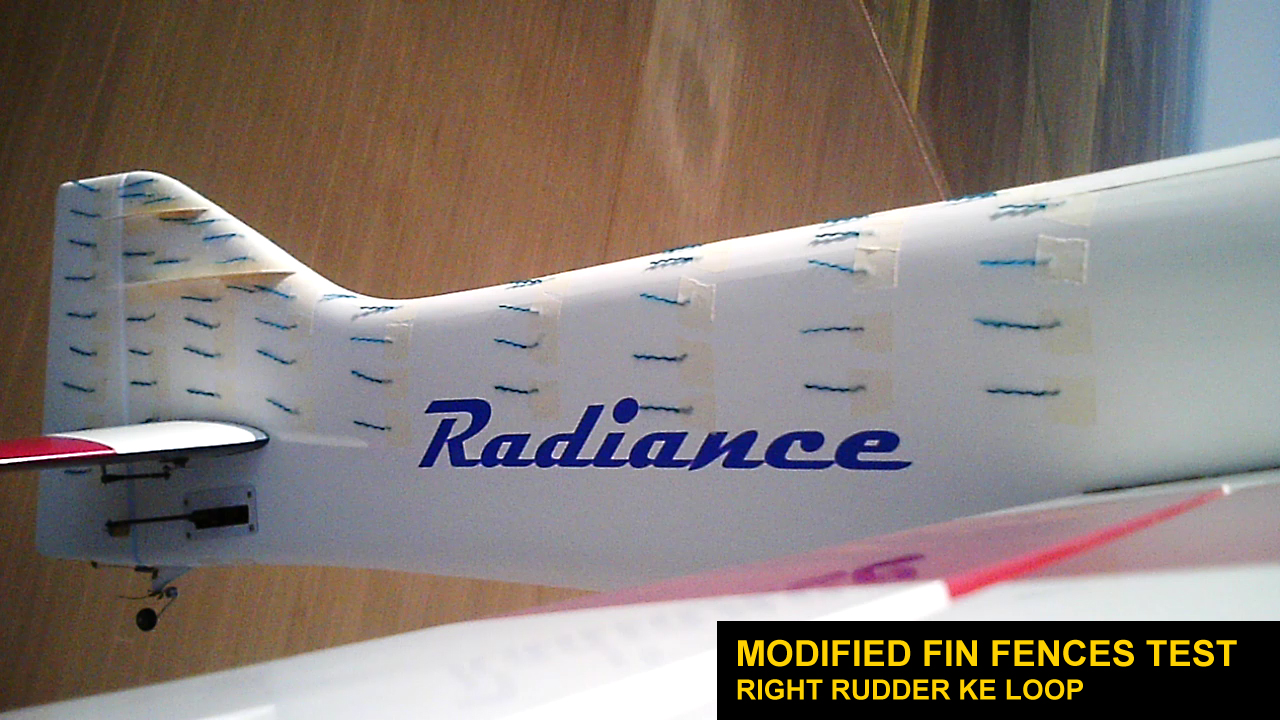
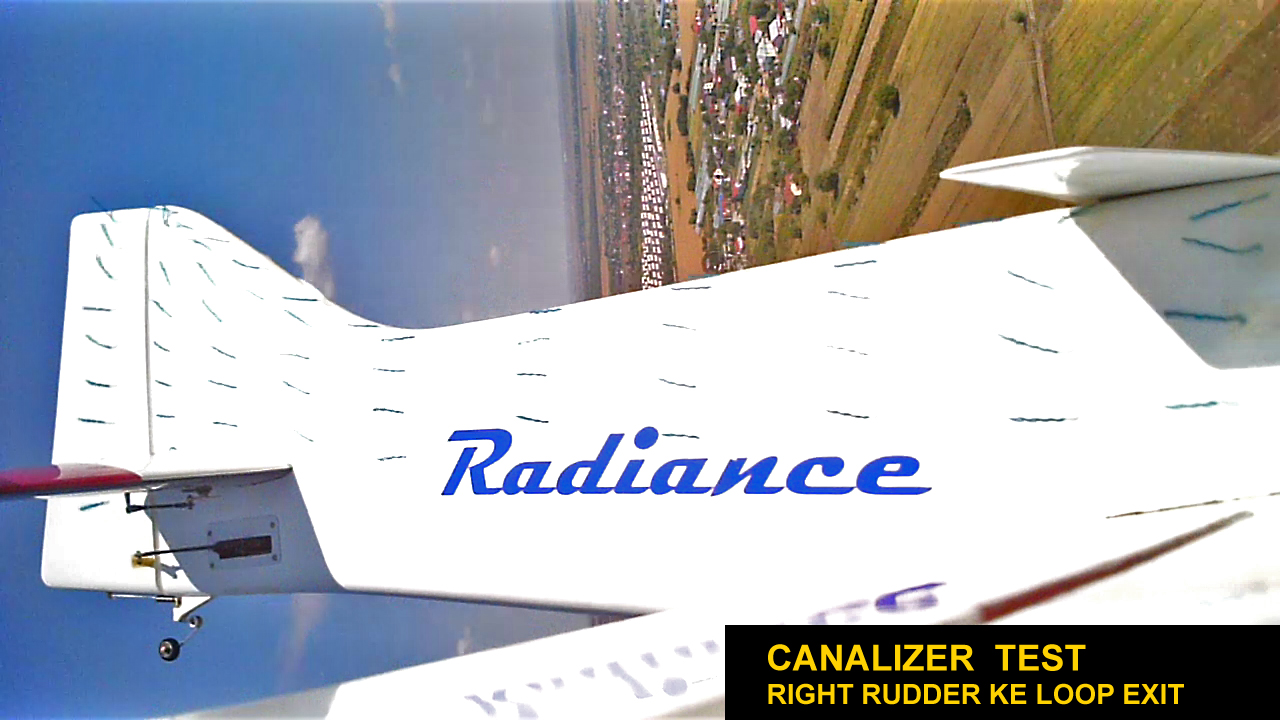
Finally here are the results from the fin fences and canalizer test.
Since the airflow was almost symmetrical on the left and right sides of the fuselage in previous tests, I decided to tuft only the right side and concentrate on the rear fuselage and tail area. Fin fences obviously don�t have any influence on the airflow around the nose section, the canalizer may have but only for a small area on the canopy.
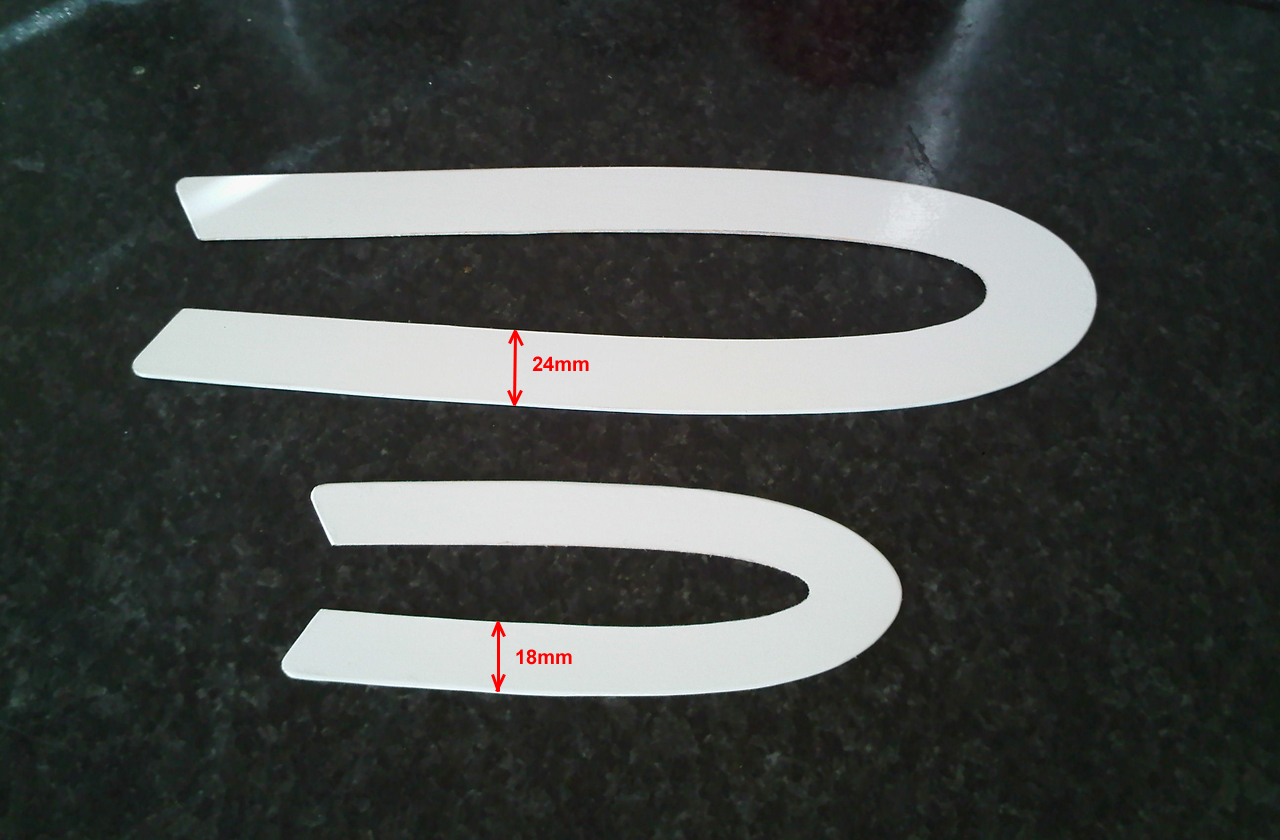
I initially built and tested 2 fin fences, shaped as seen in the image below. They have a constant width and follow the shape of the fin airfoil.
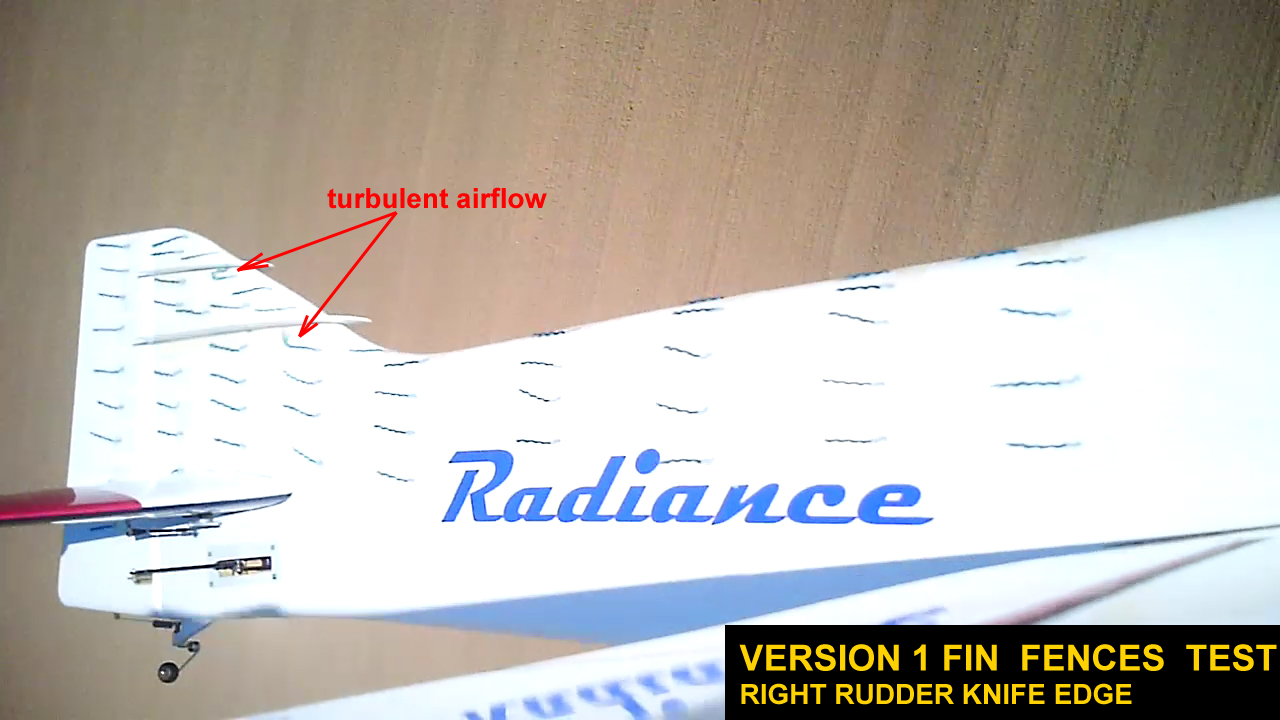
I expected some visible improvements in right rudder KE maneuvers, but the results were disappointing at first; in KE horizontal flight the spanwise flow was indeed limited by the fences in the trailing edge area, but I could see some turbulence near the leading edge, probably caused by the front end of the fin fences.
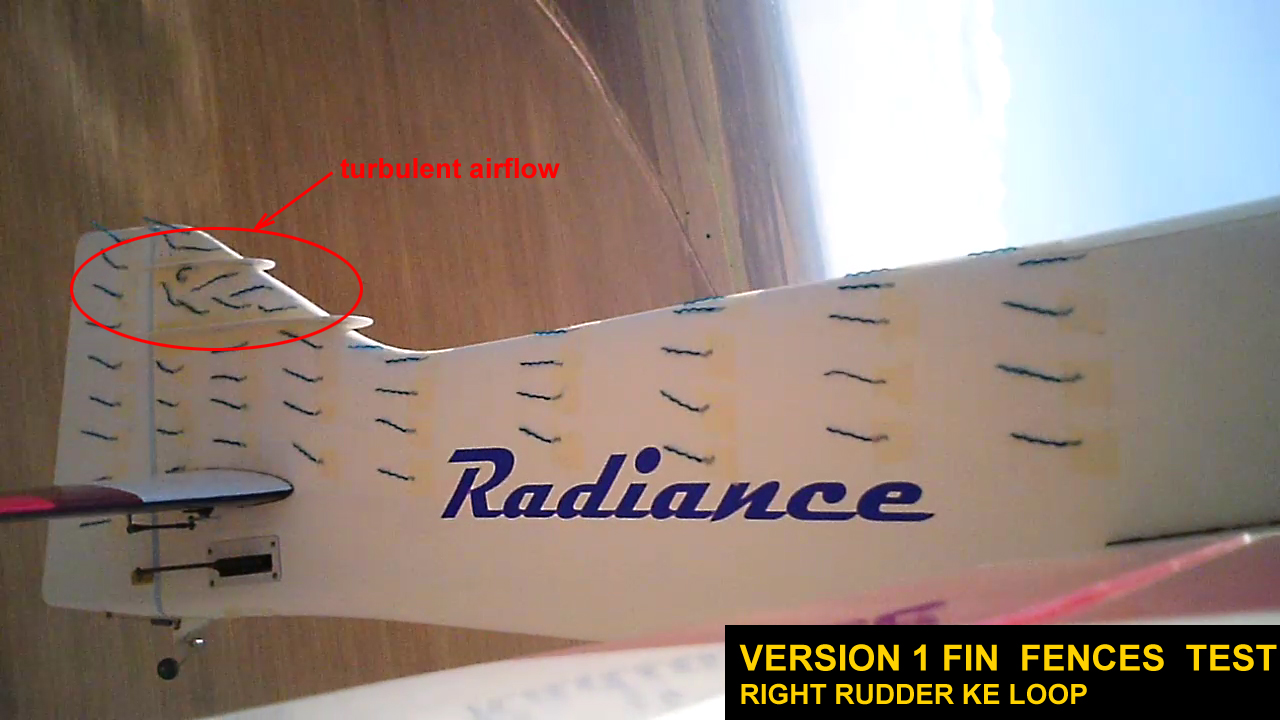
In KE loops it was much worse, you can actually see the disrupted airflow caused by the 2 fin fences:
Since the airflow was almost symmetrical on the left and right sides of the fuselage in previous tests, I decided to tuft only the right side and concentrate on the rear fuselage and tail area. Fin fences obviously don�t have any influence on the airflow around the nose section, the canalizer may have but only for a small area on the canopy.
I initially built and tested 2 fin fences, shaped as seen in the image below. They have a constant width and follow the shape of the fin airfoil.
I expected some visible improvements in right rudder KE maneuvers, but the results were disappointing at first; in KE horizontal flight the spanwise flow was indeed limited by the fences in the trailing edge area, but I could see some turbulence near the leading edge, probably caused by the front end of the fin fences.
In KE loops it was much worse, you can actually see the disrupted airflow caused by the 2 fin fences:
09-09-2013 | 12:20 PM
#62
Thread Starter
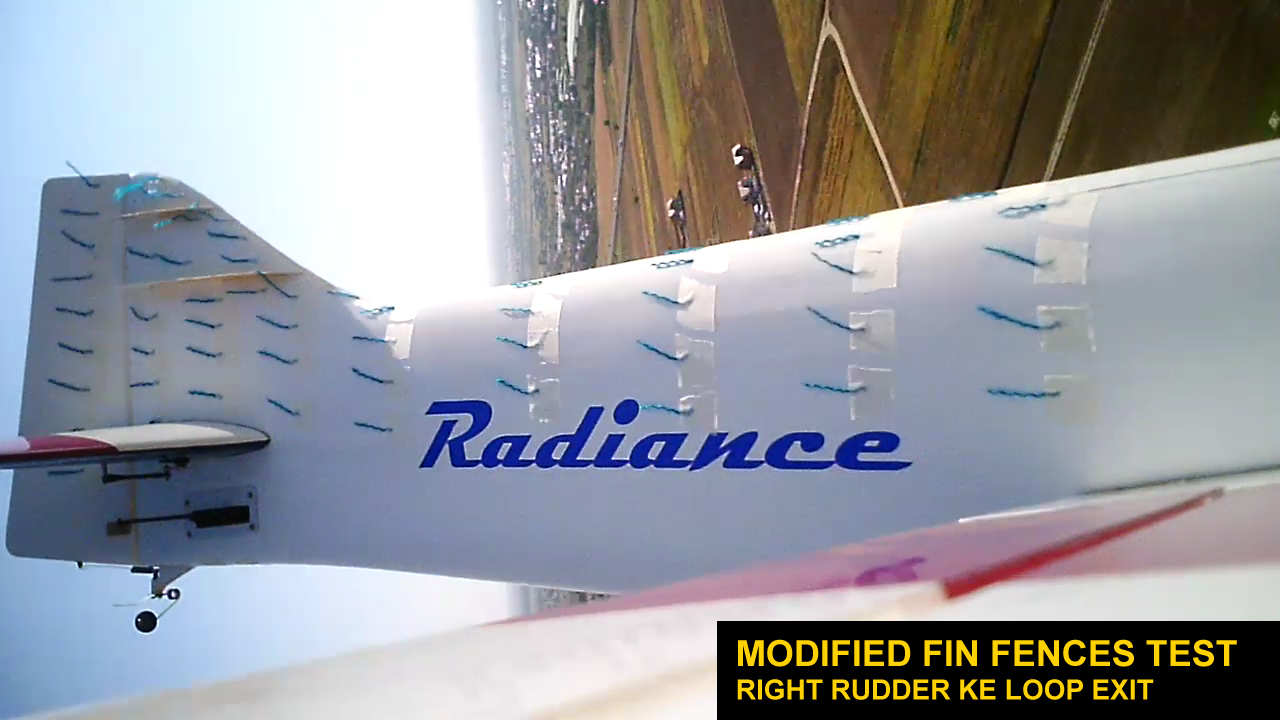
Anyway, instead of giving up on the fin fences, I went back to the images from the previous tests. I noticed that without the fences, the airflow is pretty straight near the leading edge and only goes spanwise in a clearly delimited area:

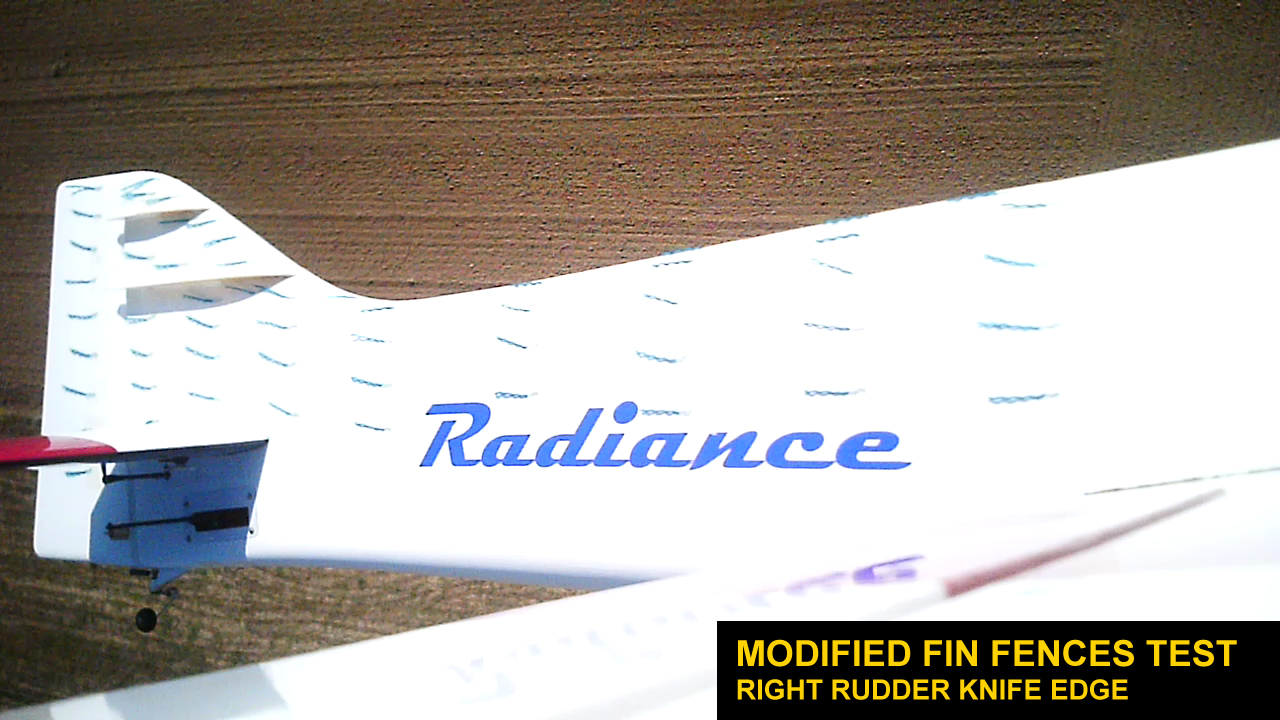
The obvious conclusion was to try a new type of fence, one that goes from 0 width near the leading edge to full width near the rudder hinge line. I quickly removed the fences from the model, reshaped them right there on the field and put them back on for more tests.

I didn�t expect too much from this, but I was very surprised to see the results are clearly superior to the previous version of the fences and also showed a marked improvement compared to the normal configuration (without fin fences).
I tested the model with and without the camera and the rudder is clearly more powerful, especially on KE loop exits (last quadrant) I can be more relaxed, the model is smoother and comes back to horizontal KE much easier.
The obvious conclusion was to try a new type of fence, one that goes from 0 width near the leading edge to full width near the rudder hinge line. I quickly removed the fences from the model, reshaped them right there on the field and put them back on for more tests.
I didn�t expect too much from this, but I was very surprised to see the results are clearly superior to the previous version of the fences and also showed a marked improvement compared to the normal configuration (without fin fences).
I tested the model with and without the camera and the rudder is clearly more powerful, especially on KE loop exits (last quadrant) I can be more relaxed, the model is smoother and comes back to horizontal KE much easier.
09-09-2013 | 12:28 PM
#63
Thread Starter
I also tested the canalizer and it�s clear from the videos that it works in a similar way to the fin fences, effectively limiting the spanwise flow on the vertical tail.
You can see how well it works in horizontal KE; it�s interesting that it also helps with the airflow around the fuselage (less air moving from high pressure side to the low pressure side.
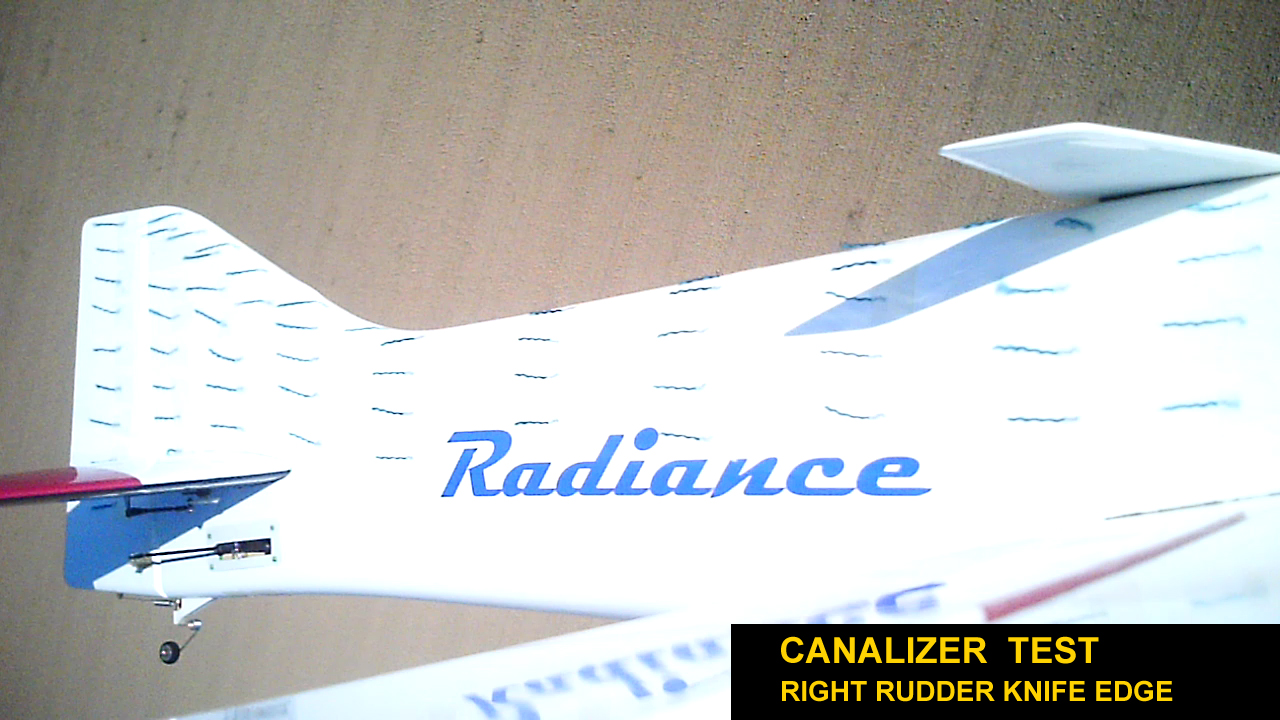
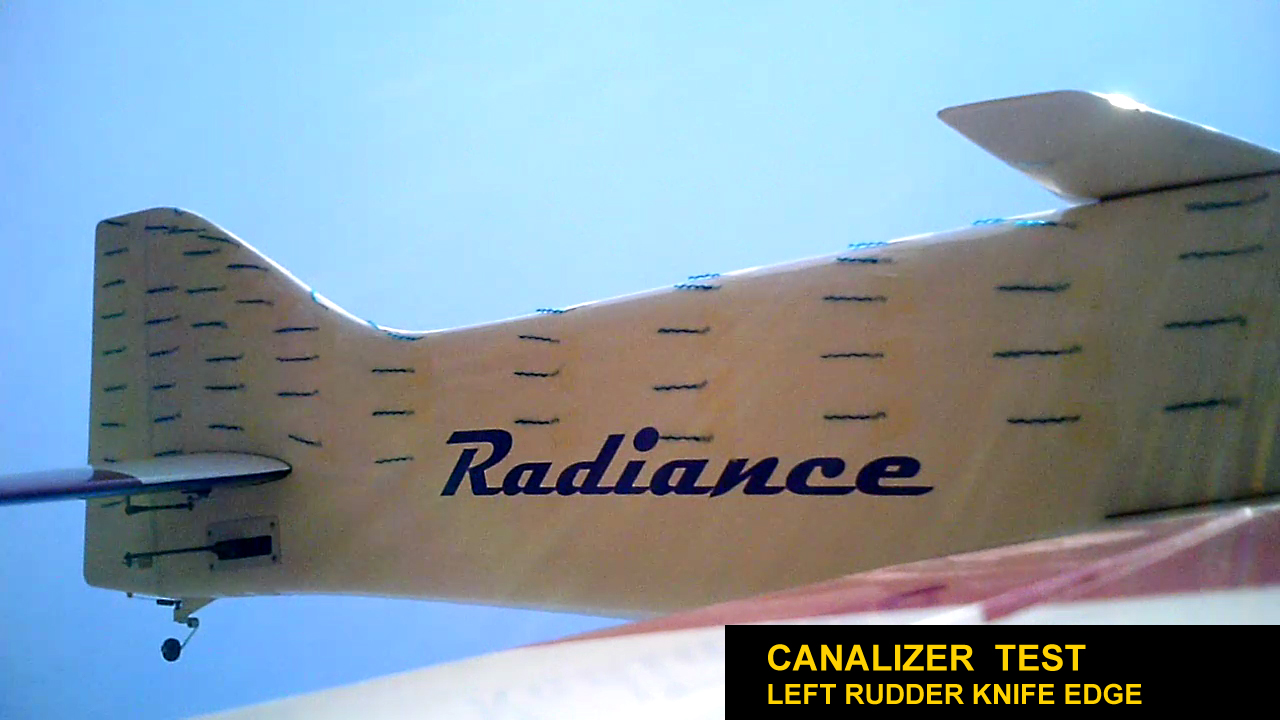
In KE loops it has its limitations though, probably because is too far from the vertical tail to effectively help in all situations. Compared to the modified fin fences, there�s more spanwise flow.
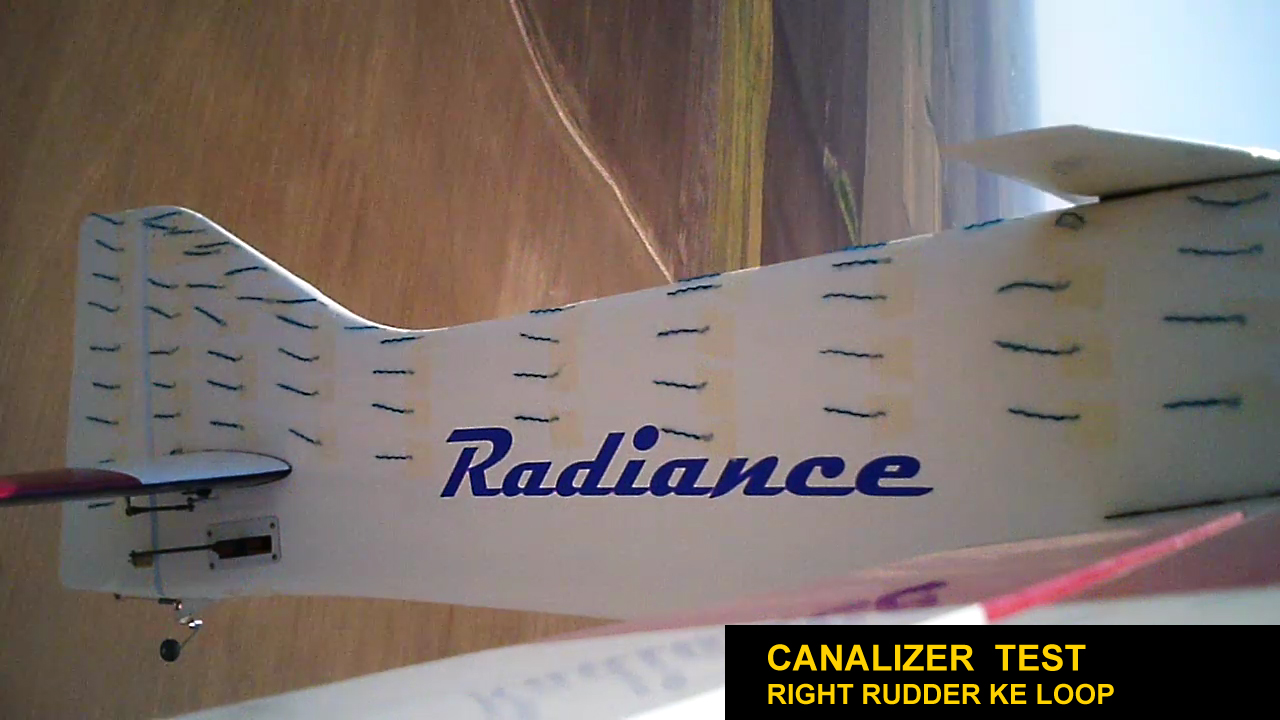
In KE loop exits, when high rudder deflections are required, both have their problems, but there�s a noticeable improvement in rudder response compared to the normal configuration.
Anyway, not all models are the same so results may be different, but in my opinion if you�re looking for a way to increase the rudder authority, the second version of the fin fences worths trying. It�s very simple to manufacture them, they weight almost nothing and they don�t have any negative impact on the flight performance. I will definitely keep them on my model.
You can see how well it works in horizontal KE; it�s interesting that it also helps with the airflow around the fuselage (less air moving from high pressure side to the low pressure side.
In KE loops it has its limitations though, probably because is too far from the vertical tail to effectively help in all situations. Compared to the modified fin fences, there�s more spanwise flow.
In KE loop exits, when high rudder deflections are required, both have their problems, but there�s a noticeable improvement in rudder response compared to the normal configuration.
Anyway, not all models are the same so results may be different, but in my opinion if you�re looking for a way to increase the rudder authority, the second version of the fin fences worths trying. It�s very simple to manufacture them, they weight almost nothing and they don�t have any negative impact on the flight performance. I will definitely keep them on my model.
09-09-2013 | 12:52 PM
#66
Thread Starter
And finally the videos... sorry for the wrong date and time, forgot how to remove or adjust them on the keychain camera.
http://www.youtube.com/watch?v=_5GA1LpBhZU http://www.youtube.com/watch?v=MroXZWgXQTY http://www.youtube.com/watch?v=gFC80iaj4c0 http://www.youtube.com/watch?v=FFTadwSFPYI
http://www.youtube.com/watch?v=_5GA1LpBhZU http://www.youtube.com/watch?v=MroXZWgXQTY http://www.youtube.com/watch?v=gFC80iaj4c0 http://www.youtube.com/watch?v=FFTadwSFPYI
Last edited by Alex Voicu; 09-09-2013 at 12:57 PM.
 09-09-2013 | 02:01 PM
#70
Thread Starter
I have the wing at +1.1deg, stab at +0.2 and canalizer at 0 deg.
I tried many incidence settings for the canalizer and different CG positions, but it still pulls to the canopy in horizontal KE. Without the canalizer it's fine (i have a little mix on for left rudder KE though).
I tried many incidence settings for the canalizer and different CG positions, but it still pulls to the canopy in horizontal KE. Without the canalizer it's fine (i have a little mix on for left rudder KE though).
09-12-2013 | 12:55 PM
#73
Senior Member
My Feedback: (1)
Excellent work done.
Yes, fuselage fences - I am really curious to see what those will effect, and if pilot feels it.
In your video even the recorded sound of the airflow around the camera microphone changes quite noticably when you enter knife edge with camera side upwards.
I like the grasshopper on your wing after plane comes to a stop.
09-15-2013 | 10:02 AM
#74
Thread Starter
I added the fuselage fences and went testing today. First thing I noticed was no change in pitch trim, probably because they are aligned with the local airflow around the turtle deck and belly pan.
The improvement in horizontal KE was nothing short of spectacular. My model always needed some visible fuselage incidence in KE flight (very similar to the Integral in that aspect), but with the fuselage fences on, the fuselage angle in KE was now close to 0, looks almost parallel to the ground.
To be honest I’m not crazy about the looks of the fuselage fences, so before testing them I was just looking for a reason to take them off, but now it looks like I have to keep them.
The video recordings confirmed my impressions; the fences stop the air leaking over the turtle deck and belly pan from the high pressure side to the low pressure side, making the fuselage much more efficient in KE flight. The tufts are barely moving during transitions from horizontal to KE.
Even more performance can be found by extending the fences forward on the canopy at the top and up to the cowl on the bottom, but I’m not sure I’ll have the time for it. We have our national contest coming up in October, so I’ll need some time for training.
Left rudder knife edge (horizontal and loop):
Right rudder knife edge (horizontal and loop):
Last edited by Alex Voicu; 09-15-2013 at 10:14 AM.
09-15-2013 | 10:07 AM
#75
Thread Starter

