


Cessna Retracts


 04-08-2016 | 03:36 AM
#203

Joined: Nov 2013
Posts: 78
Likes: 0
Received 0 Likes
on
0 Posts
From: Dayton, Ohio
The Main Gear retracts were shown at the Toledo Show last weekend.
See link below and go to the Toledo News - Radical RC Cessna Retracts page.
http://www.rcgroups.com/weak-signals-show-2016-975/
The nose retract unit is a standard Robart nose gear.
Don
See link below and go to the Toledo News - Radical RC Cessna Retracts page.
http://www.rcgroups.com/weak-signals-show-2016-975/
The nose retract unit is a standard Robart nose gear.
Don
10-09-2016 | 05:52 PM
#205

Joined: May 2010
Posts: 38
Likes: 0
Received 0 Likes
on
0 Posts
From: Spring Hill, FL
Hi Don, I bought a pair of the Cessna retracts you developed for the Cessna 337 from Radical RC back in April, I am getting ready to start my seagull 337 and wondered if you could tell me if you or someone started a new thread on the gear or plane, and where i might find it.
Thanks
Keith
Thanks
Keith
10-30-2016 | 03:04 PM
#206
Joined: Nov 2013
Posts: 78
Likes: 0
Received 0 Likes
on
0 Posts
From: Dayton, Ohio
Hi Keith. I don't check this site very often so I apologize for the late response. There is no build site, but I would be happy to answer any questions that you have. I found it most convenient to work from the underside of the fuselage so I removed all the sheeting from 3 inches in front of the rear bulkhead that was part of the fixed gear framing, all the way back to the rear of the fuselage. I added 1/8th inch plywood to the fuselagesides as well as to the rear bulkhead, for extra support in mounting the retracts.
First I made a Fiberglass bottom to replace the sheeting by stretching Saran wrap tightly over the original fuselage and 3 layers of 6 oz fiberglass cloth and epoxy resin. Once the edges are trimmed it is fastened using small screws. The bottom LG Doors are then cut out and hinged.


Retract operation Link
http://youtu.be/BJ_jE4Wk-kY Radical RC has very detailed instructions for installing the servos and adjusting the retracts for proper operation.
Let me know if I can help in anyway.
Don
First I made a Fiberglass bottom to replace the sheeting by stretching Saran wrap tightly over the original fuselage and 3 layers of 6 oz fiberglass cloth and epoxy resin. Once the edges are trimmed it is fastened using small screws. The bottom LG Doors are then cut out and hinged.
Retract operation Link
http://youtu.be/BJ_jE4Wk-kY Radical RC has very detailed instructions for installing the servos and adjusting the retracts for proper operation.
Let me know if I can help in anyway.
Don
Last edited by dkurtzid; 10-30-2016 at 04:33 PM.
11-01-2016 | 07:21 PM
#207
Joined: May 2010
Posts: 38
Likes: 0
Received 0 Likes
on
0 Posts
From: Spring Hill, FL
Hi Don thanks for the details. I bought my retracts in april when they first came out and i got the instruction page. I checked radical rc and did not see any revisions. I wondered how you attached the wires to the trunions, does not apear to be any set screws for secureing them.
Keith
Keith
11-03-2016 | 02:00 PM
#208
Joined: Nov 2013
Posts: 78
Likes: 0
Received 0 Likes
on
0 Posts
From: Dayton, Ohio
Hi Keith
The landing gear strut (wire) is sandwiched between the trunnion block pieces. To disassemble first remove the set screw using an Allen wrench and remove the trunnion shaft
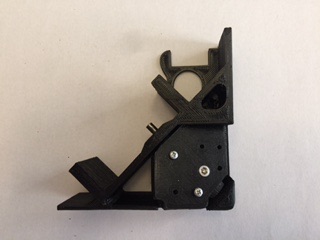

Remove the trunnion and after removing all the screws take the top and bottom parts apart
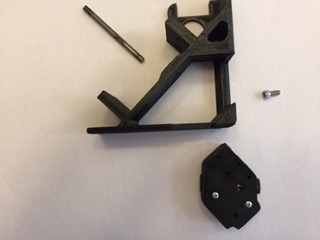
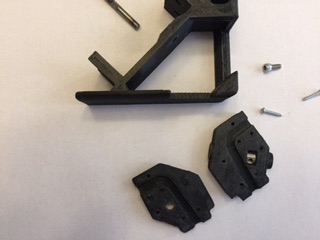
The landing gear has a 90� bend and is placed into the channel. Reinsert the trunnion shaft and start the set screw into the collar. Then place the top half of the trunnion block over the setscrew and press to sandwich the landing gear.

Reinstall all the screws and remove the trunnion shaft once again

Place the trunnion in the frame with the holes lined up to receive the trunnion shaft again. Make sure the flat spot is under the setscrew. Then tighten the setscrew onto the trunnion shaft.

The bend in the landing gear wire keeps the landing gear from rotating in the trunnion block. The setscrew keeps the trunnion block from rotating on the shaft.
let me know if you have any other questions.
Don
The landing gear strut (wire) is sandwiched between the trunnion block pieces. To disassemble first remove the set screw using an Allen wrench and remove the trunnion shaft
Remove the trunnion and after removing all the screws take the top and bottom parts apart
The landing gear has a 90� bend and is placed into the channel. Reinsert the trunnion shaft and start the set screw into the collar. Then place the top half of the trunnion block over the setscrew and press to sandwich the landing gear.
Reinstall all the screws and remove the trunnion shaft once again
Place the trunnion in the frame with the holes lined up to receive the trunnion shaft again. Make sure the flat spot is under the setscrew. Then tighten the setscrew onto the trunnion shaft.
The bend in the landing gear wire keeps the landing gear from rotating in the trunnion block. The setscrew keeps the trunnion block from rotating on the shaft.
let me know if you have any other questions.
Don
11-03-2016 | 02:25 PM
#209
Joined: Nov 2013
Posts: 78
Likes: 0
Received 0 Likes
on
0 Posts
From: Dayton, Ohio
Keith. By the way, there is an easier way by just removing the trunnion block top piece while it is still attached to the frame. Just remove all the screws and the setscrew in the top of the trunnion block, and it will come off. At that point you can insert the landing gear and place the trunnion top piece back on. However, sometimes it is difficult to get the setscrew lined up and started with the wheel collar threads. You can try this method first, and if you can't get the setscrew started you could always just disassemble it the rest of the way. Keep in mind that the set screw head is meant to fit tight in the hole of the trunnion block to keep from having slop in the mechanism.
After you take it apart and reassemble once you'll find it's pretty simple to do in the future.
don
After you take it apart and reassemble once you'll find it's pretty simple to do in the future.
don
11-09-2016 | 08:10 PM
#210
Joined: May 2010
Posts: 38
Likes: 0
Received 0 Likes
on
0 Posts
From: Spring Hill, FL
Thanks for the pictures Don
I got the instructions out , i had forgot where i put them, and with the photos i can clearly tell how the wires fit, and the information you just gave me is great. The instructions on set up seem to be good too. Did you write them?
I got the instructions out , i had forgot where i put them, and with the photos i can clearly tell how the wires fit, and the information you just gave me is great. The instructions on set up seem to be good too. Did you write them?
08-18-2025 | 02:12 AM
#212
Joined: Apr 2003
Posts: 18
Likes: 0
Received 0 Likes
on
0 Posts
From: Mount Pocono, Pa
So I was going through all of my hidden kits and misc parts and came across a radical RC Cessna retract kit and a new unopened top flite 182 kit. I am thinking of getting started on it. Anyone here have any progress they are willing to share?? I know this thread is old but it would be great to get some ideas for my build. These top flite kits are getting harder to find and I don�t want too many issues that can�t be fixed by buying a new kit. I will post my progress as I go. I may even build a mock up fuselage to do all of my experimenting before cutting into the real one.
08-18-2025 | 03:14 AM
#213
My Feedback: (1)
Greetings - I used a custom set of those retracts that were built a little larger for a C337 100" wingspan pkane I was building. Not sure if that will help, but here is my build forum: https://www.rcgroups.com/forums/show...s#post35110213
08-18-2025 | 06:26 AM
#214
My Feedback: (14)
08-18-2025 | 12:38 PM
#215
Thread Starter
I looked at the 210 when they first were available. I was hoping they would come out with a Silver Eagle, but it looks like they are long gone now. Their website is gone and their last Facebook post was from 2023.


