


Tamiya Leopard 2A6 conversion to 2A4
 02-08-2020 | 09:13 PM
#1
Thread Starter

This is another one of those long drawn-out projects that sat on the bench, occasionally got worked on, sometimes left untouched for months just like my Hooben T-55. Hooben is somewhat involved in this as well as they had originally announced their intention to release a Leopard 2A4 years ago. Since then they announced and reviewed other tanks but the Abrams and Leopard are vaporware as of 2020.
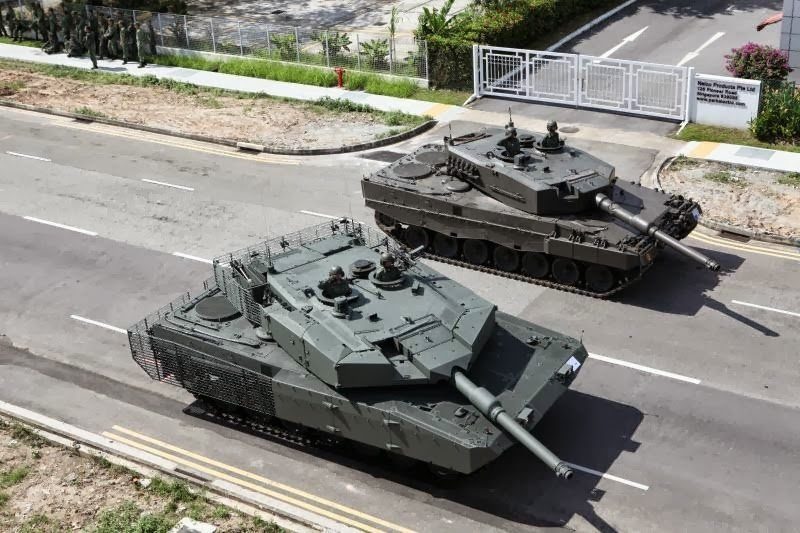
The reason for starting the project was in homage to my country Singapore's purchase of ex-Bundeswehr Leopard 2A4 stocks back in 2006 which were subsequently updated to 2SG standard, which is similar in appearance to the Leopard 2A4 Revolution. However I wasn't really a fan of the add-on applique armour which made the tank rather wide for IR games in built-up situations, plus the slat armour around the rear quarters weren't going to hold up well either!
I already owned a Tamiya Leopard 2A6 but always wanted to convert it to 2A4 but studying the exterior dimensions of the 2A4 against the 2A6 in relation to the DMD T-07 electronics package quickly led me to realize that it was far from a simple exercise. Tamiya had made extensive use of the interior space, including the arrowhead cheek armour spaces as well as the extended rear turret bustle to fit everything in. In Tamiya's WW2 tanks, the DMD/MFU are located in the hull and the turret merely carries the gun elevation and recoil gearboxes, flash capacitor and battle unit, but with the Leopard the turret rotation motor, battery, receiver and DMD T-07 utilize this space as well.

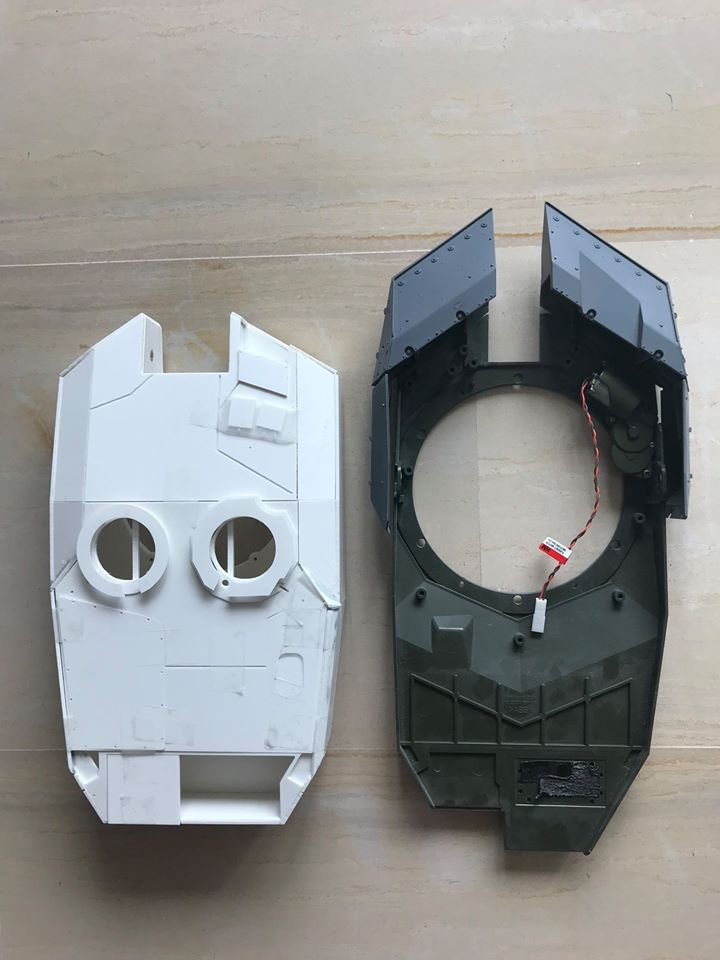
As you can see, every bit of space has been utilized. The challenge then was to figure out how to retain the Tamiya's excellent running gear and electronics while accommodating all of it in 20% less space. When a secondhand used Leopard 2A6 came up for sale, instead of cutting up my 2A6, I had my donor tank from which to perform the conversion. In retrospect it was great that I had an unmolested 2A6 to compare and study because the cutting process was extensive...... the basis of which was Christian Ludwig's 2A4 turret conversion kit. However it was intended for the Heng Long Leopard 2A6 and much more work still needed to be done to make it work together.
More in the next post......
The reason for starting the project was in homage to my country Singapore's purchase of ex-Bundeswehr Leopard 2A4 stocks back in 2006 which were subsequently updated to 2SG standard, which is similar in appearance to the Leopard 2A4 Revolution. However I wasn't really a fan of the add-on applique armour which made the tank rather wide for IR games in built-up situations, plus the slat armour around the rear quarters weren't going to hold up well either!
I already owned a Tamiya Leopard 2A6 but always wanted to convert it to 2A4 but studying the exterior dimensions of the 2A4 against the 2A6 in relation to the DMD T-07 electronics package quickly led me to realize that it was far from a simple exercise. Tamiya had made extensive use of the interior space, including the arrowhead cheek armour spaces as well as the extended rear turret bustle to fit everything in. In Tamiya's WW2 tanks, the DMD/MFU are located in the hull and the turret merely carries the gun elevation and recoil gearboxes, flash capacitor and battle unit, but with the Leopard the turret rotation motor, battery, receiver and DMD T-07 utilize this space as well.
As you can see, every bit of space has been utilized. The challenge then was to figure out how to retain the Tamiya's excellent running gear and electronics while accommodating all of it in 20% less space. When a secondhand used Leopard 2A6 came up for sale, instead of cutting up my 2A6, I had my donor tank from which to perform the conversion. In retrospect it was great that I had an unmolested 2A6 to compare and study because the cutting process was extensive...... the basis of which was Christian Ludwig's 2A4 turret conversion kit. However it was intended for the Heng Long Leopard 2A6 and much more work still needed to be done to make it work together.
More in the next post......
 02-10-2020 | 07:36 AM
#2
The crhistian's 2a4 turret has a lot of problems and innacuracies. I suggest to read my tutorila which offer a lot of changes plus details I have added with no aftermarket. Still I made some mistakes explained in the text. I tried hard to put all inside a tamiya however I dind't have one other that the already built to try so I desisted. If you need some advice I will be happy to help, contact my by facebook or private.

02-11-2020 | 02:31 AM
#3
Thread Starter
Before I continue (as I am gathering the photos) I wanted to highlight the fragile nature of the RC tank industry - the key supplier of the conversion Ludwig Modellbau suffered a nearly catastrophic fire last year and another German manufacturer I wanted to buy more parts from, HPK Modellbau suddenly called it a day. So people, get your parts while they're still available because you don't know when they'll just go away.
12-25-2020 | 05:40 AM
#4
Thread Starter
Although the tank is now done (if you're on Facebook), I will go through the thought process in tackling the problem.
First, a bit of discussion about the two variants (correct me if I am wrong as I am typing off memory) - the 2A6 is an improvement upon the basic 2A4, where it retains the basic turret structure while addressing a number of weak points of the older tank. This includes adding additional armour around the crew spaces, resulting in the arrowhead turret cheek profiles containing spaced armour, and swing-out front side quarters. The front of the lower hull similarly gets added armour plates, with the driver's hatch being changed from a swing-type to a slide-type. A known weak spot, the targeting optics, which were recessed in the 2A4, have been moved to a pod that sits proud of the turret top deck. Side skirt configurations were also changed - while I know the 2A4 uses heavy rubber side skirts, I am not sure but suspect they changed over to steel plates.
All this is great for the 1:1 tank, but when it came to the 1:16th scale tank, I was faced with a problem. Tamiya designed their 2A6 as a 2A6, and did not take into account the tank's internal dimensions. As a result electronics, wiring, and components used up the entire internal volume of the model - not good news if you need to make all that fit within a smaller space. I quickly figured out what space I would be losing:
In a nutshell, the T-07 DMD/MFU needed to be moved - the wiring for the motor cables and the gun barrel strobe unit needed someplace to go; in a normal 2A6, this was already a challenging task to manage nicely without the dreaded turret sag. Even the optical instruments droping into the turret spaces was critical. With much less volume, it was looking quite impossible!
To be honest, when I started cutting into the turret, I didn't have much of a game plan, except that I might have had to relocate major components into the lower hull by sacrificing the speaker box. Sometimes, instead of planning, you just needed to take that first step!
 12-26-2020 | 12:07 AM
#7
Thread Starter
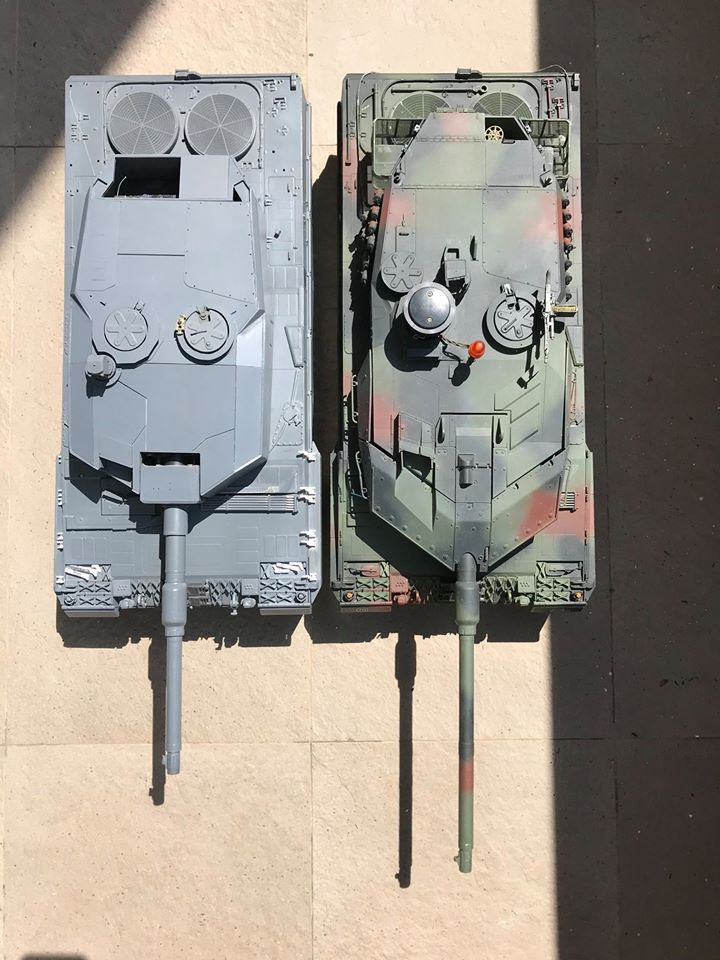
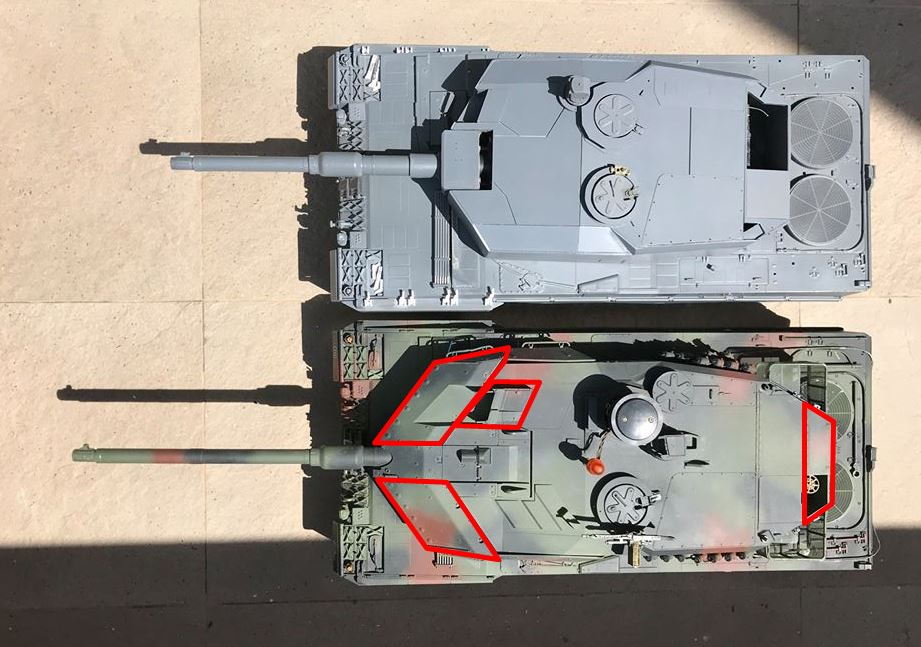
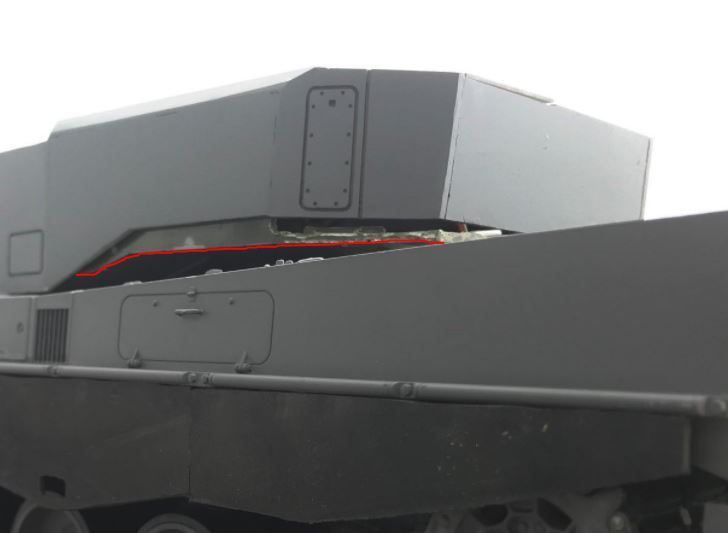
As shared, the turret is one major identifying feature that separates the Leopard 2A0 through 2A4 from the 2A5 and 6. Here are some of the major differences and implications for a RC tank conversion. Note that Heng Long uses an entirely different internal layout, so these challenges are quite unique to Tamiya - yellow is the reference line, with red being the stock 2A6 internal layout and blue being the 2A4's revised layout. Green highlights the relocated radio receiver. Everything aft of the recoil gearbox had to be shifted forward, except for the receiver, which went into the notch next to the power switch. In this photo, I have used a 1350mAH 2S LiPo in order to fit within the reduced volume, as the consequence of shifting things forward was that the battery compartment suffered. Gotta do that, or else the tank is not going anywhere!
In this photo you can also see the obvious difference of an L/44 120mm gun as opposed to the L/55 on the 2A6.
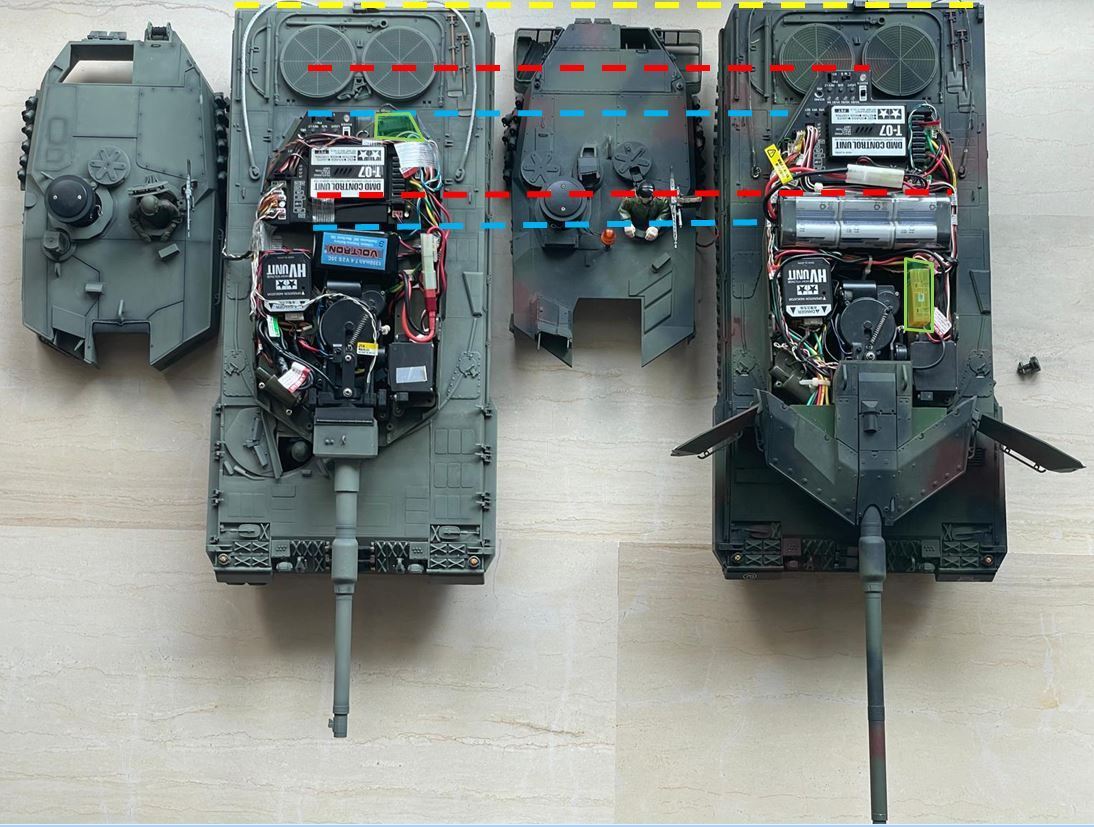
In this photo you can also see the obvious difference of an L/44 120mm gun as opposed to the L/55 on the 2A6.
12-26-2020 | 12:33 AM
#8
Thread Starter
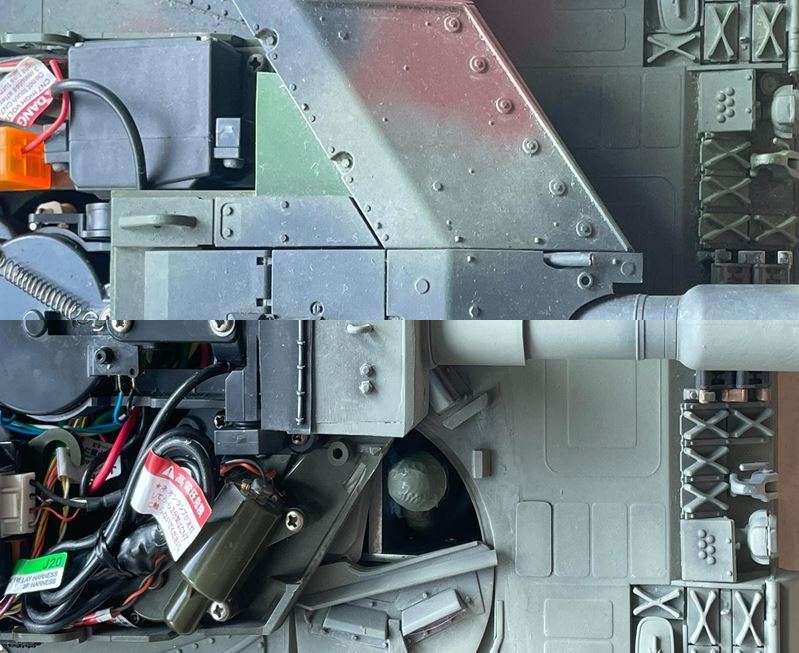
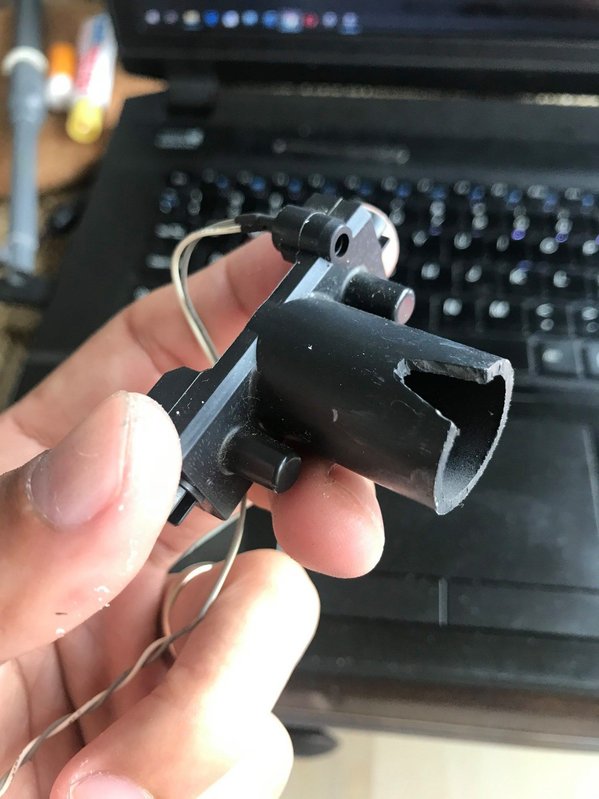
Next up - the mantlet. You can see from this split image that with the entire removal of the arrowhead spaced armour, the base of the turret is exposed. In addition to that, the C-shaped turret portion that surrounds that arrowhead mantlet has also been deleted. This meant using the Ludwig gun mantlet. It is intended for the Heng Long 2A6, and required extensive modification for it to ride on top of the Tamiya gun barrel carrier. I modified the carrier itself, as well as thinned down the Ludwig mantlet before filling in the gap with 2-part Tamiya putty.

12-26-2020 | 06:06 PM
#9
Thread Starter
Next up, the front arrowhead spaced armour, which is attached to the lower tray of the turret, is cut off with a dremel wheel, using Tamiya's handy panel lines as a guide.
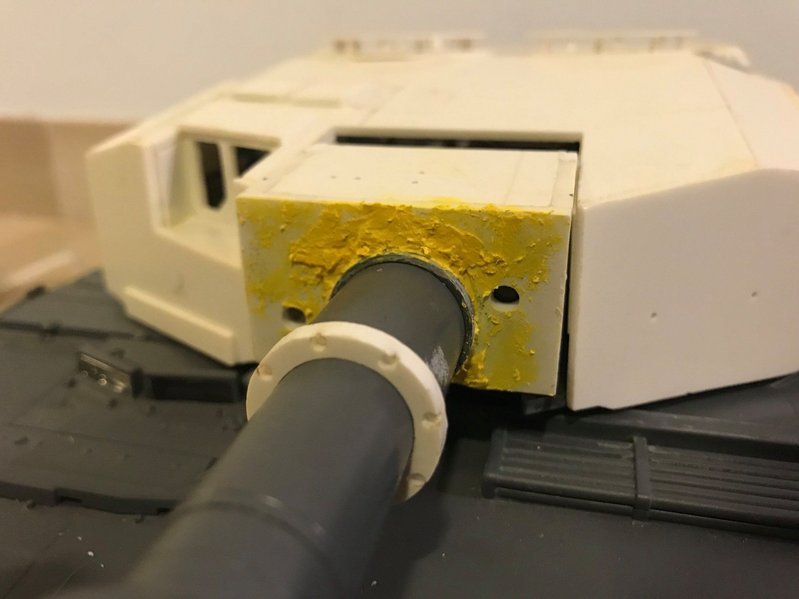
With the mantlet change, the handy mounting spot for the IR LED is also lost. Given the diameter of the 120mm I bought the Tamiya KV-2's sprue for its clip-on IR emitter. The 2A4 mantlet is also wider than the 2A6's and necessitated cutting a notch so that it would clear the gun barrel's pivot. I reckon that the mantlet took up the most time as far as the turret part of the conversion goes.


The Ludwig 2A4 conversion kit is intended for the Heng Long 2A6. The Heng Long turret carries very little components compared to the Tamiya, in addition to the required elevation and recoil gearbox which both have, Tamiya adds a battery, a HV flash unit, the large T-07 MFU as well as receiver. In addition, the angles and positions at the blue lines shown below were different, and required additional cutting and filing of the turret base pan in order to fit.

Along the turret sides where the smoke grenade launcher racks were, they didn't match well, necessitating the grafting of addition thin sheet styrene to extend coverage. Both sides had the same problem.


With the mantlet change, the handy mounting spot for the IR LED is also lost. Given the diameter of the 120mm I bought the Tamiya KV-2's sprue for its clip-on IR emitter. The 2A4 mantlet is also wider than the 2A6's and necessitated cutting a notch so that it would clear the gun barrel's pivot. I reckon that the mantlet took up the most time as far as the turret part of the conversion goes.
The Ludwig 2A4 conversion kit is intended for the Heng Long 2A6. The Heng Long turret carries very little components compared to the Tamiya, in addition to the required elevation and recoil gearbox which both have, Tamiya adds a battery, a HV flash unit, the large T-07 MFU as well as receiver. In addition, the angles and positions at the blue lines shown below were different, and required additional cutting and filing of the turret base pan in order to fit.
Along the turret sides where the smoke grenade launcher racks were, they didn't match well, necessitating the grafting of addition thin sheet styrene to extend coverage. Both sides had the same problem.
 01-01-2021 | 06:44 PM
#12
Thread Starter
Happy new year, we take a pause in the build series to snap to 2021 where we had our first meet up in over a year. 2020 in Singapore is a year marked by social distancing, a near-curfew when COVID19 hit, to a relaxation to groups of no more than 5. On December 28th the rules were relaxed to groups of up to 8, so we took the opportunity to meet up on New Year's Day with our tanks.
In addition to the 2A4, a couple of friends brought their Tamiya 2A6, and a 2A7+ Tamiya-based Okmo conversion. It is quite interesting to see the evolution of the basic Leopard 2 platform through the years as well in 1/16th scale form.
The normal build log will resume in the next post. Stay tuned!


In addition to the 2A4, a couple of friends brought their Tamiya 2A6, and a 2A7+ Tamiya-based Okmo conversion. It is quite interesting to see the evolution of the basic Leopard 2 platform through the years as well in 1/16th scale form.
The normal build log will resume in the next post. Stay tuned!
The following users liked this post:
bowlman (01-02-2021)
01-02-2021 | 04:20 PM
#13

Heh... Yea... Doing a conversion from one to another generation sure can be nerve wrecking... I too experienced that when I did my OKMO 2A7+ one documented on Imgur imgur.com/a/GzLRqvl ( can't post links, yet )
Sawing off that rear portion of the turret sure as hell was a "press [F] to pay respect" moment and the darn DMD-T07 would not fit after that necessitating a modding of its casing and later total 3D Printing into a better shape to satisfy my needs of lowering its profile even further.
Sawing off that rear portion of the turret sure as hell was a "press [F] to pay respect" moment and the darn DMD-T07 would not fit after that necessitating a modding of its casing and later total 3D Printing into a better shape to satisfy my needs of lowering its profile even further.
02-24-2021 | 06:06 AM
#14
Thread Starter
I am slightly annoyed that Facebook has dropped the links to my previous post so I am reposting them again. I've also added a set of new photos of the 2A4 in the field with some subtle improvements (see if you notice them)


The following users liked this post:
Pnzjgr (02-24-2021)
03-27-2021 | 06:12 PM
#15
Thread Starter
I�ve not been gone, or forgotten, just caught up in other life things. Here�s the next installment of the conversion saga, which isn�t 2A4-specific but more to correct the chassis equipment to my liking.
The tank came with some nice upgrades from AFV - suspension reinforcement, shafts as well as hull brace. The suspension arms and track tensioner was from Impact, and the tensioner was incompatible with the AFV hull brace(more on that below), so the owner lopped off the front bit. As I had another Leopard 2 with the same hull and tensioner setup, I knew that the AFV tensioner kit would work with their hull brace and set about ordering replacement parts as I like my tank complete.

This is what an unmodified end plate should look like

This was what was done to fit an Impact track tensioner

The reason is because the standard sleeve is too short to accommodate the thicker plate as well as the plastic tub. Thus the left side piece is required.

Some emails and a lengthy wait of two months from AFV in the summer of 2020, (remember COVID brought a lot of freight disruptions even if it was shipped via DHL) and I had my replacement end plates and adapters.
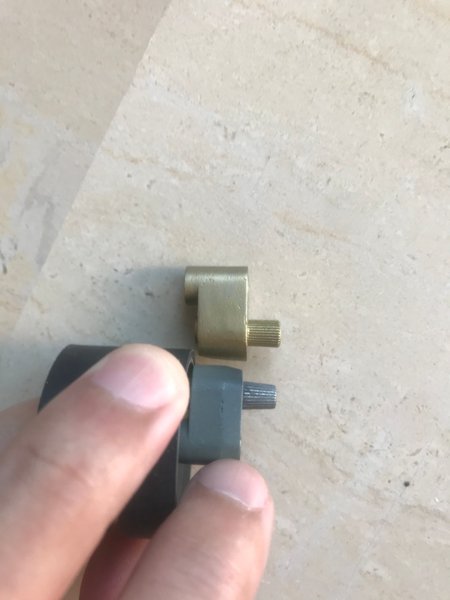
I had a second surprise though, as the adapter I got was intended for older versions of the adapter that had a tapered profile. The AFV tensioner I purchased was improved and had a square profile which I feel provided a more positive interface during installation and reduced chances of stripping the splines during installation. In the end, I resolved the drama by swapping my brand new tensioners with a friend that had the older version.
Home and all together again. Note that the front glacis features a brace that is now restored to tie the front end together.
The tank came with some nice upgrades from AFV - suspension reinforcement, shafts as well as hull brace. The suspension arms and track tensioner was from Impact, and the tensioner was incompatible with the AFV hull brace(more on that below), so the owner lopped off the front bit. As I had another Leopard 2 with the same hull and tensioner setup, I knew that the AFV tensioner kit would work with their hull brace and set about ordering replacement parts as I like my tank complete.
This is what an unmodified end plate should look like
This was what was done to fit an Impact track tensioner
The reason is because the standard sleeve is too short to accommodate the thicker plate as well as the plastic tub. Thus the left side piece is required.
Some emails and a lengthy wait of two months from AFV in the summer of 2020, (remember COVID brought a lot of freight disruptions even if it was shipped via DHL) and I had my replacement end plates and adapters.
I had a second surprise though, as the adapter I got was intended for older versions of the adapter that had a tapered profile. The AFV tensioner I purchased was improved and had a square profile which I feel provided a more positive interface during installation and reduced chances of stripping the splines during installation. In the end, I resolved the drama by swapping my brand new tensioners with a friend that had the older version.
Home and all together again. Note that the front glacis features a brace that is now restored to tie the front end together.
Last edited by cleong; 03-27-2021 at 07:07 PM.
03-27-2021 | 07:05 PM
#16
Thread Starter
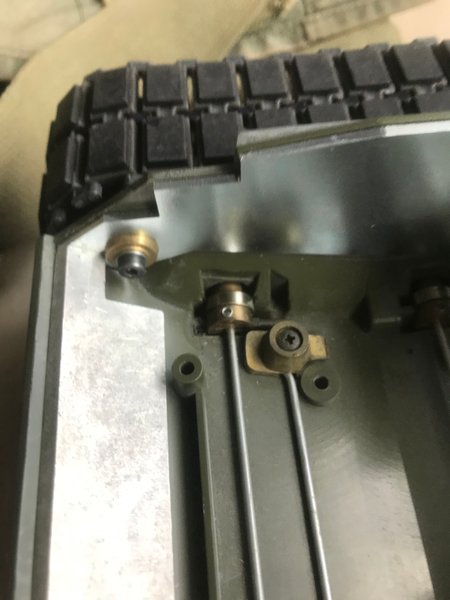
One of the omissions of the Tamiya Leopard was rubber tires on their idler wheels. A set of King Kong RC machined aluminium idler wheels were duly procured off eBay.

It arrived in Singapore very quickly, taking just a little over a week.


Machining standard was good, although I encountered a slight hiccup trying to fasten the bolts that tied the two wheel halves together. The solution in the end was a 2mm hex bolt head with nuts stacked at the end of the screw thread for extra purchase. Remember to use thread lock!

The rubber that is visible on the Tamiya idler wheel are bicycle inner tubes cut and glued to the wheel.

Side by side comparison with a standard Tamiya 2A6 idler wheel shows some differences such as a different bolt count (undoubtedly due to space limitations for hardware) as well as a simplified wheel hub. Oh well given that it is mostly hidden under the tank's armoured skirt, this is function over form.

The differences are more obvious once painted. I've had to insert a washer into the idler shaft as the rim of the King Kong wheel would rub on the idler arm. I guess with each manufacturer having slightly different tolerances, the variances start adding up. I don't think this will affect too much, though.
It arrived in Singapore very quickly, taking just a little over a week.
Machining standard was good, although I encountered a slight hiccup trying to fasten the bolts that tied the two wheel halves together. The solution in the end was a 2mm hex bolt head with nuts stacked at the end of the screw thread for extra purchase. Remember to use thread lock!
The rubber that is visible on the Tamiya idler wheel are bicycle inner tubes cut and glued to the wheel.
Side by side comparison with a standard Tamiya 2A6 idler wheel shows some differences such as a different bolt count (undoubtedly due to space limitations for hardware) as well as a simplified wheel hub. Oh well given that it is mostly hidden under the tank's armoured skirt, this is function over form.
The differences are more obvious once painted. I've had to insert a washer into the idler shaft as the rim of the King Kong wheel would rub on the idler arm. I guess with each manufacturer having slightly different tolerances, the variances start adding up. I don't think this will affect too much, though.
Last edited by cleong; 03-27-2021 at 07:26 PM.
03-30-2021 | 06:38 AM
#17
Thread Starter
And now we get into the real meat and potatoes of the conversion - the modifications that are necessary to the driver's hatch. Before we go on, I must emphasize that this work is not done by me, as I lacked the necessary talent to bring this forward. What I had done however was to commit to a course of action by modifying the conversion parts so that they would work with Tamiya's LED lighting box and upper hull retention system. It meant that when a tank buddy of mine offered to take on the conversion, he was committed to a specific approach, which resulted in a large amount of scratchbuilding:

In this photo, you can see the the Ludwing conversion parts cut at an angle to retain the necessary changes and retaining as much of the stock plastic as possible. You can also see the driver's hatch area, pay attention to the colour of the styrene which is analogous to plastic thickness - more on that in the next post.

With the superfluous parts removed (gun barrel cleaning rods and housing) by grinding, it is clear that Tamiya did not provide enough plastic material underneath, and there are missing parts of the hull compared to the 2A4.

Once the hull has been cut to accommodate the conversion fillet.

Bits of scrap styrene are next fitted in to fill the gaps and reduce the amount of filler needed to smooth out the surfaces. Parts are also salvaged from the original 2A6 hull such as periscopes, and little details such as bolt heads, mounting plates and various deflector panels are added.

Much more action is going on under the hull and an entire reinforcement section is added in, as the driver's hatch at that location is dangerously thin after milling for the necessary height level differences compared to the hull.

Despite being able to retain the front hull mounting clip, my builder had to scratch build a mount so that the LED light box is able to remain in its stock position to make it easier to re-connect the fibre optic lines for the lighting system.
In this photo, you can see the the Ludwing conversion parts cut at an angle to retain the necessary changes and retaining as much of the stock plastic as possible. You can also see the driver's hatch area, pay attention to the colour of the styrene which is analogous to plastic thickness - more on that in the next post.
With the superfluous parts removed (gun barrel cleaning rods and housing) by grinding, it is clear that Tamiya did not provide enough plastic material underneath, and there are missing parts of the hull compared to the 2A4.
Once the hull has been cut to accommodate the conversion fillet.
Bits of scrap styrene are next fitted in to fill the gaps and reduce the amount of filler needed to smooth out the surfaces. Parts are also salvaged from the original 2A6 hull such as periscopes, and little details such as bolt heads, mounting plates and various deflector panels are added.
Much more action is going on under the hull and an entire reinforcement section is added in, as the driver's hatch at that location is dangerously thin after milling for the necessary height level differences compared to the hull.
Despite being able to retain the front hull mounting clip, my builder had to scratch build a mount so that the LED light box is able to remain in its stock position to make it easier to re-connect the fibre optic lines for the lighting system.
Last edited by cleong; 03-30-2021 at 07:04 AM.
03-31-2021 | 02:40 AM
#19
Thread Starter
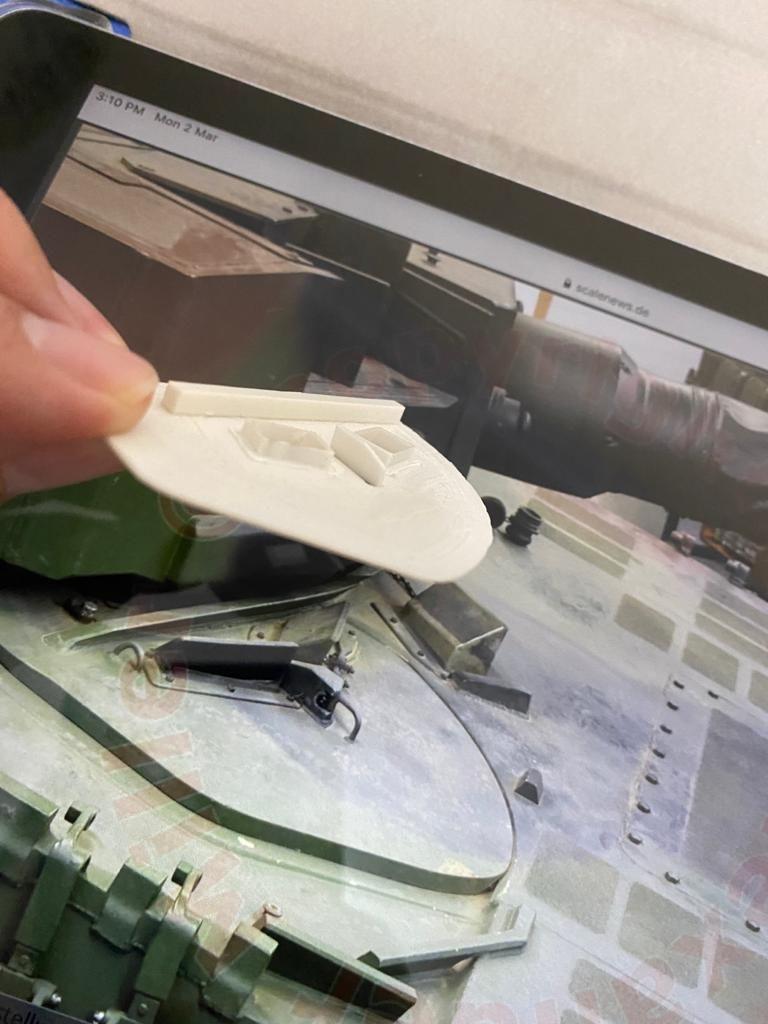
The Ludwig driver�s hatch is too thin to be accurate or sturdy - probably as a result of milling to include representations of the periscope sights. However a comparison with the actual hatch shows the difference in thickness.

My builder used the Ludwig part as a template and remade the hatch in thicker styrene sheet.

The aforementioned periscopes are salvaged from the Tamiya hatches.

This photo is used as a reference for the various details of this particular part of the hull.

Result. Most of the details you see here are scratch-built.


