


Hooben Merkeva 4M has arrived
 12-14-2021, 08:37 AM
#76
Honestly Rich, sounds like reinventing the wheel, basically scratch build the model correctly and add the 'models' detail skin and bits over it
The initial release T55A from Hooben that I modeled almost went that way for sure
The initial release T55A from Hooben that I modeled almost went that way for sure
 12-14-2021, 09:33 AM
#77

Thread Starter

I want to make this tank work. I enjoy the challenge to an extent. Like when I built the DKlM M60a3 and haul ass with it and rock the battlefield. It’s a one of a kind with its performance. Also my M5 is going quite well. Also did that re-engineering on an old Leopard. I enjoy engineering challenges, but didn’t expect that with a RTR tank.
There are specific week points Fsttanks and I identified quickly and they have proven true. I’m working through it and with the cooperation of Hooben, I believe I can resolve their flaws. But a I doubt they will sell any more of these, Henglong will clean up the market. Just like Tamiya will take the Centurian market from Haya. If I were Haya, I would immediately drop that Centurian project now and not waste another penny and immediately progress to the M60a3 project before anyone else does it. At his price point compared toTamiya, he won’t sell many Centurians.
There are specific week points Fsttanks and I identified quickly and they have proven true. I’m working through it and with the cooperation of Hooben, I believe I can resolve their flaws. But a I doubt they will sell any more of these, Henglong will clean up the market. Just like Tamiya will take the Centurian market from Haya. If I were Haya, I would immediately drop that Centurian project now and not waste another penny and immediately progress to the M60a3 project before anyone else does it. At his price point compared toTamiya, he won’t sell many Centurians.
12-14-2021, 10:53 AM
#78
Hi Rich
If you are using Shapeways steel printed parts make sure to scale the .STL up by 2%. The process of making the parts causes them to shrink by about 2%. May not be a problem in the end. I'd hate to see you spend $100 and they don't fit or don't fit with a mating part. The material is very tough to machine afterwards (but can be ground or machined with carbide tools).
The Shapeways stainless/bronze steel is strong and tough as heck, so would work ok for this part. The Multi-jet Fusion plastic (Nylon P12) is much less expensive and would be a good choice as well, and no shrink issues. This material is sintered so is very impact and break resistant.
Best regards,
Bob
12-15-2021, 03:01 PM
#79


Hi Rich
If you are using Shapeways steel printed parts make sure to scale the .STL up by 2%. The process of making the parts causes them to shrink by about 2%. May not be a problem in the end. I'd hate to see you spend $100 and they don't fit or don't fit with a mating part. The material is very tough to machine afterwards (but can be ground or machined with carbide tools).
The Shapeways stainless/bronze steel is strong and tough as heck, so would work ok for this part. The Multi-jet Fusion plastic (Nylon P12) is much less expensive and would be a good choice as well, and no shrink issues. This material is sintered so is very impact and break resistant.
Best regards,
Bob
If you are using Shapeways steel printed parts make sure to scale the .STL up by 2%. The process of making the parts causes them to shrink by about 2%. May not be a problem in the end. I'd hate to see you spend $100 and they don't fit or don't fit with a mating part. The material is very tough to machine afterwards (but can be ground or machined with carbide tools).
The Shapeways stainless/bronze steel is strong and tough as heck, so would work ok for this part. The Multi-jet Fusion plastic (Nylon P12) is much less expensive and would be a good choice as well, and no shrink issues. This material is sintered so is very impact and break resistant.
Best regards,
Bob
12-16-2021, 09:14 PM
#80
I wouldn't recommend the "versatile plastic" - Shapeway's standard nylon for a high stress part. Perfectly ok for hull parts, turret, gun mount and other parts. But straight raw nylon will absorb moisture and could eventually fail by cracking if under load (like weight of model). The versatile nylon is also a little on the brittle side.
I'd stick with Multijet Fusion P12 with no glass beads for highest strength. Its a sintered nylon so has less moisture absorption and better impact strength than the standard nylon. I use it for gears and high strength parts and its great. I'd still paint it to reduce the chance of moisture absorption. It is a high grade engineering plastic and is still pretty reasonably priced (1/2 to 2/3 less than steel).
ASA would be ok for home printed parts. It has good UV properties, but contains Acrylic so will be on the brittle side, as well as absorb moisture over time.
12-16-2021, 10:28 PM
#81
Thread Starter
Thankyou so much for the help guys.
Last week as soon as my friend opened the print files and split them into singles for me I ordered one of each side in metal. If its a tad under dimension, it may not matter, if it does I wasted 100 bucks. EAch one was $40.
Based on your advice I ordered 2 each of the P12. That was $7.50 each. I will put the metal one on when I get it and see if it works.
With the mod my friend made to remove the nut recess in the back of the arm, they should be quite a bit stronger in the plastic version so will see how those hold up. Will probably have to get some shorter screws now... The parts are all due mid January. Wow they are slow...
The following users liked this post:
herrmill (12-24-2021)
12-17-2021, 11:08 AM
#83
Thread Starter
12-17-2021, 01:08 PM
#84
So I was browsing around last night looking for filament when I noticed a glass fiber infused nylon filament. I'm not a huge fan of nylon myself but since you have the file now you can do something like a reverse mold fairly easily now. Heck if you want to get fancy you could always do something like a forged carbon fiber mold and it would be set forever. I've never done a CF mold before but didn't look too hard from the YT videos online.
12-22-2021, 01:41 AM
#85
Мой друг только бачок проверил дома ..
Не сомневаюсь, что из него получится отличная модель.
Из железа умел, из пластика будет легче ..
Пока все устраивает, кроме ....: Сумасшедший: ..... звук, по нашим советам, модуль нашего парня будет установил .... ДК. https://dkmodule.ru/tank/description/
hooben 1/16 merkava 4m - ???????? 2
Не сомневаюсь, что из него получится отличная модель.
Из железа умел, из пластика будет легче ..
Пока все устраивает, кроме ....: Сумасшедший: ..... звук, по нашим советам, модуль нашего парня будет установил .... ДК. https://dkmodule.ru/tank/description/
hooben 1/16 merkava 4m - ???????? 2
Last edited by Pavel Pankratov; 12-22-2021 at 01:46 AM.
01-10-2022, 08:56 PM
#86
Thread Starter
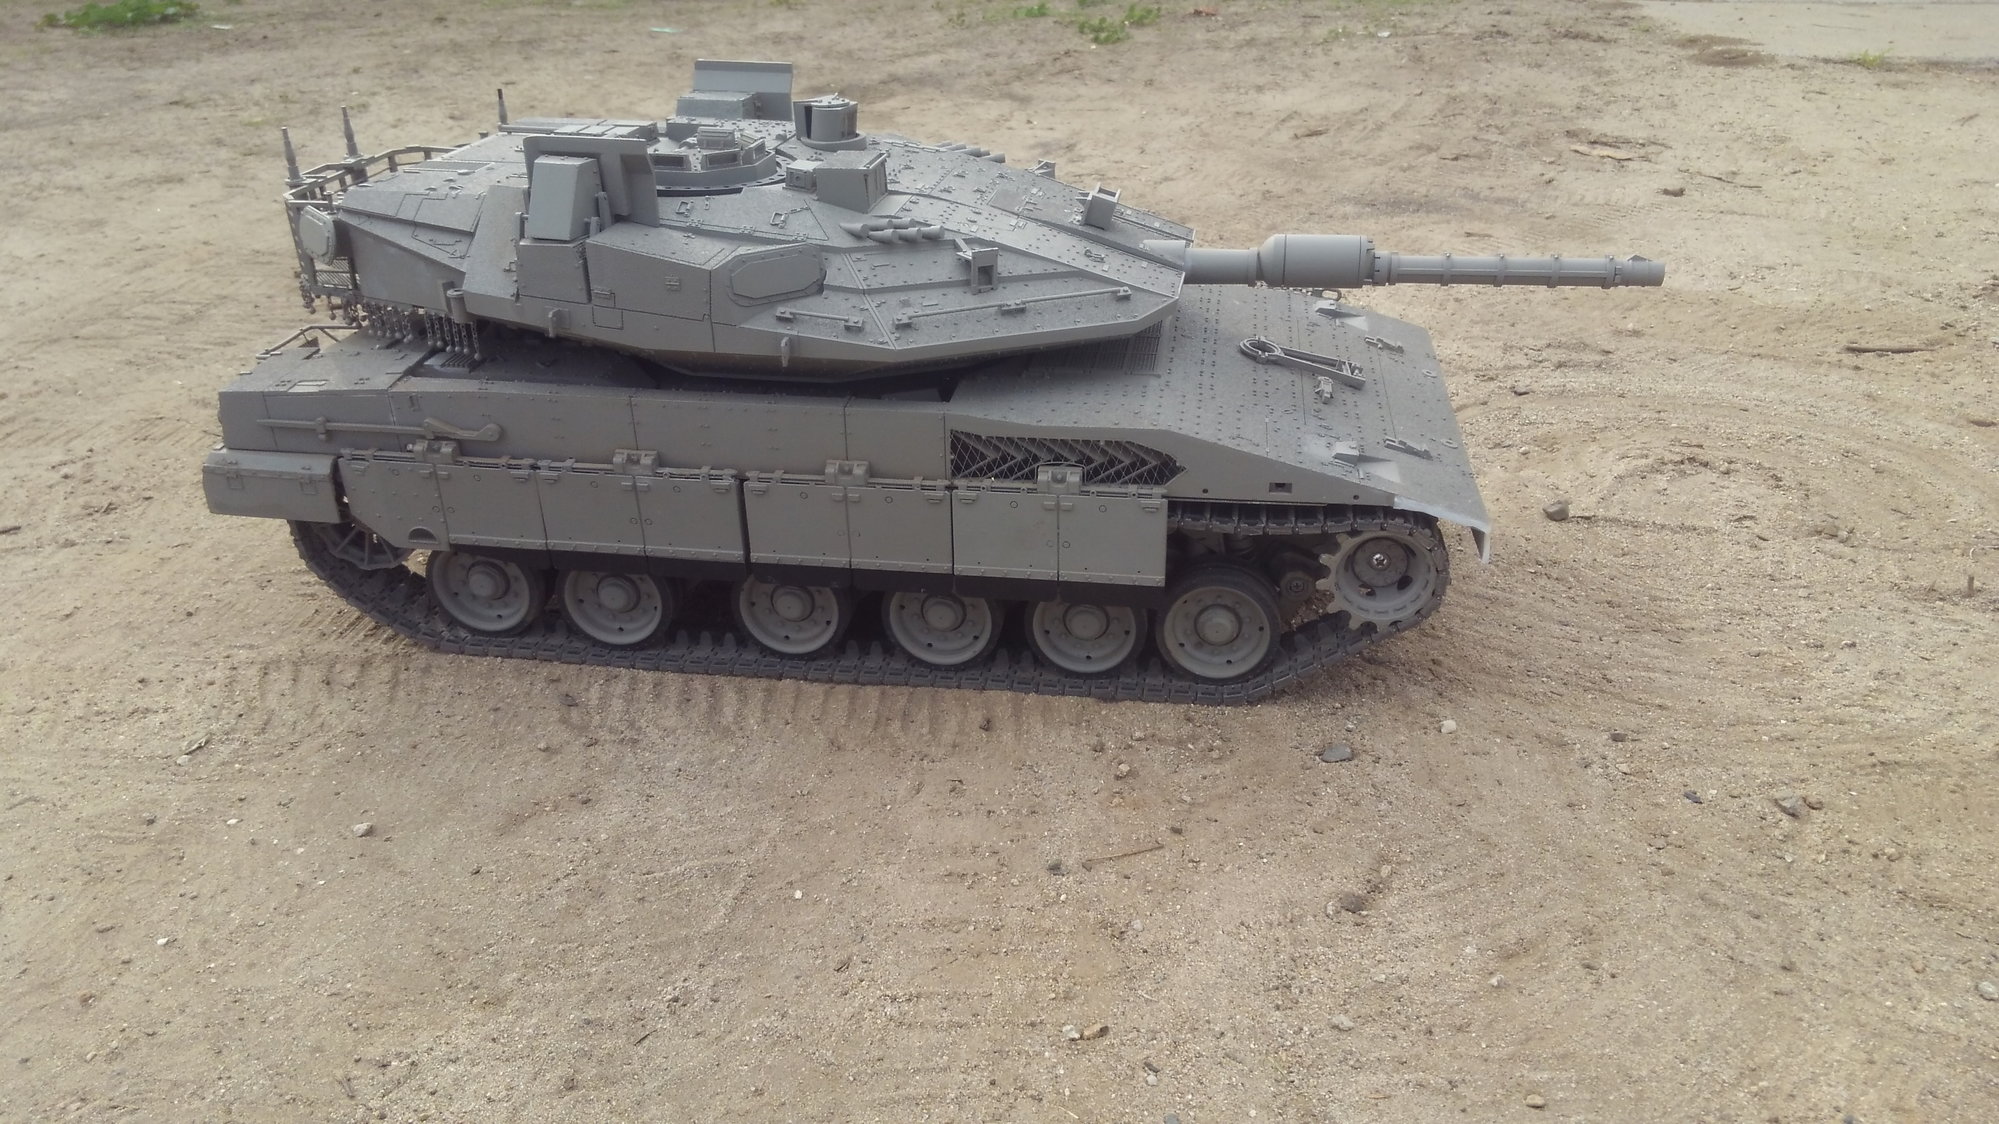
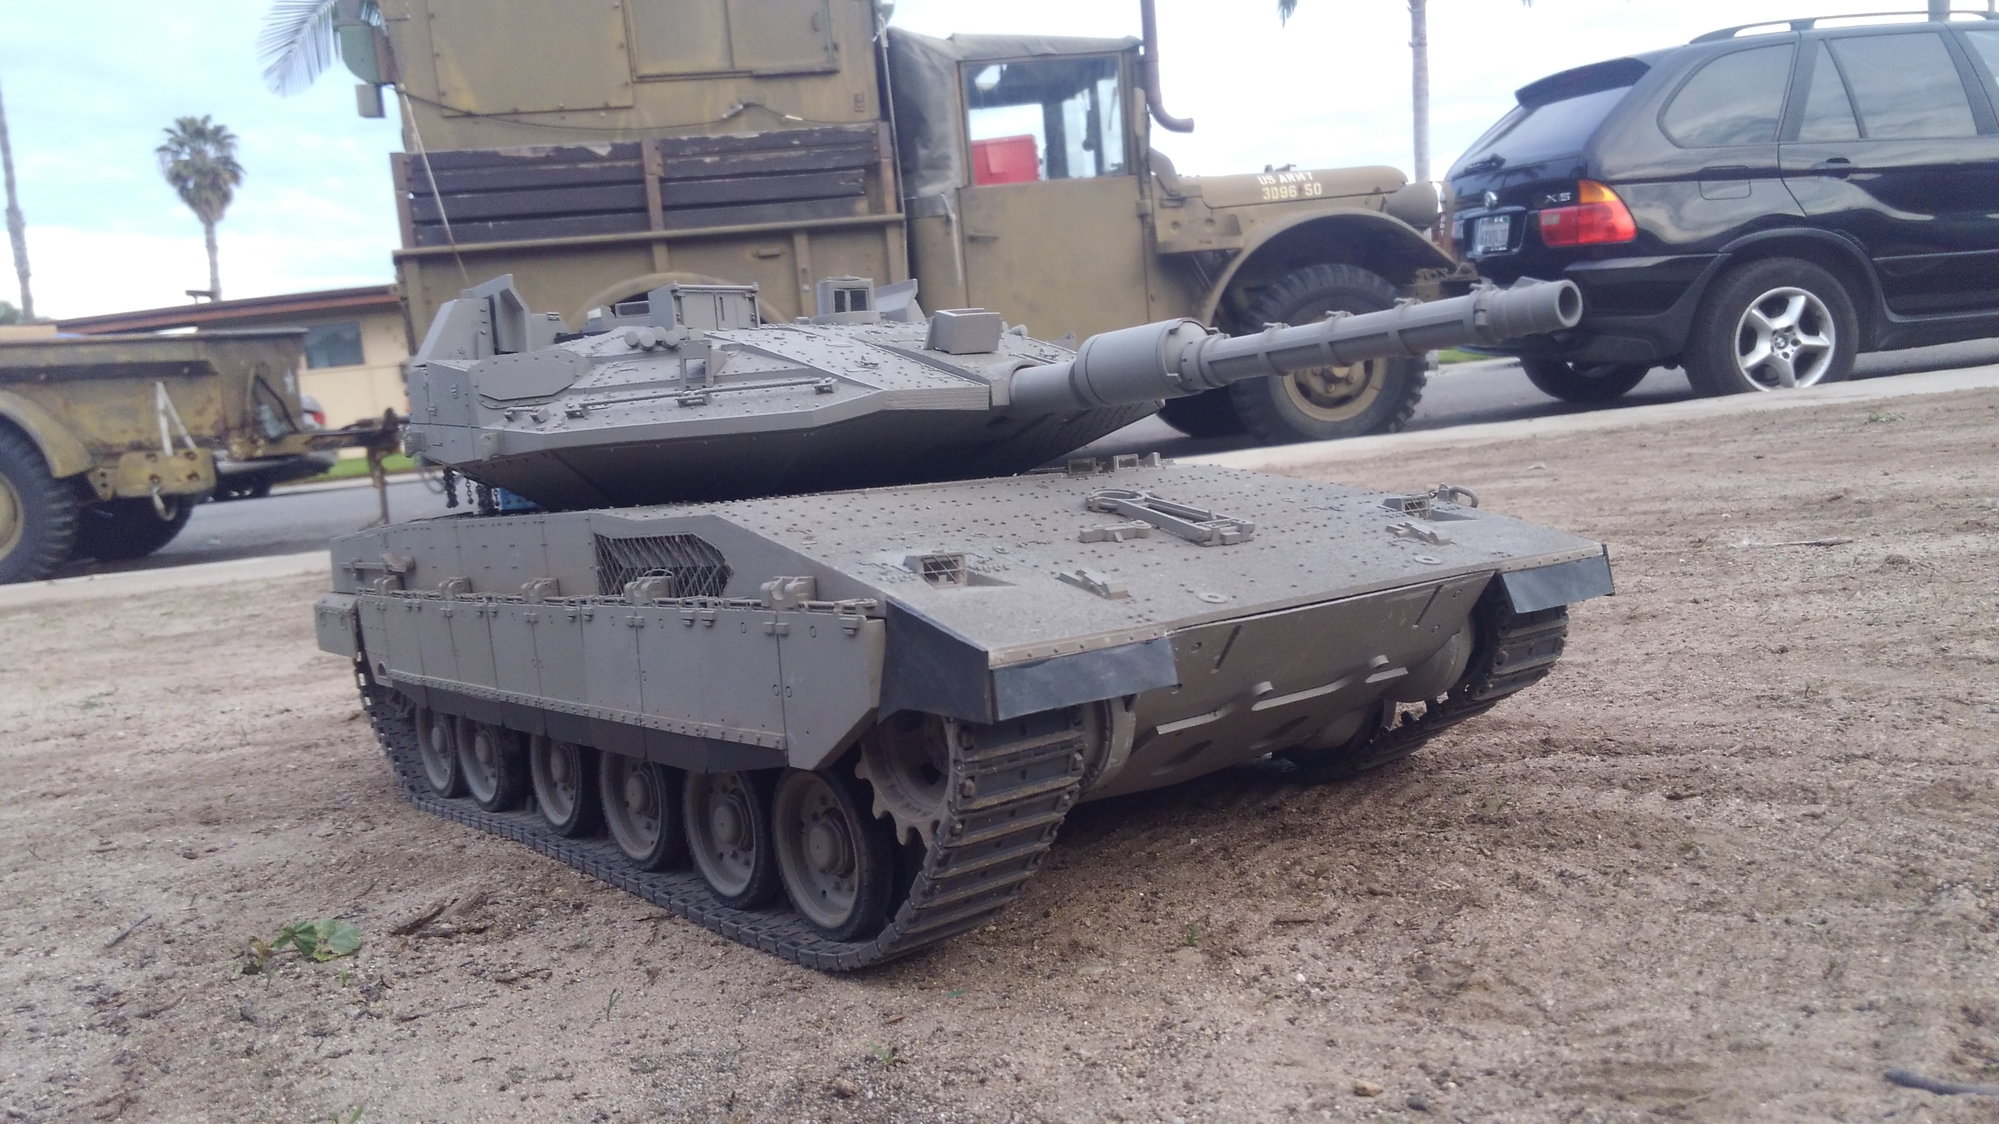
Ok so Im back torturing myself with the Hooben Merkava again.
The 3d printed parts all arrived. The two metal arms I hope will turn out to not be needed. Oh my, they are very hard metal. I have to drill out the screw hole and broke two bits,, inside the screw hole point to point if you can belive that, One drill bit was sent to open up the back end to try and save the part to extract the first, but after two hours with a friggin tiny ass punch and lots of torching and cussing the mad scientist got both drill bits out. Call me double lucky. So maybe I will use them if I get to that need. Would like them to be a 100 dollar expirement I dont need.
I have a hand full of P12 control arms that have the nut cavity deleted by my good friend Ksoc. This makes the arm much stronger at the point of failure plus a stronger plastic material.
Also, I learned the wheels and idlers use the same bearing size as a tamiya sherman so I replaced a few with ball bearings from my stock.... ask me how many of those I stock and why I would lol.....
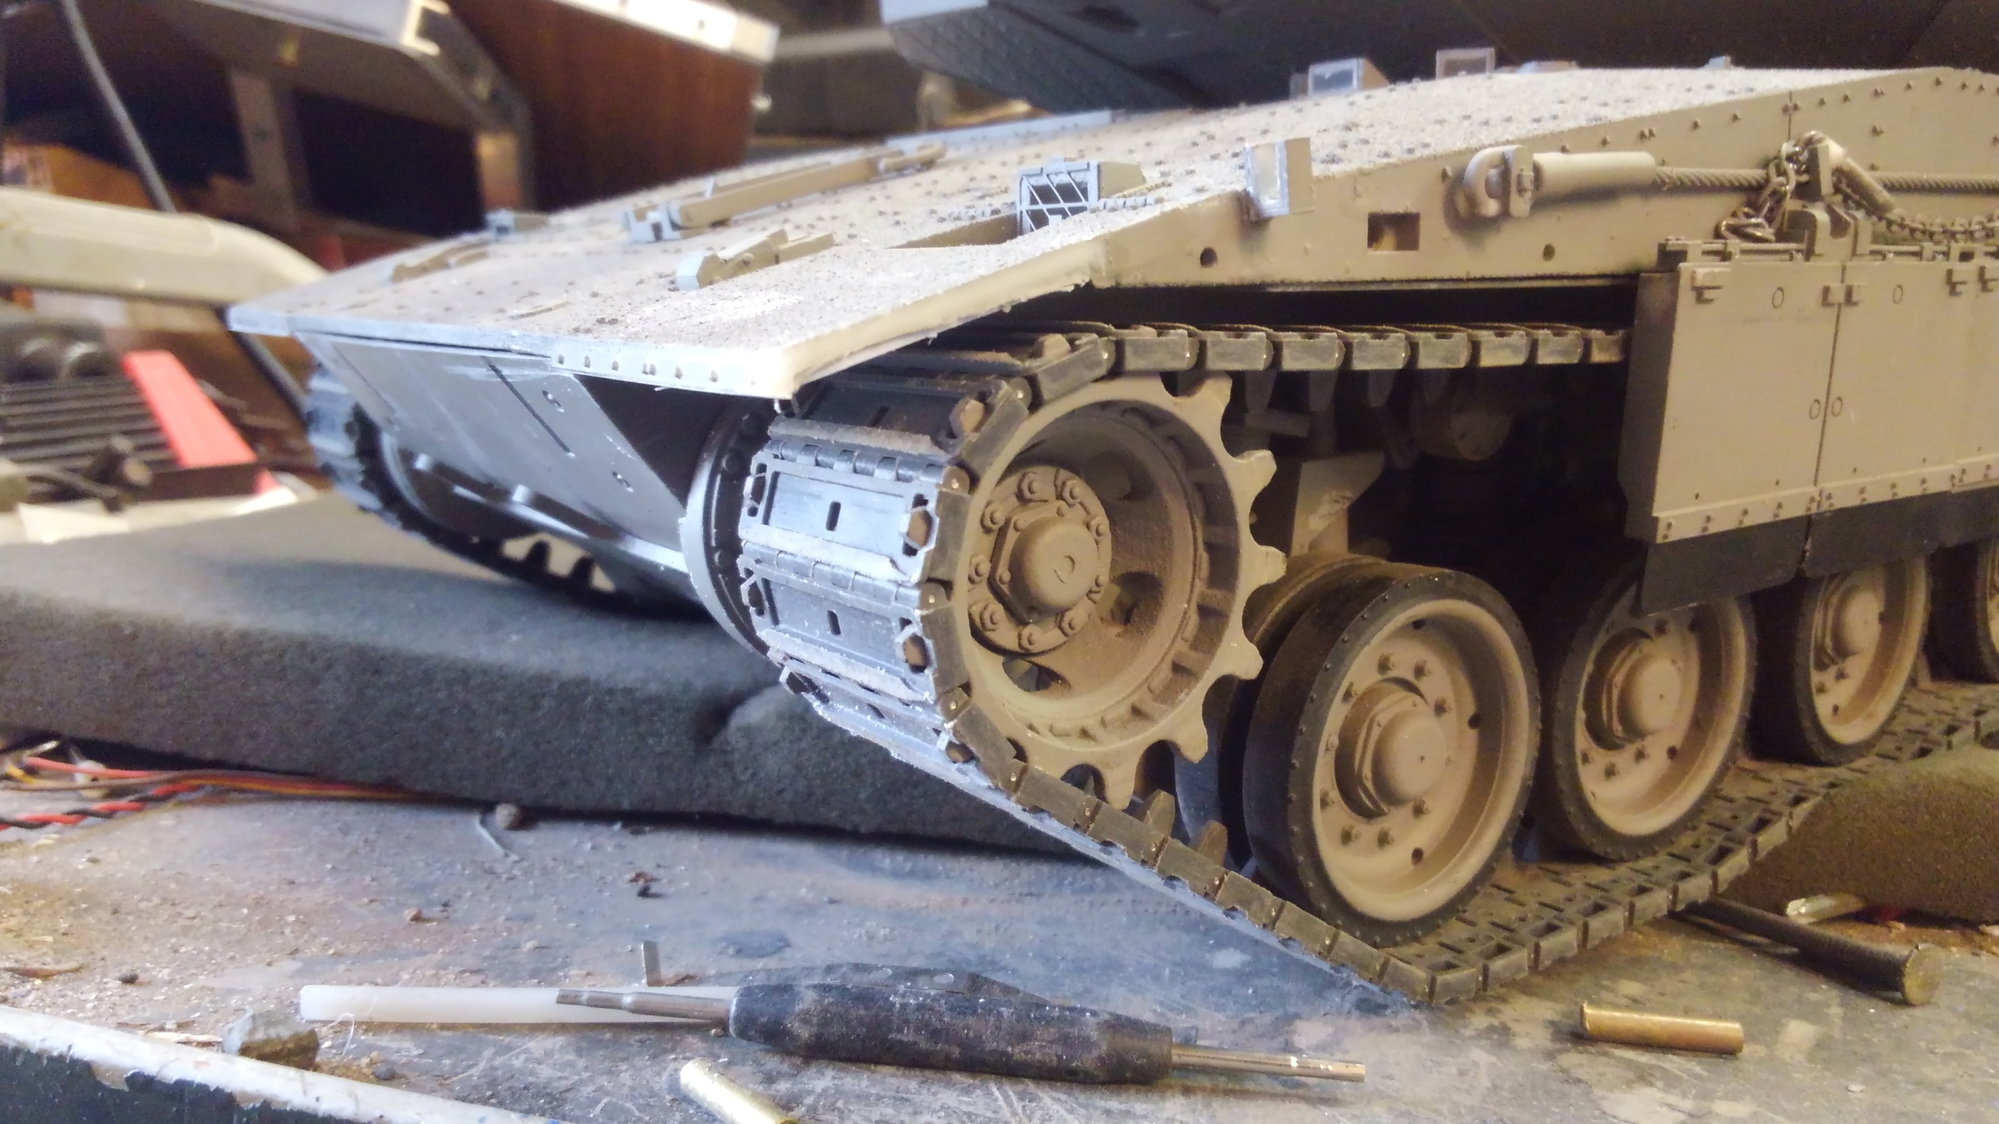
So after that adventure to get back to where I was a few months ago.... I went driving and was still loosing the track off the sprockets.. Which just should not happen with a front drive tank.
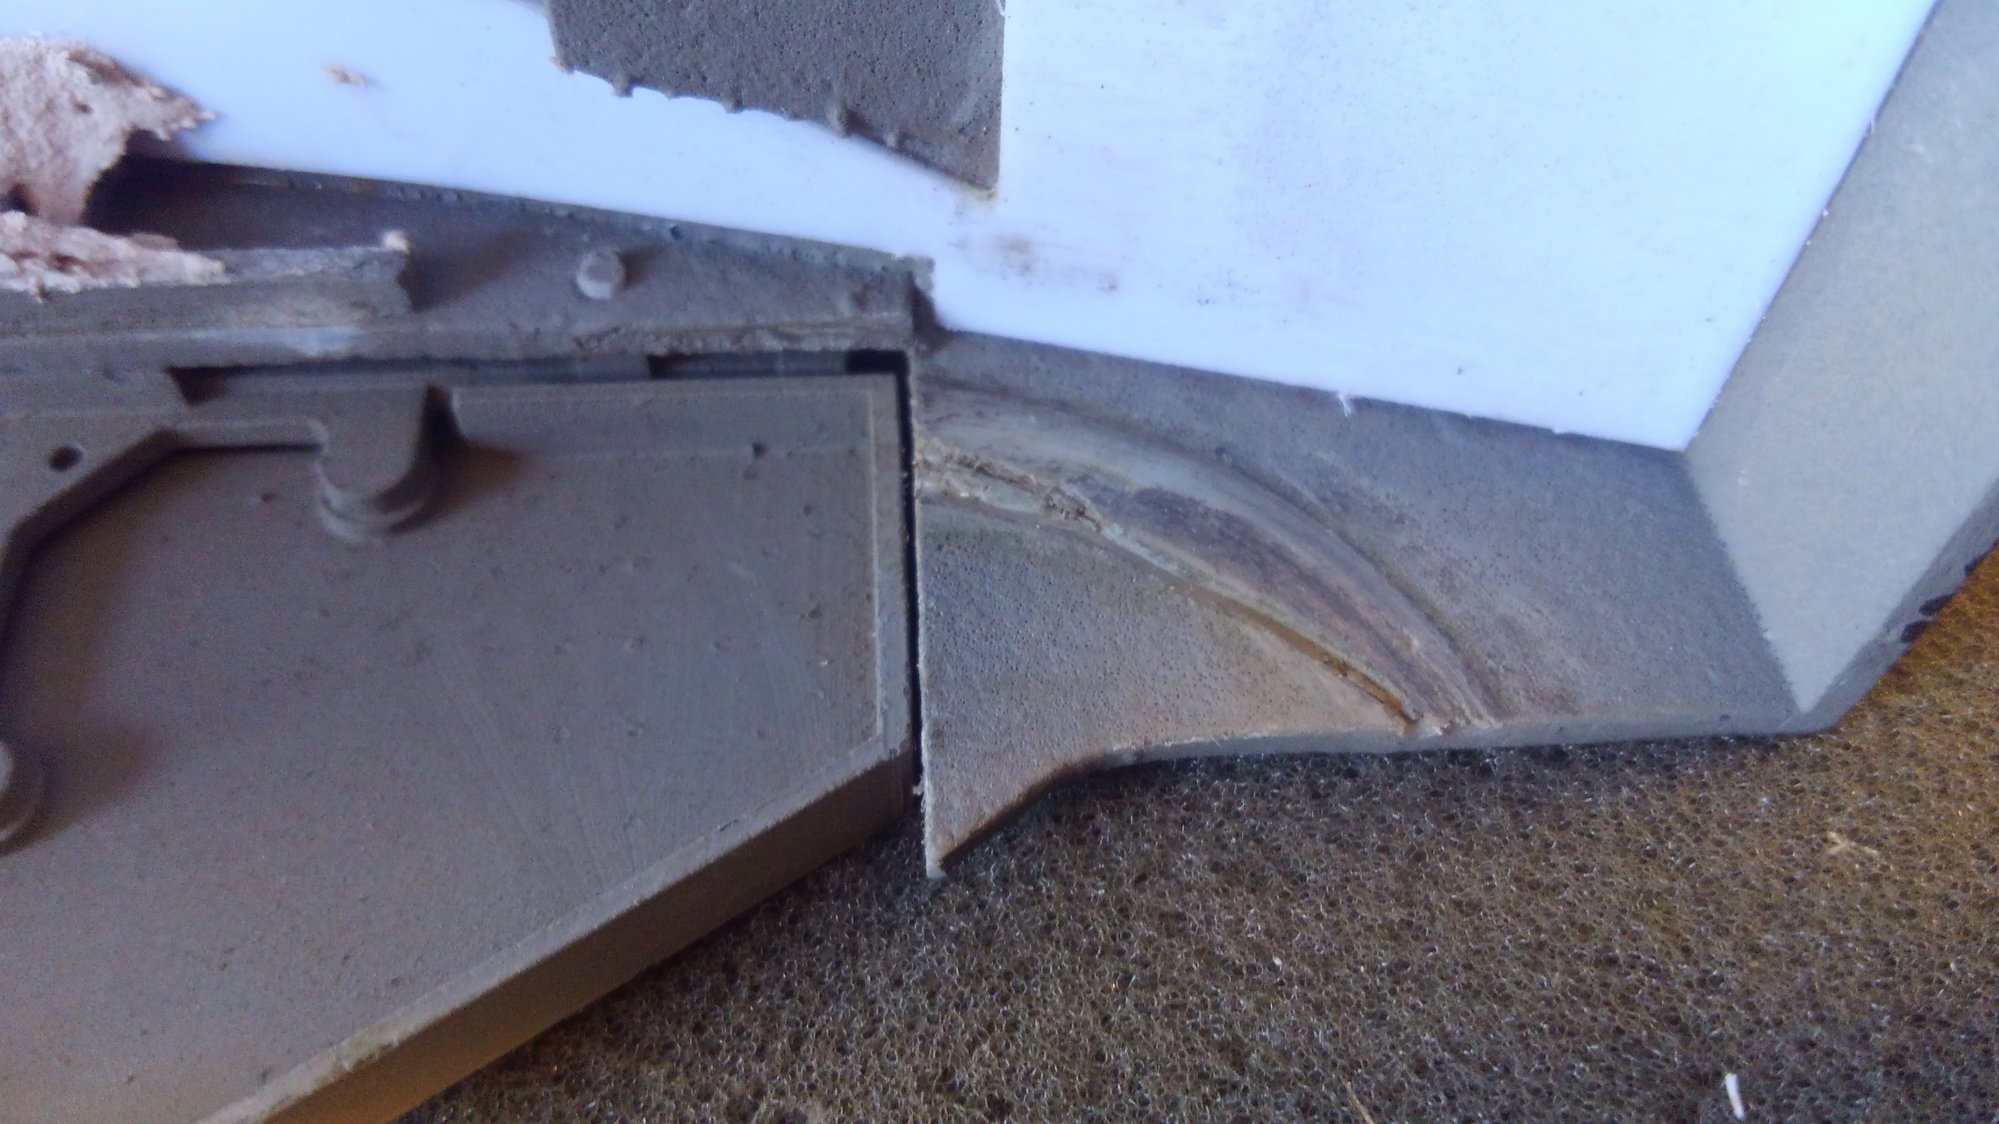
I knew the problem and was ignoring it. The plastic fake rubber mud guards over the sprockets actually rub the track pretty hard. The track was wearing a groove in the body.
I used my dremmel and ground out alot of material and painted it black to test for more rubbing.
The tracks still came off with just slight rubbing. I had it. I drove the heck out of it without the upper hull. No detracking. So. the fake mud guards had to go. I first did one side and test drove it with success and then did the other and as expected problem solved so then I went and cut the front fake rubber mud guards off to match.
Now, the tank looks funny so I did what I did with my M60a3 build, I used rubber innertube material from my old army truck tires and made real rubber mud guards and glued in place. Problem solved with accuracy.
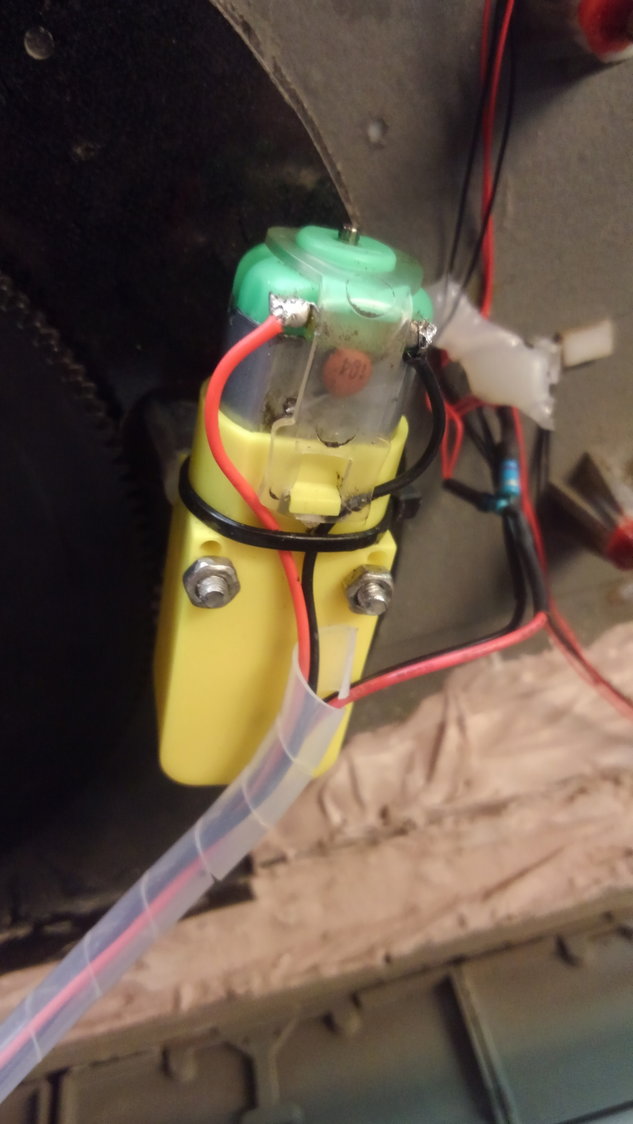
The turret has bugged me with how slow it moves. So I replaced the motor with a green cap HL rotation motor that is about twice as fast. Now the turret works properly.
I also drove the tank through the toughest parts of my dirt yard which are hardned mud holes from car tires from the neighbors. I took them as hard as I could actually trying to de track or break more control arms. I didnt break anything. Though I did bottom out. I think I will try to find better front springs that are stronger and maybe rear as well and upgrade them.
So, maybe Im ready to take on the desert training center next.....
Still, the track is getting loose and I need a way to take out a little slack but not the crazy amount their idler teeth move one notch back. Im working up an idea for that problem.
The 3d printed parts all arrived. The two metal arms I hope will turn out to not be needed. Oh my, they are very hard metal. I have to drill out the screw hole and broke two bits,, inside the screw hole point to point if you can belive that, One drill bit was sent to open up the back end to try and save the part to extract the first, but after two hours with a friggin tiny ass punch and lots of torching and cussing the mad scientist got both drill bits out. Call me double lucky. So maybe I will use them if I get to that need. Would like them to be a 100 dollar expirement I dont need.
I have a hand full of P12 control arms that have the nut cavity deleted by my good friend Ksoc. This makes the arm much stronger at the point of failure plus a stronger plastic material.
Also, I learned the wheels and idlers use the same bearing size as a tamiya sherman so I replaced a few with ball bearings from my stock.... ask me how many of those I stock and why I would lol.....
So after that adventure to get back to where I was a few months ago.... I went driving and was still loosing the track off the sprockets.. Which just should not happen with a front drive tank.
I knew the problem and was ignoring it. The plastic fake rubber mud guards over the sprockets actually rub the track pretty hard. The track was wearing a groove in the body.
I used my dremmel and ground out alot of material and painted it black to test for more rubbing.
The tracks still came off with just slight rubbing. I had it. I drove the heck out of it without the upper hull. No detracking. So. the fake mud guards had to go. I first did one side and test drove it with success and then did the other and as expected problem solved so then I went and cut the front fake rubber mud guards off to match.
Now, the tank looks funny so I did what I did with my M60a3 build, I used rubber innertube material from my old army truck tires and made real rubber mud guards and glued in place. Problem solved with accuracy.
The turret has bugged me with how slow it moves. So I replaced the motor with a green cap HL rotation motor that is about twice as fast. Now the turret works properly.
I also drove the tank through the toughest parts of my dirt yard which are hardned mud holes from car tires from the neighbors. I took them as hard as I could actually trying to de track or break more control arms. I didnt break anything. Though I did bottom out. I think I will try to find better front springs that are stronger and maybe rear as well and upgrade them.
So, maybe Im ready to take on the desert training center next.....
Still, the track is getting loose and I need a way to take out a little slack but not the crazy amount their idler teeth move one notch back. Im working up an idea for that problem.
The following users liked this post:
herrmill (01-10-2022)
01-10-2022, 09:12 PM
#87

I have to say, Rich. You have a hellava lot more patience than me.
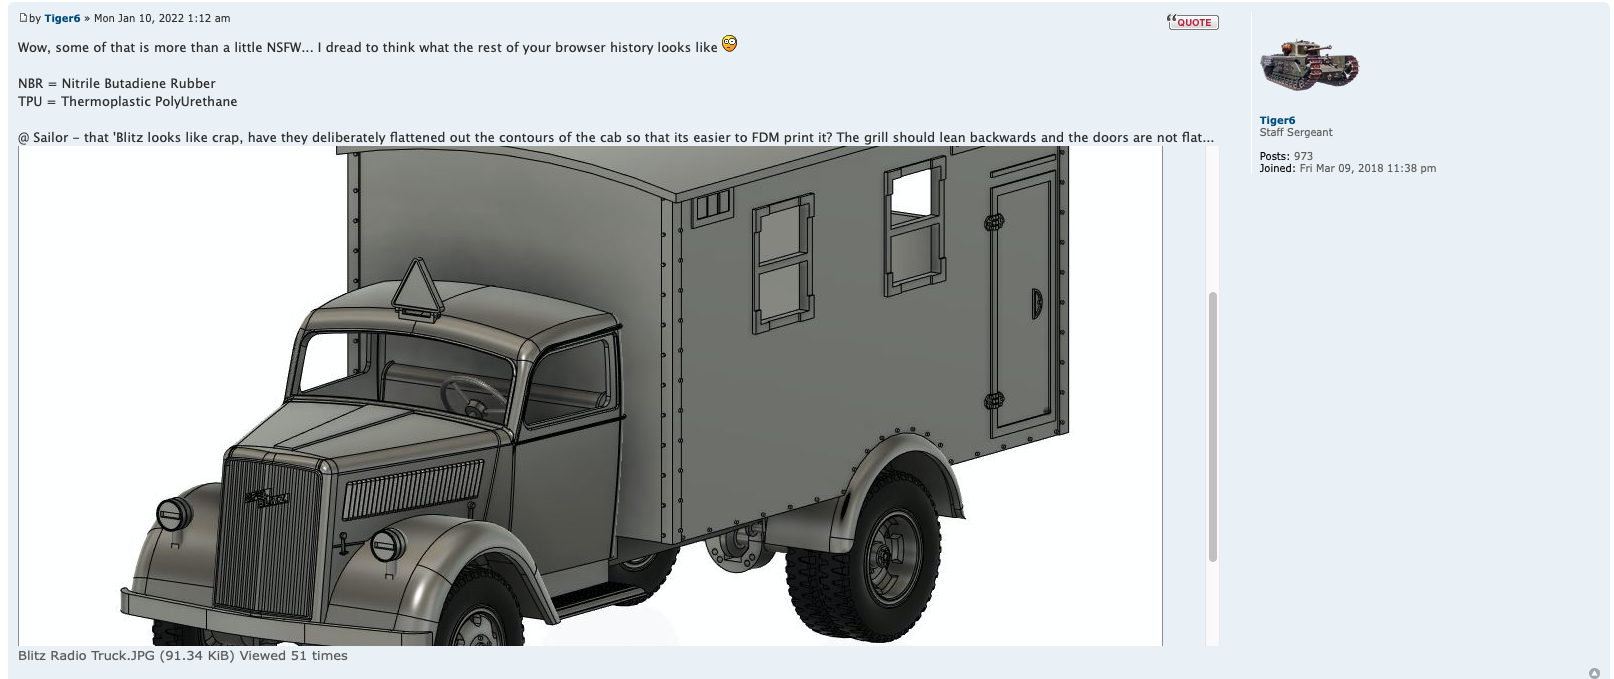
Given Hooben's aversion to rubber, I love how you fixed those fake rubber mud guards. Here's a glimpse of their new Blitz proto that makes me wonder what material he's going to use for the tires.
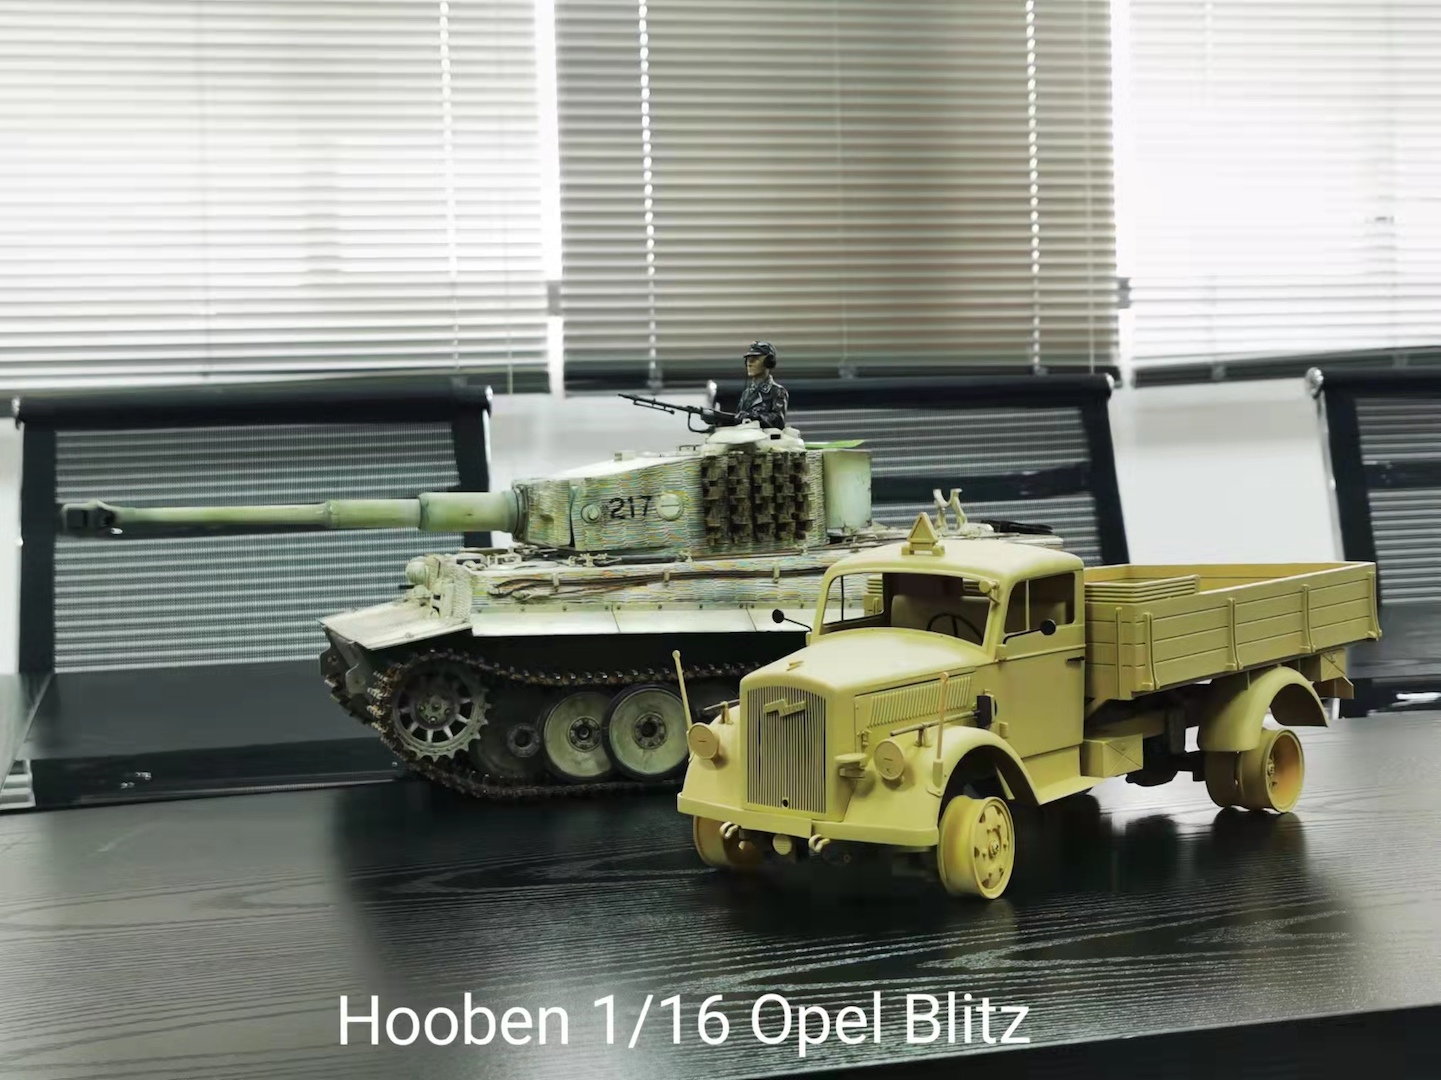
Given Hooben's aversion to rubber, I love how you fixed those fake rubber mud guards. Here's a glimpse of their new Blitz proto that makes me wonder what material he's going to use for the tires.
Last edited by herrmill; 01-10-2022 at 09:14 PM.
01-10-2022, 10:21 PM
#88
Ok so Im back torturing myself with the Hooben Merkava again.
The 3d printed parts all arrived. The two metal arms I hope will turn out to not be needed. Oh my, they are very hard metal. I have to drill out the screw hole and broke two bits,, inside the screw hole point to point if you can belive that, One drill bit was sent to open up the back end to try and save the part to extract the first, but after two hours with a friggin tiny ass punch and lots of torching and cussing the mad scientist got both drill bits out. Call me double lucky. So maybe I will use them if I get to that need. Would like them to be a 100 dollar expirement I dont need.
I have a hand full of P12 control arms that have the nut cavity deleted by my good friend Ksoc. This makes the arm much stronger at the point of failure plus a stronger plastic material.
Also, I learned the wheels and idlers use the same bearing size as a tamiya sherman so I replaced a few with ball bearings from my stock.... ask me how many of those I stock and why I would lol.....
So after that adventure to get back to where I was a few months ago.... I went driving and was still loosing the track off the sprockets.. Which just should not happen with a front drive tank.
I knew the problem and was ignoring it. The plastic fake rubber mud guards over the sprockets actually rub the track pretty hard. The track was wearing a groove in the body.
I used my dremmel and ground out alot of material and painted it black to test for more rubbing.
The tracks still came off with just slight rubbing. I had it. I drove the heck out of it without the upper hull. No detracking. So. the fake mud guards had to go. I first did one side and test drove it with success and then did the other and as expected problem solved so then I went and cut the front fake rubber mud guards off to match.
Now, the tank looks funny so I did what I did with my M60a3 build, I used rubber innertube material from my old army truck tires and made real rubber mud guards and glued in place. Problem solved with accuracy.
The turret has bugged me with how slow it moves. So I replaced the motor with a green cap HL rotation motor that is about twice as fast. Now the turret works properly.
I also drove the tank through the toughest parts of my dirt yard which are hardned mud holes from car tires from the neighbors. I took them as hard as I could actually trying to de track or break more control arms. I didnt break anything. Though I did bottom out. I think I will try to find better front springs that are stronger and maybe rear as well and upgrade them.
So, maybe Im ready to take on the desert training center next.....
Still, the track is getting loose and I need a way to take out a little slack but not the crazy amount their idler teeth move one notch back. Im working up an idea for that problem.
01-10-2022, 10:35 PM
#89
Thread Starter
Well, I would almost buy that Opal Blitz lol. After all, we put up with the mediocre WPL trucks. Two of which went 5 feet for me before the gears spun and I litterally drop punted them as far as I could. Seeing that the rims are for real in scale, the tires likely will be solid or foam rubber. Either way, if I have a tire master, I can make rubber ones. I have photos of my dragon wagon tires on my instagram when I was making them and working up my dragon wagon. But I got distracted.....
01-10-2022, 11:17 PM
#90
Well, I would almost buy that Opal Blitz lol. After all, we put up with the mediocre WPL trucks. Two of which went 5 feet for me before the gears spun and I litterally drop punted them as far as I could. Seeing that the rims are for real in scale, the tires likely will be solid or foam rubber. Either way, if I have a tire master, I can make rubber ones. I have photos of my dragon wagon tires on my instagram when I was making them and working up my dragon wagon. But I got distracted.....
Here's a file you can download & resize for a proper looking 1/16 Blitz. https://co3d.art/modeldetail/opel-bl...or-3d-printing
 01-11-2022, 09:03 AM
#93
Thread Starter
Circus, how true…. LOL. I would only like it for static or put a metal WPL chassis under it but nah, I have too many projects lol. I have a metal 6x6 wpl from Tiagen I haven’t built yet.
01-11-2022, 09:11 AM
#94
01-31-2022, 10:13 PM
#95
Thread Starter
Ive replaced the broken control arms with my 3d printed repair parts but could not stand the stock controller and its malfunctions any more.
I got my new batch of DKTank boards and got one set up and installed.
So driving is better though Im limited with a full speed turn from the DKT. AT 8.4 the Merkava is still slow for my taste. At full speed with the steer stick in the upper corner I have about a 6 foot radius turn. I hoped for better and sharper turning at full speed. Sharp manuevering is fully possible and the tank is capable of it at lower speeds.
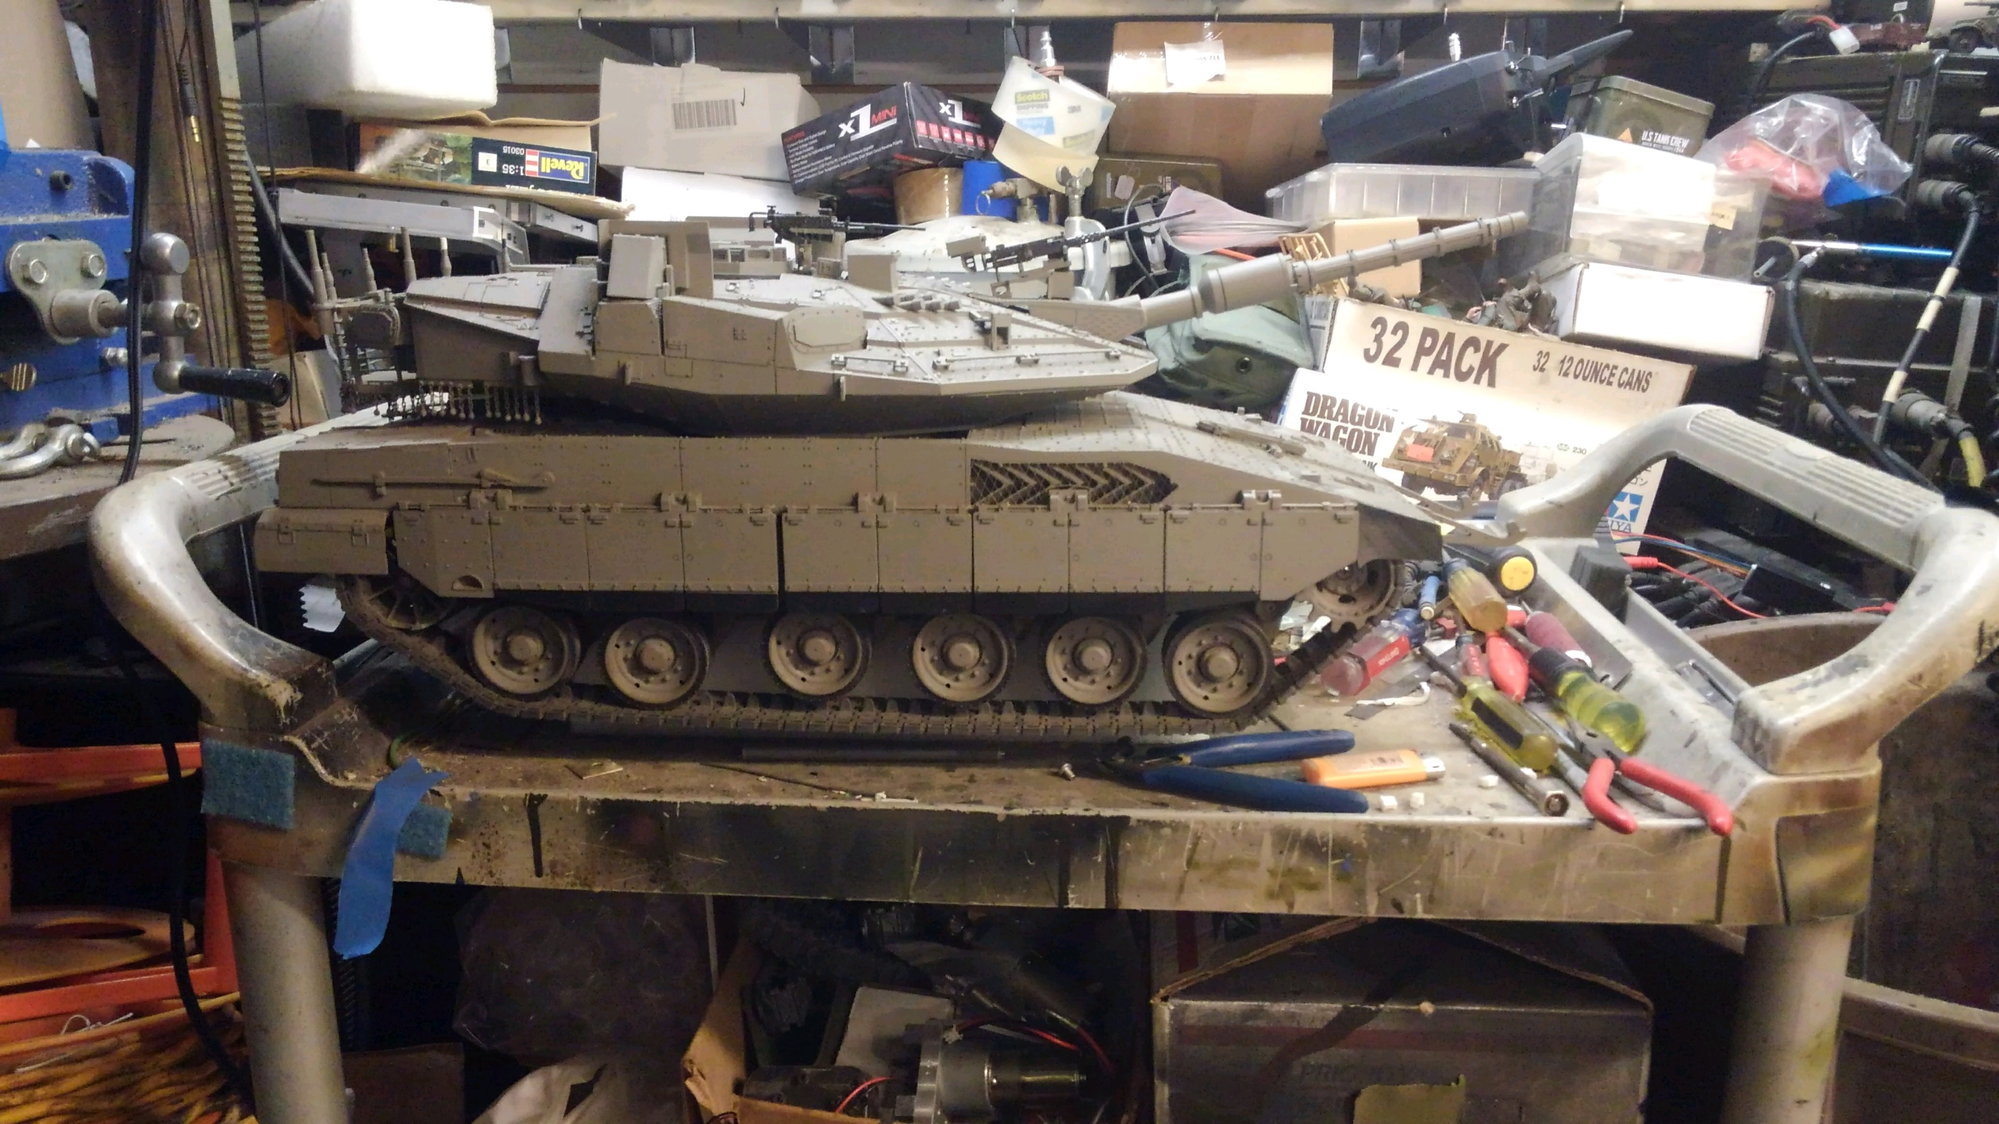
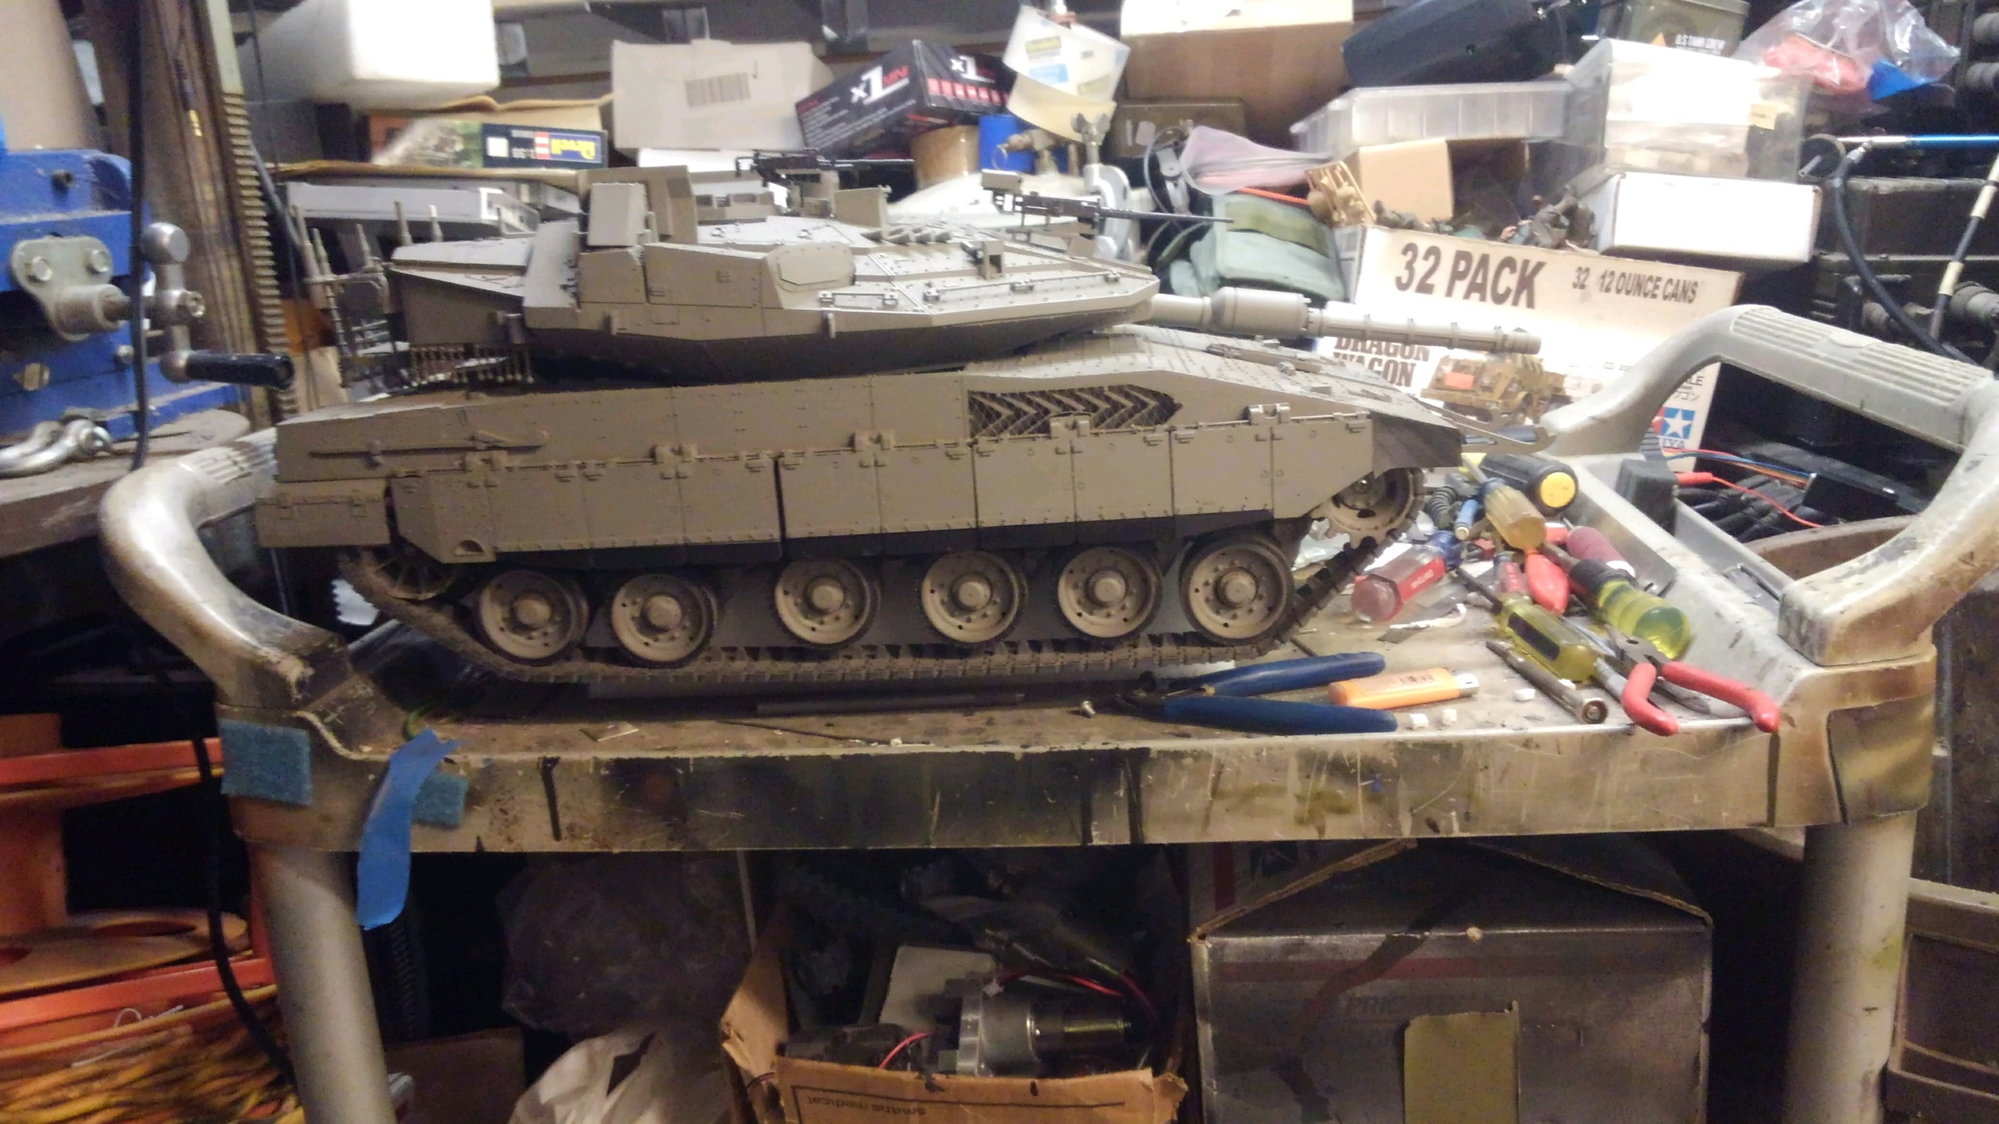
Here is some max elevaiton and depression shots.
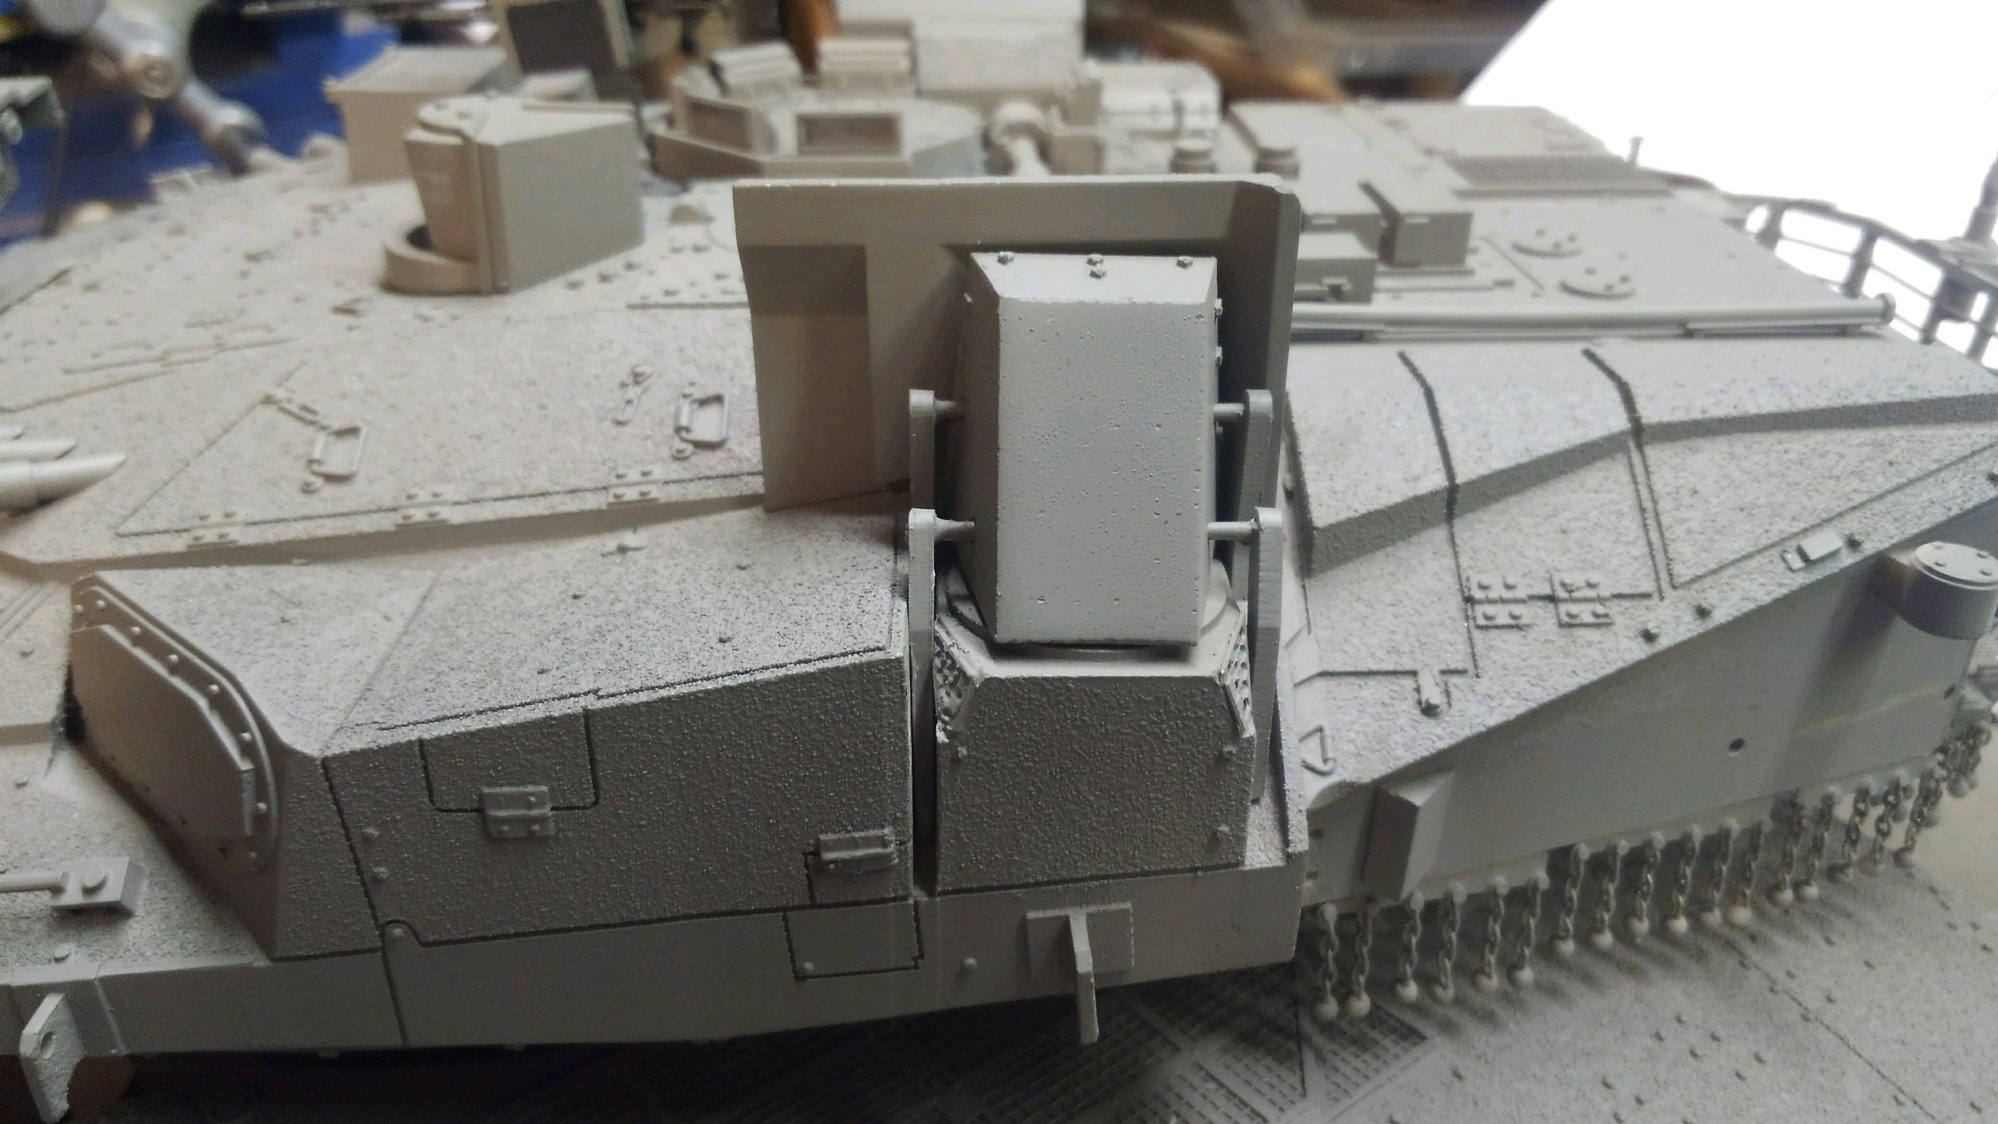
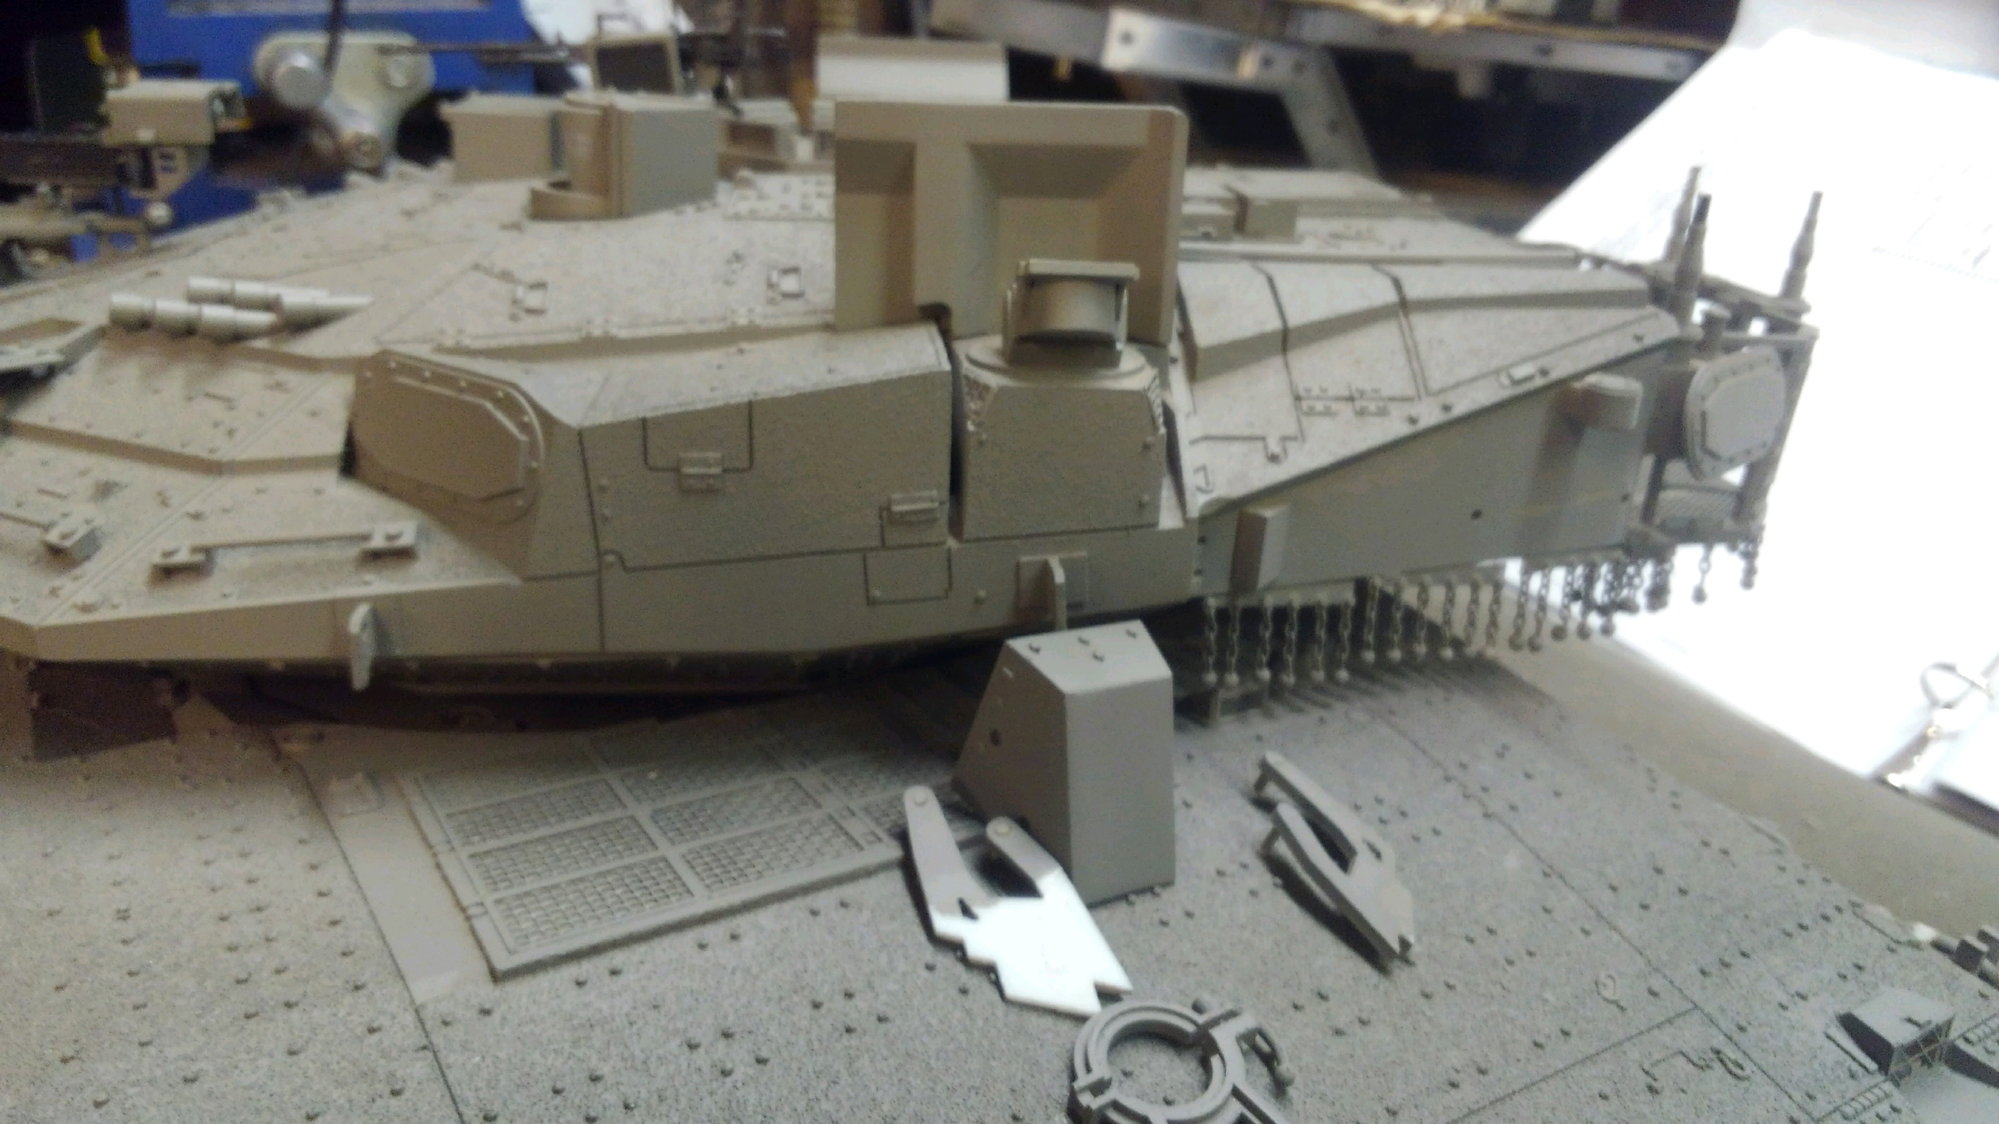
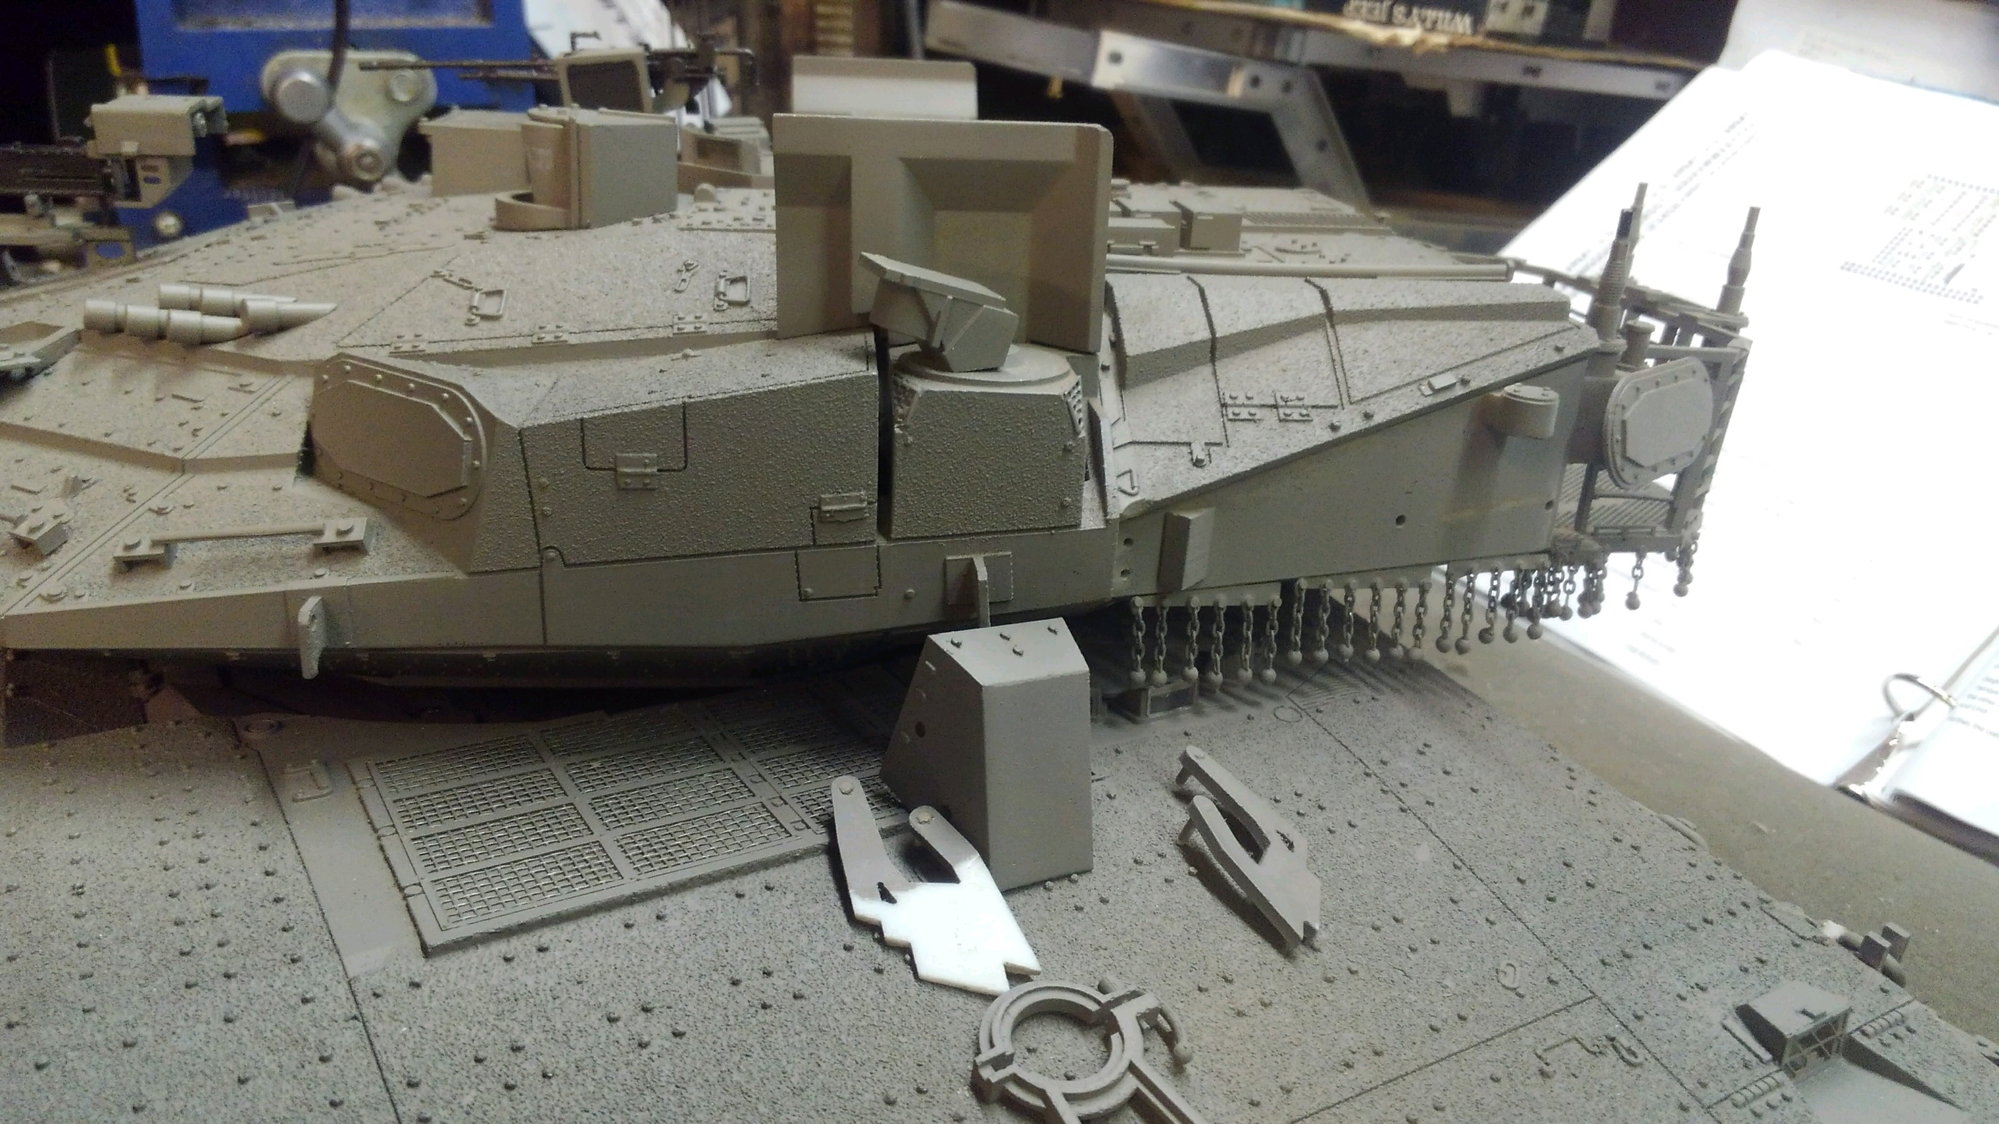
So fsttanks asks me what the Trophy system looks like. I wasnt aware the covers came off but he recalled seeing a photo with the covers off. So I started picking at them.
They were tightly stuffed in and sort of glued together. Sadly they cannot be mounted in the open position as is. It really looks like Hooben had intended to make the hoods open but gave up on it and stuck them in place.
Im pondering how I can make them open now....
I got my new batch of DKTank boards and got one set up and installed.
So driving is better though Im limited with a full speed turn from the DKT. AT 8.4 the Merkava is still slow for my taste. At full speed with the steer stick in the upper corner I have about a 6 foot radius turn. I hoped for better and sharper turning at full speed. Sharp manuevering is fully possible and the tank is capable of it at lower speeds.
Here is some max elevaiton and depression shots.
So fsttanks asks me what the Trophy system looks like. I wasnt aware the covers came off but he recalled seeing a photo with the covers off. So I started picking at them.
They were tightly stuffed in and sort of glued together. Sadly they cannot be mounted in the open position as is. It really looks like Hooben had intended to make the hoods open but gave up on it and stuck them in place.
Im pondering how I can make them open now....
The following users liked this post:
ksoc (02-03-2022)
02-02-2022, 12:40 PM
#97
Sorry to hear about the wheel. It is a good looking tank. I was so hoping Hooben would put out a good Merkeva.
 02-05-2022, 05:06 AM
#98
Hooben. The gift that keeps on giving.
02-05-2022, 07:39 AM
#100
Thread Starter
Anh, I expect all the stock control arms to break off eventually. I replaced the broken one with shapeways part I had modified without the nut hole. I ordered up two more and probably will just go and change the rest out eventually before they break since I know they will.
I also added stiffer springs in front, but they are too tall. I need to cut them down to length and do the same with the back eventually. Ive had a lot of fun the last few days. I took it to my desert training center and was tearing it up. It feels slow but it drives 3mph. I am not really sure what that translates to as scale speed. One formula says its 48 mph which I doubt and another formula says its 12 mph which it is much faster than that. Im guessing around 35 ish which is what they actually do on road and flat ground.
It feels like a big tank driving and is fun after my modifications but without them it would only be good to sit on a shelf.