


Scratch Built T-80
 09-02-2022 | 09:02 AM
#1
Thread Starter

Hello
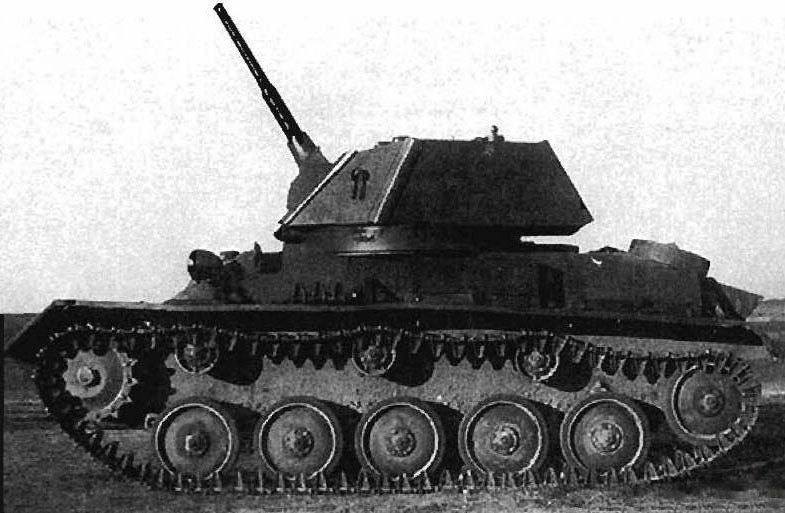
This will hopefully be a scratch built 1:16 scale T-80. Nope.....not that one. This one.....
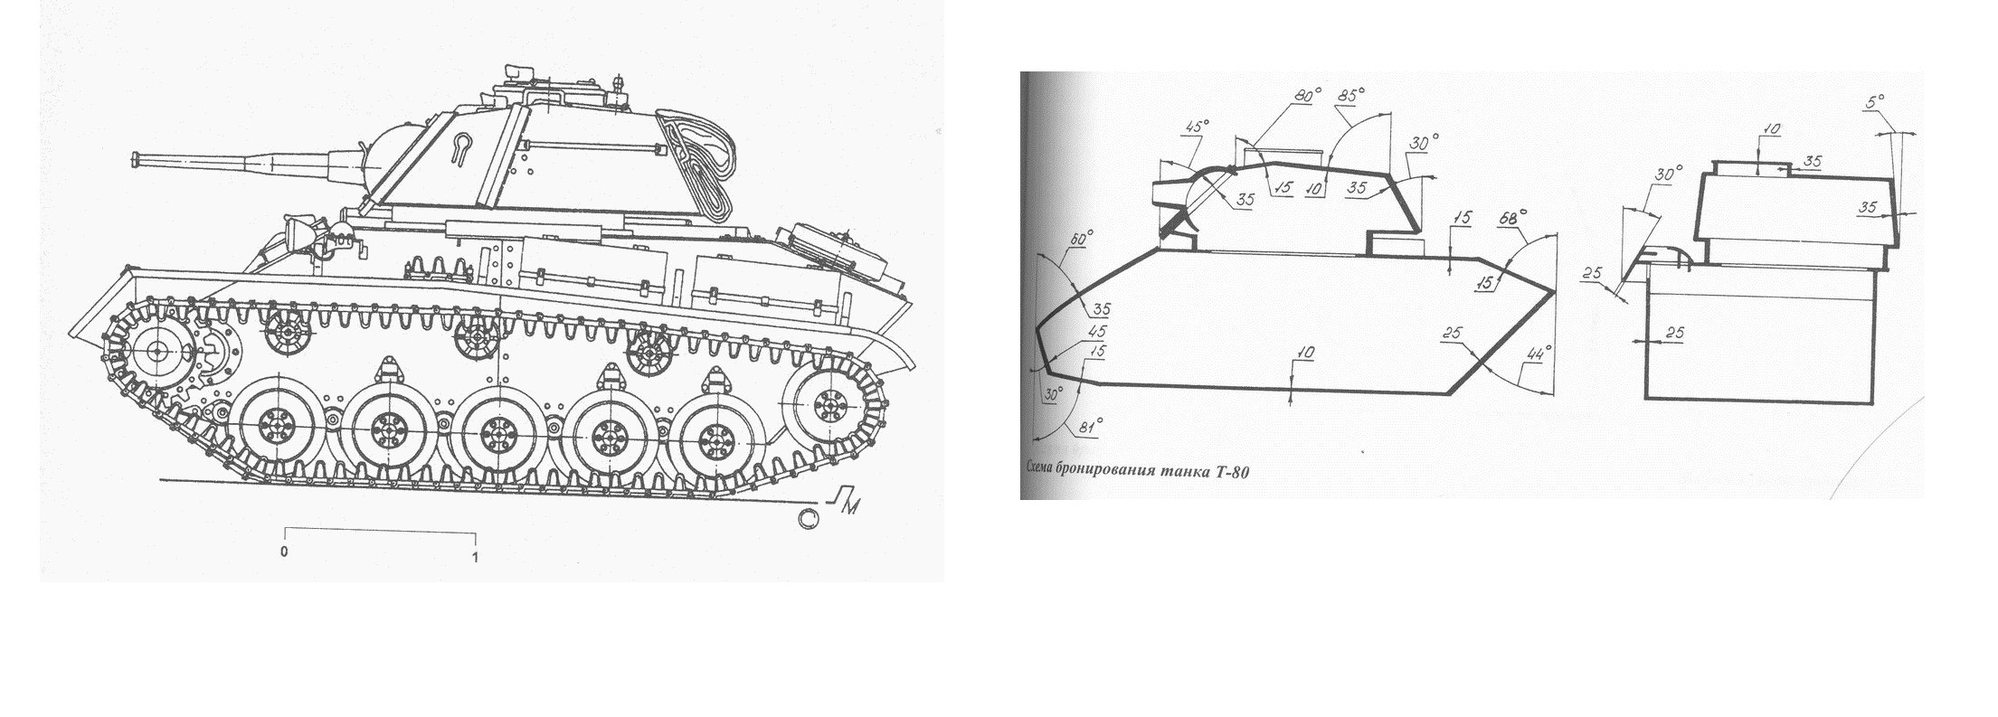
The T-80 light tank was a tank from 1943 where the problems with the T-70 were supposed to be solved. An entirely reasonable design, by the time it came about however it was simply outclassed by tank developments in general.
It was built upon a T-70 hull but the top is obviously different. Two things caught my eye with this one:
1. Its covered in "grab ons" for tank riders....you dont see that that often on other tanks.
2. It was possibly the only tank in the war purposely designed to hit ground targets and to engage air targets. Its gun could go a whole way up and it had a dedicated sight for aerial targets and one for more normal targets. There may be other tanks that could do this but I havent heard of them at least.

I think around 80 were built and its one of those intriguing designs that had much to offer but which were just washed away as development passed them by.
I decided to make one, as usual, from steel and brass where necessary.
Right off the bat I cocked up. I thought the track widths were the same as the T-70. In which case these Pz I tracks would probably work.

Two problems with these.... the first being that they are not very good. Fine for a static model probably but the "metal" is really bad white metal and I doubt they will take a beating with a steel sprocket.
The second problem is that the T-80 actually used a wider track than the T-70. Which leaves me with a problem that I am kicking down the road a bit.
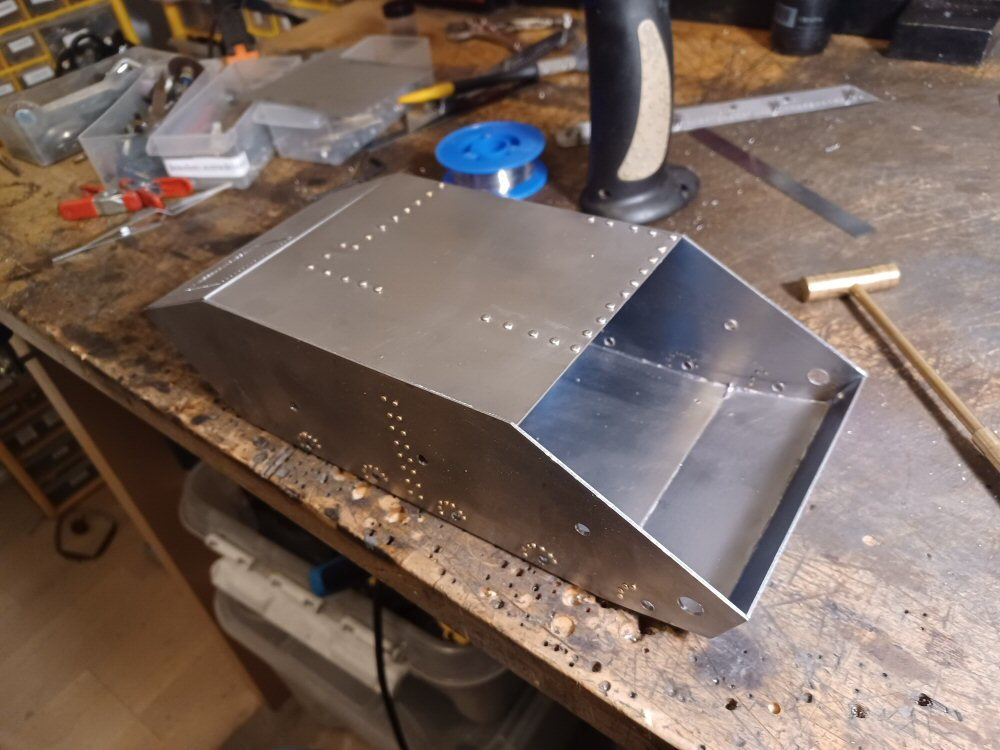
I started off by making the two sides and sticking in a load of rivets and peening them off on the back.
The suspension will be simple and one I have used before but it needs to be dainty as this is a very small tank. So I started making the rails out of 1mm brass and these rails will be further developed as I proceed along the road.
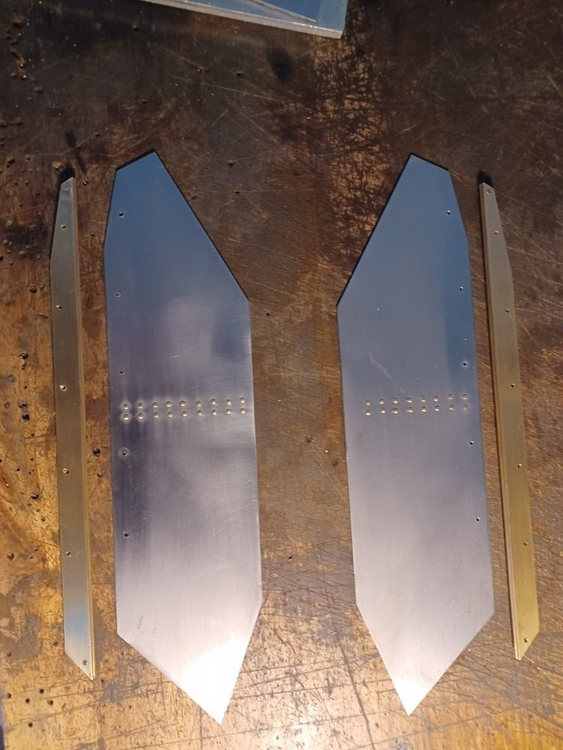
A small start but one that had to be taken.
P
This will hopefully be a scratch built 1:16 scale T-80. Nope.....not that one. This one.....
The T-80 light tank was a tank from 1943 where the problems with the T-70 were supposed to be solved. An entirely reasonable design, by the time it came about however it was simply outclassed by tank developments in general.
It was built upon a T-70 hull but the top is obviously different. Two things caught my eye with this one:
1. Its covered in "grab ons" for tank riders....you dont see that that often on other tanks.
2. It was possibly the only tank in the war purposely designed to hit ground targets and to engage air targets. Its gun could go a whole way up and it had a dedicated sight for aerial targets and one for more normal targets. There may be other tanks that could do this but I havent heard of them at least.
I think around 80 were built and its one of those intriguing designs that had much to offer but which were just washed away as development passed them by.
I decided to make one, as usual, from steel and brass where necessary.
Right off the bat I cocked up. I thought the track widths were the same as the T-70. In which case these Pz I tracks would probably work.
Two problems with these.... the first being that they are not very good. Fine for a static model probably but the "metal" is really bad white metal and I doubt they will take a beating with a steel sprocket.
The second problem is that the T-80 actually used a wider track than the T-70. Which leaves me with a problem that I am kicking down the road a bit.
I started off by making the two sides and sticking in a load of rivets and peening them off on the back.
The suspension will be simple and one I have used before but it needs to be dainty as this is a very small tank. So I started making the rails out of 1mm brass and these rails will be further developed as I proceed along the road.
A small start but one that had to be taken.
P
 12-20-2022 | 11:14 AM
#3
Thread Starter
Fair point!!!! In actuality I have been plugging away at this but progress was/is(perhaps) slow. For the following reasons.
The tracks were a pain. I needed double horned tracks of approaximate width and the only ones I could land on were Sherman tracks. So I bought a set of Taigen. The T-80 uses a sprocket with one central row of teeth. So the Sherman tracks needed tweaking.
And fair warning.......if you like fine modelling and Sherman tracks, I would leave about now.
I took the tracks and disassembled them. Then I literally ground the chevron of each and every bloody link with the tiny little belt sander thing I use in builds.
This took weeks...I lost a couple of fingernails along the way and that hampered progress. They still need rubbing down with a fine sanding sponge.
Then I built a jig and drilled precise holes in the centre of each and every bloody link. These holes needed to be precise as they will be the holes that engage the ..... not yet built but planned out...scratch built sprocket!! Not looking forward to that but what can you do.
On a side note...after grinding all those links...only three links showed any evidence of cavities or flaws within the castings!!1 I thought this was pretty good given that I am well used to crap cast cheapo metal tracks. So nice one Taigen!!!

I appreciate that is not very interesting or clever of even remotely post worthy...but that is what I was doing for weeks.
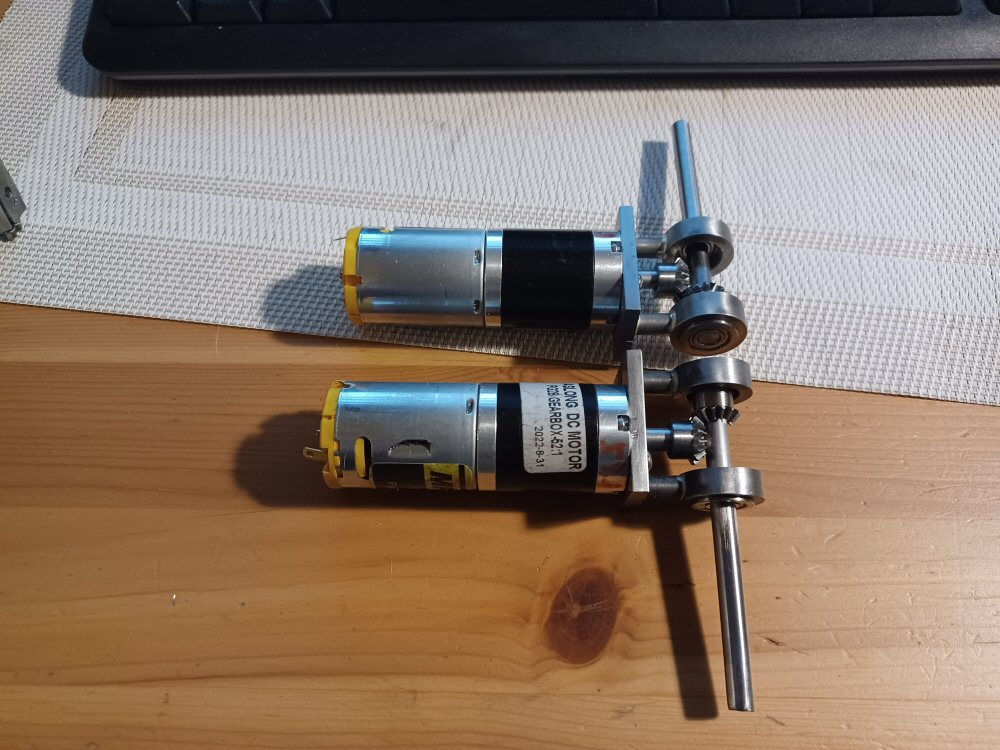
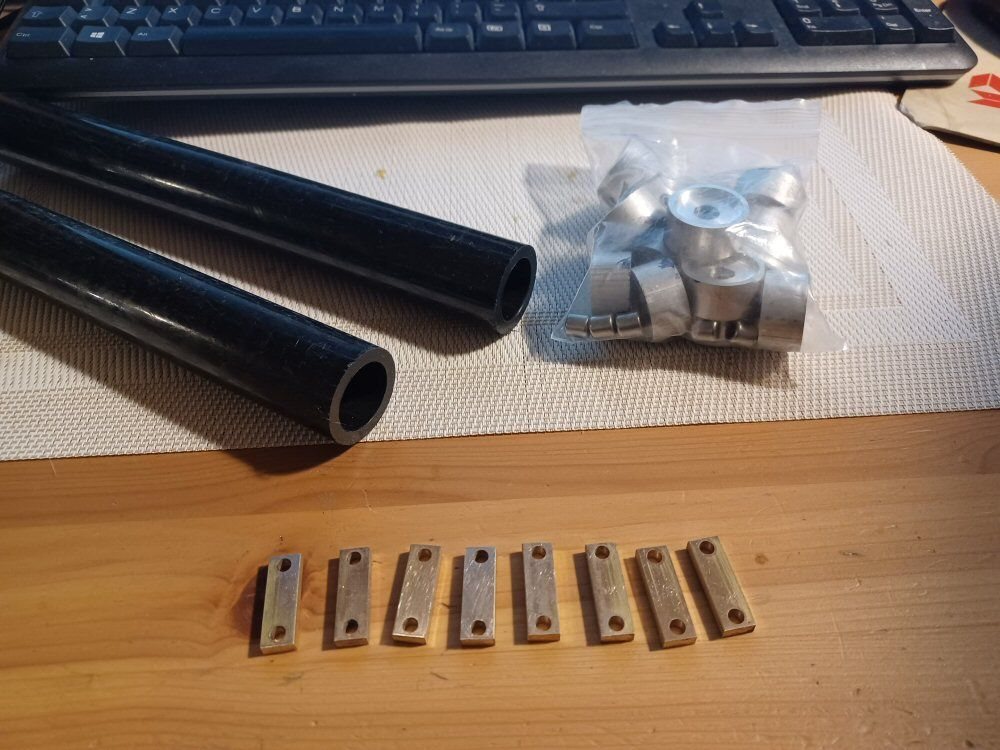
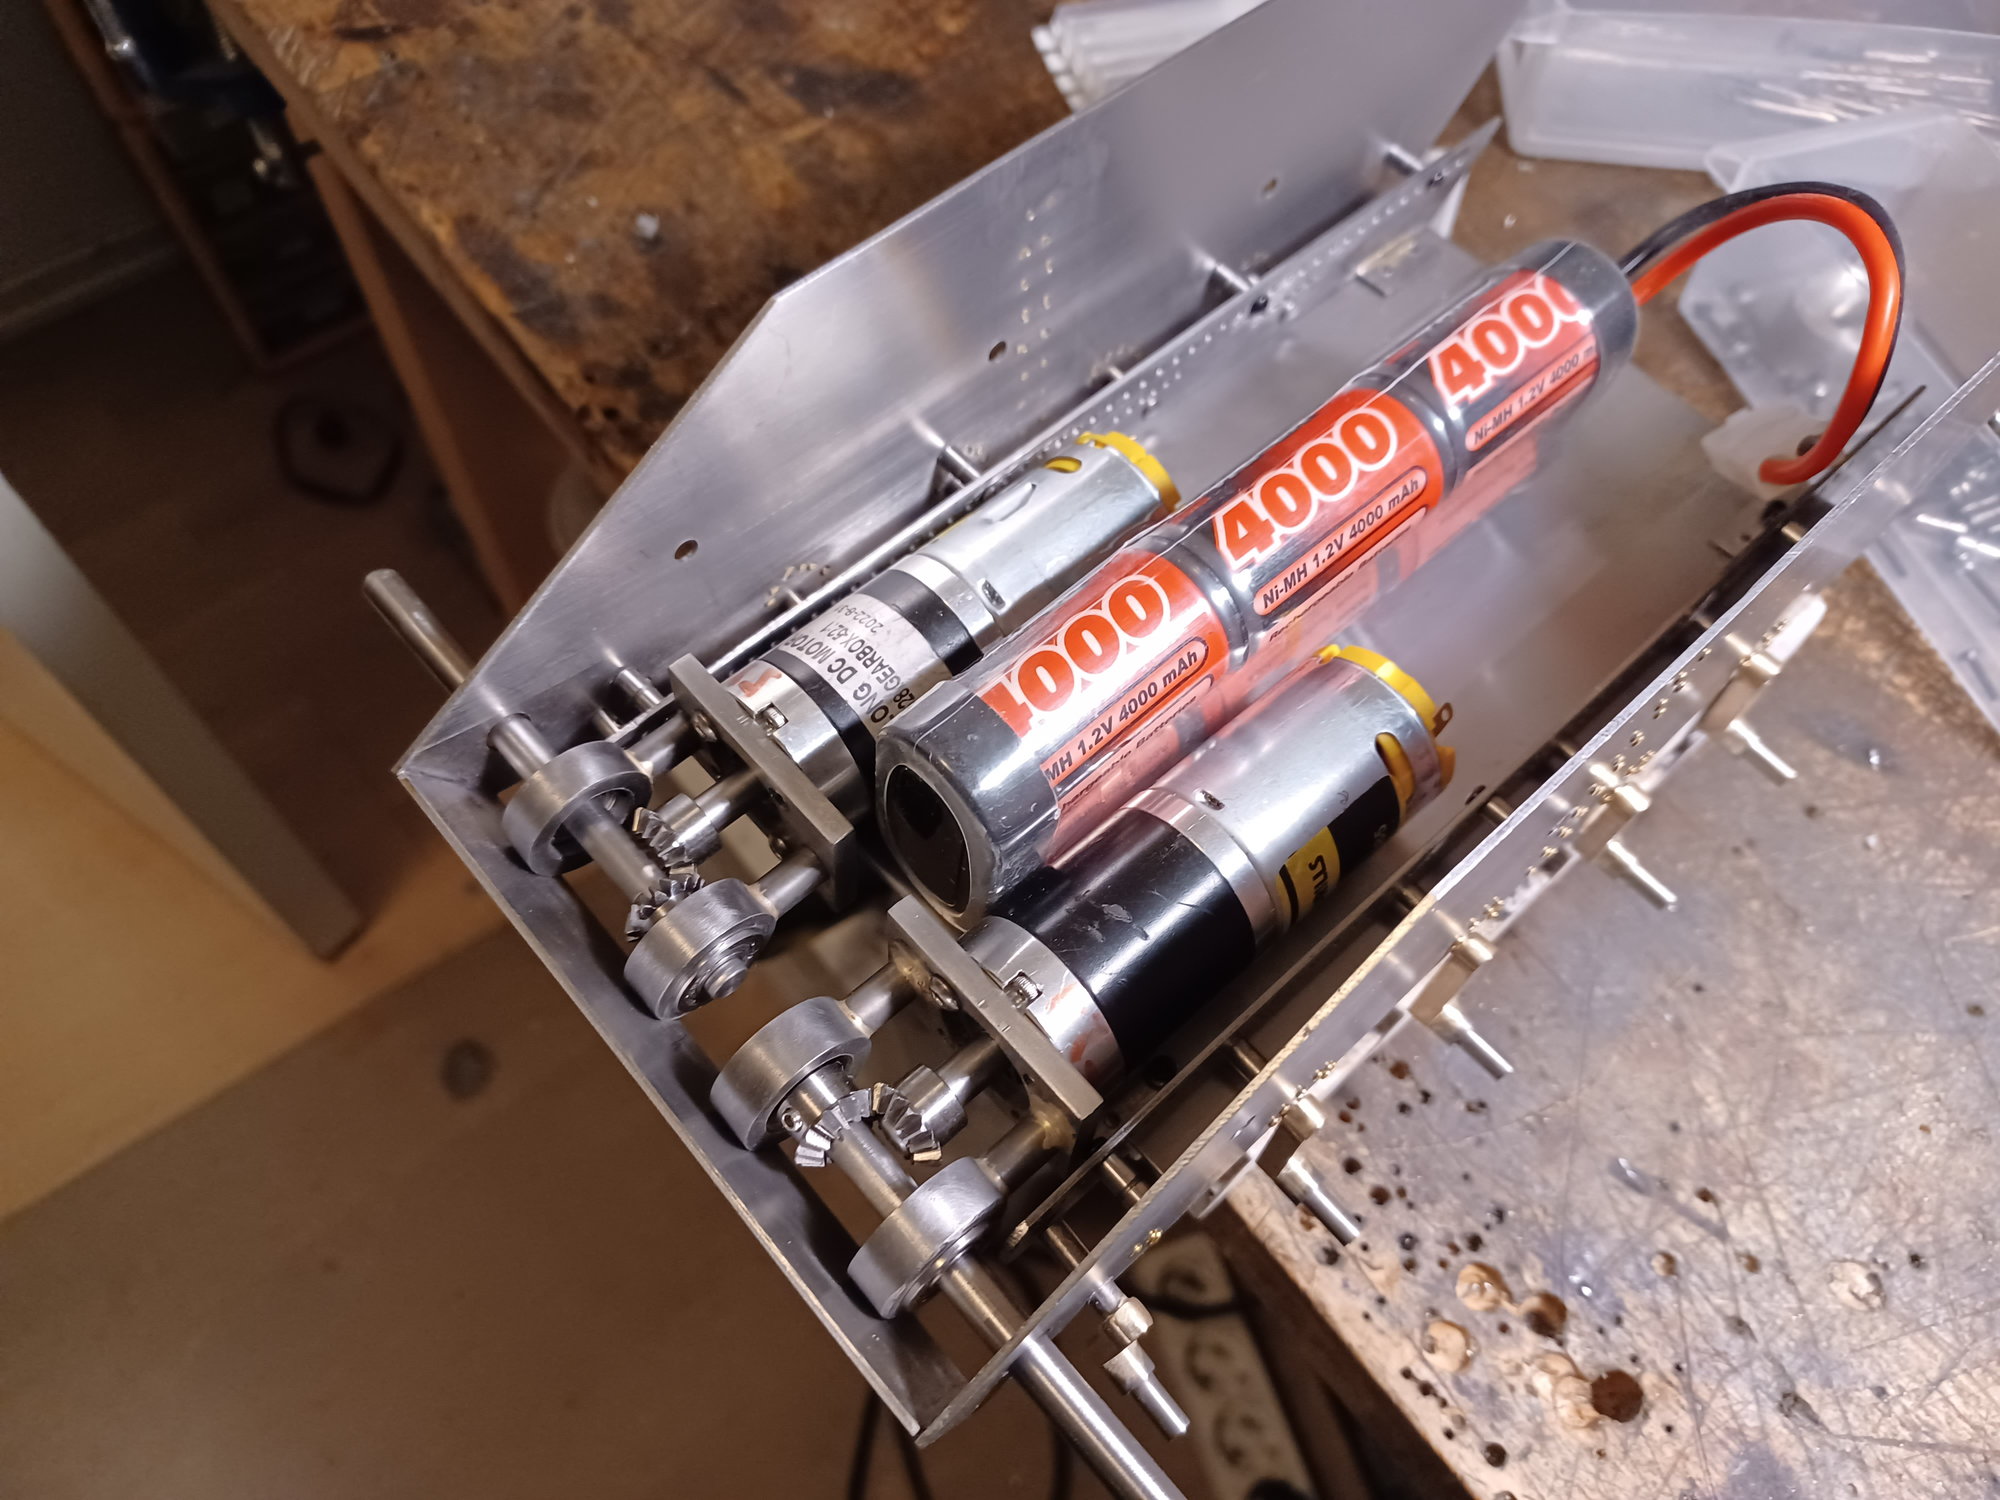
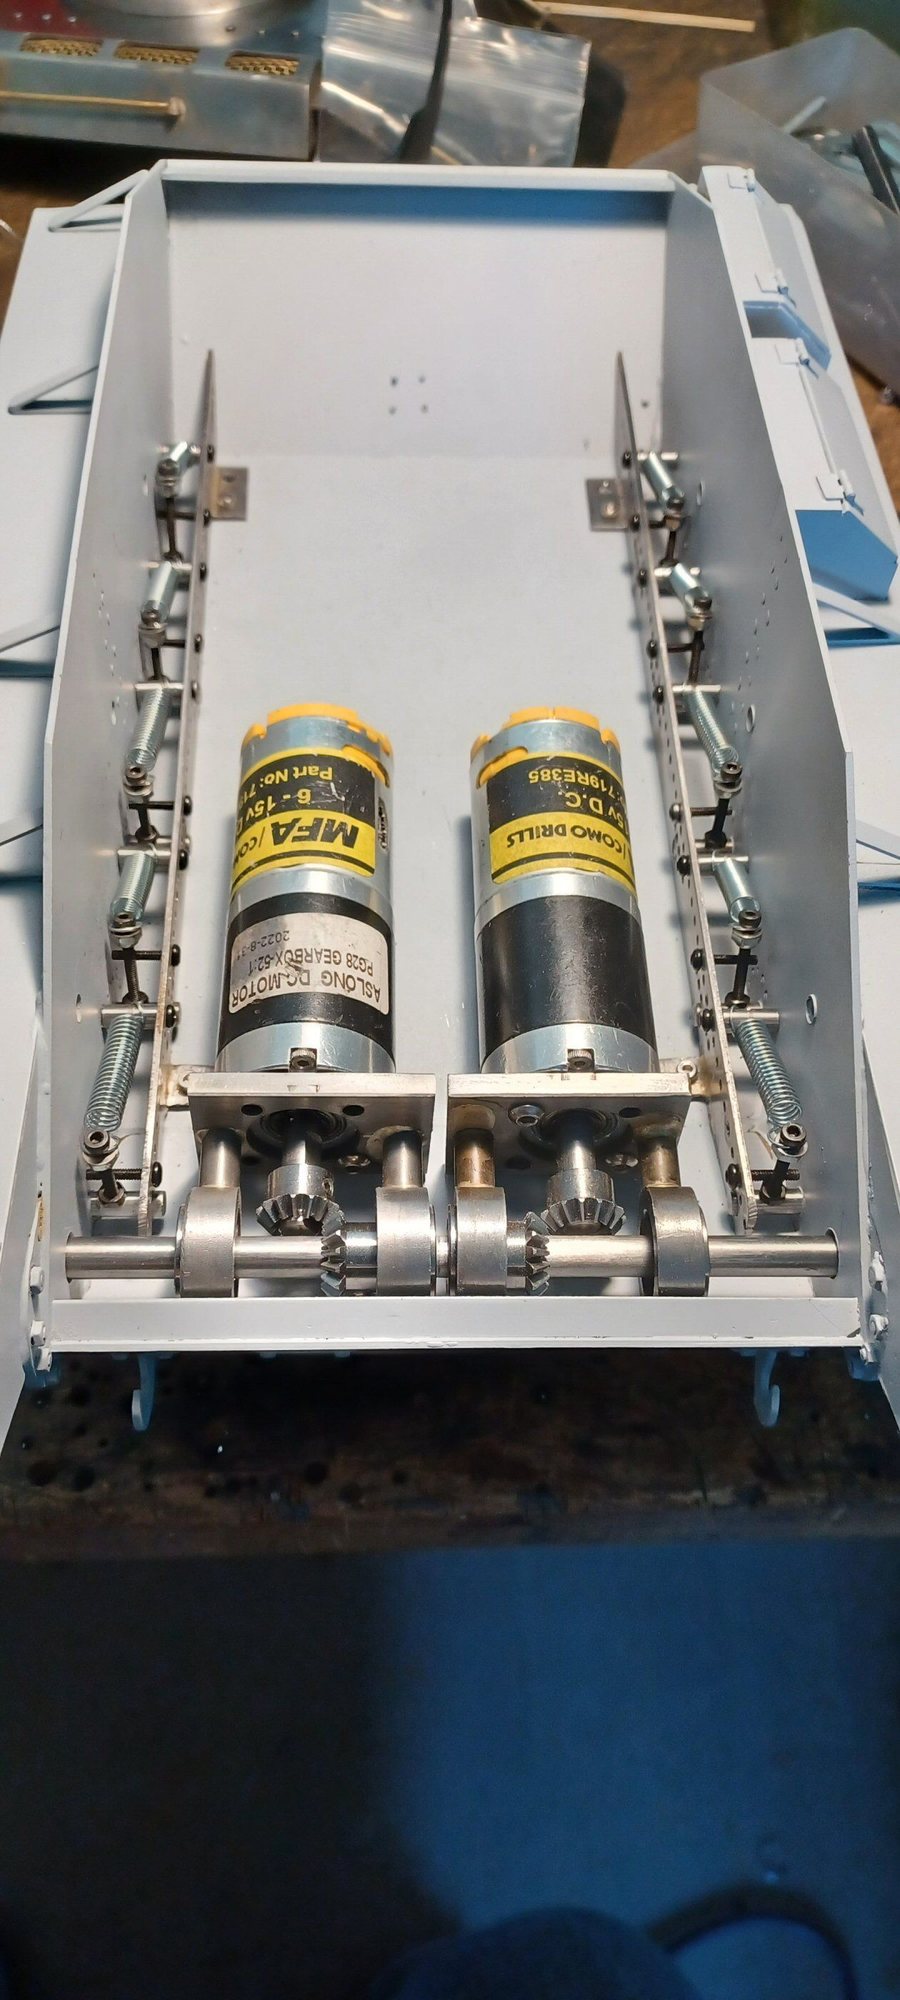
Then I needed gears. I have been stung before using too big motors....so this time I opted for 380 motors I think and bought separate gear boxes on Aliexpress that gear down to about 150 rpm which should be OK. I installed the motors and I recommend these gearboxes .. .they really are nice.
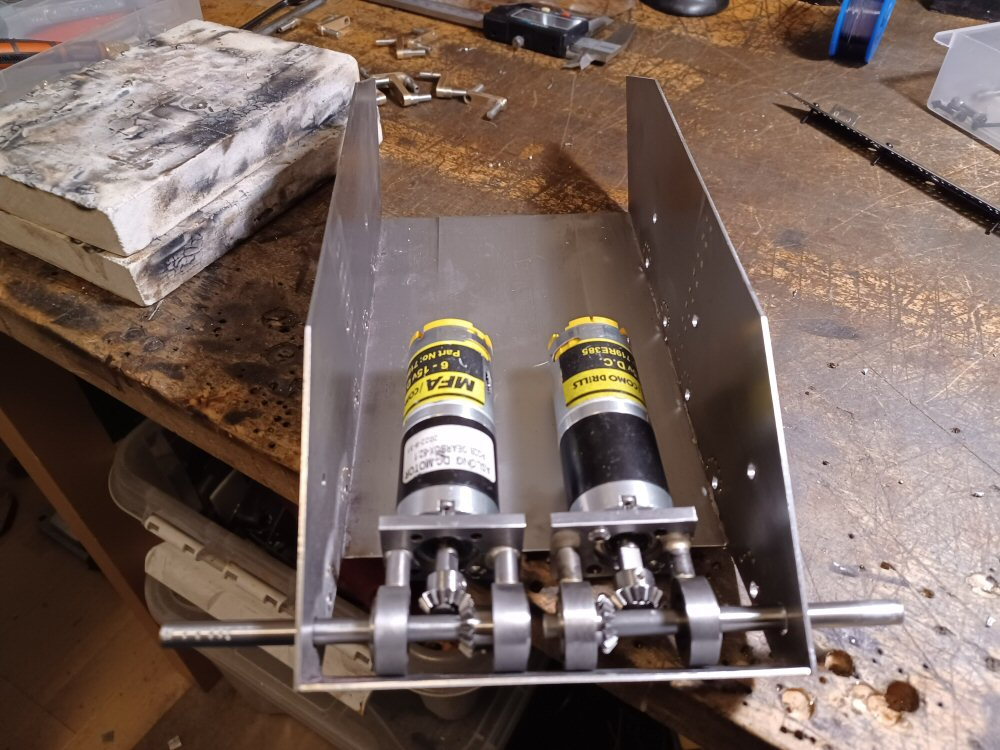
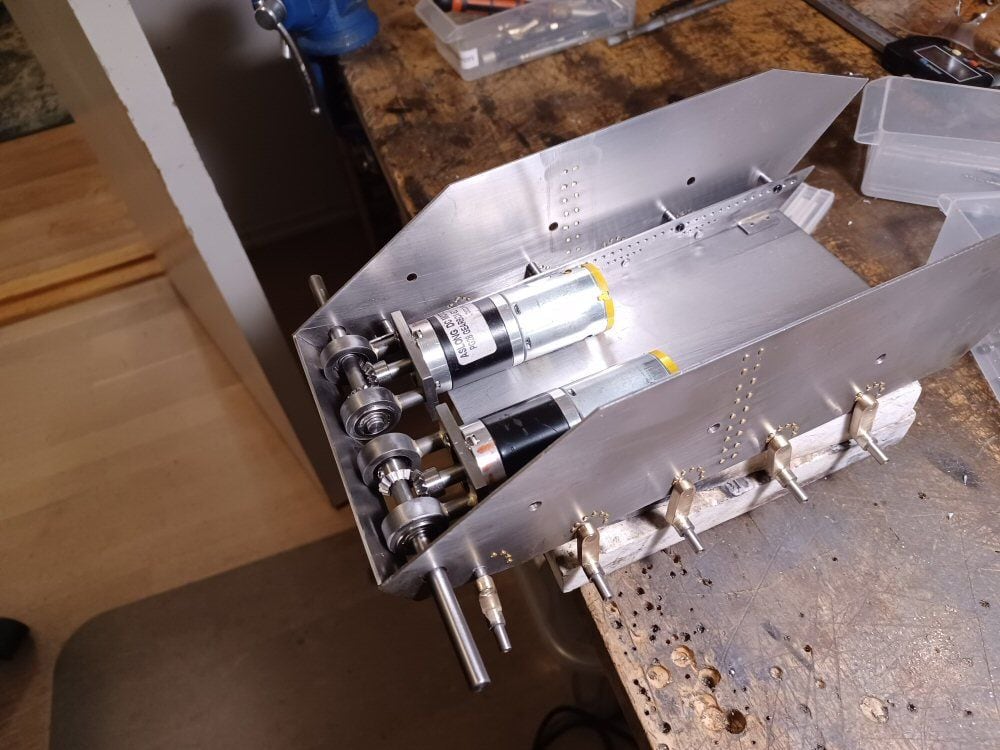
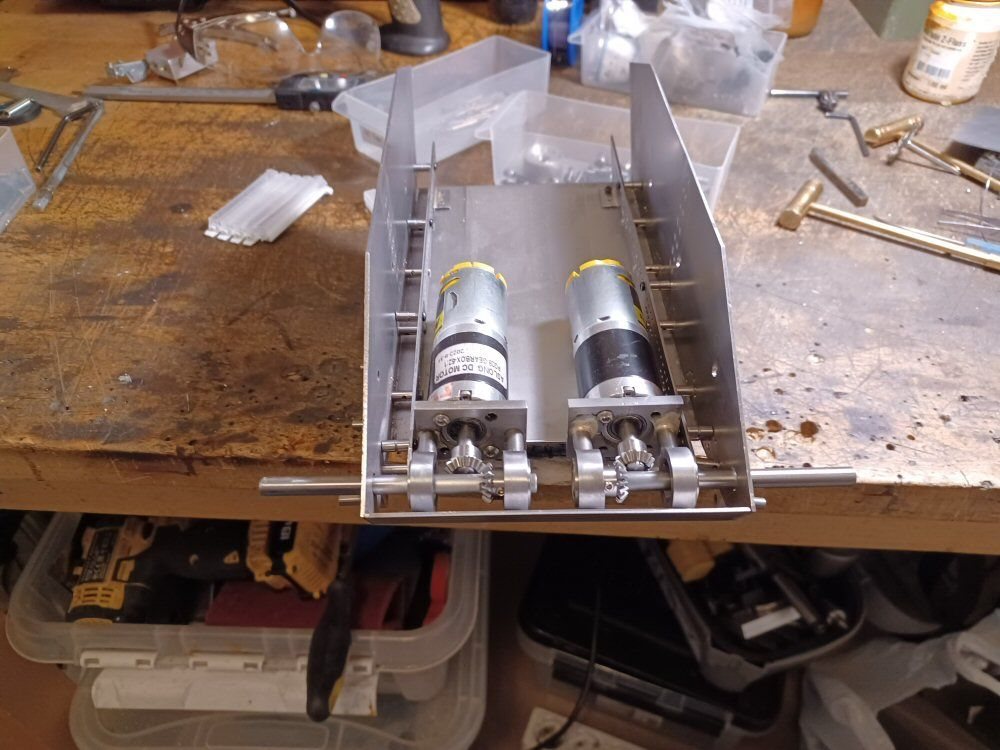
Then I needed either chains or a bevel gear. I tried using blocks of aluminium and so on but I am not equipped for drilling accurate holes in big things. But I am better at building things up from simple shapes so I simply made them as you see in the picture...by hand with no machine tools and lots of brazing. With all shafts on bearings....
And that took a few weeks of faffing about. But now they are done and there is 0 runout so I am pleased with them. I just need to work out a way to mount them in the hull.

Then I needed road wheels. It took a while to source aluminium of the right diameter and with a basic shape but I got some, drilled out to accept a press fit bearing and they are ready to go.
I also got two delrin tubes of correct diameters and with some cutting and sanding they will form the tires.
I also made the rough swing arms...from brass and they need finishing but I am happy with the location of the holes and the consistency of their placing relative to each other.
I also have the back broken of the suspension system ...this will be a fairly diminutive system but pictures are pointless until I can get the hull assembled. Which is waiting for me to finish all th erunning gear bits.
But Christmas should see some major progress.
I hope. Its like pulling bloody teeth for some reason.
P
The tracks were a pain. I needed double horned tracks of approaximate width and the only ones I could land on were Sherman tracks. So I bought a set of Taigen. The T-80 uses a sprocket with one central row of teeth. So the Sherman tracks needed tweaking.
And fair warning.......if you like fine modelling and Sherman tracks, I would leave about now.
I took the tracks and disassembled them. Then I literally ground the chevron of each and every bloody link with the tiny little belt sander thing I use in builds.
This took weeks...I lost a couple of fingernails along the way and that hampered progress. They still need rubbing down with a fine sanding sponge.
Then I built a jig and drilled precise holes in the centre of each and every bloody link. These holes needed to be precise as they will be the holes that engage the ..... not yet built but planned out...scratch built sprocket!! Not looking forward to that but what can you do.
On a side note...after grinding all those links...only three links showed any evidence of cavities or flaws within the castings!!1 I thought this was pretty good given that I am well used to crap cast cheapo metal tracks. So nice one Taigen!!!
I appreciate that is not very interesting or clever of even remotely post worthy...but that is what I was doing for weeks.
Then I needed gears. I have been stung before using too big motors....so this time I opted for 380 motors I think and bought separate gear boxes on Aliexpress that gear down to about 150 rpm which should be OK. I installed the motors and I recommend these gearboxes .. .they really are nice.
Then I needed either chains or a bevel gear. I tried using blocks of aluminium and so on but I am not equipped for drilling accurate holes in big things. But I am better at building things up from simple shapes so I simply made them as you see in the picture...by hand with no machine tools and lots of brazing. With all shafts on bearings....
And that took a few weeks of faffing about. But now they are done and there is 0 runout so I am pleased with them. I just need to work out a way to mount them in the hull.
Then I needed road wheels. It took a while to source aluminium of the right diameter and with a basic shape but I got some, drilled out to accept a press fit bearing and they are ready to go.
I also got two delrin tubes of correct diameters and with some cutting and sanding they will form the tires.
I also made the rough swing arms...from brass and they need finishing but I am happy with the location of the holes and the consistency of their placing relative to each other.
I also have the back broken of the suspension system ...this will be a fairly diminutive system but pictures are pointless until I can get the hull assembled. Which is waiting for me to finish all th erunning gear bits.
But Christmas should see some major progress.
I hope. Its like pulling bloody teeth for some reason.
P
12-21-2022 | 12:35 AM
#5
Thread Starter
12-23-2022 | 07:20 AM
#6
Thread Starter
Got my swing arms soldered up today so I started assembling the hull. This was hardly difficult.
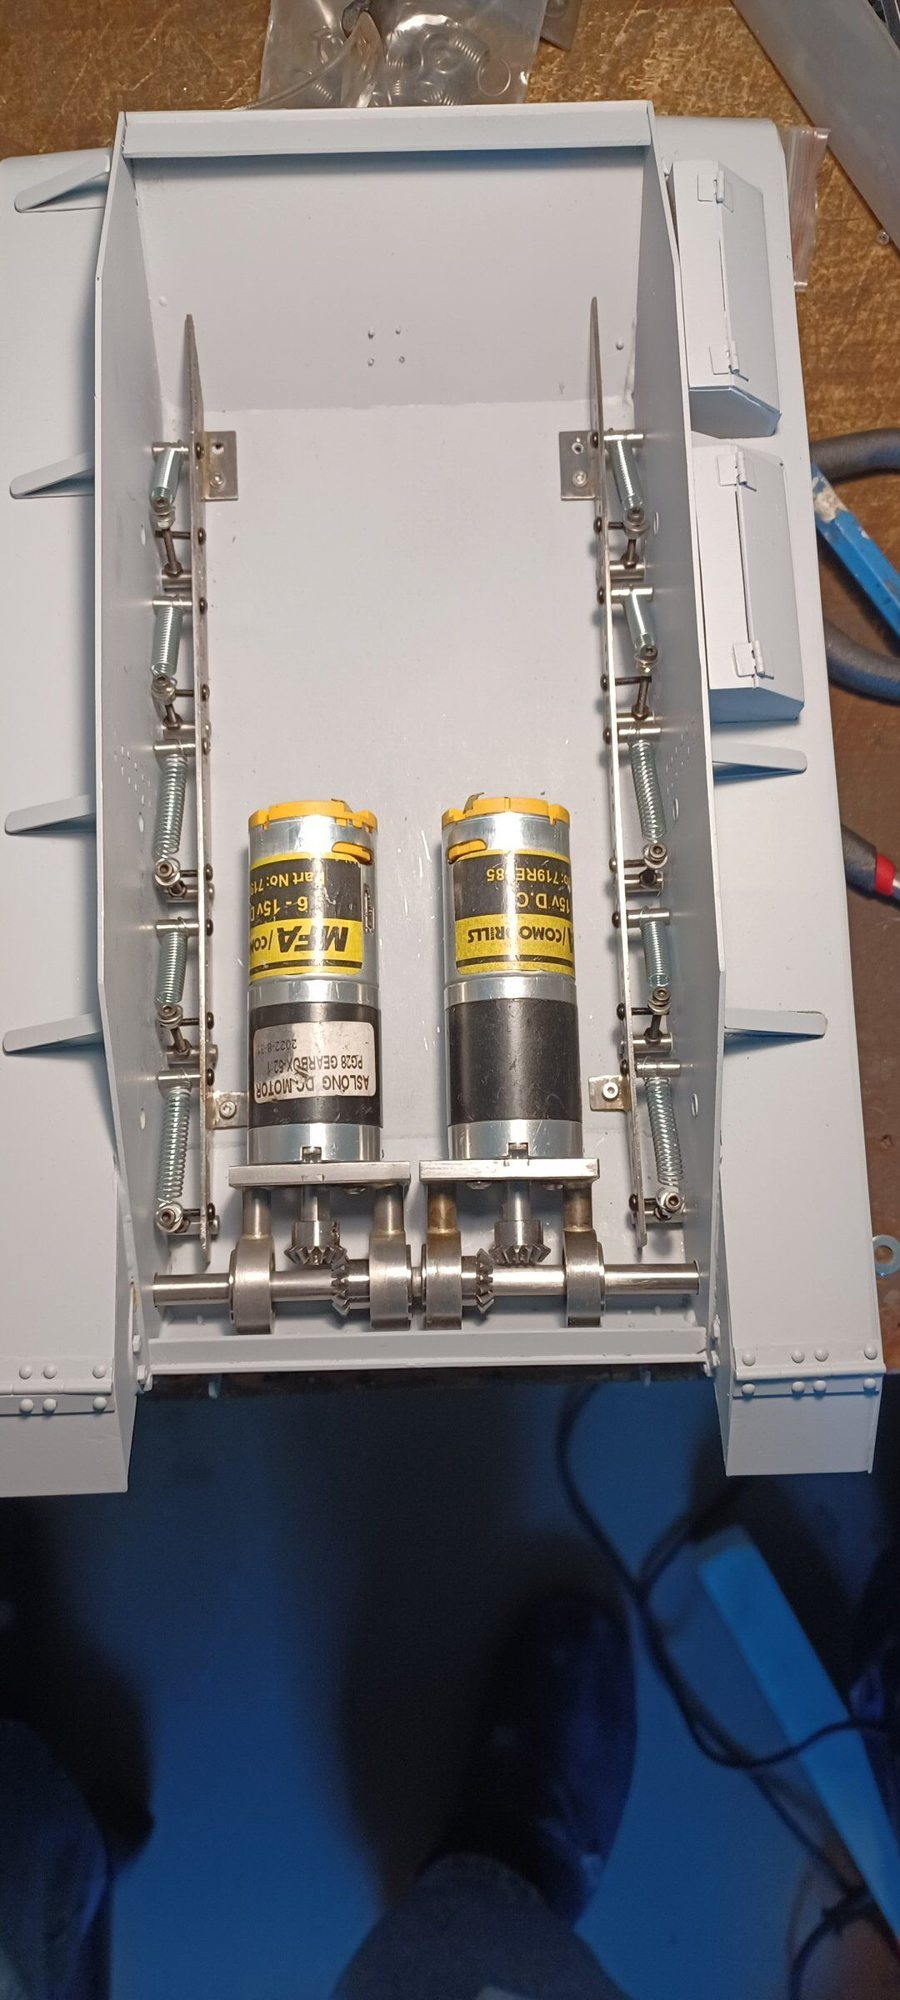
I tried the motors for size.
The motors will sit in this position and I need a bracket along the floor to hold them up as right now, the motor magnets are sticking to the floor and its making taking pictures tricky.
Then I roughly installed the suspension racks. All the drilled and tapped holes along the lengths of the racks are for cross members that will hold the springs and the other ones act as restraints to stop the swing arms returning too far.
It all sounds a bit janky but it works in principle. But it needs final fitting and finishing.
There are so many holes as I needed lots of room for fine tuning the suspension. The shafts on the swing arms that go between the hull and the rack have tapped cross holes drilled in them. Into these holes goes a shaft that ho.ds the other end of the springs.
It all looks rough now but it should be OK when done.
The battery is intended to sit like this in the final iteration to maximize space. Then ESCs and so on will go on either side and towards the back behind the motors.
Hopefully the holiday next week will let me get a bit more done.
P
The following users liked this post:
Conan_the_Hungarian (01-11-2023)
12-26-2022 | 06:38 AM
#7
Thread Starter
Just a small update while I try to digest the turkey.
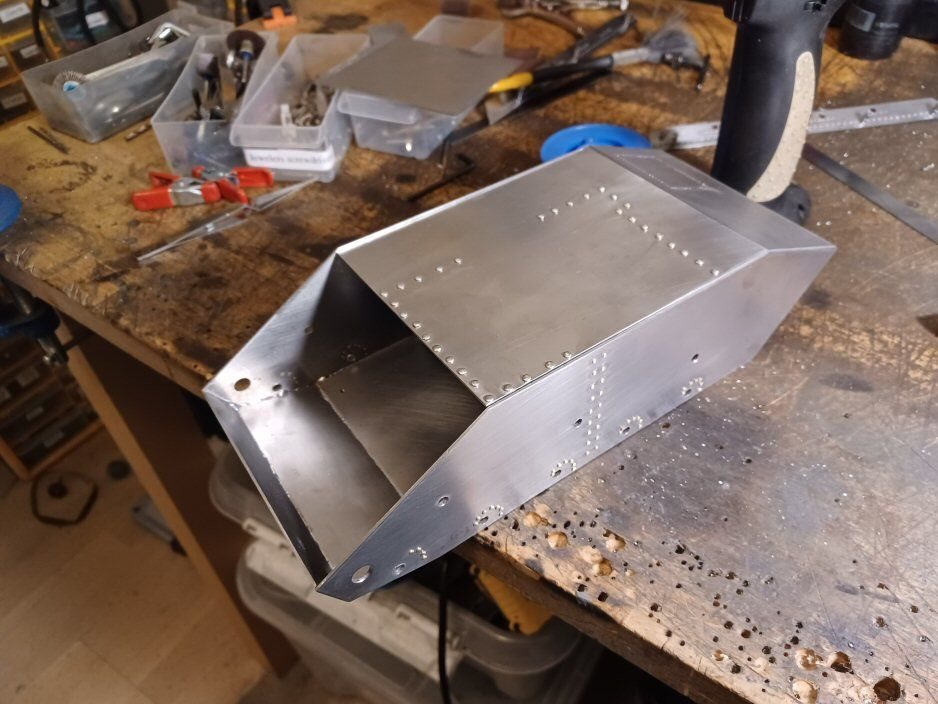
Worked on fleshing out the hull superstructure...top plate, rear glacis, front glacis. This went quite well. Nice skinny solder seams. everything lining up....
I am trying to cut out the hole on the rear glacis so that's why its full of holes as I chain drill it.
The motors fit like a glove with about a mm to spare between the front glacis and the drive shaft mounts!
The plates on the top are only held with magnets so if they look like they are not lining up...that's why for the moment.
p
The following 3 users liked this post by lposter:
01-11-2023 | 09:50 AM
#8
Thread Starter
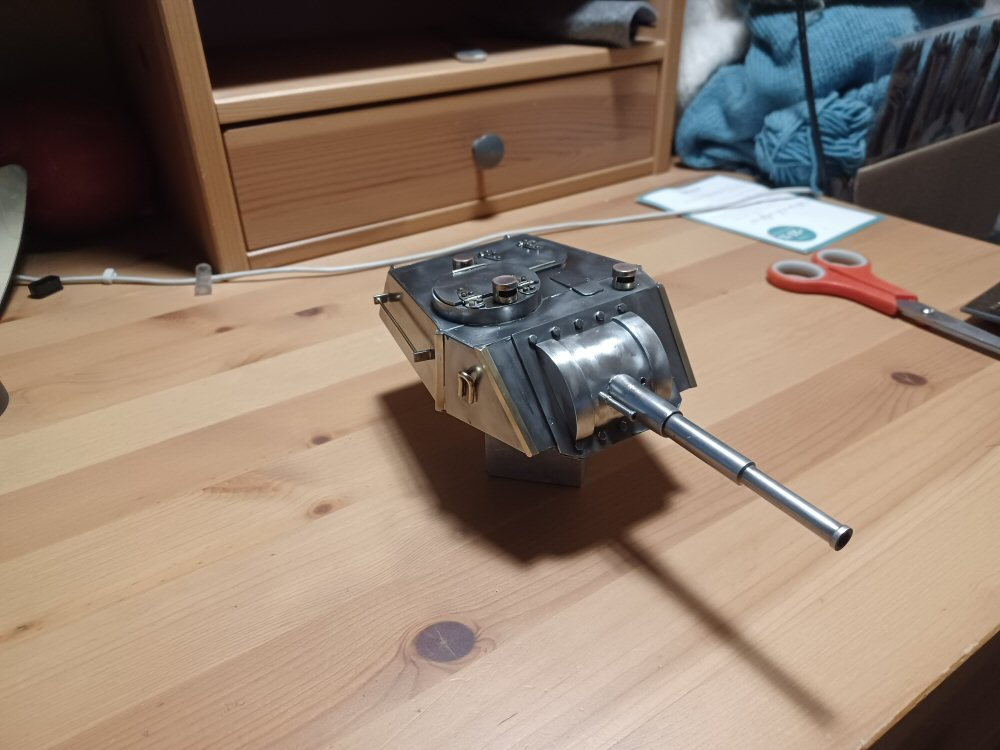
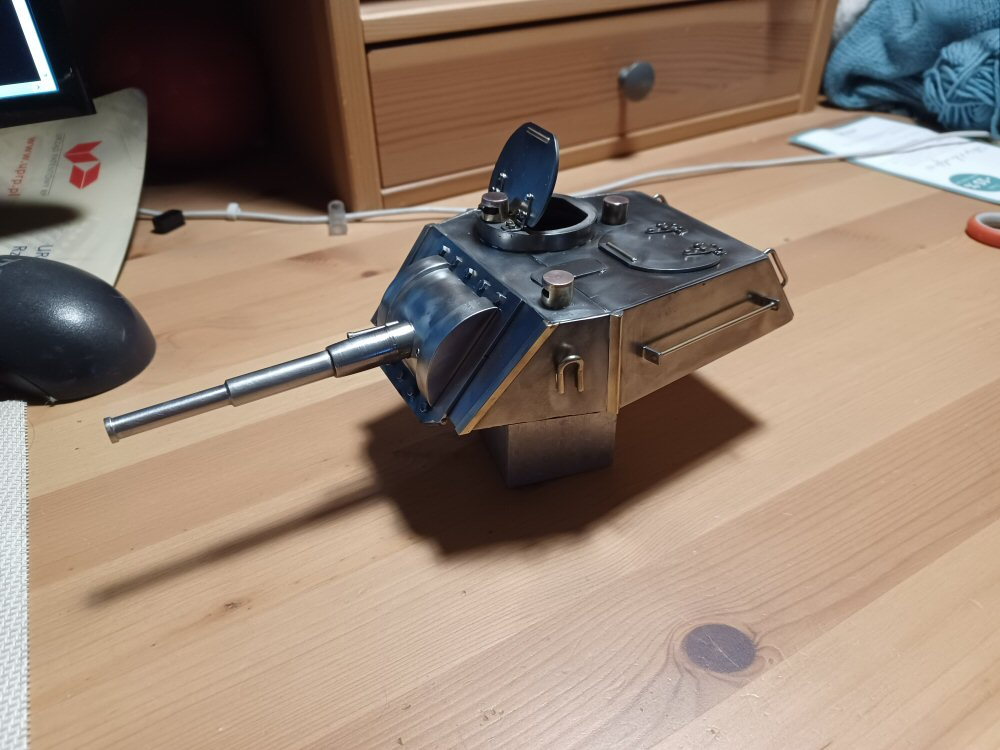
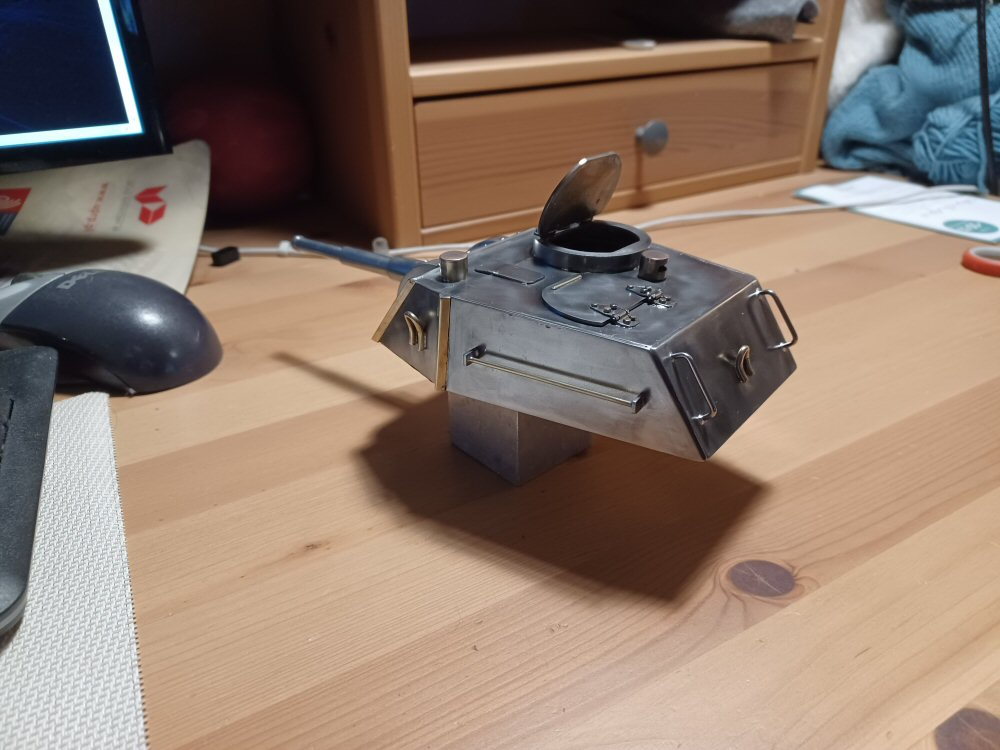
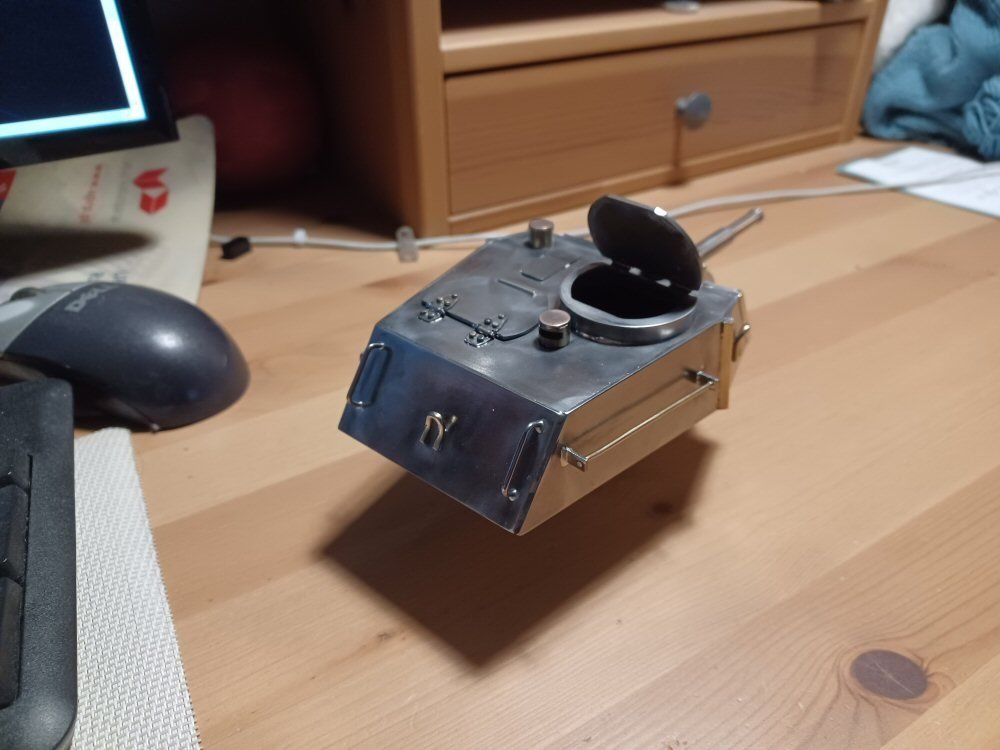
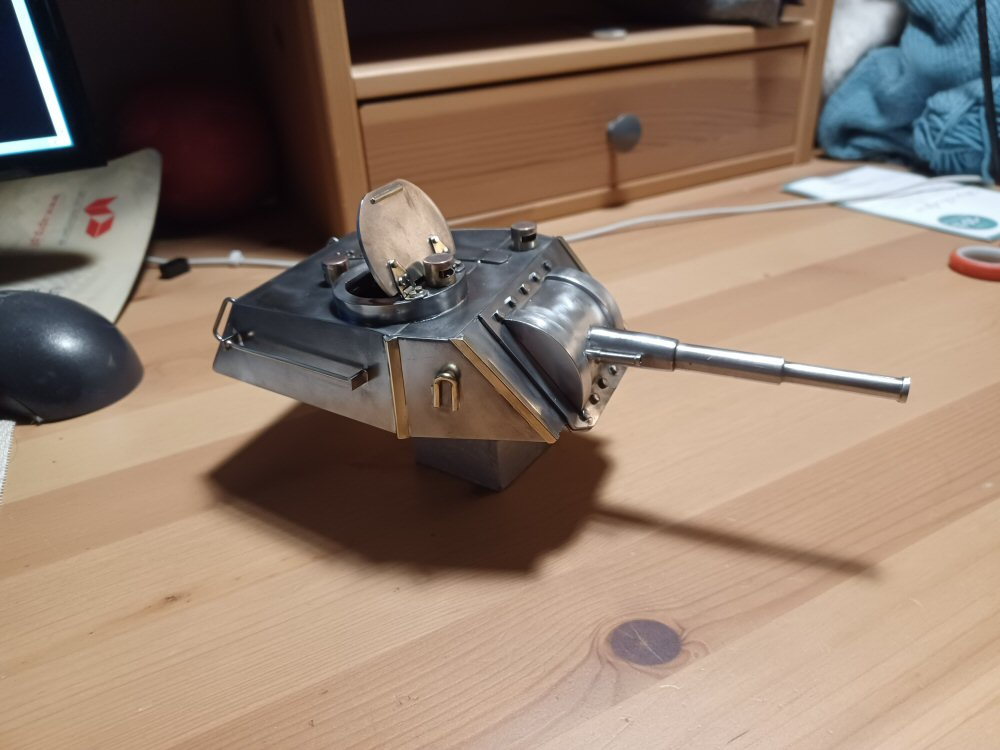
Pretty much finished off the turret today. It was really awkward to construct and was even more difficult to tidy up at the end - there are so many nooks and crannies that is essentially impossible to get into everywhere with a sanding sponge.
The angles were very slight and that makes them difficult - the side walls slope inward at about 5 degrees which is somewhat tricky.
There are still patches of filler visible. I will try and get to them. Some blobs of stray solder as well but I will deal with those.
There are quite a few omissions and mistakes too that I did not notice until the end and then it was too late.
Only one hatch opens...I need that one to allow access to the screw that will ultimately lock it onto the rotation motor shaft.
Im not entirely happy with the finish but it will be getting painted at the end.
P
The following 4 users liked this post by lposter:
08-10-2023 | 08:21 AM
#9
Thread Starter
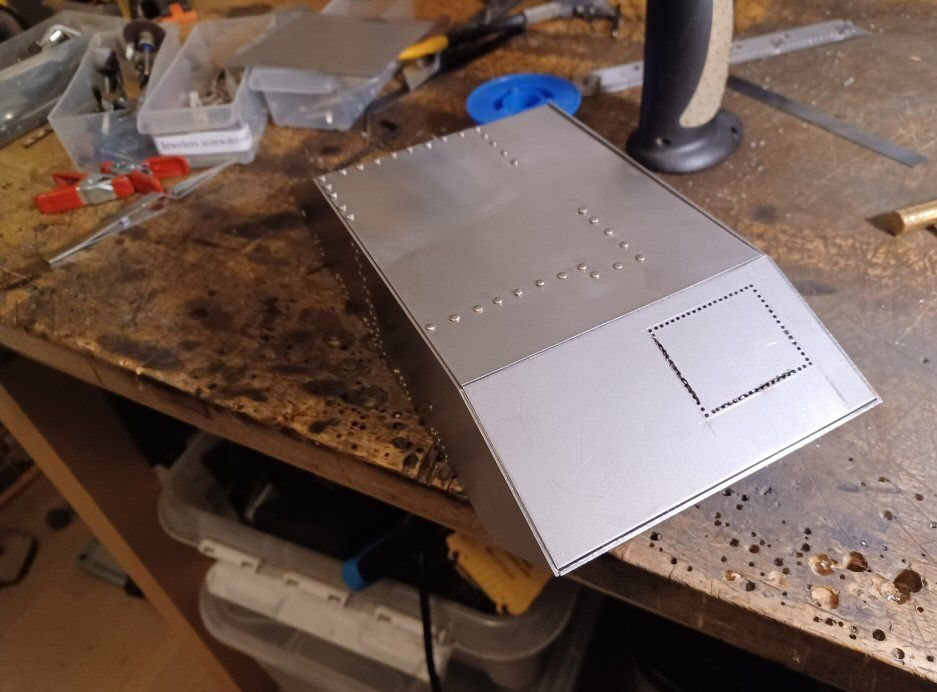
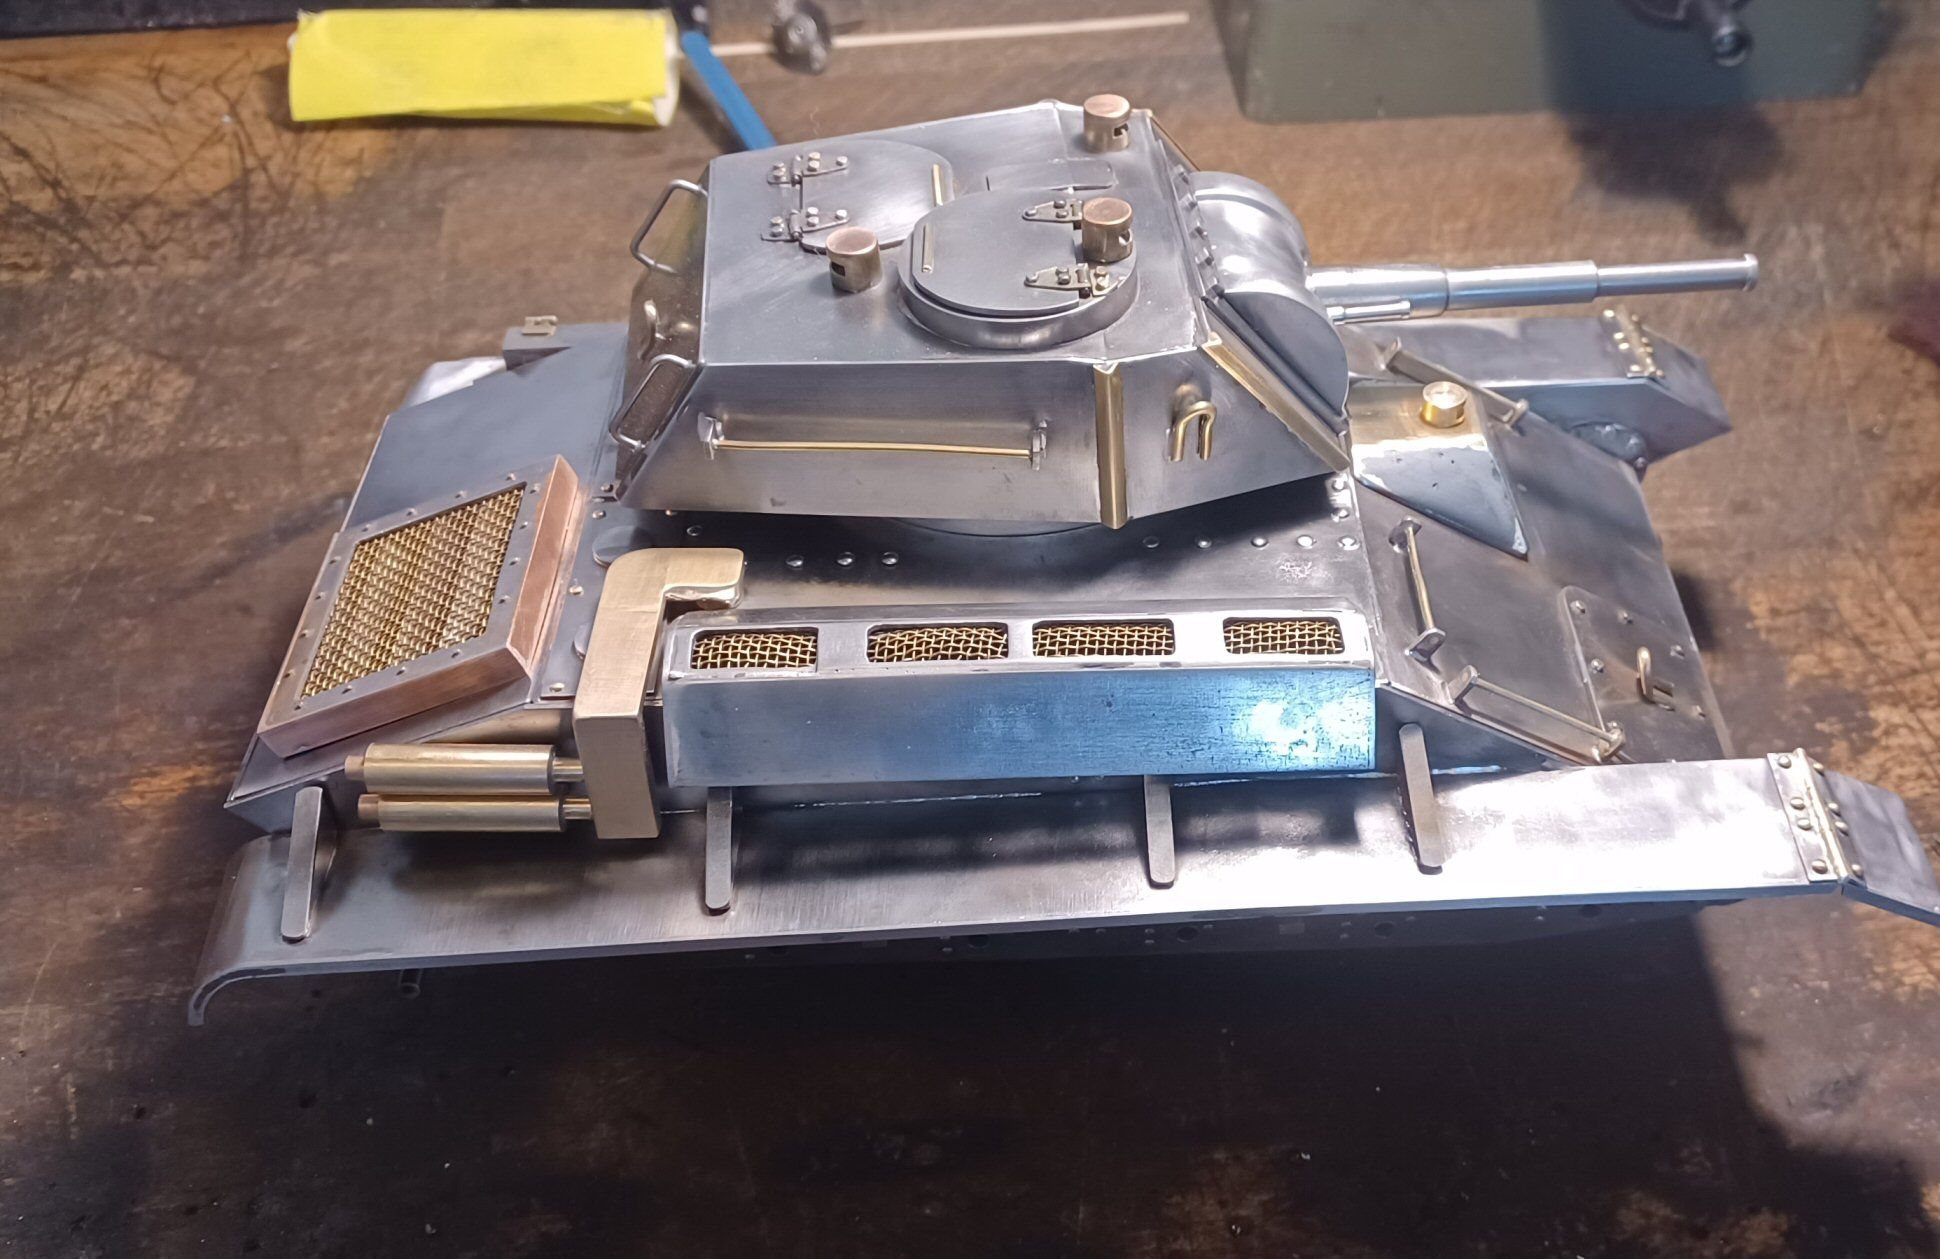
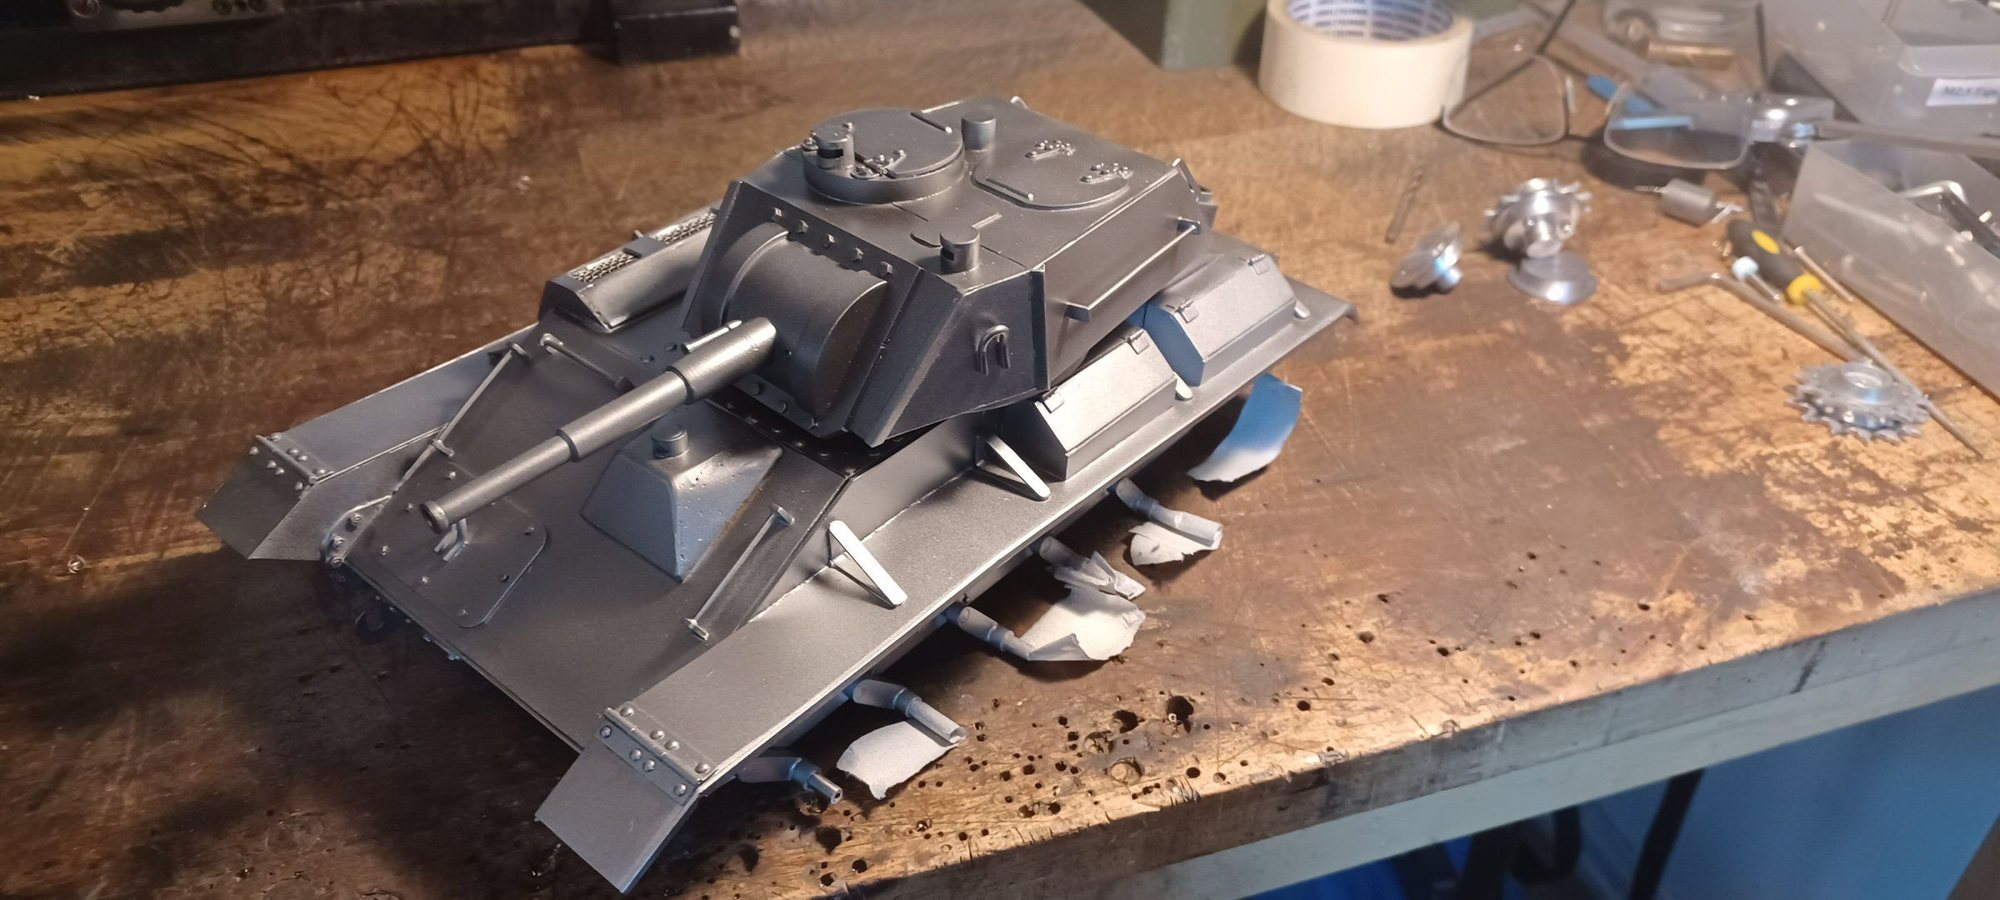
The T-80 is almost ready for getting th ehull primed. A degreasing and a scrub with a brass brush will be all I will do. I need to get it primed before I can fit the running gear so its a bit of a priority at th eminute.
I see now that I forgot a headlamp (as usual) and a spare wheel mount on the rear. I will do them tomorrow.
The big bulge on the front glacis was a hassle and I had resort to filler to get the curvy shape. Such is life I guess.
p


I see now that I forgot a headlamp (as usual) and a spare wheel mount on the rear. I will do them tomorrow.
The big bulge on the front glacis was a hassle and I had resort to filler to get the curvy shape. Such is life I guess.
p
08-10-2023 | 08:34 AM
#10
What a thing of beauty. Almost a shame to paint it! 

 08-11-2023 | 09:05 AM
#13
Thread Starter
Trial fit of the suspension system today. Looks a bit.... dainty?.......but its hardly a heavy tank and I am stuck for space in there.
All worked fine ...its fully adjustable so once I get wheels on and tracks, I can tweak it all. happy with that.
P

All worked fine ...its fully adjustable so once I get wheels on and tracks, I can tweak it all. happy with that.
P
08-16-2023 | 09:15 AM
#14
Thread Starter
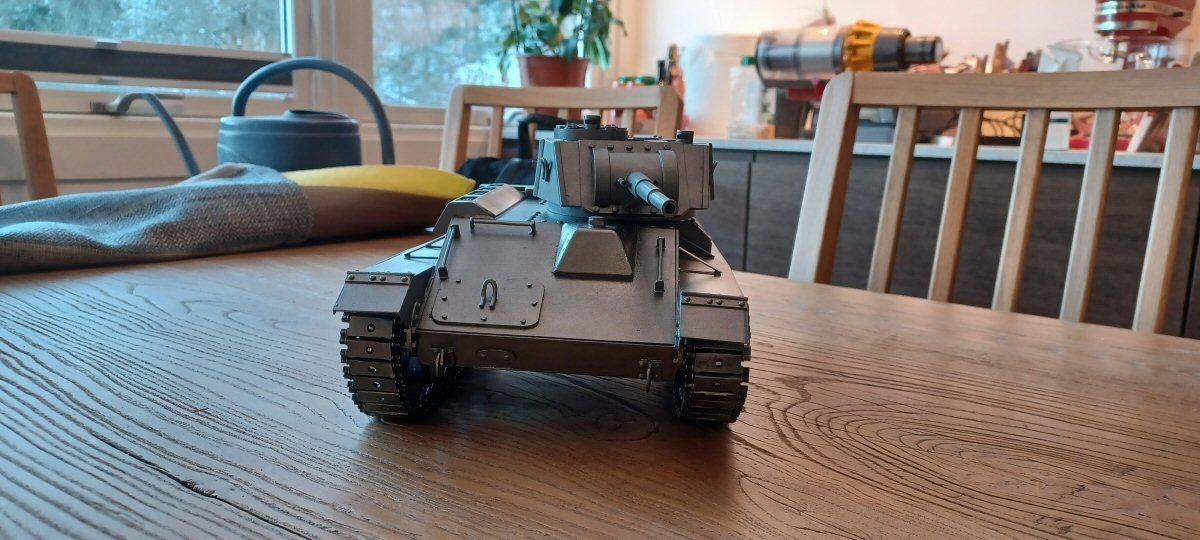
Put my standard issue coat of gun metal on the hull and turret.


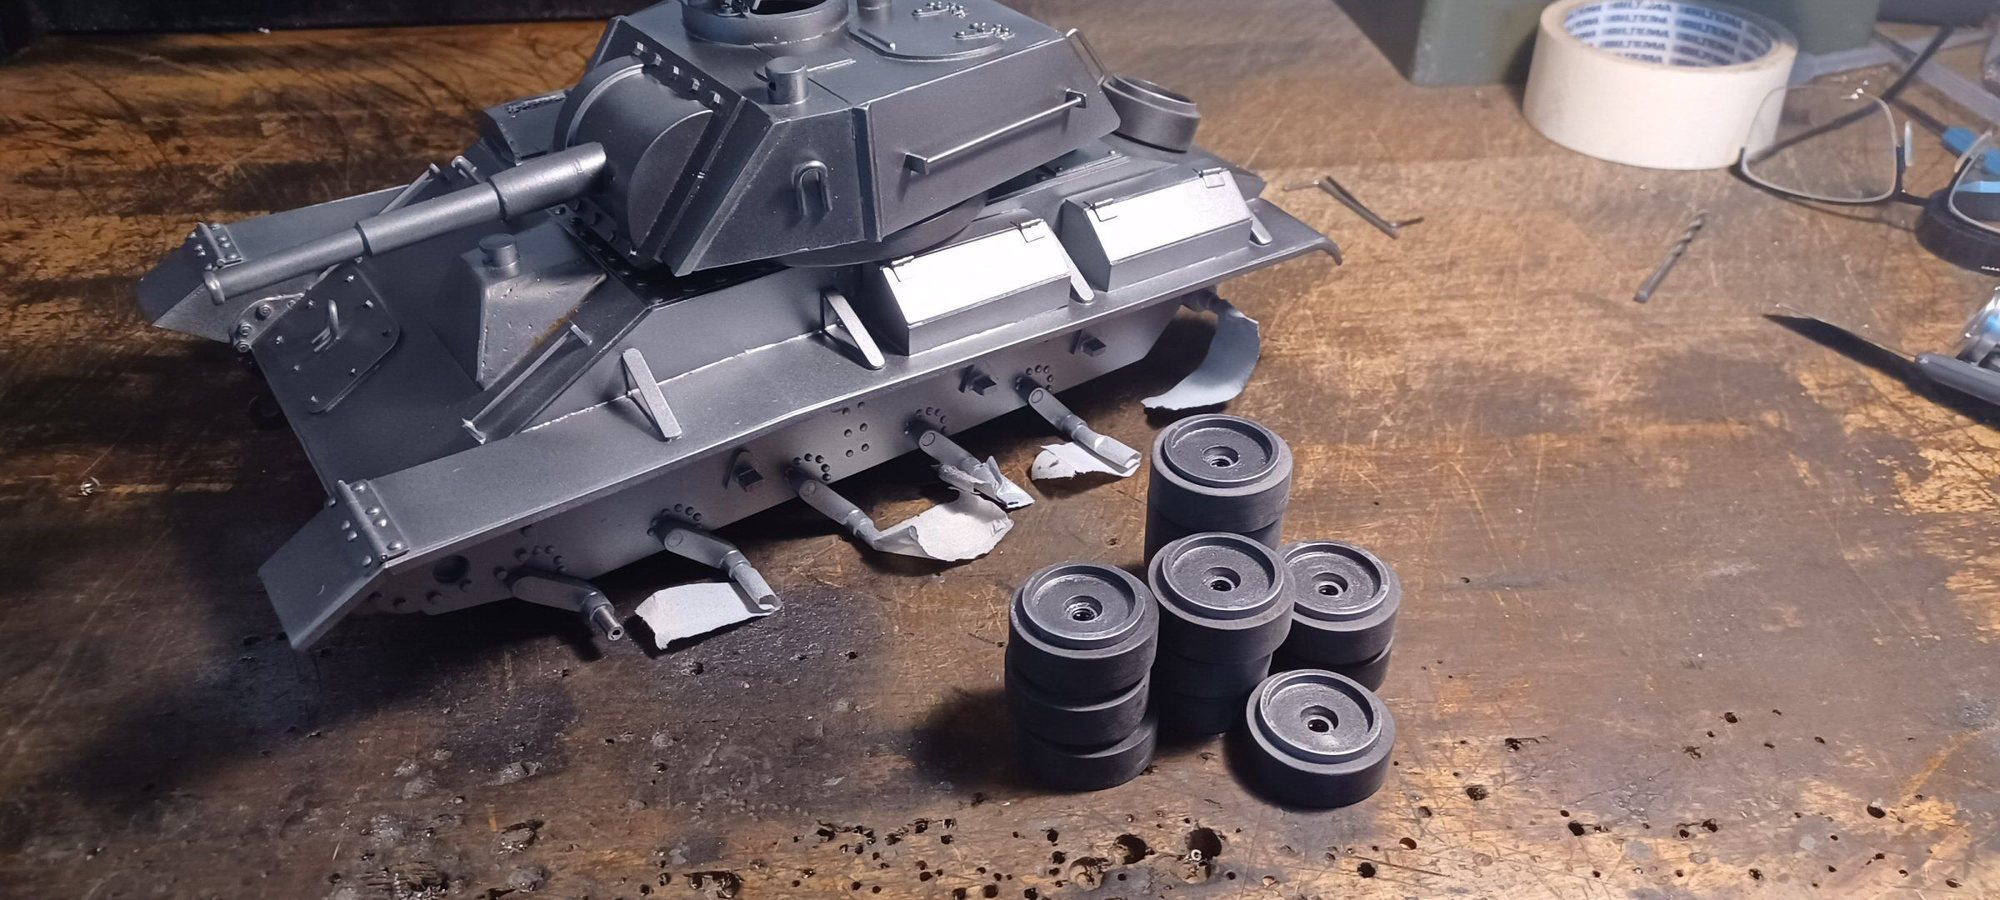
Managed to get some scratches on it so I will have to touch it up.
Th epoker chips in the last image are the wheels and idlers.
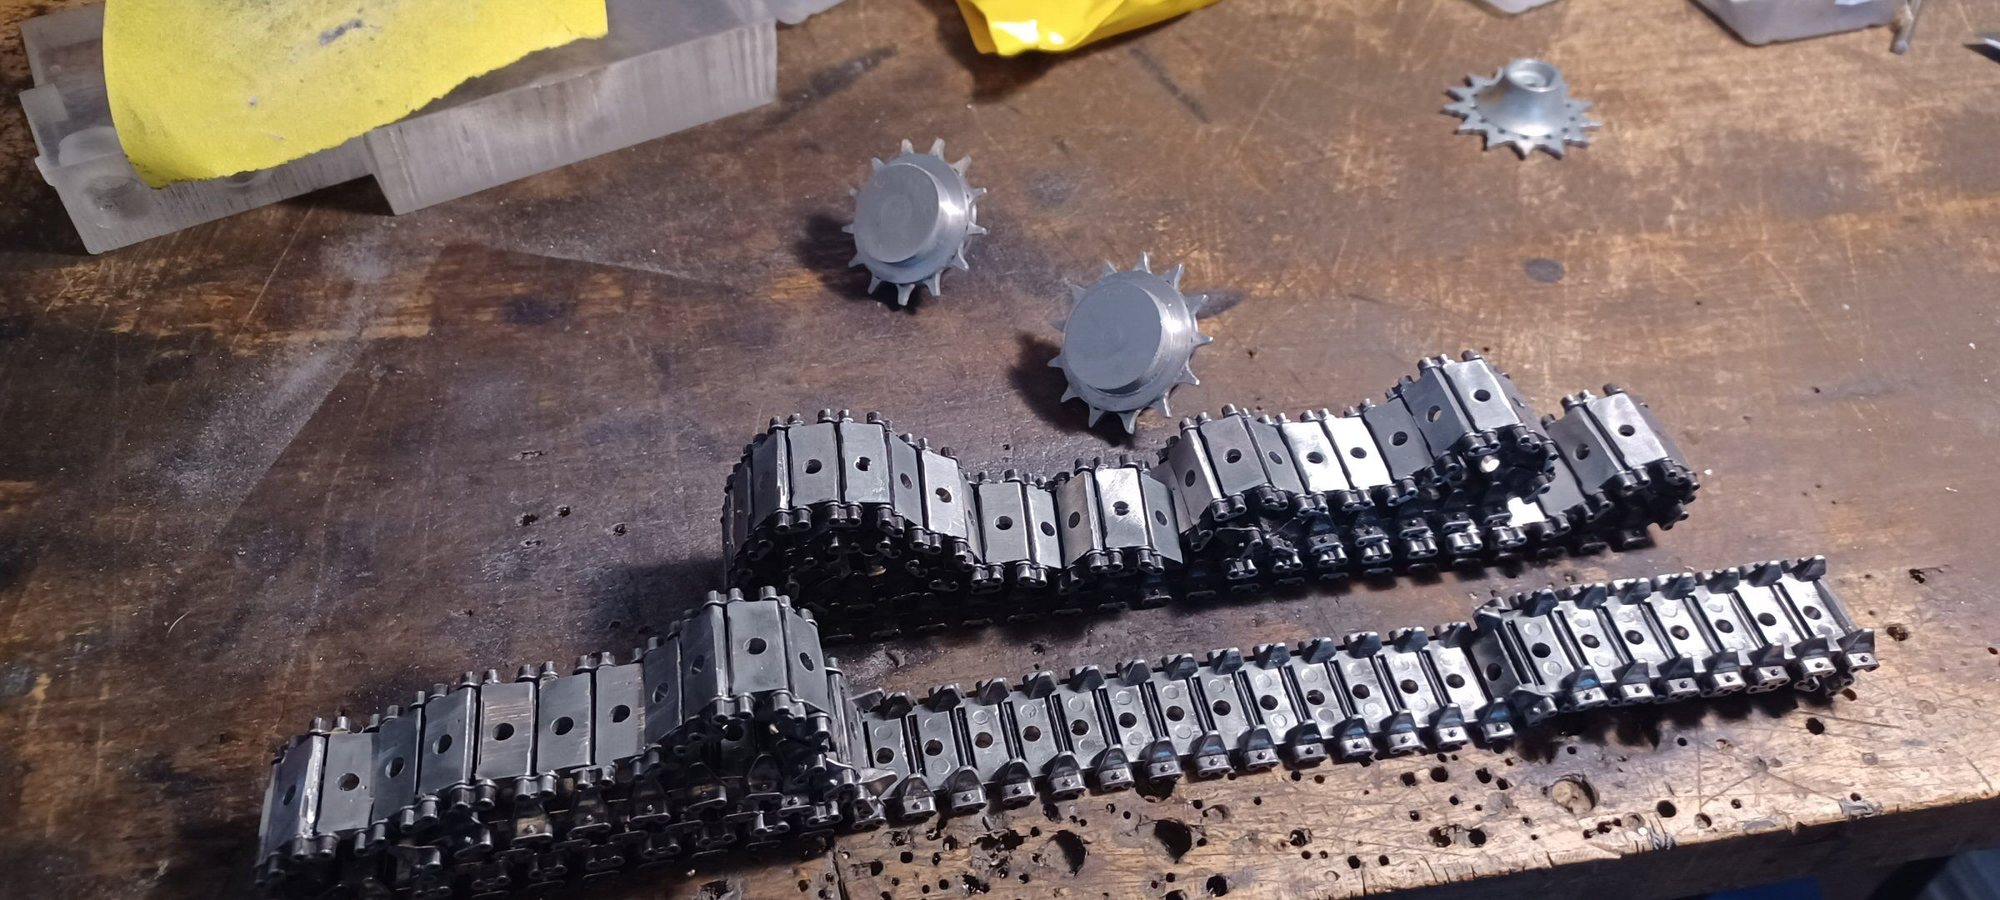
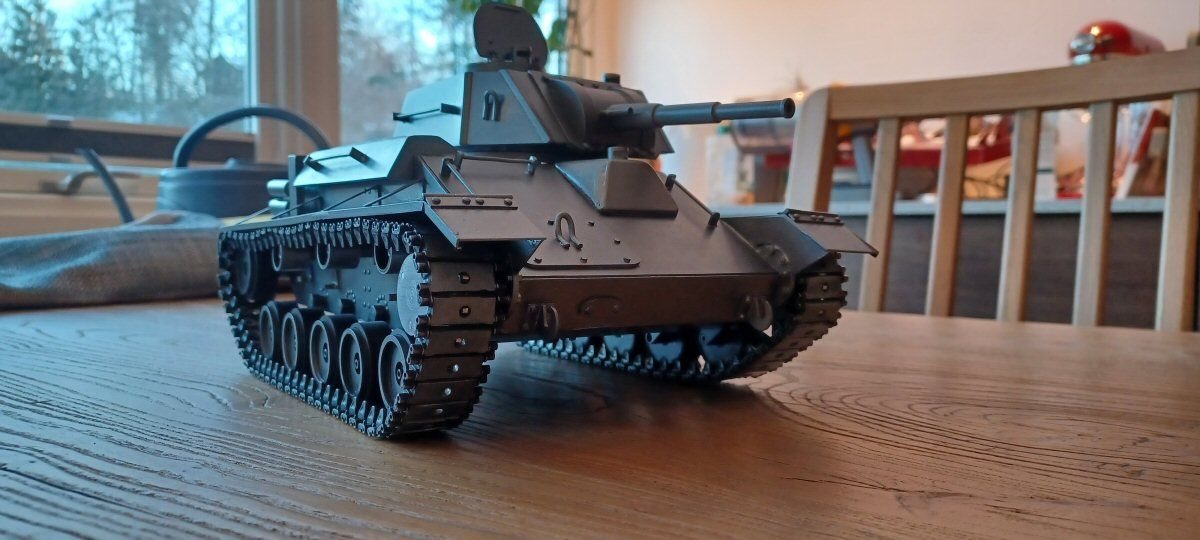
Then there was the track issue. The T-80 uses some weird double toothed track with a single row of teeth on the sprocket engaging in the middle.
The only two toothed track I know of is the Sherman. So I got some. Then I filed, ground, Dremeled and sanded off the chevron things. Then I made a little jig and drilled a hole in the dead centre of each link. Tedious work. The aim is not so much to produce a T-80 track, but to produce any track that works and that doesnt stink of Sherman.
Then the sprockets wouldnt fit correctly. So I ground off the back of the sprocket until I had just a disk of teeth left.
Then I adjusted the teeth spacing with a file. Then I mounted that disk between two steel "rims", checked that the "sprocket" was running true, then bolted the two "rims" together ending up with a rudimentary sprocket with a central row of teeth.
They need some finessing and a means of getting them on the drive shaft but that shoul dbe OK.
They engage nicely with the tracks at any rate.


Managed to get some scratches on it so I will have to touch it up.
Th epoker chips in the last image are the wheels and idlers.
Then there was the track issue. The T-80 uses some weird double toothed track with a single row of teeth on the sprocket engaging in the middle.
The only two toothed track I know of is the Sherman. So I got some. Then I filed, ground, Dremeled and sanded off the chevron things. Then I made a little jig and drilled a hole in the dead centre of each link. Tedious work. The aim is not so much to produce a T-80 track, but to produce any track that works and that doesnt stink of Sherman.
Then the sprockets wouldnt fit correctly. So I ground off the back of the sprocket until I had just a disk of teeth left.
Then I adjusted the teeth spacing with a file. Then I mounted that disk between two steel "rims", checked that the "sprocket" was running true, then bolted the two "rims" together ending up with a rudimentary sprocket with a central row of teeth.
They need some finessing and a means of getting them on the drive shaft but that shoul dbe OK.
They engage nicely with the tracks at any rate.
01-02-2025 | 05:12 AM
#15
Thread Starter
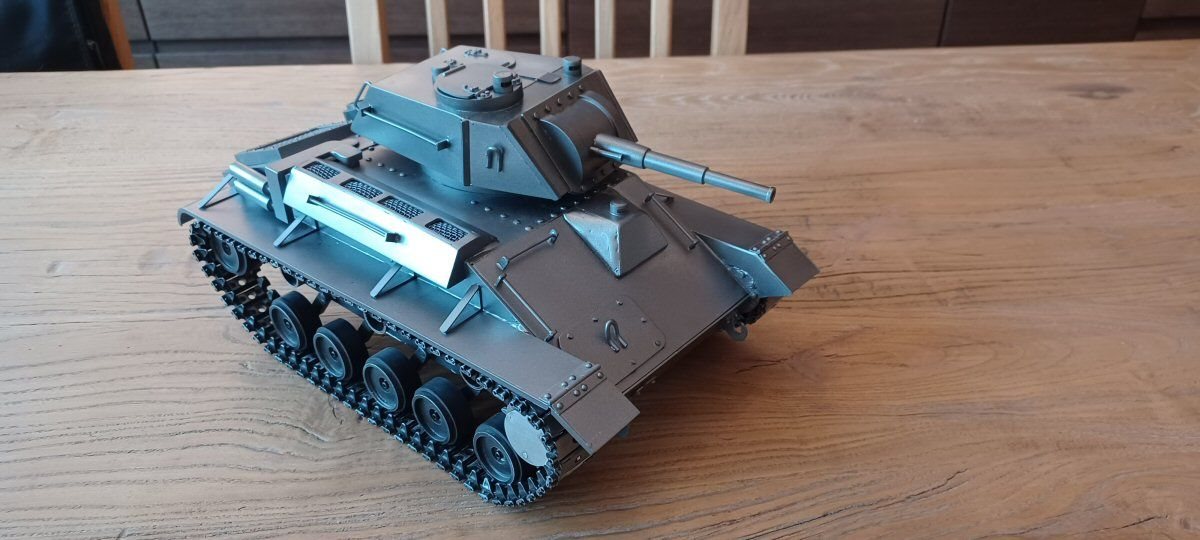
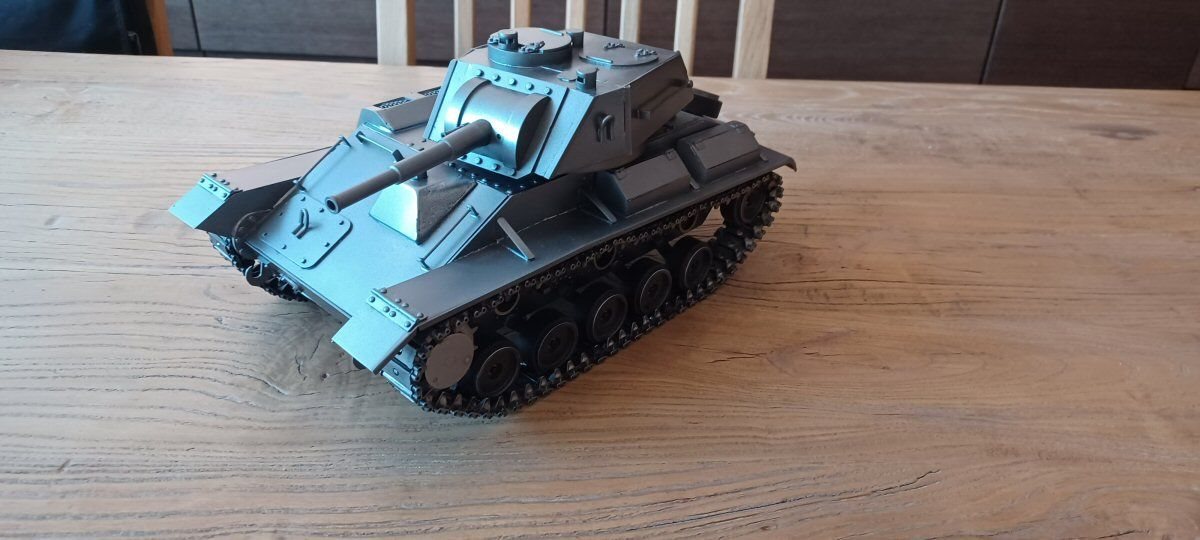
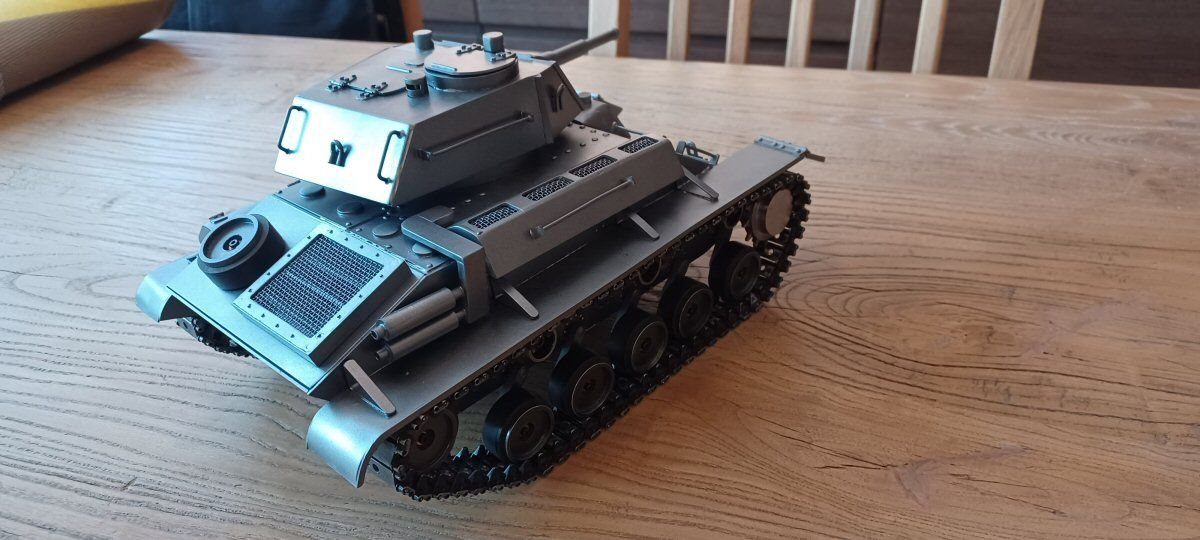
This cursed tank has been back and forth between the bench and the shelf too many times and survived renovations and losing some bits. But I resolved to finish tot over Christmas and I did. Not perfect at all but unique in this scale I reckon and I still....after all this time...like all the towel rails they distributed over it. Plus, it has a nice place in Soviet tank development history and for that it was worth the build. Have to paint a bit to touch up some scratches but I will get to it. Charging points and switches mounted under the rear vents which are held on by magnets. And a happy new year to all!


The following 5 users liked this post by lposter:
dkaniel (01-06-2025),
flyboy2610 (01-05-2025),
Panther F (01-02-2025),
Tankhobby (01-04-2025),
tankme (01-02-2025)
01-02-2025 | 05:46 AM
#16
Nice update, it looks great!

 01-14-2025 | 07:23 AM
#19

Looks really good.


