


3d modeling software
 02-03-2023 | 04:36 PM
#26
Thread Starter

I will most likely just print things for myself maybe accessories and such nothing major, although I am a fan of the Israeli Sho't Kal Gimel on cults3d. Speaking of Miata's I used to watch the grassroot racing with them in parking lots with cones set up. I do like the older Miatas there is so much you can do with them for performance
 02-04-2023 | 01:40 AM
#27

I'm a BIG fan of Fusion360 for design. Takes some practice to get used to the program, but it's very powerful and superb for designing even entire tanks.
Complex shapes is a bit more difficult. I started with Blender (freeware) a long time ago but am now doing everything in Fusion.
Here an example of an Early M4A2 I'm working on, which I've completely designed from scratch.


Complex shapes is a bit more difficult. I started with Blender (freeware) a long time ago but am now doing everything in Fusion.
Here an example of an Early M4A2 I'm working on, which I've completely designed from scratch.
02-05-2023 | 05:31 AM
#28
Very cool Sherman! I bet that was some work to get all those shapes correct. It will be fun to see it when you print it and build it.
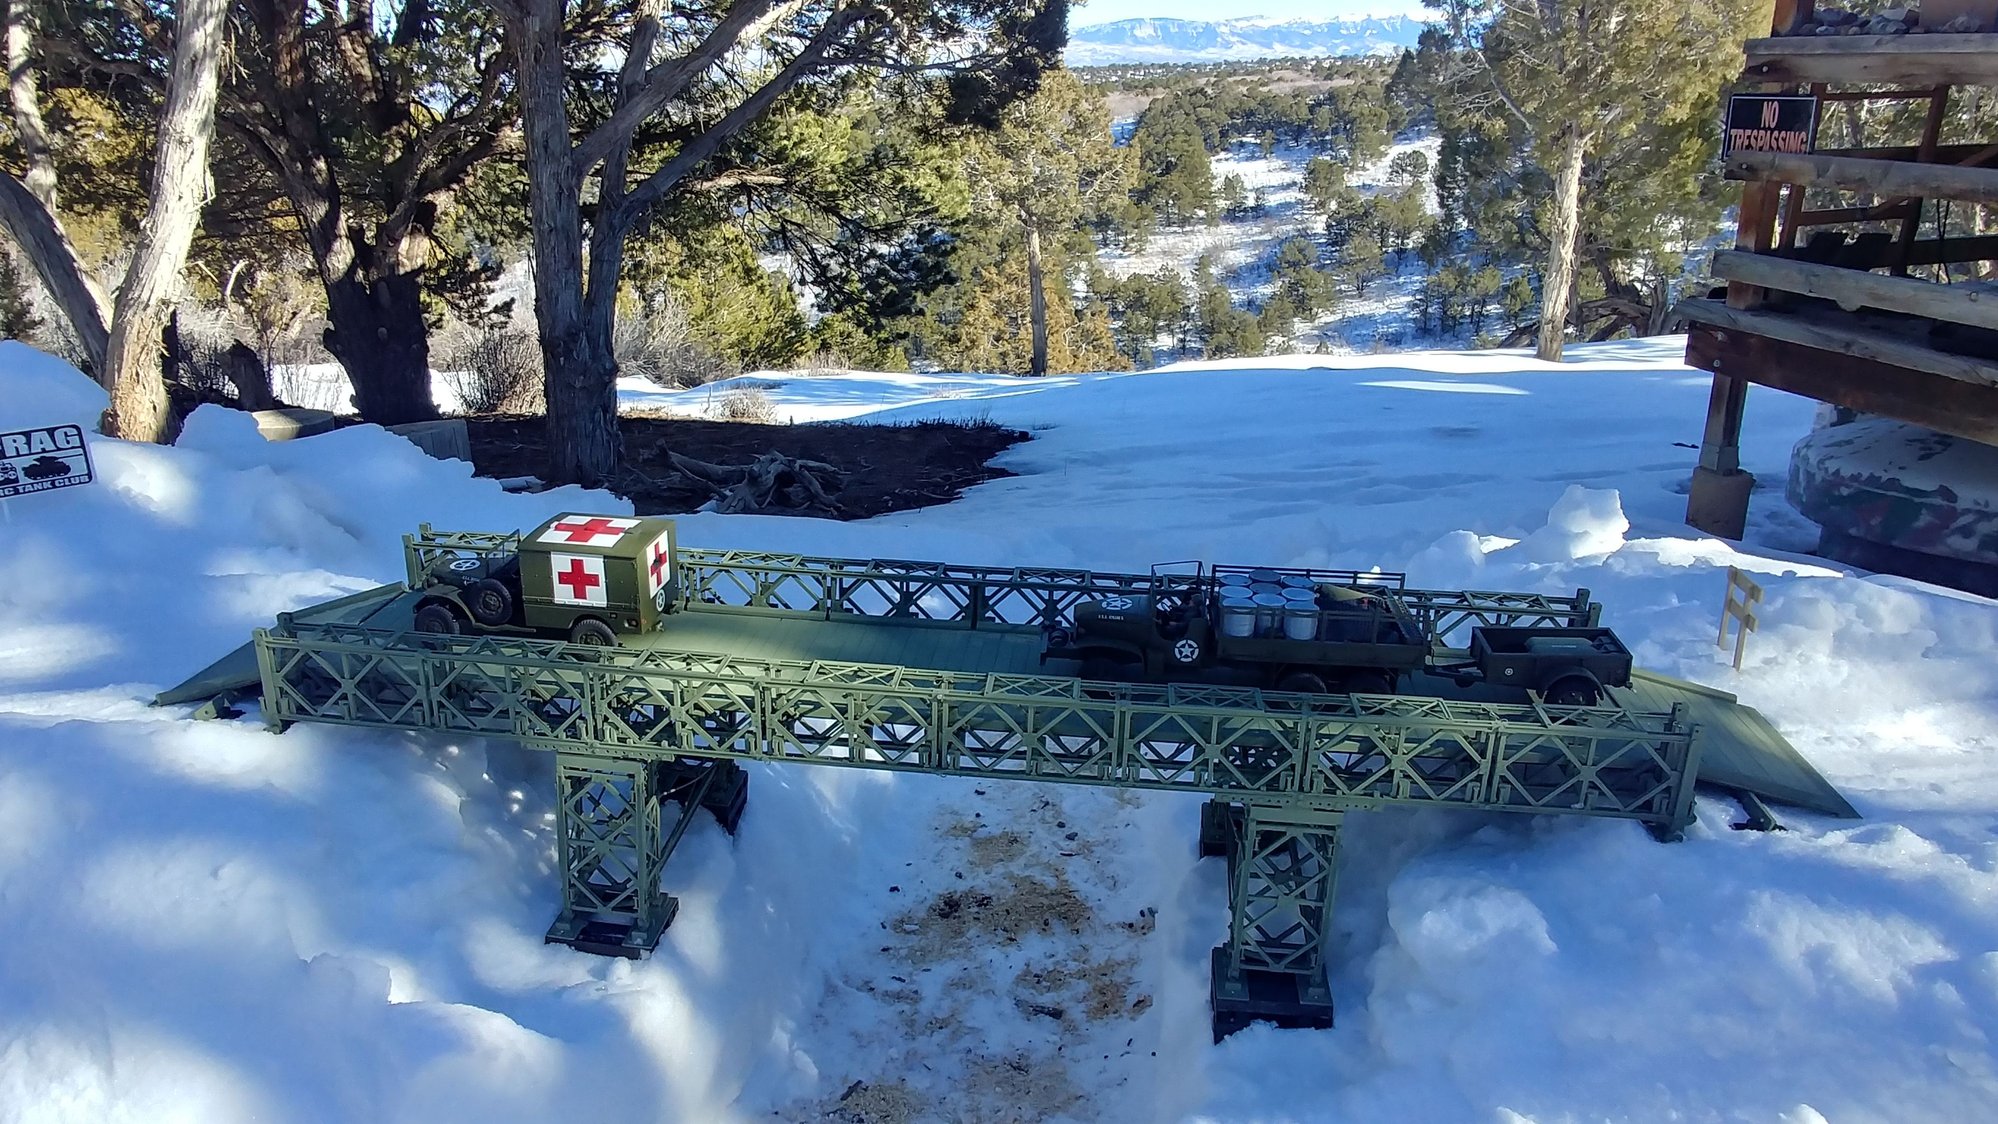
This Bailey bridge was designed with Fusion 360. So were the ambulance and CCKW truck and trailer. (and the barrels in the back) The trucks are both RC.
The other great thing about Fusion 360 is that I can share my designs online. I designed the bridge and Martin (ex-pat tanker) designed the trucks. We invited each other into our designs, so now we can both edit and print each other's designs. That means that RiskyR could invite me into his Sherman project and we could work on the design together, and I could invite him into my Bailey Bridge design, and we could work on it together. I don't think those free CAD programs allow you to do that.
I'm currently printing out the parts to build a M3 scout car that Martin designed. I can get into his CAD file and make my own STL files. Fusion 360 is the way to go.
The following 3 users liked this post by Pah co chu puk:
 02-05-2023 | 08:25 AM
#30
Thread Starter
I most likely will go with fusion 360 down the road, I do not mind paying if I will be using it regularly. As for now I want to get my feet wet and become familiar with using design software and see if this is something I want to pursue. I have been dabbling with SelfCAD when I have the time, I need to watch more vids on how to "do" certain things. I tried a simple "L" angle to make a Sherman sight for the turret, I spent two hours on something simple and still didn't look correct lol. Trying to figure out how to have holes in it by extruding and have equal spacing etc. I know it is a learning curve, and I will figure it out. When you don't know what you are doing it can be a little frustrating. To design say the Sherman that Risky is designing, and this may sound dumb, but do you take measurements of the tank first or do you design it then scale it down?
Thanks
Wade
Thanks
Wade
02-05-2023 | 10:36 AM
#31

Rebellion 13 (Wade)
If you have the real tank to measure that is best. Most don't have that option. If measuring real tank then -> Real tank measurement/16 = 1/16 model measurement, or Real tank measurement/6 = 1/6 scale etc. You get the idea for whatever scale you want.
Generally in CAD for making a model of something you design in the scale you want. But if you have the real dims then you can design in 1:1 and reduce it for scale desired. The best way in my opinion is to just design to the scale you want.
Another technique is scale up a 1/35 model, or 1/16 model if you have one.
This means:
For 1/35 model to 1/6 would be-> 1/35 measurement x 5.83333
1/16 to 1/6 ->1/16 measurement X 2.6666
1/35 to 1/16-> 1/35 measurement X 2.1875
Another option is to Scale a 2D drawing to your desired scale and take measurements from that. This works best when there is no model of the thing you want, but you have or can find a decent 3 view drawing. This works well if you're just aiming for "close is good enough"
Some folks can look at photos and come up with pretty good CAD interpretation. Sometimes you have to wing it like this if there's no model, no drawing, and no real 1:1 part to measure.
Lots of ways to make the coon skin cap.
Hope this helps...
Bob
02-05-2023 | 01:25 PM
#32
Thread Starter
Thank you Bob, that makes sense. I always sucked at math. I was always decent at history, science, geography etc�� math, yeah not so much. I read how to convert scales but that was awhile ago and it just wasn�t ringing a bell. So yes your post did in fact sink in, thank you
Wade
Wade
02-05-2023 | 06:18 PM
#33
Yep, the bridge took a while to print. Months.
Like Bob said, in CAD you draw your item the size you want it to be in the real world, but you can scale anything up or down too. If you draw something big like a Sherman tank in full scale then scale it down to 1/16 scale for printing, you can get some scaling issues, but those have more to do with the limitations of the printer than the limitations of the CAD. You can scale every measurement of the real tank down to 1/16th, but that is a lot of work. Better to draw it as the real measurements, then scale down the whole thing at once.
Like Bob said, in CAD you draw your item the size you want it to be in the real world, but you can scale anything up or down too. If you draw something big like a Sherman tank in full scale then scale it down to 1/16 scale for printing, you can get some scaling issues, but those have more to do with the limitations of the printer than the limitations of the CAD. You can scale every measurement of the real tank down to 1/16th, but that is a lot of work. Better to draw it as the real measurements, then scale down the whole thing at once.
02-05-2023 | 07:02 PM
#34

I'm a strong believer of "just because you can doesn't mean you should" and with 3D Printing people seem too Hell bent in either doing things with as few 3D Printed Parts as possible thus resulting shapes that - if split apart sensibly - would drastically have reduced the print time or even worse use 3D Printed Parts for things that would have have benefited from being manufactured differently. Both of which I've caught myself being guilty of 😅
Concerning that Bridge that took months to print... With a repeating design like that I'd probably have gone the route of 3D Printing myself a bunch of JIGs which then get populated with the parts made from cut to size raw stock material ( like sheets of plastic, profiles, etc... ) where they then get glued together. Sure... You won't have the leisure of sitting back while the Machine does like 90% of the work but I'd wager it being like 900% faster 😁 Though who knows... Maybe waiting for months on a Model to finish is something you enjoy 🤔
After doing my E-100 and the Experience I've gained from it I'm now occasionally working on my VT 1-2 with the emphasis on using ( new parts ) or reusing ( parts I replaced with aftermarket ones ) as many stock parts as possible for the build to ease its production.
Like a LOT of parts from the Tamiya #56020 Leopard 2A6 Drivetrain ( Tracks, Wheels, Suspension, Photo Etch, etc... ) including the entire Differential Gearbox Assembly IF I can fit it into the Model without having to adjust its width too much.
02-06-2023 | 06:40 AM
#35
Concerning that Bridge that took months to print... With a repeating design like that I'd probably have gone the route of 3D Printing myself a bunch of JIGs which then get populated with the parts made from cut to size raw stock material ( like sheets of plastic, profiles, etc... ) where they then get glued together. Sure... You won't have the leisure of sitting back while the Machine does like 90% of the work but I'd wager it being like 900% faster 😁 Though who knows... Maybe waiting for months on a Model to finish is something you enjoy 🤔
Each bridge section has 37 parts, the bridge has 8 sections for a total of 296 parts plus the end posts (4) and base plates (4). The big structural truss panels alone would take over 50 parts just to build just one, and there are 36 of those in the bridge. The 6 stringers in each section would take 6 parts each. That would be over 25,000 parts to cut and glue together accurately to build the bridge in those pictures. Some of the parts would not be easy to fabricate from off the shelf plastic stock.
I do enjoy watching the machine churn out parts. It's a joy to design something and then watch it become a reality.
The following users liked this post:
rb67mustang (08-13-2023)
02-06-2023 | 07:56 AM
#37
It was the ambulance. I built it and it runs great. The M3 scout car is about 1/2 printed out. Did you build an M3?
02-06-2023 | 08:07 AM
#38
My Feedback: (1)
I printed everything out, including the shortened axle housings which I did on the resin printer, but then I got sidetracked, as usual, so it's become one more of the projects that I'll finish if I live long enough. I'm doing a fairly decent job of sticking with this SAS Jeep project, now all the wheels are primed and ready for paint and then it's just a question of putting everything together and giving it that last coat with the airbrush and then weathering the crap out of it. You know I've never been a fan of overly weathered models but for the SAS Jeep it's going to get the whole treatment. Those things took a lot of abuse out there in the desert and they showed it, so I'll try to make the model look as close to the real thing as I can. I've got some good reference photos to work with so that will help a lot. I'll be doing an update on that thread in the next couple days if you've been keeping up, Greg.
02-06-2023 | 08:26 AM
#39
Cool. I may never get mine built ether, too many other projects, but it's fun to work on it.
I like that SAS Jeep. Keep posting pix and movies. Weathering is tricky, too much and it looks lame, too little and you can't tell it was weathered. Study some dirty cars and trucks where you live, especially the dusty ones. Those guys lived with constant dust in North Africa.
I like that SAS Jeep. Keep posting pix and movies. Weathering is tricky, too much and it looks lame, too little and you can't tell it was weathered. Study some dirty cars and trucks where you live, especially the dusty ones. Those guys lived with constant dust in North Africa.
02-06-2023 | 08:42 AM
#40
and getting back to design software...
I haven't heard from Martin in months, I worry that something has happened to him, but I can still get into his Fusion 360 designs to make my own STL files for 3d printing. I'm combining some of his M3 parts into sub-assembles for easy printing and to give them more strength when I make the STL files, but then putting them back to his original configuration before logging out of his design.
A good example is the back part of the M3 crew compartment. Martin has it designed as 3 parts, two sides and a back. Printing three parts and then gluing them together would be hard to get square and make weak points at the glue joints. I combined those three parts in CAD into one part that has the 90 degree angles built in, and then printed it. Much stronger, and no chance for me to screw up the glue joint. I did the same thing with the hood, and I even added the doors onto the hood assembly. I did all that, and then preserved Martin's original designs intact.
That aspect of Fusion 360 is really cool.
02-08-2023 | 04:17 AM
#41
Senior Member
I've never owned a Jeep (and never will because Chrysler screwed me in the '90s), but I get the Jeep thing. I'm a Miata owner and Miata owners are just as passionate as Jeep owners about their vehicles. I'm on my 4th Miata.
As far as the Jeep stuff goes though, Jeep actively and ferociously defends their trademark. Just be careful if you do get into making stuff in that space that you don't refer to them as a Jeep. Jeep has been known to go after small creators.
Speaking of that space and you wanting to design in it, there are others that are in that space: https://wcpmodels.com/
I would assume you are wanting to design something like what WCP Models did: https://www.youtube.com/watch?v=CbdSE0jKYdU

Originally designed that wee thing for my wife as i couldn't afford a full size one, so she got one in scale haha. Was an interesting thing to piece together. It takes some abuse aswell
I am Will and work with my wife @ WCP Models
I love designing models and then bringing them to life.
For the CAD side of things i love Inventor, but its pricey, so for home use i use Fusion 360 and work with others to bring some lovely models to reality.
F360 is very cost effective, i have never found a free CAD software that works soo well. If money was no object i would go further to Inventor coupled with Vault for control of files etc.
The following users liked this post:
Rebellion13 (02-08-2023)
02-08-2023 | 04:20 AM
#42
Senior Member
and getting back to design software...
I haven't heard from Martin in months, I worry that something has happened to him, but I can still get into his Fusion 360 designs to make my own STL files for 3d printing. I'm combining some of his M3 parts into sub-assembles for easy printing and to give them more strength when I make the STL files, but then putting them back to his original configuration before logging out of his design.
A good example is the back part of the M3 crew compartment. Martin has it designed as 3 parts, two sides and a back. Printing three parts and then gluing them together would be hard to get square and make weak points at the glue joints. I combined those three parts in CAD into one part that has the 90 degree angles built in, and then printed it. Much stronger, and no chance for me to screw up the glue joint. I did the same thing with the hood, and I even added the doors onto the hood assembly. I did all that, and then preserved Martin's original designs intact.
That aspect of Fusion 360 is really cool.
I haven't heard from Martin in months, I worry that something has happened to him, but I can still get into his Fusion 360 designs to make my own STL files for 3d printing. I'm combining some of his M3 parts into sub-assembles for easy printing and to give them more strength when I make the STL files, but then putting them back to his original configuration before logging out of his design.
A good example is the back part of the M3 crew compartment. Martin has it designed as 3 parts, two sides and a back. Printing three parts and then gluing them together would be hard to get square and make weak points at the glue joints. I combined those three parts in CAD into one part that has the 90 degree angles built in, and then printed it. Much stronger, and no chance for me to screw up the glue joint. I did the same thing with the hood, and I even added the doors onto the hood assembly. I did all that, and then preserved Martin's original designs intact.
That aspect of Fusion 360 is really cool.

I think he is just trying to keep warm and playing with model trains at the moment.
There have been some other things we have been working on, so come the warmer weather, it be great to see them come to life
The following users liked this post:
Rebellion13 (02-08-2023)
02-08-2023 | 09:25 AM
#43
The following users liked this post:
Will01Capri (02-08-2023)
02-17-2023 | 05:42 AM
#44
My Feedback: (1)
Rebellion13, not sure if you made a decision on a printer yet. If not, as a first printer, I would suggest what I actually ended up with. I bought an Artillery Sidewinder x1 as my first printer. It is now an older model, of course, as I have had it a few years. However, it works very well, with no trouble. I also bought two more machines since starting out. An Artillery Genius Pro, and a Sovol SV06. All have been awesome.
I would suggest trying the genius pro or sidewinder X2, which is the new model of my X1. 3dprintersbay.com has the best prices on thee machines, and they are very reliable. The main difference between the two is the print size they are capable of. They are great machines for printing PLA, PETg, and TPU out the box. If you wanted to do ASA or ABS, which require higher temperatures, then you would need to upgrade the parts in the hotend to all metal. PETg should be sufficient for most parts and TPU for tires. I am assuming you want to print tank parts. The Sovol comes with an all metal hot end and can do most materials out the box..keep in mind that an enclosure is needed for some types of filament. I am not recommending the SV06 only because it is a newer machine and I cannot speak for long term reliability yet. I can on the genius pro and x1. I hope this helps a bit.
I would suggest trying the genius pro or sidewinder X2, which is the new model of my X1. 3dprintersbay.com has the best prices on thee machines, and they are very reliable. The main difference between the two is the print size they are capable of. They are great machines for printing PLA, PETg, and TPU out the box. If you wanted to do ASA or ABS, which require higher temperatures, then you would need to upgrade the parts in the hotend to all metal. PETg should be sufficient for most parts and TPU for tires. I am assuming you want to print tank parts. The Sovol comes with an all metal hot end and can do most materials out the box..keep in mind that an enclosure is needed for some types of filament. I am not recommending the SV06 only because it is a newer machine and I cannot speak for long term reliability yet. I can on the genius pro and x1. I hope this helps a bit.
The following users liked this post:
rb67mustang (08-13-2023)
02-17-2023 | 09:14 AM
#45
I can add a second vote for the Artillery Sidewinder. I don't have one, but a friend does, He was complete nube to 3D printing. I've seen the parts it makes and the quality is excellent right out of the box. Good first choice for an FDM printer.
Bob
Bob
The following users liked this post:
yellowshaker (02-17-2023)
08-13-2023 | 01:17 PM
#48
Thank you. It's fun to have an outdoor place to run the tanks and trucks. We all spend so much time and effort making them look real. Getting to run them in real dirt and mud is a pleasure. It also makes a great proving ground to test everything I build for capability and durability.
The following users liked this post:
rb67mustang (08-13-2023)


