


leopard 1


 07-11-2005, 01:32 AM
#2
Banned
My Feedback: (-1)
Join Date: Nov 2003
Location: HORSHAM, PA,
Posts: 900
Likes: 0
Received 0 Likes
on
0 Posts
I have done one, here is the video and pix
http://tomsrctanks.com/leopard1a4.html
use pershing guts.
but really, I want to redo it with leo 2 guts
http://tomsrctanks.com/leopard1a4.html
use pershing guts.
but really, I want to redo it with leo 2 guts
11-30-2015, 12:23 PM
#4

I think the Leopard 2's MFU has a special way of powering the motors so I dont think it will work with conventional gear boxes. One motor turns the tank and one drives it forward and backwards. i cant see this being able to run the way we are used too.
11-30-2015, 01:29 PM
#5
Panther G is right, unless you use the Leopard 2A6 gearbox also, you can't use the Leopard MFU and DMD.
Besides, the dang thing stops for a second every time it takes a hit in a battle. If a light tank is shooting at you it can hit you a second time before you get the Leopard moving again.
Besides, the dang thing stops for a second every time it takes a hit in a battle. If a light tank is shooting at you it can hit you a second time before you get the Leopard moving again.
 11-30-2015, 04:15 PM
#7

Literally a blast from the past. Here is a Tamiya Static Leo 1 converted using the Tamiya JS-2 DMD, MF and TBU plus Panther G gearboxes and built for IR play.
https://www.youtube.com/watch?v=kDbkh6LwMnA
https://www.youtube.com/watch?v=kDbkh6LwMnA
Last edited by Pcomm1.v2; 11-30-2015 at 04:17 PM.
12-02-2015, 05:14 AM
#8
So cool! I know what you mean about zombie threads and builds as I have a kit & parts collecting dust too.
Nice to see it getting built and a lot of good information here too!
Jeff
Nice to see it getting built and a lot of good information here too!
Jeff
12-02-2015, 09:49 AM
#9
I would use the KV electronics if you are staying with Tamiya. AFV model site makes a killer gearbox for it as well. Based on the Sherman, but upgraded. Also might want to change the pinion gear on motors for a better top speed, but that is preference.
I used them in my Leopard 1 build some years back, and very god results.
I used them in my Leopard 1 build some years back, and very god results.
12-02-2015, 10:20 AM
#10
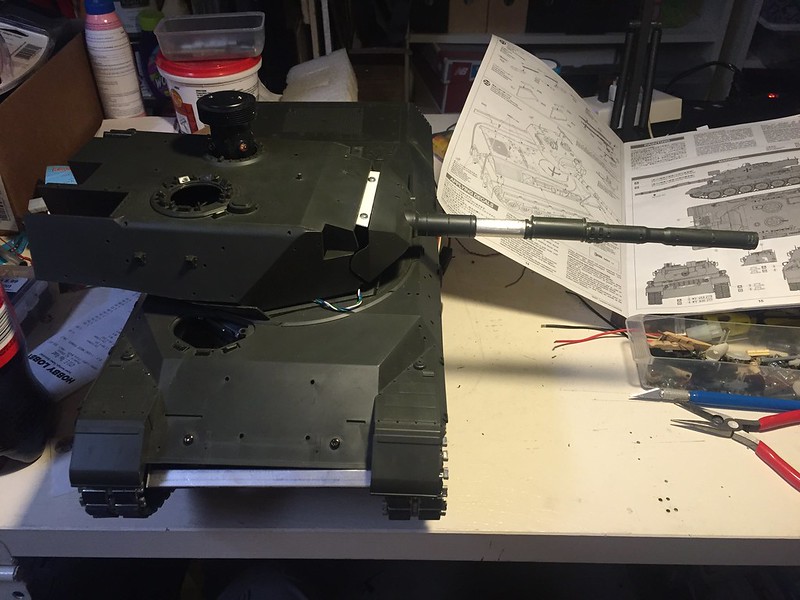
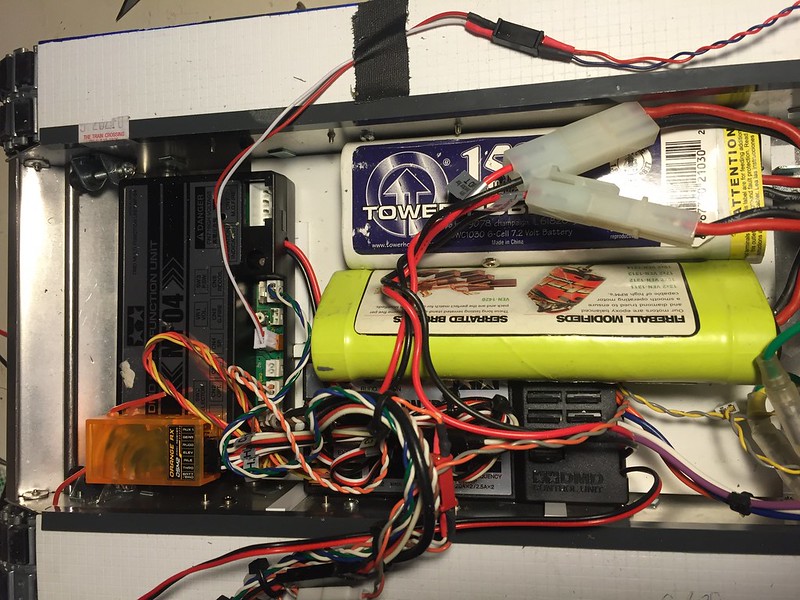
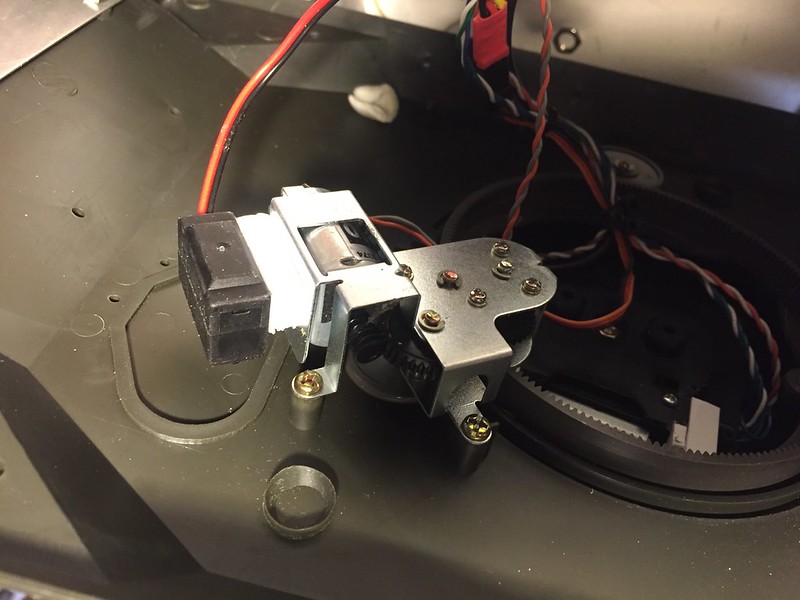
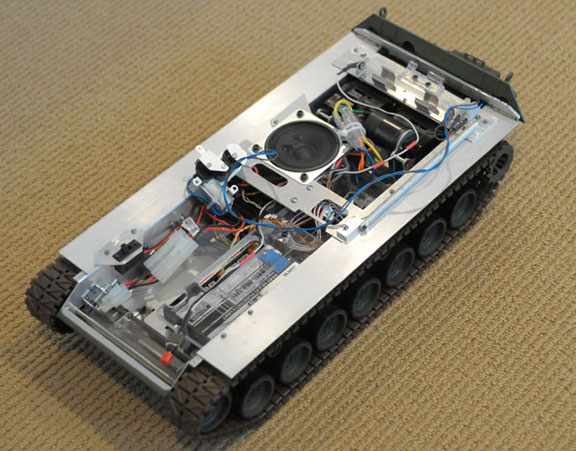
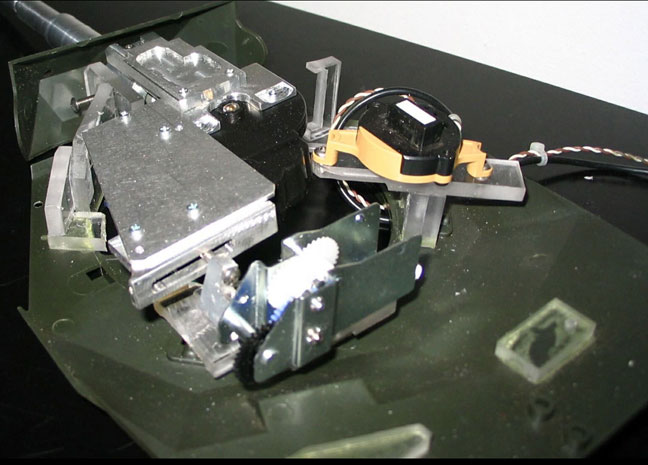
This project was a bit of a curious happenstance as I remember wanting this kit in the early '80s but never really made the effort to own it. I happened upon a good deal on ebay about a year ago with the metal track and I couldn't resist. I added Tamiya Panther Gearboxes and Jagdpanther Electronics (they were on sale--- thank you JR-RC) Servo elevation and upgraded Tamiya traverse with a faster motor. Gun tube was surgically altered and a King Tiger recoil was added (only one in my spares box)
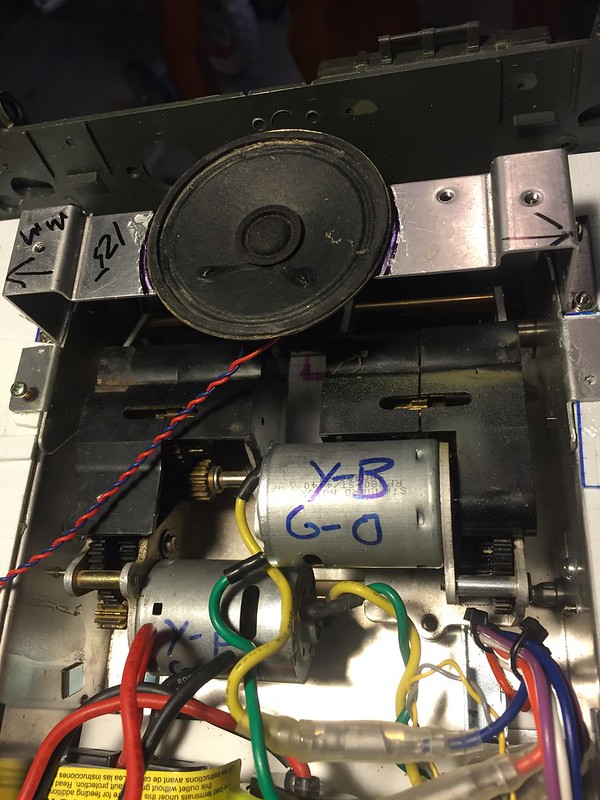
Elevation was replaced with the components from a Tamiya Leopard 2A6 and the recoil tray from the same was altered to align with the gun tube and KT recoil. I tried using the Leo 2 recoil but the motor seemed to only go half speed in its un modified state with the JagdPanther MFU. I used an old WSN speaker and modified the engine deck (drilled holes) and the hull brace to fit. I am never worried about high volume as most of my use is in a social setting.
Battle system mounted in Loaders hatch, used and old Tiger mount and several of those plastic mounts for the Tamiya Sherman external antenna. (I have a dozen spares from over the years.)
Tank runs pretty good for a franken tank. Cosmetic work begins now and should be ready for our Jan 9 event.
Enjoy
 <script async src="//embedr.flickr.com/assets/client-code.js" charset="utf-8"></script>
 <script async src="//embedr.flickr.com/assets/client-code.js" charset="utf-8"></script>
 <script async src="//embedr.flickr.com/assets/client-code.js" charset="utf-8"></script>
 <script async src="//embedr.flickr.com/assets/client-code.js" charset="utf-8"></script>
 <script async src="//embedr.flickr.com/assets/client-code.js" charset="utf-8"></script>
 <script async src="//embedr.flickr.com/assets/client-code.js" charset="utf-8"></script>
 <script async src="//embedr.flickr.com/assets/client-code.js" charset="utf-8"></script>
 <script async src="//embedr.flickr.com/assets/client-code.js" charset="utf-8"></script>
 <script async src="//embedr.flickr.com/assets/client-code.js" charset="utf-8"></script>
 <script async src="//embedr.flickr.com/assets/client-code.js" charset="utf-8"></script>
Elevation was replaced with the components from a Tamiya Leopard 2A6 and the recoil tray from the same was altered to align with the gun tube and KT recoil. I tried using the Leo 2 recoil but the motor seemed to only go half speed in its un modified state with the JagdPanther MFU. I used an old WSN speaker and modified the engine deck (drilled holes) and the hull brace to fit. I am never worried about high volume as most of my use is in a social setting.
Battle system mounted in Loaders hatch, used and old Tiger mount and several of those plastic mounts for the Tamiya Sherman external antenna. (I have a dozen spares from over the years.)
Tank runs pretty good for a franken tank. Cosmetic work begins now and should be ready for our Jan 9 event.
Enjoy
<script async src="//embedr.flickr.com/assets/client-code.js" charset="utf-8"></script><script async src="//embedr.flickr.com/assets/client-code.js" charset="utf-8"></script><script async src="//embedr.flickr.com/assets/client-code.js" charset="utf-8"></script><script async src="//embedr.flickr.com/assets/client-code.js" charset="utf-8"></script><script async src="//embedr.flickr.com/assets/client-code.js" charset="utf-8"></script><script async src="//embedr.flickr.com/assets/client-code.js" charset="utf-8"></script><script async src="//embedr.flickr.com/assets/client-code.js" charset="utf-8"></script><script async src="//embedr.flickr.com/assets/client-code.js" charset="utf-8"></script><script async src="//embedr.flickr.com/assets/client-code.js" charset="utf-8"></script><script async src="//embedr.flickr.com/assets/client-code.js" charset="utf-8"></script>
12-02-2015, 11:09 AM
#11
LUV the detailed pics and making use of what works!
Jeff
Jeff
12-02-2015, 01:13 PM
#12


Join Date: Aug 2006
Location: Tucson,
AZ
Posts: 624
Likes: 0
Received 0 Likes
on
0 Posts
Looks great Ethan. Are you going to play it as Allied or German? Since it's way bigger than your Shermans does that mean your gonna make the battlefield less crowded so you'll be able to maneuver with it? 
Last edited by Pzjgr; 12-02-2015 at 01:29 PM.
12-02-2015, 11:04 PM
#16
Nice work in progress! Huge Leopard Fan.
My two Leo 1s, Leo 2 and Gepard build photos are posted here:
1. https://www.rctankwarfare.co.uk/foru...hp?f=21&t=6916
2. http://www.rctankregiment.com/rctank...hp?f=30&t=2247
The threads are older, have a lot of views and mark the beginning of my shift away from WWII tank builds to modern armor.
The models were all commissioned collaboration efforts for the metal, "one off design" and fabricated parts, between friend Daryl Turner and me
Another Leo 1 is on the bench, hence my interest in what you are up too.
Enjoy, John
My two Leo 1s, Leo 2 and Gepard build photos are posted here:
1. https://www.rctankwarfare.co.uk/foru...hp?f=21&t=6916
2. http://www.rctankregiment.com/rctank...hp?f=30&t=2247
The threads are older, have a lot of views
and mark the beginning of my shift away from WWII tank builds to modern armor. The models were all commissioned collaboration efforts for the metal, "one off design" and fabricated parts, between friend Daryl Turner and me
Another Leo 1 is on the bench, hence my interest in what you are up too.
Enjoy, John
Last edited by Pcomm1.v2; 12-02-2015 at 11:23 PM.
12-14-2015, 07:29 AM
#17
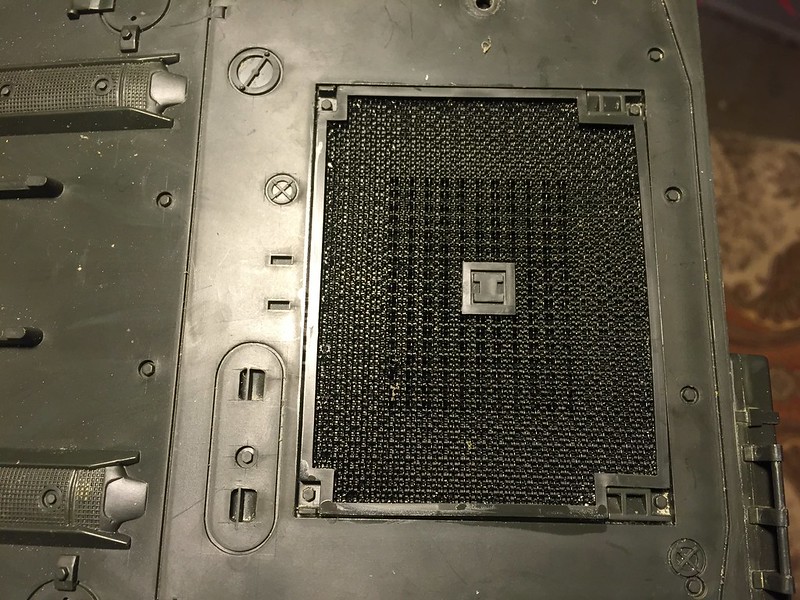
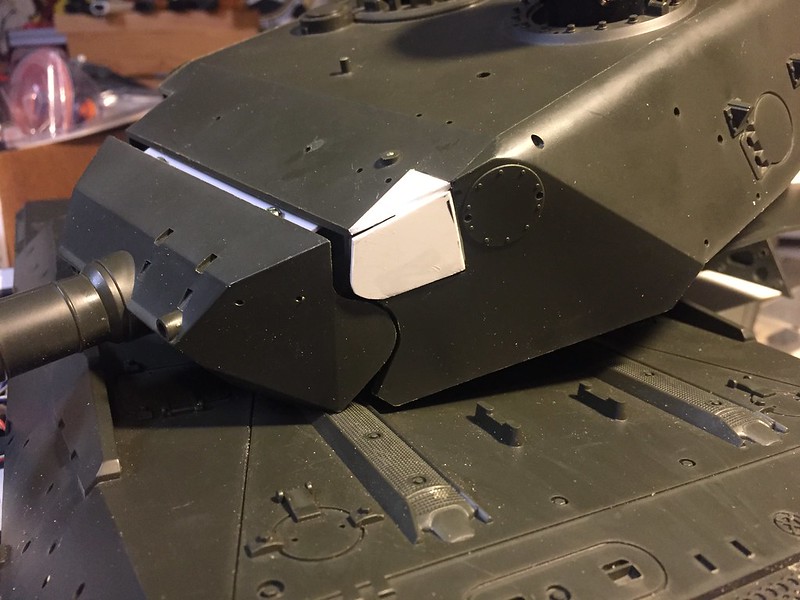
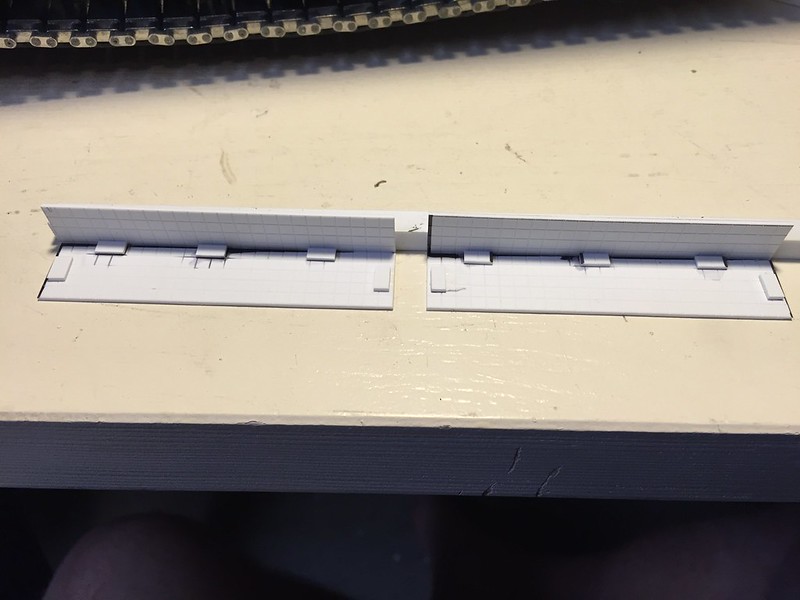
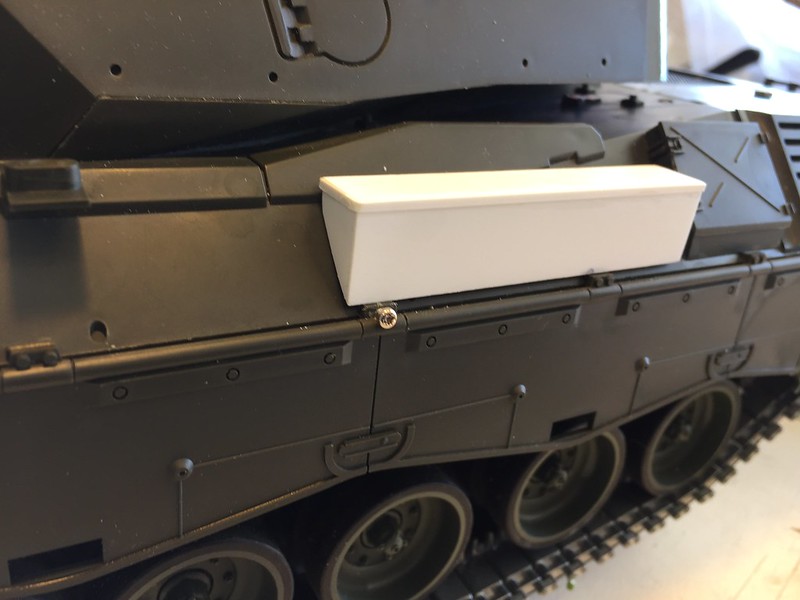
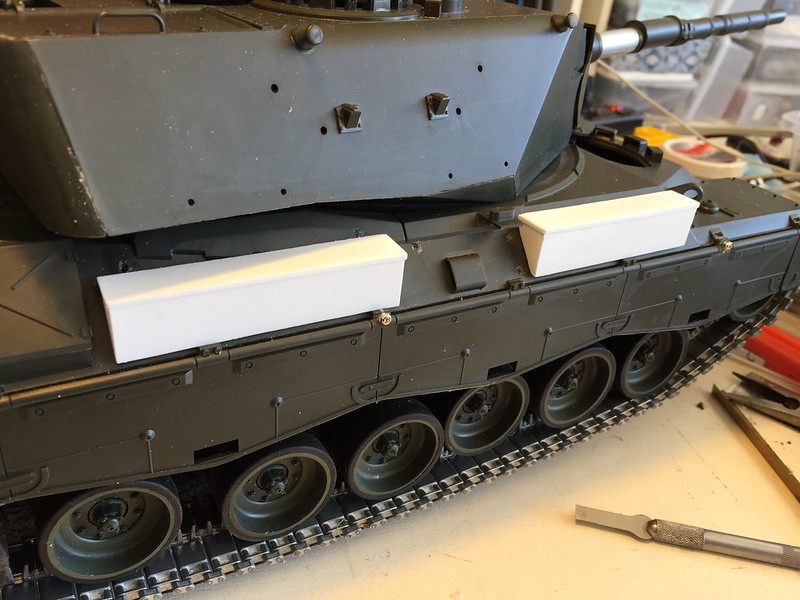
I will skip all the gory details being added as I am going stock on a lot of the basic parts. But I did use some small self tapping screws to install the side skirts. The version of the tank I want to do doesn't have all the pioneer tools on the hull but hull stowage boxes. I pull out some sheet stock to get fabbing.
 IMG_7312 by Ethan Dunsford, on Flickr
There are 2 matching boxes on each rear hull side and one slightly smaller one on the front right. I use the good old sidewalk stock to help with the right angles and measuring.
 IMG_7313 by Ethan Dunsford, on Flickr
Rough shape before filling and sanding.
 IMG_7316 by Ethan Dunsford, on Flickr
Shaped and located. Attached with superglue gel.
 IMG_7318 by Ethan Dunsford, on Flickr
IMG_7312 by Ethan Dunsford, on FlickrThere are 2 matching boxes on each rear hull side and one slightly smaller one on the front right. I use the good old sidewalk stock to help with the right angles and measuring.
IMG_7313 by Ethan Dunsford, on FlickrRough shape before filling and sanding.
IMG_7316 by Ethan Dunsford, on FlickrShaped and located. Attached with superglue gel.
IMG_7318 by Ethan Dunsford, on Flickr
12-14-2015, 01:04 PM
#18
looking good...as mentioned, a lot of Leo 1 parts here if you need them: http://www.afv-model.com/4711shop/in...?cPath=2_4_254
12-14-2015, 06:27 PM
#20
Go for it Dan your last build turned out very nice .
Jimmy
Jimmy
12-14-2015, 09:28 PM
#21
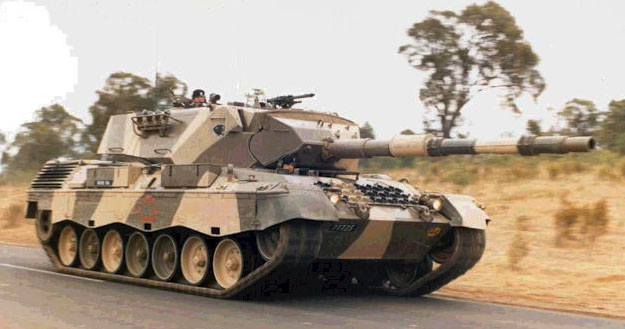
Looks like your building the Leopard AS1 MBT which had been in service with the Australian Army.
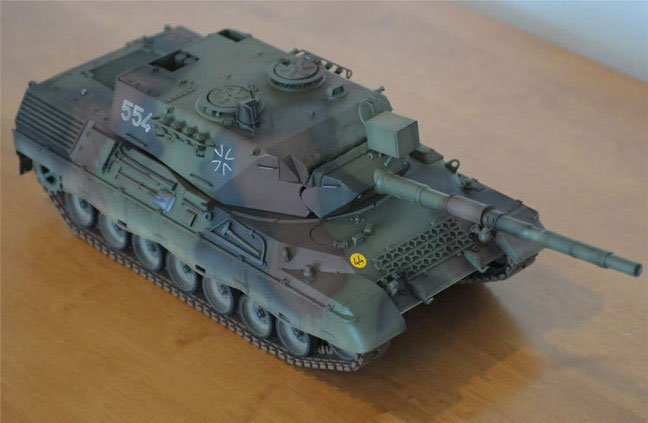
And for the last 18 months another Leo 1 has been a WIP off and on. This build is for me, since collectors snapped up my first two Leo 1A4 builds. The third build is also a Daryl Turner collaboration for all the best reasons.

And for the last 18 months another Leo 1 has been a WIP off and on. This build is for me, since collectors snapped up my first two Leo 1A4 builds. The third build is also a Daryl Turner collaboration for all the best reasons.
Last edited by Pcomm1.v2; 12-15-2015 at 12:02 AM.
12-15-2015, 10:29 PM
#23

Join Date: Nov 2012
Location: USA
Posts: 903
Likes: 0
Received 0 Likes
on
0 Posts
Nice work in progress! Huge Leopard Fan.
My two Leo 1s, Leo 2 and Gepard build photos are posted here:
1. https://www.rctankwarfare.co.uk/foru...hp?f=21&t=6916
2. http://www.rctankregiment.com/rctank...hp?f=30&t=2247
The threads are older, have a lot of views and mark the beginning of my shift away from WWII tank builds to modern armor.
The models were all commissioned collaboration efforts for the metal, "one off design" and fabricated parts, between friend Daryl Turner and me
Another Leo 1 is on the bench, hence my interest in what you are up too.
Enjoy, John
My two Leo 1s, Leo 2 and Gepard build photos are posted here:
1. https://www.rctankwarfare.co.uk/foru...hp?f=21&t=6916
2. http://www.rctankregiment.com/rctank...hp?f=30&t=2247
The threads are older, have a lot of views
and mark the beginning of my shift away from WWII tank builds to modern armor. The models were all commissioned collaboration efforts for the metal, "one off design" and fabricated parts, between friend Daryl Turner and me
Another Leo 1 is on the bench, hence my interest in what you are up too.
Enjoy, John
12-16-2015, 09:31 AM
#24
Want to hear a sad DT Tamiya Gepard Flakpanzer build story? First, DT's flakpanzer build solutions are fantastic.
About 3 months after finishing and setting up my DT custom one off Gepard Flakpanzer, I showed it to a local rc tank guy. He wanted to buy it then and there, just name the price he said.
I said NO. Six months later he asked again, still NO. Months later, he called and I gave him a price, a big go away number. The collector came back a week later with cash and my wife spent the money.
Sad story, told you.
Merry Christmas, John
01-04-2016, 11:50 AM
#25
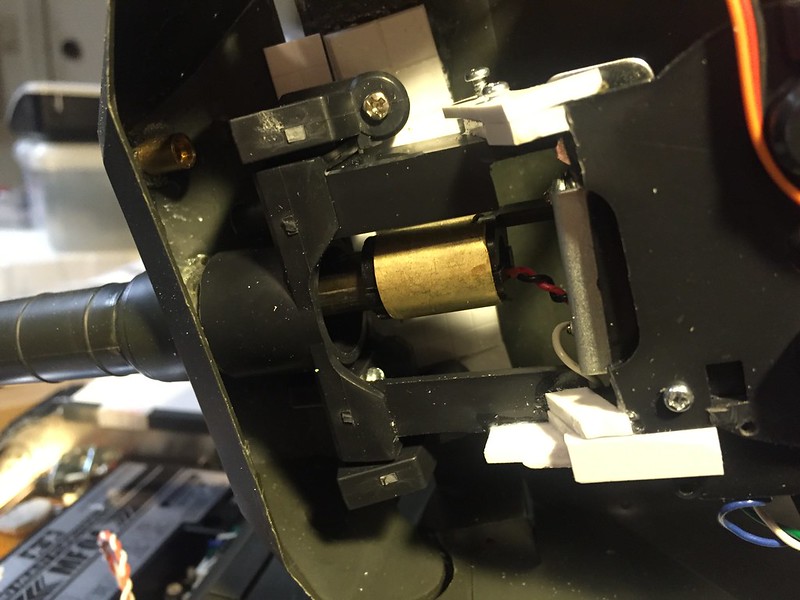
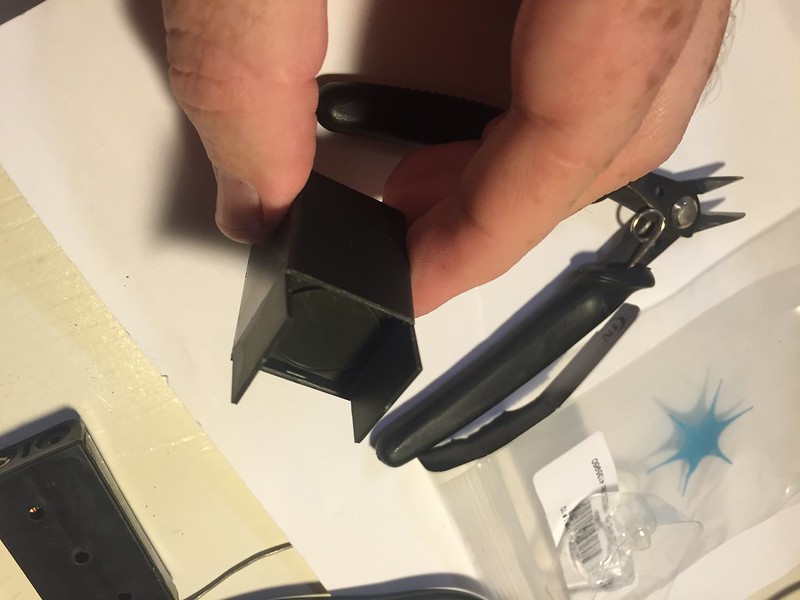
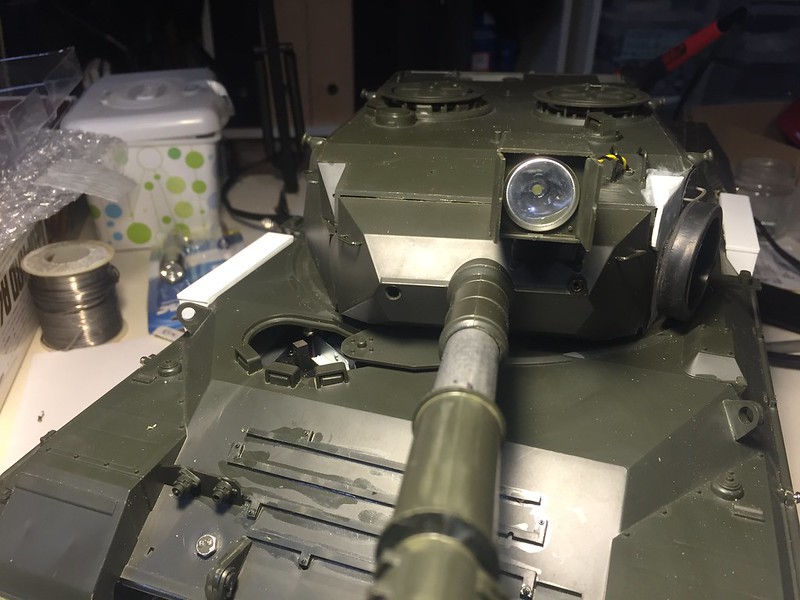
Today I am proud to tell the community I figured out something fun and ...... wait for it..... illuminating! I wanted to make the search light on this tank functional and not only functional but cool at the same time. Granted this was generally used in the IR mode in real life but we do have some night battles in Phoenix there so why not? The key is finding something that won't melt the surrounding plastic, and runs on a reasonable power source. I don't want to tie it in to the main system (yet) but a future interest is adding relays for accessory fun.
 IMG_7538 by Ethan Dunsford, on Flickr
At the local ACE I found my solution, an LED upgrade for Mini MagLite Flashlights.
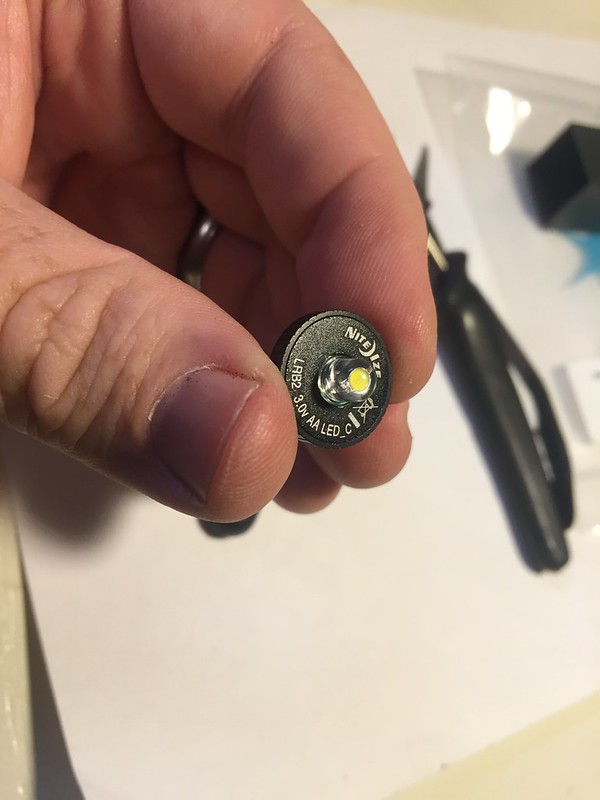 IMG_7539 by Ethan Dunsford, on Flickr
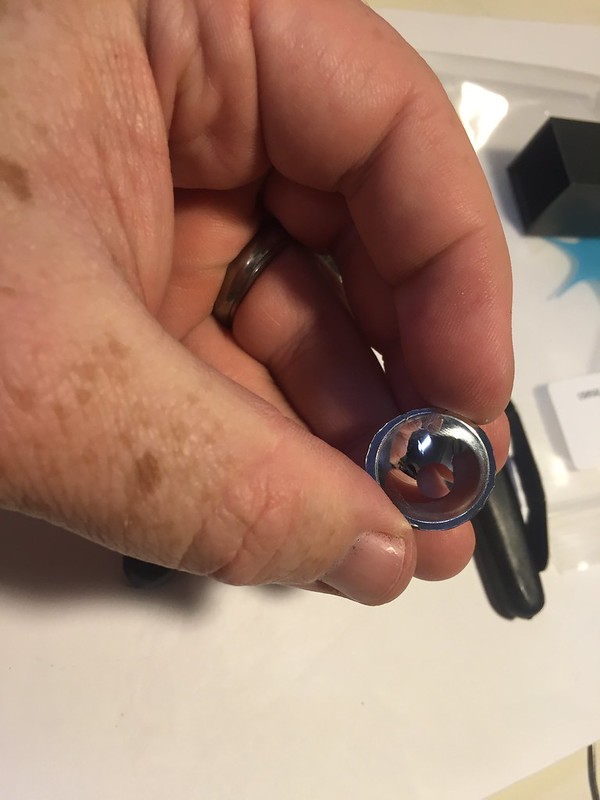
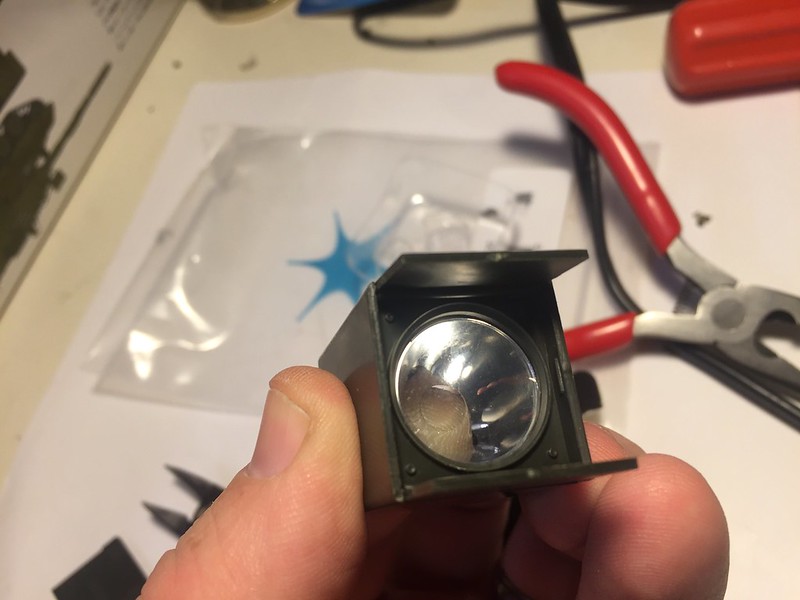
Runs on 3 volts and cost 9 bucks. The reflector needed a little sanding to fit.
 IMG_7540 by Ethan Dunsford, on Flickr
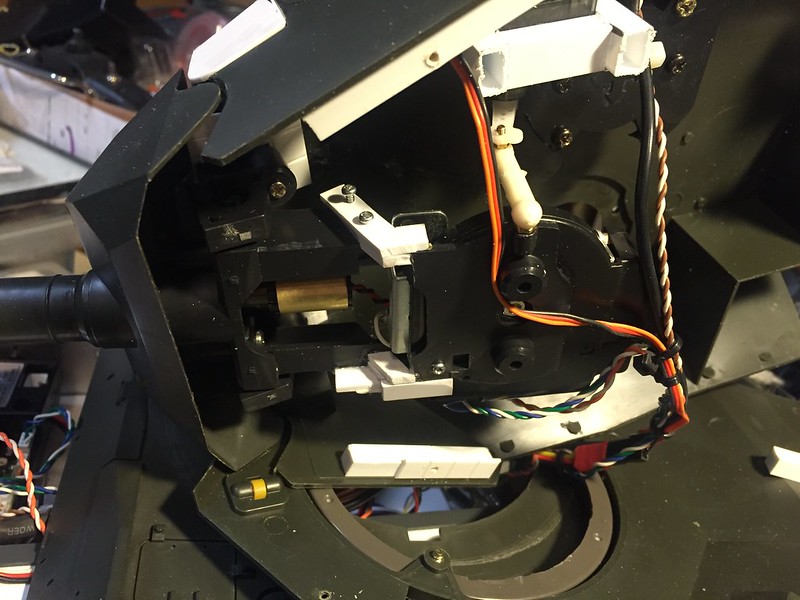
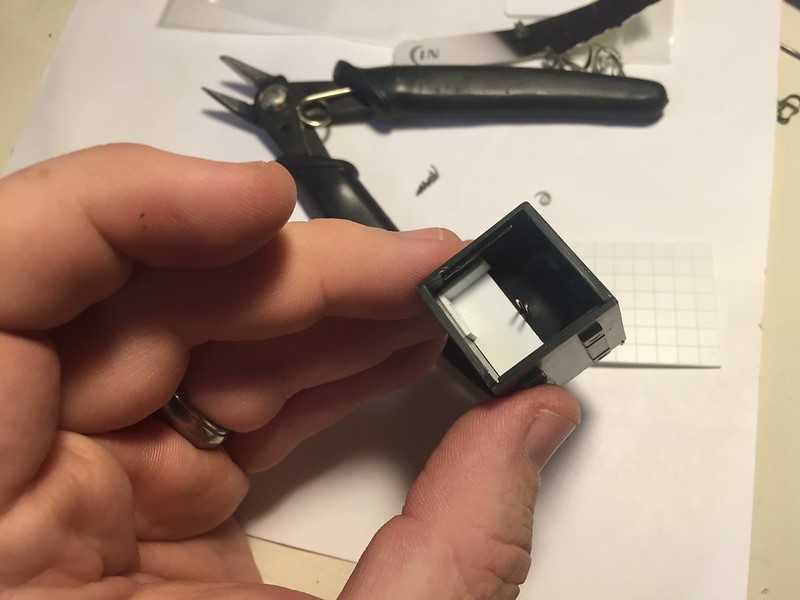
I used a step drill to cut out the Tamiya part.
 IMG_7541 by Ethan Dunsford, on Flickr
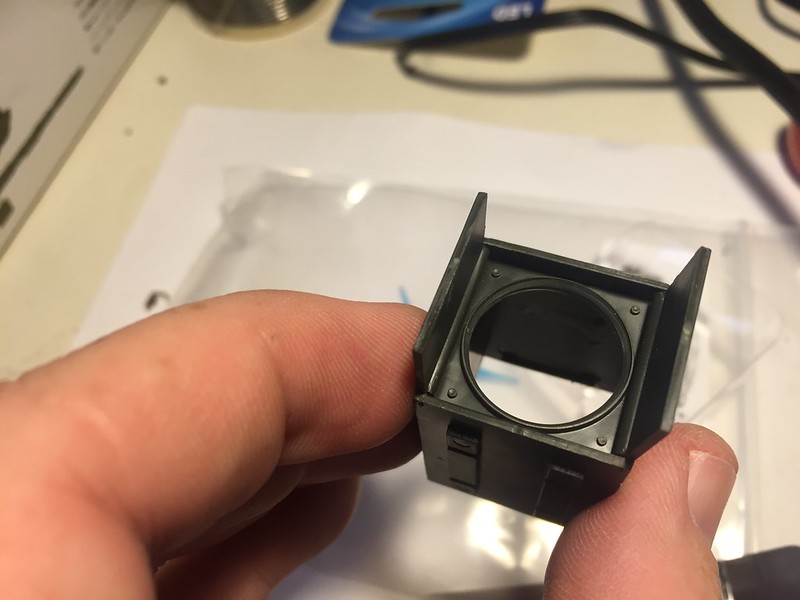
Fit some plastic from a random Xmas gift packaging.
 IMG_7542 by Ethan Dunsford, on Flickr
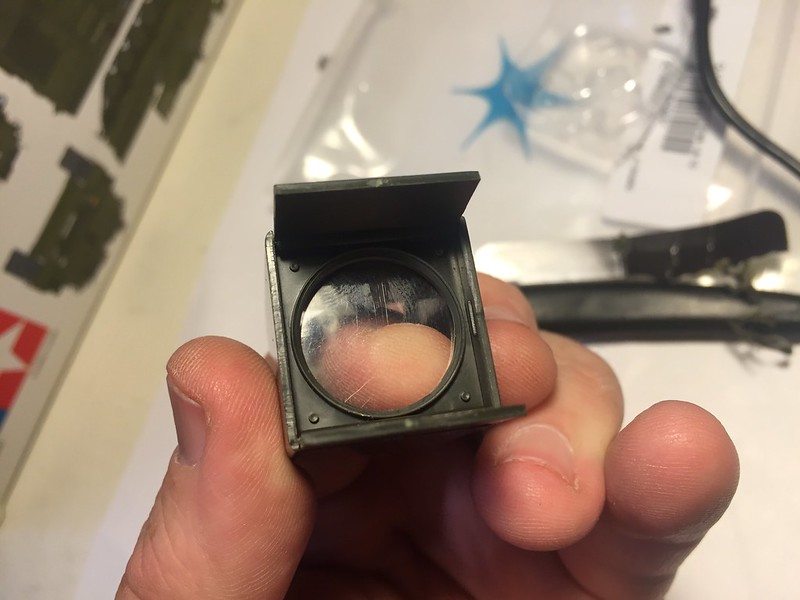
Fit the reflector.
 IMG_7543 by Ethan Dunsford, on Flickr
Added the bulb...
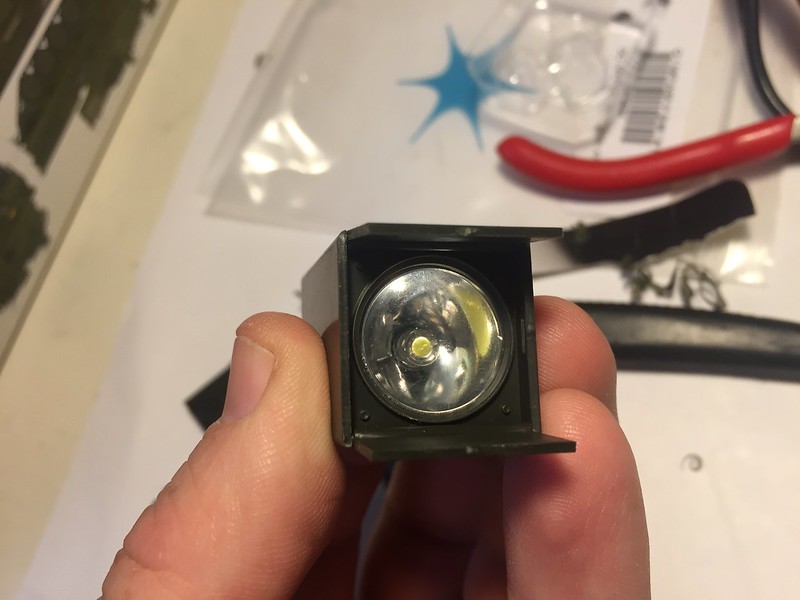 IMG_7545 by Ethan Dunsford, on Flickr
built up a bracket to hold it in.
 IMG_7546 by Ethan Dunsford, on Flickr
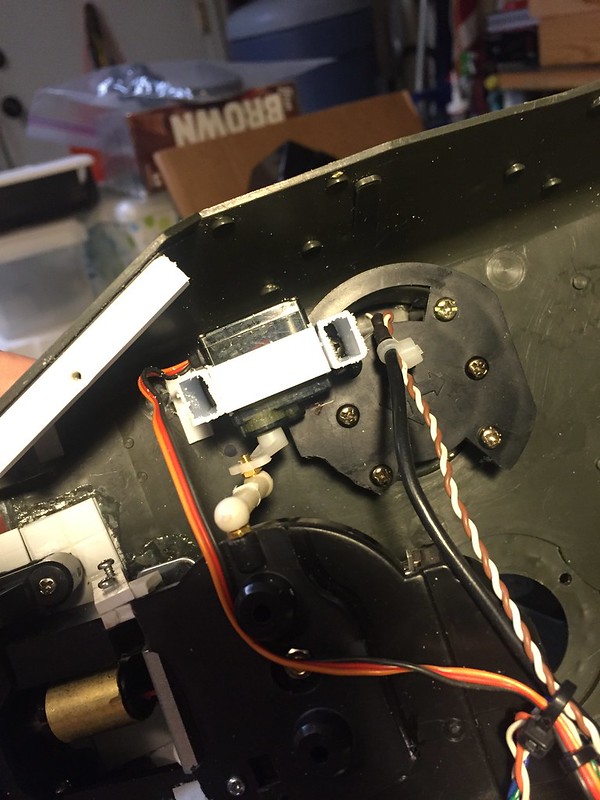
Wired ut up with some scrap from a dead DX-5.
 IMG_7548 by Ethan Dunsford, on Flickr
 IMG_7551 by Ethan Dunsford, on Flickr
Used an old switch and some AAAs with a battery box from Radio Shack.
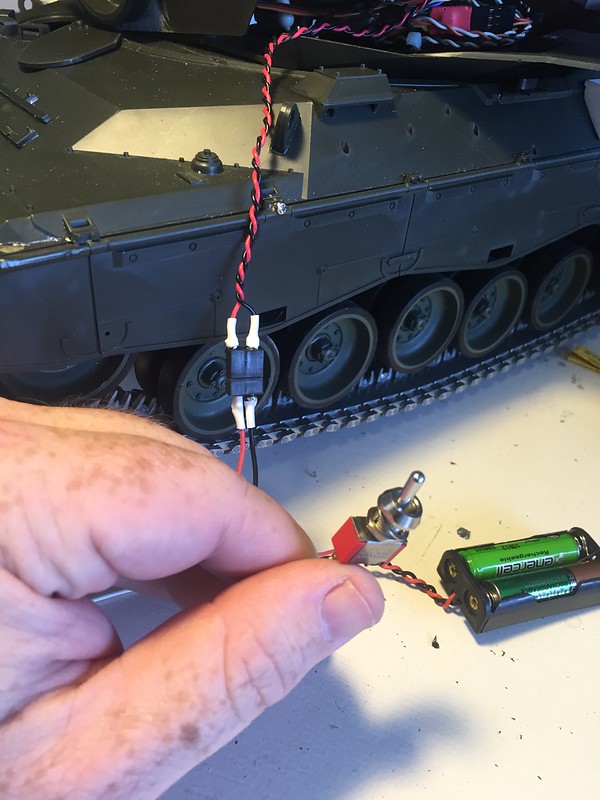 IMG_7552 by Ethan Dunsford, on Flickr
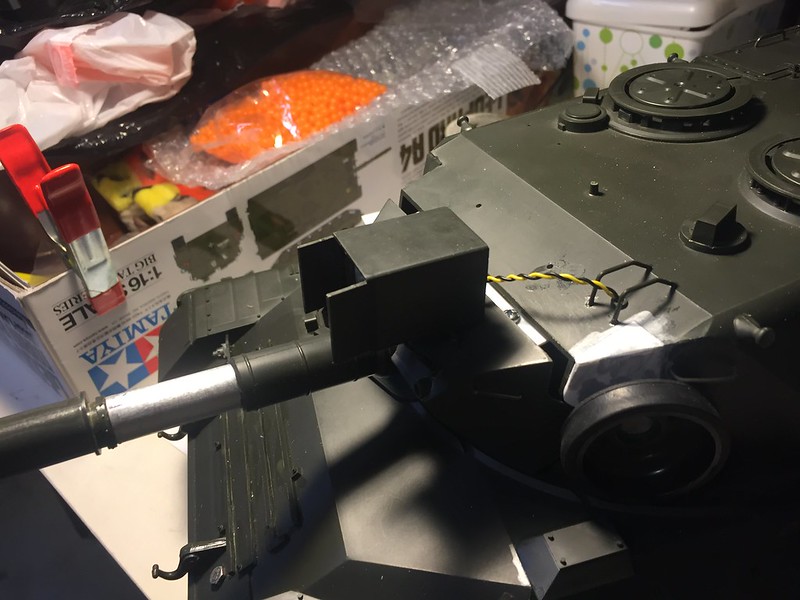
SHAZAAM!!!!
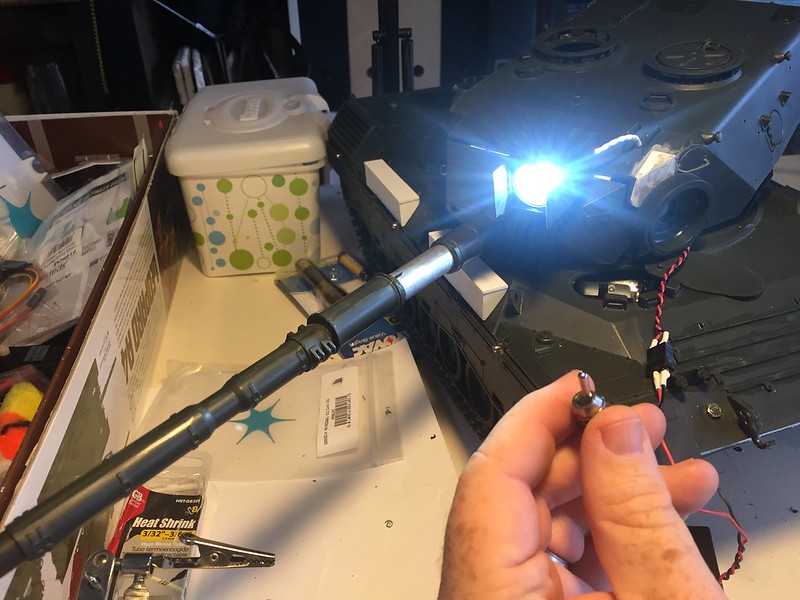 IMG_7553 by Ethan Dunsford, on Flickr
IMG_7538 by Ethan Dunsford, on FlickrAt the local ACE I found my solution, an LED upgrade for Mini MagLite Flashlights.
IMG_7539 by Ethan Dunsford, on FlickrRuns on 3 volts and cost 9 bucks. The reflector needed a little sanding to fit.
IMG_7540 by Ethan Dunsford, on FlickrI used a step drill to cut out the Tamiya part.
IMG_7541 by Ethan Dunsford, on FlickrFit some plastic from a random Xmas gift packaging.
IMG_7542 by Ethan Dunsford, on FlickrFit the reflector.
IMG_7543 by Ethan Dunsford, on FlickrAdded the bulb...
IMG_7545 by Ethan Dunsford, on Flickrbuilt up a bracket to hold it in.
IMG_7546 by Ethan Dunsford, on FlickrWired ut up with some scrap from a dead DX-5.
IMG_7548 by Ethan Dunsford, on FlickrIMG_7551 by Ethan Dunsford, on FlickrUsed an old switch and some AAAs with a battery box from Radio Shack.
IMG_7552 by Ethan Dunsford, on FlickrSHAZAAM!!!!
IMG_7553 by Ethan Dunsford, on Flickr