


Progress on my sherman.
 03-16-2007 | 07:12 PM
#1
Thread Starter
Senior Member
Joined: Dec 2006
Posts: 271
Likes: 0
Received 0 Likes
on
0 Posts
From: , UNITED KINGDOM
Evening all.
Thought I would report on what I have been doing today.
First off I removed the rear lifting lugs on the upper hull and refitted them at a better angle.They have been pinned for added strength.You can see in the picture below that they are now (hopefully) standing at a more correct angle.Also on the rear deck I made a couple of handles from a paper clip for the engine cover,looks better than the moulded strip did.

Next I decided I'd have a go at making the front hatches open,2 hours later one of them did.I'll do the other one tomorrow.I did this because I plan to fit a charging socket and isolator switch under them.I did not have a drill bit small enough to chain drill it so I just carefully scored around the hatch with a scalpel,got there in the end.I drilled out the hinges before I cut the hatch out.

Got some very nice periscope covers from an online shop in germany and fitted them today also.They have pins on the bottoms so once carefully drilled fit quite securely.Not glued them yet as I am decideing wether to open the drivers periscope or not,I need to find some more photos of this first.


Well thats all for now.Will post more as I go.
Thanks for your interest.
Thought I would report on what I have been doing today.
First off I removed the rear lifting lugs on the upper hull and refitted them at a better angle.They have been pinned for added strength.You can see in the picture below that they are now (hopefully) standing at a more correct angle.Also on the rear deck I made a couple of handles from a paper clip for the engine cover,looks better than the moulded strip did.
Next I decided I'd have a go at making the front hatches open,2 hours later one of them did.I'll do the other one tomorrow.I did this because I plan to fit a charging socket and isolator switch under them.I did not have a drill bit small enough to chain drill it so I just carefully scored around the hatch with a scalpel,got there in the end.I drilled out the hinges before I cut the hatch out.
Got some very nice periscope covers from an online shop in germany and fitted them today also.They have pins on the bottoms so once carefully drilled fit quite securely.Not glued them yet as I am decideing wether to open the drivers periscope or not,I need to find some more photos of this first.
Well thats all for now.Will post more as I go.
Thanks for your interest.

 03-16-2007 | 11:32 PM
#3


Nice job
Yes, the weld marks are stock.
Here is a nice pdf you can buy about detailing the Sherman - maybe if enough people buy it, they will cover other tanks
http://www.modelersite.com/PDF_Fotos_XVII/Sherman.htm
Kevin O
<S.C.A.T.>
Yes, the weld marks are stock.
Here is a nice pdf you can buy about detailing the Sherman - maybe if enough people buy it, they will cover other tanks
http://www.modelersite.com/PDF_Fotos_XVII/Sherman.htm
Kevin O
<S.C.A.T.>
03-17-2007 | 11:43 AM
#4
Thread Starter
Senior Member
Joined: Dec 2006
Posts: 271
Likes: 0
Received 0 Likes
on
0 Posts
From: , UNITED KINGDOM
Hi Ksoc.Thanks for the link.
I bought the pdf (shame that it had a minimum order of £10,so I had to get some more aswell).It is extremely interesting and very helpfull.Great detail pics.
Thanks.
I bought the pdf (shame that it had a minimum order of £10,so I had to get some more aswell).It is extremely interesting and very helpfull.Great detail pics.
Thanks.
03-19-2007 | 03:00 PM
#6
Thread Starter
Senior Member
Joined: Dec 2006
Posts: 271
Likes: 0
Received 0 Likes
on
0 Posts
From: , UNITED KINGDOM
Hi.
I have no idea what unit to depict.Not really thought about it,just kind of rebuilding it at the moment.
I kind of like the idea of having a large star on the rear deck but am unsure what units or even if this type of sherman had these.
Any ideas and or pictures would be welcome.
Another thing I have thought about is the extra armour sometimes applied to the side of the hull to protect the the amo stowages.I have seen this modelled but have yet to see it on a real M4 105mm HVSS,I wonder if they actually had it?
Cheers.
03-19-2007 | 06:58 PM
#7
My understaning was the the 105's were used more as mobile artillery then for tank to tank engagements. You could alway get an aftermarket 75 or 76mm barrel. My son loves battling with the 105 because it is so short. Let those Tigers or KT's chase you into the city or trees, and watch them try and turn turrets
For a little more realism, I up-gunned to the 76.
Kevin O
<S.C.A.T.>
For a little more realism, I up-gunned to the 76.
Kevin O
<S.C.A.T.>
03-19-2007 | 07:54 PM
#8
 03-26-2007 | 05:11 PM
#9
Thread Starter
Senior Member
Joined: Dec 2006
Posts: 271
Likes: 0
Received 0 Likes
on
0 Posts
From: , UNITED KINGDOM
Hi all.
Been doing some more detailing on the Sherman the last few days and thought I would share my progress.
First off I put some lift handles on the front hatches and made coaming under the hatches so they sit right when shut.

After downloading the article mentioned in a post above from modellersite,I have started adding extra details that I did not know where on the sherman.One such detail are the opening levers on the filler caps,very simple but quite effective.I'm learning new things all the time about the sherman.
Another detail (not actually mentioned in the modellersite article) is drain holes in the armour around the turret ring and fuel fillers.Should look good if I can paint conincing water streaks later on.

Next three shots show my attempt at welding.It's not great but I think its better than not having it.


Next I'm going to attempt to put a weld seam where the front plate is welded to the sides.Will show the results when done (if it turns out ok that is).
Progress is slow but I have four kids and a full time job so time is tight.Getting there though.
Thanks for the interest and any comments and or advice is most welcome.
Cheers.
Been doing some more detailing on the Sherman the last few days and thought I would share my progress.
First off I put some lift handles on the front hatches and made coaming under the hatches so they sit right when shut.
After downloading the article mentioned in a post above from modellersite,I have started adding extra details that I did not know where on the sherman.One such detail are the opening levers on the filler caps,very simple but quite effective.I'm learning new things all the time about the sherman.
Another detail (not actually mentioned in the modellersite article) is drain holes in the armour around the turret ring and fuel fillers.Should look good if I can paint conincing water streaks later on.
Next three shots show my attempt at welding.It's not great but I think its better than not having it.
Next I'm going to attempt to put a weld seam where the front plate is welded to the sides.Will show the results when done (if it turns out ok that is).
Progress is slow but I have four kids and a full time job so time is tight.Getting there though.
Thanks for the interest and any comments and or advice is most welcome.
Cheers.
03-26-2007 | 05:22 PM
#11
Thread Starter
Senior Member
Joined: Dec 2006
Posts: 271
Likes: 0
Received 0 Likes
on
0 Posts
From: , UNITED KINGDOM
Forgot to ask,
Ksoc,did you buy your 76mm gun or did you turn it yourself?And was the 76 used in the same turret as the 105 or was it just in the T23 turret?
I have thought about turning up a 75mm gun as I know it was in the same turret and mantlet but can't find any dimensions for it.
Panther F thanks for the info.Looking at the pictures it looks as though 76 was only in the T23 turret.
Thanks for the help.
03-26-2007 | 06:15 PM
#12

Those periscope guards looked so good I bought a set for my Pershing. Heres the link. http://www.backyardarmor.com/New%20Main.htm
03-27-2007 | 10:35 AM
#13
Wight,
Nice job! Makes me want to go an update my Sherman.
As far as the barrel goes, I got it a few years back from and outfit called Brassbarrel.com. They don't seem to be on the web anymore, not sure if they are still in business. At the time, I thought I had seen the 76mm in my turret, but I can't pull up a picture.
Here is a pict of the Sherman from last Sunday.
Kevin O
<S.C.A.T.>
03-27-2007 | 01:34 PM
#14
Thread Starter
Senior Member
Joined: Dec 2006
Posts: 271
Likes: 0
Received 0 Likes
on
0 Posts
From: , UNITED KINGDOM
It certainly looks a lot better with that barrel.
Thats a really nice picture,looks great with scale trees etc.It must be amazing to drive it around a scenic setting like that.
I'm not jealous (much)!
Do you have any more pictures like that?
Cheers.
Thats a really nice picture,looks great with scale trees etc.It must be amazing to drive it around a scenic setting like that.
I'm not jealous (much)!
Do you have any more pictures like that?
Cheers.
03-27-2007 | 10:03 PM
#15
Wight,
You can check out the S.C.A.T. site (temporary link)
http://web.mac.com/ksoc/iWeb/S.C.A.T./Welcome.html
DAK has some nice shots.
www.desertarmor.com
If you are looking for just Sherman shots, let me know and I will look through my collection and post some.
Kevin O
<S.C.A.T.>
You can check out the S.C.A.T. site (temporary link)
http://web.mac.com/ksoc/iWeb/S.C.A.T./Welcome.html
DAK has some nice shots.
www.desertarmor.com
If you are looking for just Sherman shots, let me know and I will look through my collection and post some.
Kevin O
<S.C.A.T.>
04-03-2007 | 05:17 PM
#16
Thread Starter
Senior Member
Joined: Dec 2006
Posts: 271
Likes: 0
Received 0 Likes
on
0 Posts
From: , UNITED KINGDOM
Hi all.
Got some more done this last week.
I had a go at applying weld seams to the side of the front plate.I started by scribing a line into the plastic that was deep and wide enough to take a rolled piece of putty.Then I smoothed it down with a wet finger until it sat just proud of the plastic,then I scribed the weld marks with a tiny screwdriver.It worked ok but I think it could have been better.The hardest bit was getting it square with the front plate,and trying to guess how thick the front plate should be.

I cut strips of plastic card to run along the sides just on top of the fenders.I used 1mm card for this but looking at it now it kind of looks too thick.May look better once painted.
I then used railway track pins to simulate the rivets.Unfortunatly I snapped the drill bit on the 26th hole out of 30,so can't finish till I get a new bit.
Note for self,buy more than one drill bit in the smaller sizes next time.[&o]
Here's a couple of shots of the strips in place.


This week I am hoping to scribe join marks in the fenders and the fixing holes for where the sand skirts would be fixed to.
Lights need sorting too,along with the rear guards for the lights.
Cheers.
Got some more done this last week.
I had a go at applying weld seams to the side of the front plate.I started by scribing a line into the plastic that was deep and wide enough to take a rolled piece of putty.Then I smoothed it down with a wet finger until it sat just proud of the plastic,then I scribed the weld marks with a tiny screwdriver.It worked ok but I think it could have been better.The hardest bit was getting it square with the front plate,and trying to guess how thick the front plate should be.
I cut strips of plastic card to run along the sides just on top of the fenders.I used 1mm card for this but looking at it now it kind of looks too thick.May look better once painted.
I then used railway track pins to simulate the rivets.Unfortunatly I snapped the drill bit on the 26th hole out of 30,so can't finish till I get a new bit.
Note for self,buy more than one drill bit in the smaller sizes next time.[&o]
Here's a couple of shots of the strips in place.
This week I am hoping to scribe join marks in the fenders and the fixing holes for where the sand skirts would be fixed to.
Lights need sorting too,along with the rear guards for the lights.
Cheers.
04-24-2007 | 02:31 PM
#17
Thread Starter
Senior Member
Joined: Dec 2006
Posts: 271
Likes: 0
Received 0 Likes
on
0 Posts
From: , UNITED KINGDOM
Hi all.
It's been a while since I updated this thread so I thought it about time I showed what I've been doing on my sherman.
I managed to remove the gun mantlet from the turret and decided to add some detail to it.

Back on the upper hull added more detail by drilling sand shield fixings and seperated the fenders.I did not cut right through,just scored the surface.

Scored the front fenders also to make them look seperate and added bolt heads.

The transmission casings is a detail that is lacking on the sherman so I thought I'd have a go at making them.When looking at the front of the sherman the drive shafts are quite visible,this will hide them and adds a bit of detail to an otherwise flat area on the model.


You can see on the last picture how it will hide the shaft.They are not an exact replica but they are hard to see anyway.It will be interesting to see how it holds up when running the tank.
Thats all for now.
Cheers all.
It's been a while since I updated this thread so I thought it about time I showed what I've been doing on my sherman.
I managed to remove the gun mantlet from the turret and decided to add some detail to it.
Back on the upper hull added more detail by drilling sand shield fixings and seperated the fenders.I did not cut right through,just scored the surface.
Scored the front fenders also to make them look seperate and added bolt heads.
The transmission casings is a detail that is lacking on the sherman so I thought I'd have a go at making them.When looking at the front of the sherman the drive shafts are quite visible,this will hide them and adds a bit of detail to an otherwise flat area on the model.
You can see on the last picture how it will hide the shaft.They are not an exact replica but they are hard to see anyway.It will be interesting to see how it holds up when running the tank.
Thats all for now.
Cheers all.
04-24-2007 | 03:03 PM
#18
Wight,
I built my Sherman in a hurry. It was an Xmas present for my son. Over the last few years, I have added the barrel, sandbags, graffiti....... After seeing all the detail you've add, I just might have to go tear it apart, and start over as you have. Good excuse to add metal bearings and other mechanical upgrades. Our battlefield is very dusty, so sealing it up would be a priority also.
Thanks for the inspiration and all the pictures!
Kevin O
<S.C.A.T.>
04-24-2007 | 05:50 PM
#20
Thread Starter
Senior Member
Joined: Dec 2006
Posts: 271
Likes: 0
Received 0 Likes
on
0 Posts
From: , UNITED KINGDOM
Track pins are by PECO.
Ksoc,go for it.If I can do this stuff then anyone can,and I'm sure you have more experience than I at this.
Honestly though,this started as a quick respray!
Now I've started I can't seem to stop.
This is where I'm at now.
Front fender supports.


Thank you for your interest.
Ksoc,go for it.If I can do this stuff then anyone can,and I'm sure you have more experience than I at this.
Honestly though,this started as a quick respray!
Now I've started I can't seem to stop.
This is where I'm at now.
Front fender supports.
Thank you for your interest.
 04-24-2007 | 06:59 PM
#22

Senior Member
Thanks! I wouldn't go that far! I haven't built models in almost 20 years. The problem I've had with detailing is that the tank was never getting done and getting too fragile to run outside. That's when I decided that it was impossible to completely and accurately depict a tank and not have stuff break and fall off. So with my future projects I'll pick the more durable mods to do. On my M26A1 Pershing I put working fender braces on all 4 corners, it didn't take 2 minutes before one of them broke off! I glued it back on and once the stenciling and weathering is finished and photos are taken, if they fall off again, they're not going back on.
04-29-2007 | 12:35 PM
#23
Thread Starter
Senior Member
Joined: Dec 2006
Posts: 271
Likes: 0
Received 0 Likes
on
0 Posts
From: , UNITED KINGDOM
Good point made there about detail and durability.It is a working model and that needs to be remembered,it's all very well making them look amazingly realistic,but if you are then afraid to use it?To be honest,I dont tend to use my tanks hard anyway.At the moment I am finding detailing too much fun to pass on.I am trying to make things as durable as I can though.
The next detail I decided to tackle is a good example of this.The towing points on the front of the nose armour.These are in quite a vulnerable position so I tried to make them as tough as I could.The only way I could think of doing this was to make them from brass,solder them to a brass plate which would then be glued in behind the nose.Easier said than done though.I had to make them longer than I needed them so I could bolt them to a wooden jig while I soldered it together.Then once soldered,cut off the excess.
This is the completed plate.

This is where they come through the nose.

This is them fitted.

View from inside.

They are not finished yet,they need some little bars from the thinner ones to the nose bulges.Hopefully though they should cope with the tank grounding out on them.
Cheers all.
The next detail I decided to tackle is a good example of this.The towing points on the front of the nose armour.These are in quite a vulnerable position so I tried to make them as tough as I could.The only way I could think of doing this was to make them from brass,solder them to a brass plate which would then be glued in behind the nose.Easier said than done though.I had to make them longer than I needed them so I could bolt them to a wooden jig while I soldered it together.Then once soldered,cut off the excess.
This is the completed plate.
This is where they come through the nose.
This is them fitted.
View from inside.
They are not finished yet,they need some little bars from the thinner ones to the nose bulges.Hopefully though they should cope with the tank grounding out on them.
Cheers all.
05-09-2007 | 05:35 PM
#24
Thread Starter
Senior Member
Joined: Dec 2006
Posts: 271
Likes: 0
Received 0 Likes
on
0 Posts
From: , UNITED KINGDOM
Hi all.
Finished off the towing points by adding guard bars and a bit of weld.

Also added welds to the sides where the fenders are attached.

On to the tools now.Modified the way they are fixed on.The buckle and strap works and is holding the hammer down.I can also release the strap and remove the hammer,until it's painted that is,and I don't really know why I'd want to anyway.
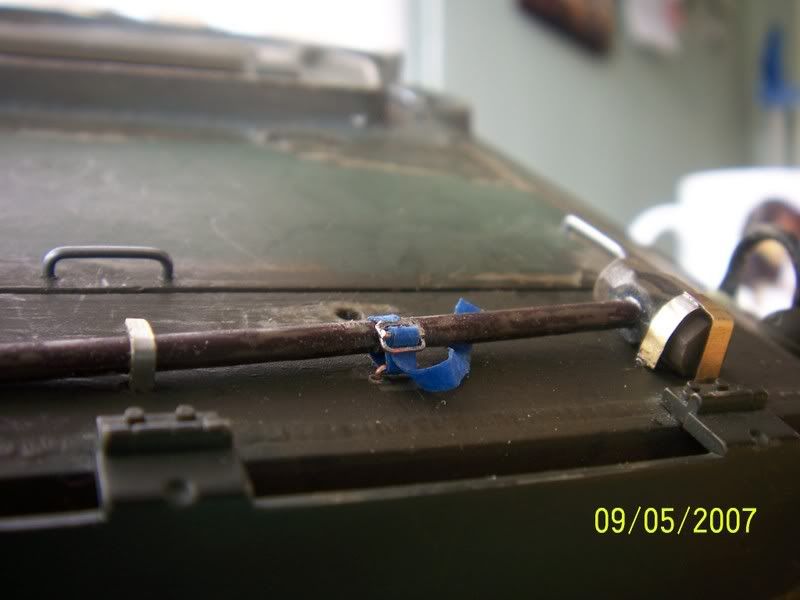
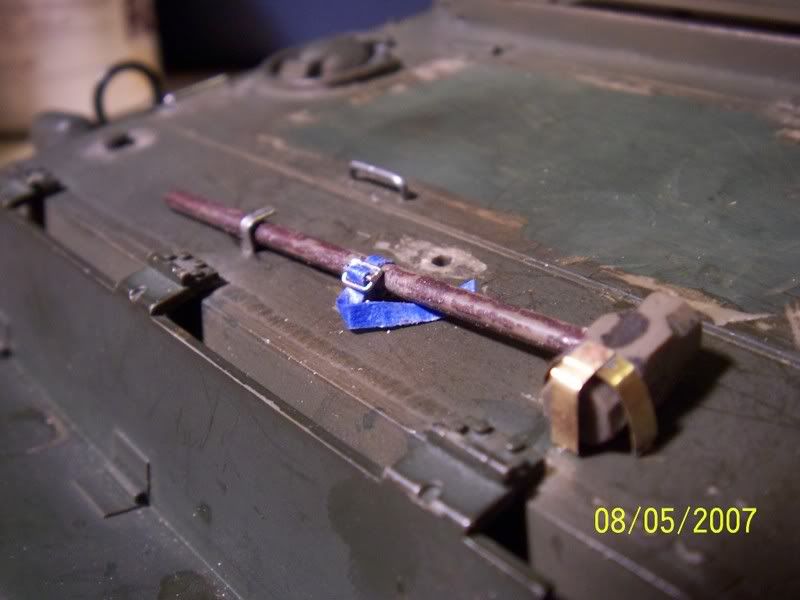
Cheers all.
Finished off the towing points by adding guard bars and a bit of weld.
Also added welds to the sides where the fenders are attached.
On to the tools now.Modified the way they are fixed on.The buckle and strap works and is holding the hammer down.I can also release the strap and remove the hammer,until it's painted that is,and I don't really know why I'd want to anyway.
Cheers all.

