


New CARF P-51D Project


The following users liked this post:
Chris Nicastro (09-07-2020)
 09-07-2020, 01:09 PM
#177


That’s right and I was looking at how to do this easily. I’m going to try some glue thru a syringe and see how it goes. I started with a thin strip of styrene but then removed it. What’s a good glue to use for this than can flow thru a large syringe tip? Canopy glue?
Last edited by Chris Nicastro; 09-07-2020 at 01:13 PM.
09-07-2020, 11:21 PM
#179
Some motivation...
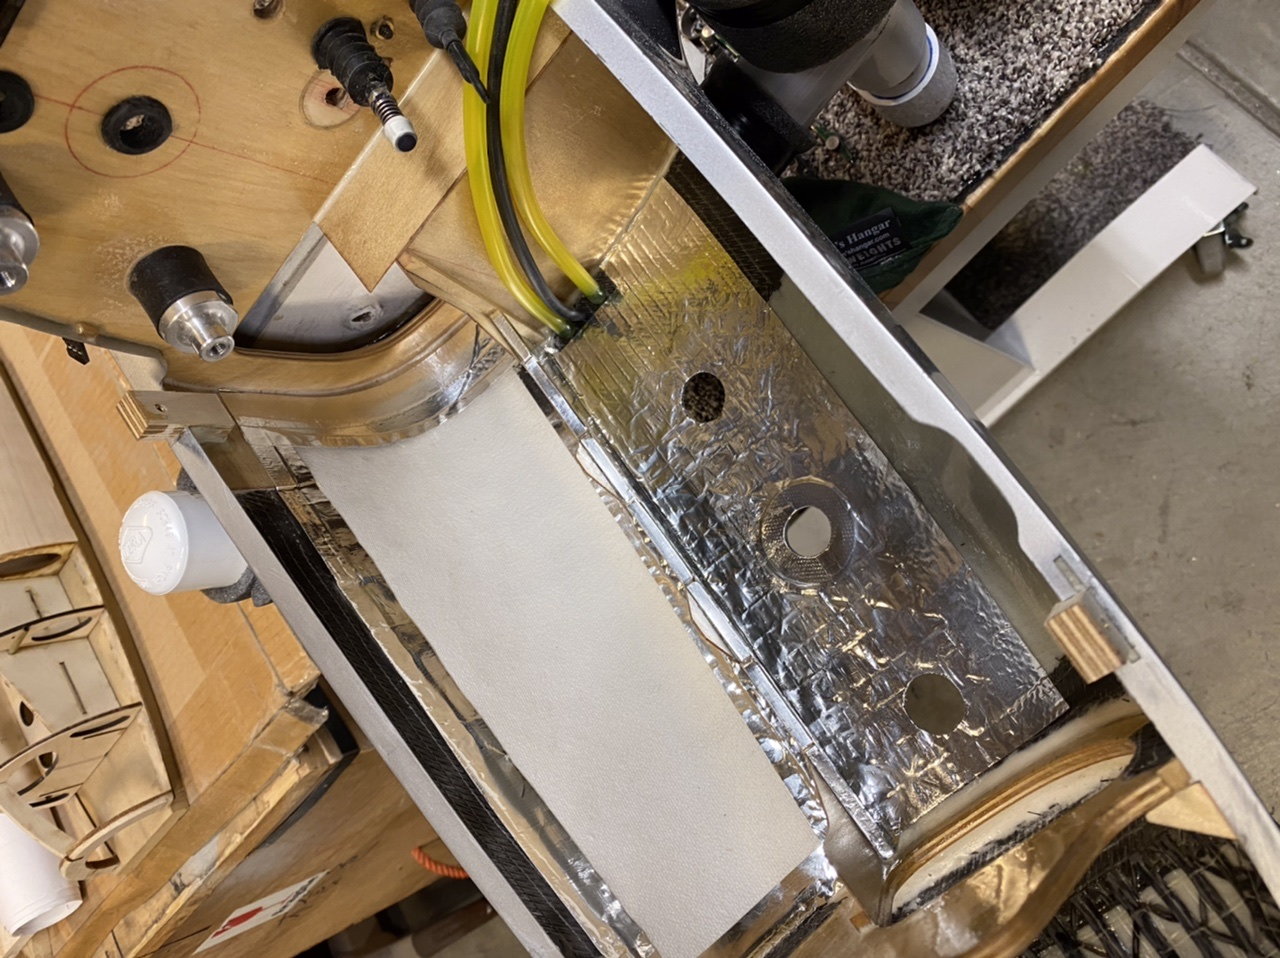
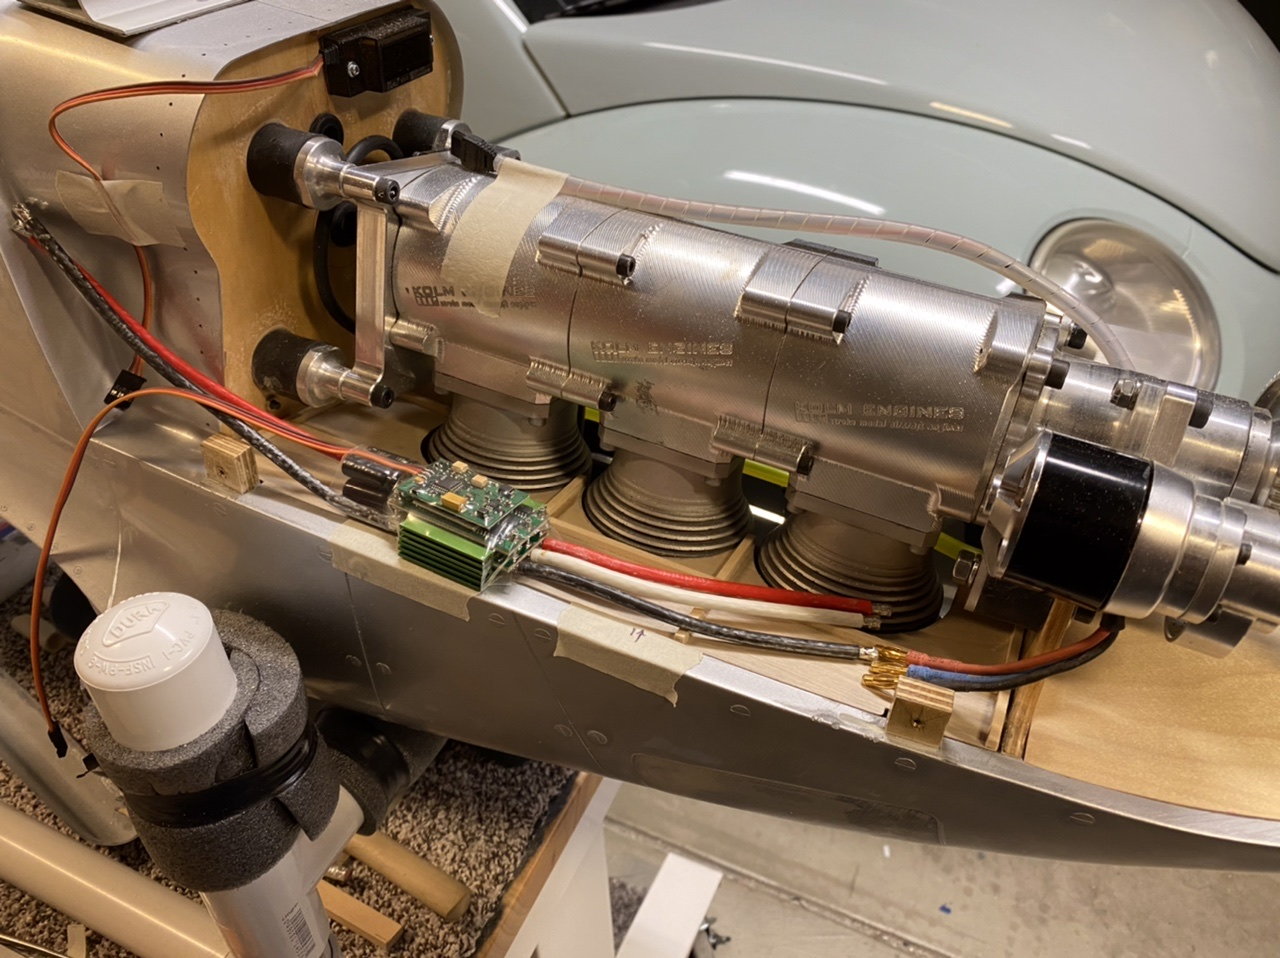
I added some ceramic blanket to the hot side to protect the fuselage. The baffle I�m working on will have some too.
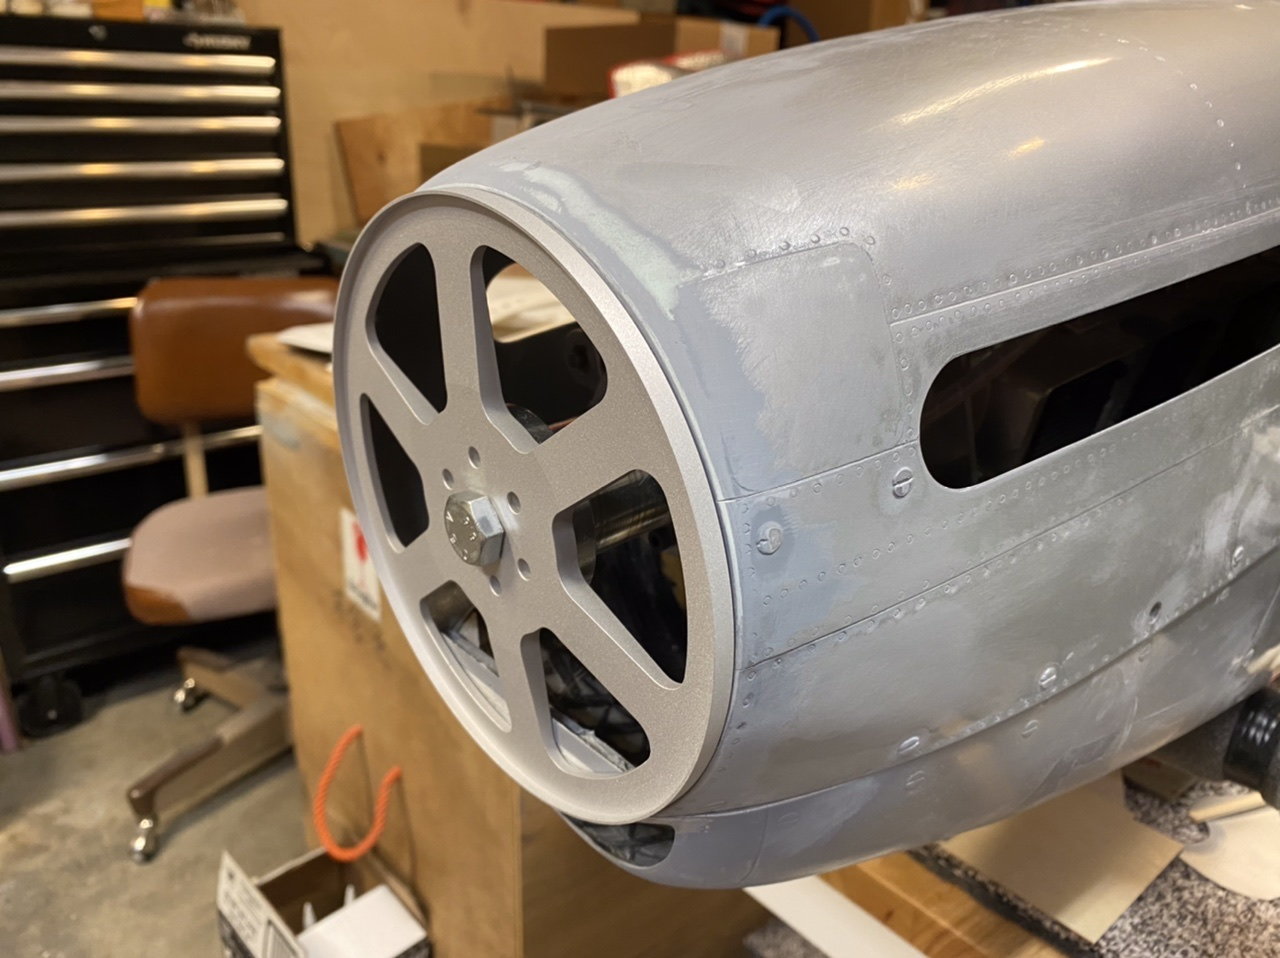
The engine is in, again, and the spinner is pretty well aligned with the fuselage and cowl but you can see the mismatch. That�s how it came, with an underbite! Lol... So there will be some clearance made and the gap evened out behind the spinner. I should have set the motor further forward by a couple millimeters but at the time I couldn�t see the issue with the cowl. What this means for future builders is you need to look at the fit of the cowl and maybe even get it fit and mounted before you install the engine. I used the fuselage nose and lower section to help me set the firewall and fwd bulkhead for alignment. I didn�t look at the cowl very much until later when it began to matter and this is what I got even after trimming and sanding the flanges and corners.
I added some ceramic blanket to the hot side to protect the fuselage. The baffle I�m working on will have some too.
The engine is in, again, and the spinner is pretty well aligned with the fuselage and cowl but you can see the mismatch. That�s how it came, with an underbite! Lol... So there will be some clearance made and the gap evened out behind the spinner. I should have set the motor further forward by a couple millimeters but at the time I couldn�t see the issue with the cowl. What this means for future builders is you need to look at the fit of the cowl and maybe even get it fit and mounted before you install the engine. I used the fuselage nose and lower section to help me set the firewall and fwd bulkhead for alignment. I didn�t look at the cowl very much until later when it began to matter and this is what I got even after trimming and sanding the flanges and corners.
09-09-2020, 10:31 PM
#180
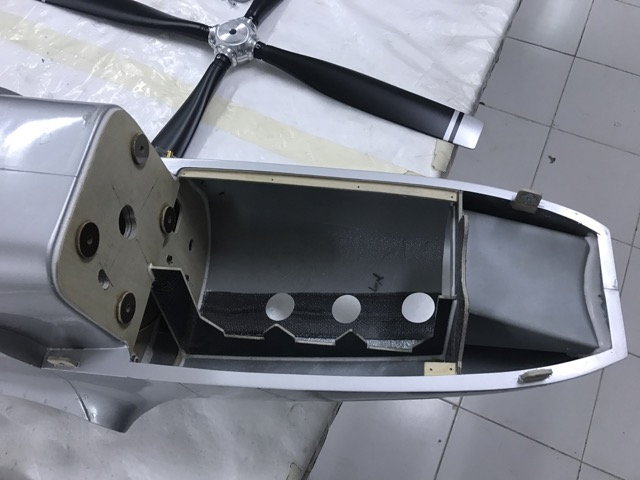
Working on the baffle on the right side of the engine. This will complete the basic baffle system I had in mind for this plane. I�m still wondering if it will need a divider between the carbs the exhaust pipes or the hot side of the engine. Also considering a wall to come off the cowl on the left side next to the engine case to keep the main airflow on the carbs before it diffuses up into the cowl volume.
The other issue I have is weather to have the ESC in the cowl or external to keep the extra weight out. Anybody have experience with this? Please chime in and tell me what you think. I�d have to add the starter battery in the fuselage and that�s a big 3S pack which I�m not keen on adding the extra weight. Originally I had planned to have the ESC and battery outside but I�d have to use a servo tester to start the engine instead of a channel on the Tx. With an external jack I could still use the Tx... thinking as I type...
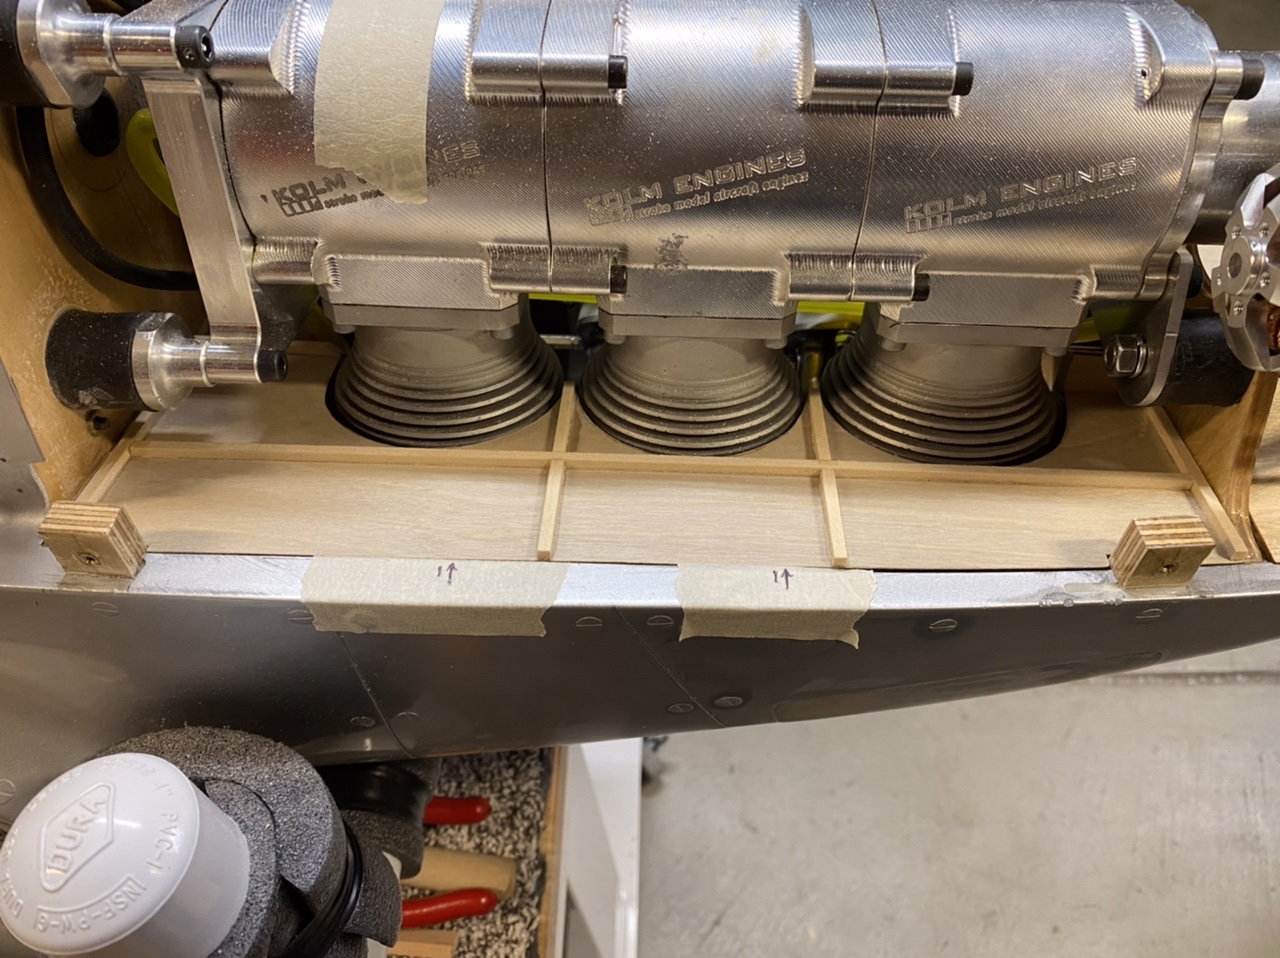
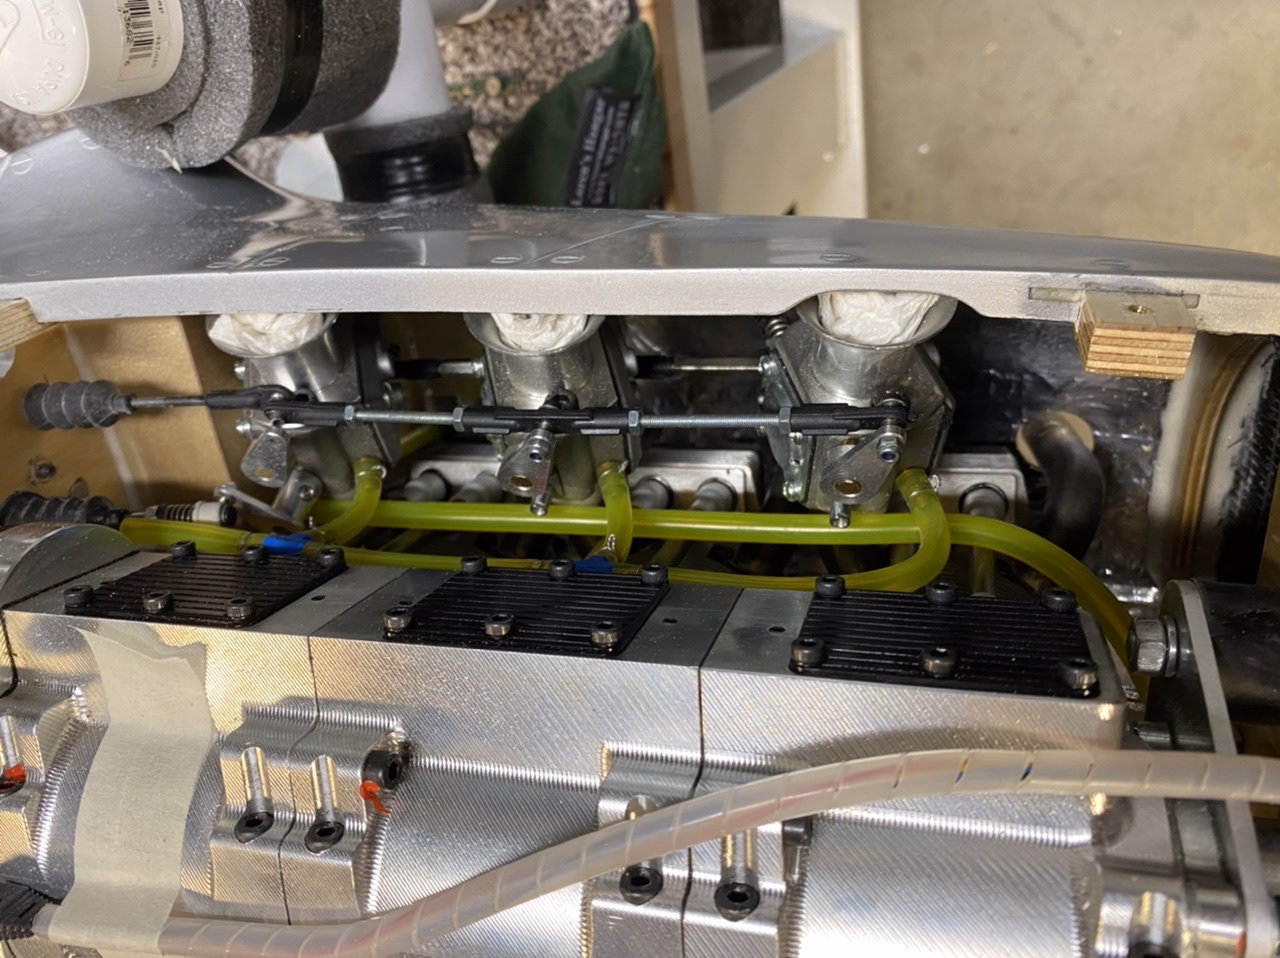
The other issue I have is weather to have the ESC in the cowl or external to keep the extra weight out. Anybody have experience with this? Please chime in and tell me what you think. I�d have to add the starter battery in the fuselage and that�s a big 3S pack which I�m not keen on adding the extra weight. Originally I had planned to have the ESC and battery outside but I�d have to use a servo tester to start the engine instead of a channel on the Tx. With an external jack I could still use the Tx... thinking as I type...

The following users liked this post:
Chris Nicastro (09-10-2020)
09-10-2020, 09:04 PM
#182
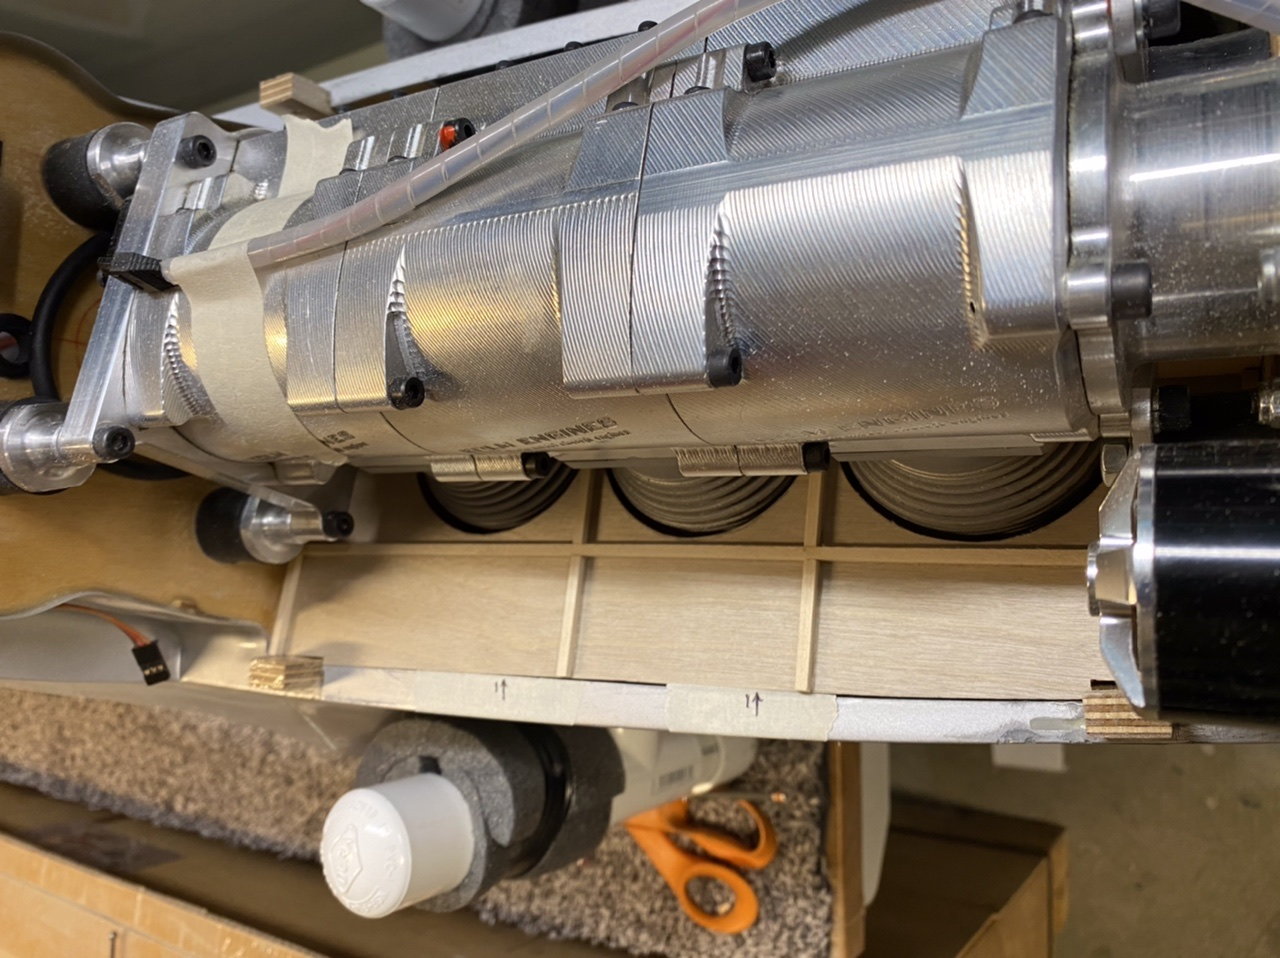
Thanks Tom, yes I could if it needs it but it’s not currently planned to be installed. I have a lot of ducting and with the baffles it should promote good air flow thru the fuselage duct. It’s been calculated to be 4x the area of the intake so at speed there should be plenty of vacuum plus the hot air will help promote flow. I did the same sort of installation on a Yellow AC P-38 with fully cowled and baffled DLE 35 RA’s and the results are great.
It’s getting there, I’ll have the radio and retracts operating this weekend I think and the engine will be running next week. I’m having the spinner backplate machined for the bolt pattern and lightening holes. I had a pair of 3/4 inch front motor mount spacers made today because the rubber isolation mounts are sagging. That will be installed this weekend too. I’m going to try running the engine with the rubber rear mounts and the hard fronts.
It’s getting there, I’ll have the radio and retracts operating this weekend I think and the engine will be running next week. I’m having the spinner backplate machined for the bolt pattern and lightening holes. I had a pair of 3/4 inch front motor mount spacers made today because the rubber isolation mounts are sagging. That will be installed this weekend too. I’m going to try running the engine with the rubber rear mounts and the hard fronts.
09-10-2020, 09:10 PM
#183
Ok , so same cooling system like i did on voodoo. i added the tube after a couple of flights just to see how it works (temps was OK also without it). but the effect was really good. about 10 deg C less.
just use temp sensors and you are save!
if you don�t use the rubber mounts, go with aluminium all around. makes no sense to use alu in back and rubber in front. upcoming vibrations will stress the backplate of the engine a lot.
anyway the triple runs very smooth, so no problems with vibrations at all.
09-10-2020, 09:26 PM
#185
the short rubber mounts are more stiff - so better for sure.
the triple you can really hardmount to the fuselage. no problem, trust me. if you want to go soft mount, then do it over all. one side hard and one on rubbers makes really no sense.
the triple you can really hardmount to the fuselage. no problem, trust me. if you want to go soft mount, then do it over all. one side hard and one on rubbers makes really no sense.
09-10-2020, 09:46 PM
#186
Ok I’ll try the short ones because I can see the long mounts let the front of the engine sag down. I’ll see when it’s running how it vibrates and go from there. Like you said the 3cyl should be pretty smooth and I’ve heard the same before. I just don’t want the plane to experience hard vibration and damage servos.
09-10-2020, 10:12 PM
#188
ISB and all other belongings to KOLM you get there :
www.radiocityrc.com
For Ramoser Parts maybe you go direct to Ramoser. We made also a special replacement hub for your engines. will take a look if i have one left.
with the original ramoser the prop comes 6mm in front after the spinner plate, so you have to cut out the spinner a bit more. but works fine anyway.
you have the ramoser already ?
09-19-2020, 01:02 AM
#189
Thomas I sent them a request about the ISB because it�s not listed on their website. No reply. Can you check with them from your side?
ISB and all other belongings to KOLM you get there :
www.radiocityrc.com
For Ramoser Parts maybe you go direct to Ramoser. We made also a special replacement hub for your engines. will take a look if i have one left.
with the original ramoser the prop comes 6mm in front after the spinner plate, so you have to cut out the spinner a bit more. but works fine anyway.
you have the ramoser already ?
www.radiocityrc.com
For Ramoser Parts maybe you go direct to Ramoser. We made also a special replacement hub for your engines. will take a look if i have one left.
with the original ramoser the prop comes 6mm in front after the spinner plate, so you have to cut out the spinner a bit more. but works fine anyway.
you have the ramoser already ?
09-19-2020, 01:40 AM
#190
 09-22-2020, 04:27 PM
#192
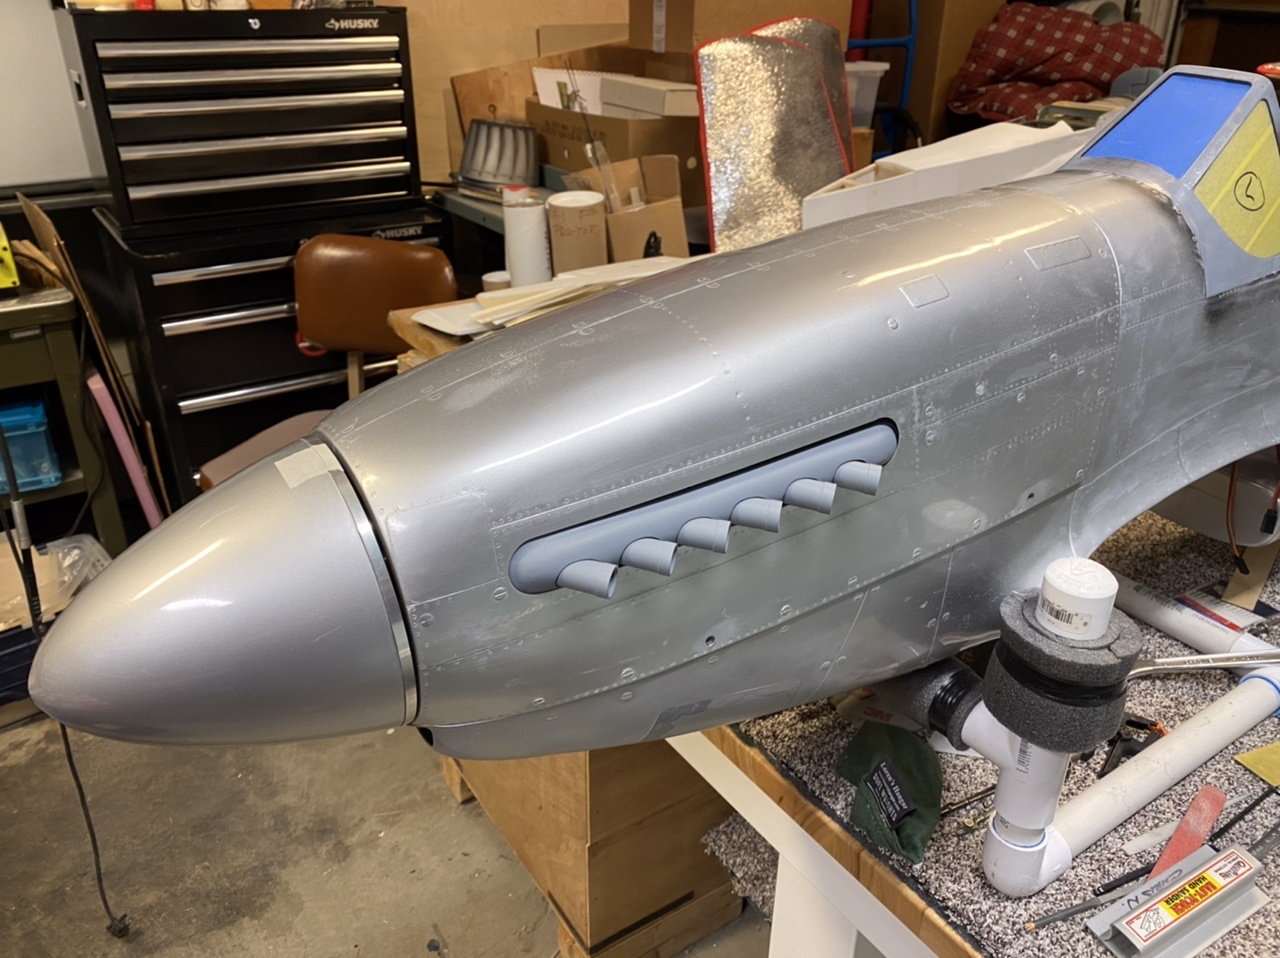
Nose update...
The cowl had a big gap to the backplate at the top and not enough space at the bottom. I checked the alignment and like the full scale plane the engine sits with about a 1.5 degree down thrust. The thrust line points back to the horizontal stab basically. I�m ok with this because of other Mustangs I�ve flown needing down trim for level flight so I�m interested in seeing how this flies.
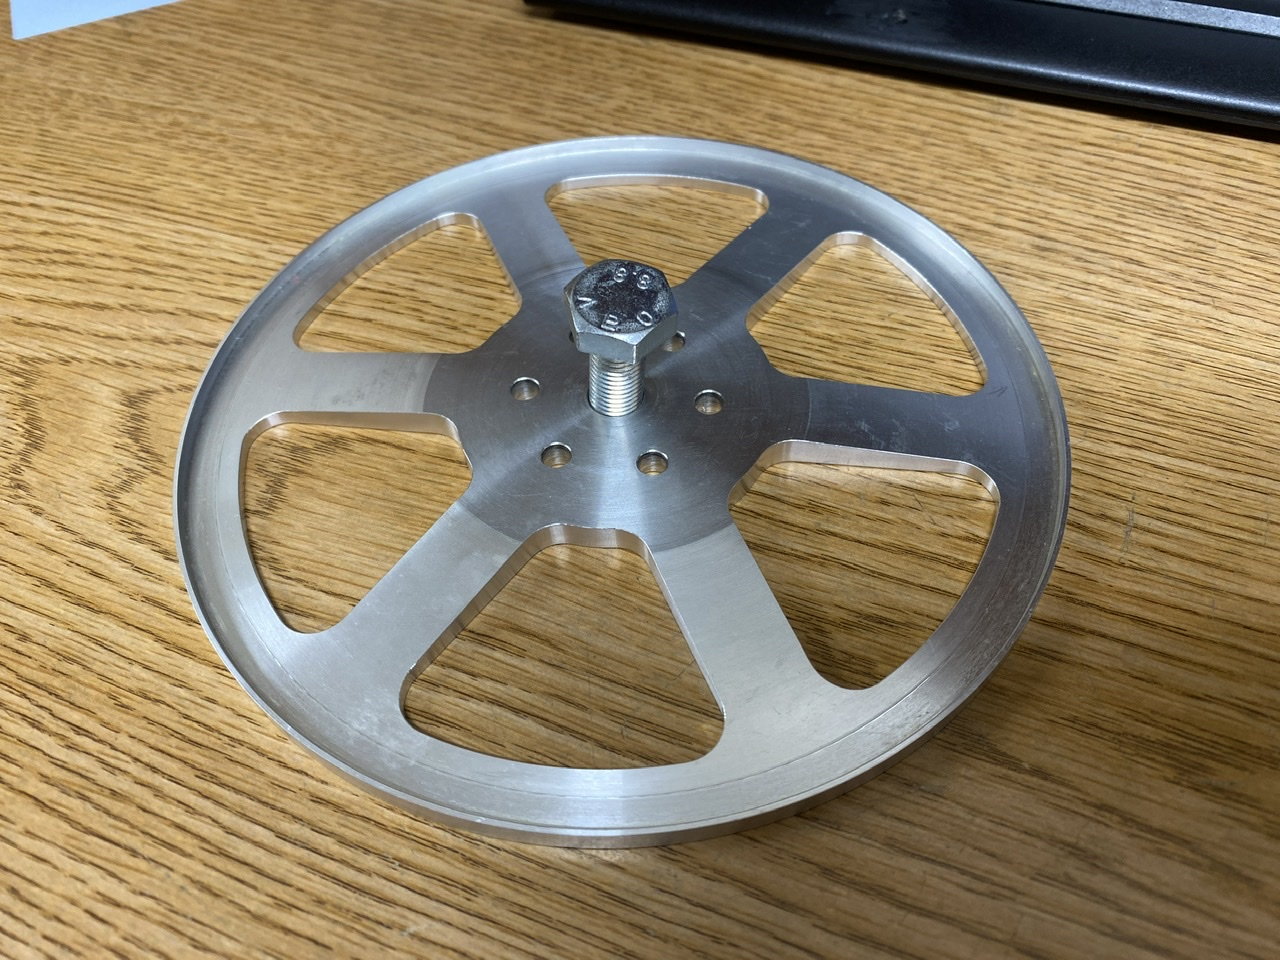
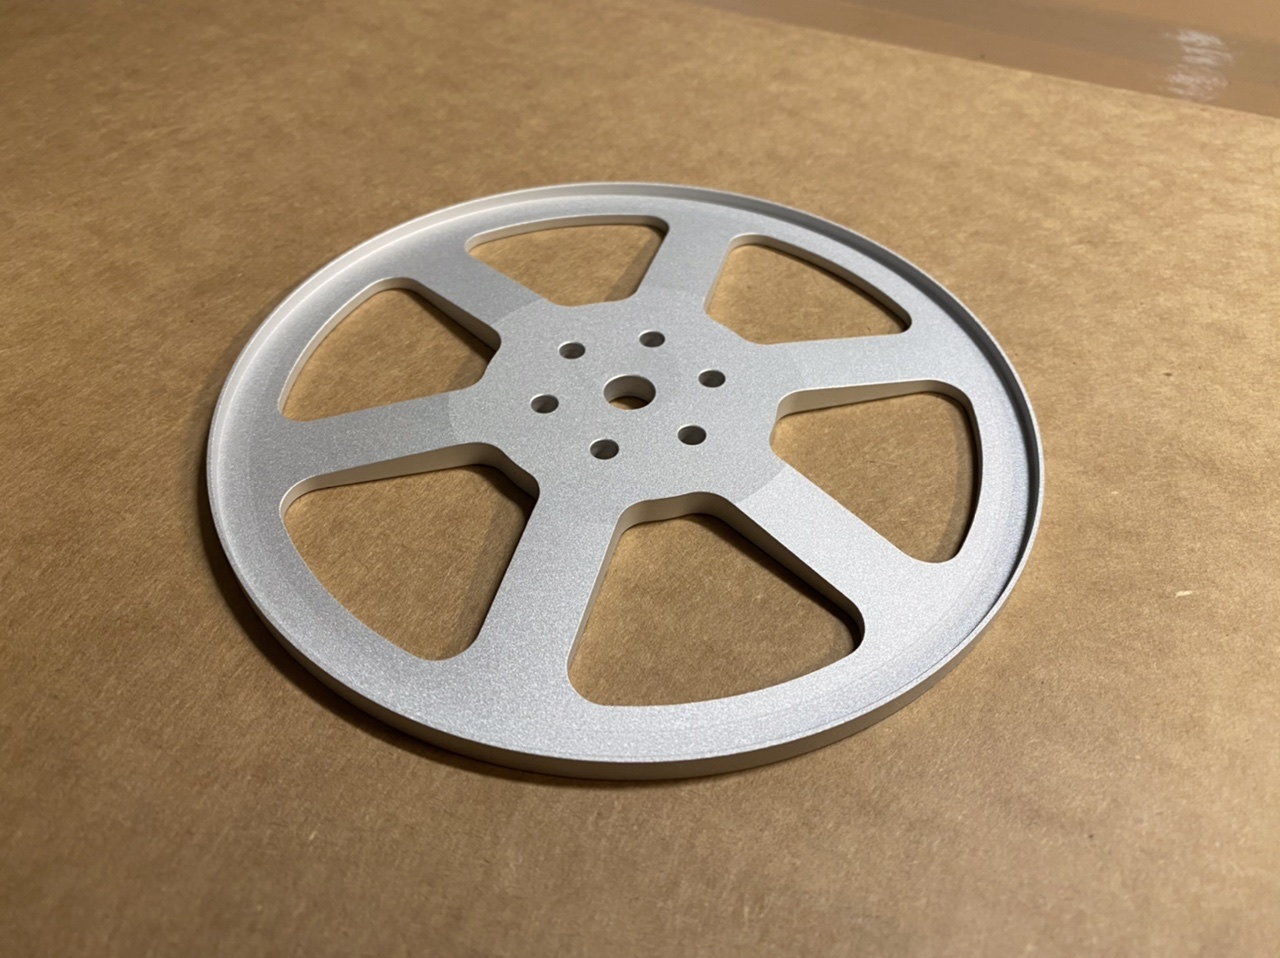
The spinner backplate has been drilled and milled to lighten it up. This will be painted red later so I sand blasted it for texture so the primer can really stick.

The cowl had a big gap to the backplate at the top and not enough space at the bottom. I checked the alignment and like the full scale plane the engine sits with about a 1.5 degree down thrust. The thrust line points back to the horizontal stab basically. I�m ok with this because of other Mustangs I�ve flown needing down trim for level flight so I�m interested in seeing how this flies.
The spinner backplate has been drilled and milled to lighten it up. This will be painted red later so I sand blasted it for texture so the primer can really stick.
09-22-2020, 09:12 PM
#193
I screwed up...
So I missed the memo on the Kolm hubs. The Short Hub has the 34mm 6 bolt pattern. The Long Hub has the 29mm pattern... WHY!!!
I made this backplate with the 34mm pattern because I had the front plate in hand and the short hub and I didn’t compare the parts or forgot or whatever.
I know I should have looked or realized they are different but why the heck are they different to start with!! Now I’ll slot the holes and move on but W.T.F.??
Rant over....
09-22-2020, 09:42 PM
#194
I screwed up...
So I missed the memo on the Kolm hubs. The Short Hub has the 34mm 6 bolt pattern. The Long Hub has the 29mm pattern... WHY!!!
I made this backplate with the 34mm pattern because I had the front plate in hand and the short hub and I didn’t compare the parts or forgot or whatever.
I know I should have looked or realized they are different but why the heck are they different to start with!! Now I’ll slot the holes and move on but W.T.F.??
Rant over....
So I missed the memo on the Kolm hubs. The Short Hub has the 34mm 6 bolt pattern. The Long Hub has the 29mm pattern... WHY!!!
I made this backplate with the 34mm pattern because I had the front plate in hand and the short hub and I didn’t compare the parts or forgot or whatever.
I know I should have looked or realized they are different but why the heck are they different to start with!! Now I’ll slot the holes and move on but W.T.F.??
Rant over....
that looks perfect so far. will work good as you did it for sure.
the difference in pattern came from a change we did longer time ago. i think the last extended hubs with 20 was made 2017. do you own the engine already that long ?
all 2cyl have 29, all 3 cyl have 34.
We have extensions with 34 in stock. can ship you quickly if needed
or:
there is enogh space to drill the 34 pattern in between. we made hubs also that have both pattern drills.
so maybe this can be your slolution ?!
anything more i can do ?
Last edited by Ixtrim; 09-22-2020 at 09:52 PM.
09-23-2020, 03:59 PM
#195
Yes the engine is the older version, ser.# 024. I can’t believe I’ve been working on this plane this long but anyway here we are!
No problem Tom I’ll make the holes into slots and it will work fine. The backplate is centered from the center bolt anyway.
No problem Tom I’ll make the holes into slots and it will work fine. The backplate is centered from the center bolt anyway.
09-23-2020, 04:02 PM
#196
Tom do you know if the exhaust pipes are longer now compared to the early version? I have to make two extensions from brass tubing to clear the nose.
Also, Simon replied to me but now he is waiting for parts, still no price in the US for the ISB I guess.
Also, Simon replied to me but now he is waiting for parts, still no price in the US for the ISB I guess.
09-24-2020, 11:52 PM
#197
Pipes are same lengh since years.
i do the same, just is a longer pipe one size bigger.
ISB is 175 euros here in EU. so might be around this in dollar plus the shipping problem. I talk to simon. maybe we send you one togehter with the next engine he gets.
Tom
i do the same, just is a longer pipe one size bigger.
ISB is 175 euros here in EU. so might be around this in dollar plus the shipping problem. I talk to simon. maybe we send you one togehter with the next engine he gets.
Tom
 09-26-2020, 07:24 AM
#199
Hello, Chris.
I've caught up on your build and everything is looking great so far! Awesome engine choice as well.
I am at the stage on mine where I need to select an air cylinder for the clamshell doors. For the air cylinder travel, and after you've made the internal adjustments....what is the total travel that your cylinder's ram can now do? Like from fully retracted to fully extended.
Also, you mentioned it's a 5/8" diameter cylinder, but on Robart's chart all I can find that looks like the one you have points to a 3/8" cylinder, which I believe would be plenty as well with 10+ lbs of force.
Hope you have a moment to answer these questions. Thanks in advance !
Gabriel
09-26-2020, 05:37 PM
#200
Hi Gabriel,
Thats great, I�m happy you�re benefiting from my build info.
Let me check because from memory I want to say the travel was about 1 inch and the internal limiter was less than 0.6 inch.
More info soon.
Chris
UPDATE: glad I checked...
Robart Cylinder is 1/2 inch dia. X 3 1/2 inches. Not sure where the 3/8 or 5/8 measurement came from but maybe a typo? The travel is 35mm (1.377 inch) with my limiter.
Make it like I did but make one insert instead! The other issue for you is matching the position of the pivot point in the door. I can give you measurements if you want but the location is basically what you get in the vertical position from the wing to the door. The cylinder has to be tucked in the space between the tire and the tube with clearance.
Last edited by Chris Nicastro; 09-26-2020 at 05:58 PM.