


TopRc F4U Corsair assembly
 04-01-2022, 05:22 AM
#251


I prefer pneumatic over electric. In my opinion the current state of the electric retracts does not provide more reliability than a well setup air system. If they would use higher quality motors and build the electric gear a bit better there's no reason it shouldn't be bullet proof, but that doesn't seem to happen. Add in the low cost electronics that also have issues, and people still struggle with electric gear. If you are worried about a pinhole leak you can always throw a low pressure fail safe into the system that drops the gear. I've never used one though. The electric gear has improved. I installed e-flite gear in my H9 60cc Mustang I just built, I'll see how that works.
The Robart gear for my Corsair should be arriving today. The main gear is a standard rotating unit that I've used in other planes like my Ziroli P40. They have it pretty well sorted out, and some re-structuring of leadership and a move of the Robart location shouldn't affect the quality (time will tell). I'll be posting about the Robart install and the quality I see in the next few days.
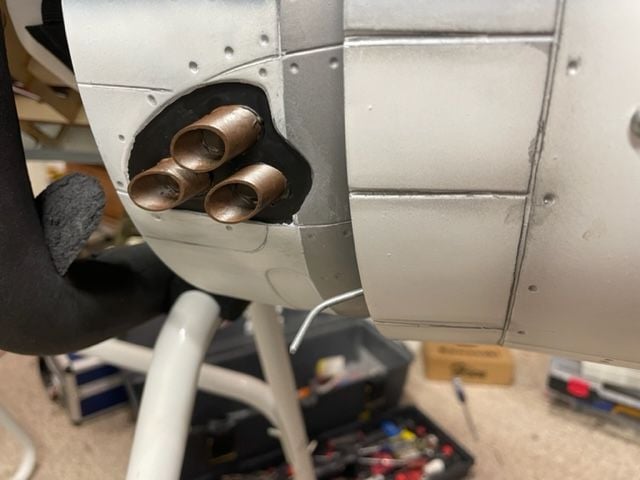
Until then, I'm forced to figure out ways to add details to the Corsair while I wait. Here's the latest, some scale exhaust stacks.
The Robart gear for my Corsair should be arriving today. The main gear is a standard rotating unit that I've used in other planes like my Ziroli P40. They have it pretty well sorted out, and some re-structuring of leadership and a move of the Robart location shouldn't affect the quality (time will tell). I'll be posting about the Robart install and the quality I see in the next few days.
Until then, I'm forced to figure out ways to add details to the Corsair while I wait. Here's the latest, some scale exhaust stacks.

The following users liked this post:
Fly2XS (04-28-2022)
 04-01-2022, 07:43 AM
#253
Since Horizon is selling the Mustangs right now and shows the electric Retracts to be coming into stock sometime in April, it seems odd that they have no source for the controllers. One more issue with electrics, the parts are not always as transferrable as air retracts. It's a good thing you found something that would do the job for you. I might have to jot down those current settings you posted just in case!
04-01-2022, 01:08 PM
#254
Senior Member
I can tell you the inner gear door setup is much easier too. Just center, attach the arms and linkage, move end points.
On the eflite, its going full travel, period, and you gotta adjust the linkage.
On the eflite, its going full travel, period, and you gotta adjust the linkage.
04-02-2022, 07:29 AM
#255
Member
I prefer pneumatic over electric. In my opinion the current state of the electric retracts does not provide more reliability than a well setup air system. If they would use higher quality motors and build the electric gear a bit better there's no reason it shouldn't be bullet proof, but that doesn't seem to happen. Add in the low cost electronics that also have issues, and people still struggle with electric gear. If you are worried about a pinhole leak you can always throw a low pressure fail safe into the system that drops the gear. I've never used one though. The electric gear has improved. I installed e-flite gear in my H9 60cc Mustang I just built, I'll see how that works.
The Robart gear for my Corsair should be arriving today. The main gear is a standard rotating unit that I've used in other planes like my Ziroli P40. They have it pretty well sorted out, and some re-structuring of leadership and a move of the Robart location shouldn't affect the quality (time will tell). I'll be posting about the Robart install and the quality I see in the next few days.
Until then, I'm forced to figure out ways to add details to the Corsair while I wait. Here's the latest, some scale exhaust stacks.
04-03-2022, 09:15 AM
#256
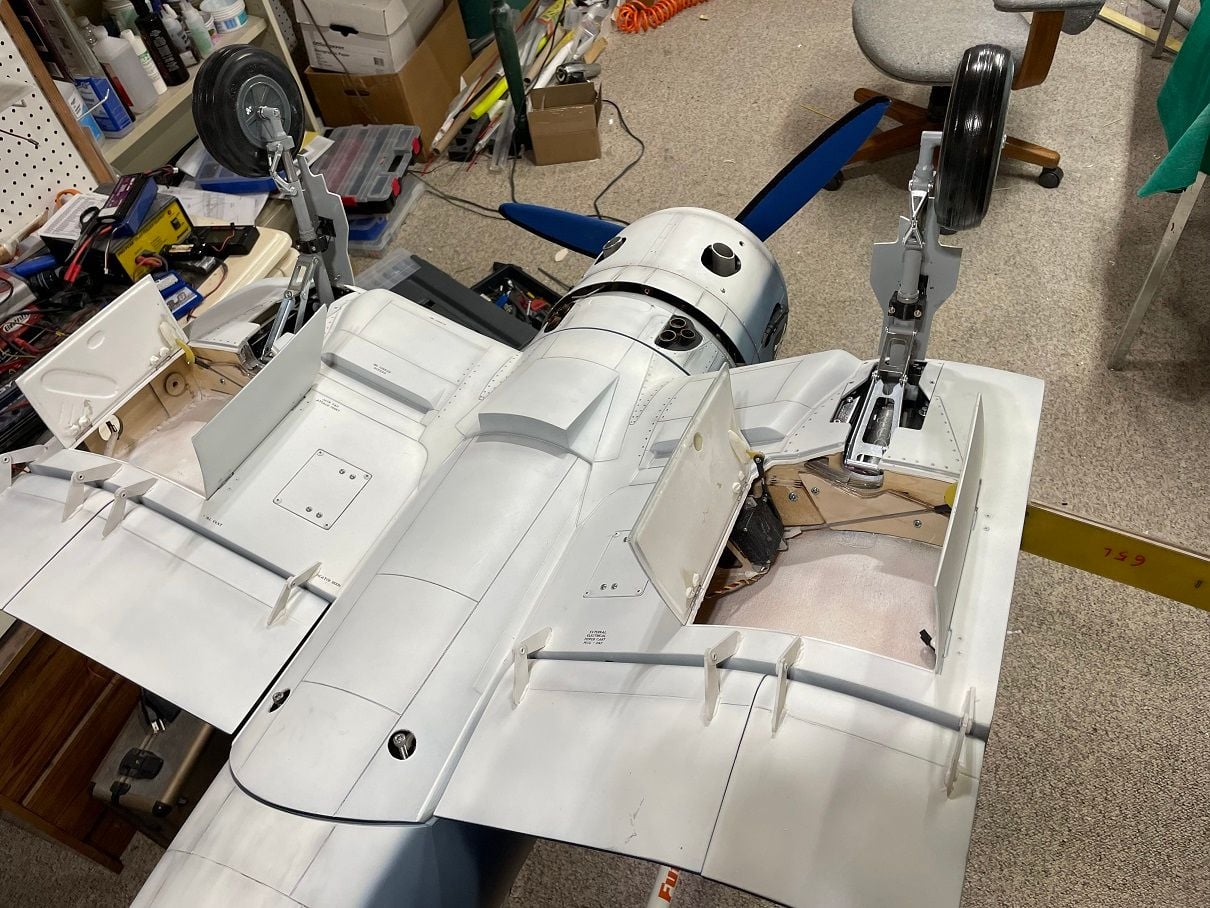
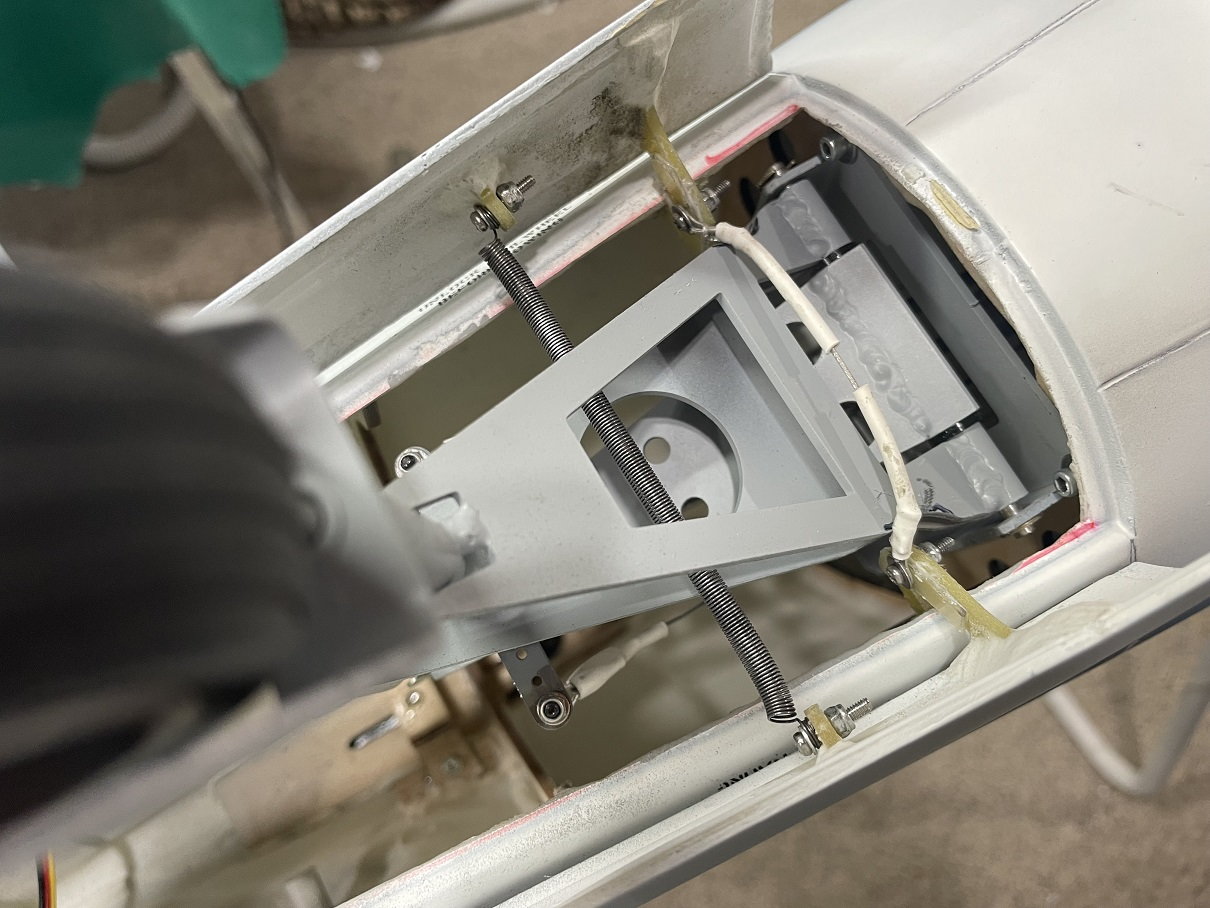
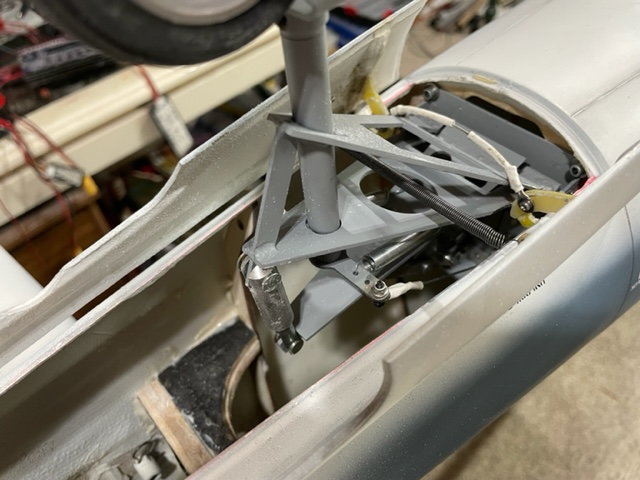
The Robart Retract set arrived, and I will walk though some of the things I noticed on the install. The main gear is the standard Robart rotating units with some notches cut into the frame to allow them to fit into the TopRC. I think the gear legs are a unique length compared to other models they offer. The went in without too much effort. A bit of trimming was needed on the edges of the glass to get them to go in. They are a bit tight. I'm glad I didn't add anything to the spar area on the retract side. There is no room there, and I even shaved just a bit off to make sure the piston didn't hit when it went into the full lock position. I used some #8 allen wood screws, and they were mounted. It took a bit of work to make sure the air lines were routed so there would be no pinching as the air piston moved through the cycle.
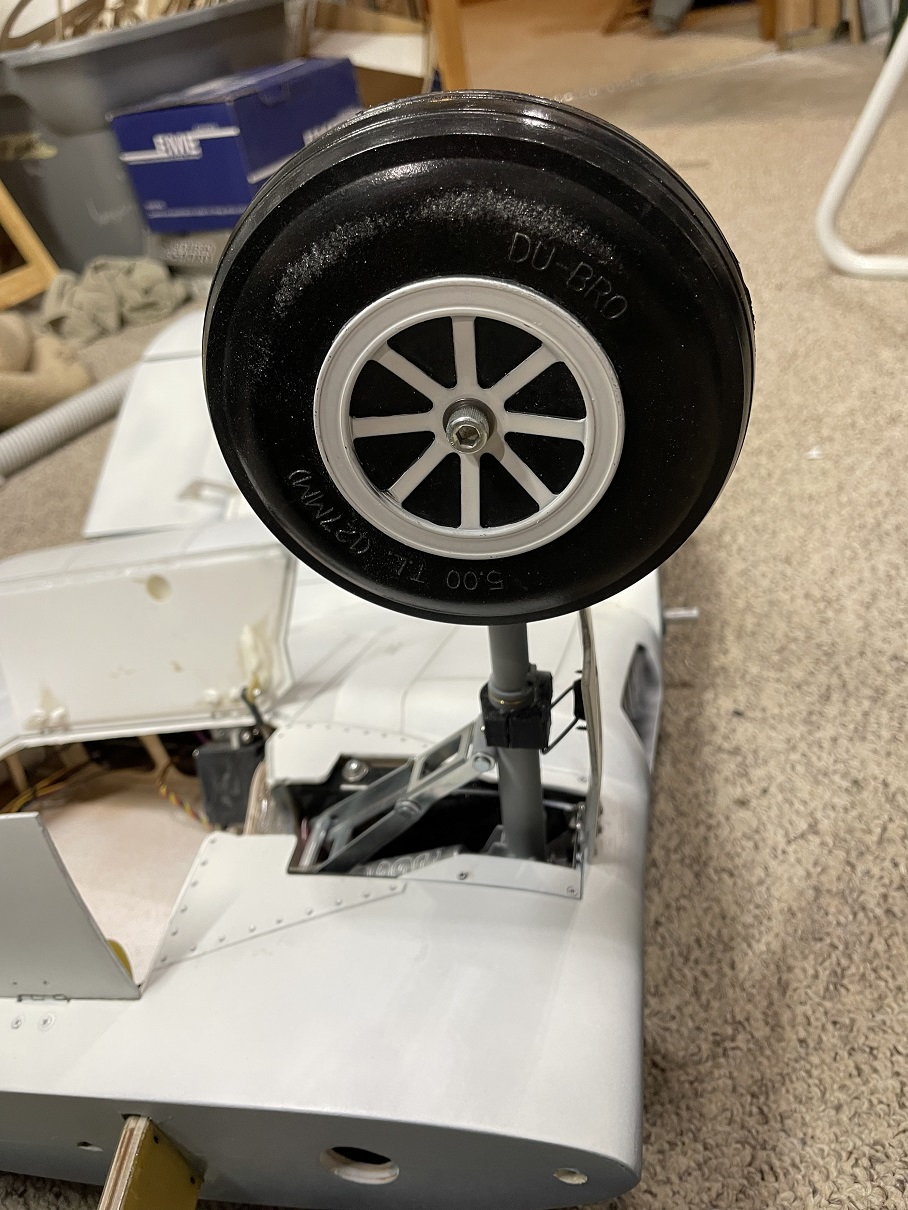
You'll notice I have Dubro 5" wheels. The gear came with scale aluminum wheels, but the rubber is on backorder. I was happy to find that there is room for the Dubro wheels that I'm sure are a bit wider than the narrow tires that come with the Robarts.

You'll notice I have Dubro 5" wheels. The gear came with scale aluminum wheels, but the rubber is on backorder. I was happy to find that there is room for the Dubro wheels that I'm sure are a bit wider than the narrow tires that come with the Robarts.
04-03-2022, 09:25 AM
#257
On to the Doors. I had done some work ahead of time, but found that most of that had to be undone. I mounted the door to the leading edge of the opening with a hinge. Problem is, it didn't align with the gear and wouldn't cycle correctly, or look right when it was down.
It looked nice once it was folded up, but wouldn't work. Robart includes some door mounting hardware with the kit. This is 3D printed stuff, that seems to be made from a nylon material that should hold up. There is a hinge mount that goes on the leading edge of the wing and screws to the wood there. That piece allowed me to attach the door at the right angle so it would cycle straight with the gear. It makes it nice since you can screw the hinge into the mount, then screw the mount onto the wing. No glue for the that side. I thickened up the wood a bit to get the correct spacing, more on the left than the right.
Once I had the doors cycling straight I worked on the linkage to the gear. The mounts on the gear provided holes for a wire that gets bent into position. It takes a long time to get those bent right. I even used wire that was a bit less stiff than what Robart provided. After many failed attempts I found a combination that allowed the gear to pull down into the right position. Quite a bit of trimming is needed on the door pieces to get the proper gap, and I even heated up the front door and bent it some to get it to sit correctly.
04-03-2022, 09:31 AM
#258
You'll see some little wood screws in the photos holding on the doors. Those work well to get everything aligned. Once I had it all set I used some small screws with nuts and some Zap goo. It can come apart if need be.
In the end the doors seem to work fine. We'll see how they work in the air, always a bit different.
I did some testing of the gear, and they didn't want to cycle properly. I was thinking I had a pinched line, but I re-routed them until the were perfect. I think the issue was the little locking mechanism. It depends on some rather precise spacing where it moves along the piston, and if that's not there it can get hung up. I had to do some tweaking of the piston brackets to make sure the little locker moved freely. After some messing around it seems to cycle reliably. It's always fun to pull the gear out a few more times after you think you have it finished.
Here's a photo of gear down and gear up.
04-03-2022, 09:46 AM
#259
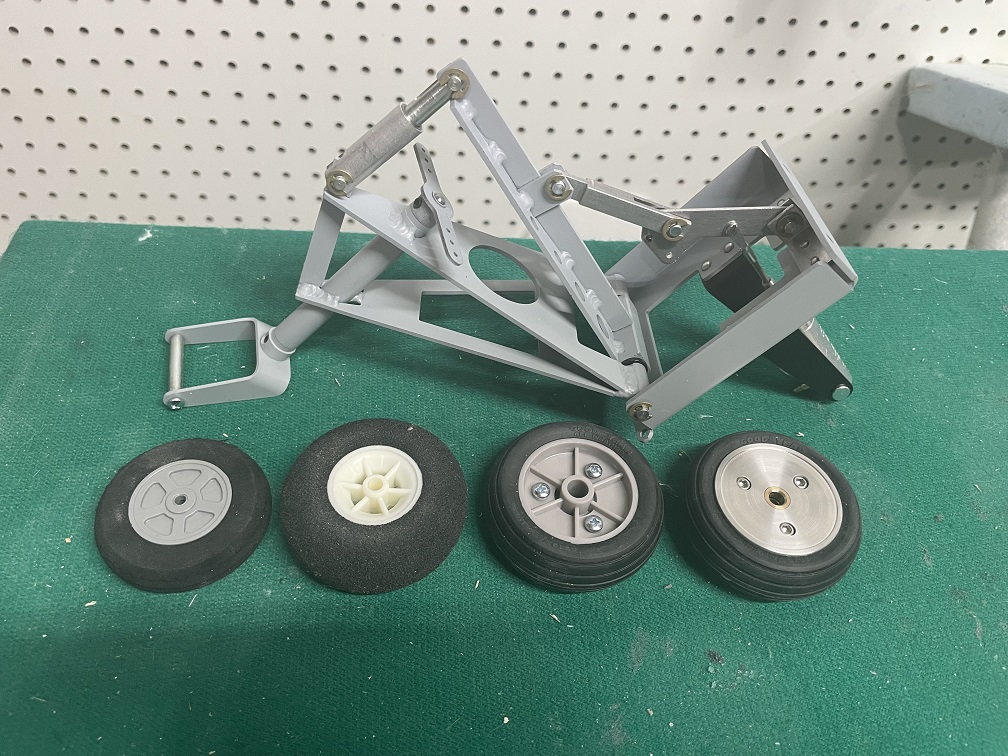
On to the tail wheel. Robart provides the "new" more scale Corsair tail gear unit and an Aluminum tail wheel. First off, this thing is heavy. The tail gear weighs in at 11 oz. by itself. That's about double what most tail gear weighs. It's mostly a steel frame. It does seem strong though. Then there's the aluminum tail wheel. At 2 oz. by itself it also feels quite heavy. I decided to go with a plastic Robart wheel of the same size that weighs about 1 oz. Some foam options shown can be even lighter, but I want something that will hold up. Doesn't sound like much, but on a nose weight challenged plane that extra 1 oz. needs about 4 oz. of extra lead in the nose. Add the1 oz. to that and it's 5 oz. heavier. Nothing I can do about the heavy gear though. I don't want to risk making it weaker, so I installed it as it is.
The Tail unit dropped in without too much effort. 4 screws holds it in place. I'm pretty happy with how it went in. I had to figure out a way to get the doors to open and close. They were pre-mounted, and I had to work with what I was given. I noticed the front hinges on the door hit the retract unit. I took a bit of metal off of the retract and a small amount off of the hinges to get clearance. I used the stock spring provided by TopRC through the Robart retract to provide the closing feature. To open, I mounted a wire across between the front hinges. I added some extra G5 on the hinges to make sure they didn't fail with a screw drilled into them. The cable works, as long as the ends can pivot so it doesn't get hung up. It seems to cycle fine and opens up the door every time. When right side up, the robart gear doesn't quite lock up all the way (there is no up lock) and it doesn't seem to close completely. I might be able to tweak the spring to get it to work better. Seems Ok for now.
I hooked up the pull pull system through the holes in the retract body. I first put some nylon rod into the holes to create a guide for the cable, since they are not very well aligned. Once I had it all installed I put it through some cycles. Sure enough the tail wheel unit would stick in the up position sometimes. It looks like the air piston rod was bent a bit. I straightened it out and it seems to move fine now. It looks like the piston size and the rod size is quite small for all the work it has to do. I guess they thought they needed to save some weight after they found out how much the thing weighed. Here it is after the final install.
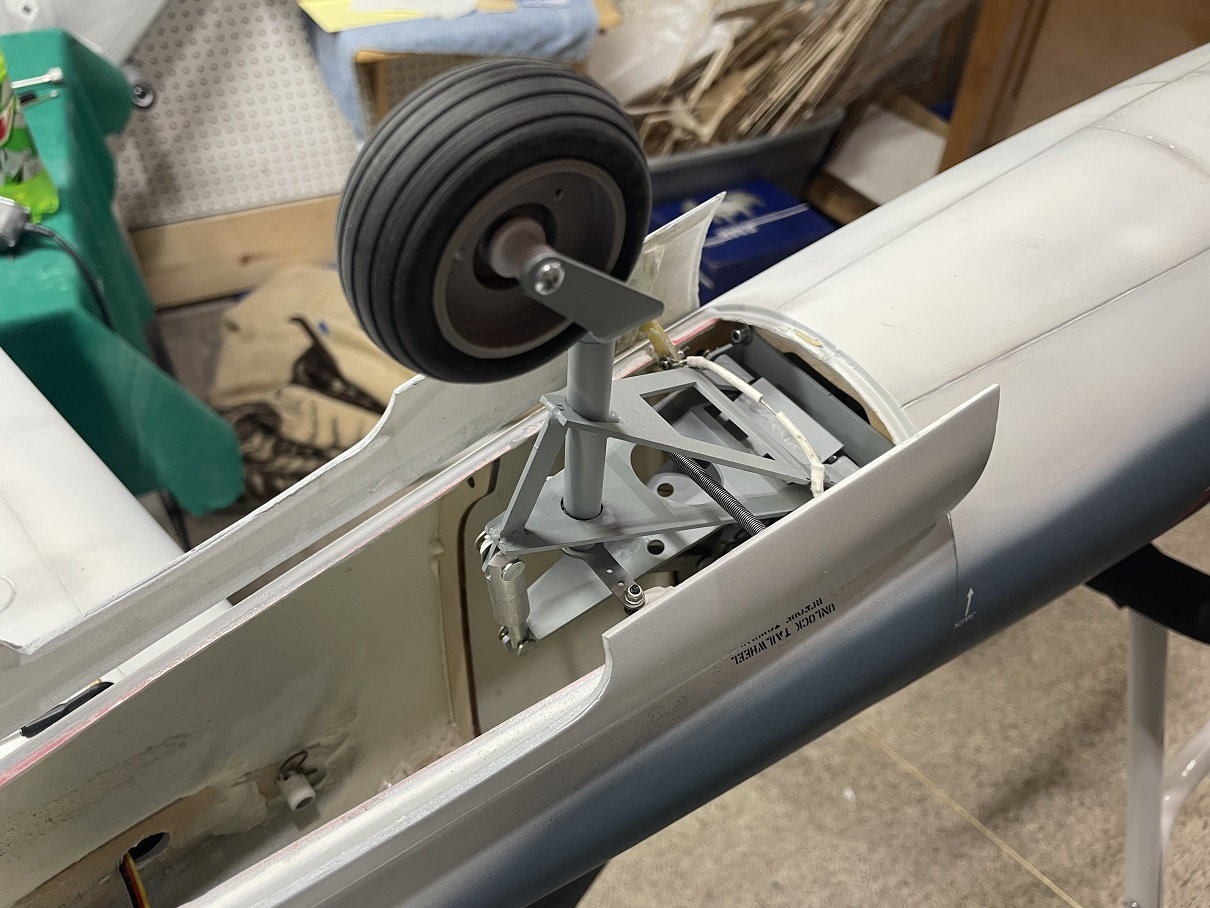
04-03-2022, 09:54 AM
#260
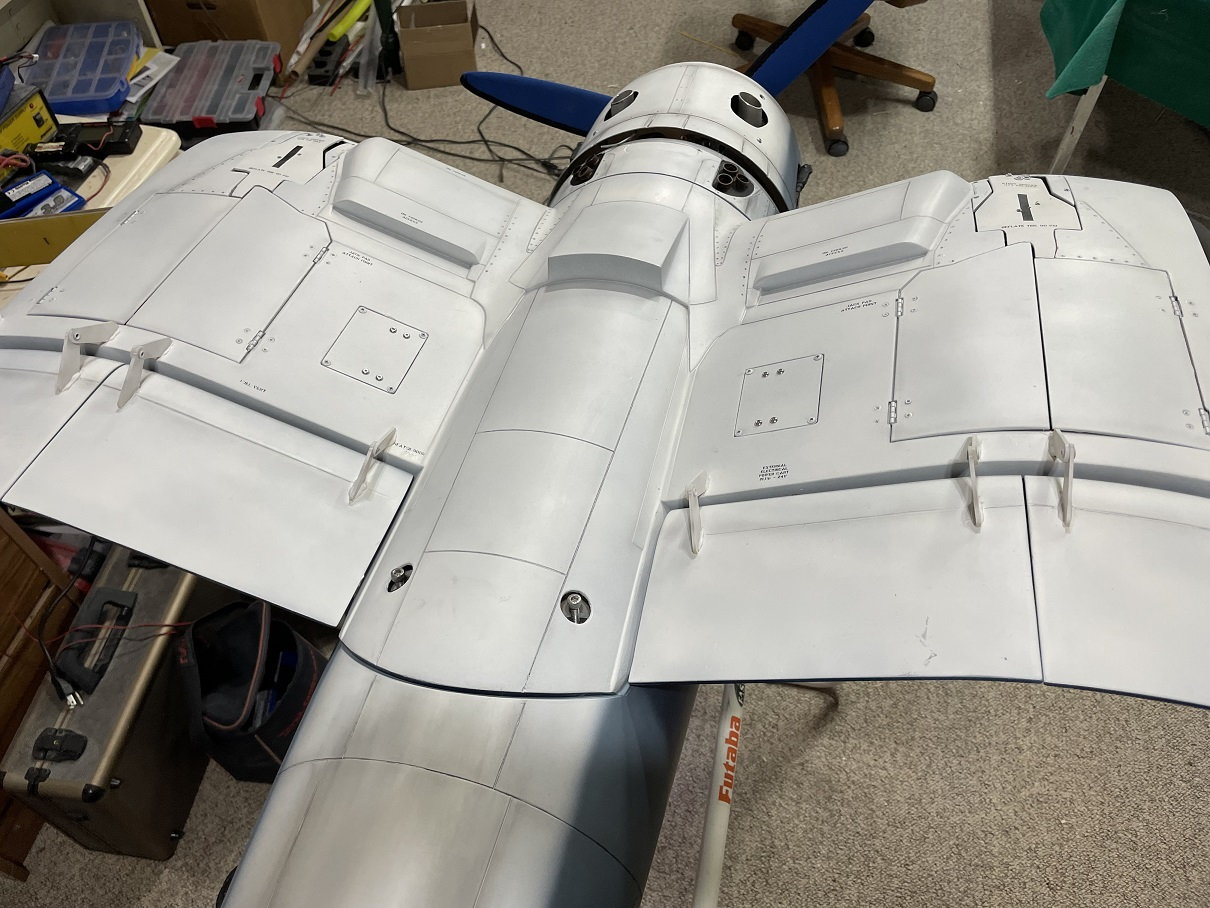
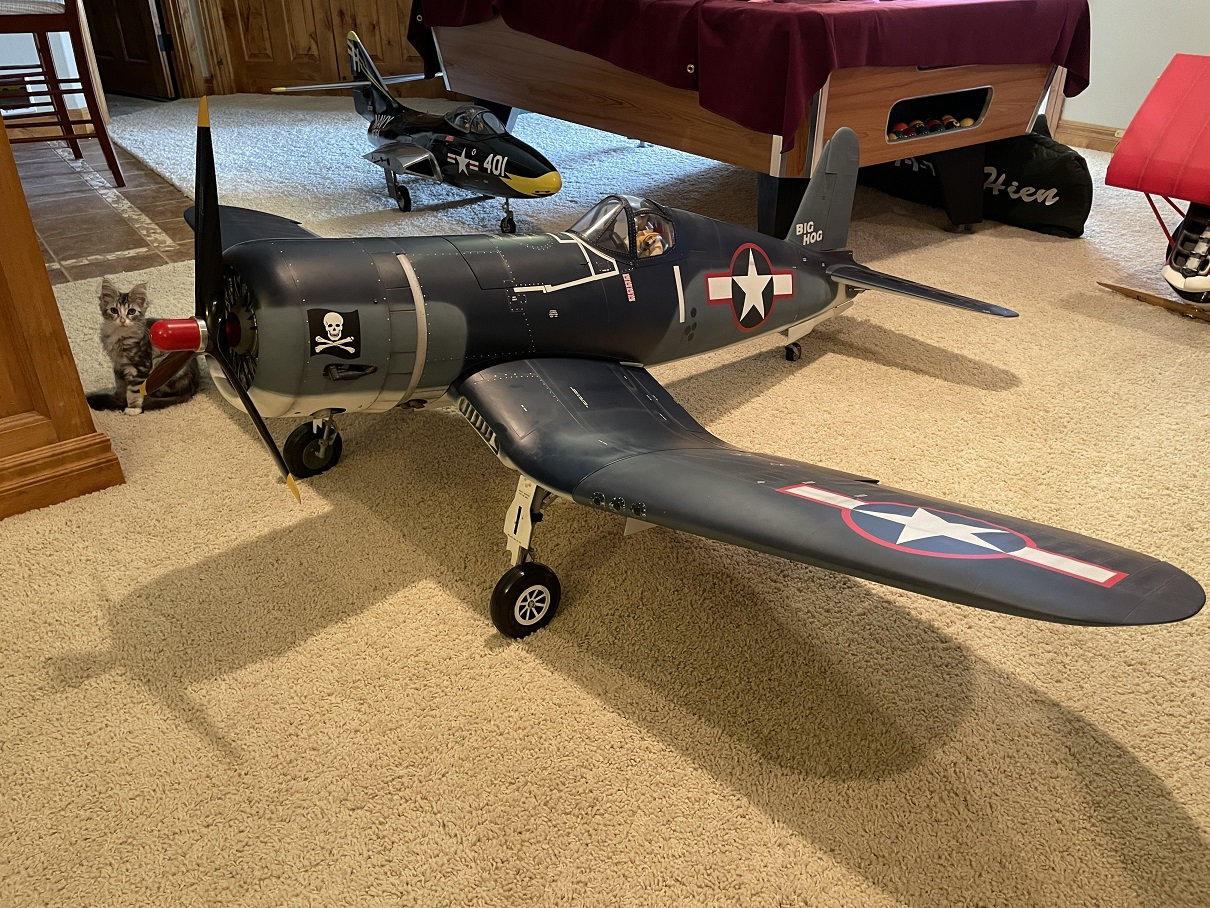
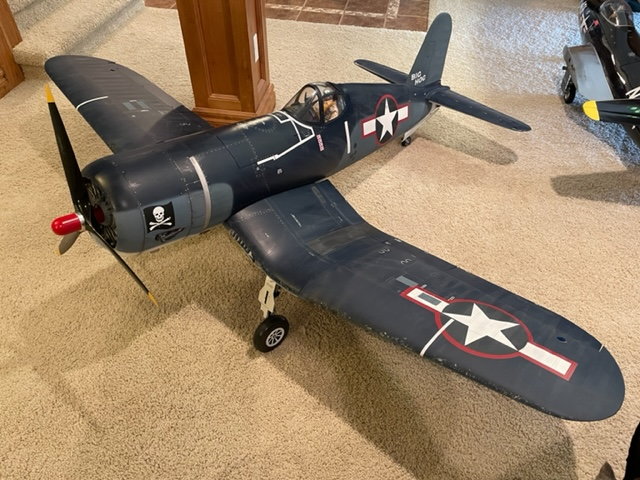
After getting the gear installed I finally got to get the Hog on it's legs. I took a photo in the basement. I still have some details to add and a bit of weathering. I'm not going to weather it up too bad, it's just too pretty to make it look really dirty. I did my initial balance check, planning to balance at 5.5" (not the 6.1" TopRC says). It took all three of the brass bars I had on hand (2.1 lbs) to get to the 5.5". With the 2.1 lbs the all up weight came in at 38.7 lbs. (bathroom scale). I'm quite happy with that. I was ready for it to go over 40 lbs. I'm confident that my wing mod will hold up to anything but a bad hit, and that weight should make it a good flier considering the amount of wing it has. The big VVRC 120 will make it a bit of a handful on takeoff, since it's a bit rudder challenged. I'll just have to be careful with the throttle.
Once we get some good weather here in Iowa I'll get the engine broke in and provide a maiden report. I might not like the weight of the scale tail retract, but I do like that it holds the tail up high which will help the ground handling.
Once we get some good weather here in Iowa I'll get the engine broke in and provide a maiden report. I might not like the weight of the scale tail retract, but I do like that it holds the tail up high which will help the ground handling.
04-03-2022, 11:08 AM
#261
I rolled it into the yard to get a coupe photos in the light. While I was moving it I noticed that the horizontal stab flexes quite a bit in the front. With the amount of power I have in mine and the speed it could reach I am a bit concerned of what would happen if the stab went into a flutter. I think I'll use a bit more weight to add a bit of strength to that area. There really isn't much there, just the thin fiberglass. If it would flutter I think it would quickly fail. Not sure yet what I'll use. Maybe some carbon fiber and Aeropoxy. It's easy to access the area through the tail wheel doors. So I won't brag about my all up weight yet, there may be a couple more pounds needed between the reinforcement and the compensating nose weight.
04-04-2022, 11:11 AM
#262
So I looked into the flexy stab issue. Right in front of the stab there is really no structure other than the fiberglass. Sometimes this is enough, but I can tell by how easy it moves around it could be a problem. In the heat of the sun it will only get softer making it even more flexible. If it would happen to move enough to initiate a flutter at high speed I'm sure the glass would quickly fail and, well, you know the rest.
I was thinking of way to get maximum stiffness with minimum weight. I decided to go with two pieces made from 3 layers of 1/8" balsa. Once I had the shapes figured out I laminated three layers of the balsa, crossing the grain on each layer. I re-fitted the pieces until they were tight, and then I put a sheet of fiberglass Veil on both sides. Using thin CA, they quickly set up. It's very thin but adds quite a bit of stiffness. A trick I learned from one of the pattern guys. After I was done I checked the weight, and both pieces weigh in at 5/8 ounce.
I then used Hysol with micro-balloons to glue it on to the fuse, each other, and the former right in front of the Stab. I used quite a bit of glue, but it was less than .2 oz. Here's a photo of the two pieces installed. Once it sets up I'll see if the stab feels stiff enough to my liking. I'll have to re-check my balance and may have to add a few more ounces of weight to compensate, but I think it was worth it. Hope to get some weather and get a flight on it soon. Good luck with your build.
 04-08-2022, 07:23 AM
#264
Getting things dialed in even more. As I thought, I had to add 6 more oz. of nose weight to compensate for the added tail structure. I also had to add a couple centering springs to the tailwheel, since it would sometimes turn while retracting and catch on the door. Now that the springs have been added I think it will work fine. I also shortened the stock spring that pulls the doors shut just a bit. Now it seems to shut all the way.
As I was messing around I found that the TopRC decal that I used for the Star-Bar on top of the wing wasn't sticking well. My Corsair came with no graphics applied and the decal sheet provided. I bit the bullet and painted one on. After that I added some final touches like the formation lights. After some additional weathering an wash it's about as done as it gets. Next step is to test run the engine and then wait for some decent weather for a maiden flight.
As I was messing around I found that the TopRC decal that I used for the Star-Bar on top of the wing wasn't sticking well. My Corsair came with no graphics applied and the decal sheet provided. I bit the bullet and painted one on. After that I added some final touches like the formation lights. After some additional weathering an wash it's about as done as it gets. Next step is to test run the engine and then wait for some decent weather for a maiden flight.
05-15-2022, 12:40 PM
#267
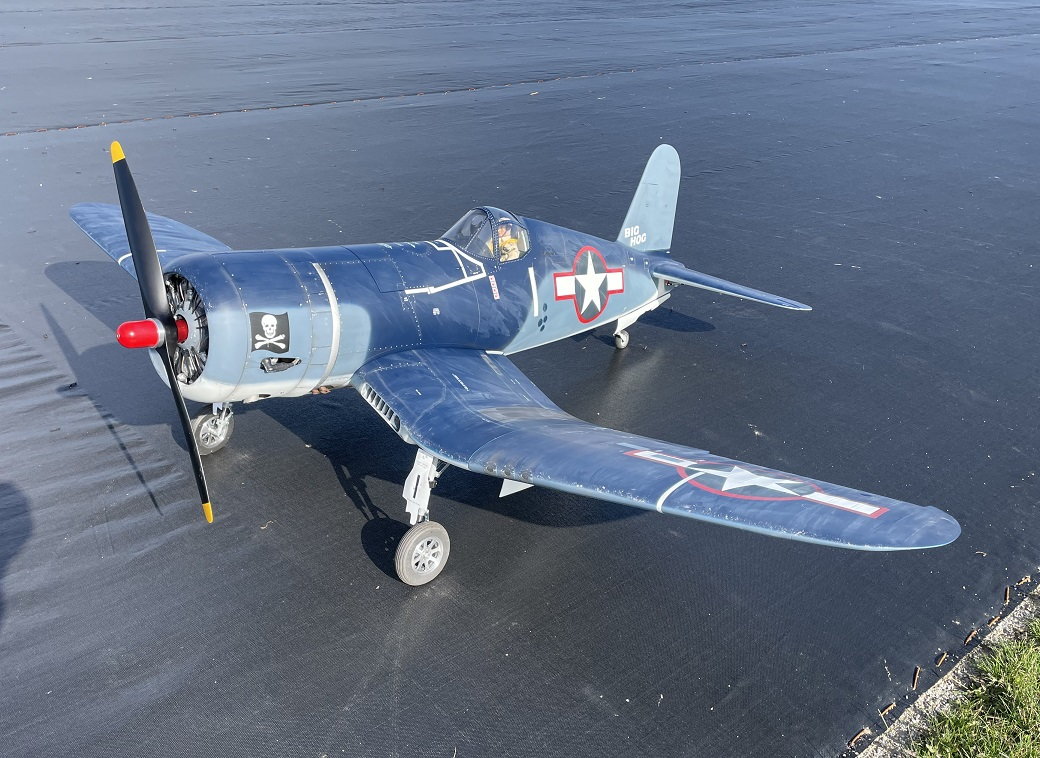
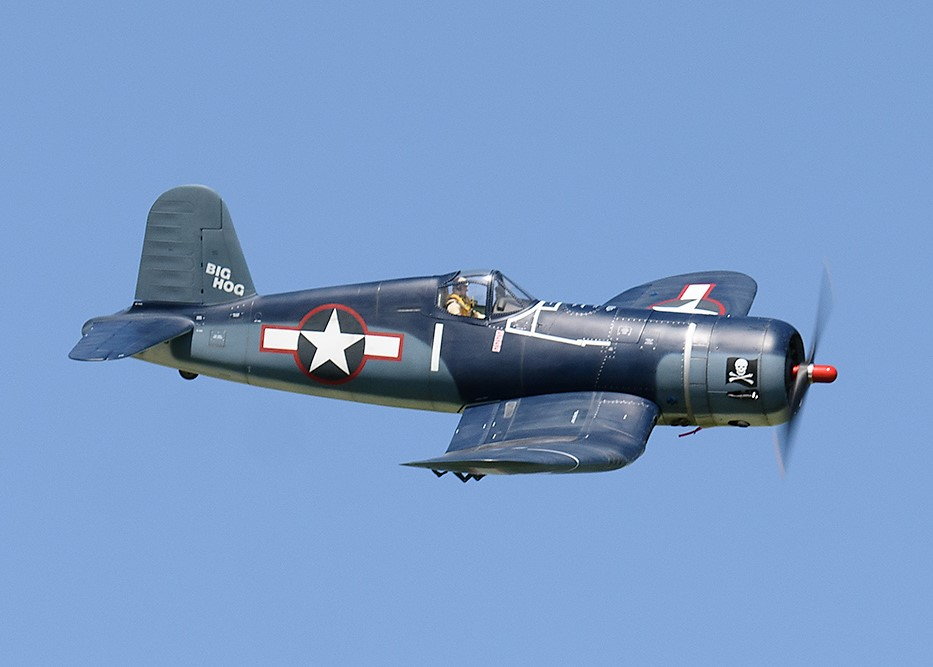
Had some decent weather so I was able to get the Corsair to the field for a maiden flight. It was a nice day with a bit of wind down the runway. The VVRC 120 started right up and seemed to be running good. The idle was a bit high, but I had it set last time it got hot, so I went ahead and left it as is. Started the takeoff roll into the wind, and the Corsair lifted off fairly early. It didn’t do anything exciting, so I just continued to feed in some power and took to the air. Soon after takeoff I noticed it needed quite a bit of down trim (explaining the early lift off). It didn’t need any aileron trim at all. Once I got it trimmed out I could fly around and see how it felt. The engine didn’t sound the greatest at lower throttle settings, running like it was a bit rich. If I ran it up over � throttle it cleared out. It is very fast and loud at those throttle settings though. I expect I won’t get so much prop noise when I put the 3-blade prop on it. I liked the way it handled, felt fairly quick on the sticks and didn’t really feel heavy in the air at all. Inverted flight took about the expected amount of down elevator to maintain, giving me indication that the CG was pretty good (used 5.5” with the gear down). I was pretty happy with the aileron and elevator rates, and the plane felt good as I flew around the pattern. I noticed the typical Corsair waggle on occasion, such as when I flew through some turbulence over the trees, but it didn’t bother me. I didn’t do any stall testing, not always a good idea with a new engine without much run time on it. I had some wind down the runway, so I put in a bit more than half flaps to come in. I settled nicely, and I was able to set down on the mains with no bounce. I was fast on landing since the idle speed was still quite high. As soon as I touched down I killed the engine so it would slow. It still ran off the end of the runway and went through a couple ruts, but the gear held up fine.
I leaned out the engine a bit and did a second flight. I also re-set the idle before takeoff to help with the landing. The second flight went fine, and I was able to get a better feel for the plane. Overall, I like the way it handles. Takeoff didn’t give me any problems; I was careful to feed in the power fairly slowly. The second landing there was a bit more wind and the Corsair floated a bit as it came in. It seems to fly plenty light and I don’t think I’ll have any problems with it at the current weight. I cut my flights early so I landed with quite a bit of fuel on board as well. My 40oz tank is a lot more than I will normally need but it provides good range when stuck in the air at a flying event. There’s really no way I’d fly it around at high throttle settings. It’s a rocket at anything over half throttle with the 120 on it. I don’t have the inflight photos yet, but some were taken.
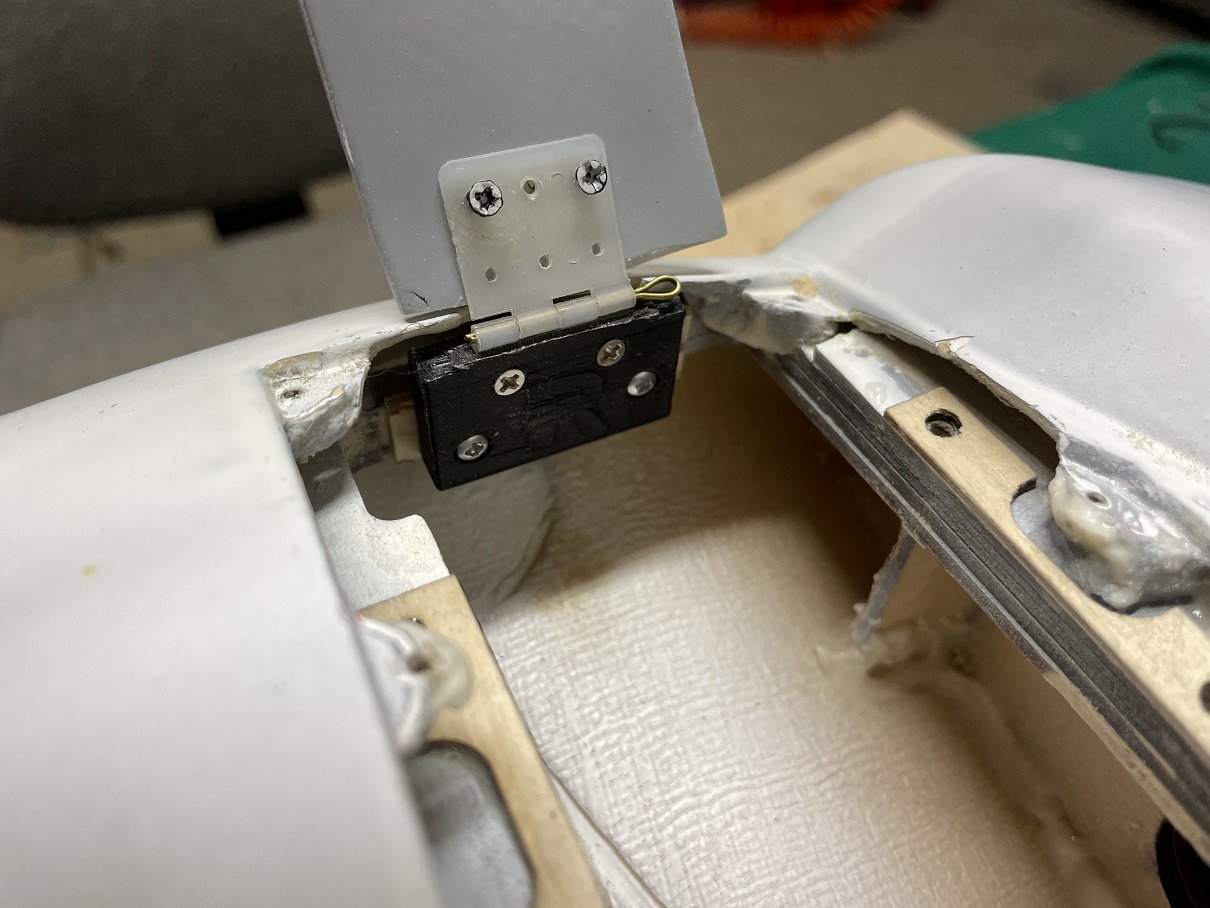
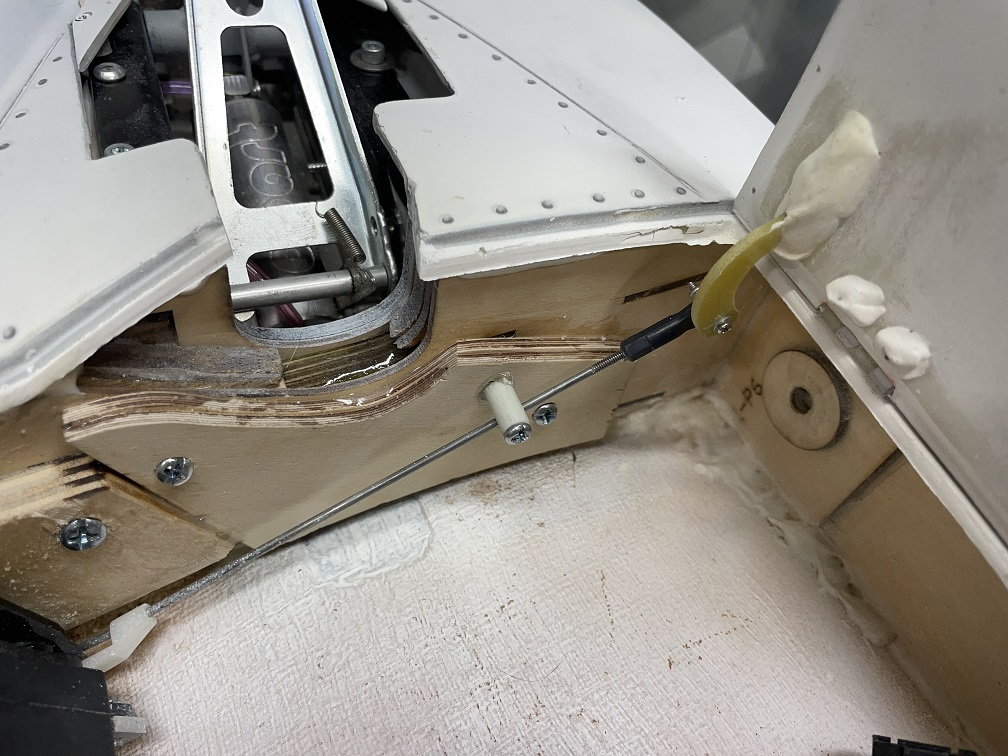
One issue I noticed was that the outer gear door could over extend. If that happens, the servo pushes it open farther instead of closed. I solved the issue by mounting a dowl that would stop the rod from moving far enough to over extend. See the photo.
Once I get it dialed in and have faith in the retracts I’ll run it with the 3-blade. Stay tuned for more photos and I’ll post if I find any more issues.
I leaned out the engine a bit and did a second flight. I also re-set the idle before takeoff to help with the landing. The second flight went fine, and I was able to get a better feel for the plane. Overall, I like the way it handles. Takeoff didn’t give me any problems; I was careful to feed in the power fairly slowly. The second landing there was a bit more wind and the Corsair floated a bit as it came in. It seems to fly plenty light and I don’t think I’ll have any problems with it at the current weight. I cut my flights early so I landed with quite a bit of fuel on board as well. My 40oz tank is a lot more than I will normally need but it provides good range when stuck in the air at a flying event. There’s really no way I’d fly it around at high throttle settings. It’s a rocket at anything over half throttle with the 120 on it. I don’t have the inflight photos yet, but some were taken.
One issue I noticed was that the outer gear door could over extend. If that happens, the servo pushes it open farther instead of closed. I solved the issue by mounting a dowl that would stop the rod from moving far enough to over extend. See the photo.
Once I get it dialed in and have faith in the retracts I’ll run it with the 3-blade. Stay tuned for more photos and I’ll post if I find any more issues.
The following users liked this post:
Killer_Matt (05-15-2022)


The following 2 users liked this post by Hot Rod Todd:
JRSmith (05-16-2022),
Killer_Matt (05-16-2022)

 06-19-2022, 01:45 PM
#274

My Feedback: (11)
Join Date: Sep 2002
Location: Shingle SpringsCA
Posts: 26
Likes: 0
Received 0 Likes
on
0 Posts
Looks awesome and glad to hear it's flying well. I maidened mine a couple months ago and will post some pics and video. I guess I need 10 post before the site will let me post those :-( I'll post some details, then should have enough to post the photos and video.
06-19-2022, 01:47 PM
#275
My Feedback: (11)
Join Date: Sep 2002
Location: Shingle SpringsCA
Posts: 26
Likes: 0
Received 0 Likes
on
0 Posts
My Corsair came out quite light at 36 lbs. That was after I added the wing center spar and 1/8" aluminum spar gussets in the gear wells. This is the first warbird I've not added any weight to the nose!