


B-29 SUPERFORTRESS BUILD
 07-07-2014, 07:38 PM
#251


 Ya, I've been told that before. I'm just concentrating on the top side. Problem is the aluminum paint I'm using shows every small scratch and imperfection like I was using gloss black. I let the bottom side slide, nobody gonna see the underneath that close

 07-20-2014, 06:17 PM
#253
Because I don't have a proper paint both and equipment for spraying latex or automotive paints, I just decided to use standard rustoleum 7715 aluminum rattle can paint. I was going to use the chrome which produced a very nice glossy aluminum look, but I like the more satin sheen the aluminum color produces. I'm just going to paint the fuse in sections and create the panel lines where the full scale would have been assembled in sections. Here's the first coat on the outer wings and center section. One does have to be careful when spraying this stuff as it comes out of the can heavy. But it also settles in well without any orange peel and over spray. Once it is fully dried and cured. There shouldn't be a need for a clear coat. Not running slimmers on it.


Last edited by Warbird Man; 07-20-2014 at 06:41 PM.

 11-11-2015, 07:24 AM
#256
Junior Member
Hello, I know this is an older thread but the model looks great. I recently acquired a B-29 model which resembles yours but was built by home made plans. The original builder passed away but his son told me that he had success with other planes he had built from his own plans. I have several questions, but one of the biggest challenges is that he built it with a non-removable wing. I removed the wing sheeting and found that he had the ailerons and flaps operated by cables that were not intact. I am thinking about changing those to wing mounted servos. I am not sure how and where to separate the wing. I saw the one on the thread is in three parts. Due to it already being built together should I make it so that the wing tips come off at the outside engines to allow for easier transport or at the fuselage. Right now it is a beast to transport and won't fit into the workshop.
Thanks for any suggestions.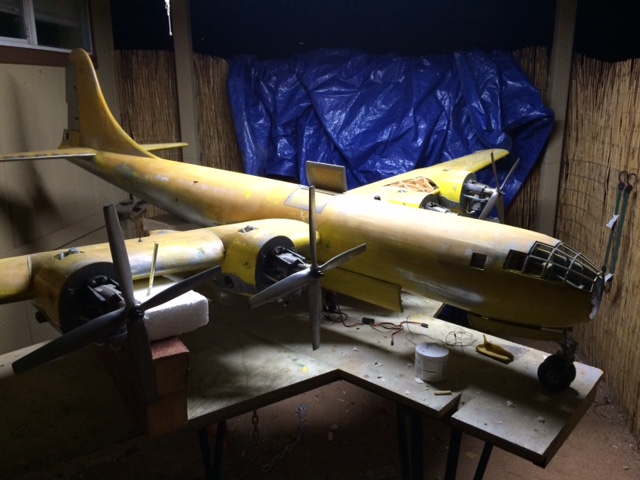

Thanks for any suggestions.
Last edited by jswan520; 11-11-2015 at 07:25 AM. Reason: typo
11-11-2015, 10:41 AM
#258
Junior Member
The wing span is 12 feet. I do have access through the top as well as the bomb bays and one other hatch on the bottom. It is not easy to turn over alone so it is a challenge to get underneath when it is right side up. 
11-11-2015, 01:18 PM
#259

wow!
Looks like quite the beast, and one gets the impression it's pretty well-built
Don Smith's smaller 29 is 141", so ya gotta wonder if it was built off that plan set
Yes, make servo boxes and power the ailerons and flaps directly
Yes, figure out a way to cut the wings off just outside the outer nacelles and make sure the re-connectors are strong: aluminum tubes or bars. This may require some cutting into the wings top or bottom, but handling a single piece 29 wing is just too much and too floppy: things will get broken.. With the tips disattached, the center section is an easy one-man carry and my Don Smith all fits in the back of my SUV on a PVC rack
Are those inverted 4-strokes? DON'T! You'll spend all your time time trying to tune them and never fly it
I can send you pictures of mine if you want
It is a real sweetheart to fly: >8 yrs old and >20 flights this summer
I might be worth it to pay for a set of Don Smith 141" plans. Do a real compulsive job of checking the wing and engine and stab incidences and especially the washouts to make sure it behaves at low speed
Believe me! It's a real stable flyer and there usually aren't many of them, even at large meets, so you'll garner some attention
11-11-2015, 03:21 PM
#261
Junior Member
Thank you for the info. I am in over my head on this project so I appreciate all the info available. I will look for some plans. There are many similarities from what I can see from the pics of the other build. I am amazed by some of the things he did and question why he made some other choices. The only reason I can think that he built it as one piece is that he was a fan of cables for the ailerons. His son told me he was very stubborn and would often get mad when the guys at the hobby store made recommendations.
Just to clarify, you recommend having the wing separate at the outer side of the outboard engines and leave the center connected to the fuselage? That makes sense to me because I am worried about keeping the structural rigidity with the landing gear and engines. Thanks for the info about the engines being inverted. They have compression but I have not started them up yet to check on how they run. Did you fiberglass and paint yours or did you use covering for yours.
Thanks for all of the info!!
11-11-2015, 04:25 PM
#262
Oh, gosh!
The center wing and the fuse are built together?
Unless you have a really wide trailer, that's a tough transport
And cutting them apart and designing the dowels and bolts to put it back together is gonna be a SamParfitt-level job
Might be easier to build a runway behind your house!
The fuse and centerwing come apart on mine, a process somewhat simplified and shortened by separate air tanks and the multi-clip servo wire hold shown here
My wing sits on the foam padded floor and the PVC rack suspends the fuse above it. Wing tips are easy to stow away and weigh very little
I didn't build this plane: I bought from Dwayne, the Big Cahuna of bomber builders in these parts, and rehabbed it. He has built 3-5 of these and is a bottomless well of knowledge and experience, but would never get on RCU or email with strangers. The plane is entirely balsa-planked, then covered with thin glass and spray-painted.
I can't see where you're from, but it would almost be worth a trip to show him the plane and ask his advice


The fuse adds nothing to the structural integrity of the wing. The biggest potential weak spot of the center wing is where the wheel-wells are cut out of the main wing spars and there is a lot of auxiliary bracing around those points
The center wing and the fuse are built together?
Unless you have a really wide trailer, that's a tough transport
And cutting them apart and designing the dowels and bolts to put it back together is gonna be a SamParfitt-level job
Might be easier to build a runway behind your house!
The fuse and centerwing come apart on mine, a process somewhat simplified and shortened by separate air tanks and the multi-clip servo wire hold shown here
My wing sits on the foam padded floor and the PVC rack suspends the fuse above it. Wing tips are easy to stow away and weigh very little
I didn't build this plane: I bought from Dwayne, the Big Cahuna of bomber builders in these parts, and rehabbed it. He has built 3-5 of these and is a bottomless well of knowledge and experience, but would never get on RCU or email with strangers. The plane is entirely balsa-planked, then covered with thin glass and spray-painted.
I can't see where you're from, but it would almost be worth a trip to show him the plane and ask his advice
The fuse adds nothing to the structural integrity of the wing. The biggest potential weak spot of the center wing is where the wheel-wells are cut out of the main wing spars and there is a lot of auxiliary bracing around those points
Last edited by kram; 11-11-2015 at 04:48 PM.
11-11-2015, 05:02 PM
#265
Junior Member
A runway would be nice. Luckily there is a field not far (three miles) from my house that hosts the Tucson Aerobatic Shootout and several smaller events with a beautiful runway and lots of open desert around it.
The plane was all built as one piece. He even built a table to accommodate it. To transport it we put it on a flat bed and drove very slowly.
The engines are going to be a pain. He built his own mufflers and have those running through the nacelles and out. He has each engine with its own fuel tank behind it. The props that he had are Master Airscrew 16X6. He has another set that appear to be about 1 inch smaller but are not marked. The planes I have seen videos of appear to all have two bladed props.
I am located in Tucson, AZ but usually drive up to Minneapolis every summer so maybe we can meet up as I drive through Ames so that I can check out your plane when I am passing through. I did find some plans and will be ordering them tonight.
Thanks again for all of your info!
11-12-2015, 10:39 AM
#267
Wow, You've got a big problem on your hands.
If you go through this thread you should be able to see some of the plans and where the wing is separated in 3 sections. The original design has the outer wing panels separated from the center section at the ailerons. I modified them to separate between the nacelles so I could leave the center section attached to the fuse. That was so I could keep the plane on its gear and roll it in and out of the trailer and also fit through the trailer doors.
In your particular case (and this is just a suggestion) I think I would leave the wing in one piece and separate it from the fuse and do some rework as to bolting the two together. To add a wing tube into a wing that is already built is going to require some major surgery. Not that it can't be done, but I would be concerned about the structural integrity and the time spent in order to do so. If you do decide to make a 3 piece wing out of it, I think I'd separate it at the outer wing panels and not mess with any of the nacelle areas. As stated earlier, the weakest part of that wing is at the main gear nacelle. And as big as the plane is, there is not a whole lot of room in those wings for it all.
Last edited by Warbird Man; 11-12-2015 at 10:41 AM.
11-12-2015, 11:11 AM
#268
As far as my build goes, Yes I'm still working on it. I apologize to those following the thread. This project has been put on the back burner more times than I wanted. But job changes, long hours, other projects, health and family problems have all taken their toll on build time for this project. I do intend on finishing it as it is literally all over my shop in pieces. I decided to put a clear coat on it so I am in the process of clear coating all the parts and then I'll be able to finally assemble the plane for the last time. I just hadn't anything to post for a while of any significance.
The 8' fuse was a bit of a challenge to paint. I had to suspend the whole thing from the bench and ceiling. I mounted temporary dowel pins in the front and back of the fuse so I could rotate it in the brackets.


The 8' fuse was a bit of a challenge to paint. I had to suspend the whole thing from the bench and ceiling. I mounted temporary dowel pins in the front and back of the fuse so I could rotate it in the brackets.
Last edited by Warbird Man; 11-13-2015 at 11:07 AM.
11-14-2015, 06:44 AM
#269
Junior Member
Thank you for the info Warbird Man. I ordered some plans to see if I can see about separating it at the fuselage. Your plane looks great so far and I appreciate being able to read through the forum to see how the build has been going.
01-31-2016, 12:05 PM
#270
Well I"m finally assembling this plane for the last time. All the parts are painted and I'm now installing all the radio controls and pneumatic systems. Setting up all this stuff in an organized fashion and testing it all will take some time. I'm going with a Spektrum AR12110 power safe RX. That should cover all the needs of controlling this beast.


Last edited by Warbird Man; 01-31-2016 at 12:20 PM.
05-20-2016, 08:49 AM
#272
The painting went ok, I don't recommend using a rattle can on a model this big though. I had a bit of trouble trying to get the center section painted evenly as its just to wide of an area. I would definitely use a paint gun and probably a auto base coat-clear coat next time around. Unfortunately I'm just not set up with that kind of equipment anymore.
I work on this thing a little bit here and there when I can, Unfortunately I work too many hours with my current job and I just don't have much free time for hobbies anymore. Of course that really sucks.
I work on this thing a little bit here and there when I can, Unfortunately I work too many hours with my current job and I just don't have much free time for hobbies anymore. Of course that really sucks.
05-20-2016, 09:56 AM
#273
Ditto! Sucks not finding the time to work on our birds. Right now I have 5 planes in various states of build, before I can get back to finishing my P-51. Then I have two more kits in the wings, a P-61 and B-25. SO I know what you mean!
Since I have 2 1/2 hours of driving every day, at least the builds are getting done...in my head.
Since I have 2 1/2 hours of driving every day, at least the builds are getting done...in my head.
