


Bernard Dumas' Canadair CL-215


 10-01-2007, 12:11 PM
#252

Thread Starter

Join Date: Jan 2005
Location: Vlodrop, The Netherlands
Posts: 385
Likes: 0
Received 1 Like
on
1 Post
I've been priming, filling and sanding for the last few days... as usual when it comes to finishing something!
Primer coat:
First very heavy filler coat:
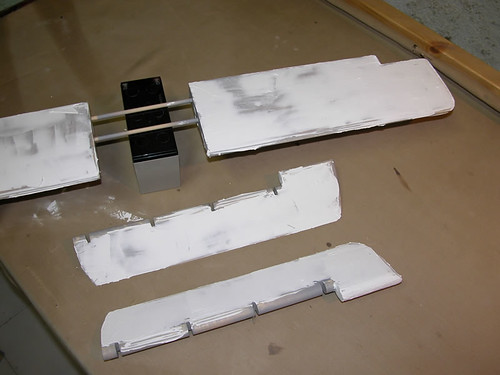
The filler I use sands like a dream:
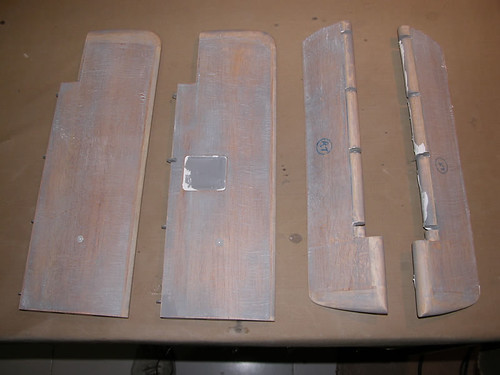
And so on... nothing special about it as you all know...
I'm pretty decided about my painting scheme... I'm looking for something totally different from the well-known yellow&red or yellow&blue or white&blue or yellow&black...
What do you think??
Primer coat:
First very heavy filler coat:
The filler I use sands like a dream:
And so on... nothing special about it as you all know...
I'm pretty decided about my painting scheme... I'm looking for something totally different from the well-known yellow&red or yellow&blue or white&blue or yellow&black...
What do you think??
10-03-2007, 08:34 AM
#253
Junior Member
Join Date: May 2007
Location: Owen Sound,
ON, CANADA
Posts: 5
Likes: 0
Received 0 Likes
on
0 Posts
Hi, I just found your thread a couple of days ago while looking for hinging info for the 72" electric version of the CL-415 (plans by RT Models) that I am currently building. It has taken me a couple of days to read through and absorb all the great build photos. Great job. Thanks for the info. on the elevator and rudder hinging, I will try to adapt to my smaller model.
Are you planning to do the same for the ailerons, and how are you going to hinge the flaps? I want to do something more scale like than no flaps shown on my plans.
Any help would be appreciated.
Ken
Are you planning to do the same for the ailerons, and how are you going to hinge the flaps? I want to do something more scale like than no flaps shown on my plans.
Any help would be appreciated.
Ken
10-03-2007, 09:48 AM
#254
Thread Starter
Join Date: Jan 2005
Location: Vlodrop, The Netherlands
Posts: 385
Likes: 0
Received 1 Like
on
1 Post
Hi Ken and thank you for stopping by!
Yes I'll use the same hinging technique for the rudder and the ailerons.
The flaps will be hinged exactly as the real ones and I'll use the large V-shaped hinges you see on the wing bottom. Those hinges are drawn on Bernard's plans so you may take a look at them and you can scale everything down.
http://bernard.dumas.chez-alice.fr/Plans.htm
If you need any other info please let me know, I'll be glad to help you!
10-03-2007, 03:22 PM
#255
Thread Starter
Join Date: Jan 2005
Location: Vlodrop, The Netherlands
Posts: 385
Likes: 0
Received 1 Like
on
1 Post
One more thing. I first discovered this tech on MAN (July 2003 under Scale Techniques by Vance Mosher) and the following are some basic guidelines given in the article.
For small models the gudgeons can be made of 1/16" ply; use 1/8" ply for larger models. For a very large, giant-scale model, you should use 1/4" ply gudgeons, and they should be inset into the fixed surface- not butt- glued to it.
As a personal preference, I do always inset them regardless of their size.
In the control surface use a yellow (inner) Nyrod tube with a 1/16" ID; it is strong enough for models with engines up to 2ci. For smaller models, a 1/32" ID tube would be strong enough, and in giant-scale models, a 3/32" ID tube should be used.
Make sure that the spacer sheet is thick enough to ensure that the structural spar is far enough behind the hinge line to allow room for the rear edges of the hinge supports. This is usually about 1/8" for small models and 1/4" for models .40 size and larger.
HTH,
 10-05-2007, 09:27 AM
#258
Thread Starter
Join Date: Jan 2005
Location: Vlodrop, The Netherlands
Posts: 385
Likes: 0
Received 1 Like
on
1 Post
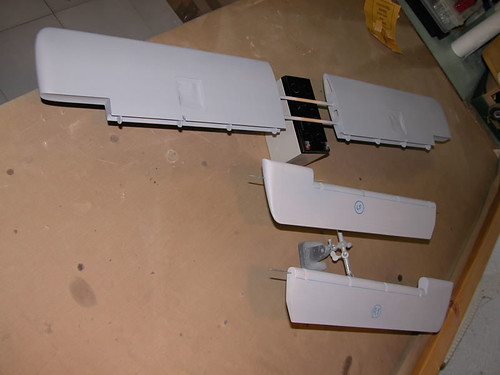
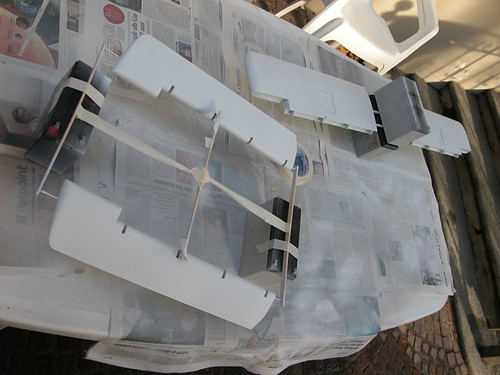
I was pretty satisfied with the 'primer state' of the stab halves so I put them back together and aside until I have the rudder finished. I will detail and prepare every part for painting at the same time.
I'll be away until mid October.
I'll be away until mid October.
10-24-2007, 05:43 AM
#259
Thread Starter
Join Date: Jan 2005
Location: Vlodrop, The Netherlands
Posts: 385
Likes: 0
Received 1 Like
on
1 Post
Ok, I'm back. It isn't a real update but I just wanted you to know I got back to the project.
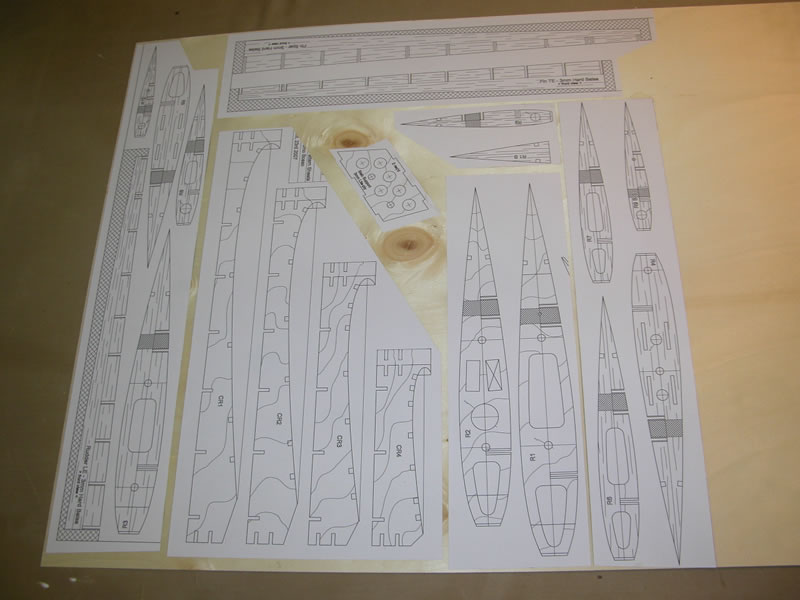
Fin & Rudder
I finished drawing the plans and I got them printed. I tried to keep in mind what I learned while developing the stab plans... we will see...
Here's a pic of the plans:
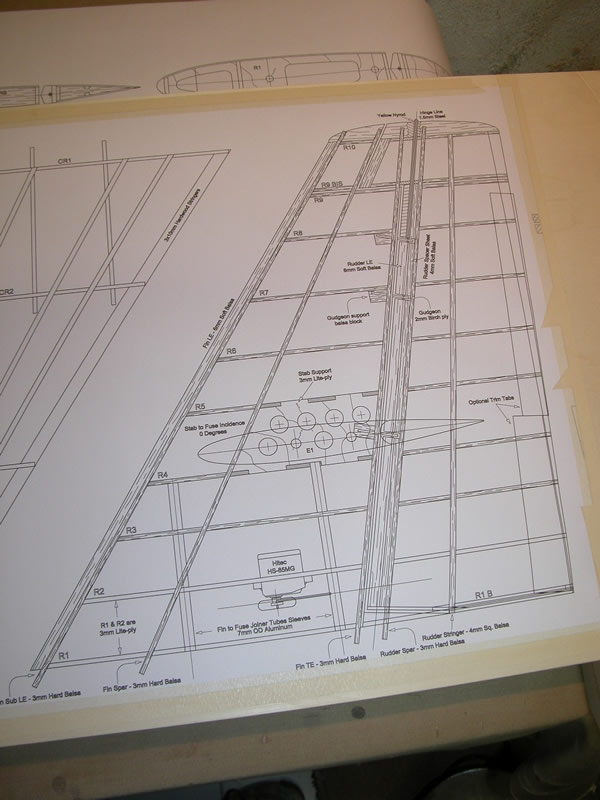
The only step I went through so far consisted in transferring templates to the lite-ply sheet... more to follow in the next days!
Another matter. I got a quote from Darrell @ Sierra Precision for the main gear: the quote for a single unit is well beyond my budget due to CNC setup costs; if someone IS interested in the gear please let me know as it would help to size prices down.
I know it will be really hard to find someone else but I try.
Please keep in mind that these plans are free and I'm working on them to get them even better. I do understand that they are not by a well-known and estabilished designer but they're still worth a look and... a model!
I didn't see many 215s with a working main gear: having it machined by such a craftsman Darrell is may help getting more modelers involved in this subject.
Enough said, stay tuned for future updates!
Fin & Rudder
I finished drawing the plans and I got them printed. I tried to keep in mind what I learned while developing the stab plans... we will see...
Here's a pic of the plans:
The only step I went through so far consisted in transferring templates to the lite-ply sheet... more to follow in the next days!
Another matter. I got a quote from Darrell @ Sierra Precision for the main gear: the quote for a single unit is well beyond my budget due to CNC setup costs; if someone IS interested in the gear please let me know as it would help to size prices down.
I know it will be really hard to find someone else but I try.
Please keep in mind that these plans are free and I'm working on them to get them even better. I do understand that they are not by a well-known and estabilished designer but they're still worth a look and... a model!
I didn't see many 215s with a working main gear: having it machined by such a craftsman Darrell is may help getting more modelers involved in this subject.
Enough said, stay tuned for future updates!
10-24-2007, 09:08 AM
#260
Senior Member
Join Date: Oct 2002
Location: La Sarre, QC, CANADA
Posts: 226
Likes: 0
Received 0 Likes
on
0 Posts
What are the wing span of your model ? My CL-415 have 80" (2032m) and it's the same gear than the CL-215. I sold for my kit a pre-machined kit of the main gear. May be it's can help you ! You can find more info on my website or contact me directly and I can send some pics. I'm not at home now so I can't post a pics for now.. [ ]
]
www.mraerodesign.com
]www.mraerodesign.com
10-31-2007, 12:41 PM
#262
Thread Starter
Join Date: Jan 2005
Location: Vlodrop, The Netherlands
Posts: 385
Likes: 0
Received 1 Like
on
1 Post
Ok, I lied... no wood work at all but A LOT of CAD done.
After finishing the Fin & Rudder Plans I felt in a particular CAD-mood and I decided to move on and do the wing plans as well. Done that it will be a simple matter of putting everything together on the building board.
It took me several days to get to this point due to the many choices available and to the physical drawing time required.
The wing share a common structure with the Stab and the Rudder: sub-le and offset scale hinging are used throughout the plans as you may have already noticed.
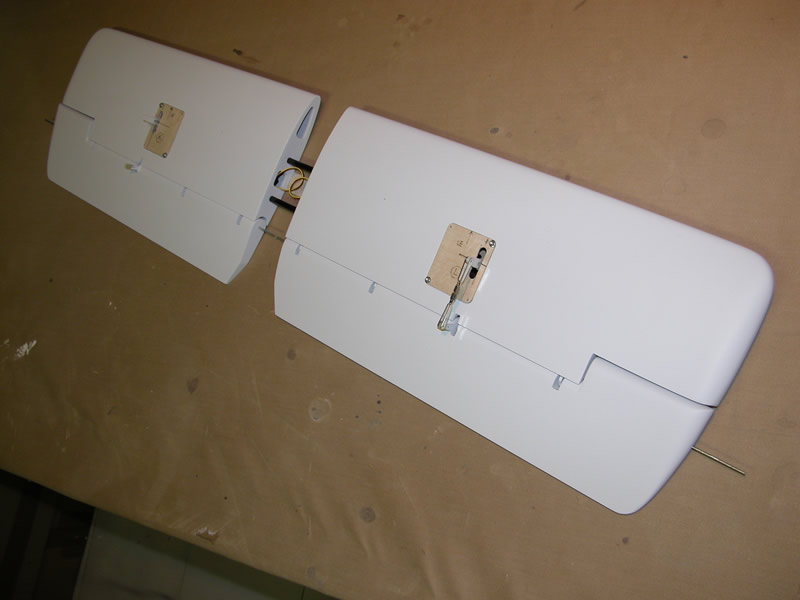
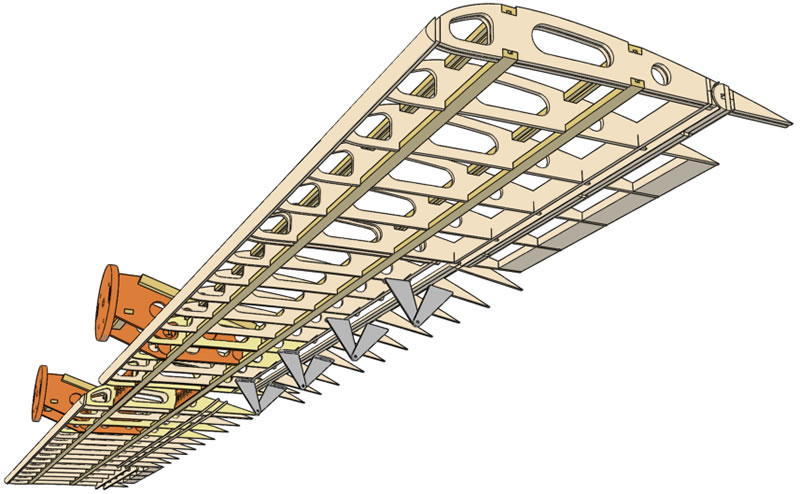
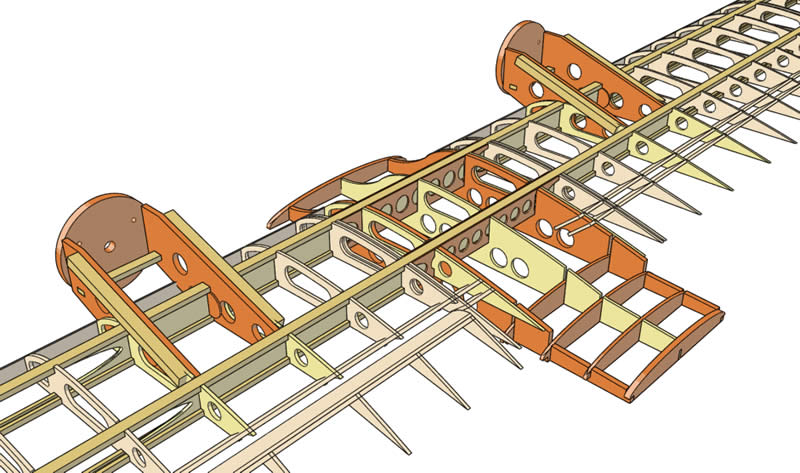
The key elements for the wing structural integrity are its spars: the wing features 2 of them (as per Bernard design) and they are 'divided' into 3 separate sections.
The central section consists of the lower and upper spruce sticks joined to the lite-ply vertical member: everything is then doubled on the outside with thin birch ply.
The inner section ends outboard of the engine mounts and features all the previous elements but the doublers.
The outer section consists of the spruce sticks only.
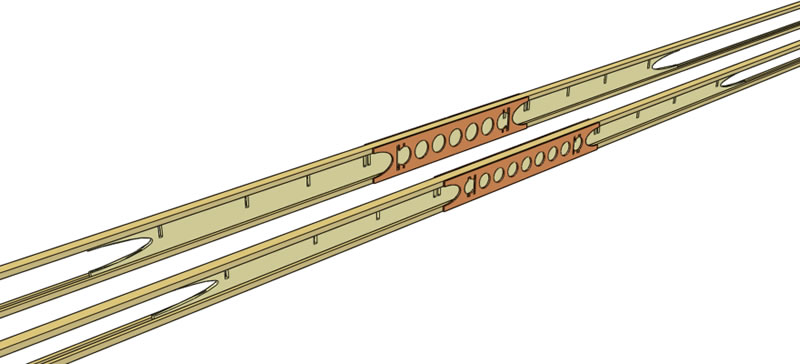
So there are 3 groups of ribs: inner w/ flaps, outer w/ flaps and outer w/ ailerons.
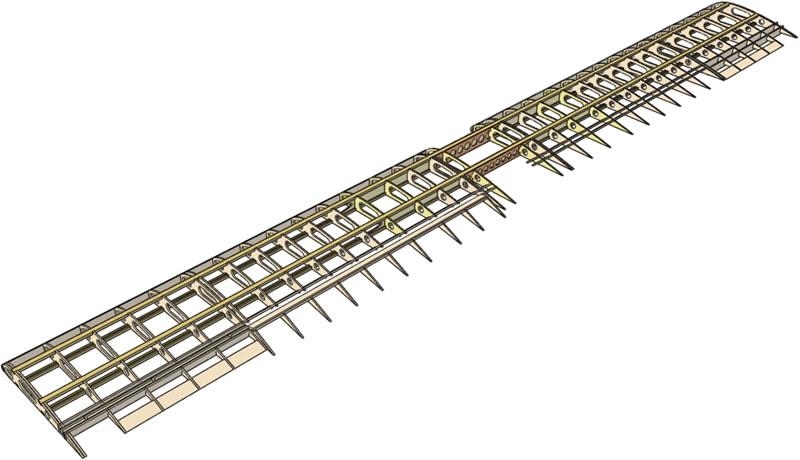
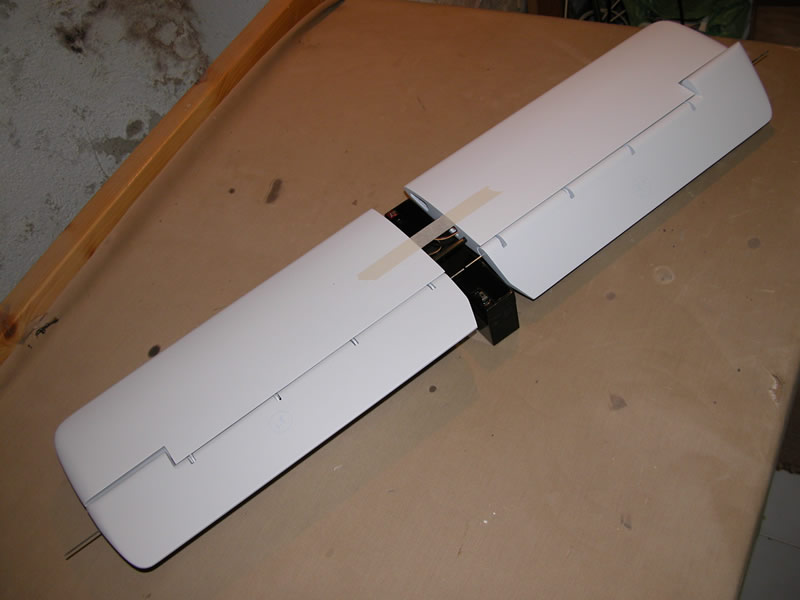
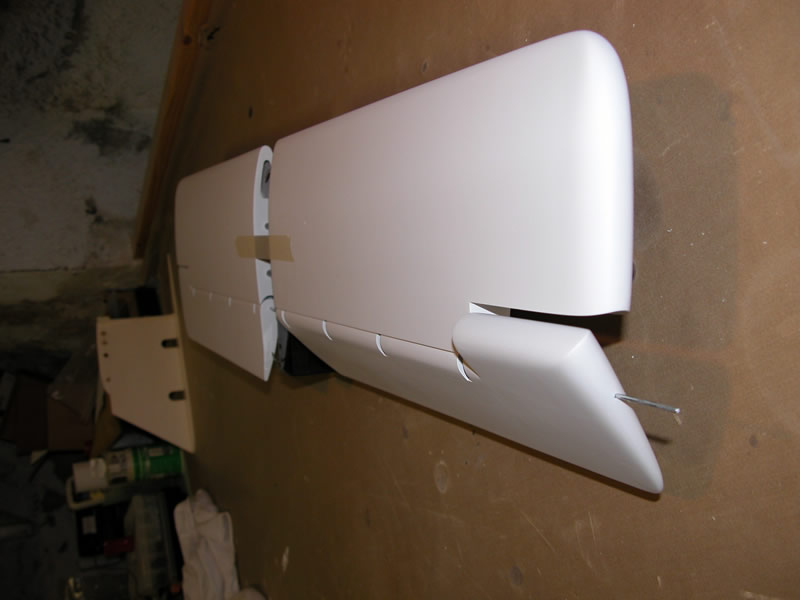
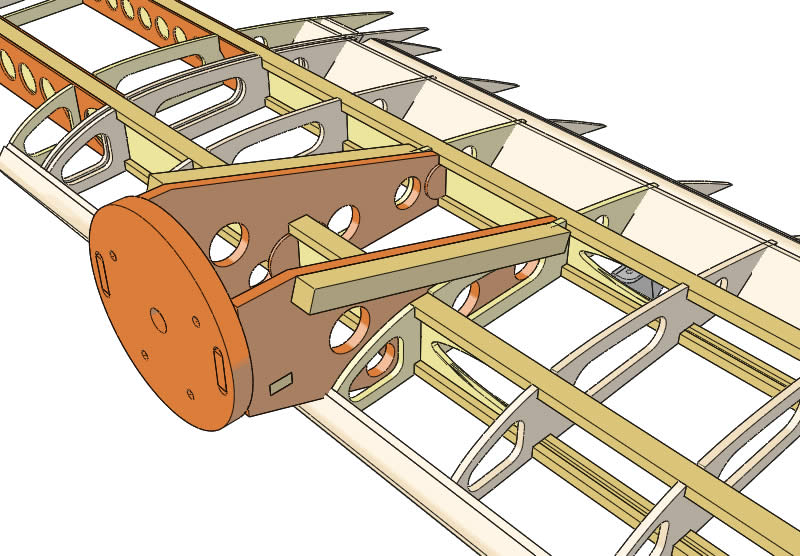
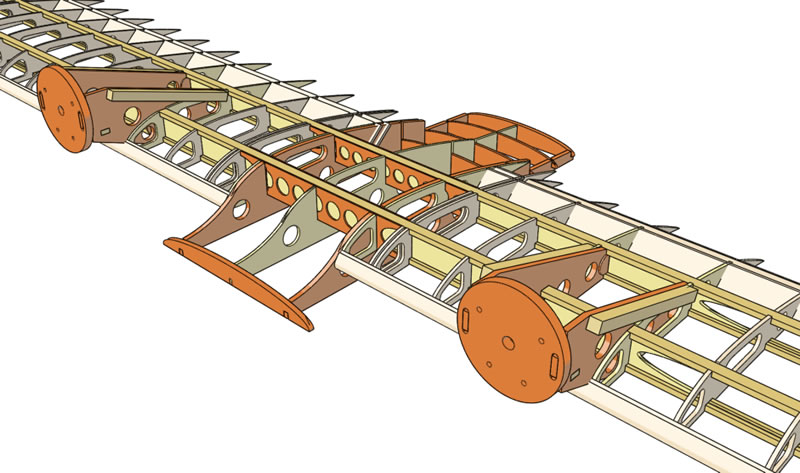
The wing is built over the plans and the engine supports are added later on (once the shetting is done):
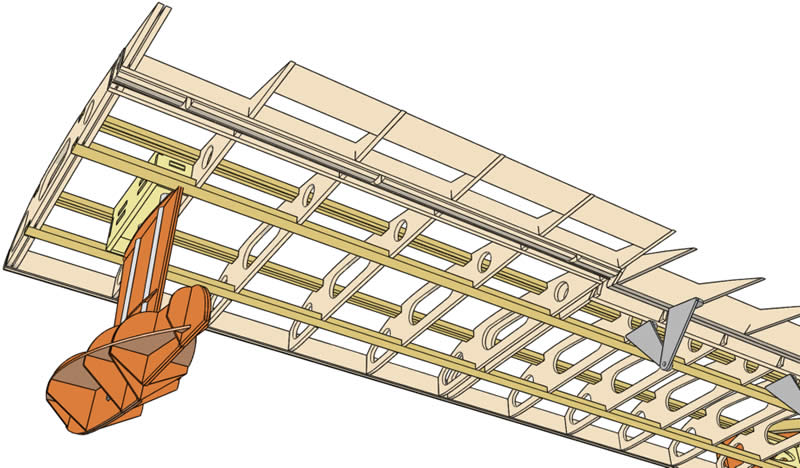
A shot from below shows the flap hinges: actually the 'flap' is deflected to its maximum @ 10 deg. in the pic:
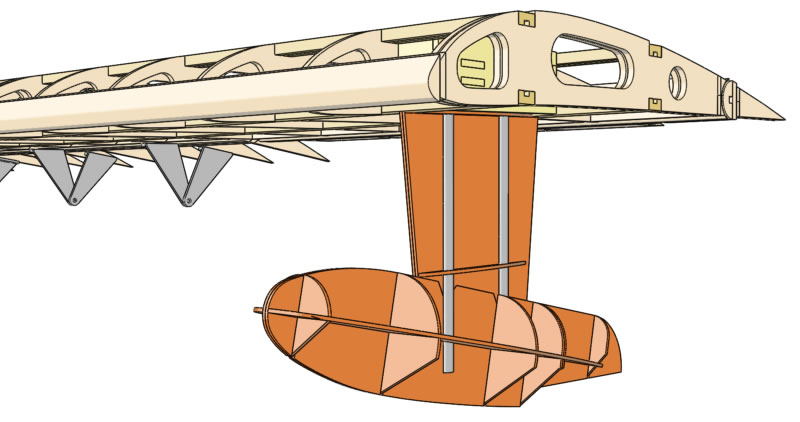
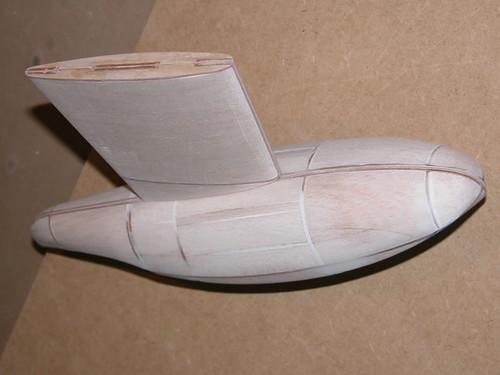
And here is the tip float, not the actual one but the wood frame that will be filled with foam, sanded and used as a plug for the f/g mold:

After finishing the Fin & Rudder Plans I felt in a particular CAD-mood and I decided to move on and do the wing plans as well. Done that it will be a simple matter of putting everything together on the building board.
It took me several days to get to this point due to the many choices available and to the physical drawing time required.
The wing share a common structure with the Stab and the Rudder: sub-le and offset scale hinging are used throughout the plans as you may have already noticed.
The key elements for the wing structural integrity are its spars: the wing features 2 of them (as per Bernard design) and they are 'divided' into 3 separate sections.
The central section consists of the lower and upper spruce sticks joined to the lite-ply vertical member: everything is then doubled on the outside with thin birch ply.
The inner section ends outboard of the engine mounts and features all the previous elements but the doublers.
The outer section consists of the spruce sticks only.
So there are 3 groups of ribs: inner w/ flaps, outer w/ flaps and outer w/ ailerons.
The wing is built over the plans and the engine supports are added later on (once the shetting is done):
A shot from below shows the flap hinges: actually the 'flap' is deflected to its maximum @ 10 deg. in the pic:
And here is the tip float, not the actual one but the wood frame that will be filled with foam, sanded and used as a plug for the f/g mold:
10-31-2007, 12:49 PM
#263
Thread Starter
Join Date: Jan 2005
Location: Vlodrop, The Netherlands
Posts: 385
Likes: 0
Received 1 Like
on
1 Post
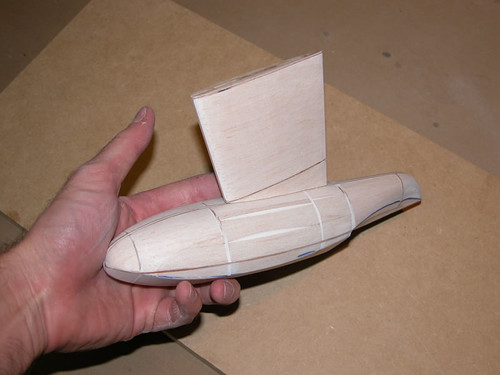
Some other shots of the tip float:
The center section joins the wing to the fuse and it will be added as the wing is finished: it represents an area to be further explored, many things still lies in the unknown down there...

I'm really cooked right know... I almost see things in their wireframe... I'd better do something else...
One last thing: I opted for dual RCV-60SP so they'll fit inside the cowls and swing larger 3-bladed props... any advise?
The center section joins the wing to the fuse and it will be added as the wing is finished: it represents an area to be further explored, many things still lies in the unknown down there...
I'm really cooked right know... I almost see things in their wireframe... I'd better do something else...
One last thing: I opted for dual RCV-60SP so they'll fit inside the cowls and swing larger 3-bladed props... any advise?
11-01-2007, 11:41 AM
#266
Beautiful artwork! I surely wish I was able to do CAD.
Again, not a 215 but interesting photos anyway of the 415 refreshing its water during the recent Southern California wildfires:
http://www.canyoncrosswinds.com/imag...oper/index.htm
Again, not a 215 but interesting photos anyway of the 415 refreshing its water during the recent Southern California wildfires:
http://www.canyoncrosswinds.com/imag...oper/index.htm
11-01-2007, 03:00 PM
#267
Senior Member
Join Date: Mar 2007
Location: Thessaloniki, , GREECE
Posts: 180
Likes: 0
Received 0 Likes
on
0 Posts
wow...your work is fascinating , .......I must..... close my mouth now....[X(]
I made the floats from balsa block...
11-02-2007, 05:22 AM
#268
Thread Starter
Join Date: Jan 2005
Location: Vlodrop, The Netherlands
Posts: 385
Likes: 0
Received 1 Like
on
1 Post
Thank you for your appreciation Tom and George. Your floats look really nice! Good work!
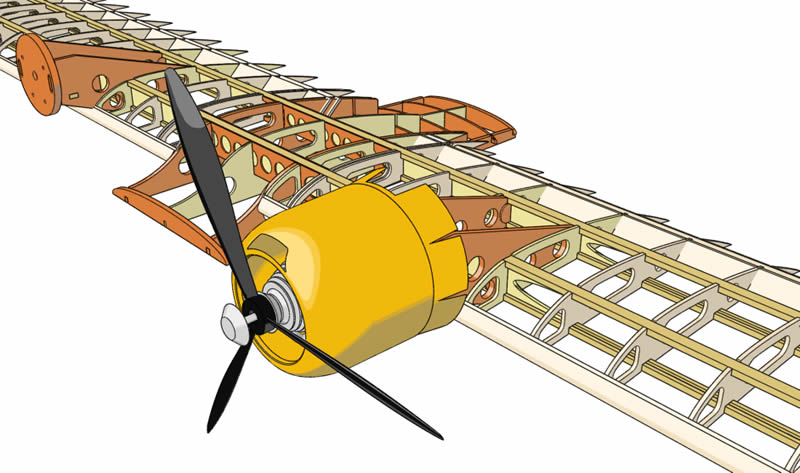
I drew a few more 'parts' for my CAD mock-up: these include the RCV-60SP engine I plan to use, the f/g cowl and the APC 13.4x13.5 3-bladed prop.
Here is the cowled SP60:
Uncowled front view:
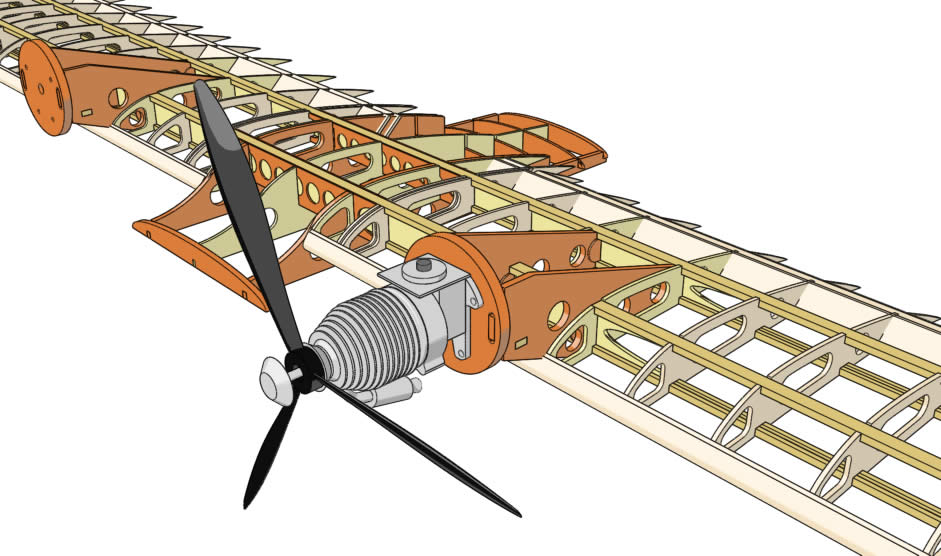
Uncowled rear view:
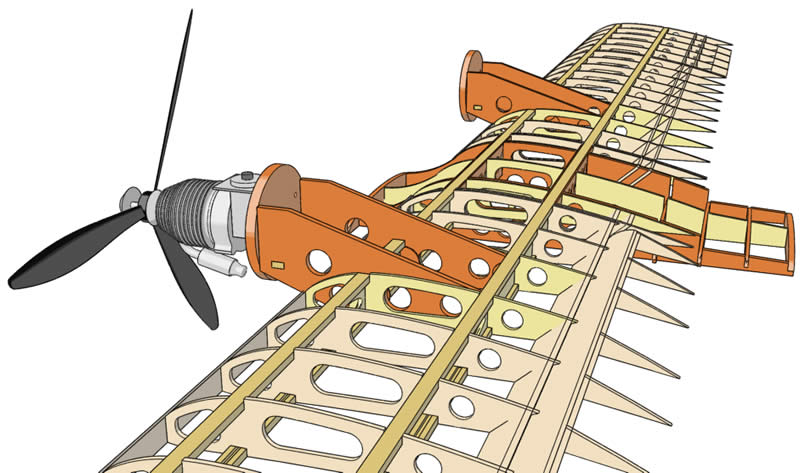
The RCV was drawn according to the dimensions and drawings I found on their site: it isn't the ultimate SP60 CAD model but it helps to figure out how it deals with its 'surroundings'.
All the vital infos such as the firewall hole pattern, length from firewall to spinner backplate are true to RCV drawings.
As you can see from the last pic, the SP60 fits nicely inide the cowl and there's a lot of outlet area between the cowl and the firewall:
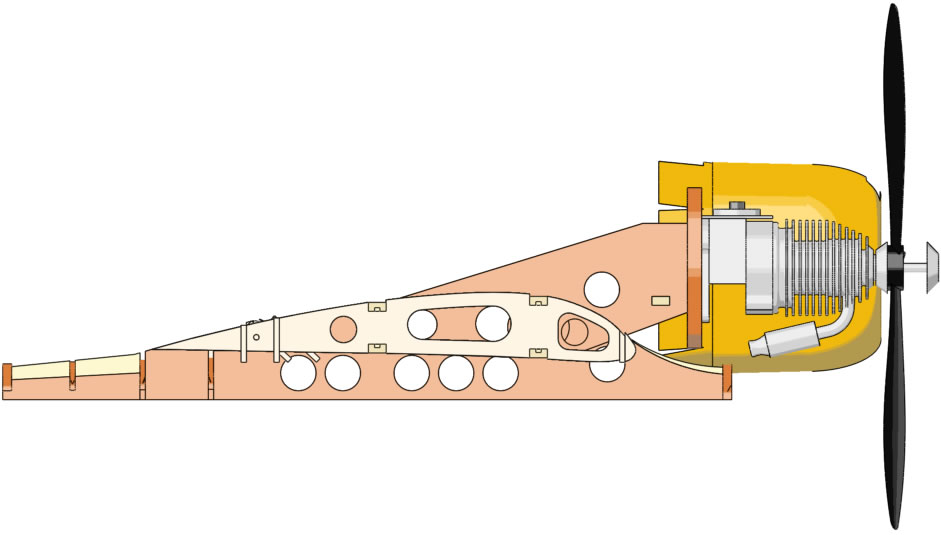
Another nice feature is that it flips larger multi-bladed props!
I drew a few more 'parts' for my CAD mock-up: these include the RCV-60SP engine I plan to use, the f/g cowl and the APC 13.4x13.5 3-bladed prop.
Here is the cowled SP60:
Uncowled front view:
Uncowled rear view:
The RCV was drawn according to the dimensions and drawings I found on their site: it isn't the ultimate SP60 CAD model but it helps to figure out how it deals with its 'surroundings'.
All the vital infos such as the firewall hole pattern, length from firewall to spinner backplate are true to RCV drawings.
As you can see from the last pic, the SP60 fits nicely inide the cowl and there's a lot of outlet area between the cowl and the firewall:
Another nice feature is that it flips larger multi-bladed props!
11-02-2007, 05:30 AM
#269
Thread Starter
Join Date: Jan 2005
Location: Vlodrop, The Netherlands
Posts: 385
Likes: 0
Received 1 Like
on
1 Post
I have a few questions:
- George, did you build the wing in one piece? is it a pain to deal with or is it manageable?
- I see from the original Bernard plans that the RIGHT engine has 2° of both right-thrust and up thrust: what about the LEFT engine? The original plans do not include left wing panel.
Thank you,
- George, did you build the wing in one piece? is it a pain to deal with or is it manageable?
- I see from the original Bernard plans that the RIGHT engine has 2° of both right-thrust and up thrust: what about the LEFT engine? The original plans do not include left wing panel.
Thank you,
11-03-2007, 04:51 AM
#270
Senior Member
Join Date: Mar 2007
Location: Thessaloniki, , GREECE
Posts: 180
Likes: 0
Received 0 Likes
on
0 Posts
ORIGINAL: g_boxwood
- George, did you build the wing in one piece? is it a pain to deal with or is it manageable?
- I see from the original Bernard plans that the RIGHT engine has 2° of both right-thrust and up thrust: what about the LEFT engine? The original plans do not include left wing panel.
- George, did you build the wing in one piece? is it a pain to deal with or is it manageable?
- I see from the original Bernard plans that the RIGHT engine has 2° of both right-thrust and up thrust: what about the LEFT engine? The original plans do not include left wing panel.
Yes I build it in one piece, and it was not trouble at all . The only problem ..I think ..is the length of the wing . It was much more
difficult for me to build the tail/fin, than the wing.
You're right about the plans ,but always i had in mind to place the same tune-up for both engines.
11-03-2007, 09:14 AM
#271
Thread Starter
Join Date: Jan 2005
Location: Vlodrop, The Netherlands
Posts: 385
Likes: 0
Received 1 Like
on
1 Post
Thank you George. Building the wing in one piece surely simplifies construction but get the handling worse... I'll go with it (1 piece) anyway.
I see you modified the flap hinges.
I see you modified the flap hinges.
11-03-2007, 06:21 PM
#272
Senior Member
Join Date: Mar 2007
Location: Thessaloniki, , GREECE
Posts: 180
Likes: 0
Received 0 Likes
on
0 Posts
ORIGINAL: g_boxwood
I see you modified the flap hinges.
I see you modified the flap hinges.
 ... I got the idea from Mr-Aerodesign . I think that's the easiest way to construct the flap hinges.
I hope that the photos will help .
11-09-2007, 11:52 AM
#273
Thread Starter
Join Date: Jan 2005
Location: Vlodrop, The Netherlands
Posts: 385
Likes: 0
Received 1 Like
on
1 Post
Nice work George. At first, I wanted to attach the flap hinges to the wing ribs as you did but I then decided to leave them screwed in from the outside (as per original Bernard plans) in case I ever needed to replace them...
OK, I printed my wing plans, I found some mishaps I didn't notice 'on screen', I corrected them and I printed a new sheet with the corrected patterns and I finally started to cut some of the many pieces required. It will take me some time but I wanted to start making some sand dust so I began with the
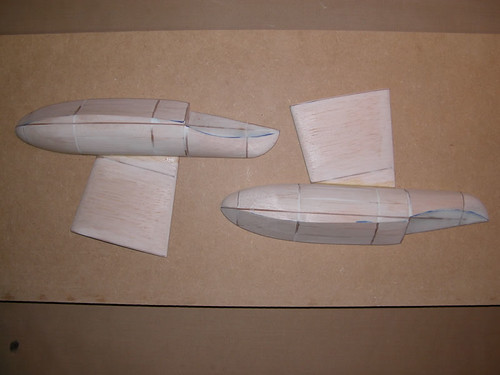
Tip Float Plug
I decided to make the float plug in two parts so I put each skeleton together over the plans
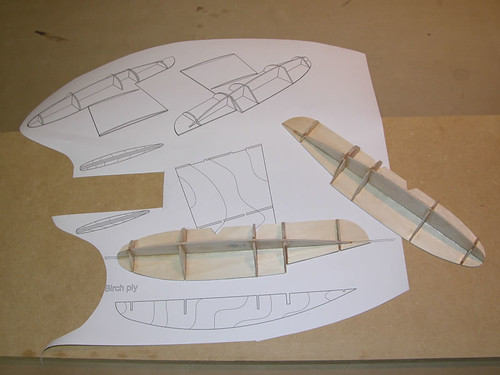
and I filled it with balsa sticks and blocks: fill it with foam, it is indeed better and cheaper than balsa but I had none laying around...
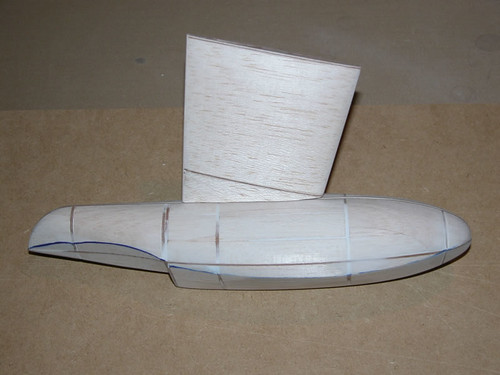
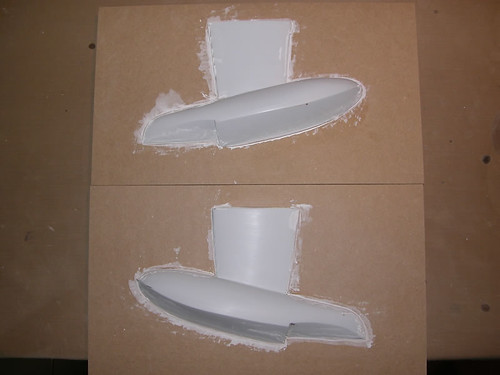
About the following pic: upper float half is roughly sanded to shape, lower half is still in its 'primitive' state:

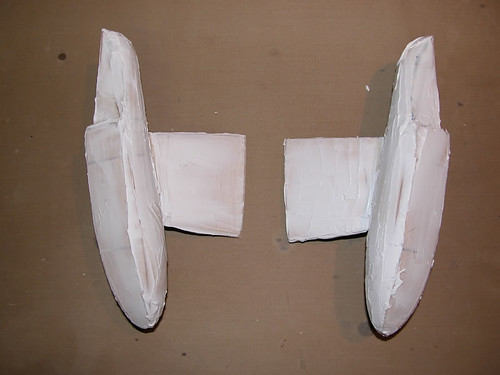
Once each half had been shaped I built the vertical struts and I tack-glued everything together for final filling and sanding:
I then split them apart and I got them ready for glass (which I already did).
Until next time,
OK, I printed my wing plans, I found some mishaps I didn't notice 'on screen', I corrected them and I printed a new sheet with the corrected patterns and I finally started to cut some of the many pieces required. It will take me some time but I wanted to start making some sand dust so I began with the
Tip Float Plug
I decided to make the float plug in two parts so I put each skeleton together over the plans
and I filled it with balsa sticks and blocks: fill it with foam, it is indeed better and cheaper than balsa but I had none laying around...
About the following pic: upper float half is roughly sanded to shape, lower half is still in its 'primitive' state:
Once each half had been shaped I built the vertical struts and I tack-glued everything together for final filling and sanding:
I then split them apart and I got them ready for glass (which I already did).
Until next time,
11-13-2007, 02:34 PM
#274
Thread Starter
Join Date: Jan 2005
Location: Vlodrop, The Netherlands
Posts: 385
Likes: 0
Received 1 Like
on
1 Post
I'm still working on the tip-float plugs since they require a lot of attentions...
I glassed them...

... and I filled them...
... and I sanded/primed them many times...

... until they looked ready to be mounted onto their frames:
I'll prime them some more times along with the frames and I'll then coat them with the gloss dark blue I usually treat my plugs with.
Quite boring plug-and-mold-making-routine I know, I only hope it won't get too cold to paint...
I glassed them...
... and I filled them...
... and I sanded/primed them many times...
... until they looked ready to be mounted onto their frames:
I'll prime them some more times along with the frames and I'll then coat them with the gloss dark blue I usually treat my plugs with.
Quite boring plug-and-mold-making-routine I know, I only hope it won't get too cold to paint...

