


install a tailwheel
 11-13-2009 | 11:50 PM
#1
Thread Starter
Senior Member
My Feedback: (11)
Joined: Sep 2009
Posts: 124
Likes: 0
Received 0 Likes
on
0 Posts
From: gilmer, TX
I'm changing .40 tri wheel airplane over to a taildragger .this is a trainer I bought a DU-BRO tail wheel bracket {for.40size airplane} the problem I don't have any idea how to install it ,the instruction are terrible. I,m new at this RC airplanes so I could us all the help I can get. I don't want to connect to the rudder</p>
 11-14-2009 | 01:08 AM
#2

My Feedback: (10)
Joined: Sep 2004
Posts: 694
Likes: 0
Received 0 Likes
on
0 Posts
From: Grants Pass,
OR
Well assuming you have a DuBro 955 or 956 it is designed to attach to the bottom of the fuselage and the U shaped piece is designed to attach to the rudder. Then the springs run from the rudder to the tiller arms above the tail wheel. It's pretty simple. The tail wheel bracket does not attach to the rudder only the U shaped piece so all the force is applied to the fuselage.
11-14-2009 | 01:36 AM
#3

Joined: Jul 2004
Posts: 579
Likes: 0
Received 0 Likes
on
0 Posts
From: Cape Town, SOUTH AFRICA
I installed the "40" sized tailwheel onto a 4*40. The instructions regarding the interface with the tailwheel and the rudder are pretty unclear. I also did not want to permanently attach to the rudder so I bent the wire so that it would run underneath the rudder. I then attached e piece of fuel tubing to the rudder with a servo screw and then slid the tailwheel wire into the tubing.
This allows the tailwheel assembly to be replaced without cutting off the rudder but allows the tailwheel to be steerable.
Hope this helps
This allows the tailwheel assembly to be replaced without cutting off the rudder but allows the tailwheel to be steerable.
Hope this helps
11-14-2009 | 10:15 AM
#4
Senior Member
Andrewac's way is a good and easy one to implement. You did not mention anything about the main gear but I assume that you moved them forward from the tricycle position. Proper placement of the main gear is important on a tail dragger; they must be forward of the CG, usually with the axle right under the leading edge of the wing when in flying attitude for best performance. To far back and lots of nose overs on taxi, to far forward and hard to take off plus lots of bounce on landings. You also want a bit of toe-in on the main gear.
12-10-2009 | 04:22 PM
#6
My Feedback: (1)
Joined: Jun 2009
Posts: 1,207
Likes: 0
Received 0 Likes
on
0 Posts
From: ft payne, AL
I am curious as to why you would not want to attach to the rudder. I have just started building my first taildragger and I never considered not attaching to the rudder.
12-10-2009 | 04:50 PM
#7
My Feedback: (126)
With the Kadet, the rudder sets on top of the stab. It doesn't go down to the bottom of the fuse. For me the servo was easier. I mixed the 5th channel with the rudder channel so I could reverse one of the servos.
This Kadet is an ARF. If it was the stick kit, I would've built it with the tail wheel attached to the rudder.
This Kadet is an ARF. If it was the stick kit, I would've built it with the tail wheel attached to the rudder.
12-10-2009 | 06:30 PM
#8

My Feedback: (6)
Another option is to make a "y" rod by attatching another short pushrod to the rudder pushrod and using a bell crank or making one out of the tail wheel rod. This keeps all the stress from steering and rough landings away from the rudder and hinges. Very similar to the pics phatbob had, but instead of attaching to a servo, you run the pushrod up into the fuse and attatch to the rudder pushrod. Doesn't look as neat as attatching to the rudder, but saves U from using another servo.
12-10-2009 | 10:21 PM
#9
Senior Member
ORIGINAL: phatbob02
I don't know if you're up to it, but here's how I did my Kadet LT-40.
And like Rodney mentioned, notice where the main gear has been moved to.
I don't know if you're up to it, but here's how I did my Kadet LT-40.
And like Rodney mentioned, notice where the main gear has been moved to.
I have the same set up on my planes, it works.
Bob
 12-14-2009 | 05:55 PM
#11
My Feedback: (1)
Joined: Jun 2009
Posts: 1,207
Likes: 0
Received 0 Likes
on
0 Posts
From: ft payne, AL
I just purchased the Goldberg tailwheel assy for 6-12 pd models to install on my Tiger 60. I am not quite ready yet to install it as I am not finished with the Fuselage build. I still have to install my ccontrol rods for the elev and the servo tray. It may be a month before I get to that point. This is my first taildragger and I cannot wait to make this happen.
12-18-2009 | 10:28 PM
#12

I perverted my SIG Kadet Senior ARF to a tail dragger. The TW is a Sullivan tailwheel (TW) bracket for 40-60 with a 1" wheel. Like the LT-40 the rudder is not accessible for controlling the TW. My plan was to augment the wood rudder control rod with a 2-56 pull-pull system for the TW as there was a straight shot between the servo and the TW.
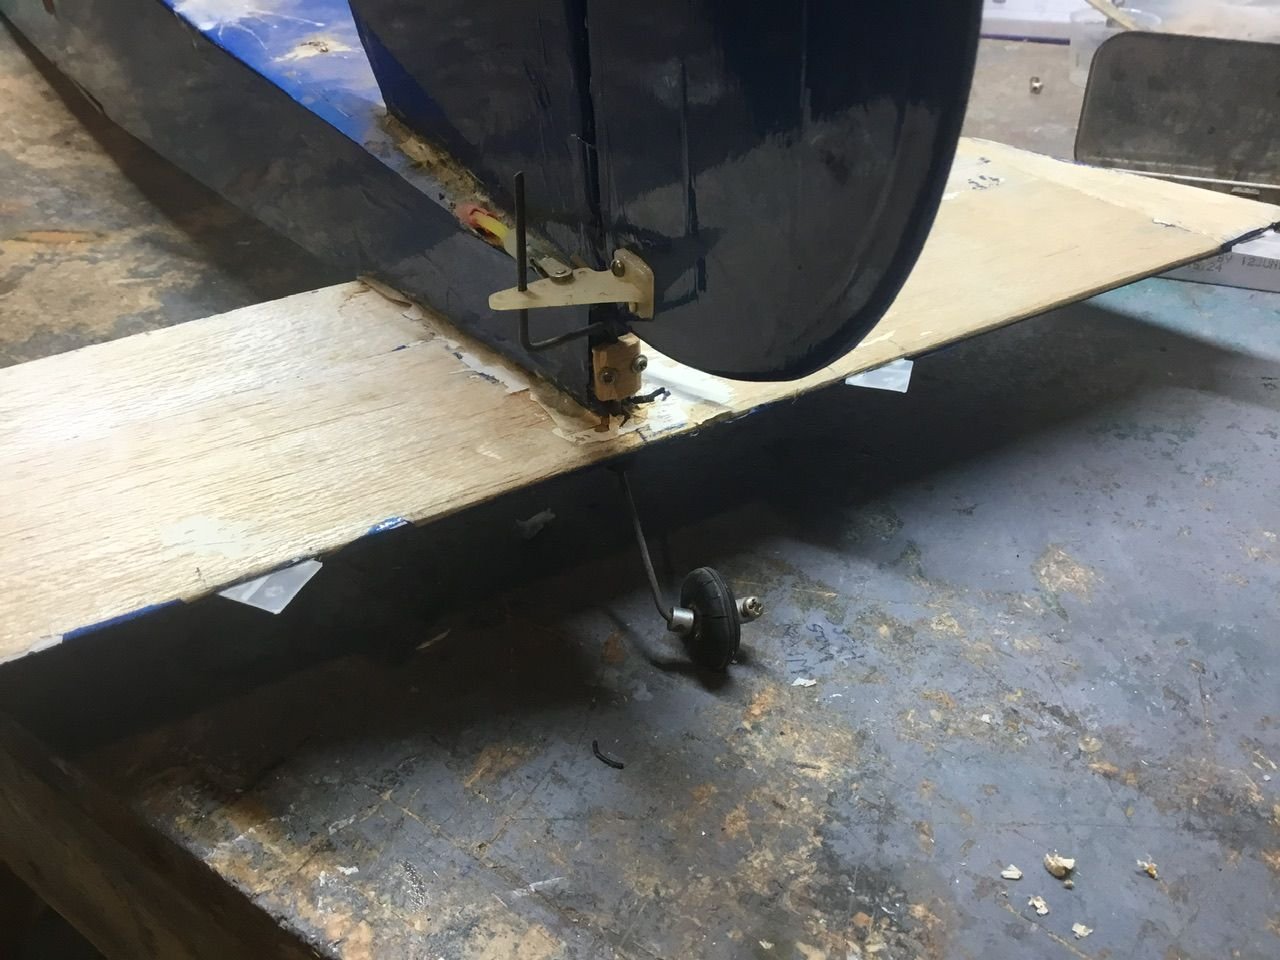
TW: 1st thing I addressed was fuse structure. Covering was rolled back from the tail. The fuse bottom balsa sheet was cut away. Several pieces of balsa stock was added for support. 5-ply plywood was added with 4-40 blind nuts that matched the TW support. Reseal the covering over the new ply bottom. A couple of holes for the TW bolts. Plumb the pull-pull to the rudder servo.
LG: Add structure - I cut a 1/4" plywood plate to fit in front of the wing mount former - about 2 wide. Epoxy plate w/ tri-stock. Locate the LG such that the axles are parallel and in line (vertically) with the wing's leading edge. Secure the landing gear & drill holes for 1/4x20 nylon bolts (4 in my case). Remove the LG and open up the fuse holes to accept 1/4x20 blind nuts. Using metal screws, draw the blind nuts into the holes, adding epoxy under the shoulders of the blind nuts. Oh yea, make sure that the tri-stock bracing leaves room for the blind nut shoulders (emmm, been there and haven't done that).
I figure pictures are a good thing ...
12-18-2009 | 10:30 PM
#14
the last of the pics ...
OK- you got me - Ilied. That's NOTa Sullivan TW. And Iused 3 bolts for the LGrather than 4. That was my original RCplane. Soloed in 9 flights with tri-cycle gear. Before the 10th flight it got converted to a tail dragger. Note the lead!!!! There was an OS 46 LAon the front of that thing. Later replaced with an OS 61 FX. Wings failed during flight 15 at 100' - made for a not-so-kool white-n-red lawn dart.
Planning a conversion of an LT-40 tricycle to a tail dragger soon.
You'll notice in the side pics that include the tail, the rudder is totally above the fuse top and elevator.
Also, Ibuilt a Kadet Senior (kit)that uses a Hitec HS-81 servo mounted just in front of the tail wheel. Fairly simple but adds a bunch of weight at the back end. There is a hidden benefit of the servo approach, IFyou are thinking of floats, makes for a sweet-n-simple float rudder control servo.
 01-08-2025 | 07:27 AM
#16

The simplest and best way is to just mount the tail wheel using thin piano wire to the fuselage using the all swiveling metod (same as the full scale Spitfire had) . You do not have to make it steerable as in the above suggestion.
01-09-2025 | 10:48 AM
#17
I have my 3d arf biplane (Accel hobby) setup free castor. It’s nuts because short coupling. Crosswinds make me want to change it or at least put limits on the swivel.
I like my above post because it doesn’t include the rudder at a weak point (like cutting a notch!) Most of my setups are that of the original I think post here using fuel line to flex but that still stresses the rudder at that spot. I’m too excited to see this use a control horn. Never saw that in any directions for any plane.
I like my above post because it doesn’t include the rudder at a weak point (like cutting a notch!) Most of my setups are that of the original I think post here using fuel line to flex but that still stresses the rudder at that spot. I’m too excited to see this use a control horn. Never saw that in any directions for any plane.


