


Setting up a WALKERA 36 fresh out of the box
 08-01-2006, 11:41 AM
#1
Member
Thread Starter
Join Date: Jul 2006
Location: Philadelphia, PA
Posts: 50
Likes: 0
Received 0 Likes
on
0 Posts
As for some of us newbies we dont know the first thing to do when it comes to setting up a heli, other than placing it on my dinning room table is as far as i got.
I would like to get a thread started that would help us get ready for out first flight (after sim training of course). Everything from blade pitches to fly bar adjustment etc.
Example: out of the box the blades are folded back? Do i just straighten them, or do i have to tighten the bolt? and is there a correct placement for them.
Also i have noticed the flybar to be "Limp" so to say, it doesn't stay parallel like i see in pictures when i pick up one of the paddles it just falls back down, is there a screw that i need to tighten it to make it stay horizontal.
As you might imagine for alot of us this is overwhelming, and for some of us we can not get to a local club to learn, so we rely on the help of forums and the good people who read them, lets make this thread strong, remember back to when you started, when you had the heli on your dining room table and had no clue what to do, bring us to the end result that would be flying and the joy it can bring.
Thanks, i will be posting many pics and questions from step one out of the box in the near future .[8D]
 08-01-2006, 11:55 AM
#2
Member
Thread Starter
Join Date: Jul 2006
Location: Philadelphia, PA
Posts: 50
Likes: 0
Received 0 Likes
on
0 Posts
in this picture you can see the blades the way they came in shipping toward the back and loose

Are these suppose to be tightened or just extented straight and spinning forces keep the out straight?
In this picture is the flybars? and how i have to hold them up with finger or else the fall down like in pic #2


is that suppose to be like that or does it need to be tightened down somehow
Are these suppose to be tightened or just extented straight and spinning forces keep the out straight?
In this picture is the flybars? and how i have to hold them up with finger or else the fall down like in pic #2
is that suppose to be like that or does it need to be tightened down somehow
08-01-2006, 01:42 PM
#3

Join Date: Jul 2006
Location: Miami, FL
Posts: 144
Likes: 0
Received 0 Likes
on
0 Posts
I just ordered my 36 a couple of days (still waiting for it to get here) ago so I am pretty interested in seeing this thread continue. Just out of curiosity, didn't your 36 come with any set up instructions? I bought mine off ebay after much searching and it is supposed to come with many extras. One of which is a set up guide. Hopefully when it arrives it will be of some help. I will post up when I get it. I'm hoping by the end of the week since shipping was $40 and it is coming for California. Good luck man. Keep us informed with anything you figure out.
08-01-2006, 01:57 PM
#4
Member
Thread Starter
Join Date: Jul 2006
Location: Philadelphia, PA
Posts: 50
Likes: 0
Received 0 Likes
on
0 Posts
na mine had some really brief advanced setup instruction, but nothing that i can understand, that is why i am lost, i got mine from ebay also, it shipped from NJ came in 1 day since im in philly, but i would be curious if you got the same body and other things like i did, it suppose to be the :new 2006: model. anyway i hope someone with experience can guide us through our venture
08-01-2006, 04:36 PM
#5
Senior Member

Join Date: Aug 2005
Location: fayetteville,
GA
Posts: 1,228
Likes: 0
Received 0 Likes
on
0 Posts
ok, I'm the guy to talk to...
here we GO!
step one: unpack box
step two: charge and insert batteries in nessary places (like the controler)
step three: read the manual and laugh at the wording, AFTER you get anything you can out of it
step four: make sure ALL the screws on the frame (not head) are TIGHT, preform same with tail
Exception: the two screws for the little plate that has that teeny tiny rod though it leave SLIGHTLY loose, the plate SHOULD move easily (with servo's disconnected, please do so while setting up)
step five: straighten blades, they should be easily movable but NOT floppy, floppy works, but is a pain to use
step six: spin rotor head by hand (motor should not move while spinning clockwise) if you feel unnessary amounts of friction loosen the back 6 screws in the frame and push the tail boom all the way in, then pull out until you feel a small amount of friction. tighten. hold tail rotor in hand and try to twist blades, if you feel the belt jump under a MODEST amount of friction, pull the tail boom out a tad more.
step seven: put graphite lube in any linkage or bearing that moves.
step eight: loosen the bolts on those two bars, closest to the rotor head attached to the flybar. Now using a METRIC ruler make the distance as seen in picture, please make this the SAME on both sides, tighten AFTER you make sure to squeeze those two bars towards the rotor head, the flybar should now be level. *note* that thing SHOULD tilt when touched, this is a GOOD thing.

step 10: dis-engage the motor with gear. Turn on Transmitter, set ALL trims to the MIDDLE except the throttle, put that one at minimum (stick should be in LOW position). Attach all servo arms again with each causing the servo horns to be at a 90 degree angle with the servo.
step 11: make SURE the swash plate is LEVEL, if not adjust the linkages (by screwing them in/out)

step 12: unplug battery, turn off Tx (turn both back on if you force a servo to move) the paddles should both be LEVEL adjust this by using a plyers (and some thin wood chunks to prevent marring) and clamping down on the metal peice of the paddle (circled in red). Then just twist the plastic peice (circled in blue) (try to keep the plyers still) until it is level, repeat with other side

step 13: loosen the set screw on the "pitch plate" (blue). push the rod that it was cinched on up until the pitch slider is in the middle of it's range on the main shaft (slider red).

step 14: adjust these (green) linkages to get the blades NO pitch, adjust up for more pitch, down for less.

step 15: now, remove the linkage from the tail servo PLEASE. Then using two rulers (wooden if possible, they must be stiff) stick them through the skids, then rubberband 'em to a brick or two. CLEAR OFF YOUR WORK AREA! these things tend to blow HARD!!! re-connect the motor to the gear leaving a TINY gap of space, don't just mash the two togther, but, if they have even a mm of space they're too far apart. Adjust the throttle trim until you hear the motor try to move, move it back down two notches from there.
push the throttle up to mid stick (after you've turned the TX then the heli ON of course ) get down to blade level but DON'T shove your face in there, please... and check to see if the blade with the blue tip is higher, or the red one. Adjust the linkages accordingly untill both are in the same flight path (your paddles should also be level by the way, if not, put equal amounts of tape and then level them like you are the blades)
step 16: adjust the tail servo linkage until the slider on the tail shaft is in the MIDDLE of travel (you get to figure this one out yourself, it's not hard, and it'll help you out trust me) now, unstrap the heli and place on driveway. push to half throttle. if the heli is trying to take off please adjust the right knob down a bit, if the throttle's at minimum the pitch shouldn't move much, if it moves as you turn the knob though... put this back where it was, adjust the left knob down a bit... (sorry I don't exactly remember which adjusts the pitch curve and which adjust the pitch position... )
)
Anyways the heli should NOT be spinning on it's own, if it is, well, adjust the set screw on the collar that's attached to the end of the shaft. Move the collar around until the heli stops spinning on it's own. (once again you get to figure it out for yourself, I'm only going to guide you from here on out, the vital stuff's done anywho)
step 17: the final step, adjust that pitch curve knob until you ARE off the ground at 3/4 throttle. if you aren't at full throttle, well that's another problem entirely, may I Then suggest a brushless motor? (note, if you can't seem to control throttle with your thottle control, except that one servo controling pitch, flip the switch on the right of your Tx.)
step 18: take it slow and fly!
PS:sorry for the small pictures, photobucket decided to resize...
here we GO!
step one: unpack box
step two: charge and insert batteries in nessary places (like the controler)
step three: read the manual and laugh at the wording, AFTER you get anything you can out of it
step four: make sure ALL the screws on the frame (not head) are TIGHT, preform same with tail
Exception: the two screws for the little plate that has that teeny tiny rod though it leave SLIGHTLY loose, the plate SHOULD move easily (with servo's disconnected, please do so while setting up)
step five: straighten blades, they should be easily movable but NOT floppy, floppy works, but is a pain to use
step six: spin rotor head by hand (motor should not move while spinning clockwise) if you feel unnessary amounts of friction loosen the back 6 screws in the frame and push the tail boom all the way in, then pull out until you feel a small amount of friction. tighten. hold tail rotor in hand and try to twist blades, if you feel the belt jump under a MODEST amount of friction, pull the tail boom out a tad more.
step seven: put graphite lube in any linkage or bearing that moves.
step eight: loosen the bolts on those two bars, closest to the rotor head attached to the flybar. Now using a METRIC ruler make the distance as seen in picture, please make this the SAME on both sides, tighten AFTER you make sure to squeeze those two bars towards the rotor head, the flybar should now be level. *note* that thing SHOULD tilt when touched, this is a GOOD thing.
step 10: dis-engage the motor with gear. Turn on Transmitter, set ALL trims to the MIDDLE except the throttle, put that one at minimum (stick should be in LOW position). Attach all servo arms again with each causing the servo horns to be at a 90 degree angle with the servo.
step 11: make SURE the swash plate is LEVEL, if not adjust the linkages (by screwing them in/out)
step 12: unplug battery, turn off Tx (turn both back on if you force a servo to move) the paddles should both be LEVEL adjust this by using a plyers (and some thin wood chunks to prevent marring) and clamping down on the metal peice of the paddle (circled in red). Then just twist the plastic peice (circled in blue) (try to keep the plyers still) until it is level, repeat with other side
step 13: loosen the set screw on the "pitch plate" (blue). push the rod that it was cinched on up until the pitch slider is in the middle of it's range on the main shaft (slider red).
step 14: adjust these (green) linkages to get the blades NO pitch, adjust up for more pitch, down for less.
step 15: now, remove the linkage from the tail servo PLEASE. Then using two rulers (wooden if possible, they must be stiff) stick them through the skids, then rubberband 'em to a brick or two. CLEAR OFF YOUR WORK AREA! these things tend to blow HARD!!! re-connect the motor to the gear leaving a TINY gap of space, don't just mash the two togther, but, if they have even a mm of space they're too far apart. Adjust the throttle trim until you hear the motor try to move, move it back down two notches from there.
push the throttle up to mid stick (after you've turned the TX then the heli ON of course
) get down to blade level but DON'T shove your face in there, please... and check to see if the blade with the blue tip is higher, or the red one. Adjust the linkages accordingly untill both are in the same flight path (your paddles should also be level by the way, if not, put equal amounts of tape and then level them like you are the blades)step 16: adjust the tail servo linkage until the slider on the tail shaft is in the MIDDLE of travel (you get to figure this one out yourself, it's not hard, and it'll help you out trust me) now, unstrap the heli and place on driveway. push to half throttle. if the heli is trying to take off please adjust the right knob down a bit, if the throttle's at minimum the pitch shouldn't move much, if it moves as you turn the knob though... put this back where it was, adjust the left knob down a bit... (sorry I don't exactly remember which adjusts the pitch curve and which adjust the pitch position...
)Anyways the heli should NOT be spinning on it's own, if it is, well, adjust the set screw on the collar that's attached to the end of the shaft. Move the collar around until the heli stops spinning on it's own. (once again you get to figure it out for yourself, I'm only going to guide you from here on out, the vital stuff's done anywho)
step 17: the final step, adjust that pitch curve knob until you ARE off the ground at 3/4 throttle. if you aren't at full throttle, well that's another problem entirely, may I Then suggest a brushless motor? (note, if you can't seem to control throttle with your thottle control, except that one servo controling pitch, flip the switch on the right of your Tx.)
step 18: take it slow and fly!
PS:sorry for the small pictures, photobucket decided to resize...
08-01-2006, 07:17 PM
#7
Member
Thread Starter
Join Date: Jul 2006
Location: Philadelphia, PA
Posts: 50
Likes: 0
Received 0 Likes
on
0 Posts
YEAH THE post is awesome, is there any chance we can get links to the full size pictures, other than that as soon as the weather breaks im gonna get going on your specs, is there any suggestion as to servo setup and radio setup, but i guess that will be aproblem once i get to that point.
08-02-2006, 01:19 PM
#9
Member
Thread Starter
Join Date: Jul 2006
Location: Philadelphia, PA
Posts: 50
Likes: 0
Received 0 Likes
on
0 Posts
ok here we go
setting the pitch plate thing i got lost, is that adjusting the paddle like blades at the end of the flybar,does that set the pitch of the heli? if so what should the pitch be? i have the same amount of space on either side of my rotor head on the flybar.
also the tail servo glitches so bad it goes crazy, but constanly twitches what causes that?and the servo horn on the tail rudder should be at a 90 degree and the slider on the tail part should be in the middle of its run right? and does that servo sit up staright or is kinda crooked? i have the servo sitting so that the tube runs straight back.
now the GYRO i just noticed switches and thinki might have hit one by accident the one is set to AVSC and the other switch is set to REV, what are they and what do they do?,
and it would be nice to have an exploded view of the heli and names so that i could betteer describe my problems, if you know of a link that has it let me know,
thanks again, getting there slowely but surely, and man i STINK on the flight sim lololol
08-02-2006, 02:45 PM
#10
Member
Thread Starter
Join Date: Jul 2006
Location: Philadelphia, PA
Posts: 50
Likes: 0
Received 0 Likes
on
0 Posts
also the dip switches on the back of controller are suppose to be set how? according to my manual and they way they came in mail are 2 different things.
08-02-2006, 07:24 PM
#11
Senior Member
Join Date: Aug 2005
Location: fayetteville,
GA
Posts: 1,228
Likes: 0
Received 0 Likes
on
0 Posts
frezel, ya, I was a bit lazy so I just used yours... 
more on problems in a sec... fixing pictures...
ok, it's done, you're request has been completed, BIG PICTURES!
now the pitch plate adjusts the pitch on the MAIN blades, producing lift.
the swash plate adjusts the pitch on the paddles, causing them to tilt, adjusting the pitch on the main blades, causing the heli to tilt.
it's.... complicated to explain...
now the tail glitching, I think that's the gyro, try to remove it... try adjusting the senstivity, but DO NOT EVER touch the avcs switch, it will NOT help you fly. It just screws up controls on the tail to "simulate" a HH (heading hold) gyro. If you want that (I'd suggest it) get a futaba gy240.
whew... I think it's time to take a break.
if you've got any problems, I can help! just give pictures/ video and good explination if possible....
08-02-2006, 09:36 PM
#12
Member
Thread Starter
Join Date: Jul 2006
Location: Philadelphia, PA
Posts: 50
Likes: 0
Received 0 Likes
on
0 Posts
ok here is the progress i have done so far..
Step #8 centering the flybars i noticed that the flybar was even on both sides but it seemed to be bent on the left side see pic
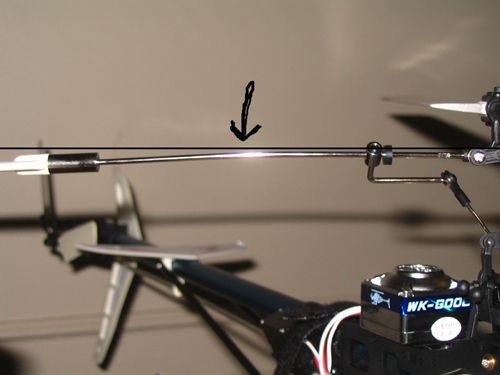
i drew a black line that the arrow is pointing to to show u the curve, could that be what is causing my heli min shaft to shake like crazy, it cause the entire heli to rock back and fourth. So the fix i guess would be to somehow bend it back straight..
\\
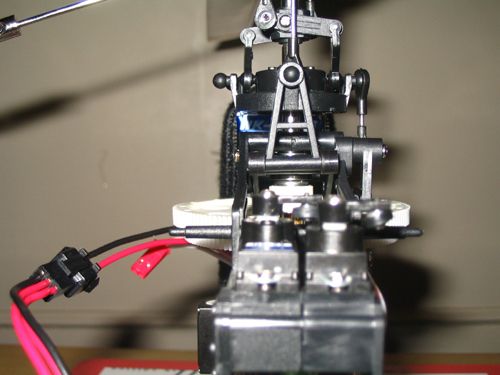
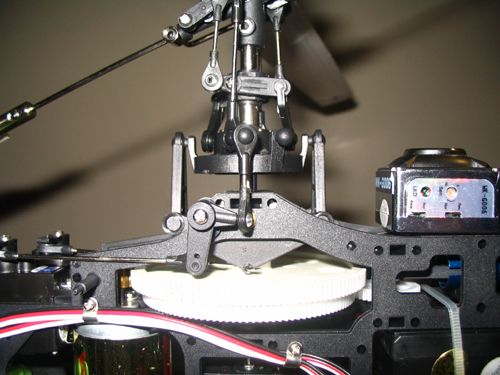
Steps 10 & 11
i took off all the servo arms and set them to be at a 90 degree angle with the servo. and made SURE the swash plate is LEVEL
see pics
FRONT
SIDE VIEW
and controller settings to make servos 90 Degree
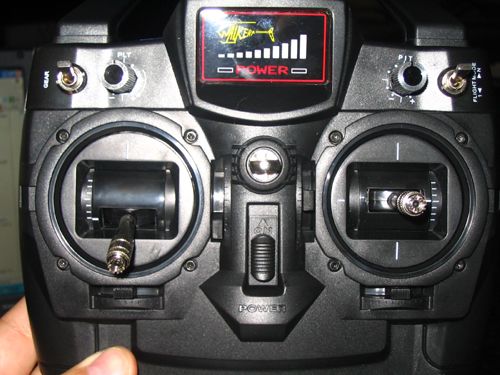
Ok now this is the configuration on the back of my controller, as far as the dip switches. is this correct? i dunno if this new "2006" model is the same as the older ones?
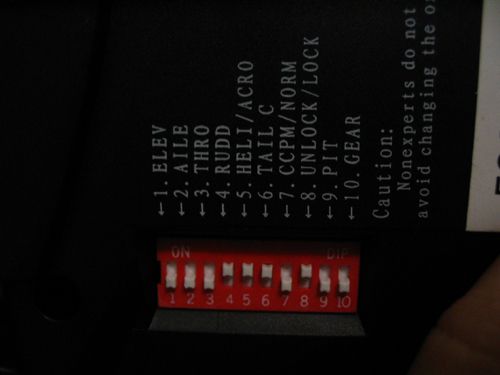
and as far as the fly bar paddles? am i suppose to have them both flat? in other wards if i was to take that flybar out and place it on a table with the paddles on would they lay flat or is there suppose to be a pitch to them? and if so do i need to get a pitch guage, or not, i dunno if they are a fixed pitch and if the main blades are as well?
thats it for now im tired tommorow ill take video of the sloppy head and when i push up and down on right stick the roto head does nothing, i think something is real loose once again thanks so much for the fix in the post and ill keep questions coming as best i can if you can keep up lol
thanks
Step #8 centering the flybars i noticed that the flybar was even on both sides but it seemed to be bent on the left side see pic
i drew a black line that the arrow is pointing to to show u the curve, could that be what is causing my heli min shaft to shake like crazy, it cause the entire heli to rock back and fourth. So the fix i guess would be to somehow bend it back straight..
\\
Steps 10 & 11
i took off all the servo arms and set them to be at a 90 degree angle with the servo. and made SURE the swash plate is LEVEL
see pics
FRONT
SIDE VIEW
and controller settings to make servos 90 Degree
Ok now this is the configuration on the back of my controller, as far as the dip switches. is this correct? i dunno if this new "2006" model is the same as the older ones?
and as far as the fly bar paddles? am i suppose to have them both flat? in other wards if i was to take that flybar out and place it on a table with the paddles on would they lay flat or is there suppose to be a pitch to them? and if so do i need to get a pitch guage, or not, i dunno if they are a fixed pitch and if the main blades are as well?
thats it for now im tired tommorow ill take video of the sloppy head and when i push up and down on right stick the roto head does nothing, i think something is real loose once again thanks so much for the fix in the post and ill keep questions coming as best i can if you can keep up lol
thanks
08-03-2006, 12:30 PM
#13
Member
Thread Starter
Join Date: Jul 2006
Location: Philadelphia, PA
Posts: 50
Likes: 0
Received 0 Likes
on
0 Posts
Also here is the loose play in the rotor head i was talking about, is that normal for it to be sooooo loose where the slightest touch bounces it around like that?
http://s36.photobucket.com/albums/e3...t=helislop.flv
**** ALSO *****
i figured out why the tail servo glitched and when you turned it on it would slam it self into one direction and not stop pushing, i just noticed that the gyro responds to the tail movement and tried to counter it by moving the tail rudder i would guess to keep it straight, but the factory conviently zip tied all the wires so tight and bundled together that somthing was making the servo and gyro go nuts, so i unclipped the zip ties and straighted out the harness it works like a dream now, i had the same problem with and rc truck once, that glitched and same principle applied here. So cut them zip ties off and put something looser to hold the harness....Helicopter ownership gets better at every disection
08-03-2006, 06:28 PM
#14
Senior Member
Join Date: Aug 2005
Location: fayetteville,
GA
Posts: 1,228
Likes: 0
Received 0 Likes
on
0 Posts
ok, the flybar is supposed to be straight... Just re-bend it back.
as for slop? that's GOOD, as long as you don't see it going L/R with the rotor head still you're ok. be happy it moves freely! If it does seem overly sloppy hovever just tighten the bolts on either side of where the flybar goes though the head, if they're all the way in, DON'T push them. They're working as intended.
also, that's a BEUTIFULLY level swash, good job! and I see the trims are set correctly as well, another commendation! As for the switches on the back, don't touch 'em.
As for the rotor head not moving, Is the servo moving? If not try plugging it in backwards, it may be in the wrong way. but if it is, make sure something is NOT disconnected, just trace the movement up until you see the problem and post a pic!
08-03-2006, 06:40 PM
#15
Member
Thread Starter
Join Date: Jul 2006
Location: Philadelphia, PA
Posts: 50
Likes: 0
Received 0 Likes
on
0 Posts
i think i worked out most of the kinks, only thing is should i buy a pitch gauage for the blades and the arions? also where is the best place to buy spare parts or hopups for this heli in the US?
08-03-2006, 08:42 PM
#16
Senior Member
Join Date: Aug 2005
Location: fayetteville,
GA
Posts: 1,228
Likes: 0
Received 0 Likes
on
0 Posts
gee, for buying something in the us... you'll have a Real fun time... I'd suggest heli-fever, pinnacle model (DO NOT GO FOR THE CHEAP METHOD OF SHIPMENT!) or.... dunno, those're the only real places I've bought from. I really don't know of a US stocked walkera supply!
08-04-2006, 07:59 AM
#17
Member
Join Date: Mar 2006
Location: Oldham, UNITED KINGDOM
Posts: 36
Likes: 0
Received 0 Likes
on
0 Posts
wow, this thread certainly helped make my 36 fly a lot smoother, only problem now is that with the new lipo and brushless setup I can't keep the thing on the ground! so much more power then the stock nimh and brushed motor !
08-04-2006, 10:35 AM
#18
Member
Thread Starter
Join Date: Jul 2006
Location: Philadelphia, PA
Posts: 50
Likes: 0
Received 0 Likes
on
0 Posts
Parsec what kind of battery and lipo are you running and where did you get it from? Im glad this thread is helping that was the point of it for us new guys, im sure ill have more questions as this progress goes, i still not been able to even attempt to try my heli as i am buzy with work etc, so hopefully this weekend i can see if i can do some floor exercises..
08-04-2006, 10:41 AM
#19
Junior Member
Join Date: Aug 2006
Location: , NY
Posts: 7
Likes: 0
Received 0 Likes
on
0 Posts
hello heli guys, i am new to this walkera helis and been hearing a lot about it. I know that most of the guys here have experience on this brand. how good is it? and what is the best model to get. I tried to post on the 36 thread which i see has the most replies but no one seems to be there. can anyone of you fine fellows give me an instant view on how this walkera 36 manages to be superior than the other models.
bob
bob
08-04-2006, 11:13 AM
#20
Member
Thread Starter
Join Date: Jul 2006
Location: Philadelphia, PA
Posts: 50
Likes: 0
Received 0 Likes
on
0 Posts
i dunno about superior as you get what you pay for basially but overall it seems to be ok but than again im new to hoobby and dont know much , my bro got a walera 60 it has more aluminum parts to it seems better, but i went with the 36 for some reason, im still trying to get things staright and get it flying but i will let you know
08-04-2006, 11:17 AM
#21
Junior Member
Join Date: Aug 2006
Location: , NY
Posts: 7
Likes: 0
Received 0 Likes
on
0 Posts
thank you frezel. so you are saying that they are all good both the 36 and the 60. I will be getting one to try out and test it in flight. does this come in standard RTF or do i have to add some electronics on it. I do have some parts here that i can use.
08-04-2006, 11:32 AM
#22
Senior Member
Join Date: Jul 2006
Location: NYC-Queens,
NY
Posts: 102
Likes: 0
Received 0 Likes
on
0 Posts
i got my changed name version of the walkera 36 the raptor g2 its good even tyhouhgt the tail servo seemed to be breaking so i changed it and it flew great until i crashed it then the tail started eaging left right left right and noticed it happened when the speed was increased on blades and noticed the back-tail blades were of track and this might be the reason why it start wagging around and i also changed the boom maybe that is a reason too it might be to slanted to one side and making the helicopter acting like so.
08-05-2006, 05:29 AM
#23
Junior Member
Join Date: Aug 2006
Location: , UNITED KINGDOM
Posts: 4
Likes: 0
Received 0 Likes
on
0 Posts
Hi Guys, Good thread. I bought the walkera #60 and Ive gotta say it seems good for the money but the MANUAL!!!! its useless. One thing is for sure it isnt RTF. Here is the problem I am having, im just about to re-go through all of the steps above, but i think I kind of already done that, so ive set all my servos at 90 deg and the trims to centre and the only problem I have is the heli spins constantly counter-clockwise even when the rudder is right over with no play left. Ive tried everything I can think of and am totally stuck. With the rudder servo set so the rudder movement is in the middle the heli spins very fast counter clockwise, and then when I apply full rudder on the stick to conter-act this it still spins slowly counter clockwise.
Also frezel, I had glitches on the tail servo and read that its because gyro sensitivity is too high, mine was constantly glitching so I nturned the gyro sensitivity down until you hear it stop.
A few things that arent in the manual that I would like to know and probably help others is :
What is the REV / NOR setting on the gyro actually for?
What is the AVCS / NOR setting on the gyro actually for?
The transmitter has PIT mode adjustments - what are they for? Ive tried fiddling with this with dip 12 on the back of the TX set for PIT mode and it seems to do absolutely nothing?
For anybody who gets the training skid attachment with your walkera - NOTE that it doesnt fit and you need cable ties - that may save someone half an hour trying to figure that out.
Also, the battery charger with my #60 turns red after about half an hour where the manual says to turn it off - this is total rubbish and you need to leave it on for a good 3 hours.
Anyone whos just bought or going to buy a #60 or a #36 with a NIMH 650VA battery you are going to need a new one straight away so ide advise to buy one with upgraded motor/battery & ESC. Mine last for 2 minutes and gives you no chance to make adjustments. BTW Can I use a LIPO battery with the standard motor and ESC? if so whats the biggest i can get without cooking my motor?
The standard stock motor with battery has only just enough power to lift your heli off the ground and hover. I challenge any walkera heli expert to show me the helis aerobatic ability with that motor and battery. I at first thought mine had a fault but apparently thats how it is. To give you an idea.... Fold up a piece of paper into the shape of a plane and throw it - it will fly for longer than your walkera does.
Any hel on the tail spin would be massively appreciated. Thx
08-05-2006, 07:12 AM
#24
Senior Member
Join Date: Aug 2005
Location: fayetteville,
GA
Posts: 1,228
Likes: 0
Received 0 Likes
on
0 Posts
tail spin- your gyro may be in reverse, try that. Also, if that doesn't fix it, your belt is probably slipping.
rev/nor: direction the gyro acts in, reverse and normal (new tail servos usually are reverse...)
avcs/nor: heading hold vs stopping a movement by wind, do NOT use AVCS on the WALKERA GYRO!!
as for dip 12, you've probably got the walkera 7ch tx and since you PROBABLY aren't using that channel it won't do a thing.
training skids, yeah, I figured that one out... after an hour of frustration, zip ties are the key!
YES you can use a standard 11.1v li-po with the stock Rx (2100 mAh) however do NOT I repeat do NOT buy walkera ESC's and BL motors! get an align 35A and align 420LF!
PARSEC: you may want to adjust that left knob DOWN a lil' bit so you CAN land
FINLESSFRED: walkera makes some pretty decent heli's, they fly great, work great, and seem to be designed mostly by someone who's sober. However the ELECTRONICS they give you are quite worthless, and really will dig a NICE DEEP pit for you to throw your money in. If you want to buy a walkera (I assume this is your first heli) go with the #4 until you can fly WELL then upgrade to the 36.
Another thing, why is this model superior? I really don't know, it just seems to have less issues than most of the other models, of course, if you notice, they've got the same tail boom, blades and such so are really just different versions of the 36. It flies steady, smooth and rather well, what else could you want? (besides free parts )
rev/nor: direction the gyro acts in, reverse and normal (new tail servos usually are reverse...)
avcs/nor: heading hold vs stopping a movement by wind, do NOT use AVCS on the WALKERA GYRO!!
as for dip 12, you've probably got the walkera 7ch tx and since you PROBABLY aren't using that channel it won't do a thing.
training skids, yeah, I figured that one out... after an hour of frustration, zip ties are the key!
YES you can use a standard 11.1v li-po with the stock Rx (2100 mAh) however do NOT I repeat do NOT buy walkera ESC's and BL motors! get an align 35A and align 420LF!
PARSEC: you may want to adjust that left knob DOWN a lil' bit so you CAN land
FINLESSFRED: walkera makes some pretty decent heli's, they fly great, work great, and seem to be designed mostly by someone who's sober. However the ELECTRONICS they give you are quite worthless, and really will dig a NICE DEEP pit for you to throw your money in. If you want to buy a walkera (I assume this is your first heli) go with the #4 until you can fly WELL then upgrade to the 36.
Another thing, why is this model superior? I really don't know, it just seems to have less issues than most of the other models, of course, if you notice, they've got the same tail boom, blades and such so are really just different versions of the 36. It flies steady, smooth and rather well, what else could you want? (besides free parts
)
08-05-2006, 07:12 AM
#25
Junior Member
Join Date: Aug 2006
Location: , UNITED KINGDOM
Posts: 4
Likes: 0
Received 0 Likes
on
0 Posts
Well, ive gone through those entire steps and im getting frustrated. I get slight vibration now, but didnt before so I think ive done something not quite right. Thanks for letting me know about the collar adjustment on the tail.... I adjusted it all the way out so that the tail blades are nowhere near central and when i throttle up it spins counter clockwise and when i throttle back it spins clockwise - at least its doing something different!
I emailed rcfever where I bought it from about the battery life and power and got this reply:
hi,
i am sorry that you cannot use the orignial motor.
the problem is not in the motor, it is in the ESC.
you need to change to:
https://www.rc-fever.com/Walkera-180...et-pr-492.html
https://www.rc-fever.com/3e-Li-Polym...mAh-pr-24.html
https://www.rc-fever.com/Lithium-Pol...ry-pr-324.html
then you can fly about 10 mins~
and much stronger power output.
So it seems that the #60 needs a few upgrades before its properly useable.... what setup have you got in yours cheatscalc?
The thing is im not prepared to buy the above until I can get it hovering without spining. Ive messed with it that much that I dont know what to do to get it back to where i started!!?! Ive adjusted the throttle/rudder mix, the gyro sensitivity, the rudder collar, the NOR/REV , the AVCS/NOR as well as all the above steps and I feel as though im a million miles away from where I started. Not sure wether to ebay this to someone with better knowledge and get a TREX or something with a proper manual that I can refer to when things go wrong.
http://img.auctiva.com/imgdata/1/2/4...17183220_o.jpg
http://img.auctiva.com/imgdata/1/2/4...17183222_o.jpg
http://img.auctiva.com/imgdata/1/2/4...17183221_o.jpg
The pics show the tail movement I can get from the servo, but only at the very extreme will it stay straight and I just aint getting it.