


What the hell did I get myself into?
 01-02-2015, 03:21 AM
#26

I forgot to mention. I have to make some decisions about the wing. Bolt on or rubber bands? Trainer wing A or sport wing B? Wing A locks out the ailerons has more dihedral. I been flying RealFlight for a few years and I have gotten used to flying with the ailerons but don't know how a real plane will be. Any suggestions?
I suggest using the lesser amount of dihedral available to you. To me, ailerons are essential.
 01-02-2015, 03:28 AM
#27
I am a beginner also. If I was you, I would learn to fly on an ARF trainer or a cheap used trainer. I would hate to crash a stick built plane that I have hours and hours building. I would fly the stick plane after after I learned to fly. Back in the day you had no choice but to learn on a stick built. Today you can purchase a arf under a hundred bucks. Also a simulator will really help you get started.
There is much more to our hobby than just flying. Building, for me, is 75% of the fun. It's hard to describe the feeling derived from seeing a model, that I built, take to the air for the first time. The hours spent in the shop are enjoyable, not drudgery. They greatly enhance the flying experience.
For me, this hobby isn't about what I can buy, but what I can build, and what I can do with it after it's built.
01-02-2015, 03:48 AM
#28

While there is merit to what you are saying, I tend to disagree.
There is much more to our hobby than just flying. Building, for me, is 75% of the fun. It's hard to describe the feeling derived from seeing a model, that I built, take to the air for the first time. The hours spent in the shop are enjoyable, not drudgery. They greatly enhance the flying experience.
For me, this hobby isn't about what I can buy, but what I can build, and what I can do with it after it's built.
01-02-2015, 07:29 AM
#29

While there is merit to what you are saying, I tend to disagree.
There is much more to our hobby than just flying. Building, for me, is 75% of the fun. It's hard to describe the feeling derived from seeing a model, that I built, take to the air for the first time. The hours spent in the shop are enjoyable, not drudgery. They greatly enhance the flying experience.
For me, this hobby isn't about what I can buy, but what I can build, and what I can do with it after it's built.
There is much more to our hobby than just flying. Building, for me, is 75% of the fun. It's hard to describe the feeling derived from seeing a model, that I built, take to the air for the first time. The hours spent in the shop are enjoyable, not drudgery. They greatly enhance the flying experience.
For me, this hobby isn't about what I can buy, but what I can build, and what I can do with it after it's built.
A few years later (after just flying ARFs) I built a 1/4 scale Cub. Took me 3 months working on it every night after work - fabric covering, 4 stroke engine, etc. It was beautiful. I was scared to death to fly it because of all the time and energy invested in it. When I finally crashed it (servo/radio glitch), I just couldn't put the time in it to rebuild. I have flown nothing but ARFs since.
I fly my planes aggressively. I like smoke on - tumbling, spinning, etc. I could not bear to pile one into the ground that I spent months/years building.
I absolutely admire builders and their craftsmanship. One fellow in my club is an amazing builder. Projects that would take most folks many months to build, he completes in a few weeks. Building is just not for me!
PS - go with ailerons!
01-02-2015, 07:53 AM
#30

My Feedback: (2)
Join Date: Nov 2003
Location: Loveland,
CO
Posts: 341
Likes: 0
Received 0 Likes
on
0 Posts
Rapid,
If you really want to learn how to fly and to have a good flying plane when you are done, I would strongly suggest building with ailerons and less dihedral. While some of the old timers at our field enjoy flying with 3 channels, most people don't. Planes fly better with ailerons, and you may find the aileron version interesting enough to keeping flying as a back up plane even after you move on to more sophisticated models. Also, I would suggest bolting the wings on with nylon bolts. Rubber bands can be a PITA, and from what I've seen they don't save much in a crash anyway.
I applaud you for building your first plane. While I don't build much anymore (I'm short on time and I love flying), the skills I picked up in my early years of building help tremendously when modifying or repairing planes ... and if you fly you will need to repair.
Greg
01-02-2015, 09:17 AM
#31

The PT40 was my first plane. Definitely go with ailerons. The PT40 also taught me to read the entire instructions before starting. That way you will find out early about adding washout to the wings. Warping both wings by appropriately and accurately using the shrinkage of the covering is tricky at best. You'll see what I mean if you have gotten to that part yet.
01-02-2015, 09:53 AM
#32

Join Date: May 2006
Location: Gypsum,
CO
Posts: 377
Likes: 0
Received 0 Likes
on
0 Posts
After years of racing rc cars I decided that I want to get into planes. Since there probably isn't much outdoor flying here in Indiana for the next few months I thought I would try to build my first plane. A Great Planes PT40 kit will be on my doorstep tomorrow. After reading the manual for the past few days I am thinking what the hell did I get myself into? I have a strong mechanical ability but this is all new to me. Yesterday I bought some supplies from the LHS and tried gluing some balsa and making some hinges. So far they have turned out pretty good. I'm just hoping the rest of the build is a straight forward as the first few steps. Being brand new to planes I wanted to start a thread to document my progress and post questions as they come up. Hopefully my experiences helps out other people just getting started too. Thanks in advance and I am tentatively looking forward to getting started.

Sounds like you are making great progress, if you are like me you will cut pieces too short, glue things backwards or in the wrong place, sand off too much balsa, etc... That is part of the process,especially just getting into building! I agree with Tom, fit your parts as tightly as you can before gluing, it'll make for a cleaner stronger build. And build as straight and square as you possibly can. Definitely build with ailerons, but learn to fly using both ailerons and rudder.
I am a simulator taught pilot, so I believe it is possible for you to take those sim skills to the field and have success. It is completely different flying the real deal compared to the simulator, sweaty palms, adreniline and gravity come into play! Just remember, let the plane do what it was made to do... Fly. Just like the cars you've been driving, the airplane will respond to small amounts of imput, you just have to add up and down (throttle as well as elevator) to the left and right you are used to.
Enjoy!
01-02-2015, 01:13 PM
#33

My Feedback: (1)
Join Date: Nov 2011
Location: Greater Houston Area
Posts: 20
Likes: 0
Received 0 Likes
on
0 Posts
Rapid13,
Congrats on building your airplane. I love to build as well and like you, by far prefer to fly what I build. Building your own also helps keep from having a shop full of junk that falls apart and flies poorly. Try to get a tight parts fit so you don't have to fill gaps. Lightweight spackle is OK for non-structural areas but has zero strength. "Gap filling" CA is only for the tiniest of gaps. All CA except the flexible variety is very brittle and will easily crack if too thick. An aliphatic resin like yellow woodworking glue or Titebond is a great alternative to CA. It seldom causes a build to take longer because it dries pretty quickly. Parts like a rudder or elevator can be handled 15-30 minutes after the last part is glued in. It also gets lighter as it dries unlike CAs and epoxies and is more durable in a hard landing than CA because it retains some flexibility and it soaks into the wood fibers.
Washout, as was mentioned previously, is easy to add on the building board. Just prop up the trailing edge of the outboard rib with a piece of scrap balsa 3/8" thick so you build the twist into the wing. That way you aren't dependent on the covering alone to create and hold the washout. Washout causes the outboard portion of the wing to remain flying as the inboard area stalls. The result is that if you stall, the plane drops the nose straight ahead and starts flying again instead of dropping a wing.
I can't agree that airplanes with ailerons fly "better." They fly DIFFERENTLY. Ailerons make it easier to roll. They keep the plane more interesting beyond the initial learning curve. I have a Kadet Senior that's 20 years old and it's still fun to fly without ailerons. I'm thinking about building the smaller Seniorita with electric power because I like the Senior so much.
Have fun with the build.
David
01-03-2015, 06:23 AM
#34
Junior Member
Thread Starter
Join Date: Mar 2011
Location: Noblesville, IN
Posts: 14
Likes: 0
Received 0 Likes
on
0 Posts
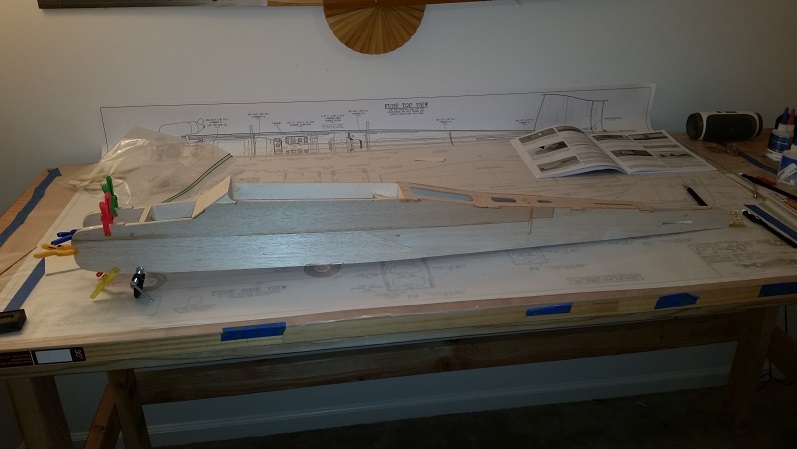
Thanks for all the good info and words of encouragement! It's settled, I'm building wing B with ailerons and a bolt on wing. Once I took the clamps off the firewall and wing bolt plate I didn't like how they fit together. The edges are uneven by .5 to 1mm. I'm thinking I want to file the edges smooth but don't want to take off too much material. It might be better to wait until I get to installing them into the fuselage before I do any adjusting. The gap in the fuse I was talking about you can't see unless you hold the part up to the light so I'm not gonna worry about it. I am starting to see the value of reading the WHOLE manual before starting instead of reading ten pages ahead. I might take a break from building after the step I'm on to finish reading the manual. Besides if I keep going the way I have been I'm gonna need an engine soon. I am thinking OS .46 AX.

01-03-2015, 03:44 PM
#35
Junior Member
Thread Starter
Join Date: Mar 2011
Location: Noblesville, IN
Posts: 14
Likes: 0
Received 0 Likes
on
0 Posts
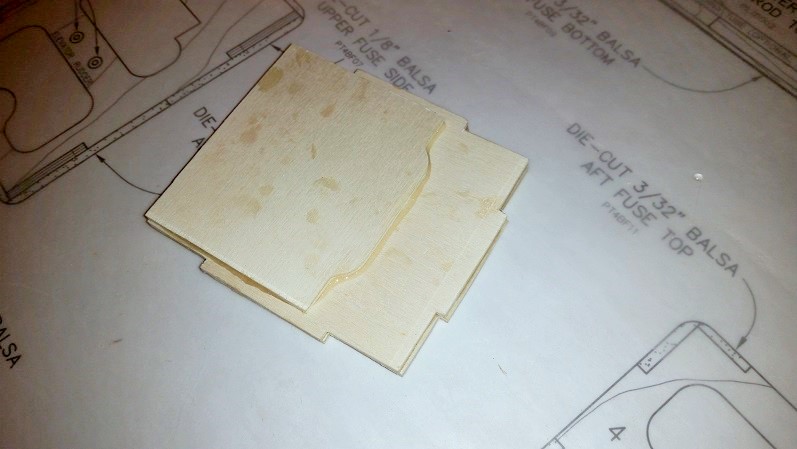
Well, I did my first major screw up today. When I was gluing the fuse sides together I put too much pressure on it and broke F2 and F3 formers. Luckily they didn't break all the way and I was able to glue them back together. I test fitted some of the other fuse parts and everything fits good and it seems solid. I might have gotten away with it. Right now I have the firewall epoxied in and curing. Here are the pics of my ugly fix. Ugly but hey, it works.


01-03-2015, 04:48 PM
#37
 01-03-2015, 05:07 PM
#39

The point being, Rapid 13, that we all experience a blunder, or two, or three, when we build our models.
01-04-2015, 06:37 AM
#40
My Feedback: (1)
Join Date: Aug 2004
Location: Decatur,
IN
Posts: 44
Likes: 0
Received 0 Likes
on
0 Posts
Rapid, there are tons of clubs in the Indy area, please save some time and effort on your part by seeking them out, visiting them, and finding an instructor who you are comfortable with. Also check in the events forum here, there is an indoor fly session scheduled most Saturday nights (I think) in Indy. Go there, meet some people who can fly, and make yourself known. There is no substitute for a helping hand in R/C aircraft. I find most of the fun of R/C is the social aspect. Maybe you will also!
Your choice of a trainer is a fine one, just exert some patience, know you will make small errors, and almost no errors cannot be fixed (except perhaps making two fuselage sides the same instead of mirror images (don't ask how one knows this!)
Good Luck, and enjoy!!
Your choice of a trainer is a fine one, just exert some patience, know you will make small errors, and almost no errors cannot be fixed (except perhaps making two fuselage sides the same instead of mirror images (don't ask how one knows this!)
Good Luck, and enjoy!!
01-05-2015, 02:46 AM
#41
Junior Member
Thread Starter
Join Date: Mar 2011
Location: Noblesville, IN
Posts: 14
Likes: 0
Received 0 Likes
on
0 Posts
Things have been moving along much faster than I thought. Most everything has been going together well. When I glued the fuse bottom on I glued the masking tape to the fuse. PITA but I got it sanded off. Probably should have used medium CA instead of thin. Then the wing bolt plate and former F3 had a gap in it that I filled with a shaved down piece of balsa. Other than that I have some small gaps but I guess that is to be expected. I will probably fill them with the filler I use for the control tubes. Now I need to get an engine. I want to go OS but am not sure if I should get the .46LA or spend the extra money and get the .46AX. Since this is my first plane I'm kinda leaning towards the LA to save money.


01-05-2015, 07:35 AM
#42
Join Date: Apr 2014
Location: Jackson , Georgia
Posts: 49
Likes: 0
Received 0 Likes
on
0 Posts
I would spend the extra bucks for the 46ax. That's what I did. I ran it on my trainer and then mounted it on my easy stick after it learned to fly. . It will scream on a sport plane. The AX will last a long time with ball bearings.
01-05-2015, 07:41 AM
#43
Join Date: May 2006
Location: Gypsum,
CO
Posts: 377
Likes: 0
Received 0 Likes
on
0 Posts
Hey Rapid,
Chances are that you will take the engine from this plane and use it in several more airframes. I have an OS .46FX (?) that has seen 5 or 6 planes and is still running strong. The LA will serve you well in your trainer (had one in a Goldberg Eagle II), but as you move into sportier types of planes you might be happier with the AX... Just my thoughts...
Chances are that you will take the engine from this plane and use it in several more airframes. I have an OS .46FX (?) that has seen 5 or 6 planes and is still running strong. The LA will serve you well in your trainer (had one in a Goldberg Eagle II), but as you move into sportier types of planes you might be happier with the AX... Just my thoughts...
01-05-2015, 08:39 AM
#44
My Feedback: (-1)
I use light weight spackle for a filler, the tub it comes in weighs more then the product. I let it set up over night then sand it smooth then just give it a bit of thin CA and it becomes part of the wood. Once it has been CAed it doesn't sand though.
I used the OS .46la engines in all my fun fly planes, all of the planes were the Up-Roar then I used them in several different planes over the years. They are great little engines and last forever if you use a good fuel with Castor in the mix.
However the FX and AX are a better product and produce more power and if you live long enough to wear one out they are an easy rebuild but the LAs are a bushing type of engine so when they wear out you pretty much just toss them.
I have known people to rebush them but for the price they aren't worth the trouble.
In the small two strokes any of the OS engines are a good choice. The OS are pretty much trouble free and backed by a good warranty. There are other brands though but for a first engine I would stick with the OS.
01-06-2015, 05:01 PM
#45
Junior Member
Thread Starter
Join Date: Mar 2011
Location: Noblesville, IN
Posts: 14
Likes: 0
Received 0 Likes
on
0 Posts
Thanks for the input guys! I've been checking out clubs in my area. I found one that operates a field ten minutes from my house and has a beginner program. As far as an engine goes I think I will go with the LA because it will work in the PT40 and seems like a reliable engine (plus it's cheap). I can always upgrade the engine when I get into another plane. And, if I crash and wreck the engine I won't feel as bad. Other than that I'm not doing more building until this weekend but I looking forward to trying spackle as filler. I take it that if I don't fill the gaps the monocote will shrink into it and be visible.
01-06-2015, 05:17 PM
#46
My Feedback: (-1)
Well, the LA series is also the most user friendly. I discovered real fast that you should remove the head screws one at a time and clean them then put a dab of locktite on them or they tend to back out. The air bleed carb is all but idiot proof.
The covering doesn't sink into any gaps, if it shrinks well it covers them and you can't really see them. Sometimes the covering will show a dark line where the CA glue was used.
The covering doesn't sink into any gaps, if it shrinks well it covers them and you can't really see them. Sometimes the covering will show a dark line where the CA glue was used.
01-07-2015, 08:45 AM
#48

Thanks for the input guys! I've been checking out clubs in my area. I found one that operates a field ten minutes from my house and has a beginner program. As far as an engine goes I think I will go with the LA because it will work in the PT40 and seems like a reliable engine (plus it's cheap). I can always upgrade the engine when I get into another plane. And, if I crash and wreck the engine I won't feel as bad. Other than that I'm not doing more building until this weekend but I looking forward to trying spackle as filler. I take it that if I don't fill the gaps the monocote will shrink into it and be visible.
Dennis
01-07-2015, 08:45 AM
#49
Thanks for the input guys! I've been checking out clubs in my area. I found one that operates a field ten minutes from my house and has a beginner program. As far as an engine goes I think I will go with the LA because it will work in the PT40 and seems like a reliable engine (plus it's cheap). I can always upgrade the engine when I get into another plane. And, if I crash and wreck the engine I won't feel as bad. Other than that I'm not doing more building until this weekend but I looking forward to trying spackle as filler. I take it that if I don't fill the gaps the monocote will shrink into it and be visible.
Dennis
01-07-2015, 11:24 AM
#50
Senior Member
My Feedback: (3)
Join Date: Sep 2002
Location: OZark,
MO
Posts: 2,694
Likes: 0
Received 0 Likes
on
0 Posts
CONGRATS! on building your first trainer! You have gotten lots of very good tips. I have built a few trainers and the one you picked out will be perfect.
I have flown the LA s and the other OS motors. I have used up a few LAs but still own and fly the 1988 OS FSR ABC .40 that was my first RC motor.
if you go LA go for the 46.
When you get to covering SAVE all the backing! It is the best to build on over plans, also save some the little pieces of covering for patching.