


What the hell did I get myself into?
 12-28-2014 | 06:25 PM
#1
Thread Starter
Junior Member
Joined: Mar 2011
Posts: 14
Likes: 0
Received 0 Likes
on
0 Posts
From: Noblesville, IN
After years of racing rc cars I decided that I want to get into planes. Since there probably isn't much outdoor flying here in Indiana for the next few months I thought I would try to build my first plane. A Great Planes PT40 kit will be on my doorstep tomorrow. After reading the manual for the past few days I am thinking what the hell did I get myself into? I have a strong mechanical ability but this is all new to me. Yesterday I bought some supplies from the LHS and tried gluing some balsa and making some hinges. So far they have turned out pretty good. I'm just hoping the rest of the build is a straight forward as the first few steps. Being brand new to planes I wanted to start a thread to document my progress and post questions as they come up. Hopefully my experiences helps out other people just getting started too. Thanks in advance and I am tentatively looking forward to getting started.
 12-28-2014 | 09:55 PM
#3

My Feedback: (6)
Joined: Oct 2002
Posts: 2,684
Likes: 0
Received 0 Likes
on
0 Posts
From: Mountain Home,
AR
I've never built a PT40,, but Great Planes usually includes pretty good plans and manuals. Read the manual over and over until you fully understand each step and visualize them on the plans. If there is something you do not fully understand, the is a good place to ask. Somebody here will know and be willing to help. Understanding every step fully before executing that step is essential to a quality finished product.
12-29-2014 | 04:10 AM
#4

Looking at the instructions, and that box of lumber, can be daunting. Once you get into it, though, you'll soon figure out what's going on.
The plans and instructions should be straight forward. They'll lead you step by step, through your build. If you do run into questions, members of this forum will surely come to your assistance.
If you do a build thread, we can watch your progress, and alert you if we see anything questionable.
Welcome to building. Many of us find this side of the hobby the most enjoyable, with flying being an added bonus.
 12-29-2014 | 03:52 PM
#6
Senior Member
If your already doing hinges my guess is you bought an ARF (almost ready to fly) kit? Unless your just practicing.
I have a PT-40 flying for my winter beater with snow skis and a K&B 61 for power, pretty stout little trainer, easy to build and repair.
I have a PT-40 flying for my winter beater with snow skis and a K&B 61 for power, pretty stout little trainer, easy to build and repair.
Last edited by a70eliminator; 12-29-2014 at 03:55 PM.
12-29-2014 | 05:22 PM
#7
Thread Starter
Junior Member
Joined: Mar 2011
Posts: 14
Likes: 0
Received 0 Likes
on
0 Posts
From: Noblesville, IN
Thanks for the words of encouragement! I will try to keep updating this as a build thread as TomCrump suggested. I got the kit today and checked out the pieces for damage. So far so good. Then I unrolled the plans and found out my building table is not big enough to lay the plans out completely. I built a work bench exactly like the one in the manual and used a 30x80 interior door. I guess I will have to move the plans as I build different sections. The manual says to separate all the parts and label them. Seems like a pain and a good way to lose parts. Is it really necessary to do that? Or can I take what I need as I need it like building a car kit?
12-29-2014 | 06:15 PM
#8
Thanks for the words of encouragement! I will try to keep updating this as a build thread as TomCrump suggested. I got the kit today and checked out the pieces for damage. So far so good. Then I unrolled the plans and found out my building table is not big enough to lay the plans out completely. I built a work bench exactly like the one in the manual and used a 30x80 interior door. I guess I will have to move the plans as I build different sections. The manual says to separate all the parts and label them. Seems like a pain and a good way to lose parts. Is it really necessary to do that? Or can I take what I need as I need it like building a car kit?
I like to cover my plans with wax paper and build right on top. Use the paper with the heavier wax content. As long as you don’t flood the joint the wax paper will protect your plans. The brand I like to use is Reynolds Cutright Wax Paper.
I recommend using a yellow highlighter and highlight every step as you complete it. That way if you skip a step to do later a quick glance through a missed step will stand out. If you leave your construction for a while you know exactly where you left off.
Take your time cut and fit twice glue once.
Dennis
12-30-2014 | 10:21 AM
#10
Homasote comes in a 4x8 sheet so if you save the off cuts from covering the door you can make a few small portable building surfaces. These are great for smaller subjects or even sub assemblies and I can even stand them up against the wall with the parts pinned in place.
Dennis
Dennis
12-30-2014 | 11:02 AM
#11
Junior Member
Joined: Dec 2014
Posts: 3
Likes: 0
Received 0 Likes
on
0 Posts
One thing to remember throughout your build, especially if this is your first time, is to be very patient. If you find yourself rushing ANY part of the building process, tell yourself to chill out and concentrate. The itch to fly will always be there and it is pretty easy to get frustrated. Just take your time and you'll end up with a pretty, and formidable, flying machine.
12-31-2014 | 02:47 AM
#12
Thread Starter
Junior Member
Joined: Mar 2011
Posts: 14
Likes: 0
Received 0 Likes
on
0 Posts
From: Noblesville, IN
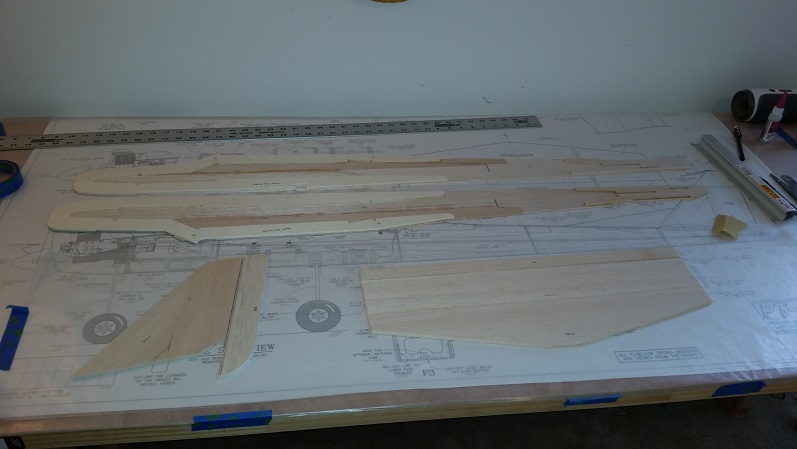
I got the fin and stabilizer glued last night. They turned out flat and smooth. The wax paper stuck to the stabilizer but that was easily sanded off. Now its time to start on the hinges, tomorrow.

12-31-2014 | 08:16 AM
#14
Dennis
12-31-2014 | 08:21 AM
#15
If your going to build from plans its a good idea to copy the prints so you have something to refer to that isn't covered by the structure you are building. Some of the prints I have built from have all the instructions printed right on the print. I recommend taking to a local printer and having them make you a copy. One hint if it says copyright any where on the print cover it with white out or magic marker. Some places don't like to make copies when they see the copyright in plain view.
12-31-2014 | 04:03 PM
#16
My Feedback: (-1)
I started using Parchment paper, it's found with the wax paper at the market, you just can't see through it as well but nothing sticks to it. I also use the plastic wrap as Tom mentioned. Never tried homasote but it looks pretty good.I have been using the same old soft pine building board I made several decades ago but it has been added to over the years as required.
Plans can be cut to fit the board or folded. Anyway you can do it. If you want to make a copy of the plans Kinko's does a nice job. Sometimes I do and sometimes I don't, depends on my mood and the plane I'm building.
Plans can be cut to fit the board or folded. Anyway you can do it. If you want to make a copy of the plans Kinko's does a nice job. Sometimes I do and sometimes I don't, depends on my mood and the plane I'm building.
12-31-2014 | 04:59 PM
#17

My Feedback: (1)
If one is a Monocoat user and saves most of the backing material I find this to me is a superior backing to the wax paper for building. Tower hobbies even sells the same stuff packaged for building plans protector.
On my current build I unfortunately ran out and being somewhat cheap was not about to Pay Tower prices for backing plastic so headed to the grocery. Picked up both waxed and parchment. Waxed being my old standby but thought I would also try the parchment. Did the first frame with the parchment and did not care for how it released and changed back to the waxed. I did find I like drawing frames and such on the parchment for bashes and so forth.
John
12-31-2014 | 09:36 PM
#18
My Feedback: (-1)
Funny how that works John, it seems to stick or not stick to parchment from batch to batch but for the most part I find parchment better then wax paper. My kingdom for the old wax paper before microwave ovens when you could peel the wax off the paper. I did a search and tried to find the good old stuff without any luck.
Gene
Gene
01-01-2015 | 09:15 AM
#19
Member
Joined: Aug 2011
Posts: 67
Likes: 0
Received 0 Likes
on
0 Posts
From: Dubuque, IA
I built one of these this summer from a partially built kit. It's a good flyer. We use it as our club trainer. The plans say you can build it with 8" or 5" of dihedral. I changed it to 3" and put a servo on each wing. I think high wing trainers with too much dihedral are challenging on windy days.
I also made it a tail dragger using a Dubro fiberglass gear and a Sullivan tail wheel. I also built it with a bolt on wing. The plans have the wing mounting blocks about an inch below the wing. That space is there if you use one wing mounted servo for the ailerons. But this means you have a large gap between the wing and mounting block. Therefor the wing can slide a little side to side. I glued a small block of wood to the underside of the wing as wide as the fuselage to prevent any shifting. It is a simple fix. The other way to fix it is to bring the mounting block closer to the wing.
Ours is powered by an O.S. 46fx. It is plenty of power for a trainer.
Ask plenty of questions as you build. There is a lot of good knowledge here.
Adam
01-01-2015 | 09:19 AM
#20
Like I said the heaviest wax paper I have found is Reynolds Wax paper. It may be a Canadian only product. Someone once suggested a comercial grade wax paper but heck it comes in like 1000 ft rolls. I think if I pin the wax paper over the plans then apply a light coat of paste wax and buff it off nothing should stick. Heck its what I use to release from my molds.
Dennis
Dennis
01-01-2015 | 02:44 PM
#21
Thread Starter
Junior Member
Joined: Mar 2011
Posts: 14
Likes: 0
Received 0 Likes
on
0 Posts
From: Noblesville, IN
I got the elevator and the rudder hinged today. It turned out better that I thought it would. I used the great planes center line tool and a #11 xacto blade for the slots and a razor plane and a bar sander to make the bevel. Everything is straight and even. I also glued the fuse sides. They look good but I did notice a couple of spots where they didn't fit together perfect and can see light through the joint. Can those spots be filled with thick CA? Also, I epoxied the wing bolt plate and firewall. The pieces don't fit together perfect but I figure they can be cleaned up later. Is that normal?
Last edited by Rapid13; 01-02-2015 at 02:20 AM.
01-01-2015 | 06:04 PM
#22

Joined: Apr 2014
Posts: 49
Likes: 0
Received 0 Likes
on
0 Posts
From: Jackson , Georgia
I am a beginner also. If I was you, I would learn to fly on an ARF trainer or a cheap used trainer. I would hate to crash a stick built plane that I have hours and hours building. I would fly the stick plane after after I learned to fly. Back in the day you had no choice but to learn on a stick built. Today you can purchase a arf under a hundred bucks. Also a simulator will really help you get started.
01-01-2015 | 06:08 PM
#23
Thread Starter
Junior Member
Joined: Mar 2011
Posts: 14
Likes: 0
Received 0 Likes
on
0 Posts
From: Noblesville, IN
I forgot to mention. I have to make some decisions about the wing. Bolt on or rubber bands? Trainer wing A or sport wing B? Wing A locks out the ailerons has more dihedral. I been flying RealFlight for a few years and I have gotten used to flying with the ailerons but don't know how a real plane will be. Any suggestions?
01-01-2015 | 06:27 PM
#24
My Feedback: (-1)
I have only seen one pilot and was told by a friend of another that were able to pretty much be able to fly a plane after just using Real Flight. My instructor loaned me real flight G-nothing and when I was still teaching I loaned my students RF #2 but I picked the plane and had them doing exercises on it after a day of instructions at the field. I like a combination of both flight training and the sim. I have also found age makes a big difference. A 13 yer old will learn to fly a bunch faster then a 65 year old. Kids have been around joy sticks most of there lives. I had a 12 year old and a 60 year old learning to fly at the same time. The kid could solo in one day, the 60 year old took a couple months but a lot of that is fear. The 60 year old understood the price of the gear, the kid didn't care. Funny thing, when he had to buy his own gear he was a lot more careful and started to show nerves.
01-02-2015 | 03:12 AM
#25
I got the elevator and the rudder hinged today. It turned out better that I thought it would. I used the great planes center line tool and a #11 xacto blade for the slots and a razor plane and a bar sander to make the bevel. Everything is straight and even. I also glued the fuse sides. They look good but I did notice a couple of spots where they didn't fit together perfect and can see light through the joint. Can those spots be filled with thick CA? Also, I epoxied the wing bolt plate and firewall. The pieces don't fit together perfect but I figure they can be cleaned up later. Is that normal?
Pics of the wing bolt plate and firewall would help. Most likely, if you are satisfied with the joints, and they are solid, they'll be fine.

