


are these blades any good for cp pro?
 09-06-2018, 06:49 AM

My Feedback: (10)
Join Date: Jun 2004
Location: Orlando, FL
Posts: 1,543
Likes: 0
Received 0 Likes
on
0 Posts
Hi JPEE,
I forgot about BuddyRC - thats actually where I got my paraboard from as they were the only ones that offered it with powerpole connectors. Thanks for your video. When the paraboard was working it was nice to charge up all my 6S lipo's in about 30 minutes.
However, one day when charging my charger, in the middle of the charge, started beeping stating uneven cells detected. When I checked each lipo individually I discovered one lipo wasn't charged at all and the other one had one cell at 4.2 while the other 5 were at 3.9. So the board had developed a problem and I wasn't able to use it any longer as I had tried different configurations using some simple 3S lipo's. Each time I kept getting the same problem - one lipo would charge too high and the other not at all.
That is why I'm leaning more towards the squiddy parallel wires this time instead of the board. Also to try something a bit different. I had made a few extra longer cables to extend the spacing so the lipo's had more room when charging using the board. I'll let you know how I feel about them after I get them up and running.
Mark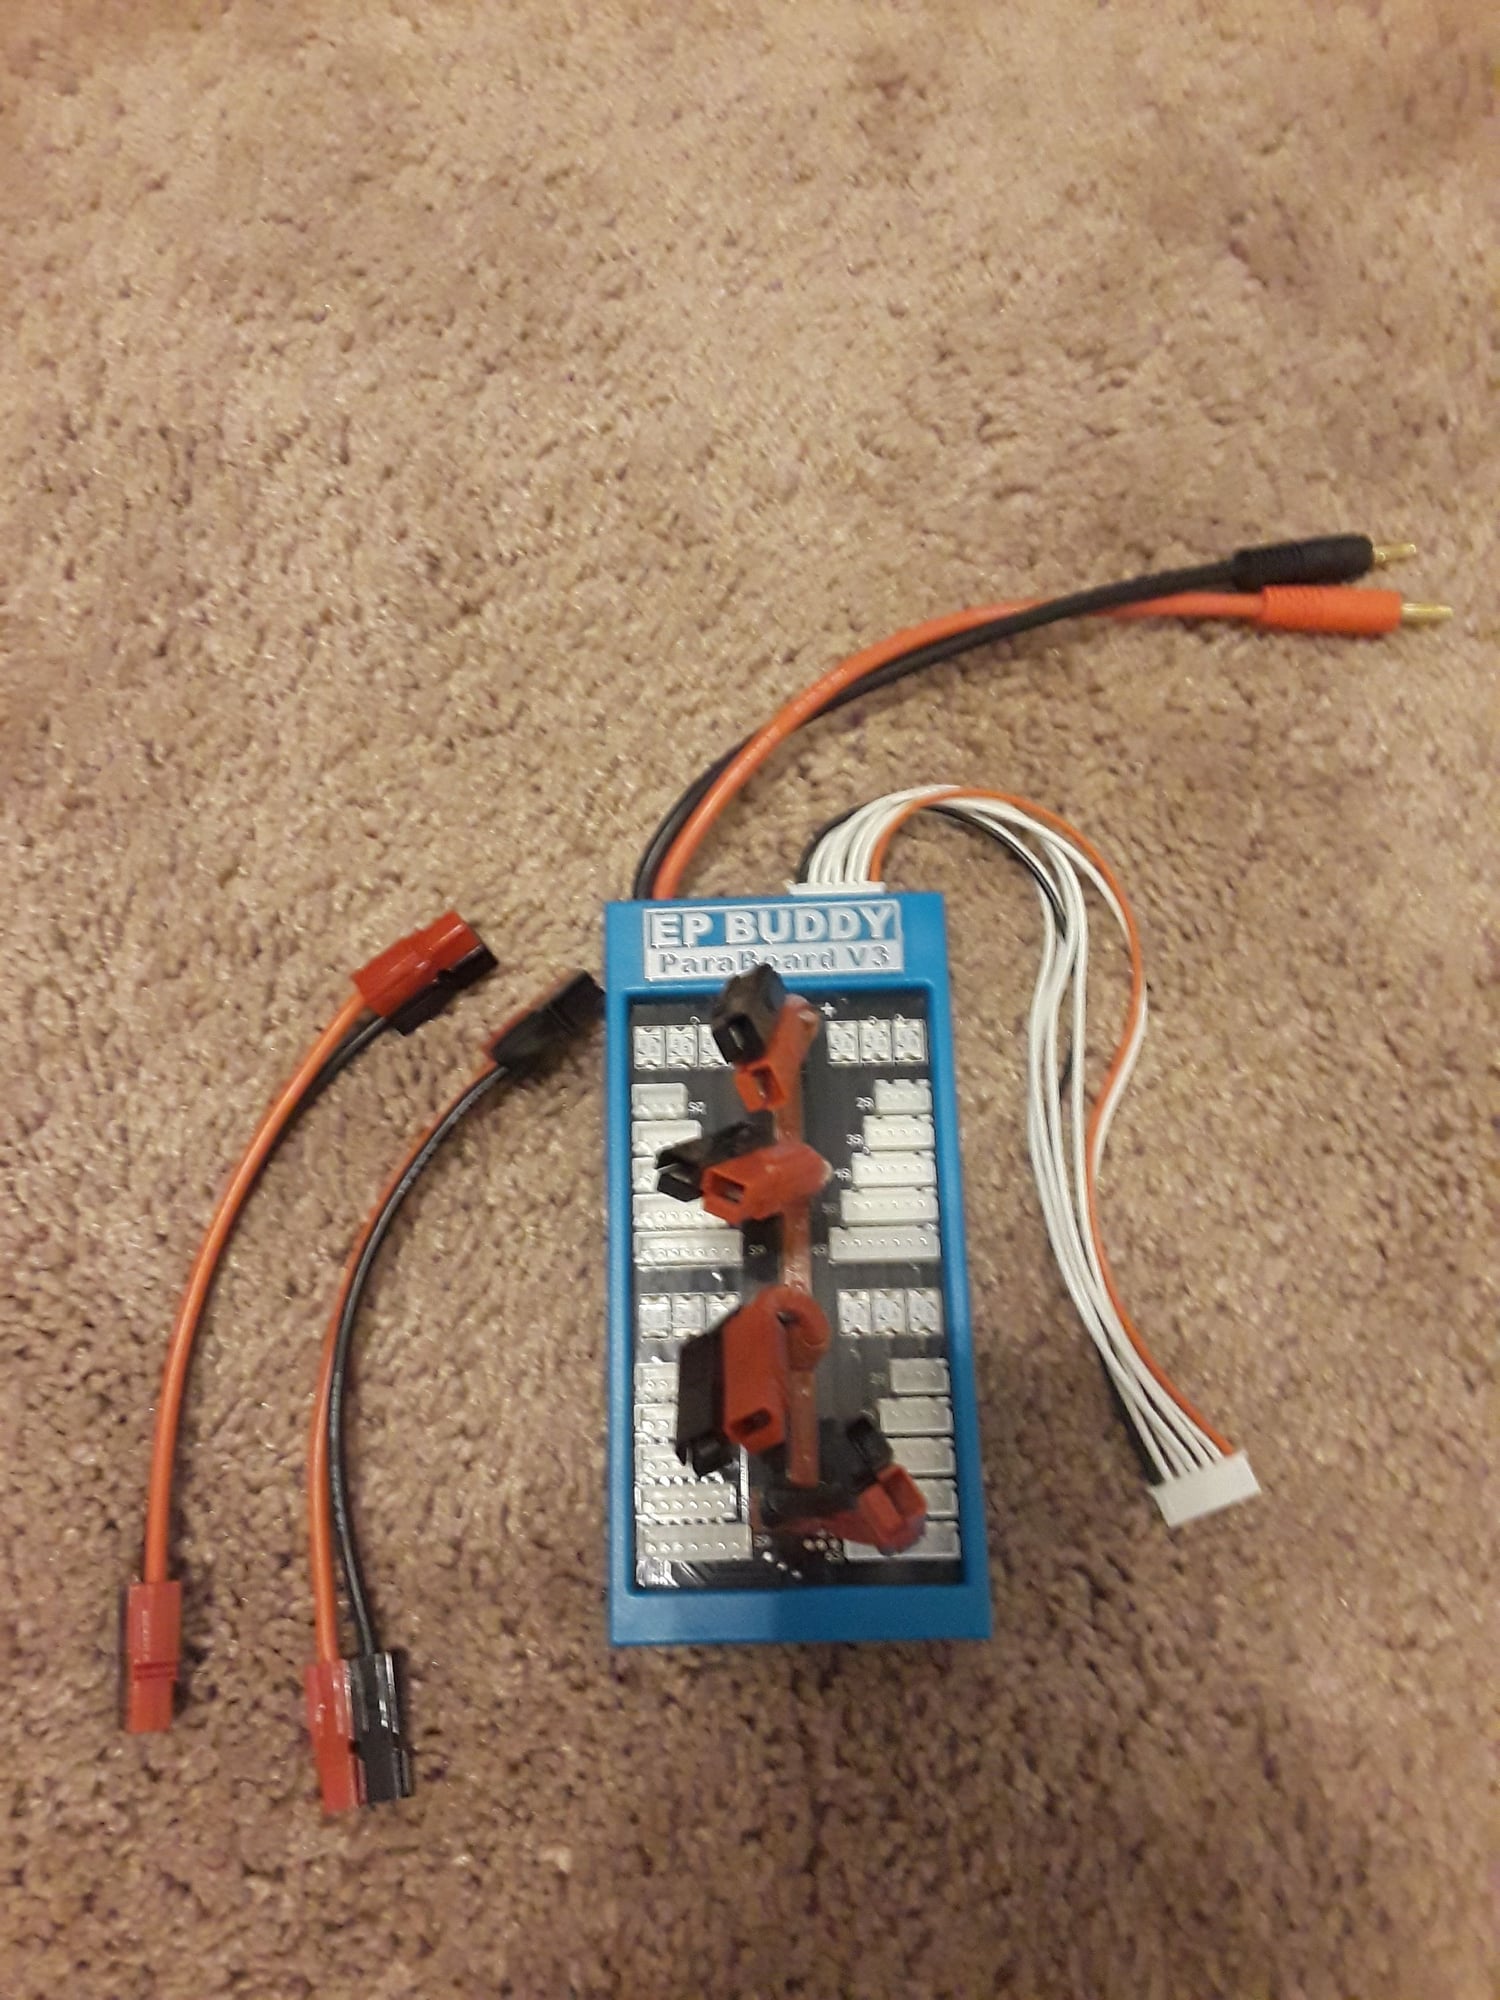
 09-06-2018, 09:09 AM
Well Mark,
That is the proof of the pudding as they say, your board took a big dumper for sure! But that said, anything can have a failure. I look forward to the skiddie parallel charging cord you use. Like you and not shown in my video I have 6 balance connector extensions to go from the para board to where ever I need them. I have so use EC5 6-8 extension cords from the board to where the batteries are. As an example I set 4 ea 6S on each side of the board like wings on each side. Then like bricks I stack the last two batteries on the top of the first layer cross ways thus having a two tear stack. I also want to note that my charger puts out 30 amps!!! which taking my Gens 5300s and rounding them down to 5000x6ea takes 30 amps to charge. ALSO most important I run my charges with an input of 25vt no the typical 12. By the time to step up from a 12 vt power source to 25v to charge those 6S you have put a critical load on the whole system and perhaps...........that might have added to your issue......maybe, If you push a large load from charger it has to have the capability. when I do 6 packs I have a my charger and power source outside in the shade on a table. If I am in the garage I may set them on the floor and often will have a small table fan on the to help dissipate the heat from the charger rear cooling fins.
OBTW here is what a rev servo runs.
https://www.motionrc.com/pages/searc...=reverse+servo
09-08-2018, 05:31 AM
My Feedback: (10)
Join Date: Jun 2004
Location: Orlando, FL
Posts: 1,543
Likes: 0
Received 0 Likes
on
0 Posts
Hi JPEE,
Your reverse servo isn't all that bad price wise. I have several of the Freewing brand servo's that came with my Freewing planes and they do fine, so no problems there. I didn't want to downgrade the importance of the flaps verses something more critical, like the elevator but since the flap malfunction was the possible cause your crash then it isn't so noncritical it would appear. Who would have thought - a flap of all things?!!
I will most probably start with only charging 2 of my lipo's at first so I can get comfortable before deciding to do all 4 at once. Your wonderful powersupply you helped me build a few years back will push out the full 24 volts and my revolectrix charger can handle 12 and 24 volts so no problems there. I looked up the purchase date from Buddyrc for my board and it was purchased 10/27/2013. Wow, 2013! I have nothing to complain about as that thing lasted 5 years.
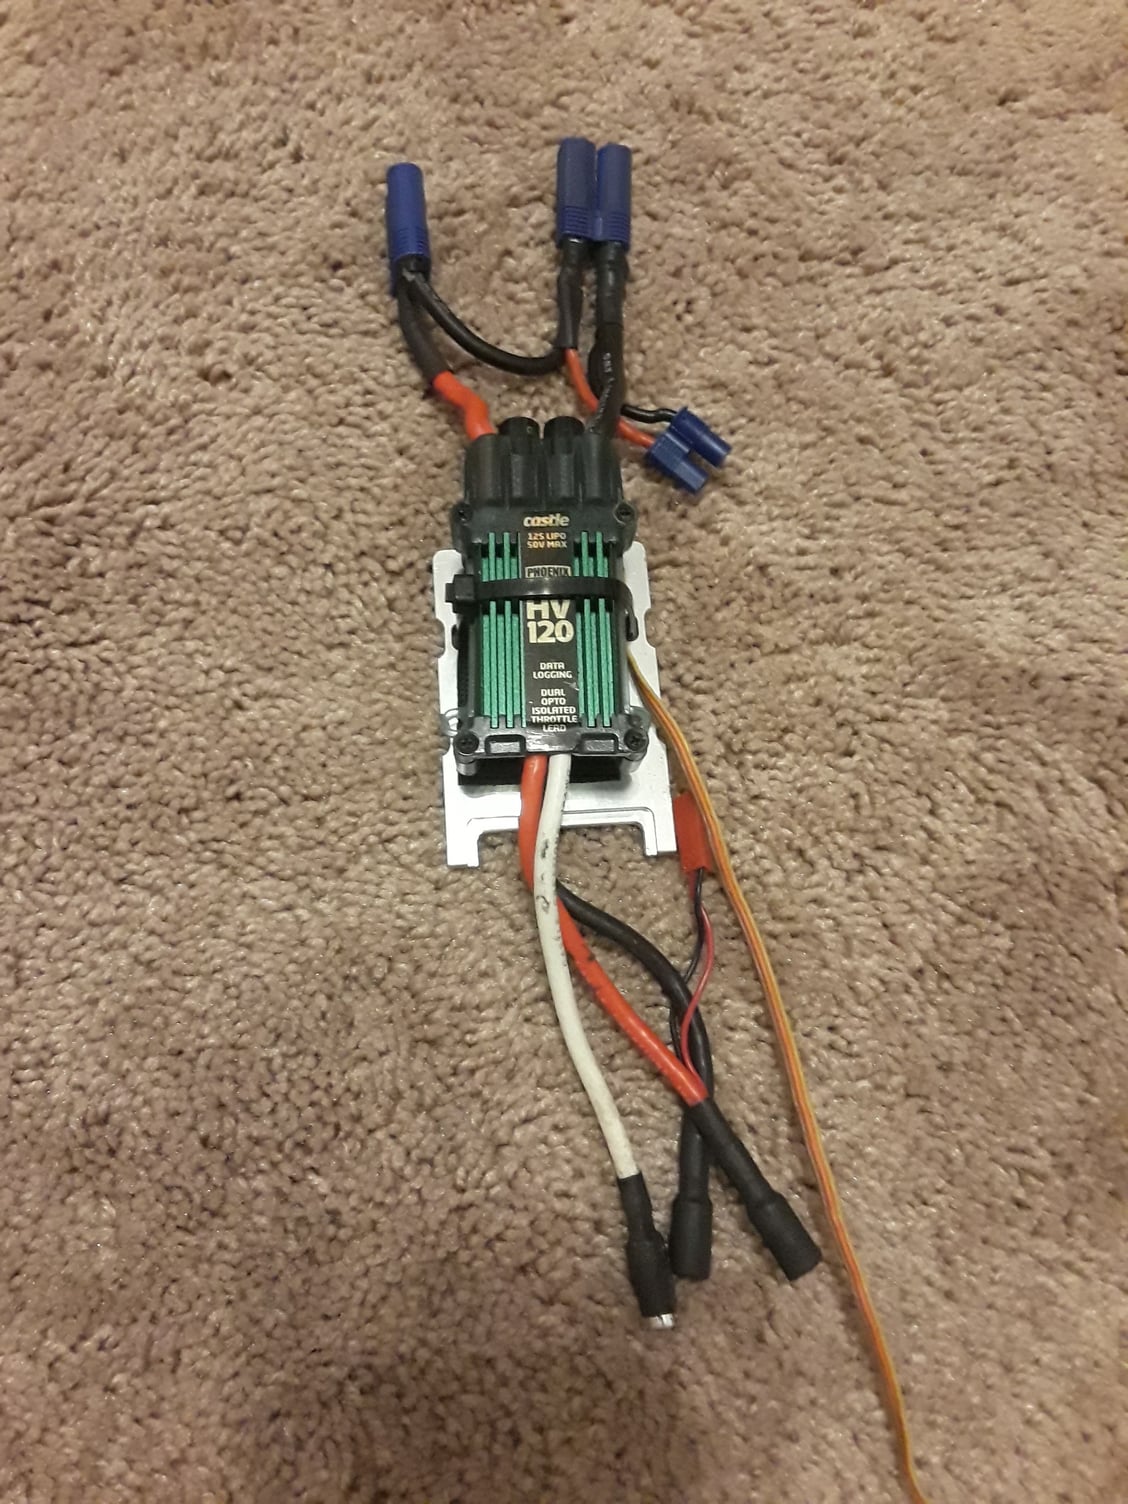
I do have a question about how to hook up the 2 lipo's to the esc for 12S - do you just plug one batt in, then the other? Won't the esc arm when the first batt is plugged in? Or is there some electrical magic that I'm missing? Just don't want to burn up anything!
Your reverse servo isn't all that bad price wise. I have several of the Freewing brand servo's that came with my Freewing planes and they do fine, so no problems there. I didn't want to downgrade the importance of the flaps verses something more critical, like the elevator but since the flap malfunction was the possible cause your crash then it isn't so noncritical it would appear. Who would have thought - a flap of all things?!!
I will most probably start with only charging 2 of my lipo's at first so I can get comfortable before deciding to do all 4 at once. Your wonderful powersupply you helped me build a few years back will push out the full 24 volts and my revolectrix charger can handle 12 and 24 volts so no problems there. I looked up the purchase date from Buddyrc for my board and it was purchased 10/27/2013. Wow, 2013! I have nothing to complain about as that thing lasted 5 years.
I do have a question about how to hook up the 2 lipo's to the esc for 12S - do you just plug one batt in, then the other? Won't the esc arm when the first batt is plugged in? Or is there some electrical magic that I'm missing?
Just don't want to burn up anything!
09-08-2018, 05:54 PM
Hello Mark,
I cannot see whats going on with that plug to the ESC? I looks like two EC5s and an EC3? Now that could be just the angle of the shot taken. I have attached a video with two still included at the beginning of the video. I would really like to see a photos of the heli when it is near together so as to see where the ESC is gonna be. That might explain how your...if need pig tail will be run that you'll see in my video. When you do a bench test, I suggest you hook up the batteries first and when your think they are in series, put a volt meter on the EC5 before you plug in the ESC if possible to verfiy your are at the 24 vt.
Yea, the servo deal is no big deal, I'll get to it when I have some time. We are back in 100s again today so I got up early and took the Radian and did three packs floating the sky with the guys. No worries everything worked great there.
OK take care JP
BTW: Watch in HD
09-10-2018, 08:04 PM
My Feedback: (10)
Join Date: Jun 2004
Location: Orlando, FL
Posts: 1,543
Likes: 0
Received 0 Likes
on
0 Posts
Thank you JPEE for the personalized video - it helped A LOT!
Yes, my Y is soldered directly to the ESC. Looks to save a bit of room up front not having extra lengths of wire. I just didn't know how to plug both batts to it, or should I say, if there was a sequence. After watching your video I think I have it figured out. I'll need to check out all the electronics but after I charge up my lipos, which by the way my parallel squiddies come tomorrow! Also, the smaller EC3 is to hook up to the BEC.
Congrats on getting some glide time with the Radian - hope you found a shady spot to retreat from the sun!
Mark
09-16-2018, 01:31 PM
Hello Mark,
I took that hobby king servo part I believe as you suggested and watched the video and re-soldered the internal wiring to reverse the one servo to get my flaps to work in unison. Came out very well and I’m very tickled and here is the end result in the video. I also broke off the tabs on the one wing where they both slide over each other in the middle the fuselage with a set of through screw from the belly that hold both wings in place. I had considered just gluing the wings in permanently but decided no let’s make the repair proper. I used gorilla glue with through carbon fiber rods pushed through the broken tabs along with CA and let it dry for three days. It appears to be a good fit and be plenty of strong. So here again is the little video I just finished here on the bench today Sunday.
JP PS: Nick let us know how you’re doing.
Last edited by JPEE; 09-16-2018 at 01:41 PM.
09-20-2018, 01:08 AM
My Feedback: (10)
Join Date: Jun 2004
Location: Orlando, FL
Posts: 1,543
Likes: 0
Received 0 Likes
on
0 Posts
Hi JPEE,
Or should we be now calling you Mr. Video Tutorial Extraordinaire? lol
The whole serial electric thing is a bit puzzling to me but I have been doing a bit of research into understanding it. The whole black wire of one batt going to the red wire of the other batt throws me but it is the way of completing the circuit in this type of circuit wiring. I'll just have to accept it as is and get used to it!
Your wing tab fix was quite impressive and it appears you kept the dihedral intact - well done. I worked with Gorilla glue once and didn't like it - the way it expanded and pushed itself out of the hole I was working on made a mess of the repair. I still like my epoxy for repairs. But you seemed to do a good job with it, and the CF rods gives those tabs extra strength.
So you were able to resolder those small servo wires in reverse so the servo operates in the same direction as its opposite? Sometimes its better to work with what you have rather than buying again. And your radio talks to you?!? ha, ha! I had to reply your video a few times to be sure of what I heard! How funny - a talking radio! I now remember you mentioning it when you first got it but to actually hear it, wow. lol.
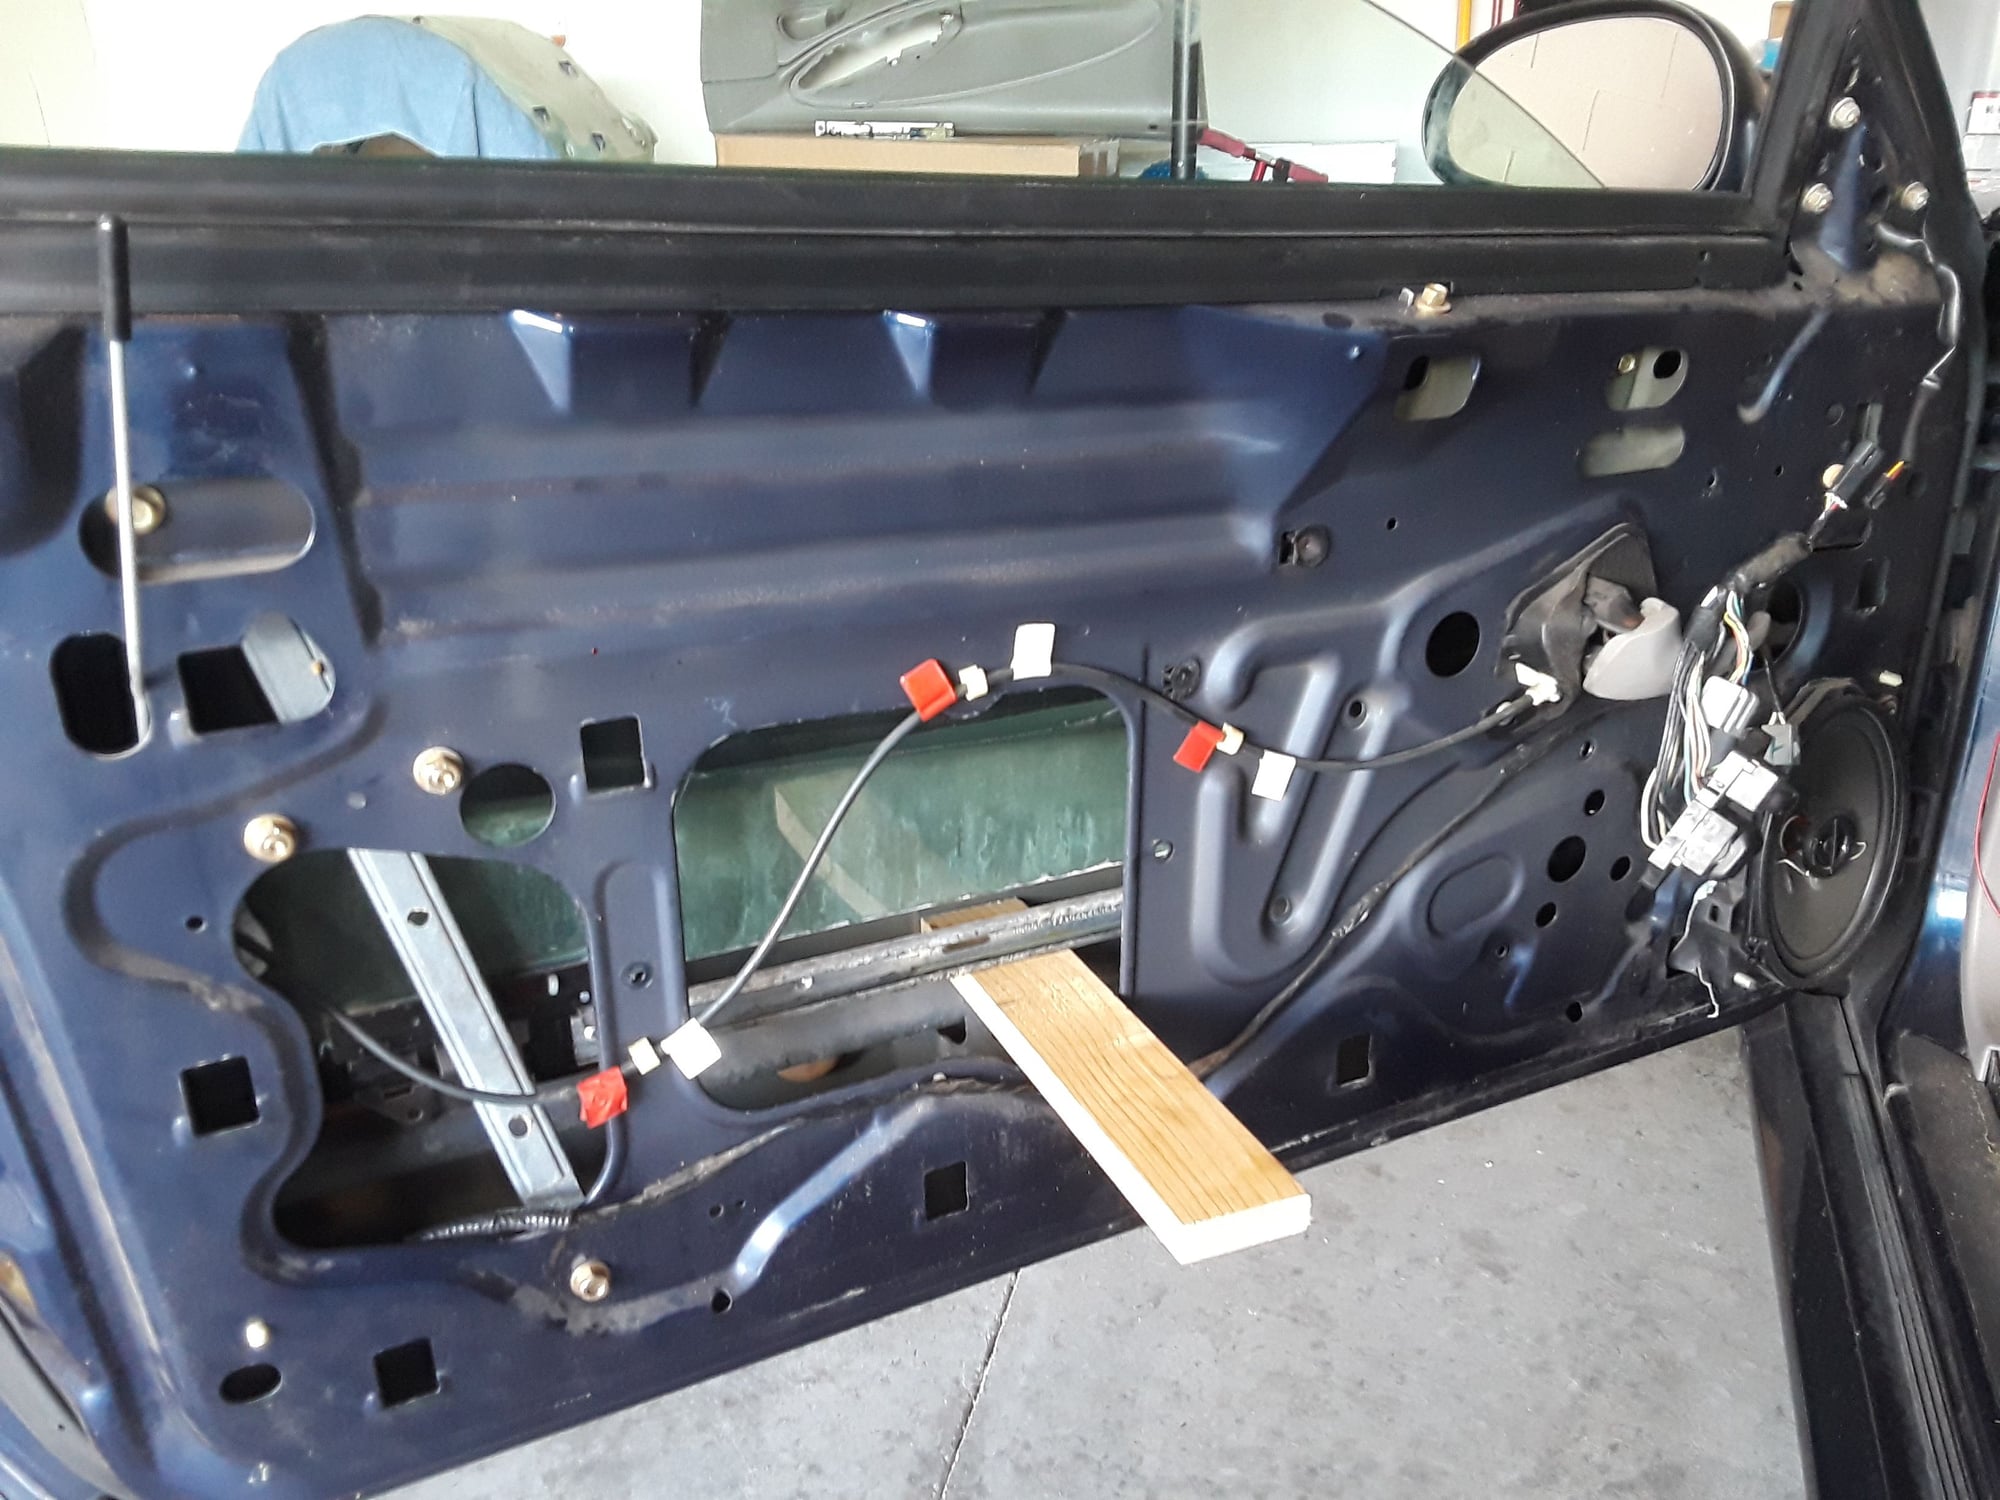
Work on the heli has been slow b/c my car has required my attention the past week. Got to work last week and when I went to roll up my window...nothing. Dead at the spot. Can you imagine, pulling up to work, getting ready to go in and then the window does nothing. Plus, a thunderstorm was brewing. So all I could do was drive back home and take the wife's car.
On my day off I was able to take the door apart (with the help of youtube videos) and get the motor and regulator out. Now, they say this job is a bxxxch. Get yourself a Philips screwdriver, a 10 and 11mm sockets, and a whole slew of cuss words! No kidding. I tore my hands up pretty good with all the metal in there. Good thing my tetanus shot was up to date! And when it was finished did it work? The motor, yes. The window, however only went up a quarter way then got jammed. Arrgh! So far I have redone this job 3 times and still the window gets jammed part way. So now at least I can have the window completely closed so I can drive it to work but I'm going to try another thing next week and see if that works. Right now its been too dang hot to work in the car and I don't want to rush the job and chance breaking the window. On a positive side, I can take everything out without tearing up my hands anymore. lol!
So that's my life on this side of the coast!
Mark
Or should we be now calling you Mr. Video Tutorial Extraordinaire? lol
The whole serial electric thing is a bit puzzling to me but I have been doing a bit of research into understanding it. The whole black wire of one batt going to the red wire of the other batt throws me but it is the way of completing the circuit in this type of circuit wiring. I'll just have to accept it as is and get used to it!
Your wing tab fix was quite impressive and it appears you kept the dihedral intact - well done. I worked with Gorilla glue once and didn't like it - the way it expanded and pushed itself out of the hole I was working on made a mess of the repair. I still like my epoxy for repairs. But you seemed to do a good job with it, and the CF rods gives those tabs extra strength.
So you were able to resolder those small servo wires in reverse so the servo operates in the same direction as its opposite? Sometimes its better to work with what you have rather than buying again. And your radio talks to you?!? ha, ha! I had to reply your video a few times to be sure of what I heard! How funny - a talking radio! I now remember you mentioning it when you first got it but to actually hear it, wow. lol.
Work on the heli has been slow b/c my car has required my attention the past week. Got to work last week and when I went to roll up my window...nothing. Dead at the spot. Can you imagine, pulling up to work, getting ready to go in and then the window does nothing. Plus, a thunderstorm was brewing. So all I could do was drive back home and take the wife's car.
On my day off I was able to take the door apart (with the help of youtube videos) and get the motor and regulator out. Now, they say this job is a bxxxch. Get yourself a Philips screwdriver, a 10 and 11mm sockets, and a whole slew of cuss words! No kidding. I tore my hands up pretty good with all the metal in there. Good thing my tetanus shot was up to date! And when it was finished did it work? The motor, yes. The window, however only went up a quarter way then got jammed. Arrgh! So far I have redone this job 3 times and still the window gets jammed part way. So now at least I can have the window completely closed so I can drive it to work but I'm going to try another thing next week and see if that works. Right now its been too dang hot to work in the car and I don't want to rush the job and chance breaking the window. On a positive side, I can take everything out without tearing up my hands anymore. lol!
So that's my life on this side of the coast!
Mark

 09-20-2018, 11:22 AM
Hi Mark,
Thanks for the new Handle Mr. Video Extraordinaire, me likie!
Here is perhaps another way that you can swallow the point even easier. Take anything you have around the house that holds more than 1 to 4 AA batteries. Each battery is 1.5 volts, when placed in your remote for instance notice the way they are turned opposed. So they are in series and now the voltage output is 3 volts. You’ve been doing this on older transmitters that hold 4 ea AAs for years. Also for thought is you lipos. When you get a 3s pack it has three cells within and each cell is 3.70! Now times that by three 3.70 X 3= 11.1 (what we call 12 volts. But when fully charged each cell comes in at 12.60 which as you see on your charger 4.2 per cell = 12.60. I think you built that 24 vt power supply and that was 2 ea 12 volt supplies, wired in series and now the output is 24 volts and you did that by running one black to a red and yadda yadda yadda. You are the man have been doing this for years.
BTW way I found my Blade 400, my starter heli tucked so far back I did not see it on my first three tries looking for it LMAO.
I see your door window job is like the one dealt with before we gave the Ford Fusion to my grandson where that rear power door-lock broke internally. I watched an un-tallied amount of YT videos too! I took photos of every step and laid out 1” wide blue painters tape on the work bench 3’ long in two rows. As I took the car apart I labeled and placed each piece in order as removed thus helping me later for reassembly. I also stopped and made some 15 second videos showing what I was doing with short cuts and wrench and metric sock sizes. It too was a SOB job and I had Band-Aids to prove it, dang Warfrin. I had to remove everything that held the glass and then tape it with wide packing tape in the closed position so then there was rooms for my arm inside the door. I also had to had have my Judy hand me screw etc when both hands were full holding something in place and threading with the other, she is great that way. After 36 years she can going into my two rollaways and get me pretty near the tool asked for everytime. Ell good luck and I am hoping that the next try will be the solution for you. If worse comes to worse and I do not say this lightly, open the other door and see how everything’s placement should be and………how its functioning. With the window not going up all of the way something is out of time. Like my servo reversing, when I was done and powered it on the bench and I held it together it only moved part way. Long story short I I had not centered the gears (they had slipped) so it was reaching it end point in an 1/8” and then the other direction it traveled 160 degrees, but I got re-centered in the end. Step away for a few days and come back and look at it fresh, it took me a few days too because when I got frustrated I WALKED AWAY until the next day, like you tired and sweating.
Good luck and it appears your Dad was on track re the storm from what we have viewed. Our friends sent us some 30 second snippets that were incredible, noting huge mind you but the scary clouds and heavy rain.
PLANES:
I will go over that in a day or two, this saga is long enough!
JPEE
09-23-2018, 07:41 AM

Join Date: Aug 2007
Location: Lincoln,
NE
Posts: 6,441
Likes: 0
Received 0 Likes
on
0 Posts
Mark,
I was basing my electric bill savings on what I was paying during the winter. It hovered around 75-85 inside this summer. I just had a ceiling fan running to stay cool. I know I have some air leaks through out the house, but I can’t fix them until some other things are resolved first.
I would recommend adding a power resistor to your ESC cables to first charge the capacitors if your ESC doesn’t have a built in mechanism to do that. It will help extend the life of the capacitors. I can show you a picture of my setup if you want.
Sorry to hear about your car window. My car has been having issues starting up lately. My brother in law is going to get me a new battery, since I am still using the stock battery. Hopefully it isn’t an issue with the starter. It seems to work fine after I drive it around for awhile, but won’t if it sits over night.
I did my first oil change on my motorcycle yesterday. I don’t know why I was so intimidated by doing it because it was easier than my car. Now I don’t have to pay the high dealer fees to change my oil.
John,
That is good your bixler is fixable.
Sorry I haven’t checked in sooner. I always forget when I last checked in.
Nick
09-23-2018, 07:57 AM
Nick,
I flew at the Dam this a.m. the first pack in the Bixler flew great and........I flew it most of the time at 1/2 flaps, the plane likes it. Of course she was slower in the air but took twice as long on a float across the sky as no thermals were out yet as I was there early for testing before the guy got there. Pack two, same thing.......flaps partially down and floating and then she nose dived and I had no control and I heard the “crack” when she hit up by the restrooms. When I got the there the nose was totally blown out BUT........the tail stabilizer-rudder and elevator wing both undamaged had come out of the fuselage and were behind the plane hanging on their rods pretty as you please! Upon inspection it was clear there was very little CA from HK when they assembled the plane and that's what let go! For the price of just the fuse, $20.00 “everything else including the wings are perfect” so it can be built for a few bucks........go figure! I may just put a new fuselage on it and sell it and get another plane that Hobby King has. It is Bixler size but a clone if you will of a Radian type glider with the folding back prop, when I’m home next April. No need now with shoving off for AZ in a week.
Glad you got the Bike's oil change in, easy peasy !
Yes please elaborate on the placement of the capacitor to the ESC!
Two things, you battery might be on its way out. But there could be an over night drain on it too. I doubt it if you have been without trouble till now. If you have a volt meter, even a cheap one you can......................set it for 12vt DC and then put the black prob on the NEG battery terminal, then take the red and "Carefully" put that in each cell into the acid and just lightly tough the plates in that cell and you will get a voltage of each of the cells on the battery and if one one is weak you see it. Use care and the wash your probes off. Most auto parts will do a "load test" on your battery for FREE. Your battery may say 12 vts but it amperage ability is gone or weak. When you drive the car your putting a high charge on the battery but over night because the battery cannot hold it as it is dying that is why the morning start doesn't happen.
Good luck I hope some this helps. I still have my fingers crossed on the your other daunting issue and I hope that fall your your way by years end.
JPEE
10-06-2018, 04:19 PM
My Feedback: (10)
Join Date: Jun 2004
Location: Orlando, FL
Posts: 1,543
Likes: 0
Received 0 Likes
on
0 Posts
JPEE,
I got your email and see Space X is targeting a launch and ground recovery attempt this Sunday at 7:21PM, your time. How exciting for you guys out west!
Mark
I got your email and see Space X is targeting a launch and ground recovery attempt this Sunday at 7:21PM, your time. How exciting for you guys out west!
Mark
10-06-2018, 04:43 PM
Thank you Mark we’re looking forward to it, it may just be a bright light in the sky and again maybe we’ll hear a sonic boom. However, today is been overcast and I don’t know if tomorrow is going to be the same? We shall see what happens.
Take care my friend thanks for your note.
Take care my friend thanks for your note.
Last edited by JPEE; 10-06-2018 at 04:45 PM.
10-07-2018, 05:06 PM
 10-07-2018, 08:23 PM
Mark, that video I took with my iPad sitting in the driveway! That’s just a snippet, the real video is five minutes long. If I get time tomorrow I’ll do the whole thing. It’s just with an iPad is a bit blurry, it’s not crystal...... but it was still exciting.
Last edited by JPEE; 10-07-2018 at 08:25 PM.