


Thecheatscalc's 36 tuning and assy
 10-22-2005, 05:42 PM
#1
Senior Member
Thread Starter

Join Date: Aug 2005
Location: fayetteville,
GA
Posts: 1,228
Likes: 0
Received 0 Likes
on
0 Posts
hello! I've decided to make a thread for setting up this fine bird.
to start is the setting up portion. I'll get to the asembling portion once my new parts come in. feel free to ask questions.
one last thing before I start. I'm going to be using quite a few pic's, so dialup users beware
STEP 1 setting up and ridding of that tail vibration and wag
once you've set up your heli using this guide the controler trims should look like this:

all centered, which is always the best setup as it uses the least power, giving you much longer flight times. remember the tabs are just so while flying you don't have to put it down if you're having fun, but after flight you should always fix the problem!
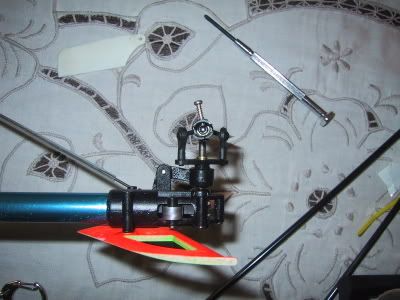
First on the list is centering that tail and removeing tail wag. lets take a quick look

ok as you can see the tail slider is supposed to be centered. (duh!) i have larger blades which are at 215mm, err shorter due to crashes... in anycase there are a couple ways to fix this.
1 slide the rear servo holder until the problem is fixed
2 change the positons on the servo horn
3 use the trim tabs on your Tx
4 legnthen the tail blades
5 change the postion of the blade holders on the shaft giving a larger/smaller movement area.
the recomended one? #1 #2 #4 and #5 so yes that's why I don't do tests, trick questions are much too fun :8
now how is this accomplished? Before I show more pics the servo horn should ALWAYS be in perpendicular to the tail boom when in neutral position. this allows for the largest range of travel
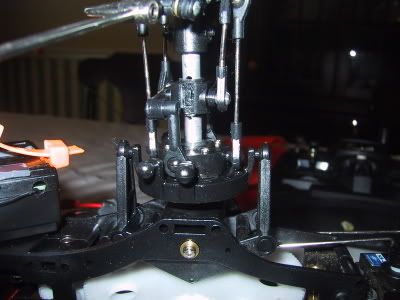
ok pic num #1 this shows a little black screw in the middle of the blade holders. this screw is VITAL, if it comes out, your heli will have some "difficultys countering" so just tighten it once done.

Ok now take this screw and loosen it. now slide it up and down the shaft usually only a mm or two.
This has screwed up your slider! it's now not in the exact middle any more. so to change it less than the horn, slide the holder on the shaft until the tail slider is almost centered, exact adjustments are hard, so you need to screw this ball link off just a tad at a time until it's completely centered. you may want to chck by flying ABOVE 3 feet and seeing if tail wag is gone.
now for checking tail wag REMOVE THE GYRO!! this could potentally cause problems. now note which way that tail is spinning. if you don't feel comfortable flying that high get a helper to tell you. flying on it's own is preferred. now if it's (head) turning to the right you'll want to slide that blade holder out. if the opposite way, slide it in. once it stays steady and only wind is affecting it stick the gyro back on. the tail wag should be completely gone, at least once out of ground effect inground effect tail wagging is normal, so don't worry about that, if you're just flying in ground effect removing the gyro is the best choice.
Now sometimes those blades come and the plastic holders are off center, it really stinks, and you don't know what to do. well this is the assemblers fault, not the heli's! now look you may not be able to see this in the pic, it's hard to take such close up pics, but there's a allen key screw in the holder, you must remove the blade to see it. just unscrew a ways until both match. This is also the way to make the tail have more athority so if they can't counter the larger blades by sliding on that shaft.
now for the final instruction in step one, most people have rolling problems, if they looked at their tail if their swash is level then they could find the problem. I have. the tail can rotate because of loose bolts. now if the tail shaft is not perfectly level then the tilt can cause the heli to roll, once I found myself trying to counter the roll and luckly found this. just level out your tail then point it up around 2-4 degrees, this should keep it still in the air and will help in ground effect.
You have completed step one. congrats!
to start is the setting up portion. I'll get to the asembling portion once my new parts come in. feel free to ask questions.
one last thing before I start. I'm going to be using quite a few pic's, so dialup users beware
STEP 1 setting up and ridding of that tail vibration and wag
once you've set up your heli using this guide the controler trims should look like this:
all centered, which is always the best setup as it uses the least power, giving you much longer flight times. remember the tabs are just so while flying you don't have to put it down if you're having fun, but after flight you should always fix the problem!
First on the list is centering that tail and removeing tail wag. lets take a quick look
ok as you can see the tail slider is supposed to be centered. (duh!) i have larger blades which are at 215mm, err shorter due to crashes... in anycase there are a couple ways to fix this.
1 slide the rear servo holder until the problem is fixed
2 change the positons on the servo horn
3 use the trim tabs on your Tx
4 legnthen the tail blades
5 change the postion of the blade holders on the shaft giving a larger/smaller movement area.
the recomended one? #1 #2 #4 and #5 so yes that's why I don't do tests, trick questions are much too fun :8
now how is this accomplished? Before I show more pics the servo horn should ALWAYS be in perpendicular to the tail boom when in neutral position. this allows for the largest range of travel
ok pic num #1 this shows a little black screw in the middle of the blade holders. this screw is VITAL, if it comes out, your heli will have some "difficultys countering" so just tighten it once done.
Ok now take this screw and loosen it. now slide it up and down the shaft usually only a mm or two.
This has screwed up your slider! it's now not in the exact middle any more. so to change it less than the horn, slide the holder on the shaft until the tail slider is almost centered, exact adjustments are hard, so you need to screw this ball link off just a tad at a time until it's completely centered. you may want to chck by flying ABOVE 3 feet and seeing if tail wag is gone.
now for checking tail wag REMOVE THE GYRO!! this could potentally cause problems. now note which way that tail is spinning. if you don't feel comfortable flying that high get a helper to tell you. flying on it's own is preferred. now if it's (head) turning to the right you'll want to slide that blade holder out. if the opposite way, slide it in. once it stays steady and only wind is affecting it stick the gyro back on. the tail wag should be completely gone, at least once out of ground effect inground effect tail wagging is normal, so don't worry about that, if you're just flying in ground effect removing the gyro is the best choice.
Now sometimes those blades come and the plastic holders are off center, it really stinks, and you don't know what to do. well this is the assemblers fault, not the heli's! now look you may not be able to see this in the pic, it's hard to take such close up pics, but there's a allen key screw in the holder, you must remove the blade to see it. just unscrew a ways until both match. This is also the way to make the tail have more athority so if they can't counter the larger blades by sliding on that shaft.
now for the final instruction in step one, most people have rolling problems, if they looked at their tail if their swash is level then they could find the problem. I have. the tail can rotate because of loose bolts. now if the tail shaft is not perfectly level then the tilt can cause the heli to roll, once I found myself trying to counter the roll and luckly found this. just level out your tail then point it up around 2-4 degrees, this should keep it still in the air and will help in ground effect.
You have completed step one. congrats!
 10-22-2005, 05:43 PM
#2
Senior Member
Thread Starter
Join Date: Aug 2005
Location: fayetteville,
GA
Posts: 1,228
Likes: 0
Received 0 Likes
on
0 Posts
Step 2: setting up those blades, you asked for it...maybe not...but still!
well this is the part most people have problems with. this deals with the swash, blades, and really the remaining servos, once set up right this should give you longer much more enjoyable, and easier to fly, flights. this is the first step towards aerobatics, yes that's right aerobatics. If you have those trims anywhere besides the middle, you have limited motion in a direction. this is unacceptable. Once you get to aerobatics this will help you immensly. Also this should help you with hovers, if done right your heli can fly hands off for around 5 seconds. mine is at around 3... still working on it, just havn't taken the time to completely adjust it. :8
ok let's begin.
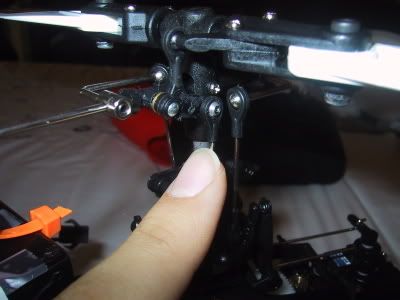
all servo arms must be at 90 degrees. look here.
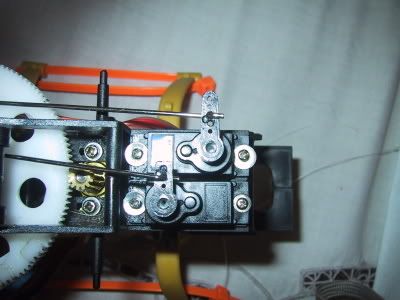
ok as you saw the swash servo arms are at 90 degrees. now, please adjust this ONCE THE CONTROLLER IS ON and neutral in all sliders. now most of the time the swash still isn't level it should look like this
the problem is that the servo arms must be in their spot that was just shown. this creates a problem which is easy to fix. just pop off the ball link on the approprate spot. now take that ball link and untwist it if you need that side higher if lower do the opposite. now for that forward back servo it takes some creative enginering. it doesn't have anything adjustable that attatches to the swash.
look at the one with the large cradle. now to fix this try loosening the servo screws that hold it in place, you can make minor adjustments by scooting it forward and back. if it needs to be a good bit closer, try bending the metal rod a bit until that's fixed.
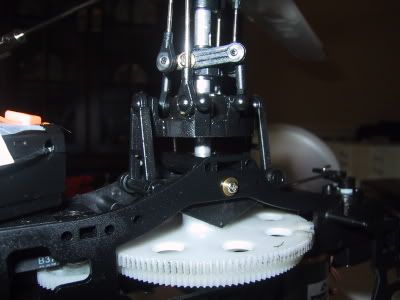
ok so the swash is level, but those blades aren't and are making it vibrate. to adjust look here
once again it's down to ball links. if you need the blade higher twist it up, and lower tighten. now before you do something stupid and locktite it, which you shouldn't have to do, lets have a look at that pitch servo.
now that's what it should look like. that little plate should be level. I didn't get it in the pic but see that little cylinder coming from the bottom of that pitch plate? that has a allen screw on it as well. now look here at the plastic piece straddling the main shaft.
well once you've loosened that screw on the pitch plate, move that plastic piece until you see the same amount of space on the top and bottom of the hole in which it slides. now being very careful tighten that screw again. don't get frustrated if it's just a tad off the center. to change that hold the blades and clamp down on that little shaft. now holding it tight spin the blades and you should see that plastic straddler move slowly up or down depending upon the direction you're spinning the blades, to tighten and move it down autorotate the blades. to move it up a tad spin so the gear spins the motor.
ok now you've gotten that all fixed up, now the pitch of the blades should be the same. well I've got a pitch measurer, so at center for aerobatics the blades should be 0. well you're not ready for that so at bottom it should be at 0 degrees. at top it should be somewhere around 15 degrees. if you don't have ABS blades you'll want at bottom -2 degrees and at top 15
ok now's the reason why I didn't let you locktite those blades.
you're back here again because that's what you use to adjust the pitch of the blades without messing with the plastic straddler. this is easy now because all you have to do is count the num of rotations you do and just repeat on the other side.
ok now just to say it take, a sturdy ruler and stick it imbetween the skids in an open/non outdoors area and weigh it down. now put on that battery and step back after you put different colors on the blade leading edges. now get at blade level and look at the blades as you put the throttle at full. if a blade is higher than the other look at the color and stop the heli. adjust the blade's pitch and repeat until the colors mix and are undistinguishable as the blades follow the same track.
OK your heli should be completely set up for flying. the blades are fine and the tail doesn't wag. vibration should be gone. if not it's time to ballance those blades. remove them from the heli. now take an approprate pole and stick it though the blade holes. now this pole should be tight enough to hold the blades firm so they don't droop. now take that pole and ballance it imbetween two flat objects now take the lowest blade and take a file and remove some of the end. Repeat until the blades stay ballanced. Stick them back on the heli. All vibration should be gone, if not it's probably a slightly unballanced tail, get that done and it should take off with out any vibration. ok there you go. that heli should be still in the air! if not DON'T trim. Pick up the heli. now with the blades facing perpendicular to the tail. if the heli stays level all is well. now make them perpendicular to the tail. If the same happens your heli is ballanced.
AND to finish make sure the flybar is just as long on one side as the other as well as the paddles are the same. You just have to take those tiny set screws and unscrew them, and move the paddles inward until it's stopped. now straighten the blades so the flybar doesn't droop to either side.
WHEW! that's a long post! your heli should be completely able to fly with no vibration AT ALL if there still is some, you probably have a bent shaft, of some pinnion is screwed. It shouldn't be anything adjustable now only a defect in the heli.
well this is the part most people have problems with. this deals with the swash, blades, and really the remaining servos, once set up right this should give you longer much more enjoyable, and easier to fly, flights. this is the first step towards aerobatics, yes that's right aerobatics. If you have those trims anywhere besides the middle, you have limited motion in a direction. this is unacceptable. Once you get to aerobatics this will help you immensly. Also this should help you with hovers, if done right your heli can fly hands off for around 5 seconds. mine is at around 3... still working on it, just havn't taken the time to completely adjust it. :8
ok let's begin.
all servo arms must be at 90 degrees. look here.
ok as you saw the swash servo arms are at 90 degrees. now, please adjust this ONCE THE CONTROLLER IS ON and neutral in all sliders. now most of the time the swash still isn't level it should look like this
the problem is that the servo arms must be in their spot that was just shown. this creates a problem which is easy to fix. just pop off the ball link on the approprate spot. now take that ball link and untwist it if you need that side higher if lower do the opposite. now for that forward back servo it takes some creative enginering. it doesn't have anything adjustable that attatches to the swash.
look at the one with the large cradle. now to fix this try loosening the servo screws that hold it in place, you can make minor adjustments by scooting it forward and back. if it needs to be a good bit closer, try bending the metal rod a bit until that's fixed.
ok so the swash is level, but those blades aren't and are making it vibrate. to adjust look here
once again it's down to ball links. if you need the blade higher twist it up, and lower tighten. now before you do something stupid and locktite it, which you shouldn't have to do, lets have a look at that pitch servo.
now that's what it should look like. that little plate should be level. I didn't get it in the pic but see that little cylinder coming from the bottom of that pitch plate? that has a allen screw on it as well. now look here at the plastic piece straddling the main shaft.
well once you've loosened that screw on the pitch plate, move that plastic piece until you see the same amount of space on the top and bottom of the hole in which it slides. now being very careful tighten that screw again. don't get frustrated if it's just a tad off the center. to change that hold the blades and clamp down on that little shaft. now holding it tight spin the blades and you should see that plastic straddler move slowly up or down depending upon the direction you're spinning the blades, to tighten and move it down autorotate the blades. to move it up a tad spin so the gear spins the motor.
ok now you've gotten that all fixed up, now the pitch of the blades should be the same. well I've got a pitch measurer, so at center for aerobatics the blades should be 0. well you're not ready for that so at bottom it should be at 0 degrees. at top it should be somewhere around 15 degrees. if you don't have ABS blades you'll want at bottom -2 degrees and at top 15
ok now's the reason why I didn't let you locktite those blades.
you're back here again because that's what you use to adjust the pitch of the blades without messing with the plastic straddler. this is easy now because all you have to do is count the num of rotations you do and just repeat on the other side.
ok now just to say it take, a sturdy ruler and stick it imbetween the skids in an open/non outdoors area and weigh it down. now put on that battery and step back after you put different colors on the blade leading edges. now get at blade level and look at the blades as you put the throttle at full. if a blade is higher than the other look at the color and stop the heli. adjust the blade's pitch and repeat until the colors mix and are undistinguishable as the blades follow the same track.
OK your heli should be completely set up for flying. the blades are fine and the tail doesn't wag. vibration should be gone. if not it's time to ballance those blades. remove them from the heli. now take an approprate pole and stick it though the blade holes. now this pole should be tight enough to hold the blades firm so they don't droop. now take that pole and ballance it imbetween two flat objects now take the lowest blade and take a file and remove some of the end. Repeat until the blades stay ballanced. Stick them back on the heli. All vibration should be gone, if not it's probably a slightly unballanced tail, get that done and it should take off with out any vibration. ok there you go. that heli should be still in the air! if not DON'T trim. Pick up the heli. now with the blades facing perpendicular to the tail. if the heli stays level all is well. now make them perpendicular to the tail. If the same happens your heli is ballanced.
AND to finish make sure the flybar is just as long on one side as the other as well as the paddles are the same. You just have to take those tiny set screws and unscrew them, and move the paddles inward until it's stopped. now straighten the blades so the flybar doesn't droop to either side.
WHEW! that's a long post! your heli should be completely able to fly with no vibration AT ALL if there still is some, you probably have a bent shaft, of some pinnion is screwed. It shouldn't be anything adjustable now only a defect in the heli.
10-22-2005, 07:29 PM
#3
Member
Join Date: Sep 2005
Location: Fort Saskatchewan, AB, CANADA
Posts: 81
Likes: 0
Received 0 Likes
on
0 Posts
Also look at
http://www.rcgroups.com/forums/showt...alkera+owners+
I also noticed what they did about the elevator servo pushrod going to the wrong side and contacting the main gear. Moving this pushrod to the other side (ala shogun, x400 etc) fixes the problem and gives more direct control.
http://www.rcgroups.com/forums/showt...alkera+owners+
I also noticed what they did about the elevator servo pushrod going to the wrong side and contacting the main gear. Moving this pushrod to the other side (ala shogun, x400 etc) fixes the problem and gives more direct control.
10-23-2005, 02:30 AM
#4
Member
Join Date: Sep 2005
Location: , AUSTRALIA
Posts: 75
Likes: 0
Received 0 Likes
on
0 Posts
Nice work thecheatscalc, takes a bit of time but it is well worth getting those servo arms at 90 degrees, had a wind free day today and was finally back in the air with a nice stable, shake free hover after my crash.
Stripping the whole heli down to bare bones gives you the confidence to fix most problems that will arise and once its correctly balanced the 36 hovers quite well, and even with the nimh you get a good 7 or 8 mins.
keep up the good work.
Stripping the whole heli down to bare bones gives you the confidence to fix most problems that will arise and once its correctly balanced the 36 hovers quite well, and even with the nimh you get a good 7 or 8 mins.
keep up the good work.
10-23-2005, 04:33 PM
#5
Senior Member
Thread Starter
Join Date: Aug 2005
Location: fayetteville,
GA
Posts: 1,228
Likes: 0
Received 0 Likes
on
0 Posts
heh I've stripped and dissasembled that heli at least twice... glad you like it, more to come, next is all about gears, and more gears, as well as how to fix a gear and maybe those plastic control rods. after that is the assy/dissassy.
11-03-2005, 07:35 PM
#6
Junior Member
Join Date: Sep 2005
Location: Naperville,
IL
Posts: 1
Likes: 0
Received 0 Likes
on
0 Posts
Please keep up the good work on this thread.  I rely on Ray's Complete Helicopter Manual and the #36 forums (not always in that order) to keep myself out of trouble and maximize my enjoyment of this hobby. Back when I first discovered these forums I started copy-and-pasting advice and info into a cumulative Word doc so I'd have ready access to it. (It's over 40 pages now.) THIS thread will be a real sanity saver for lots of Walkera owners. Thanks! Your effort is appreciated.
I rely on Ray's Complete Helicopter Manual and the #36 forums (not always in that order) to keep myself out of trouble and maximize my enjoyment of this hobby. Back when I first discovered these forums I started copy-and-pasting advice and info into a cumulative Word doc so I'd have ready access to it. (It's over 40 pages now.) THIS thread will be a real sanity saver for lots of Walkera owners. Thanks! Your effort is appreciated.
11-03-2005, 09:44 PM
#7
Senior Member
Join Date: Oct 2003
Location: Mooresville, NC
Posts: 148
Likes: 0
Received 0 Likes
on
0 Posts
Hey cheatscale, I noticed your 36 doesn't have any z bends on the rotor head, did your comes that way or did you add the ball links? The rotor head on mine has a combo of z bends and ball links.
11-04-2005, 12:19 PM
#8
Senior Member
Thread Starter
Join Date: Aug 2005
Location: fayetteville,
GA
Posts: 1,228
Likes: 0
Received 0 Likes
on
0 Posts
Z bends... WTC??!? I've never heard of a such thing, post a pic! yours must be an older model or a VERY new one, mine's only 1-2 months old...
thanks for the appreciation! glad it's helping, must be really good as I'm not being asked many questions!
thanks for the appreciation! glad it's helping, must be really good as I'm not being asked many questions!
11-05-2005, 04:39 AM
#9
Member
Join Date: Sep 2005
Location: , AUSTRALIA
Posts: 75
Likes: 0
Received 0 Likes
on
0 Posts
Mines two and a half months old and it has z bends, I think it would be easy to replace them with some Shogun ball links.
The Cheatscalcs looks much nicer than mine. Thecheatscalc a z bend is like what you have on your aeileron and collective servo, a wire bent like a z.
The Cheatscalcs looks much nicer than mine. Thecheatscalc a z bend is like what you have on your aeileron and collective servo, a wire bent like a z.
11-05-2005, 09:01 AM
#10
Senior Member
Thread Starter
Join Date: Aug 2005
Location: fayetteville,
GA
Posts: 1,228
Likes: 0
Received 0 Likes
on
0 Posts
I guess I get what you say... still not quite sure, anyone else have the same part and could post a pic of it? as I'm guessing that you don't have a camera at the moment...
they must have changed it when I got mine, I think I remember them saying it was a new version or model...something like that, but is their any problem with them?
they must have changed it when I got mine, I think I remember them saying it was a new version or model...something like that, but is their any problem with them?
 11-14-2005, 05:05 PM
#12
Member
Join Date: Oct 2005
Location: birmingham, AL
Posts: 46
Likes: 0
Received 0 Likes
on
0 Posts
i am almost ready to tune my #36 for the first time, as i am a new pilot, and wanted a BASIC list of the tools I must have in order to do basic adjustments and repairs to this heli. I have about 15 hours on my preflight sim, but dont want to lift this heli off the ground without making sure I at least have a fighting chance to fly it. thanks paulb.
11-15-2005, 04:52 PM
#13
Member
Join Date: Oct 2005
Location: birmingham, AL
Posts: 46
Likes: 0
Received 0 Likes
on
0 Posts
OK I got one more question. I notice that one of my main blades is higher than the other when I turn them around by hand. I saw no adjustment for this. If I had to guess, I would say that adjusting the pitch of the blades to that they spun evenly when pushed by the motor would be the solution??? Correct me if I'm wrong.
11-15-2005, 06:20 PM
#14
Senior Member
Thread Starter
Join Date: Aug 2005
Location: fayetteville,
GA
Posts: 1,228
Likes: 0
Received 0 Likes
on
0 Posts
ok, the only tools you will need are usualy allen wrenches, it's best to have all the small METRIC sizes at home (1mm up (not sure how low it goes but pretty small, I do think the smallest is 3mm though)) Also it's good to have a case of jewlers screwdrivers avalible. If you remove the frame it uses (I think) the largest size screw head avalible for glasses, Just make sure you have a size small enough to fit in the holes on the frame and the four sizes after that. The Jewlers sets are invaluable for this and if you don't have one I'd suggest going out and buying yourself a case, belive me, they're VERY hand to have when playing with electrical devices, Also all the screws on the heli are MAGNETIC so a few 2x4x5mm N50 Neodymium magnets are WONDERFUL for keeping track of those screws as it's really hard to pull them out otherwise. not a nessity and if you buy extras they're the best refridgerator magnets you'll ever buy. (don't be fooled by their size they can hold twice the weight/thickness that any magnet you have currently, unless you already have neodymium magnets....)
blade higher? is it PHISICLY higher as in the spindle shaft in the rotor head (remove the blade grips to see) above the other, or just the PITCH is higher? if it's just pitch I explain how to adjust above, mainly just by twisting the ball links on the rotor head on more or off more.
PS: please make sure you read through the whole manual, first before adjusting anything, and ENJOY, I hope this helps ease a few frustrations that come bundled in this machine.
PSS: need some magnets? just look here, this a great place to bargan buy magnets, and I think the guy will actually custom make magnets to order, real friendly, just email the number of the magnet you want. http://www.engconcepts.net/List_Of_C...ce_Magnets.asp
remember the higher the N rating the stronger they are, size affects how far they pull/surface area of pull.
11-16-2005, 01:14 PM
#15
Member
Join Date: Oct 2005
Location: birmingham, AL
Posts: 46
Likes: 0
Received 0 Likes
on
0 Posts
Thanks,
OK... I read these forums every day at work, and have read about the sorry initial factory setup of the #36, and read all the horror stories of copters crashing to the ground. I am quite competant on the flight SIM. But I think I'm scared now to go and fly the real thing. I'm afraid I will crash and damage something and that the parts and knowledge to do the repair will be unavailable. UGH. I dont want to damage anything. I saw a pic of someone holdomng their #36 in their hand while it is running. Wopuld this be a good way to make sure that things are adjusted b4 i just lift it off??? Or could I lose a finger or worse, hit myself in the head.
OH, I went and and got a tiny size screwdriver set, metric allen wrenches, and 1000 zip ties. Well.. i guess im ready. Do you recomend getting the wide training gear, or will the flight SIM be enough?
11-16-2005, 03:50 PM
#16
Senior Member
Join Date: Oct 2003
Location: Mooresville, NC
Posts: 148
Likes: 0
Received 0 Likes
on
0 Posts
I would advise against spooling up the heli in your hand. One thing to get wacked in the head, but you get hit in the eye with a blade you will become the one eyed willy.
11-16-2005, 07:16 PM
#17
Senior Member
Thread Starter
Join Date: Aug 2005
Location: fayetteville,
GA
Posts: 1,228
Likes: 0
Received 0 Likes
on
0 Posts
please don't hold this in your hand it's MUCH too easy to whack your self. now if you're careful you can hold it on the table instead and have a second person control the heli. This worked fine for me, or you can just weight the skids, one pound is plenty.
ahh, don't be scared to fly it! just take it slow, just flying 3in off the ground (training gear is good, especally if you legthen it to twice as long AFTER sticking a brushless motor on) then once you feel like you can keep it decently still move it up to one foot, and repeat until you're at 5 feet. Then practice walking it around the block. After that try side in then after that head in. After all this shorten the landing gear a tad and start at 5 feet and re do.
ahh, don't be scared to fly it! just take it slow, just flying 3in off the ground (training gear is good, especally if you legthen it to twice as long AFTER sticking a brushless motor on) then once you feel like you can keep it decently still move it up to one foot, and repeat until you're at 5 feet. Then practice walking it around the block. After that try side in then after that head in. After all this shorten the landing gear a tad and start at 5 feet and re do.
11-30-2005, 04:26 PM
#18
Member
Join Date: Oct 2005
Location: birmingham, AL
Posts: 46
Likes: 0
Received 0 Likes
on
0 Posts
I am impatiently waiting for part 2 of this wonderful info. It would be wonderful if you could also tell me about the paddles. Do they need pitch? Do they need balancing? Isnt there some rod that goes all the way from one paddle to the other? Is it vital that it be centered as well? I know I'm asking lots, but I'm waiting on parts and cant fly, so at least i can type and browse the net. 
11-30-2005, 04:54 PM
#19
Senior Member
Thread Starter
Join Date: Aug 2005
Location: fayetteville,
GA
Posts: 1,228
Likes: 0
Received 0 Likes
on
0 Posts
well, sorry, heh I stopped progress for a while as I haven't gotten to the second part (need an excuse to take this all apart) and have had it out of operation for a while... so, yes paddles must be level, no pitch. The bar does connect all the way from one paddle to the other, this MUST be able to turn, I accedentally put CA on it (superglue) and, well, I had a pain of a time to fix it. So yes you need to center all of this, and ballance it ALL otherwise it'll screw up the heli and cause vibration.
heh I'll try to get to the next part soon.
THECHEAT
heh I'll try to get to the next part soon.
THECHEAT
11-30-2005, 09:34 PM
#20
Junior Member
Join Date: Oct 2003
Location: Somerset,
KY
Posts: 5
Likes: 0
Received 0 Likes
on
0 Posts
When I wrote to you b4, I had just gotten a #36 and didn't like the way it was setup compared to my 2 gassers. I charged it and tried to get it airborn, even with the throttle trim all the way up and all I got from it was a bounce. Stock and with no training gear it barely came off of the ground for only a second. I have very little pitch movement. As a matter of fact, in normal, I have no pitch movement until 1/2 stick and then very little. In idle up (3d), I have more movement but it all looks to be positive and still, it didn't want to leave the ground. Whats with this thing? This is surely not a chopper for the beginner of which I am not. Also, do you use the stock controller or did you replace it with a real controller? Just think I bought a piece of junk but hearing you guys talk, it sounds pretty cool. Should it be flyable out of the box?
Thanx,
Chris
Thanx,
Chris
12-01-2005, 11:45 AM
#21
Senior Member
Thread Starter
Join Date: Aug 2005
Location: fayetteville,
GA
Posts: 1,228
Likes: 0
Received 0 Likes
on
0 Posts
ok, I know the problem, you need a brushless motor (please get the align420LF with the 25A ESC from Grand rc (in Trex parts-motors section) and the 11T 13T 15T pinnions (bottom link on sig))
Believe me, the internal ESC is overloaded (very common problem with this heli) causing it to fail, not lift off except little hops in 3D mode, and cause glitching, and screeching servos (tail) I wish it didn't have this problem, but, go ask walkera about that. Once you go brushless though it flys pretty stable.
Believe me, the internal ESC is overloaded (very common problem with this heli) causing it to fail, not lift off except little hops in 3D mode, and cause glitching, and screeching servos (tail) I wish it didn't have this problem, but, go ask walkera about that. Once you go brushless though it flys pretty stable.
12-02-2005, 09:45 AM
#22
Junior Member
Join Date: Jun 2005
Location: Springfield, MA
Posts: 21
Likes: 0
Received 0 Likes
on
0 Posts
a little tip for ya.
If you have a ball link that is really loose and flopping around, take a tiny (AND I MEAN TINY, like, with a toothpick or something) bit of CA and run it into the ball groove, and immediately push it onto the ball. allow it to sit for a second and then continually move the link until the CA dries. Then, you should have a nice smooth (not floppy) ball link connection.
If you have a ball link that is really loose and flopping around, take a tiny (AND I MEAN TINY, like, with a toothpick or something) bit of CA and run it into the ball groove, and immediately push it onto the ball. allow it to sit for a second and then continually move the link until the CA dries. Then, you should have a nice smooth (not floppy) ball link connection.
12-02-2005, 11:41 AM
#23
Senior Member
Thread Starter
Join Date: Aug 2005
Location: fayetteville,
GA
Posts: 1,228
Likes: 0
Received 0 Likes
on
0 Posts
but if done wrong, you've just screwed up your ball link, and it'll be one of the largest pains you'll ever find to take it off. that's risky, it may work though, but, CA takes a LONG time to dry on it's own usually. Maybe I'll try that somethime though, not much slop in my linkages anyway. good luck for those of you who use that trick, and PLEASE BE CAREFUL.
12-02-2005, 01:02 PM
#24
Senior Member
My Feedback: (1)
Join Date: Aug 2004
Location: Warner Robins,
GA
Posts: 3,360
Likes: 0
Received 0 Likes
on
0 Posts
Im just glad Im not the only one crazy enough to make a build and assembly thread.
Good job thecheatcalc.
Im considering a build thread on the MX400....considering...[:'(]
Good job thecheatcalc.
Im considering a build thread on the MX400....considering...[:'(]
12-02-2005, 04:28 PM
#25
Junior Member
Join Date: Oct 2003
Location: Somerset,
KY
Posts: 5
Likes: 0
Received 0 Likes
on
0 Posts
As far as the CA ball joint, I've heard of several successful tries and it works. But, in my experience it was better to not run the risk and just cut the plastic balls off and install metal ones. They're easy and cheap. As far as the link arm, well I would just buy new ones because I hate when I lose a chopper to mechanical failure [ ] I found one problem with that Dragonfly 36. The battery just would not get a good charge so I left it on for a lot longer than I was supposed to and then it got hot, which is what I wanted to see. It flew rather well after I got some tail authority back but that battery's flight time pretty much sucks. Thanks guys for all your inputs...helps with the brain storming.
] I found one problem with that Dragonfly 36. The battery just would not get a good charge so I left it on for a lot longer than I was supposed to and then it got hot, which is what I wanted to see. It flew rather well after I got some tail authority back but that battery's flight time pretty much sucks. Thanks guys for all your inputs...helps with the brain storming.