


Ive started another....
 05-28-2013, 10:20 AM
#1

Thread Starter
My Feedback: (1)
Join Date: Jan 2009
Location: Jeffersonville,
KY
Posts: 86
Likes: 0
Received 0 Likes
on
0 Posts
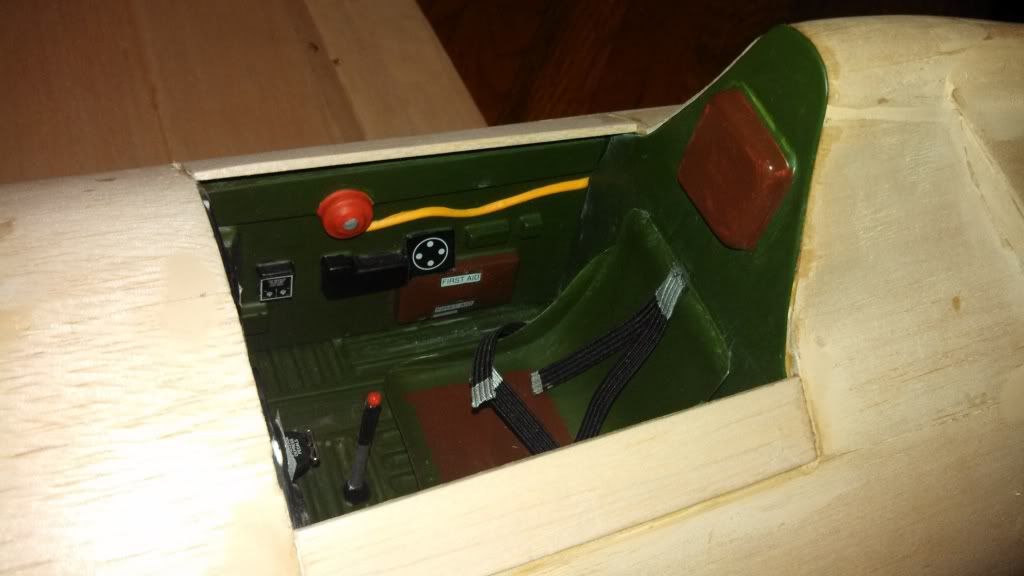
I dont consider myself to be a very good kit builder so I have no idea why I cant say no to one when I stumble upon it. A coworker approached me with the chance to buy this Topflite P-47 Gold Edition Kit and made me an offer I just couldnt refuse even though I am deathly afraid that I will goof it up and it will find its place as a static Display beside the Topflite P-40 Kit I attempted to build and never finished. Long Story.... Anyhow, this kit included the Scale Engine, Scale Cockpit, and Droptanks. I have started the build, and so far I dont think I have made any crucial mistakes that has caused me to lose interest and want to throw in the towel. I'm moving fairly quickly and although probably not attainable, I have set a goal to have this completed and flying by the end of August for a Warbird Fly In at a local Club. Even if I dont meet that goal, it should at least keep me busy on it so that it doesnt turn into a 3 year project like my first build did. ( I am happy to report that I did maiden the Piper Cub last weekend and it came home with me in one piece)
Anyhow, My question now is retracts for this airplane. Will the Eflite 85 deg electric retracts mount up without much modification if I build the wings according to the plans and the manual? Also, will the Robart Scale Struts work on the Eflite Retracts?
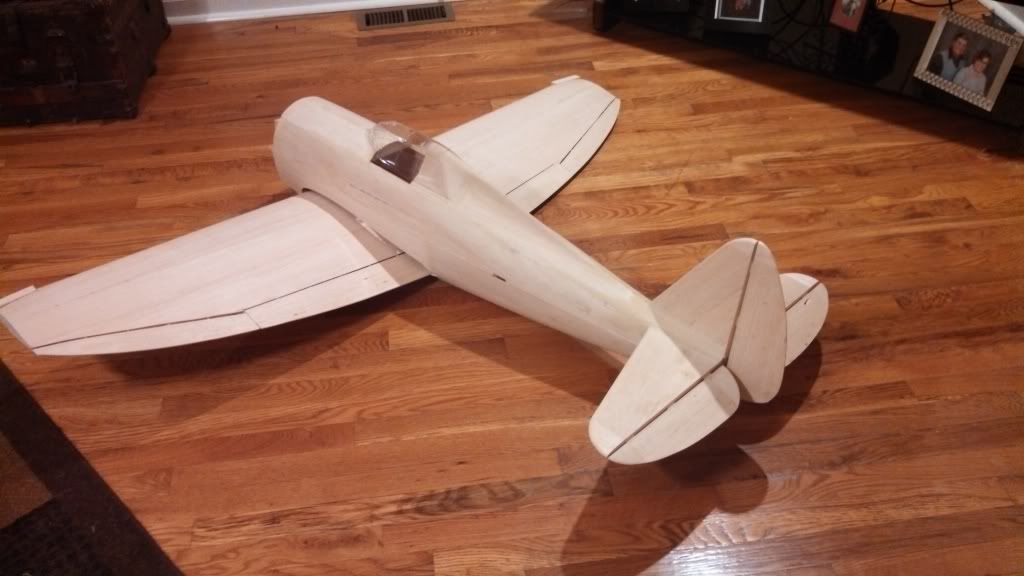
Here are a few pictures of my progress so far. I am normally happy with the build until it comes time to cover it, then it falls to pieces. I just cant seem to get a nice clean finish that I am happy with. Maybe this one will turn out okay..I'm keeping my fingers crossed.
Anyhow, My question now is retracts for this airplane. Will the Eflite 85 deg electric retracts mount up without much modification if I build the wings according to the plans and the manual? Also, will the Robart Scale Struts work on the Eflite Retracts?
Here are a few pictures of my progress so far. I am normally happy with the build until it comes time to cover it, then it falls to pieces. I just cant seem to get a nice clean finish that I am happy with. Maybe this one will turn out okay..I'm keeping my fingers crossed.

 05-28-2013, 11:05 AM
#3

Looks like some pretty good work to me ! I would go with a better retract system than the e-flight. I would look into the Robarts, or even spring-aire.
Frank
Frank
05-28-2013, 11:49 AM
#4


I can relate Steve I ended up with a Top Flight Corsair much the same way except mine is partially built. I trade a Goldberg Cub kit and a Super Tigre .40 for my Corsair. I got the airplane with a full set of Robart gear and strutes and 7 Futaba servos. The previous owner had been trying to sell it for almost 2 years and my Cub was unstarted and had a set of wheels with it.
I have a a 1/7 P-51D and a Sea Fury TF kits waiting for their turn.
I have a a 1/7 P-51D and a Sea Fury TF kits waiting for their turn.
 05-28-2013, 01:40 PM
#6
My Feedback: (13)
there are several decent threads on the build here is one http://www.rcuniverse.com/forum/m_48...tm.htm#4868696 but a little search time and you might be able to pick up some helpful tips on your build so far it looks clean.
TF kits build easy just follow the instructions(I use a yellow highlighter to check the boxes as I move along) and its a good idea to read ahead and familiarize your self with the steps you will be doing before hand other wise keep posting you will find most questions are answered fairly quickly around here
I used the CJM retracts for mine glassed with water based poly and painted with warbirdcolors paints, I used www.getstencils.com stencils for the emblems
05-29-2013, 02:50 AM
#8
Thread Starter
My Feedback: (1)
Join Date: Jan 2009
Location: Jeffersonville,
KY
Posts: 86
Likes: 0
Received 0 Likes
on
0 Posts
Thank you for the encouragement and the information. I was leaning towards the 85 degree electric retracts for their ease of installation/ plug and play capability I was also concerned with the additional weight that the Robert system would add to the model. Since I am still "new" to kit building I'm afraid my skill set will not include all of the tricks to end up hwith a light airframe. I will research it a little more and make a decision soon. I also need to decide on a powerplant. One thing for certain, I will be hitting you all up for information on the final sanding and prep work before covering this time. That seems to be where I fail and end up with a crappy looking model.
05-29-2013, 06:06 AM
#9

Here is one of those threads I posted some of my build on here I'm building my 2nd one and I'm going with all the mods and will fiberglass it and paint. You may want to consider trying it, not that hard really and much nicer than monokote and the like. http://www.rcuniverse.com/forum/m_10...m.htm#10757077take your time and you will end up with a real nice looking and flying plane.
05-29-2013, 06:36 AM
#10
From my point of view I have to say Top Flite Gold series kits are all designed about the same with the same building techniques. I like that from the standpoint you get to build on the experience from each previous kit and you know what to expect. If you are like me you like to experiment a little so if something works or does work you know the results will be fairly consistent over the whole line. Which is why I keep an eye out for discontinued kits, I know what I am getting for the money.
06-03-2013, 06:25 AM
#11
Thread Starter
My Feedback: (1)
Join Date: Jan 2009
Location: Jeffersonville,
KY
Posts: 86
Likes: 0
Received 0 Likes
on
0 Posts
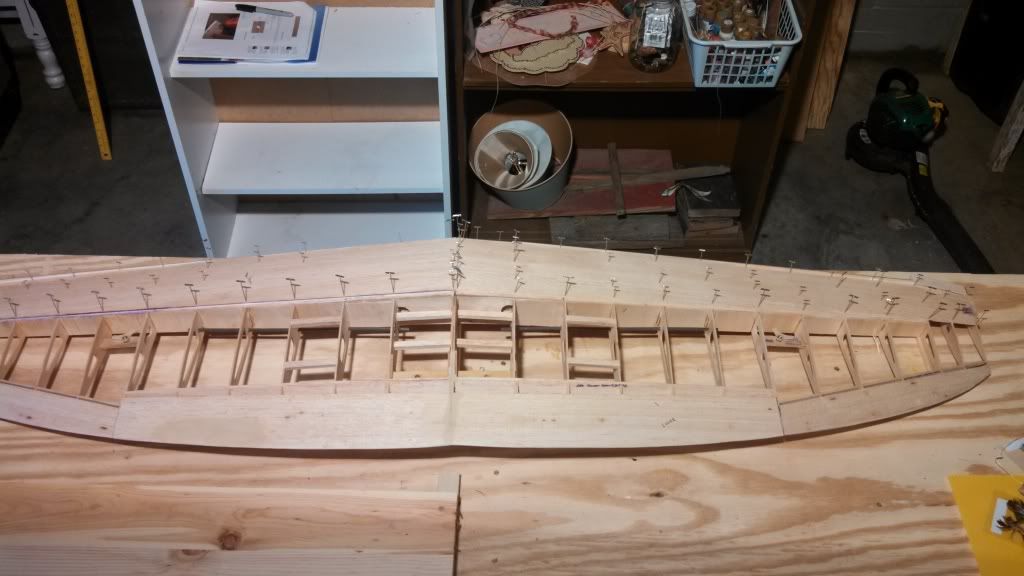
I'm moving forward with the build and have completed building and joining the two wing panels, and have also made my first blunder of this build. It seems that somehow, while joining the wing panels with epoxy I failed to make certain that the plywood dihedral wing joiner on the aft side of the spars was aligned properly and I was a little messy with the epoxy and have some squeeze out that I should have cleaned up. I failed to notice this until after the epoxy had cured! [:@] The front dihedral brace is fine, and although the rear dihedral brace was misaligned the overall wing and it's dihedral seem to be correct and still align on the jig blocks. I think I can just trim the aft dihedral brace where it sticks above the spar on the right wing panel and below the spar on the left wing panel. At least I'm hoping that I can do that without compromising too much of the strength of the wing join. I also dropped the wing while sanding it and ended up breaking out a junk of the flap skins on the right wing. I cut and pieced in a couple of patches and filled the area with filler, but I am debating whether or not to just remove the entire flap skins and do them over. These mistakes have taken a little of the wind out of my sails, but I will try to just overlook them and continue to move forward with the build.
I already had a set of #650 Robostruts laying around, so I just went ahead and ordered the #606 85 deg. Retracts and Air Kit from Robart. Now I need to decide on the powerplant.
Anyhow, although this is not intended to be a build thread, I just wanted to share my progress, report in, and share a few more photos.
06-15-2013, 10:12 PM
#12
Thread Starter
My Feedback: (1)
Join Date: Jan 2009
Location: Jeffersonville,
KY
Posts: 86
Likes: 0
Received 0 Likes
on
0 Posts
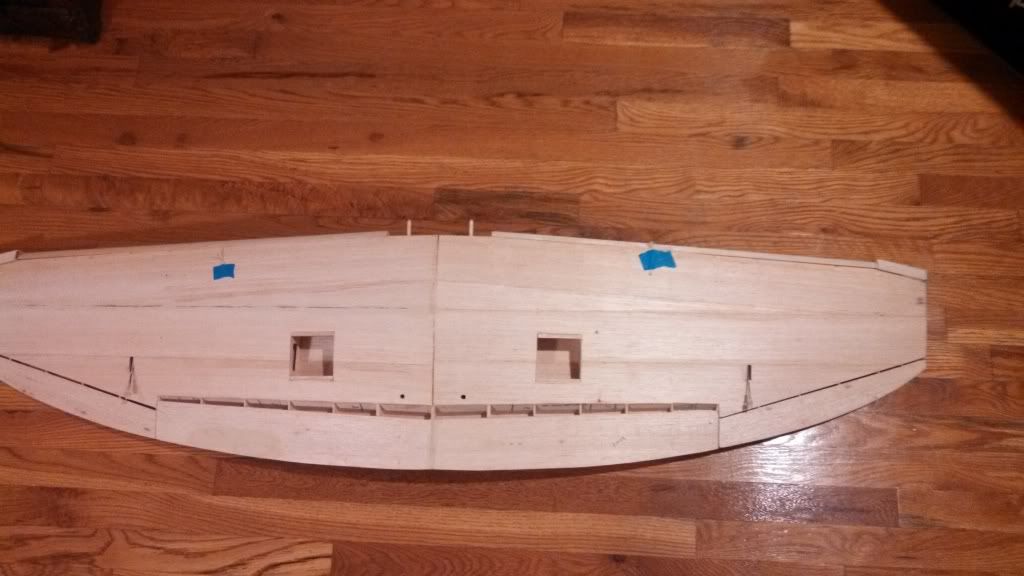
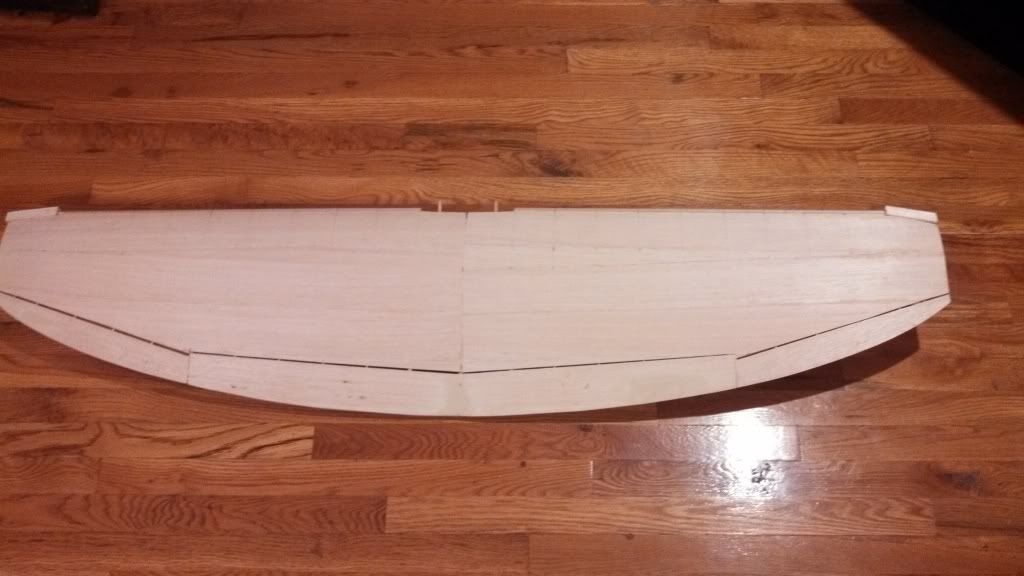
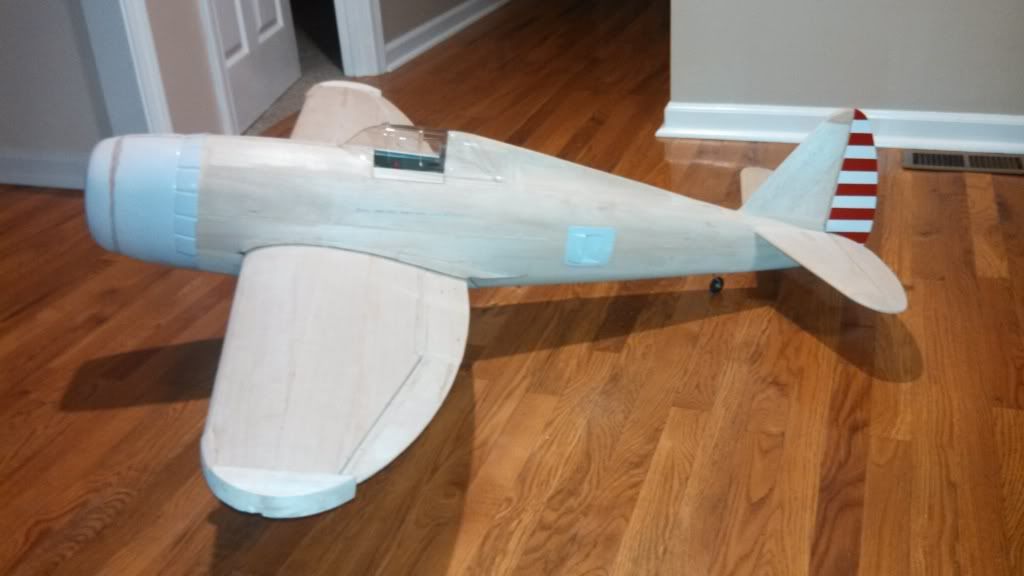
I made some time to work some more on my build. I've managed to get the aileron linkages installed, and finished sheeting the wing. I still need to fit out the retracts ( I don't have them yet) and cut out the bottom sheeting for them, as well as trim out the servo bay in the top sheeting for the aileron servo. Next is cutting the flaps, and ailerons away from the wing which seems a bit intimidating. I couldn't resist the a quick mock up on the living room floor.My wife said it looked okay, but if I didn't quit making engine sounds with my mouth she was going to call someone and have me admitted somewhere.
06-16-2013, 01:06 PM
#13

For a self proclaimed non builder it looks really nice.
If your going to use some type of iron on say in the drab colors..... I sugges picking up a woodpecker covering tool. If your going to paint, etc. disregard the rest :
:
http://compare.ebay.com/like/3805304...Types&var=sbar
With all the wood you'll end up with bubbles no matter how careful you are. The pecker has extremely sharp roller splines that slice the balsa but don't lift it as you roll it along the surface allowing the heated trapped air to be absorbed into wood. No pressure needed.. the weight of tool is all it needs. You can take it apart and go with different numbers of splines for tight areas. It's not a magic bullet but I'll say I don't cover sheeted surfaces without it anymore. It really works.
If your going to use some type of iron on say in the drab colors..... I sugges picking up a woodpecker covering tool. If your going to paint, etc. disregard the rest
:http://compare.ebay.com/like/3805304...Types&var=sbar
With all the wood you'll end up with bubbles no matter how careful you are. The pecker has extremely sharp roller splines that slice the balsa but don't lift it as you roll it along the surface allowing the heated trapped air to be absorbed into wood. No pressure needed.. the weight of tool is all it needs. You can take it apart and go with different numbers of splines for tight areas. It's not a magic bullet but I'll say I don't cover sheeted surfaces without it anymore. It really works.
06-16-2013, 05:25 PM
#14
Thread Starter
My Feedback: (1)
Join Date: Jan 2009
Location: Jeffersonville,
KY
Posts: 86
Likes: 0
Received 0 Likes
on
0 Posts
Thank you Kit builder. I really am pretty lousy at kit building. I've tried to build 4 kits prior to this one and have only completed one that is flying. A GP Piper Cub and it looks okay if you are standing 10 feet away. I am getting much better, and building the rough airframe seems to go good. My skills suffer when it comes to the fine detail and finish work, sanding shaping, covering, etc. I'm quickly approaching that part of this build and I am determined to finally finish a model that I will proud of, rather than disappointed with when it's finished. Thank you for the tip on the woodpecker. My plan is to build this one, just as it is designed and to cover it in the version and colors shown on the box. I'm really happy with this model so far and staying positive and motivated.
06-20-2013, 05:36 AM
#15
Thread Starter
My Feedback: (1)
Join Date: Jan 2009
Location: Jeffersonville,
KY
Posts: 86
Likes: 0
Received 0 Likes
on
0 Posts
Okay... I am having a very difficult time with fitting the flaps. I cut the flaps away from the main wing and glued the leading edge and horn in as the instructions stated. No real problem doing that, but I have sanded, shaped, sanded, some more and absolutely can not seem to get the flap to fit and align well with the wing. I ended up cutting away all of the trailing edge spars (instead of using a 3/4 dowl rod and sanding them down with a radius to fit the flap leading edge)...[:@] I also was not happy with the overhang of the top sheeting that extends to cover the flap hinge line so I ended up cutting it back flush with the aft inner spar while trying to fit the flap. Now I have a mess that I need to try and correct.
I dont foresee any problems with cutting an approximate 1/4 wide piece of 1/16th wing sheeting to add the overhang back onto the top wing sheeting, but I dont think I will try to tackle replacing and shaping the spars that I cut away on the aft side of the aft inner wing spar. Is there really a need for those, or were they primarily left and shaped for cosmetic purposes? If for cosmetic purposed only, I dont see them being very visible anyhow, unless you were to flip the model over and look directly into the bottom hinge gap. I think I can live without them, or I am hoping that I can.
Anyhow, I still have the root of the problem to deal with, and that is getting the flap leading edge to nest and align properly in the wing. The leading edge shape seems on par with the templates I cut and glued on from the plans but I just dont seem to be happy with how its turning out. I am afraid to sand away anymore of the leading flap edge to try and get a better fit, so I guess I am just going to have to accept it and move on to the other side.
Can anyone provide me with any tips to getting the shape of the flap leading edge consistent along the entire length of the flap before I try and tackle the other flap?. The first one has frustrated me to the point that I had to step away from it...[ ]
]
I dont foresee any problems with cutting an approximate 1/4 wide piece of 1/16th wing sheeting to add the overhang back onto the top wing sheeting, but I dont think I will try to tackle replacing and shaping the spars that I cut away on the aft side of the aft inner wing spar. Is there really a need for those, or were they primarily left and shaped for cosmetic purposes? If for cosmetic purposed only, I dont see them being very visible anyhow, unless you were to flip the model over and look directly into the bottom hinge gap. I think I can live without them, or I am hoping that I can.
Anyhow, I still have the root of the problem to deal with, and that is getting the flap leading edge to nest and align properly in the wing. The leading edge shape seems on par with the templates I cut and glued on from the plans but I just dont seem to be happy with how its turning out. I am afraid to sand away anymore of the leading flap edge to try and get a better fit, so I guess I am just going to have to accept it and move on to the other side.
Can anyone provide me with any tips to getting the shape of the flap leading edge consistent along the entire length of the flap before I try and tackle the other flap?. The first one has frustrated me to the point that I had to step away from it...[
]
 06-20-2013, 06:27 AM
#17
Yes, add pictures but I know the area you are talking about. The idea was to have some of the rib there to support the sheeting hanging off. Now that you have cut it off take a break and clear your head. The secret to model building is when you feel yourself getting frustrated step away for a day or 2 if needed and then come back with a fresh mind. Cut some strips of 1/32" ply as suggested and glue it right on top of your sheeting,over hangingjust enough to meet the flaps whenthey are upthen just blend it in with some filler. Go easy on the sanding now because the sheeting is only 1/16 and it takes no timeto sand through it and poking holes through it now is easy to do at this stage. Use nothing coarser than 220 grit and very light pressure. My first one I glued the wing panels together and had the wrong block under the center to set the dihedral but it flew just fine. I chose to change all my wing sheeting this time around to 3/32" because of the extra strength it provides. Look over this thread by Terry Bolin, he covers the covering process very well as well as lots of good tips. http://www.rcuniverse.com/forum/m_10...m.htm#10332537 Don't rush, measure twice and cut once, and dry fit before you glue will take you far in modeling. We are all glad to help and there are no dumb questions, only dumb mistakes because we didn't ask first Your doing good so don't let the little setbacks derail you.
Your doing good so don't let the little setbacks derail you.
06-20-2013, 07:24 AM
#18
Thread Starter
My Feedback: (1)
Join Date: Jan 2009
Location: Jeffersonville,
KY
Posts: 86
Likes: 0
Received 0 Likes
on
0 Posts
I will try to get some pictures taken and posted tonight. Basically, I have gaps between the flap leading edge and the wing at both the root of the flap, and the tip of the flap. This allows the flap to rock (so to speak) at the hinge line where it meets the wing. I am not certain if I have sanded away too much of the flap leading edge at these two areas, or if I have not sanded enough from the middle of the flap leading edge. I either need to sand more of the middle of the flap, or find someway to add some material back to the ends of the flap leading edge to fill the gap I created so that the flap fits flush with the wing along its entire length. I think stepping away from it for a few days until I am ready to approach the problem in a better state of mind is the best thing to do. Once I manage to get the flap fitting figured out, I will address the overhang and how to support it since Ive cut away the spars.
The link you provided by Terry Bolin, is the one that I have been reading and trying to use as reference.
Thanks for the replies.
The link you provided by Terry Bolin, is the one that I have been reading and trying to use as reference.
Thanks for the replies.
06-20-2013, 08:15 AM
#19
Sounds like you just sanded a little too much off on the ends. Are you using a long sanding bar to sand with? These are invaluable to have and I have several with different grades of paper so I don't have to keep swapping out. Get them from tower or swap meets. Also a micro plane from Master Airscrew is good to have so you can rough in the shape and then finish with the sanding bar.
07-08-2013, 05:25 PM
#20
Thread Starter
My Feedback: (1)
Join Date: Jan 2009
Location: Jeffersonville,
KY
Posts: 86
Likes: 0
Received 0 Likes
on
0 Posts
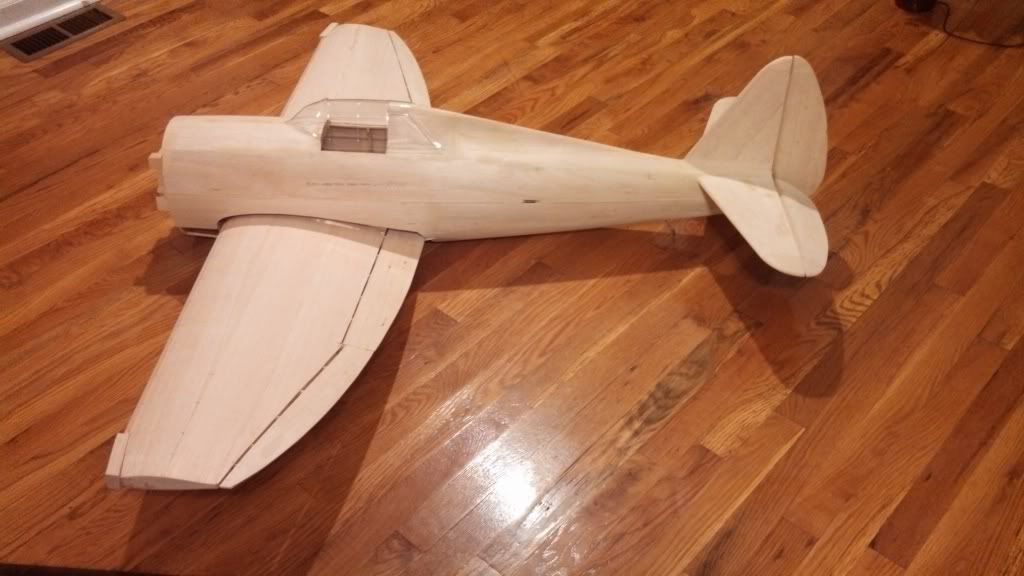
I stepped away for a week or so and when I got back at it with a clear head and a little rest I was able to work through the flap issue. I pieced back in the overhang and doubled it up using a 1/16th sheet underneath and then cut a groove in the leading edge of the flap to accept the additional thickness as Terry Bolin did on his build thread. Everything, is hinged and the "building phase" is mostly complete. I need to grab a set of new robostruts and get a powerplant, but all of the shaping, sanding and finishing work left to do will keep me busy for quite a while yet. I played around with some monokote on the rudder just to get some practice and try to get a better idea of how the sheeted surface needs to look in order to get the desired finish I'm looking for after applying the monkote. I'm getting better.Here are a few pictures of my latest mock up.....I have to shape those wing tip blocks...I keep putting that chore off hoping it will just magically happen on its own!


07-09-2013, 05:31 AM
#24
Dude! it looks real good! You don't give yourself enough credit. Get a carving knife and the micro plane and you will have those tips done in no time. It's fun wacking away all that extra wood