


Viper Jet 2M Pointers/ tips.

 09-27-2013, 12:13 PM
#502

Thanks for the picture,i didnt realize when i ordered the p90rxi that it was 112 mm in dia. but by looking at your pix. i should have plenty of room,its also little longer having fuel pump in engine make a little cleaner fuse. Thanks Robin
10-10-2013, 03:45 PM
#504
Got my 2m viper jet today everything showed up in perfect condition.
I ordered the spray painted jet,some things IHad read about this was not so true on mine this jet has about as good of paint job as can be done,It is very nice,All the squares have very good sharp lines Etc. I will be starting to assemble in next few weeks so I will probably be posting some pix and asking few questions,I have a new jetcat P-90rxi to put in it.
I ordered the spray painted jet,some things IHad read about this was not so true on mine this jet has about as good of paint job as can be done,It is very nice,All the squares have very good sharp lines Etc. I will be starting to assemble in next few weeks so I will probably be posting some pix and asking few questions,I have a new jetcat P-90rxi to put in it.
10-20-2013, 05:38 AM
#506
Startimg to put my new Viper 2m together here is a few Pix so far of what I have completed, I am using the DS8911HV ultra torque servos in the Ail,flaps rudder. The paint looks very good on plane,will post more Pix.


 11-18-2013, 04:45 PM
#508
The elev. are a little tight for a standard servo I used JR 3421's they fit great , standard 8411's every where else , I little work with the dremel on the fin to get it to fit but not much
07-28-2014, 05:03 PM
#510

Join Date: Jun 2014
Posts: 62
Likes: 0
Received 0 Likes
on
0 Posts
thinking about bye the extreme jets viper 2m. is it a good bye? any issues and if so what are they? finally will it take off and land on a 400ft. grass runway? thanks y'all your advice. 
07-28-2014, 05:35 PM
#511
07-29-2014, 04:42 AM
#514
the plane flies very nice , the only downfall is the weak landing gear blocks and very fragile airframe , if you have a hard landing or wheels up landing , you can basically say goodbye to the plane ( also the instructions recommend to beef up the gear plates if flying off grass)
recommended to strengthen the landing gear plates in any case with either carbon stands or carbon cloth of sorts
also when buying the plane , i would go with mid size servos for the elevators , as i moded mine to fit the standard servos supplied by skymaster ( Savox 1256 ) and had to remove everythig but the skin to get the servo to fit
i built 2 planes at the same time ( for me and my frined ) the odd things i found out , is each plane was completely different so i assume differert moulds are used - examples:
1 - each plane had its own length of wing tube ( the recesses were different depths )
2 - the ribs at the root for eadch wing was different
3 - stabs could not be exchanged - again different placements of tubes and hold plates
i would recomomed to go with the paint in the mould , as this saves weight , and you should try go for the lightest weight possible
lastly , do not follow the instructions for recessing and gluing the horns , the angles are all wrong , when you do build this remember that the horns need to be at 90 degrees to the hinge line
http://www.rcuniverse.com/forum/atta...1&d=1375915738 - this would be the right way to do it ( guess how i learnt .......)
07-29-2014, 12:02 PM
#515
Join Date: Jun 2014
Posts: 62
Likes: 0
Received 0 Likes
on
0 Posts
the plane flies very nice , the only downfall is the weak landing gear blocks and very fragile airframe , if you have a hard landing or wheels up landing , you can basically say goodbye to the plane ( also the instructions recommend to beef up the gear plates if flying off grass)
recommended to strengthen the landing gear plates in any case with either carbon stands or carbon cloth of sorts
also when buying the plane , i would go with mid size servos for the elevators , as i moded mine to fit the standard servos supplied by skymaster ( Savox 1256 ) and had to remove everythig but the skin to get the servo to fit
i built 2 planes at the same time ( for me and my frined ) the odd things i found out , is each plane was completely different so i assume differert moulds are used - examples:
1 - each plane had its own length of wing tube ( the recesses were different depths )
2 - the ribs at the root for eadch wing was different
3 - stabs could not be exchanged - again different placements of tubes and hold plates
i would recomomed to go with the paint in the mould , as this saves weight , and you should try go for the lightest weight possible
lastly , do not follow the instructions for recessing and gluing the horns , the angles are all wrong , when you do build this remember that the horns need to be at 90 degrees to the hinge line
http://www.rcuniverse.com/forum/atta...1&d=1375915738 - this would be the right way to do it ( guess how i learnt .......)
recommended to strengthen the landing gear plates in any case with either carbon stands or carbon cloth of sorts
also when buying the plane , i would go with mid size servos for the elevators , as i moded mine to fit the standard servos supplied by skymaster ( Savox 1256 ) and had to remove everythig but the skin to get the servo to fit
i built 2 planes at the same time ( for me and my frined ) the odd things i found out , is each plane was completely different so i assume differert moulds are used - examples:
1 - each plane had its own length of wing tube ( the recesses were different depths )
2 - the ribs at the root for eadch wing was different
3 - stabs could not be exchanged - again different placements of tubes and hold plates
i would recomomed to go with the paint in the mould , as this saves weight , and you should try go for the lightest weight possible
lastly , do not follow the instructions for recessing and gluing the horns , the angles are all wrong , when you do build this remember that the horns need to be at 90 degrees to the hinge line
http://www.rcuniverse.com/forum/atta...1&d=1375915738 - this would be the right way to do it ( guess how i learnt .......)
07-29-2014, 12:04 PM
#516
Join Date: Jun 2014
Posts: 62
Likes: 0
Received 0 Likes
on
0 Posts
02-11-2015, 04:28 PM
#517

Hey guy's,
In the middle of one of these and I have found that the vertical fin servo mount hole is for the mid-size servo like the elevators... I am using Spektrum 5060's ( 118oz @ 6.v ) for the elevators and was wondering if that is enough for the rudder?? I hate to butcher up the inside of the fin to accept the full size JR-8411/8711 Spektrum-6250 if the 118oz is enough... Thoughts please !!
Thanks,
Danno
02-12-2015, 09:24 AM
#519
Dan I sold my Viper last summer, you can calculate the loading based on the surface size and the airspeed in which you think you will hit, I did this on my Fei Bao Dolphin build thread.
I used olnico's calculator to get a warm and fuzzy!.
I used olnico's calculator to get a warm and fuzzy!.
Thanks Rich !! Do you happen to have a link the " Caculator "
Cheers,
Dan
02-23-2015, 12:01 PM
#521
Looks like this thing is gonna be way tail heavy... Where are you guys putting the end if the pipe in the cone ?? If you put it 10mm aft of rear former ( which is the front of the add on tail cone ) the end of the pipe is gonna be way inside the the add on tail cone. Even with Heat Shield is heat gonna be a problem for the add on cone ? Seems to me it would be on the ground an idle. I need help here. I don't want to end up with a ton of ballast in the nose... some, well, ok, but not a couple of pounds !!!. What an I missing here ?? These are short airplanes to start with and most the weight is behind the spar/CG. Is the pipe too short ?, I think I'm still gonna be tail heavy even with the engine ( Cheetah ) all the way up to the inlet split, but then the pipe ends up a couple inches inside the tail cone...I normally don't worry to much about total gross weight, but everyone seems to indicate here and elsewhere that that is important with this airplane. Any Ideas would be appreciated !!!
Frustrated as a 3 legged dog trying to bury a turd on a frozen pond !!!
Danno
Frustrated as a 3 legged dog trying to bury a turd on a frozen pond !!!
Danno
02-23-2015, 01:45 PM
#522
Danno,
I have a cheetah in mine and was able to balance it without any added weight. I have the batteries all the way up front and created a tray for the turbine battery that was listed here in the thread. It worked great. The turbine is as far forward as I could get it. The tailpipe comes all the back through the fiberglass tailcone to almost the end. About a 1/2" of the tailcone is exposed.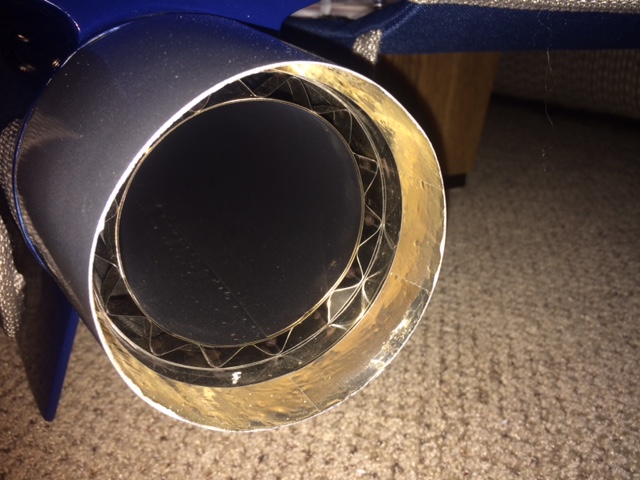
Let me know if a picture of the mount will help.
Gary
02-23-2015, 02:29 PM
#523
My Feedback: (13)
Rcjet,
Mine was the same as gbarnes. I did have the paint bubble slightly on the fiberglas tailcone. I ended up lining it with heat blanket covered in Aluminum tape...that stopped it. I had no weight in the nose of mine, but did have a heavy cockpit. I ended up with mine balanced on the back edge of the wing tube if I remember correctly.
+1 on strengthening the gear mounts. I used long drill bits, screws, hysol and extra metal 90 deg servo mounts to tie it all together. Never had a problem (until I didn't charge my tx, but that's a story for later).
Dave
02-23-2015, 03:06 PM
#524
Gary and Dave,
Thanks so much !! I have come to the conclusion as you both have indicated that the pipe cannot be flush with tail cone. I'm putting the Cheetah front mount tabs 1/4 inch behind the front mount former. Pipe bellmouth will be 28-30 mm behind engine exhaust cone, and the pipe will be aprox 3/4 - 7/8 inch from the end of the fiberglass tail cone. I have stretched all the components as far as I can !!! All this could have been avoided if the pipe were a bit longer... Oh well... I have BVM Heat Shielded the inner of the tail cone and will also put some Hi-temp foil tape.. See what happens. I am not opposed to talking an inch off the fiberglass cone if I have to.. Everything else is shaping up !!.
On the main gear mounts I'm not quite following you on your mod.. I was going to put Hysol fillets on the mounting blocks but I would like to hear more on you mod. Thanks again both you guy's for the help !!! I'll let you know how I end up !!
Cheers,
Danno
Thanks so much !! I have come to the conclusion as you both have indicated that the pipe cannot be flush with tail cone. I'm putting the Cheetah front mount tabs 1/4 inch behind the front mount former. Pipe bellmouth will be 28-30 mm behind engine exhaust cone, and the pipe will be aprox 3/4 - 7/8 inch from the end of the fiberglass tail cone. I have stretched all the components as far as I can !!!
All this could have been avoided if the pipe were a bit longer... Oh well... I have BVM Heat Shielded the inner of the tail cone and will also put some Hi-temp foil tape.. See what happens. I am not opposed to talking an inch off the fiberglass cone if I have to.. Everything else is shaping up !!. On the main gear mounts I'm not quite following you on your mod.. I was going to put Hysol fillets on the mounting blocks but I would like to hear more on you mod. Thanks again both you guy's for the help !!! I'll let you know how I end up !!
Cheers,
Danno
02-24-2015, 01:10 AM
#525
Gary and Dave,
Thanks so much !! I have come to the conclusion as you both have indicated that the pipe cannot be flush with tail cone. I'm putting the Cheetah front mount tabs 1/4 inch behind the front mount former. Pipe bellmouth will be 28-30 mm behind engine exhaust cone, and the pipe will be aprox 3/4 - 7/8 inch from the end of the fiberglass tail cone. I have stretched all the components as far as I can !!! All this could have been avoided if the pipe were a bit longer... Oh well... I have BVM Heat Shielded the inner of the tail cone and will also put some Hi-temp foil tape.. See what happens. I am not opposed to talking an inch off the fiberglass cone if I have to.. Everything else is shaping up !!.
On the main gear mounts I'm not quite following you on your mod.. I was going to put Hysol fillets on the mounting blocks but I would like to hear more on you mod. Thanks again both you guy's for the help !!! I'll let you know how I end up !!
Cheers,
Danno
Thanks so much !! I have come to the conclusion as you both have indicated that the pipe cannot be flush with tail cone. I'm putting the Cheetah front mount tabs 1/4 inch behind the front mount former. Pipe bellmouth will be 28-30 mm behind engine exhaust cone, and the pipe will be aprox 3/4 - 7/8 inch from the end of the fiberglass tail cone. I have stretched all the components as far as I can !!!
All this could have been avoided if the pipe were a bit longer... Oh well... I have BVM Heat Shielded the inner of the tail cone and will also put some Hi-temp foil tape.. See what happens. I am not opposed to talking an inch off the fiberglass cone if I have to.. Everything else is shaping up !!. On the main gear mounts I'm not quite following you on your mod.. I was going to put Hysol fillets on the mounting blocks but I would like to hear more on you mod. Thanks again both you guy's for the help !!! I'll let you know how I end up !!
Cheers,
Danno
Another idea Danno.
As you know the Viper comes in tail heavy so you need as much weight forward as you can.
What I did was cut the inside of the intake ducting, mount the turbine as far forward as possible (to assist cg), mount the pipe wherever it needs to go, then cut the end off the fibreglass tail cone so it's only 10mil longer than the pipe. I think I cut 30mil off the pipe. The result is my Viper is balanced perfect with no lead anywhere, and you can't tell the difference. It also enlarges the gap at the back for hot air to escape as the standard set up is very cramped.