


Hobbistar 60 - Tail dragger conversion
 11-11-2012 | 06:52 PM
#1

Thread Starter
Senior Member
Now that the wing repair is complete, I'm turning my attention to the next project for this plane - converting it from conventional tricycle gear into a tail dragger.
The first step was to remove all of the stock landing gear.


The first step was to remove all of the stock landing gear.
 11-11-2012 | 07:01 PM
#2
Thread Starter
Senior Member
Next step: Filling in the main gear channel with some scrap.

I went with a Sullivan tail wheel. The original idea was to have it castering, but a closer look at the tail presented a different solution - taking a notch out of the elevator.
The notch was centred, but the stripes weren't.

Re-covered...

I went with a Sullivan tail wheel. The original idea was to have it castering, but a closer look at the tail presented a different solution - taking a notch out of the elevator.
The notch was centred, but the stripes weren't.
Re-covered...
11-11-2012 | 07:08 PM
#3
Thread Starter
Senior Member
After the notch was cut and covered, I ground off the heads of the plastic tail bolts, possible because the horizontal and vertical stabilizers are epoxied in place. Once that was done, I re-covered the tail.

The tail wheel bracket was mounted with four servo screws...

... and the steering arm was connected to the rudder.

The tail wheel bracket was mounted with four servo screws...
... and the steering arm was connected to the rudder.
11-12-2012 | 05:11 PM
#4

Senior Member
Cool, Idid the same with my Tower Trainer 40 but left the tailwheel to caster , it worked OK for my flying field but your solution is quite elegant.
The plane flew a lot better as a taildragger but it still sucked and I am glad it finally crashed and burned.
Inow have a Nexstar and its much better, maybe Ican make it a taildragger too?
The plane flew a lot better as a taildragger but it still sucked and I am glad it finally crashed and burned.
Inow have a Nexstar and its much better, maybe Ican make it a taildragger too?
11-13-2012 | 03:23 AM
#6
Thread Starter
Senior Member
On to the main gear. The first step was to decide on the orientation. I chose to have it sweep back.

There are calculations you can do to determine where the gear should go. After a lot of thought, research and advice I decided that placing the axles directly beneath the leading edge (in a level attitude) was the solution for me. To that end, I followed these steps.
[*]Eyeball the placement of the gear on the fuse[*]Mark the leading edge of the gear on one side of the bottom, 5mm from the edge[*]Insert a t-pin at the mark[*]Roughly across the bottom from the t-pin, make a short line parallel to the edge and 5mm from it[*]Pick a forward point on the fuse. Measure halfway across the bottom and insert the t-pin there[*]Measure the distance between the two t-pins[*]Mark the same distance from the forward -pin to where it intersects the 5mm line drawn in step 4.[*]Insert a third t-pin at the mark[*]The line between the two rearmost t-pins forms an accurate leading edge location for the gear
11-13-2012 | 03:28 AM
#7
Thread Starter
Senior Member
With the leading and trailing edges of the gear marked, the covering came off the bottom.

There was a small gap at one point where a razor blade could be worked in...

... but first the bottom had to be cut across. A fine-toothed back saw worked well.

There was a small gap at one point where a razor blade could be worked in...
... but first the bottom had to be cut across. A fine-toothed back saw worked well.
11-13-2012 | 03:34 AM
#8
Thread Starter
Senior Member
With the crosscuts done, a razor blade fit nicely into the gap.

A small scraper soon followed.

With some gentle encouragement, the bottom plate came off the fuse with little damage.

Turns out I had a hardwood block that was the perfect depth and width - it just had to be cut to length.

A small scraper soon followed.
With some gentle encouragement, the bottom plate came off the fuse with little damage.
Turns out I had a hardwood block that was the perfect depth and width - it just had to be cut to length.
11-13-2012 | 03:45 AM
#9
Thread Starter
Senior Member
I used 30 minute epoxy to secure the block.

While it was curing, I turned my attention to the gear itself. Drilled out the axle holes...

... test fit the axles...

... and marked the centre line.

While it was curing, I turned my attention to the gear itself. Drilled out the axle holes...
... test fit the axles...
... and marked the centre line.
11-14-2012 | 06:28 PM
#10
Thread Starter
Senior Member
I put the tail wheel on before work this morning - couldn't wait to see how it looked.

I made a drilling template for the main gear based on the location of the hardwood block.


Got the holes marked and ready for drilling.

I made a drilling template for the main gear based on the location of the hardwood block.
Got the holes marked and ready for drilling.
11-14-2012 | 06:43 PM
#11
Thread Starter
Senior Member
With the holes marked it was time to lug my trusty drill press to the bench.

A little protection...

Started with the pilot holes.

Then to an 11/64" bit for the #8 wood screws.

A little protection...
Started with the pilot holes.
Then to an 11/64" bit for the #8 wood screws.
11-14-2012 | 06:48 PM
#12
Thread Starter
Senior Member
Time for one of my favourite tools - the transfer punch.

Holes marked.

Started with a pin vise...

... finished with a hand drill and 3/32" bit, marked with tape for a 1/2" depth.

Holes marked.
Started with a pin vise...
... finished with a hand drill and 3/32" bit, marked with tape for a 1/2" depth.
11-14-2012 | 06:53 PM
#13
Thread Starter
Senior Member
For#8 wood screws I'm not sure it's necessary to pre-thread the holes and drizzle in some CA, but I've gotten into the habit with RC so I went ahead.

After that came the covering, then the main gear.

I cut some brass tubing to bridge the gap between axle size and wheel bore.

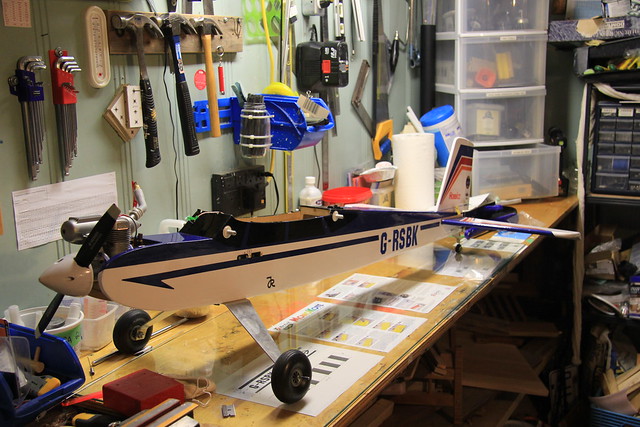
Then onto its new legs for the first time!
After that came the covering, then the main gear.
I cut some brass tubing to bridge the gap between axle size and wheel bore.
Then onto its new legs for the first time!
11-14-2012 | 09:37 PM
#14
Senior Member
Irun a lot of four strokes and having the improved ground clearance to swing a big prop is important to me. Ialso fly off tall grass sometimes and it makes a big difference with a tail dragger.
11-15-2012 | 03:09 AM
#15
Thread Starter
Senior Member
ORIGINAL: jeffie8696
I run a lot of four strokes and having the improved ground clearance to swing a big prop is important to me. I also fly off tall grass sometimes and it makes a big difference with a tail dragger.
I run a lot of four strokes and having the improved ground clearance to swing a big prop is important to me. I also fly off tall grass sometimes and it makes a big difference with a tail dragger.


