


jester_s1 I need your help
 12-20-2013 | 04:53 AM
#51
Thread Starter

My Feedback: (14)
Joined: Mar 2013
Posts: 131
Likes: 0
Received 0 Likes
on
0 Posts
From: Clayton,
GA
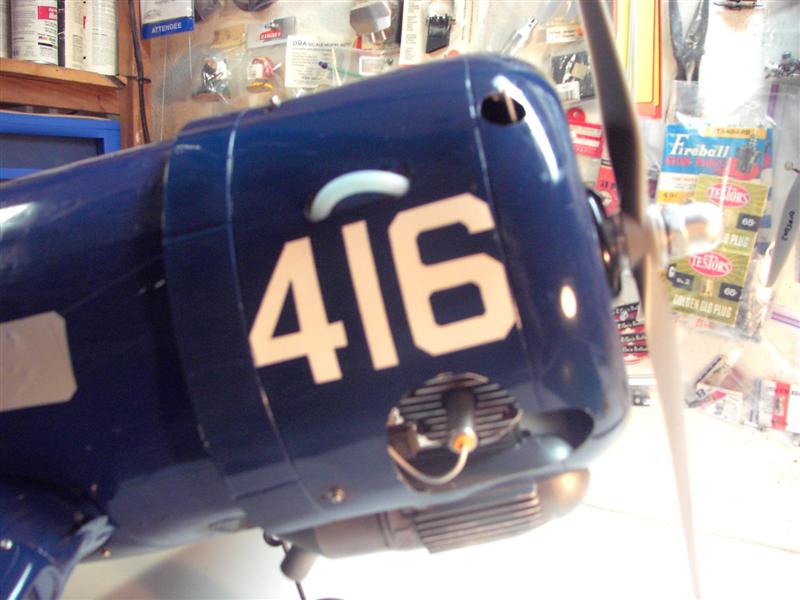
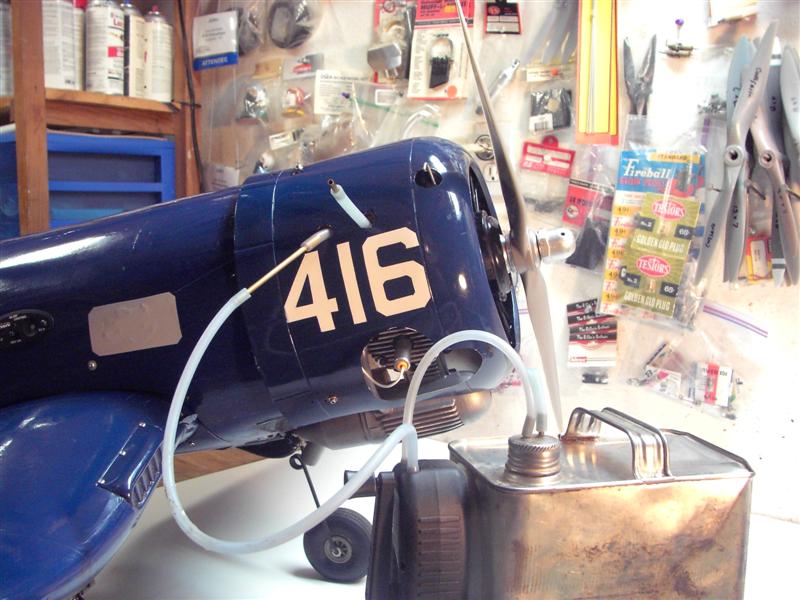
Excellent job on the engine and cowl installation!!! That gets my "seal of approval", for what ever that's worth . Look at several J-3 Cub cowls from the head on view and you will see most have three openings just below the spinner. The top one is the widest and is a horizontal slot, below that is another horizontal slot less wide that the top one, and below that is a square or rectangular oil cooler opening that will be in that raised area near the bottom front of your cowl. Some don't have the oil cooler bump but yours does. After laying out how you want to do these, cut them open so air can enter the cowl for a little additional cooling. The unused muffler tunnel plus the area around the exhaust pipes will allow plenty of air exit from the cowl. General rule of thumb is to have twice as much exit area as intake area for air flow cooling. you have plenty. This will also give a more correct scale look to your cowl. You have a nice looking plane going there. As to the fuel tank fueling; has the tank been assembled yet? There is a 2 fuel line system and a 3 line fuel system. The 2 line would use a accessory fuel valve (Dubro or Great Planes) that would be mounted somewhere on the cowl like the side or the bottom and it consists of a spring loaded valve with hose fittings inside the cowl to the tank on one end and to the engine on the other end. A metal fueling nozzel for the end of your fuel pump hose is supplied with the valve assy. They work nice when they are new but will stick open when they have a couple of years on them and will require replacement. The 3 line system has an extra line going into the tank and will require a "fuel dot", also to be mounted on the cowl. The fuel dot is just a nice finished looking spot to mount an exit spot for the extra fuel line and will have a nice machined plug for the end of the fuel line plug. 3 line with a fuel dot will be cheaper @ $4-$6, and the fuel valve will be about $12-$13. Both available from your hobby store. Some just let the extra fuel line hang out the bottom of the engine bay and plug it with an old screw. YUCK, YUCK, looks non scale and sloppy, but that's just me again! The dangling line with the old screw plug works but come on you can do better, Go with a nice fuel dot or fueling valve.
. Look at several J-3 Cub cowls from the head on view and you will see most have three openings just below the spinner. The top one is the widest and is a horizontal slot, below that is another horizontal slot less wide that the top one, and below that is a square or rectangular oil cooler opening that will be in that raised area near the bottom front of your cowl. Some don't have the oil cooler bump but yours does. After laying out how you want to do these, cut them open so air can enter the cowl for a little additional cooling. The unused muffler tunnel plus the area around the exhaust pipes will allow plenty of air exit from the cowl. General rule of thumb is to have twice as much exit area as intake area for air flow cooling. you have plenty. This will also give a more correct scale look to your cowl. You have a nice looking plane going there. As to the fuel tank fueling; has the tank been assembled yet? There is a 2 fuel line system and a 3 line fuel system. The 2 line would use a accessory fuel valve (Dubro or Great Planes) that would be mounted somewhere on the cowl like the side or the bottom and it consists of a spring loaded valve with hose fittings inside the cowl to the tank on one end and to the engine on the other end. A metal fueling nozzel for the end of your fuel pump hose is supplied with the valve assy. They work nice when they are new but will stick open when they have a couple of years on them and will require replacement. The 3 line system has an extra line going into the tank and will require a "fuel dot", also to be mounted on the cowl. The fuel dot is just a nice finished looking spot to mount an exit spot for the extra fuel line and will have a nice machined plug for the end of the fuel line plug. 3 line with a fuel dot will be cheaper @ $4-$6, and the fuel valve will be about $12-$13. Both available from your hobby store. Some just let the extra fuel line hang out the bottom of the engine bay and plug it with an old screw. YUCK, YUCK, looks non scale and sloppy, but that's just me again! The dangling line with the old screw plug works but come on you can do better, Go with a nice fuel dot or fueling valve.I also just ordered some fuel dots for the parts bin. You never know when a guy might need a valve or a dot.
 12-20-2013 | 04:56 AM
#52
Thread Starter
My Feedback: (14)
Joined: Mar 2013
Posts: 131
Likes: 0
Received 0 Likes
on
0 Posts
From: Clayton,
GA
......1234, I also intended to chime in on the .40 LA in this plane. Yes, it will fly it just fine once it's in the air. Pulling it thru grass to get enough air speed for takeoff is where the .46 LA is better. If you fly off a paved runway is doesn't matter. The outside physical dimensions of the .40LA and .46LA are identical so if you want to upgrade later it is a direct bolt in swap including the pitts muffler and the mounting bolt pattern. Do you fly off grass? Short grass maybe??
12-20-2013 | 05:41 AM
#53


My Feedback: (1)
Good morning DR yes grass certainly can be wonderfull to fly off out here in our parts its either asphalt or in most cases just desert hardpan 'arizona grass'
DR concerning the fueling valves, I tend to classify them with power panels. Just a complete waste of money and most certainly at least one lost flying day eventually fiddling with the engine when they start to leak and causing mystery running problems. I do on occasion acquire some on buy outs and such but immediately send them to the bin. I would not even give them away to friends simply because that's no way to treat a friend.
The three line systems with a fuel dot is probably the most popular way to fuel but I prefer the much simpler two line system (cowling or not makes no difference) with a simple split in the carb line where its convienent and a short piece tube to connect. fueling from here is the simplest and most convienent of all and least trouble prone.
I have pictures of many many different types of airplanes with and without cowls to illustrate this simple technique. Try searching on fuel valve or fueling you will most likely run across some of them.
John
12-20-2013 | 06:51 AM
#54
I use a 3 line system for my Cub, and it works fine. I've never used the valves because I've heard the same comments- that they are prone to leakage. They are a really tidy way to set up your plane, but planes tend to get untidy fast when the engines won't run reliably. The other advantage of using a dot is that if you lose your dot (you will), you can just stab a screw in there and keep on flying!
12-20-2013 | 11:10 AM
#55
Thread Starter
My Feedback: (14)
Joined: Mar 2013
Posts: 131
Likes: 0
Received 0 Likes
on
0 Posts
From: Clayton,
GA
The dots are sounding more like what I will use. The valve I have is well built from machined aluminum and kinda pricey as well but the dot is looking better to me. I'm not worried so much about fuel leaking because I can see that if it happens. What I worry most about is the valve sucking air and causing the engine to not be trust worthy. I assume where you push the valve in to fuel it there must be a ball check valve of some sorts. If the spring gets weak or a micro piece of trash gets in the valve then trouble could arise. Looks like to me if I use a dot and the dot is secured in the line and all the line connections are clamped good then I would have a secure positive sealed fuel system.? Tell me if this makes any sense as I'm in a learning curve on this. I need this plane to be as well prepared as possible because I don't handle dead sticks well.
12-20-2013 | 07:53 PM
#56
My Feedback: (1)
.....1234, Sounds like the 1" tall Bermuda golf turf is the best case possible for flying off grass with the 40LA powered Cub. That's good. Now on the fuel valve/fuel dot question......John and don't see eye to eye on that question. If I remember right we went back and forth with each other on another thread arguing the merits of each system and finely had to "agree to disagree" on that one. He hates fuel valves and I do use them and defended them. On a Cub I just restored for a club mate it already had a 3 line system in it that we were going to reuse so it was an opportunity to try a dot (remembering my debate with John as i did it). The plane owner supplied a nice machined aluminum mounting dot and plug. Well, I LIKED IT!! So maybe John won that debate in the long run. It did make for a nice easy to use good looking installation. I still remain a user of valves but am open to trying the dot again in the future. I guess it is a matter of personal preference. Try both and decide for yourself. Jester-s1 ("stab a screw in there and keep on flying") is my "old screw works" example. Yes, it works but I like to do things certain ways, personal preference again (or picky old fart??). Pick your poison! Both Jester-s1 and John Buckner are great sources of information and I respect both of them, it's just that on some things we find different ways to get to similar end goals. I have had a fuel valve fail on me at the field only 2 times and I use quite a few of them. Once It stuck open and I couldn't get the engine to start till I noticed the valve core not in correct position. On another plane at a fly in one stuck open and leaked out the fuel as soon as I unpluged the fuel probe. Couldn't get it to seat and in both cases I just put that plane back in the truck and flew something else that day. I replaced the bad valves back at the shop, not a big deal for me. I think that the "o" rings inside expand with age and then the valve gives trouble. I have never had one create a poor running engine or a dead stick in the air, but maybe that's possible. For me they either worked or they didn't and it leaked. Doesn't happen often but it does happen after they are a few years old. I know John is following this thread and I have a question for him......with the simple split in the carb line for a fueling line as you describe on a 2 line system how does the carb not get flooded as you are pumping in the fuel. It's going to go both to the fuel tank and the carb in equal amounts isn't it? What am I missing?
12-20-2013 | 08:47 PM
#58
My Feedback: (1)
.....maybe John won that debate in the long run. It d. I know John is following this thread and I have a question for him......with the simple split in the carb line for a fueling line as you describe on a 2 line system how does the carb not get flooded as you are pumping in the fuel. It's going to go both to the fuel tank and the carb in equal amounts isn't it? What am I missing?
These two pictures illustrate The same two line system I use for virtually every airplane with some exceptions (there are always exceptions). It is physically impossible for fuel to be forced anywhere near the carb or to flood it.
I don,t buy expensive fuel valves or ever recommend them to the folks I mentor I also never lose flying time to leaky valves or special fitting on the fuel pump that just happens to be on the can at home.
I also never use fuel dots or lose flying time looking for lost fuel dots in the sand, something I often see the fellows doing on any busy weekend. I never have to punch that third hole in the fuel tanks of every new airplane.
And best of all the most reliable system of all (of course just my opinion), the two line system with a split absolutely never cost anything.
John
Last edited by JohnBuckner; 12-20-2013 at 08:53 PM.
12-20-2013 | 08:50 PM
#59
My Feedback: (1)
Yes, but isn't it still going to flood the engine while your pumping it? True the needle valve will restrict the amount past the N.V. but with out turning the needle valve in all the way to shut it off during fueling some fuel must still enter the carb barrel. Is it so small an amount that it doesn't matter? Have you tried this and it works without flooding, cause if it does work it sounds like a good idea. I may bench test this on my engine test stand where I can easily see whats happening with everything. Next time I run an engine I'll give it a go.
12-20-2013 | 09:01 PM
#60
My Feedback: (1)
OK John, I was typing as you were posting the 2 photos. I thought you were using a tee fitting with one line going outside the cowl for external fueling access. All you show there is the same simple system that every open cowl upright engine trainer uses. Just unplug the carb line at the carb and pump fuel till it comes out the vent line. If the engine is in an enclosed cowl you don't have access to the fuel line unless you loop it outside the cowl somewhere. How do you do this with an enclosed engine??
12-20-2013 | 09:17 PM
#61
My Feedback: (1)
Larry look at the pictures I just posted above Its impossible to flood the carb and its just like every other two line glow powered trainer that has ever taken to the skys.
The only difference is you just not pulling the line off at the carb instead you just inserting the fuel pump line a little further up the carb line in the split 'fueling toward the tank not the carb'.
Its so simple, so reliable, so easy and so cheap that folks have trouble understanding. Its always a lot of verbal struggle especially for some who are not new flyers but no one who I have introduced this to has ever gone back to either the valves or the dots.
John
12-20-2013 | 09:34 PM
#63
My Feedback: (1)
Actually most of my airplanes do have all manner of cowl and by the way Daddyrabbit the J-3 particularly lends itself to this arraingement and no since I retired my YS engines from racing none of them have any form of Tee.
John
John
Last edited by JohnBuckner; 12-20-2013 at 11:44 PM.
 12-21-2013 | 12:01 AM
#66
My Feedback: (1)
OK had photos of four wildly different types of cowl all using the same system posted but the system here disallows all but two at a time anyway I am done with that no point for me to waste any further time.
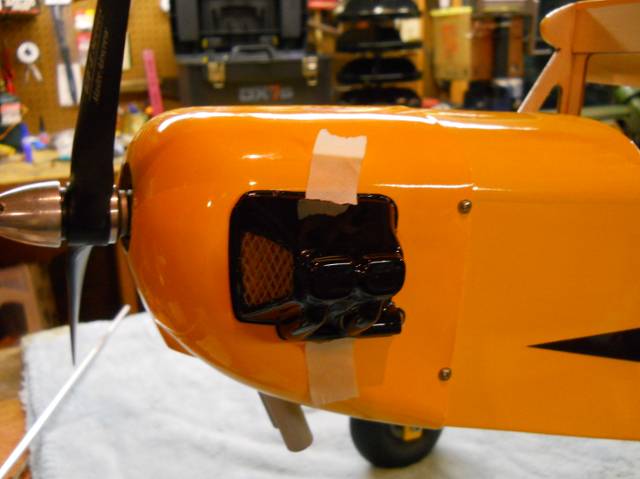
daddyrabbit I would like to approach something else concerning your airplane that has bothered me since you posted the last photos of the J-3.
Only the cylinder head is exposed outside the cowl in the high engery air. But since you have no inlet air and very little outlet air in the covered over tunnel and the very tightly cut outlet around the exhaust at the bottom.
I beleve this will cause relitively stanant air within the cowl and even around the lower cylinder cooling fins. I think there is a good chance that you may have running problems from cronic overheating. Unless you open up that bottom cowl outlet and allow some air inlet Otherwise it just becomes an oven inside.
I think an awfull lot of the running problems some fellows go through is just simply the refusal to let those cowls breath a little more.
John
12-21-2013 | 09:45 AM
#67
My Feedback: (1)
I suggested additional front cooling openings back on post #49. I thought the combination of the open muffler tunnel (it is open unless the O.P. has covered it) and the exhaust exit hole would be enough but it wouldn't hurt to open up the exhaust cut out in the bottom of the cowl. It won't be seen even in the air and in addition to helping the hot air exit the cowl it will make it easier to take the cowl on and off. I often make that a "U" shaped cut out with the back of the open area all the way to the back edge of the cowl (no connecting "bridge " across the back of the opening"). It doesn't seem to weaken the cowl as the mounting points are on the sides. As John points out, cooling air flow is important to the proper operation and longevity of the engine. So after looking a several example Cub cowls, make the intake slots and oil cooler hole as big as you can and still look "right", then do open up the bottom air exit area some just to make sure. P.S. I told you John and I disagree on fueling valves!
12-21-2013 | 11:24 AM
#68
Hi!
And a 11x6 or 12x4 prop is the best size even for a Super Tigre -40 on a CUB. 11x5 is too small! Go for a RAM, Graupner G-Sonic or APC as those are the best brands available.
And a 11x6 or 12x4 prop is the best size even for a Super Tigre -40 on a CUB. 11x5 is too small! Go for a RAM, Graupner G-Sonic or APC as those are the best brands available.
12-21-2013 | 12:35 PM
#69
Thread Starter
My Feedback: (14)
Joined: Mar 2013
Posts: 131
Likes: 0
Received 0 Likes
on
0 Posts
From: Clayton,
GA
OK had photos of four wildly different types of cowl all using the same system posted but the system here disallows all but two at a time anyway I am done with that no point for me to waste any further time.
daddyrabbit I would like to approach something else concerning your airplane that has bothered me since you posted the last photos of the J-3.
Only the cylinder head is exposed outside the cowl in the high engery air. But since you have no inlet air and very little outlet air in the covered over tunnel and the very tightly cut outlet around the exhaust at the bottom.
I beleve this will cause relitively stanant air within the cowl and even around the lower cylinder cooling fins. I think there is a good chance that you may have running problems from cronic overheating. Unless you open up that bottom cowl outlet and allow some air inlet Otherwise it just becomes an oven inside.
I think an awfull lot of the running problems some fellows go through is just simply the refusal to let those cowls breath a little more.
John
John, I'm going to open up some air vents on the front of the cowl as Larry suggested before. I'm waiting on another OS 40 LA to arrive before I proceed with the vents. I'm into scale and detail big time on everything I do so with that said I plan on somehow taking the head from the incoming 40 and mounting it on the other side of the cowl to make a true looking twin cylinder.
I've built models and dioramas for years and I think that's why I'm so detailed about anything I build. Here's a 1/25 model I built recently. Its mostly scratch built except the tub and wheels. Grannies rocking chair on the back of the truck is only 1 1/2 inches tall and it took almost a day to scratch build that rocker.
1/16 Nomad drag beater
12-21-2013 | 01:55 PM
#71
My Feedback: (1)
DR I love your Jed Clampit diorama beautiful work. And yup Larry we are both in total agreement about the cooling arraignment of DR's Cub.
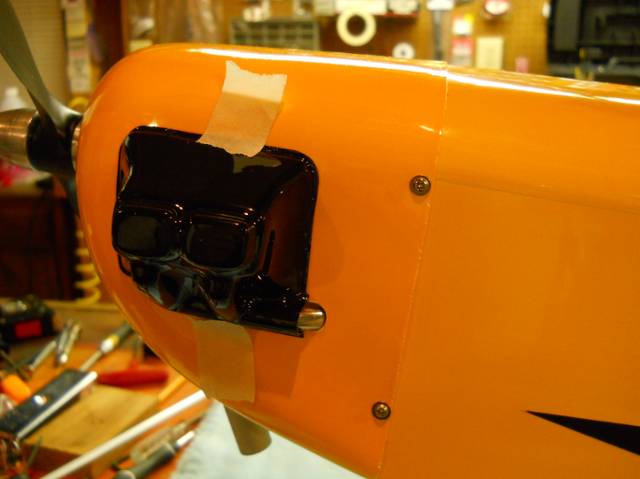
DR its going to be just about impossible to configure your airplane like the pic of the full scale airplane and here is why and I am quite familiar with J-3's having owned two of them at different times in the past. One a J-3c65 and the other a J-3c-75: If you look at your photo you can see both the upper and lower cowl halves taper from the firewall to a rather narrow wedge at the propeller to just wide enough for the crank case. Above the cylinders are eyebrow baffles which are intended to deflect high energy air down between the cylinders. The were also intercylinder baffles but for our purposes those are out of sight and mind.
Now take a close look the cowl of your cub. Almost no taper and in fact its as if the designer was actually trying to make the cowl like a PA-11, PA-18 Super cub and of course these full scale cubs did have conventional fully enclosed pressure cowl. DR you will have a bake oven there unless you open some high energy air from the front I now cheek openings will not be scale. Well I have seen far to many beautiful scale airplane live very short lives simply because their builder/owners would not cut their pretty cowls for anything even cooling. Yes of course the tunnel will let out some air but no where enough.. In most cases were the tunnel were being used the cowl would be cut away a considerable amount for the muffler. However no matter how much outlet you provide it all comes to naught if there is no high energy inlet(s) .
My recommendation for that airplane and that cowl would be cut away a lot more outlet at the bottom and provide reasonable sized cheek inlelts up front scale fidelity can go be hanged cooling is far, far more important if the airplane is actually intended to be flown.
John
12-21-2013 | 09:10 PM
#72
My Feedback: (1)
Oh boy, now that we know your interested in scale accuracy, I have some bad news for you. Your plane is not scale correct and never will be. Don't let that bother you, just make it look as "right" as you can and enjoy it. In my Cub collection I have five J-3 ARF's and none of them are the same. They all look like J-3's but all have different side profiles, different wing cord to span ratios, different tail feather shapes and sizes, and different cowl shapes. All the cowls taper to a correct narrow front except a World models 48" electric cub that is shaped similar to yours. Electric motors need cooling too and I cut two cheek openings on either side if the spinner and declared it to be a "super Cub"! As John points out on your Cub cowl, it's too wide to be a correct J-3 cowl so maybe his idea to cut cheek openings is a good one. I think there is enough room on each side to make two openings that will sorta look like a PA-18 and I would still open the oil cooler bump that's on the bottom of your cowl. With the incorrect too wide shape not enough of the engine sticks out in the air stream for cooling and cheek openings would help fix that. It still won't have the correct PA-18 shape viewed from the side but your going to have to accept a compromise. Fact is most flying scale model airplanes have been reconfigured for better flight qualities once they are scaled down from full size. This applys to kits as well as ARF's. Tail feathers get made bigger, fuselages get lengthened, etc. Contest quality models don't have these changes but the ones us "sport" flyers have do. Generally speaking, the higher quality brand name kits and ARF's will do a better job of hiding any inaccuracies. Lower cost "no name" ARF's will have more inaccuracies and and will be more visible. That's just the way is. The more scale details you add to these types of planes the more convincing it becomes. In truth these are "semi scale" planes, some more "semi" than others. Your stuck with that cowl, make look as convincing as you can. Some of the major visual differences between a J-3 Cub and a Super Cub are: most but not all Super Cubs were built with flaps, the vert. stab/rudder shape is a little different, and the enclosed cowl. For $85 just style the cowl openings like a Super Cub, call it a Super Cub and enjoy it. As you know, modeling is all about creating an allusion. Fake it!!
Last edited by 52larry52; 12-21-2013 at 09:20 PM.
12-22-2013 | 08:10 AM
#73
To be accurate with the history, by definition a Super Cub does have flaps. There were J3 Cubs built with the enclosed cowl because that was a design improvement that Piper came up with. The enclosed cowl was included on the Super Cub as it had been on all Cub subsequent to the change. So there are J3 Cubs with the enclosed cowl that are otherwise the same as all other J3 Cubs, then there are Super Cubs with the enclosed cowl and changes to the tail and interior. But there are no Super Cubs with the open cowl, at least not as produced by the factory.
12-22-2013 | 11:46 AM
#74
My Feedback: (1)
There were others long wing Cubs. For instance the J-4 Cub Coupe which was fat fuselage side by side two place Cub with a the 65 and this I believe was the first longwing Cub to have a pressure cowl. Then there was the J-5 which was a slightly widened fuselage with a bench for two in the rear and a single pilot up front it was a 75 horse bird with the eyebrow cooling like the J-3. The J-5 after the changover to the PA model numbers became the PA-12 with larger engines and a full pressure cowl.
The first two place tandem long wing Cub to Acquire the full pressure cowl was the PA-11 and I think they called it the Cub Cruzer (spelling) no flaps then came the P-18 Super cub.
Of course concurrently after the war of course came the short wing pipers.
John
The first two place tandem long wing Cub to Acquire the full pressure cowl was the PA-11 and I think they called it the Cub Cruzer (spelling) no flaps then came the P-18 Super cub.
Of course concurrently after the war of course came the short wing pipers.
John
12-22-2013 | 04:18 PM
#75
Thread Starter
My Feedback: (14)
Joined: Mar 2013
Posts: 131
Likes: 0
Received 0 Likes
on
0 Posts
From: Clayton,
GA
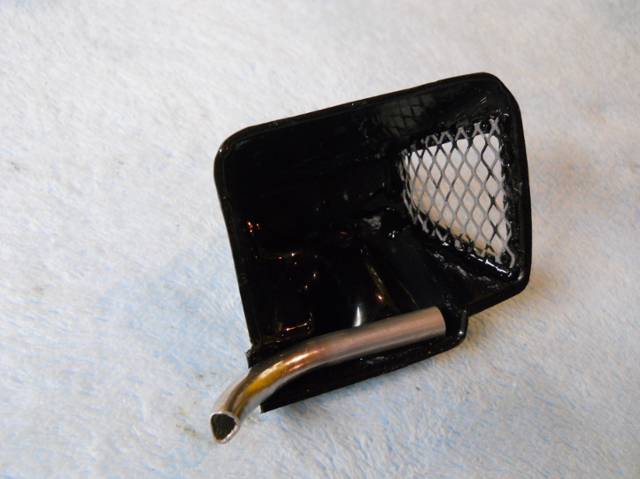
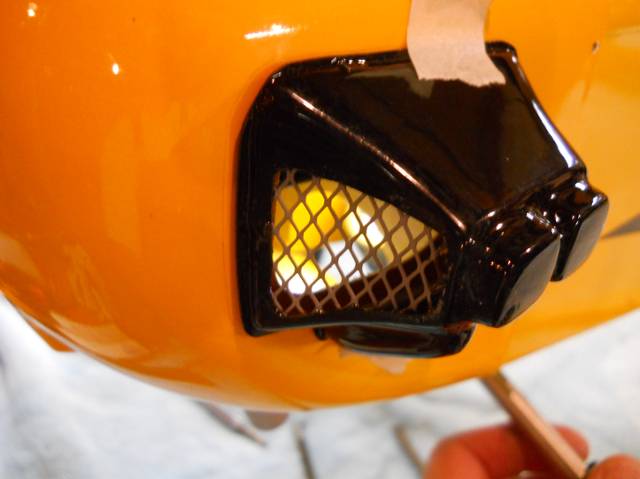
I got a little done on the cub today. Since scale is out the window I'm just going more for function and try to keep it as clean as possible. I decided on how I would get air flow to the engine. I used the fake engine and added a vent to the front of it as well as an exhaust tube to make it look a little better. After I get this installed I'm going to anchor the plane and get some numbers on the engine heat before I cut anymore. I think the exhaust tunnel will be enough outlet. If not the laser thermometer will tell me.
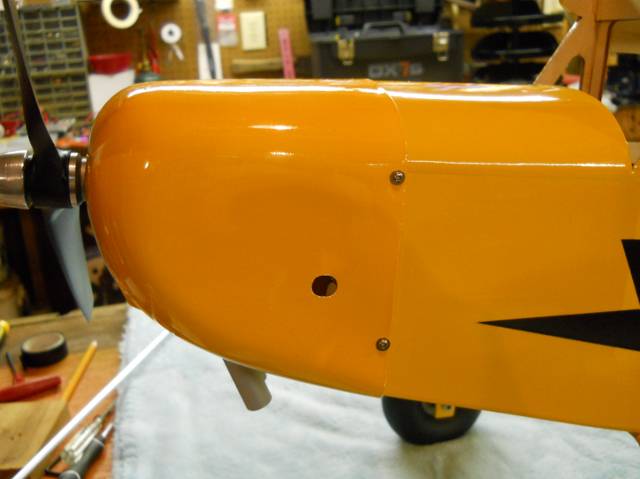

I threw together a sweet little custom transmitter tray today while glue was drying on the cowl vent. It balances perfect with the DX7.
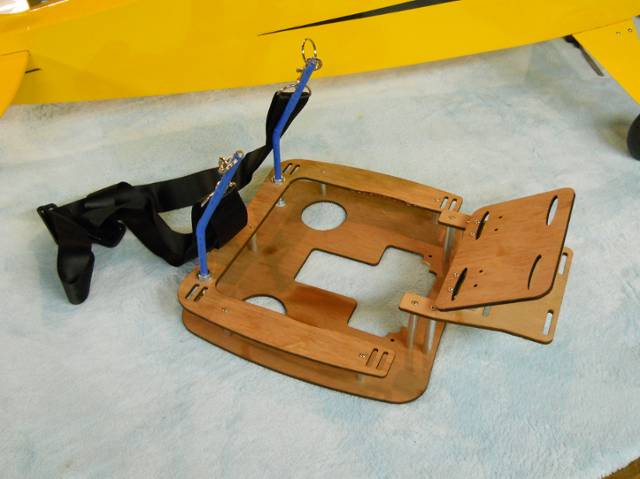
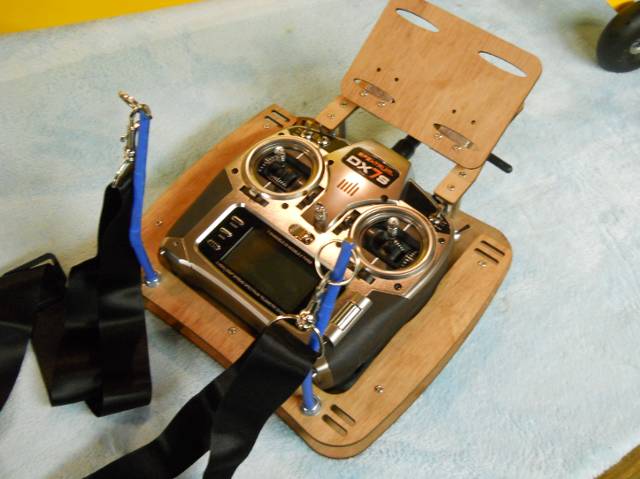
I threw together a sweet little custom transmitter tray today while glue was drying on the cowl vent. It balances perfect with the DX7.

