


jester_s1 I need your help

 12-15-2013 | 04:31 PM
#27
Thread Starter

My Feedback: (14)
Joined: Mar 2013
Posts: 131
Likes: 0
Received 0 Likes
on
0 Posts
From: Clayton,
GA
It seems to have way more compression now. I ran 4 or 5 more tanks thru it today and I swear it just keeps running better and better. I don't see how it could get much better than what it is now but it is.
12-15-2013 | 04:36 PM
#28
Thread Starter
My Feedback: (14)
Joined: Mar 2013
Posts: 131
Likes: 0
Received 0 Likes
on
0 Posts
From: Clayton,
GA
Both John Buckner and Jester_s1 are correct in offering an inverted @ 45* angle for the engine. I didn't think of that option at the time but it does work well especially because you are kit building and can build the exhaust tunnel as part of the construction not as a modification on an ARF. Easier to do it up front not after the fuselage is already ARF built. More work but you don't have to spend $35 or so on a special muffler. Your choice. Jester gave you more details on what it takes to break in a Super Tiger. If you want to go through that, "knock yourself out". I have, in my old lazy years, taken to the "smooth and easy" route in doing things and an O.S. would sure be smoother and easier. But if your into pain and frustration go ahead and use that almost "free" S.T. I have several Super Tigers in various planes (not in any Cubs) and learned to tune them and so can you, it's just not the easy route. Either way, have fun.
12-15-2013 | 06:48 PM
#29


My Feedback: (1)
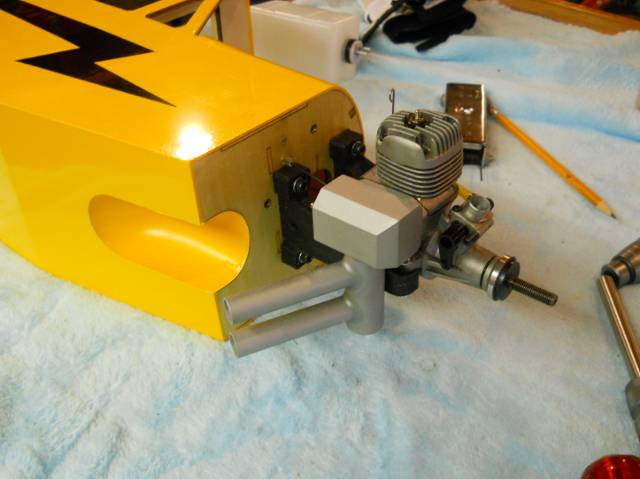
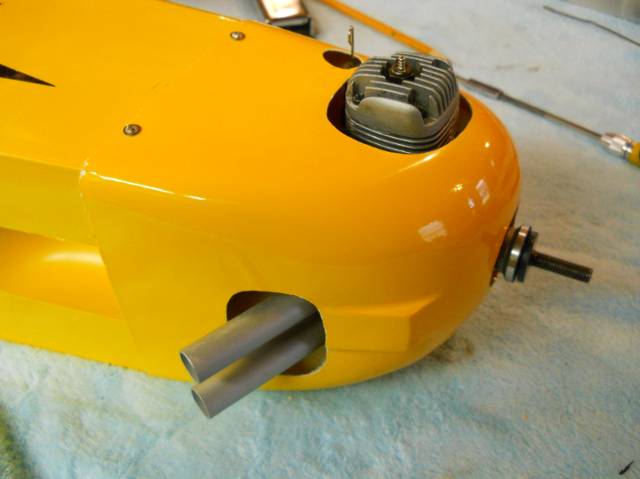
Yes, yes that is an exhaust tunnel. I hope larry won,t mind me answering Something not often provided these days Using a two stroke glow engine the cylinder is rotated down slightly from the 90 degree sideways mount until the stock muffler fits in that tunnel. This usually results in a cylinder position of 135 degrees.
I think I have just one airplane with a pitts muffler and all the rest I use in most cases the stock mufflers. As most do not have a tunnel these days its very simple to do you own and where you want it. Just dremel away a notch in the firewall as you see there a little I/16th balsa sheet water soaked and rolled then fitted in the slot a little thin ca. Your done. Most times I just paint with some thinned epoxie or if I am real lazy I just spread out some thin ca on the bare balsa for fuel proofing.
John
12-15-2013 | 07:35 PM
#30
My Feedback: (1)
John covered it correctly. BTW, with that factory muffler tunnel that airplane is not a World Models Cub. It looks identical to one currently being sold on Ebay as a "no name" Cub ARF from a seller named "Lagola" out of Chicago, Illinois. He offers them at a buy it now price of $100.00 plus $23.70 shipping. Looks nice for the price, less than $125 to your door. Enjoy !!!
12-15-2013 | 08:13 PM
#31
Thread Starter
My Feedback: (14)
Joined: Mar 2013
Posts: 131
Likes: 0
Received 0 Likes
on
0 Posts
From: Clayton,
GA
Yes, yes that is an exhaust tunnel. I hope larry won,t mind me answering Something not often provided these days Using a two stroke glow engine the cylinder is rotated down slightly from the 90 degree sideways mount until the stock muffler fits in that tunnel. This usually results in a cylinder position of 135 degrees.
I think I have just one airplane with a pitts muffler and all the rest I use in most cases the stock mufflers. As most do not have a tunnel these days its very simple to do you own and where you want it. Just dremel away a notch in the firewall as you see there a little I/16th balsa sheet water soaked and rolled then fitted in the slot a little thin ca. Your done. Most times I just paint with some thinned epoxie or if I am real lazy I just spread out some thin ca on the bare balsa for fuel proofing.
John
I think I have just one airplane with a pitts muffler and all the rest I use in most cases the stock mufflers. As most do not have a tunnel these days its very simple to do you own and where you want it. Just dremel away a notch in the firewall as you see there a little I/16th balsa sheet water soaked and rolled then fitted in the slot a little thin ca. Your done. Most times I just paint with some thinned epoxie or if I am real lazy I just spread out some thin ca on the bare balsa for fuel proofing.
John
12-15-2013 | 08:24 PM
#32
Thread Starter
My Feedback: (14)
Joined: Mar 2013
Posts: 131
Likes: 0
Received 0 Likes
on
0 Posts
From: Clayton,
GA
John covered it correctly. BTW, with that factory muffler tunnel that airplane is not a World Models Cub. It looks identical to one currently being sold on Ebay as a "no name" Cub ARF from a seller named "Lagola" out of Chicago, Illinois. He offers them at a buy it now price of $100.00 plus $23.70 shipping. Looks nice for the price, less than $125 to your door. Enjoy !!!
12-16-2013 | 08:24 PM
#33
My Feedback: (1)
@$85 I would say "well bought"! The one in the E-bay photos looks like it has wheels that will be too small for flying off grass, so if you fly off grass go for larger diameter wheels (tires). Some 1/5 th scale cub wheels from Dubro would look and work good. Your plane @ 72" w.s. is a 1/6 th scale so the 1/5 th wheels will give it that "tundra tire" look that is nice on a Cub. Also IMHO, now that you have the Super Tiger 40 broken in and running well it should be the one to go into this Cub. The 40 LA is too wimpy to fly this plane . There is a big difference between a 40 LA and a 46 LA in power. The 46 is 20% stronger and would be fine but not the 40. Use that 40 LA somewhere else. The 40 Super Tiger will perform at least as strong as the 46 LA maybe better, so in a S.T. a 40 is ok. Looks like you did well in learning to tune a Super Tiger. One thing I do when flying one of my S.T. powered planes is to make sure the engine is well warmed up and the needle valve has a final readjustment just a little on the rich side before take off. This has helped to cut down on dead sticks. They will tend to lean out a little in the air and if you take off with a cold engine set a peak lean you will be making a dead stick landing. Warm it up and set it 1/2 turn rich just before take off. Retop the fuel if you think you burned a lot off.
12-17-2013 | 06:55 AM
#34
Thread Starter
My Feedback: (14)
Joined: Mar 2013
Posts: 131
Likes: 0
Received 0 Likes
on
0 Posts
From: Clayton,
GA
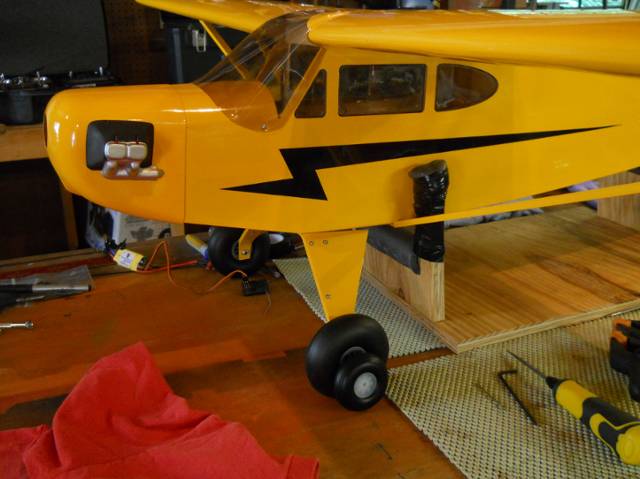
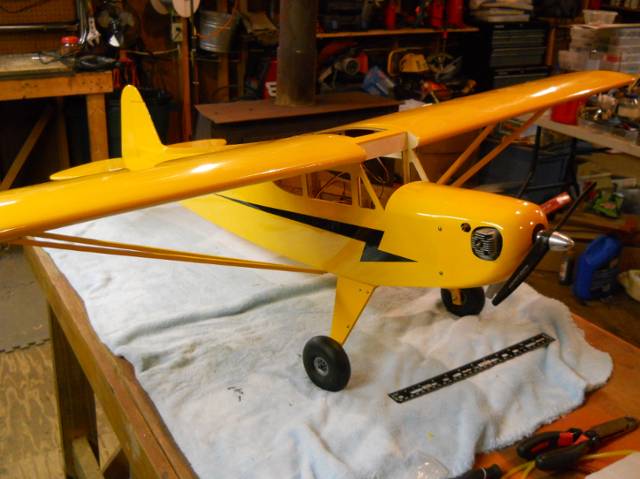
Larry, I'm going with the ST for sure. The ST is about as ready as It'll ever be. I wont have to put a landing gear together as I'm going to use the landing gear from the previous cub. I changed the factory wheels for some 3.75 Dubros as you can see in the pic. It still doesn't look like I want it to so I will most likely go even bigger with the wheels as well a going with a tail wheel that's just a hair bigger.
12-17-2013 | 08:03 PM
#37
Thread Starter
My Feedback: (14)
Joined: Mar 2013
Posts: 131
Likes: 0
Received 0 Likes
on
0 Posts
From: Clayton,
GA
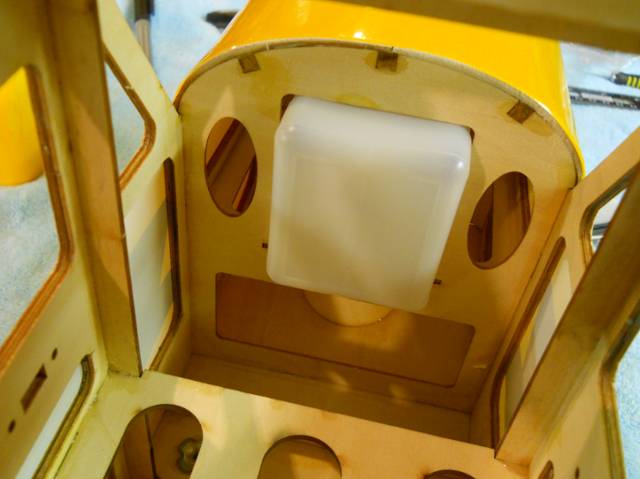
I've heard a lot of people say when you mount the fuel tank that it needs to be as close to the engine as possible. My tank will fit clean up against the fire wall with the fuel line level with the carb. Will this be adding to much weight to the nose of the plane? I've got plenty of room to slide it back if need be
12-17-2013 | 09:35 PM
#38
My Feedback: (1)
Yes that is a 135 degree orientation and is pretty common method of running the muffler through a tunnel works great and will not cause syphons as the carb is sufficiently high.
Yes use the tank exactly as it is in your photos. Right up aginst the firewall sounds like you have a perfect tank to carb relationship. And no you will not be adding to much weight to the nose. Remember when you check and adjust the CG do so with the fuel tank empty.
John
Yes use the tank exactly as it is in your photos. Right up aginst the firewall sounds like you have a perfect tank to carb relationship. And no you will not be adding to much weight to the nose. Remember when you check and adjust the CG do so with the fuel tank empty.
John
Last edited by JohnBuckner; 12-17-2013 at 09:39 PM.
12-18-2013 | 02:52 PM
#40
Thread Starter
My Feedback: (14)
Joined: Mar 2013
Posts: 131
Likes: 0
Received 0 Likes
on
0 Posts
From: Clayton,
GA
I need some advise on an engine: So I got the OS .40 LA in the mail today. I checked it out and put it on the stand. I hooked it up and when I spun it I noticed the carb was spraying fuel like crazy. I leaned the needle down and it still sprayed fuel in like crazy. I then turned the high needle all the way in and snugged it up and it still sprayed more than enough fuel. Finally I unplugged the tank line from the muffler and I got it running. It will only run wide open with the pressure hose unhooked from the muffler and the needle closed completely up and even then it's slobbering out the exhaust and 4 stroking. Do I need a whole new remote needle assembly?
12-18-2013 | 08:02 PM
#41
My Feedback: (1)
....1234, I wish you lived closer to me so I could have you visit my hanger where I could show you 6 or 8 different Cub engine and muffler installations. Posting photos on here is too much of a PITA so I won't do it! For me, the muffler you have there doesn't hit the center line of the tunnel close enough and it sits too low and a lot of muffler will be hanging out below the cowl plus the forward portion of the muffler will stick out of the lower front cowl area. Not hidden enough for me, but that's just me. You're going to have to "hack" up the cowl to get it on over that exhaust. We all have different criteria for what is ok on our models, so if you don't care about a clean hidden installation then it will work. I am picky on cutting a cowl the least amount possible on a scale type plane. On a non scale plane, then let the whole muffler hang out, it doesn't matter to me. That's just my personal little hang up! So having said that, I am now back to advising a 90* laid over with a pitts muffler installation. Do what works for you. BTY, that's a strange looking Super Tiger muffler, nothing like what a current one looks like. Is this an old (new old stock) early made in Italy Super Tiger?
12-18-2013 | 08:23 PM
#42
It sounds like the needle valve could be bad. If you put a piece of tuning on the fuel nipple and just blow into it, can you seal up the passage with the needle? You should. If the needle is defective, you might consider asking your seller for a refund. This little engine isn't worth putting much money into.
12-18-2013 | 09:04 PM
#43
My Feedback: (1)
A new needle valve assembly is available from Tower Hobby for $18.49. Tower part #LXMW56, O.S. part #26582900, and it is "in stock". It includes the needle valve, the N.V. body, a ratchet spring, and 2 mounting screws. Jester is right, "This little engine isn't worth putting much money into". However, if you can't get your money back, or just want to press forward, then $18.49 more invested will get you a new needle valve and likely fix the engine. Sometimes when we buy used "bargains" we take it in the shorts, and sometimes we make out like a bandit. For comparison a new O.S. 46 LA retails at Tower for $84.98 (40 LA has been discontinued for several years now).
12-19-2013 | 05:55 AM
#44
Thread Starter
My Feedback: (14)
Joined: Mar 2013
Posts: 131
Likes: 0
Received 0 Likes
on
0 Posts
From: Clayton,
GA
....1234, I wish you lived closer to me so I could have you visit my hanger where I could show you 6 or 8 different Cub engine and muffler installations. Posting photos on here is too much of a PITA so I won't do it! For me, the muffler you have there doesn't hit the center line of the tunnel close enough and it sits too low and a lot of muffler will be hanging out below the cowl plus the forward portion of the muffler will stick out of the lower front cowl area. Not hidden enough for me, but that's just me. You're going to have to "hack" up the cowl to get it on over that exhaust. We all have different criteria for what is ok on our models, so if you don't care about a clean hidden installation then it will work. I am picky on cutting a cowl the least amount possible on a scale type plane. On a non scale plane, then let the whole muffler hang out, it doesn't matter to me. That's just my personal little hang up! So having said that, I am now back to advising a 90* laid over with a pitts muffler installation. Do what works for you. BTY, that's a strange looking Super Tiger muffler, nothing like what a current one looks like. Is this an old (new old stock) early made in Italy Super Tiger?
12-19-2013 | 06:05 AM
#45
Thread Starter
My Feedback: (14)
Joined: Mar 2013
Posts: 131
Likes: 0
Received 0 Likes
on
0 Posts
From: Clayton,
GA
It sounds like the needle valve could be bad. If you put a piece of tuning on the fuel nipple and just blow into it, can you seal up the passage with the needle? You should. If the needle is defective, you might consider asking your seller for a refund. This little engine isn't worth putting much money into.
12-19-2013 | 07:17 AM
#47
My Feedback: (1)
Just a thought here when buying used engines that can sometimes be troublesome this is not to say you have not alreadys found your problem daddyrabbit but it may be helpful in the future or to others.
When folks are messing with a cranky engine frequently they will try other needle valves even of the same brand, design, O ring count etc. In other words may look identical. But even with all these in place it may not be identical no matter how close it looks. Two of the most important design parameters of a needle valve are the taper grind in other words the angle and length of the taper then last but not least is the thread count of threads. Both of these items will make a hugh difference in how this needle performs with this particular engine.
One example I know of first hand Is the needle valve for the TT 46 pro and the TT61 pro . the part numbers are different but the needles look identical to the eye but the 61 will not function properly with the 46 needle. At least this was the case with the old TT part numbers if not the current Tower part numbers.
John
Last edited by JohnBuckner; 12-19-2013 at 07:20 AM.
12-19-2013 | 04:02 PM
#48
Thread Starter
My Feedback: (14)
Joined: Mar 2013
Posts: 131
Likes: 0
Received 0 Likes
on
0 Posts
From: Clayton,
GA
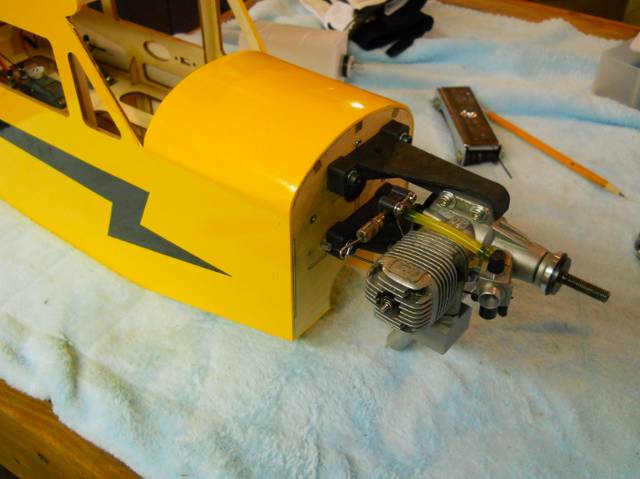
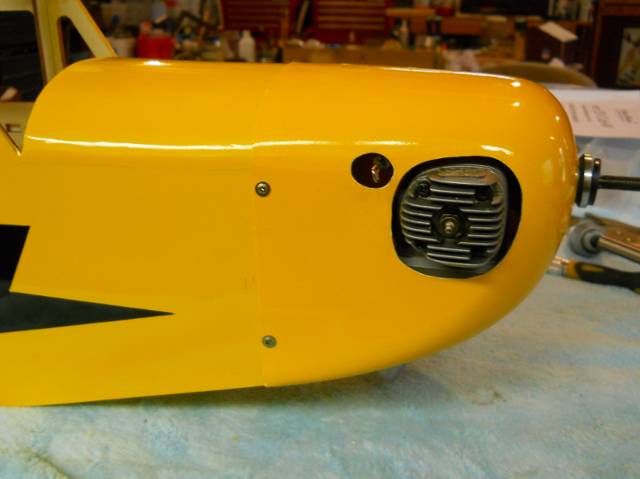
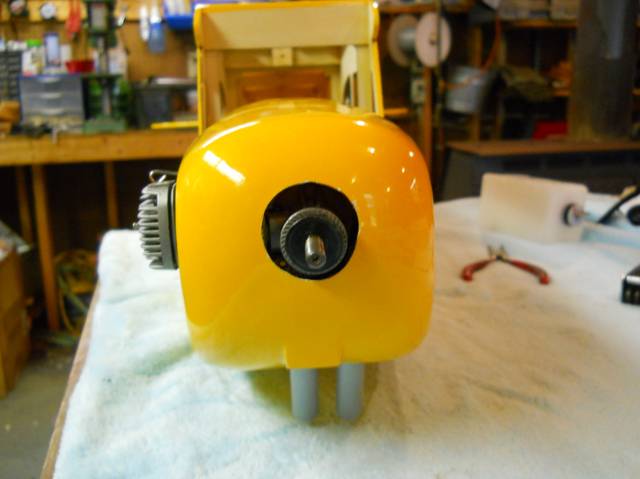
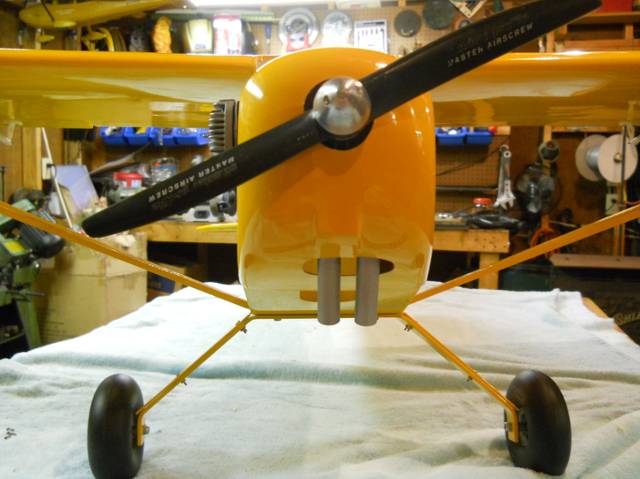
I got the OS .40 on the stand today and give her a run. After a few minutes I had it dialed in and it ran super all the way around. Since I had the new pitts muffler I just decided to put it in the cub. I know its not one of the stronger .40's but all I do is fly scale with long take off's and slow pattern flying so I think It'll do the job with a 10 x 6 prop. All I lack is the receiver switch and plumbing the fuel lines. The cowl turned out pretty good to be the first cowl I ever cut for a nitro. Heres a few pics.
Next question: I have no idea how to plumb the fuel tank so I wont have to take the cowl off to fuel. I could search what others have done but I don't trust everything on the web. I do trust Jester, John and Larry so you guys let me know how to plumb this system and I can finish this puppy up.
Next question: I have no idea how to plumb the fuel tank so I wont have to take the cowl off to fuel. I could search what others have done but I don't trust everything on the web. I do trust Jester, John and Larry so you guys let me know how to plumb this system and I can finish this puppy up.
12-19-2013 | 10:22 PM
#49
My Feedback: (1)
Excellent job on the engine and cowl installation!!! That gets my "seal of approval", for what ever that's worth . Look at several J-3 Cub cowls from the head on view and you will see most have three openings just below the spinner. The top one is the widest and is a horizontal slot, below that is another horizontal slot less wide that the top one, and below that is a square or rectangular oil cooler opening that will be in that raised area near the bottom front of your cowl. Some don't have the oil cooler bump but yours does. After laying out how you want to do these, cut them open so air can enter the cowl for a little additional cooling. The unused muffler tunnel plus the area around the exhaust pipes will allow plenty of air exit from the cowl. General rule of thumb is to have twice as much exit area as intake area for air flow cooling. you have plenty. This will also give a more correct scale look to your cowl. You have a nice looking plane going there. As to the fuel tank fueling; has the tank been assembled yet? There is a 2 fuel line system and a 3 line fuel system. The 2 line would use a accessory fuel valve (Dubro or Great Planes) that would be mounted somewhere on the cowl like the side or the bottom and it consists of a spring loaded valve with hose fittings inside the cowl to the tank on one end and to the engine on the other end. A metal fueling nozzel for the end of your fuel pump hose is supplied with the valve assy. They work nice when they are new but will stick open when they have a couple of years on them and will require replacement. The 3 line system has an extra line going into the tank and will require a "fuel dot", also to be mounted on the cowl. The fuel dot is just a nice finished looking spot to mount an exit spot for the extra fuel line and will have a nice machined plug for the end of the fuel line plug. 3 line with a fuel dot will be cheaper @ $4-$6, and the fuel valve will be about $12-$13. Both available from your hobby store. Some just let the extra fuel line hang out the bottom of the engine bay and plug it with an old screw. YUCK, YUCK, looks non scale and sloppy, but that's just me again! The dangling line with the old screw plug works but come on you can do better, Go with a nice fuel dot or fueling valve.
. Look at several J-3 Cub cowls from the head on view and you will see most have three openings just below the spinner. The top one is the widest and is a horizontal slot, below that is another horizontal slot less wide that the top one, and below that is a square or rectangular oil cooler opening that will be in that raised area near the bottom front of your cowl. Some don't have the oil cooler bump but yours does. After laying out how you want to do these, cut them open so air can enter the cowl for a little additional cooling. The unused muffler tunnel plus the area around the exhaust pipes will allow plenty of air exit from the cowl. General rule of thumb is to have twice as much exit area as intake area for air flow cooling. you have plenty. This will also give a more correct scale look to your cowl. You have a nice looking plane going there. As to the fuel tank fueling; has the tank been assembled yet? There is a 2 fuel line system and a 3 line fuel system. The 2 line would use a accessory fuel valve (Dubro or Great Planes) that would be mounted somewhere on the cowl like the side or the bottom and it consists of a spring loaded valve with hose fittings inside the cowl to the tank on one end and to the engine on the other end. A metal fueling nozzel for the end of your fuel pump hose is supplied with the valve assy. They work nice when they are new but will stick open when they have a couple of years on them and will require replacement. The 3 line system has an extra line going into the tank and will require a "fuel dot", also to be mounted on the cowl. The fuel dot is just a nice finished looking spot to mount an exit spot for the extra fuel line and will have a nice machined plug for the end of the fuel line plug. 3 line with a fuel dot will be cheaper @ $4-$6, and the fuel valve will be about $12-$13. Both available from your hobby store. Some just let the extra fuel line hang out the bottom of the engine bay and plug it with an old screw. YUCK, YUCK, looks non scale and sloppy, but that's just me again! The dangling line with the old screw plug works but come on you can do better, Go with a nice fuel dot or fueling valve.
12-19-2013 | 10:41 PM
#50
My Feedback: (1)
......1234, I also intended to chime in on the .40 LA in this plane. Yes, it will fly it just fine once it's in the air. Pulling it thru grass to get enough air speed for takeoff is where the .46 LA is better. If you fly off a paved runway is doesn't matter. The outside physical dimensions of the .40LA and .46LA are identical so if you want to upgrade later it is a direct bolt in swap including the pitts muffler and the mounting bolt pattern. Do you fly off grass? Short grass maybe??

