


Thunder Tiger Trainer 40 project


 05-31-2015 | 06:44 PM
#253
I'm afraid the engine mount rails can't be replaced as they are an integral part of the fuselage.

I could move the engine far forward but I'm afraid it would make the plane too nose heavy? Any ideas? This by the way is an old 40 trainer I picked up for next to nothing since I wanted to put my Thunder Tiger GP42 engine into something. So far it's coming along well just need to get the engine installed.
I could move the engine far forward but I'm afraid it would make the plane too nose heavy? Any ideas? This by the way is an old 40 trainer I picked up for next to nothing since I wanted to put my Thunder Tiger GP42 engine into something. So far it's coming along well just need to get the engine installed.
Last edited by AllModesR/C; 06-01-2015 at 05:23 AM.
05-31-2015 | 07:31 PM
#254

My Feedback: (1)
Ah yes, "a picture is worth a thousand words"! What you have there is an intergeral wooden beam type engine mount. I am sure most, including me, thought you had a more common fiberglass reinforced nylon type mount. Follow Gray Beards advice given in post #248. The wooden dowel trick will work for these beam mounts too. Redrill the holes as needed so the dowels inserts have a nice fit and epoxy them in. Make the tops of the repair inserts flush with the top of the beams. Locate and drill new holes for the new engine and install it.
05-31-2015 | 07:37 PM
#255
My Feedback: (-1)
AM, you really need to start doing a bit of thinking if you plan on staying in the hobby. Did you even notice the lead weight in the nose of your plane?? Put your thinking cap on, what does that tell you to do?? Just from the photo I can see the rails are wood, doesn't that give you any food for thought.
 Look at the first photo of the fire wall, it's made of wood like your rails. Think about it. I took a bunch of photos of a set up I'm doing right now. I first read up on this plane, it comes out nose heavy so I installed the elevator servo and control rod in the back as far as I could. Then I installed the rudder servo right in front of the stab and installed a pull/pull control system. The only servo located where the ARF manufacture had a tray is the throttle servo. I studied then assembled and thought ahead.
The nose of your plane is just wood, something done all the time is cutting the cheeks off the nose so the fire wall is flush and using a normal motor mount like a GP adjustable.
No, if the mount has been used before you don't toss it, you can relocate the holes for another engine. The mount I'm using has been drilled three times. Do a bit of thinking and the answers to your problems will come to you. Think out of the box a little, it's your plane, you can do anything to it you like. That's what I was told.
There is s sticky that has everything you need to know in it for beginners
06-01-2015 | 05:14 AM
#257
AM, you really need to start doing a bit of thinking if you plan on staying in the hobby. Did you even notice the lead weight in the nose of your plane?? Put your thinking cap on, what does that tell you to do?? Just from the photo I can see the rails are wood, doesn't that give you any food for thought.
Last edited by AllModesR/C; 06-01-2015 at 05:18 AM.
06-01-2015 | 05:22 AM
#258
Yeah, I would just fill the holes with a dowel and epoxy, let it cure, sand smooth, mark new holes, drill new holes, fuel proof with CA. I really like the TT GP .42, good honest engine.
06-01-2015 | 05:27 AM
#259
Thanks everyone. I'll go to Ace today to pick up a couple of dowels. Now as far as drilling the new holes I think I a small Dremel drill works best?
06-01-2015 | 06:18 AM
#260
Whatever you can get in there, just enough to clean up the hole but same size as the dowel. I'm guessing 5/32". It might be easier from the bottom. If there are blind nuts, you should try to remove them.
06-01-2015 | 08:06 AM
#261
My Feedback: (1)
AM, I would use a "normal" twist drill to size the holes for the dowel. I think it will give you a more accurate hole size. Also, what is the airplane you are now asking questions about? It seems you have brought a fourth different model into the mix without telling us. That's how the confusion over what type of engine mount it was that needed to be redone occurred. I'am going to guess that this one is a Goldberg Eagle 63 trainer. No matter, for general background information, this type of wooden beam engine mount was a very common "old school" method of engine installation going back to when all models were kit built, ARFs didn't exist yet. Some kits and even some ARFs still use this type mount, but the separate fiberglass/nylon type is much more common today. Both work well. IMHO, in this case it will be less work to dowel repair this mount than to cut off the cheeks and beam mounts and then install the newer type. A fiberglass/nylon mount will require removing the fuel tank (you probably should anyway) and installing blind nuts on the backside of the firewall for the mounting machine screws. Not a big deal as you have a removable fuel tank access hatch. You also loose the look of the side cowl cheeks if that matters to you. Pick your "poison"!
Last edited by 52larry52; 06-01-2015 at 11:40 AM. Reason: spelling error
06-01-2015 | 10:33 AM
#262
My Feedback: (-1)
Why would you think that??? If you want to buy a moto tool then by all means, they are really handy but a drill is usually your best choice for drilling holes. The moto tool is limited to the bit size. I stock dowels in as many sizes as the hardware stocks plus I have a bag of Kabob sticks in different sizes. These sticks have often come in handy for making push rods and used for taking engines apart for a rebuild.
06-01-2015 | 03:12 PM
#263
My apologies to the thread readers for chasing a rabbit, but when a guy posts pictures...
Hey Gray Beard, I had that same plane and did the same mod to it. Well worth the effort as mine only needed the smallest piece of lead to get balanced right. I don't know if you knew this though or not, but there is a weak spot in the fuselage at the LE of the horizontal stab. There is actually very little wood there, and that sharp corner acts as a stress riser. Since you have a hole there anyway, it would be smart to glue a piece of balsa in there with the grain running vertical to reinforce it. Many Ultra Stick .60s have cracked at that spot due to that flaw.
Hey Gray Beard, I had that same plane and did the same mod to it. Well worth the effort as mine only needed the smallest piece of lead to get balanced right. I don't know if you knew this though or not, but there is a weak spot in the fuselage at the LE of the horizontal stab. There is actually very little wood there, and that sharp corner acts as a stress riser. Since you have a hole there anyway, it would be smart to glue a piece of balsa in there with the grain running vertical to reinforce it. Many Ultra Stick .60s have cracked at that spot due to that flaw.
06-01-2015 | 03:43 PM
#264
AM, I would use a "normal" twist drill to size the holes for the dowel. I think it will give you a more accurate hole size. Also, what is the airplane you are now asking questions about? It seems you have brought a fourth different model into the mix without telling us. That's how the confusion over what type of engine mount it was that needed to be redone occurred. I'am going to guess that this one is a Goldberg Eagle 63 trainer. No matter, for general background information, this type of wooden beam engine mount was a very common "old school" method of engine installation going back to when all models were kit built, ARFs didn't exist yet. Some kits and even some ARFs still use this type mount, but the separate fiberglass/nylon type is much more common today. Both work well. IMHO, in this case it will be less work to dowel repair this mount than to cut off the cheeks and beam mounts and then install the newer type. A fiberglass/nylon mount will require removing the fuel tank (you probably should anyway) and installing blind nuts on the backside of the firewall for the mounting machine screws. Not a big deal as you have a removable fuel tank access hatch. You also loose the look of the side cowl cheeks if that matters to you. Pick your "poison"!
Why would you think that??? If you want to buy a moto tool then by all means, they are really handy but a drill is usually your best choice for drilling holes. The moto tool is limited to the bit size. I stock dowels in as many sizes as the hardware stocks plus I have a bag of Kabob sticks in different sizes. These sticks have often come in handy for making push rods and used for taking engines apart for a rebuild.
06-01-2015 | 04:19 PM
#265
Oh boy, no, that's not how to do it. Hold the engine in place and use either a Great Planes Dead Center Engine Mount Hole Locator or a drill bit or or a piece of sharpened piano wire to mark where the holes should be drilled. I've even used masking tape on the engine rails so that I could see the mark that I make while pushing some kind of marker through the engine mount holes. Then come back with a drill and drill those holes as straight as you can get it.
06-01-2015 | 04:45 PM
#266
My Feedback: (1)
"it's an old 40 size trainer". Guess that means you don't know what airplane it is. If you post several photos that show the entire plane, we will identify it for you. Also measure and post the wingspan size. Now, as to the Dremel it or drill it question; when doing the repair to the wooden engine mount we want you to size the holes for the dowel inserts with an accurate, correct size twist drill bit and that will have to be driven by a hand held pistol grip style electric drill motor (battery or 110 volt it doesn't matter). A Dremel tool won't be capable of this because it won't have an adjustable type chuck to take the size bit you will be using. That is what G.B. is trying to tell you is a Dremel is the wrong tool for the dowel insert repair to the mount beams. Next, after you have repaired and fuel proofed the engine mount beams, then when you locate the engine position to drill the new engine mount holes it is very important to drill the 4 holes very accurately on center with the engine holes. Yes a small diameter, 1/16' or less, "pilot hole" should be drilled first so that the larger and final size drill will follow the pilot hole and not drift to an off center position. The best way to get the all important pilot hole drilled on the exact center of the engine mount holes is to use a Great Planes "dead center hole locator". This is the best $7.99 model tool you will buy ever! (#GPMR8130 from Tower Hobbies or your local hobby store) With the engine clamped in place the $7.99 wonder tool will drill a pilot hole in the center of each engine mount holes that can then be opened up to the final size needed using a drill motor NO DREMEL on this job!....clamp engine, drill pilot holes, remove engine, drill final size holes as needed, fuel proof holes and install engine....got it? Other methods of finding the center for the pilot hole can be used, brad point drill bit, or special center punches made to find and mark the center of holes. Not likely you have these or the $7.99 wonder tool either. Doing the best you can by eye will never be even close to as accurate as the dead center hole locator will be but that's what you will likely do. Take your time and make them as centered as you can for this job and later "blow" $7.99 for the wonder tool (you will thank me when you see how handy it is for mounting servos, engines and mounts, and anything else you screw down on your models).
Last edited by 52larry52; 06-01-2015 at 04:48 PM.
06-01-2015 | 05:36 PM
#267
My Feedback: (-1)
My apologies to the thread readers for chasing a rabbit, but when a guy posts pictures...
Hey Gray Beard, I had that same plane and did the same mod to it. Well worth the effort as mine only needed the smallest piece of lead to get balanced right. I don't know if you knew this though or not, but there is a weak spot in the fuselage at the LE of the horizontal stab. There is actually very little wood there, and that sharp corner acts as a stress riser. Since you have a hole there anyway, it would be smart to glue a piece of balsa in there with the grain running vertical to reinforce it. Many Ultra Stick .60s have cracked at that spot due to that flaw.
Hey Gray Beard, I had that same plane and did the same mod to it. Well worth the effort as mine only needed the smallest piece of lead to get balanced right. I don't know if you knew this though or not, but there is a weak spot in the fuselage at the LE of the horizontal stab. There is actually very little wood there, and that sharp corner acts as a stress riser. Since you have a hole there anyway, it would be smart to glue a piece of balsa in there with the grain running vertical to reinforce it. Many Ultra Stick .60s have cracked at that spot due to that flaw.
Anyway, I have worked my magic and all is well in the ARF world.
I will maiden it, trim it out and sell it as a ready to fly minus my RX. I will buddy box it so a buyer can test fly it and look it over. I just installed the servos in the wing and did a finger CG, I think I got it but I will test it more before I mount the battery in place, it's moveable for different CGs.
Maybe All Models would like to make a trip to Vegas to buy a plane not needing any work or thought??? Even fly it first before any money hits my pocket.
Just a thought. No junk in it but not the top of the line servos, good servos but no digital, should be a nice plane for those that like ARFs. The Ultra Stick had a huge following here in all sizes. Receiver ready!!
06-07-2015 | 06:27 PM
#269

My Feedback: (1)
Depends on which servo. Those with plastic output shafts use small metric sheet metal screws. Not very likely you find an exact replacement at the hardware store. The good news is you likely can find a suitable replacement but not exact and the plasrtic will accommodate. take a sample screw to the depot with you.
Now the more expensive and all the Hitec metal gear servos have a metal shaft and it is threaded internally for a very fine metric threated screw These you must use pretty much OEM screws as there is no way Home Depot is going to have them.
Now here agine is a good example of the advantages belonging to your local club as these are likely no problem to find among your clubmates;
John
06-07-2015 | 06:34 PM
#270
My Feedback: (-1)
You can buy the servo screws from places like Servo City but like John said, most of us that have been in the hobby for any length of time have boxes of them. Seems to me that the digitals have a machined screw and they don't except anything else. My LHS also has servo screws on there shelf direct from Hitec and JR.
06-07-2015 | 06:47 PM
#271
Senior Member
Joined: Jan 2011
Posts: 2,018
Likes: 0
Received 0 Likes
on
0 Posts
From: SorrentoBritish Columbia, CANADA
There is more than one type of screw depending on what type of servos you have . plastic geared servos have a coarse thread screw almost like a tiny wood screw , while metal gear servos have a screw with machiene threads . You should be able to get replacement screws from a place like Micro Fastners . They have screws down to 0 size and thats small . I remember seeing sombody pointing out the number for the screws that fit the MG servos but I can't remember what it was
06-07-2015 | 07:45 PM
#273
Yes, if the servo is reasonably priced. I'm not paying $15 for a screw specially when I need three of them. By the way these are just regular plastic servos. Perhaps if somebody has these laying around I can Paypal you some money and you can drop the screws in an envelope for me.
Last edited by AllModesR/C; 06-07-2015 at 07:47 PM.
06-08-2015 | 04:48 AM
#275
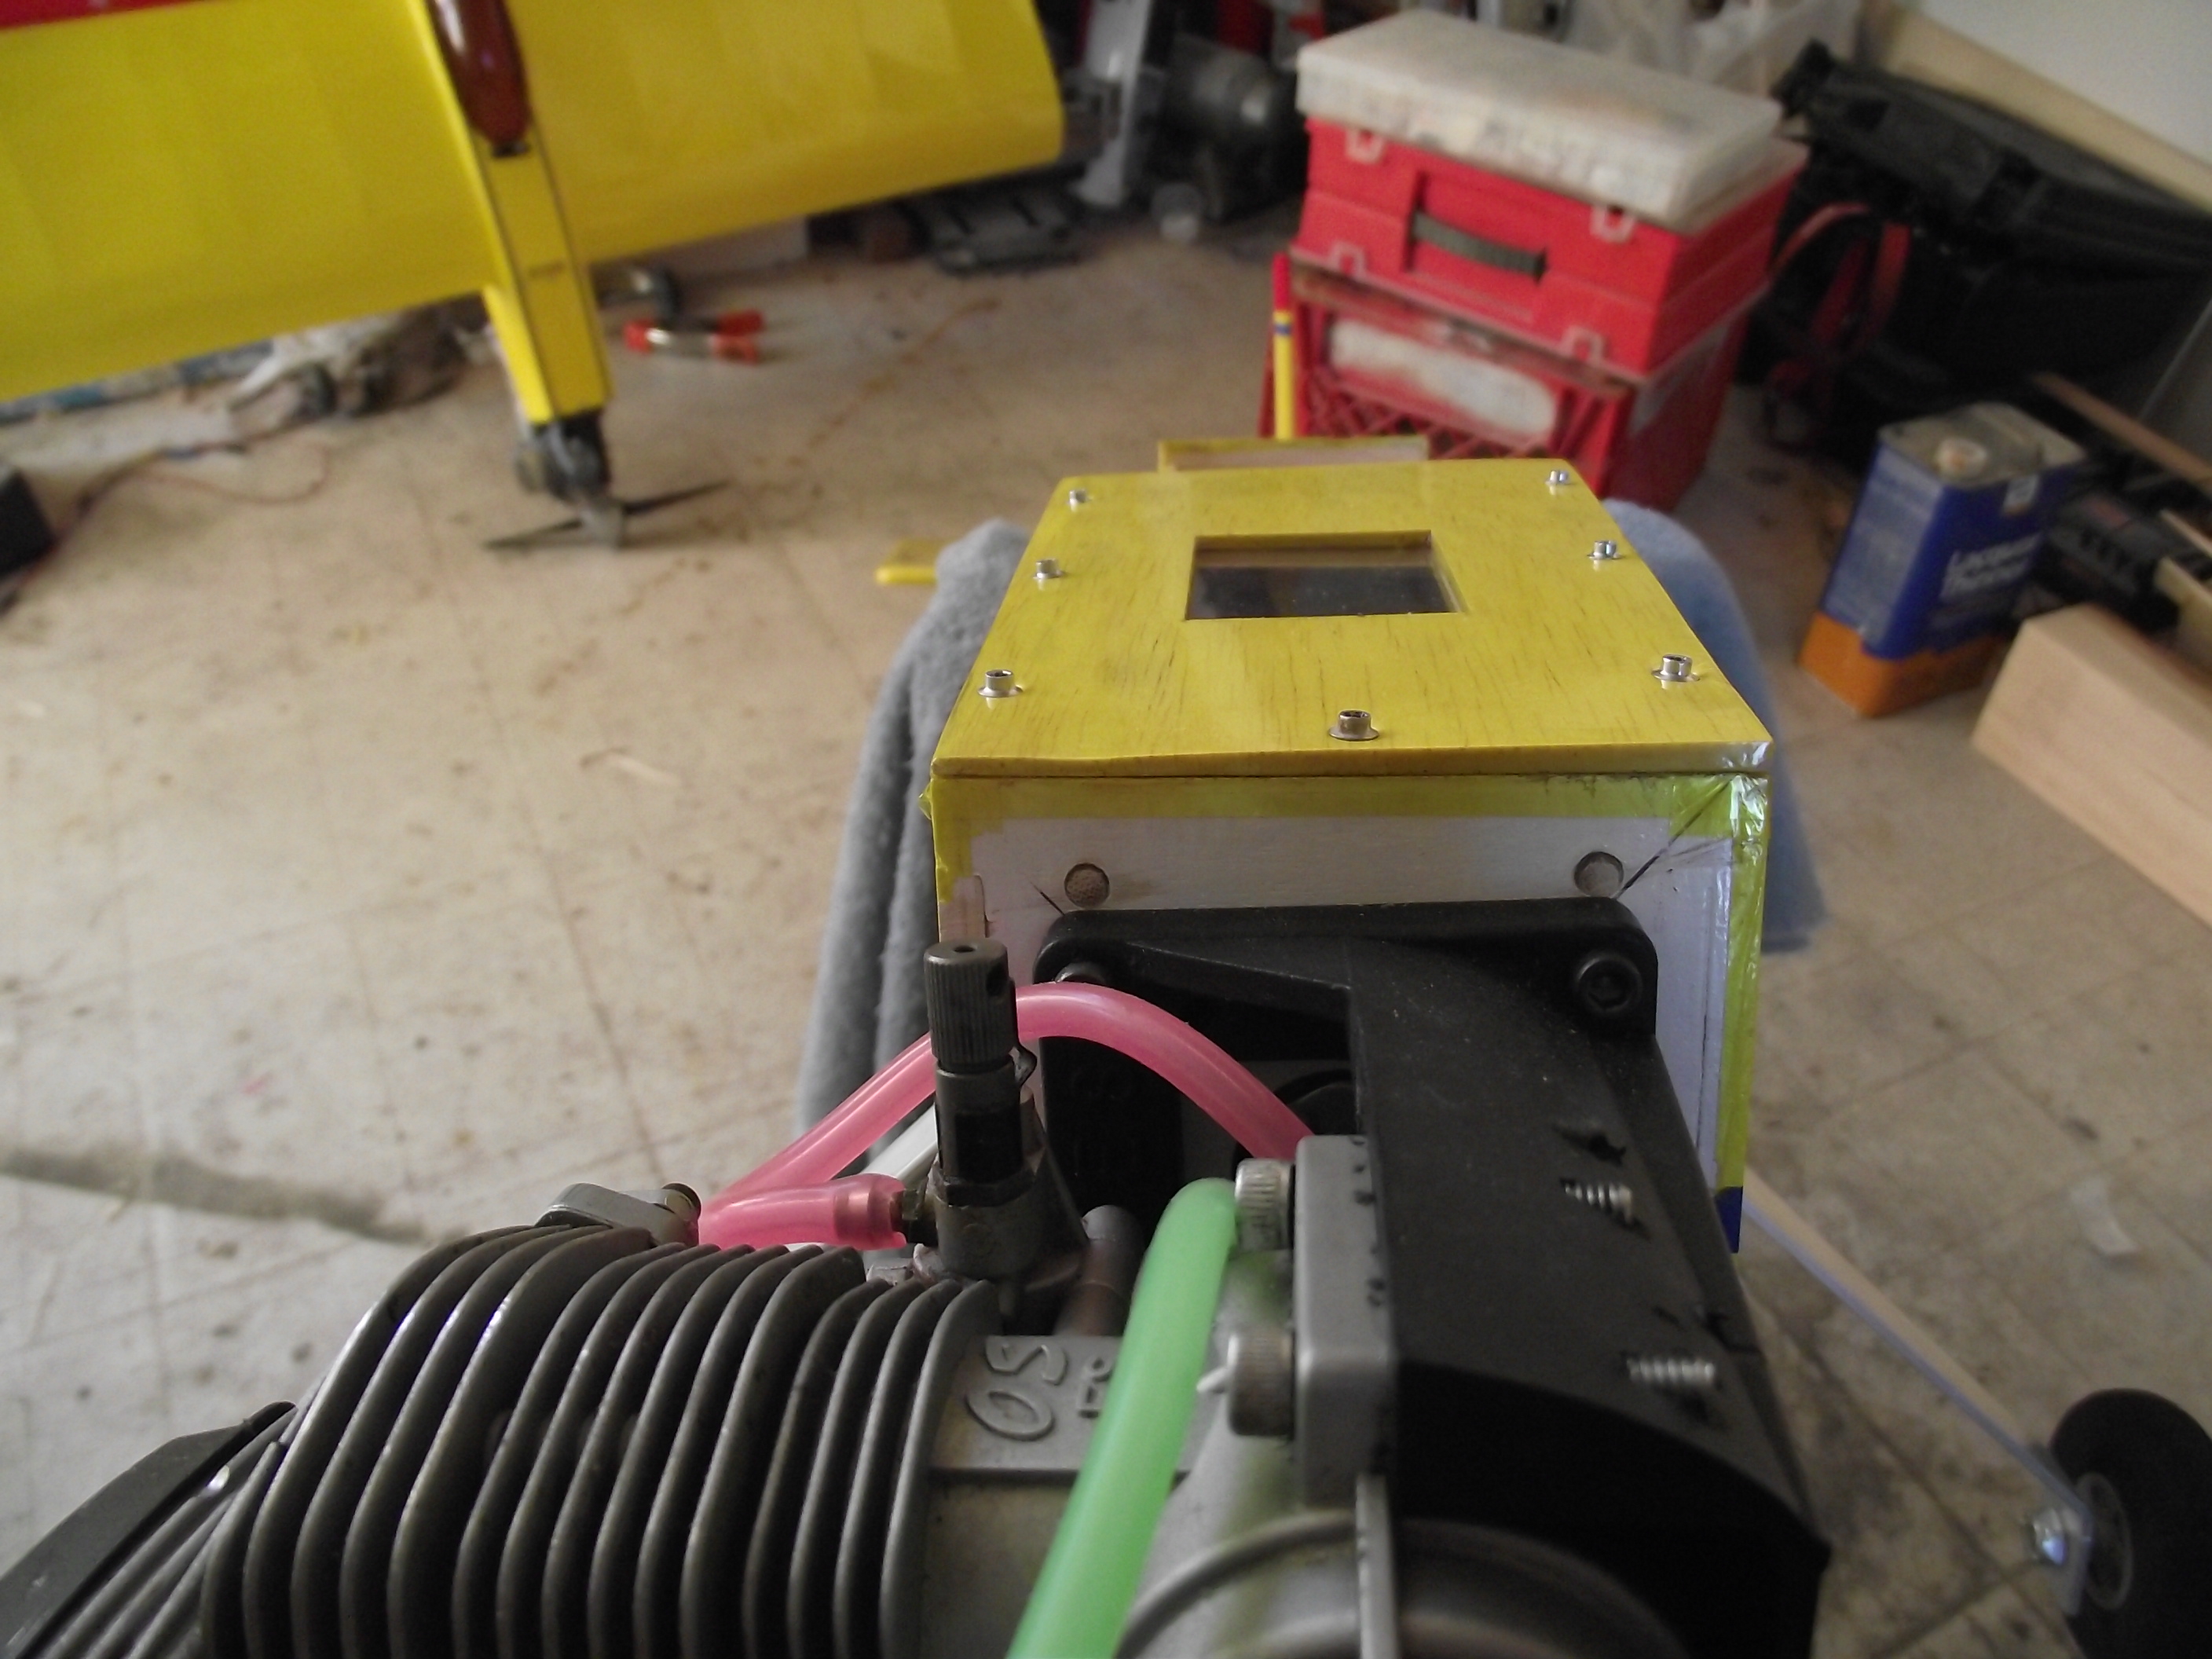
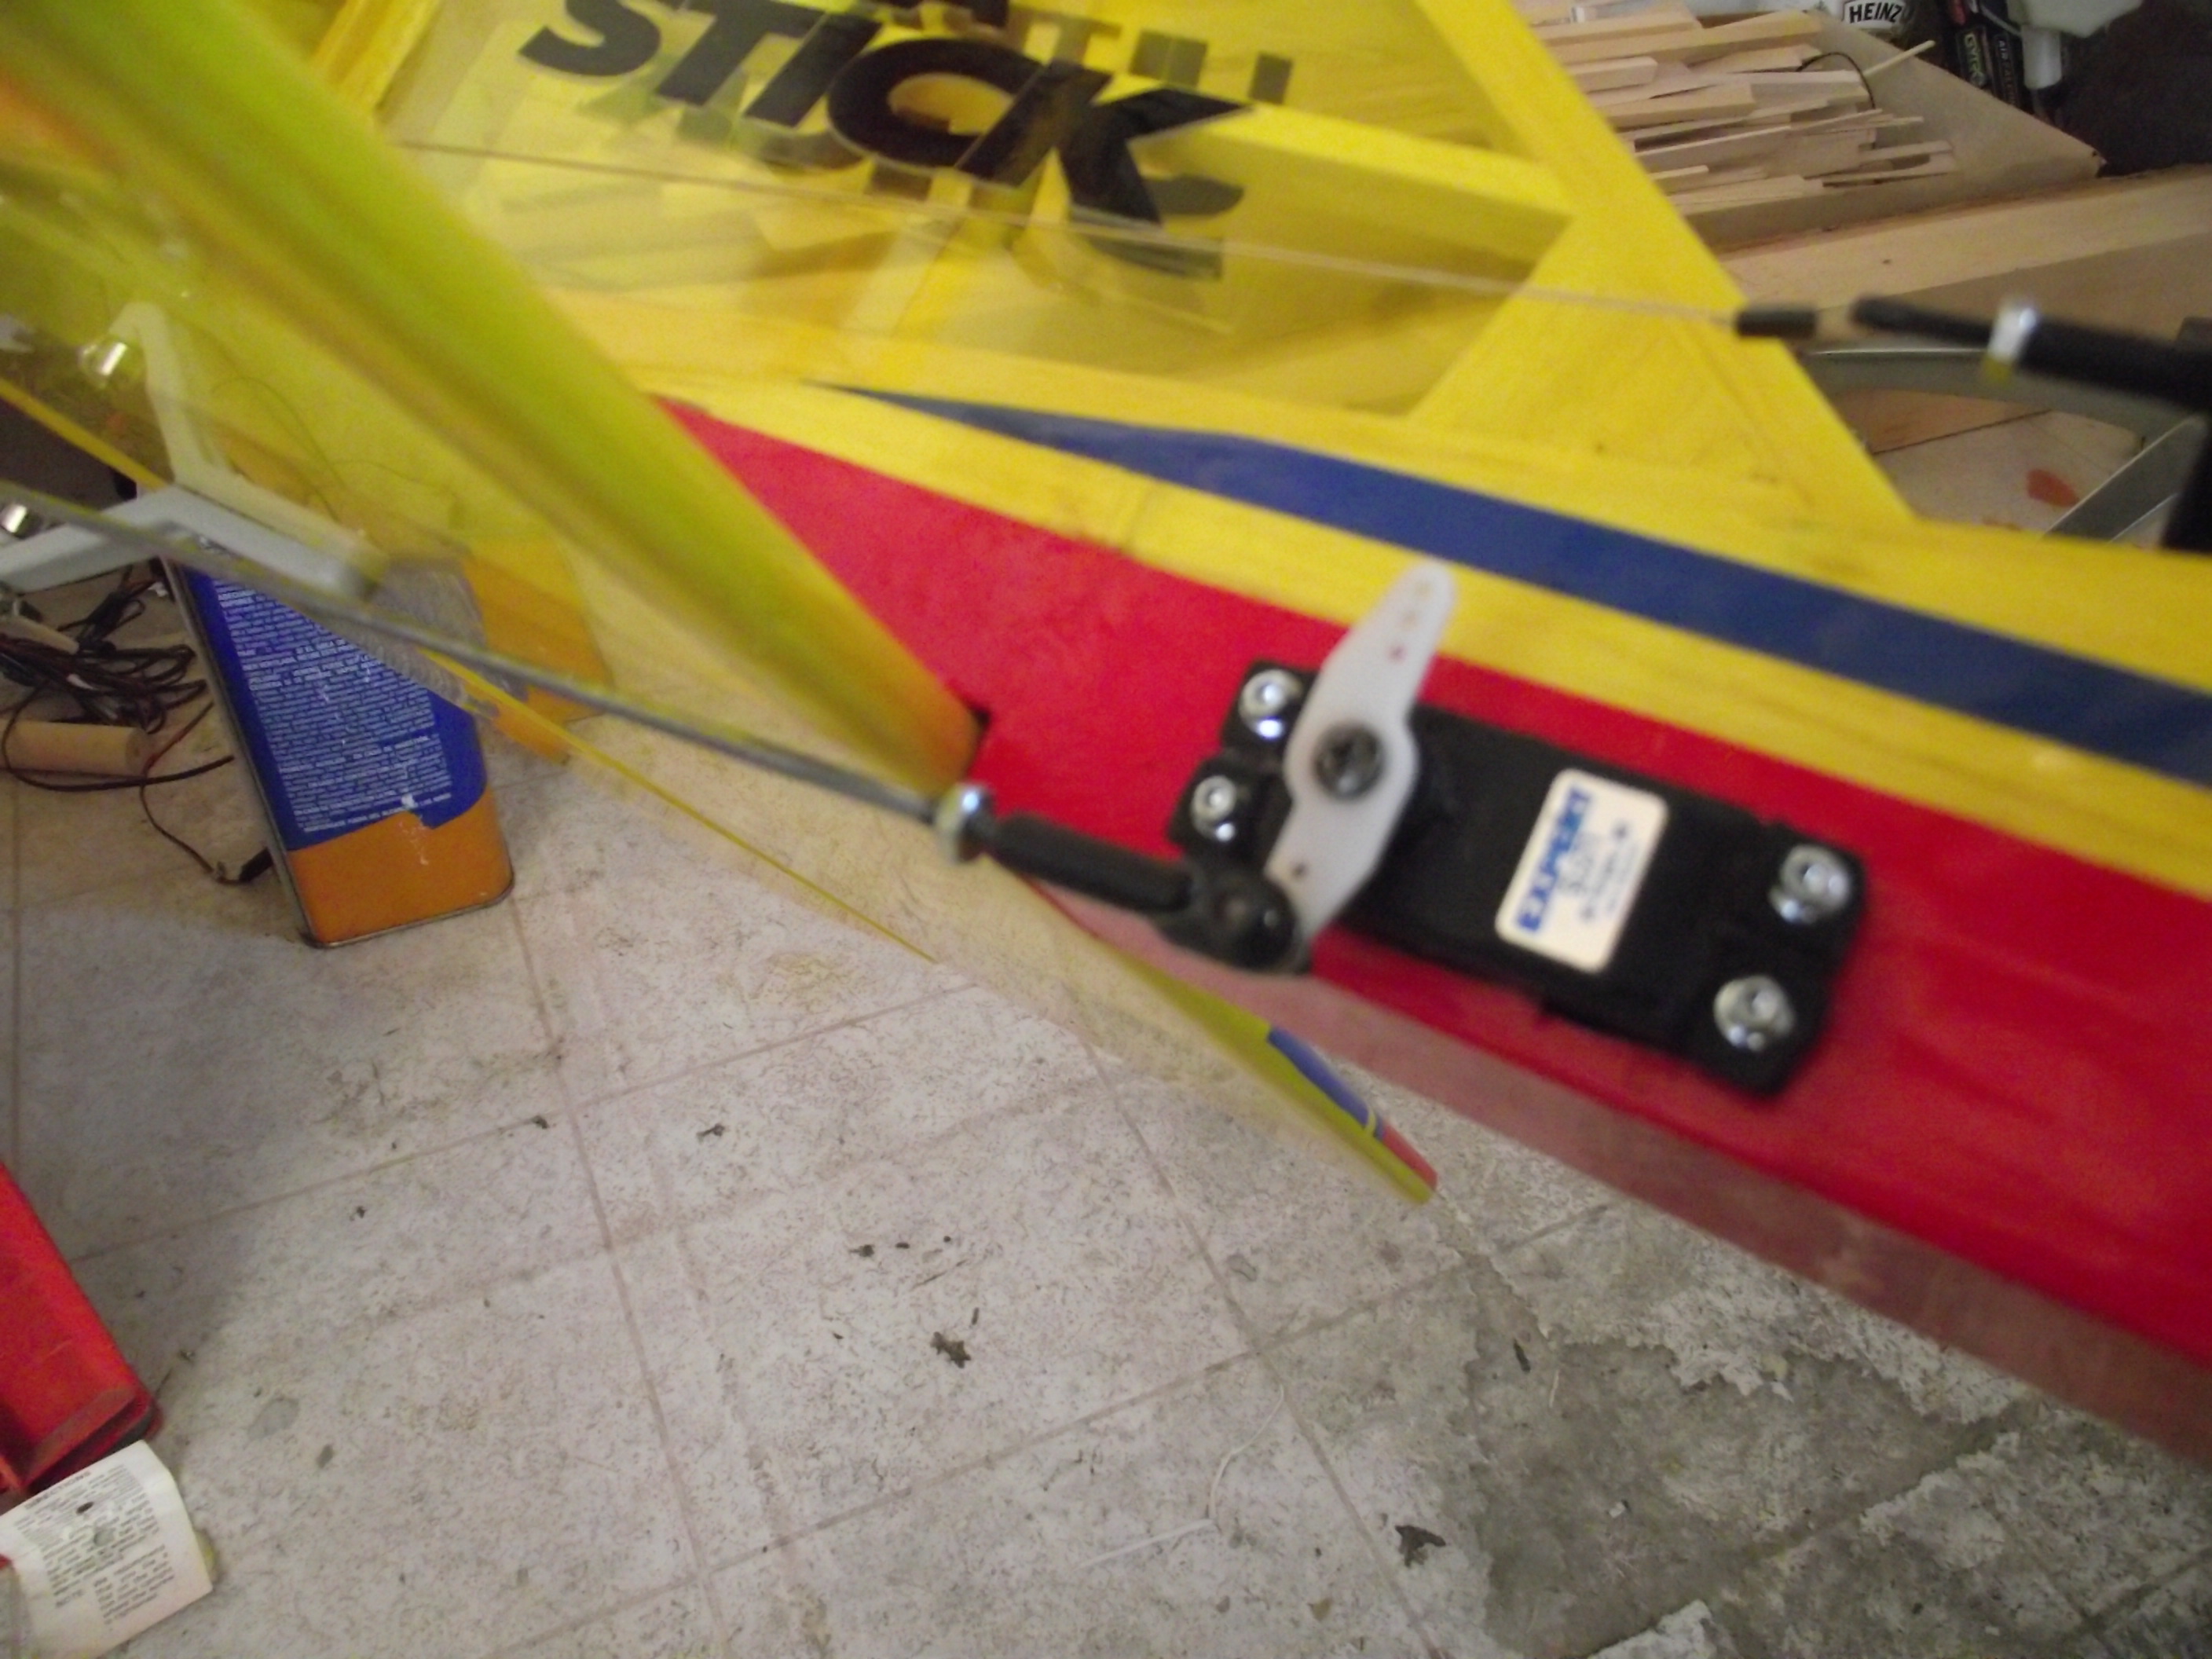
I got the engine mounted after filling the old holes with dowels. The holes were 1/8 inch and Ace Hardware had the perfect dowel stick. This is the plane: Hopefully somebody can identify it:


