


Homelite 45 Q's
 11-09-2006 | 09:35 PM
#1
Thread Starter
Senior Member
Joined: Jan 2005
Posts: 112
Likes: 0
Received 0 Likes
on
0 Posts
From: , DE
I'm converting an "old style" Homelite 45 (black top Timberman) for an airboat. How does the free-wheeling threaded thing (bar oil pump ?) come off of the clutch end of the crank? I thought I'd ask before I buggered something up. I'm thinking motor mount, de-fin and balance the flywheel, shorten the crank, muffler, throttle linkage and prop hub. Am I missing anything? Does anybody still sell a prop hub for these ? Does anybody have a pic of their hub? I was thinking 20x8 prop to start. Thanks in advance, MIKE
 11-10-2006 | 12:54 PM
#2
Senior Member
My Feedback: (29)
Joined: Jan 2005
Posts: 1,402
Likes: 0
Received 0 Likes
on
0 Posts
From: San Antonio,
TX
Mike,
Here is the thread on taking a Powerstroke apart.
http://www.rcscalebuilder.com/forum/...p?TID=888&PN=1
Dave
Here is the thread on taking a Powerstroke apart.
http://www.rcscalebuilder.com/forum/...p?TID=888&PN=1
Dave
11-10-2006 | 04:35 PM
#3
Thread Starter
Senior Member
Joined: Jan 2005
Posts: 112
Likes: 0
Received 0 Likes
on
0 Posts
From: , DE
Thanks for the link! My crank has a "sleeve" over the clutch end of it, that was part of the oiler. After much looking I've decided to cut the crank off as close as I can to the sleeve, then pull it off and cut the crank closer. It must have been put on before the crank was pinned together. It "freewheels" on the crank, but won't fit over the LH threads that held the clutch on.
It is too bad that [link]http://www.wackerengines.com[/link] is down/defunct. I looked at a few prop hubs and I can easily do something like that though. I got a Zinger 20x8 pusher to start out with. Thanks again, MIKE
It is too bad that [link]http://www.wackerengines.com[/link] is down/defunct. I looked at a few prop hubs and I can easily do something like that though. I got a Zinger 20x8 pusher to start out with. Thanks again, MIKE

 11-11-2006 | 01:38 AM
#5
Senior Member
Mike,
May want to take a look at these. A step by step pictorial.
http://users3.ev1.net/~cdjump/main/homey45/disk1/
http://users3.ev1.net/~cdjump/main/homey45/disk2/
http://users3.ev1.net/~cdjump/main/homey45/disk3/
http://users3.ev1.net/~cdjump/main/homey45/disk4/
Furnished by ChrisSpad in SPAD forum
May want to take a look at these. A step by step pictorial.
http://users3.ev1.net/~cdjump/main/homey45/disk1/
http://users3.ev1.net/~cdjump/main/homey45/disk2/
http://users3.ev1.net/~cdjump/main/homey45/disk3/
http://users3.ev1.net/~cdjump/main/homey45/disk4/
Furnished by ChrisSpad in SPAD forum
11-11-2006 | 01:25 PM
#6
Thread Starter
Senior Member
Joined: Jan 2005
Posts: 112
Likes: 0
Received 0 Likes
on
0 Posts
From: , DE
Looks good. In the pictorial, the thing I am talking about is shown fitting off over the threads on the crank. Like you could pull it off from the end. Mine won't go that way. It must be different (or buggered). I'll make my crank cut in two steps. Thanks for the links, MIKE
11-12-2006 | 01:33 PM
#8
Thread Starter
Senior Member
Joined: Jan 2005
Posts: 112
Likes: 0
Received 0 Likes
on
0 Posts
From: , DE

I don't have a picture of mine but I'll try to put something out there.
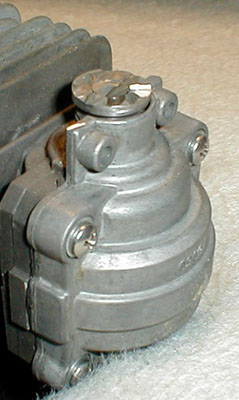
In this one, it is the larger threaded thing on the crank. In the picture, it is about 1/2 way over the left hand threads that hold the clutch on. It is threaded OD and turns on the crank freely. Mine won't thread or slip over the LH threads at all. I think it was either put on before the crank was pinned, or it is buggered up on the ID and won't come off like it is supposed to. It was a HF refirb, I bought it and took it apart well over a year ago. Just came around on the "things to do" (again) the other day. I think if I cut the crank with the sleeve slid all the way on, I can pull it off and cut it again closer to the case. If I slide it all the way out, there isn't enough room between it and the seal to get a whizzy disk in there. It won't come out, over the threads, as far as the one above. I hate to pry or force it out more to get behind it. Unless I am missing something. Thanks, MIKE
11-12-2006 | 01:48 PM
#9
Senior Member
looks like this thing from disc 3 mentioned above. Looks like a cut thru case and crank and off it falls.
Think I would just get out the hacksaw, secure the outer freewheeling thing and SLOWLY to keep temp down on crank
and saw off a portion of the case and crankshaft.
Think I would just get out the hacksaw, secure the outer freewheeling thing and SLOWLY to keep temp down on crank
and saw off a portion of the case and crankshaft.
11-12-2006 | 06:49 PM
#10
Thread Starter
Senior Member
Joined: Jan 2005
Posts: 112
Likes: 0
Received 0 Likes
on
0 Posts
From: , DE
The pic I posted is from disc 3. Since mine won't slide out as far as the one in the pic, to cut it in a spot that would not also cut into the "good" part of the case, or ruin the seal, I would have to cut through the sleeve and crank. It would be alot more cutting (and heat, etc.). I guess mine is somehow different. The one in the pictorial has been slid out untill only three threads (on the crank) still show, mine wont slide out over any threads (8 threads showing). I can't cut the crank between the sleeve and case as pictured (no room). I'll get it off, no big deal, just wondering if there was a trick to getting it out as far as the one in the pictures. Thanks, MIKE
11-15-2006 | 03:32 PM
#11

Junior Member
Joined: Nov 2006
Posts: 25
Likes: 0
Received 0 Likes
on
0 Posts
From: Huntington Beach,
CA
Hi,
You airplane guys have allot of cool tips on converting used chainsaws. Do you know if anyone has tried it for use in a car? I want to know how to adapt the clutch to a geared tranny for my 4x4 monster truck.
Is it really as simple as putting a gear on the end of the clutch and dropping it into the car? Any tips?
11-18-2006 | 03:24 AM
#12
Senior Member
Mike@Accurate or any others who have done the conversion.
A couple of questions you may have thoughts to help clarify an idea.
1) If the engine was going to have an EI (CH for example) , how about using that part of casing as a mount for the sensor?
2) If the crank were cut behind the threads, would that allow the captive steel threaded ring thing to slide off the end?
3) Do the fins on the cylinder head protrude out passed where that oil pump casting is on the case? If so it should not restrict how close it mounts to a firewall.
4) Do you think a small alum bushing with the magnet ( estimate .375" length) and and offsetting recessed set screw fit inside that oil pump casing?
I have puzzled over a neat clean install of sensor on other applications and wonder if this would solve the problem for a Homie 45.
It should not matter to the sensor which direction the magnet is rotating.
11-18-2006 | 09:29 AM
#13

Why not try this...cut crank off a little over 3/8 inch past the aluminum boss with 2 holes in it. Make a 3/8 x 1 bushing with a hole to fit crank. The boss would be a good place to mount sensor. You could use a set screw to hold bushing in place. That would make timing easy to set. Then again...it may not work. Just a idea!!!! Capt,n
11-18-2006 | 11:11 AM
#14
Senior Member
captinjohn
That is along the line I was thinking. I was going for drilling the aluminum boss to set the sensor in and being able to cut the shaft off as close a practical to the oil pump mount or aluminum boss and reducing the weight by that amount of crank. Adjustment of the timiing via setscrew is done on side opposite the 'boss'
(Really enjoy seeing what words others use to describe the same object -boss)
11-18-2006 | 12:36 PM
#16
Senior Member
this shows a good alternative, but I still like idea of using existing casting. This is a Poulan mount.
http://www.chrisspad.com/forum/viewt...a547a3b7de2cc0
Post subject: New Poulan Engine Mount
http://www.chrisspad.com/forum/viewt...a547a3b7de2cc0
Post subject: New Poulan Engine Mount
11-18-2006 | 01:55 PM
#18
Thread Starter
Senior Member
Joined: Jan 2005
Posts: 112
Likes: 0
Received 0 Likes
on
0 Posts
From: , DE
1 is covered.
>2) If the crank were cut behind the threads, would that allow the captive steel threaded ring
>thing to slide off the end?
That is what I'm shooting for. I'm going to cut it today. I'll get a pic.
>3) Do the fins on the cylinder head protrude out passed where that oil pump casting is on the
>case? If so it should not restrict how close it mounts to a firewall.
Yes, and good point. The airboat will be firewalless. Looks cleaner with it lopped off too.
>4) Do you think a small alum bushing with the magnet ( estimate .375" length) and and
>offsetting recessed set screw fit inside that oil pump casing?
I'll look at ID/OD/length when I get it off. I would say yes.
I have a CH, but the Hom 45 will likely never see it . This is a down and dirty project brought on by 2 4x8 sheets of Coroplast leftover from the political campaign. The CH was bought (a long time ago) for a reed Stihl 011AV that I WAS converting to water-cooled for a boat. It is a 40ish cc screamer chainsaw. I have a 48" 4 point outrigger hull 90% complete too. I have started alot of pretty cool projects, and finished a few. MIKE
MIKE
>2) If the crank were cut behind the threads, would that allow the captive steel threaded ring
>thing to slide off the end?
That is what I'm shooting for. I'm going to cut it today. I'll get a pic.
>3) Do the fins on the cylinder head protrude out passed where that oil pump casting is on the
>case? If so it should not restrict how close it mounts to a firewall.
Yes, and good point. The airboat will be firewalless. Looks cleaner with it lopped off too.
>4) Do you think a small alum bushing with the magnet ( estimate .375" length) and and
>offsetting recessed set screw fit inside that oil pump casing?
I'll look at ID/OD/length when I get it off. I would say yes.
I have a CH, but the Hom 45 will likely never see it . This is a down and dirty project brought on by 2 4x8 sheets of Coroplast leftover from the political campaign. The CH was bought (a long time ago) for a reed Stihl 011AV that I WAS converting to water-cooled for a boat. It is a 40ish cc screamer chainsaw. I have a 48" 4 point outrigger hull 90% complete too. I have started alot of pretty cool projects, and finished a few.
MIKE
11-18-2006 | 06:43 PM
#20
Senior Member
If I have visualized crank rotation on Homie correctly, that side of the engine with the boss will be next to firewall. It would eliminate having to mount sensor on front(prop) side of engine reducing exposure to harm. Think it would look better.
11-18-2006 | 07:08 PM
#21
Thread Starter
Senior Member
Joined: Jan 2005
Posts: 112
Likes: 0
Received 0 Likes
on
0 Posts
From: , DE
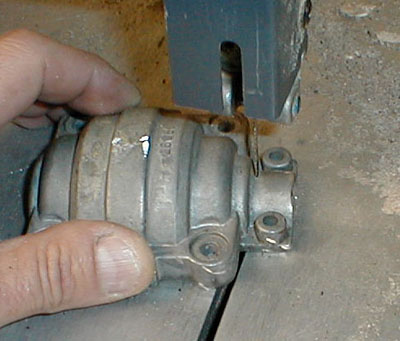
Progress today.
First cut. I tried to get as close to the sleeve as I could (into it a little). Still didn't come off.
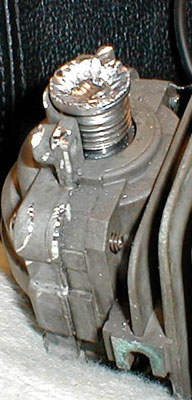
So I die ground it a good ways in. Still didn't come off.
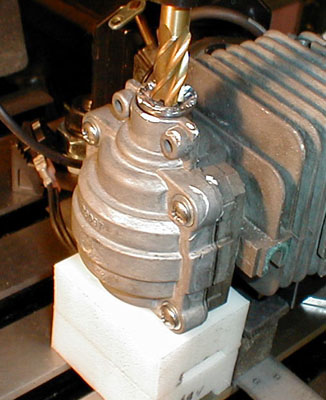
So I put it in the mill and hit it with a 7/16" end mill. I was almost all the way through before it was free. No need to cut any more.
It is OFF!
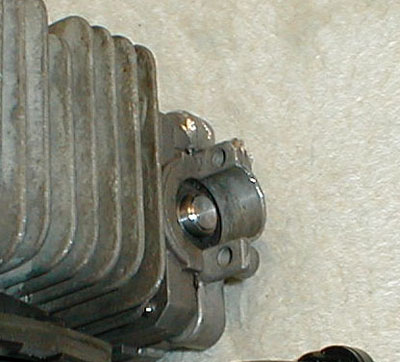
I took the bottom of the case to the band saw and cut off the boss.
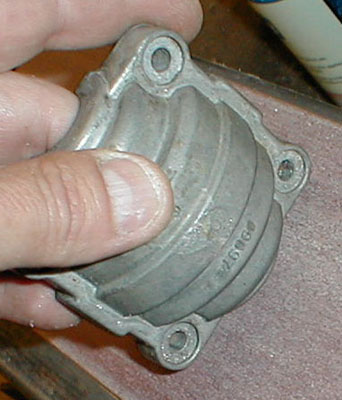
And belt sanded it.

Looks good.
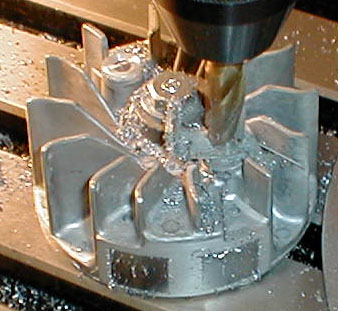
I milled off the studs. After removing the material around them, they fell out.
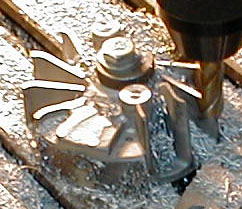
And I milled off the fins.

Ready for mounts and a prop hub.
Almost ready to start the hull. Thanks, MIKE
First cut. I tried to get as close to the sleeve as I could (into it a little). Still didn't come off.
So I die ground it a good ways in. Still didn't come off.
So I put it in the mill and hit it with a 7/16" end mill. I was almost all the way through before it was free. No need to cut any more.
It is OFF!
I took the bottom of the case to the band saw and cut off the boss.
And belt sanded it.
Looks good.
I milled off the studs. After removing the material around them, they fell out.
And I milled off the fins.
Ready for mounts and a prop hub.
Almost ready to start the hull. Thanks, MIKE
11-18-2006 | 07:51 PM
#22
Senior Member
Did those pan head Phillips case bolts come on the chainsaw or did you add them? I often have trouble loolening those later particularly if the ends get corroded.
Nice pics. I like your tools also!!!
Nice pics. I like your tools also!!!
11-18-2006 | 08:10 PM
#23
Thread Starter
Senior Member
Joined: Jan 2005
Posts: 112
Likes: 0
Received 0 Likes
on
0 Posts
From: , DE
Good eye! The screws are some 18-8 SS that I had around. They are really just holding things together while I work on it. I'll likely change to SHCS (maybe SS if I can find some laying around) when I do the final assembly.
I do have lots of tools (and many, many more where they came from) . I'm a pretty well equipped one-man machine shop. I got sick of driving to the shop, and felt bad using hand tools at home, when I knew how much better life could be with the right tools. Working at a machine shop has spoiled me. One day I may make money with MY tools, not yet though.
Here are a couple of OT things I have built, some are tool'esque.
[link=http://www.accuratepower.com/Torch/]CNC Torch[/link]
[link=http://www.accuratepower.com/Rest/]Lathe steady rest[/link]
[link=http://www.accuratepower.com/Mortar/]I hate golf balls[/link]
[link=http://www.accuratepower.com/pics/buggy.jpg]Weedie ROV[/link]
Hope that explains it. I have a good wife. MIKE
11-18-2006 | 09:35 PM
#24
Senior Member
And to think I was going to make some wise-ass crack about the keyboard in post 21 being used to control some CNC equipment!!!
Last time I saw a CNC torch it was in a Mexican shipyard for making shrimp boats. Impressive is understatement and probably enut said.
Last time I saw a CNC torch it was in a Mexican shipyard for making shrimp boats. Impressive is understatement and probably enut said.


