


Saito FG-60R3
 11-18-2018, 08:30 AM
#1901


Join Date: Jul 2011
Location: Ignacio, CO
Posts: 42
Likes: 0
Received 0 Likes
on
0 Posts
Yes I will also stay away from the oil debate. When starting out in the hobby, I used Klotz because that’s what I used in my motorcycles and snowmobiles. There was a lot of carbon build up in my 2T engines, then went with Redline. No carbon build up, but as you say it’s designed for 2 stroke engines. I’m going to pick up the Stihl HP today and use that on my next tank.
As for the Squeak, you guys are correct. Remove all tappet covers and dry in #1, #2 and #3 have a lot of oil. I’ll get everything lubed up before the next run.
Im also going to install the stock exhaust for the rest of break in, and run it with cylinder #1 down for a tank. Then move onto the timing and get that adjusted.
Thanks for for all the advice and I will post my findings.
 11-18-2018, 12:46 PM
#1902
Join Date: Jan 2007
Location: Dubai, UNITED ARAB EMIRATES
Posts: 500
Likes: 0
Received 2 Likes
on
2 Posts
MDavis28m, just watched your second video, and I thought I would just let you know that pushing the rockers down like that is not advisable. If you are at the top of the compression stroke you could push a valve against the piston, bend the valve or mess up the valve guide. The other thing, which HAS happened to me, which is why I thought I would let you know, is that the pushrod falls out of its little seat under the adjuster, and the pushrod is able to move to the side and jam up against the adjuster... I was messing with the thing the one day, dong just what you were doing, and as I went to put the rocker cover back, I thought it looked like it was not level.....just had a look around....and was glad I did.
Not chastising mate, just thought I would let you know.
Regards
Not chastising mate, just thought I would let you know.
Regards
11-18-2018, 01:31 PM
#1903

My Feedback: (93)
I recently purchased a Phoenix Lysander 126 inch wingspan with one of these engines. The plane has never been flown but I saw the engine run before i bought it and i thought it ran pretty darn good. After reading through this thread I'm a bit leery of it now.I have had a number of saito glow engines in the past and they have all been great. The discussion on the timing is interesting. I find it hard to believe that saito would design and sell an engine with it that far off. On the other hand I have a lot of faith in CH Ignitions as they have converted engines for me and they run great.
 11-18-2018, 10:26 PM
#1905
Join Date: Jan 2007
Location: Dubai, UNITED ARAB EMIRATES
Posts: 500
Likes: 0
Received 2 Likes
on
2 Posts
Gents,
I can understand why people would not want to question the 'ability' of Saito to design and produce an engine, and I would be the last one to criticise them, IF they had a presence where we could raise concerns and get answers justifying their methodology. THey dont need to answer to anyone really, but if they printed matter that said "the timing should be set as follows" then we would all know. Similarly, there is no way to contact them directly, as far as I am aware, except through their distribution channels.
I've mentioned a few 'oddities' that they have made before, including the FG-84 and its crank failures, the FG-20 and its carb failures, the FG-60 and its problematic cylinders.....all of them related to gas engines. We need Saito in this hobby, they are some of the nicest looking, nicest sounding engines, and they are little tech marvels, but they dont interac with their customers.....this is a case in point with the timing....
Want to see another example....who here has the Saito collector ring? Its an 'official' part, apparently designed with the utmost care to fit the FG-60. It's beautiful, with brilliant welds, the word SAITO lovingly laser etched on to it....and it does sound good (not quite keleo sound, but still good)...... all good, that is until you fit it, and then try to connect the plug leads. Anyone care to share a pic of theirs?
Dont get me wrong, I am not bashing Saito, I would like someone to answer on an official level, as to what the timing should be. RCexel says it should be X method, and they should know, they make the ignitions and havent changed the programming in years. Saito say...nothing.
I apologise for not being able to update on the engine performance, but at the moment, I only get a few hours a week at the flying field. I have a plane storage, little workshop up there, so dont do all of this at home. I cannot wait to see if this engine runs better in a plane, and am hoping that it does. Whilst I might seem bullish on this, all I really want is to have a great running engine... I have spent HOURS trying to get this thing to work properly, everything by the book, and still it doesnt perform the way others have...if I am wrong, I will raise my hand and apologise for unintentionally leading people down the primrose path.
For those of you who have a great running engine, if mine does gain some performance....and you do this mod, we need to hear from you.
I am going to put the engine in the same plane, with the same prop, same everything....and see if it flies with more authority while keeping the temps where they should be.
Apologies if anyone has been lead astray by my discussion....
11-18-2018, 10:38 PM
#1906
Join Date: Jul 2011
Location: Ignacio, CO
Posts: 42
Likes: 0
Received 0 Likes
on
0 Posts
I checked the timing on mine today and it was way off. I moved the hall sensor and the best I could get is 43 degrees. I want 30 degrees, so you just pulled the hub to get it closer? What method did you use to remove the hub? Just though I would ask before I give it a try.
11-19-2018, 12:11 AM
#1907
Join Date: Jan 2007
Location: Dubai, UNITED ARAB EMIRATES
Posts: 500
Likes: 0
Received 2 Likes
on
2 Posts
Denfly, I just used a small gear puller. Remember that you have to remove the locating pin before you try to pull the hub off. As mentioned before you also cannot re-install the pin as it will be in the wrong place. You will just have to tighten the hub securely when you re-install the prop.
The method I followed was as follows.
Remove prop.
Install a timing protractor, and find true TDC (many methods on you tube, one of Adrien from CH-ignitions explains it pretty well).
I made a mark on the bearing hub boss with a center punch (you dont HAVE to do this as TDC lines the locating pin with the hole between the screws on the cam cover, check my vid or Adrien's earlier in the thread)
Once you have TDC, move the hub around clockwise to 15 Deg. You can then make a mark on the prop hub where TDC is (again, you wont need to as it lines up with the 'check magnet' on the prop hub, but it may be more accurate when putting the prop hub back).
Remove the protractor and move the prop hub back to TDC.
Pull the prop hub off AFTER removing the locating pin.
Check that the locating pin hole on the crankshaft is aligned at TDC and then reinstall the tapered collet.
Install the prophub carefully with the new mark you made or with the center of the 'check magnet'. Your original locating pin should now be at 15 Deg BTDC.(It helps if you have a piston stopper in place at TDC as the crankshaft cannot move off TDC, I dont).
Tighten down the prop hub by putting a prop on and tightening it down, 'with gusto', dont break anything! lol
If you didnt have a piston-stopper in the previous step, remove the prop then install the protractor again and find true TDC in the methods mentioned above (I didnt do this, I basically just 'eyeballed' it using a wooden dowel and got as close to TDC as I could.
From TDC, rotate the engine anti-clockwise to 28-30Deg BTDC
Align the hall sensor using a beeper or light (better than trying to do it with a spark as the programming of the ignition at low rpm changes the spark timing) IMPORTANT the magnet should be APPROACHING the hall sensor in an anti-clockwise direction, as soon as it hits the hall sensor and beeps, turn it back until the beep just stops. Thats where you need to be. Tighten down the sensor.
Remove protractor and whatnot, install prop and spark plug.... run it.
You may need to adjust the needles again as I am sure the efficiency of the engine changes with the timing and you might need to change the mixture (towards the lean side). Start with the HSN, get it to max revs and then turn it back a few clicks until it slows a little, then it is in a slightly rich config.
I found that at 4.5 to 5 turns on the LSN was a little rich. Before the timing change it was fine, but afterwards, I could see cyl's 2 & 3 were lugging a little and ejecting blue smoke, so I leaned it up, and it was very smooth. I dont adjust the LSN at idle, I take it up to around 2000-2500 and adjust it there. Remember to wait a little bit after easch adjustment, it takes a little while for the mix to get through. Once you have a stable rev, and a good transtion, either leave it there or give it a little turn richer, just to err on the side of caution. Remember that the LSN is responsible for nearly 80-90% of the rev range, and even at full tilt, the LSN still has a little influence.
BTW, before you make any adjustments, make sure you get the engine up to operating temps. After starting, I leave it at a high idle for a minute or so, to get everything warmed up. From reading about the induction process that others have mentioned, the mix only stabilises in the induction chamber when things are at operating temp.
Very interessted to see what you find. And please stop running it if you find any backfires or odd noises. Until we get an official response from anyone at Saito or RCexel, this is all speculation.
Last edited by cathurga; 11-19-2018 at 12:14 AM.
11-19-2018, 07:31 AM
#1909
Join Date: Jul 2011
Location: Ignacio, CO
Posts: 42
Likes: 0
Received 0 Likes
on
0 Posts
Cathurga, thanks for all the info! I used a timing wheel and light/buzzer I purchased from CH. The best I can get when the magnet is APPROACHING the hall sensor in an anti-clockwise direction is 43 degrees. It was somewhere around 50 out of the box.
After reading the 90r3/60r3 threads and others, there is no mention of timing. All the cracked cylinders, bad running habits it’s just strange to see nothing on timing in till recently. I’m a newbie with the radial 4 strokes but have been flying and messing around with engines for along time. I have a 40 twin 2 stroke mounted to an extra and couldn’t get it to run well. Ended up checking the timing, moved it to 28 degrees and runs awesome! Now I check the timing on a my engines before I start.
Im going to finish break in, then see how it runs. My engine has the new pistons design so I guess that’s good? So they changed the pistons to lower the compression and not crack the a cylinder because the timing is not correct? Like to here more about this issue as I’m about to pull the trigger on a 90r3 as well.
Last edited by Denfly31; 11-19-2018 at 09:09 AM.
11-19-2018, 12:19 PM
#1910
Join Date: Jan 2007
Location: Dubai, UNITED ARAB EMIRATES
Posts: 500
Likes: 0
Received 2 Likes
on
2 Posts
Denfly, no prob, at least others are getting the same readings as me, and these are wrong....according to RCexel, CH-Ignitions as well as Morris at Morris Mini Motors.....
The timing discussion has been on here before, go back to post 1545 or thereabouts, there was even one guy mimmomx, who made himself a new propdrive. He also mentioned that the timing between cylinders was not 120-120-120. He hasnt been back since, I reckon he is out flying his radial! LOL
Even back then, I dont think anyone thought about the timing process of the magnet APPROACHING the hall sensor, everyone assumed, quite naturally, that it is not the case, and is just like a normal engine (single cylinder process). Someone even quoted Adrien from CH-Ignitions, who has helped design for RCexel mentions it, and nobody has picked up on it.
As far as the other engines are concerned, I am not going to preach the epistles to the apostles over on a thread that I dont have any proof on what their engines are like. Maybe they are right? Who knows....they will figure it out, and I dont want to look like I am on a soapbox there. My mate at the club has the FG90, and he is VERY keen to see where his timing is, will check it this weekend. And, we will be sending the FG60 up for its test flight....What is clear on the FG90, is that the cylinder bolts and lugs are a lot sturdier, so maybe they are safe from cracking. As far is the cylinder redesign goes, maybe to stop the cracking cylinders....I dont know, and would hazard a guess that that is why they did it....why else?
11-19-2018, 08:10 PM
#1911
Just an FYI... and I am not taking sides! I spoke to Ray English tonight, and he said that the timing is fine on these engines. He said he has a specially designed timing light from back when he was working with Cosworth, and he used it on these engines, which showed the timing to be fine, and when it was running, as well. His advice is to leave it alone.
In addition, he mentioned that Saito does not change the design of an engine once it is released, as they think it is an admission of fault or defect if they do make a change. That said, I thought I remembered seeing the piston with two valve relief cuts on the top rather than the relief all the way around the top... did I imagine that?
Wishing the best of luck to all in running the FG-60!
11-19-2018, 08:40 PM
#1912
Join Date: Jul 2011
Location: Ignacio, CO
Posts: 42
Likes: 0
Received 0 Likes
on
0 Posts
I ran another tank through my engine today. First I adjusted the valves, # 1 cylinder needed it. Then installed the stock exhaust and lubed up everything. Mounted the engine inverted and mixed some 15:1 with Stihl HP. This time the engine ran on all cylinders, around 175 F, they weren’t all the same all the time of course.
The squeaky sound it gone which I believe it needed more lube in #1. Overall the engine runs great, I’m very happy with it. Seems to be running better, and I have moved the timing to 43 degrees, it was 50 something out of the box. I’m going to leave it alone for now and start leaning out the engine. Pretty happy with it, stared today on the first flip.
The squeaky sound it gone which I believe it needed more lube in #1. Overall the engine runs great, I’m very happy with it. Seems to be running better, and I have moved the timing to 43 degrees, it was 50 something out of the box. I’m going to leave it alone for now and start leaning out the engine. Pretty happy with it, stared today on the first flip.
11-19-2018, 09:31 PM
#1913
Join Date: Jan 2007
Location: Dubai, UNITED ARAB EMIRATES
Posts: 500
Likes: 0
Received 2 Likes
on
2 Posts
Slither, thats interesting. I also wrote a mail to Mr. English, but I never got any response yet. I understand that he probably doesnt feel his efforts warrant any commenting on any forums, and I repsect that. But, it would be nice if someone was able to post their findings for the benefit of others that ARE having problems. I had thought of sacrificing an ignition system, and just putting a standard strobe/timing light on it. It would mean removing the shielding off the plug wire, but that would also mean removing the grounding. I am no expert on that, so I shelved the idea.
Yeah, its been posted earlier on page 75 I think, by Didier, that the pistons have been redesigned. Although now the entire top of the cylinder has relief all the way around, where previously it was just the valve cut outs. He has confirmed this with pics of the new engine he got, with a photo down the plug hole. Didier, I sa you mentioned the piston discussion on a German website, is there any discussion on the timing?
Denfly, thats good news. When I first got my engine, I was quite surprised at how 'dry' it was inside, and others had noted it on this forum, which prompted me, and others I believe, to lube things up a bit first. On my last startup before I shifted the hub, I pushed the sensor as far up towards TDC and it did run better then previously. Not as good as now that I have changed the timing, but still better than stock.
Dont worry guys, I am happy being the guinea pig here, I really dont care if I blast this thing into a million pieces, as its been nothing but a waste of time and money so far. Actually, the time has been well spent as its taught me a bit that I didnt know and quite frankly, that learning has offset the cost of the engine. If it does blow up, well then I clean it up, mount it on a little stand in my workshop, just as a conversation piece. The other gets put back to stock, and will be on all good forums, classified and auction sites near you! LOL
Im looking forward to this weekend so I can go and tinker with it. Based on slithers discussion with Mr. English, all of you should consider that I might be (and probably am) completely off my rocker
Last edited by cathurga; 11-19-2018 at 09:43 PM.
11-20-2018, 11:10 AM
#1914
Senior Member
Yeah, its been posted earlier on page 75 I think, by Didier, that the pistons have been redesigned. Although now the entire top of the cylinder has relief all the way around, where previously it was just the valve cut outs. He has confirmed this with pics of the new engine he got, with a photo down the plug hole. Didier, I sa you mentioned the piston discussion on a German website, is there any discussion on the timing?
No, I didn't see any discussions on the German Forum about the timing.
Although I don't know mr. English and respect his opinion and know-how, I think he is not correct concerning the timing and changes made to the engine.
Physically they re-designed the pistons, period.
I have more trust in the designers of the ignition of the FG60R3 (Adrian/RCxl ignition) and engine guru Morris mini motors stated the timing is wrong.
We experimented a little with the timing ourself on an other FG60R3 and you could definitely hear the engine sounded better and gained 200 RPM.
I think, without much experience yet with this engine, there will be a lot less pressure inside the combustion chamber with the correct timing.
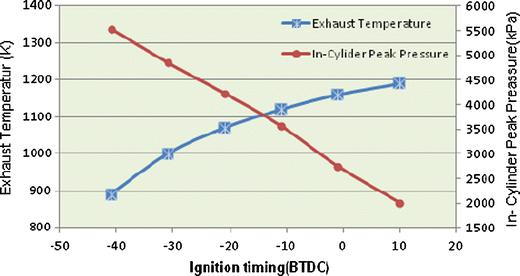
Here is a diagram of a scientific research made in 2013. You can clearly see what timing is doing in respect of exhaust temperature and "in cylinder peak" pressure.
If timing is to much retarded, it could possible burn your exhaust valve, so that is not good either.
 11-20-2018, 02:47 PM
#1915
Join Date: May 2007
Location: Sherwood,
OR
Posts: 76
Likes: 0
Received 0 Likes
on
0 Posts
I have two questions for you all?
I see that there are four magnets on the prop adapter. What is the forth magnet for?
Also, Where have you found, is the best propeller orientation relative to #1 TDC for starting?
TX Jeff
I see that there are four magnets on the prop adapter. What is the forth magnet for?
Also, Where have you found, is the best propeller orientation relative to #1 TDC for starting?
TX Jeff
11-20-2018, 09:13 PM
#1916
My Feedback: (6)
Valve lash question,
According to the instructions basically only the tiniest gap should be set. Is that how everyone is setting the valve clearance?
This is the first check I've done since new and all are over the .1MM as measured by the supplied feeler gauge.
Sparky
According to the instructions basically only the tiniest gap should be set. Is that how everyone is setting the valve clearance?
This is the first check I've done since new and all are over the .1MM as measured by the supplied feeler gauge.
Sparky
11-20-2018, 09:28 PM
#1917
Join Date: Jan 2007
Location: Dubai, UNITED ARAB EMIRATES
Posts: 500
Likes: 0
Received 2 Likes
on
2 Posts
Jeff,
Simplest answer is the 4th magnet is a ‘check’ magnet, it lets the ignition know the orientation of the hub so it can determine firing order, 1-3-2 in this case if my memory is correct. However, at starting speeds I think below 400rpm, all sparks fire.
as far as prop orientation is concerned, if the engine is running properly, it shouldn’t matter unless you want to try and get it to start in cylinder 1 everytime.
11-20-2018, 09:29 PM
#1918
It looks like exhaust temperature decreases with advanced timing... it is the high internal pressure that is the issue.
Last edited by slither; 11-21-2018 at 08:28 AM.
11-20-2018, 09:48 PM
#1919
Slither, thats interesting. I also wrote a mail to Mr. English, but I never got any response yet. I understand that he probably doesnt feel his efforts warrant any commenting on any forums, and I repsect that. But, it would be nice if someone was able to post their findings for the benefit of others that ARE having problems. I had thought of sacrificing an ignition system, and just putting a standard strobe/timing light on it. It would mean removing the shielding off the plug wire, but that would also mean removing the grounding. I am no expert on that, so I shelved the idea.
Yeah, its been posted earlier on page 75 I think, by Didier, that the pistons have been redesigned. Although now the entire top of the cylinder has relief all the way around, where previously it was just the valve cut outs. He has confirmed this with pics of the new engine he got, with a photo down the plug hole. Didier, I sa you mentioned the piston discussion on a German website, is there any discussion on the timing?
Im looking forward to this weekend so I can go and tinker with it. Based on slithers discussion with Mr. English, all of you should consider that I might be (and probably am) completely off my rocker
Another thing to consider here is the response time of the sensor. Magnetics are often ugly and unruly. Perhaps there is significant delay in the sensor response time which is taken into account during the design phase. Anyone have a data sheet on the sensor? There might be valuable info there. Additionally, the strength of the individual magnets can play a role in slight timing variations. Different magnet strengths will trigger the sensor at different times, which could explain the variation in number 2 and 3 cylinders' timing. I suspect that the stronger the magnetic field the quicker the response in relation to rotational angle, i.e the further from the sensor it will trigger. Lots of variables here! A timing light seems the best approach...
Last edited by slither; 11-20-2018 at 09:51 PM.
11-20-2018, 10:13 PM
#1920
Join Date: Jan 2007
Location: Dubai, UNITED ARAB EMIRATES
Posts: 500
Likes: 0
Received 2 Likes
on
2 Posts
Sparky, if you've never checked them before, then they will be over the recommended tolerance. Most of the 'wear' and 'seating' of the valves is done during the break in period. The valve ends, rocker arms, pushrods and guides on the cam will all wear a little as they are under a fair bit of pressure, after a few hors of running, most of the 'wear' has taken place. I set them with the supplied guage and then check them every few runs. In my case, since this engine has never really run the way it should, I have checked them more often, and since the first few runs, they dont seem to change much. Same happened with my FG40, after break in, they were out by a bit, reset them and have revisited them on occasion and mostly no new changes made..over time though, they wil keep wearing, but should have many hours of life in them before the need replacing from wear.
Slither, I concur that magnets and magnetics are more complex than my little brain can mostly comprehend, but since they have flat put them at 120Deg apart from each other, and IF the crank design makes them slightly different from what other people have measured, the Saito havent taken this into consideration. Either that OR they have put different magnets of different strengths in to the prop hub. I dont know if they have thought this through in so much detail.
That graph is interesting, and not sure if I am reading it properly, but if I am then a well-timed engine (closer to advanced than retarded) has an exhaust doing what its supposed to do, remove burnt gases AND remove heat) assuming that the heat of a retarded engine is being absorbed by the engine (cylinder/head etc) or its not being generated. Do Exhaust Gas Temperatures (EGT) and Cylinder Temps follow a similar/paralell curve or not? I am not sure, but I would rather the EGT be higher and save my mettalurgy....not sure if I am completely getting the wrong idea, but its interesting for sure. The compression in cylinder looks to be way high....maybe the reasong for the new piston design....try bring that down a bit? Who knows.
11-20-2018, 10:27 PM
#1921
Join Date: Jan 2007
Location: Dubai, UNITED ARAB EMIRATES
Posts: 500
Likes: 0
Received 2 Likes
on
2 Posts
I managed to get some time yesterday to rig up my other FG60 on the test bed. I changed the timing, but had a hard time getting it started. It would start up, and then burn all the fuel from being primed, then stop. Happened quite a few times. It has been sittting for a long time, so I suspect that the carb might need some attention. I noticed that it was VERY difficult to keep the crank and the prop hub aligned without a guide pin, so that thing is an important component in KEEPING alignement while tightening down. I had a lot of oil seepage from the front bearing onto the crankshaft (from sitting in its box, all the oil in the crankcase has seeped through the bearing) This is a good thing in so far as I know lubrication is happening, but its not a good thing if I am going to have to replace that bearing soon....thats a full teardown job...
Anyway, couldnt get the carb working, so removed it and put a walbro on it. Managet to get it primed, but the timing went out again, probably from me running a starter to get the Walbro primed up. I ran out of light so will try again on the weekend.
Importantly though, just changing the timing by rotating the prophub is definately only a stopgap, I need to have a prophub with a redesigned locating pin. Before that can be done, need an answer from RCexel whether that 'check' magnet location can be changed. If not, then there is a lot of thinking to be done, and some confirmations from people in the know, if this is the best timing we are ever going to get. The only other thing I can do is dismantle the engine and dril new holes for the hall sensor mounting.
11-21-2018, 06:23 AM
#1922
Cathurga, I was going to mention this a few posts back but decided not to until I read your recent post. From my experience with Saito engines, the Drive Flange alignment pin has to be properly seated in its slot in the crank shaft. No matter how tightly you torqued the Taper Collet/Drive Flange down and then not install the alignment pin, the Drive Flange will slip/move out of position when starting the engine. This happened on my FG36, FG20, and FG21. I believe the same slippage of the Drive Flange will happen on the FG60R3 and FG90R3 if the alignment pin is not installed.
11-21-2018, 06:57 AM
#1924
Join Date: Jan 2007
Location: Dubai, UNITED ARAB EMIRATES
Posts: 500
Likes: 0
Received 2 Likes
on
2 Posts
Agree 100%
.....which is why I think it’s a bit of a silly way of doing things, especially on an engine of this size. Any slippage and that pin will shear (bad, because you wouldn’t know from a visual inspection) or bend (worse, because then to extract it would be worse)
i discussed this on the other thread for my FG40, and was about to ditch the engine until I took a look at the timing and realised it was way off. Removed the pin and saw the non-threaded bottom part was gone. Battled with pulling the propdrive off because that small part was now ‘merged’ with the collet. Fortunately didn’t do much damage getting it off and managed to salvage the prop hub too. It needed a lid if filing and sanding to get rid of the damage.
dont recall posting these pics, but this is what my FG60 tapered collet looked like even though the pin hadn’t sheared.
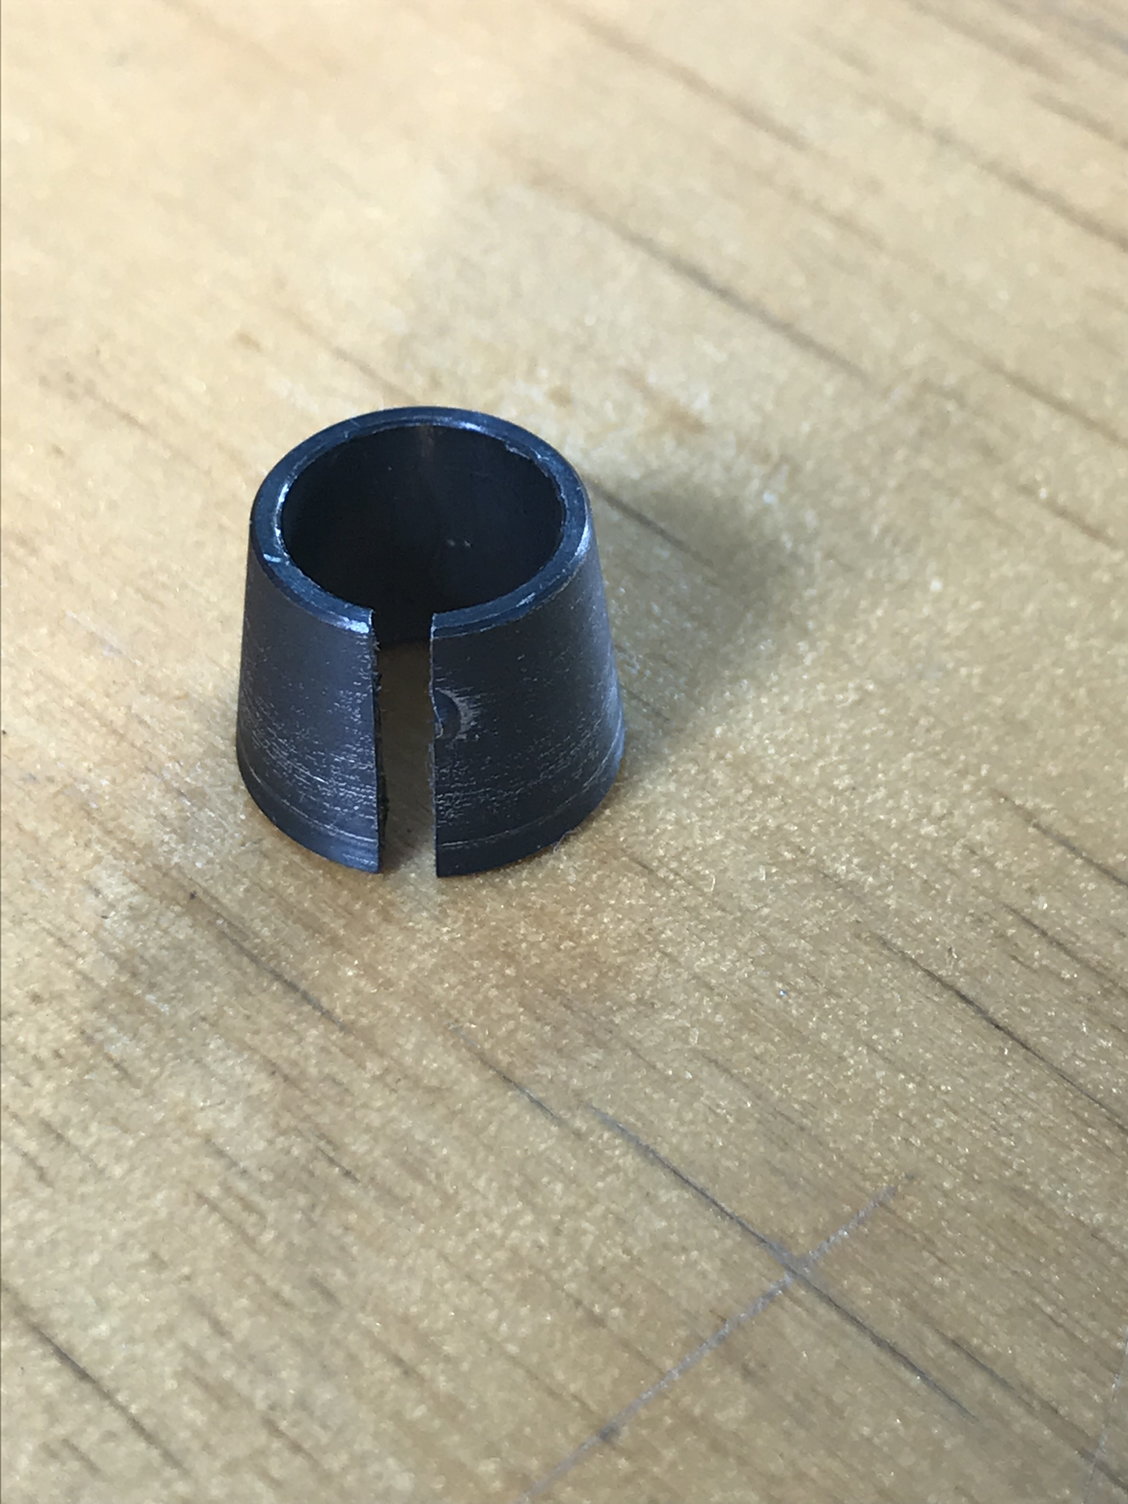
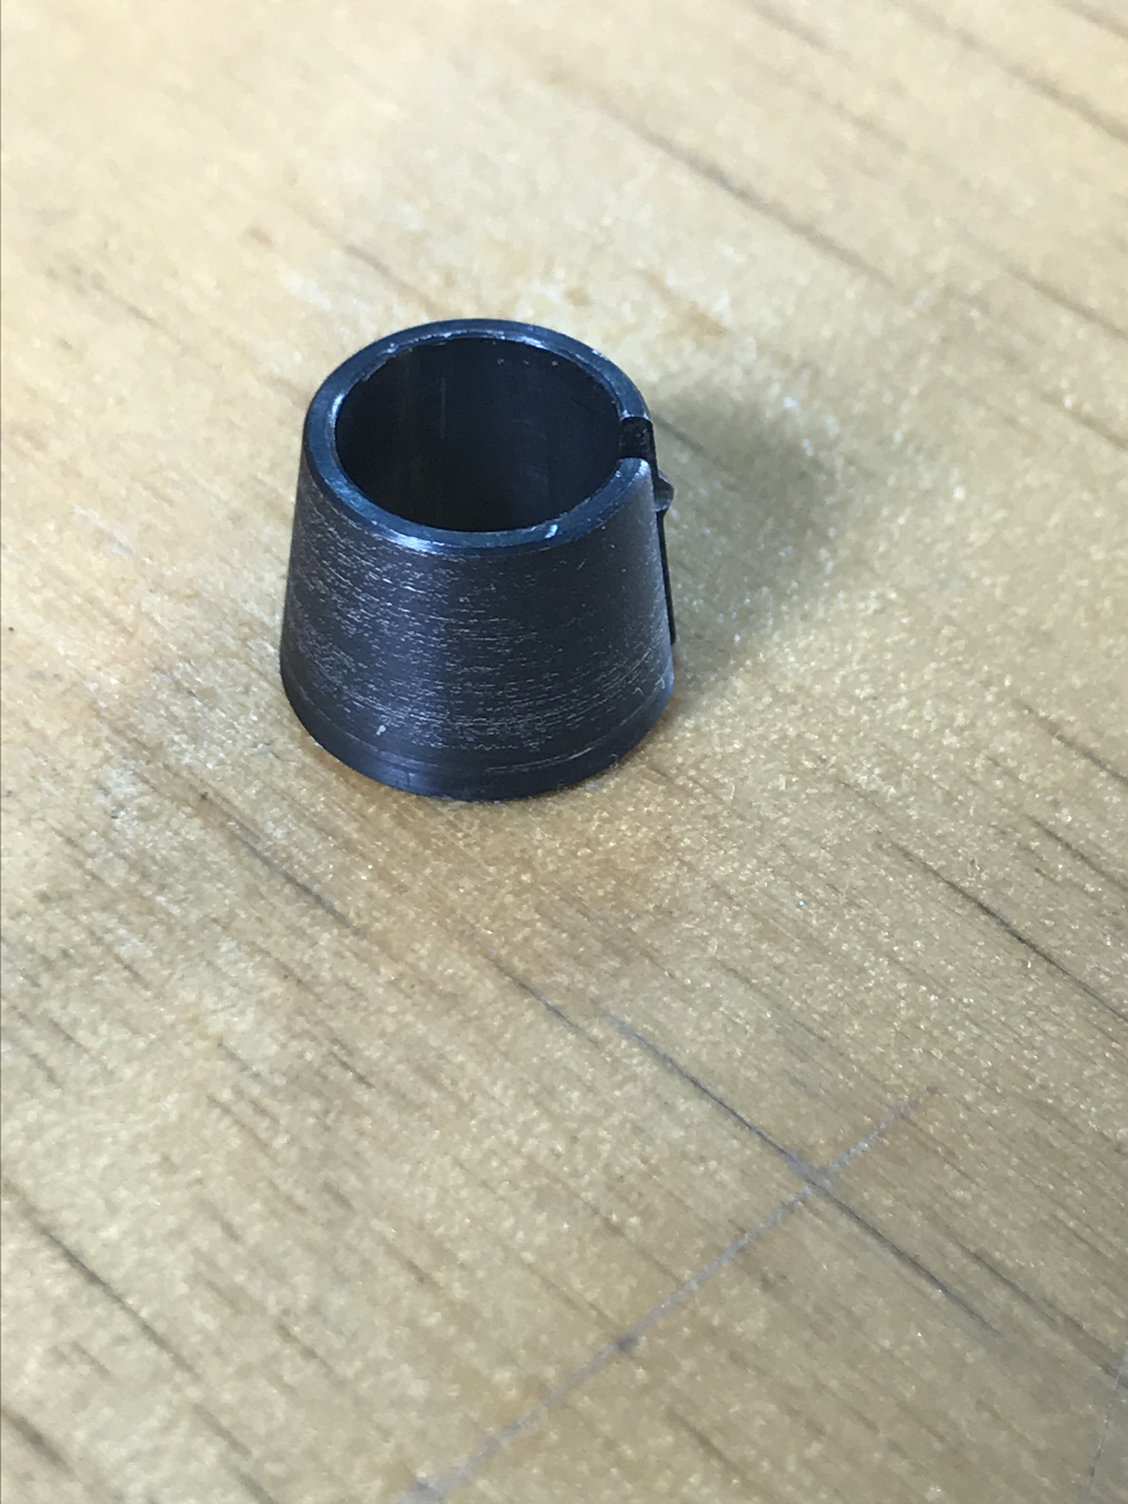
11-21-2018, 07:05 AM
#1925
Join Date: Jan 2007
Location: Dubai, UNITED ARAB EMIRATES
Posts: 500
Likes: 0
Received 2 Likes
on
2 Posts
i don’t think it makes a difference if you are out by a tiny bit mate, just get it as close as possible. What you don’t want is NO gap as then the valve could potentially be held open. Too big a gap and they aren’t going to let enough mix in, or exhaust out.
its fiddly with that tiny little gauge they give you...