Welcome to Club SAITO !
 11-15-2020, 06:30 AM

Ok pretty much finally done! Got my turbo mufflers installed on the saito 60t’s and they look great. Just need to rebalance after I take that butt load of lead out the nose!

 11-15-2020, 09:37 AM
Switched to the iphone for this post. Got of the 7 fixtures converted. Have to remove the ballast, verify the tombstones are not shunted, then rewire one side to 120v and remove the wires from the other side. I went from 6 tubes to 4 over the work bench.

Before
After
With the side bench led off like the first pic.
Before
After
With the side bench led off like the first pic.
11-15-2020, 11:51 AM
 11-15-2020, 12:08 PM
Example, my Liberty Sport Baffles. Since the head is exposed in the slip stream, it has decent cooling, but the crankcase and carb do not so I directed the flow towards the case, and have plenty of exit for full flow.
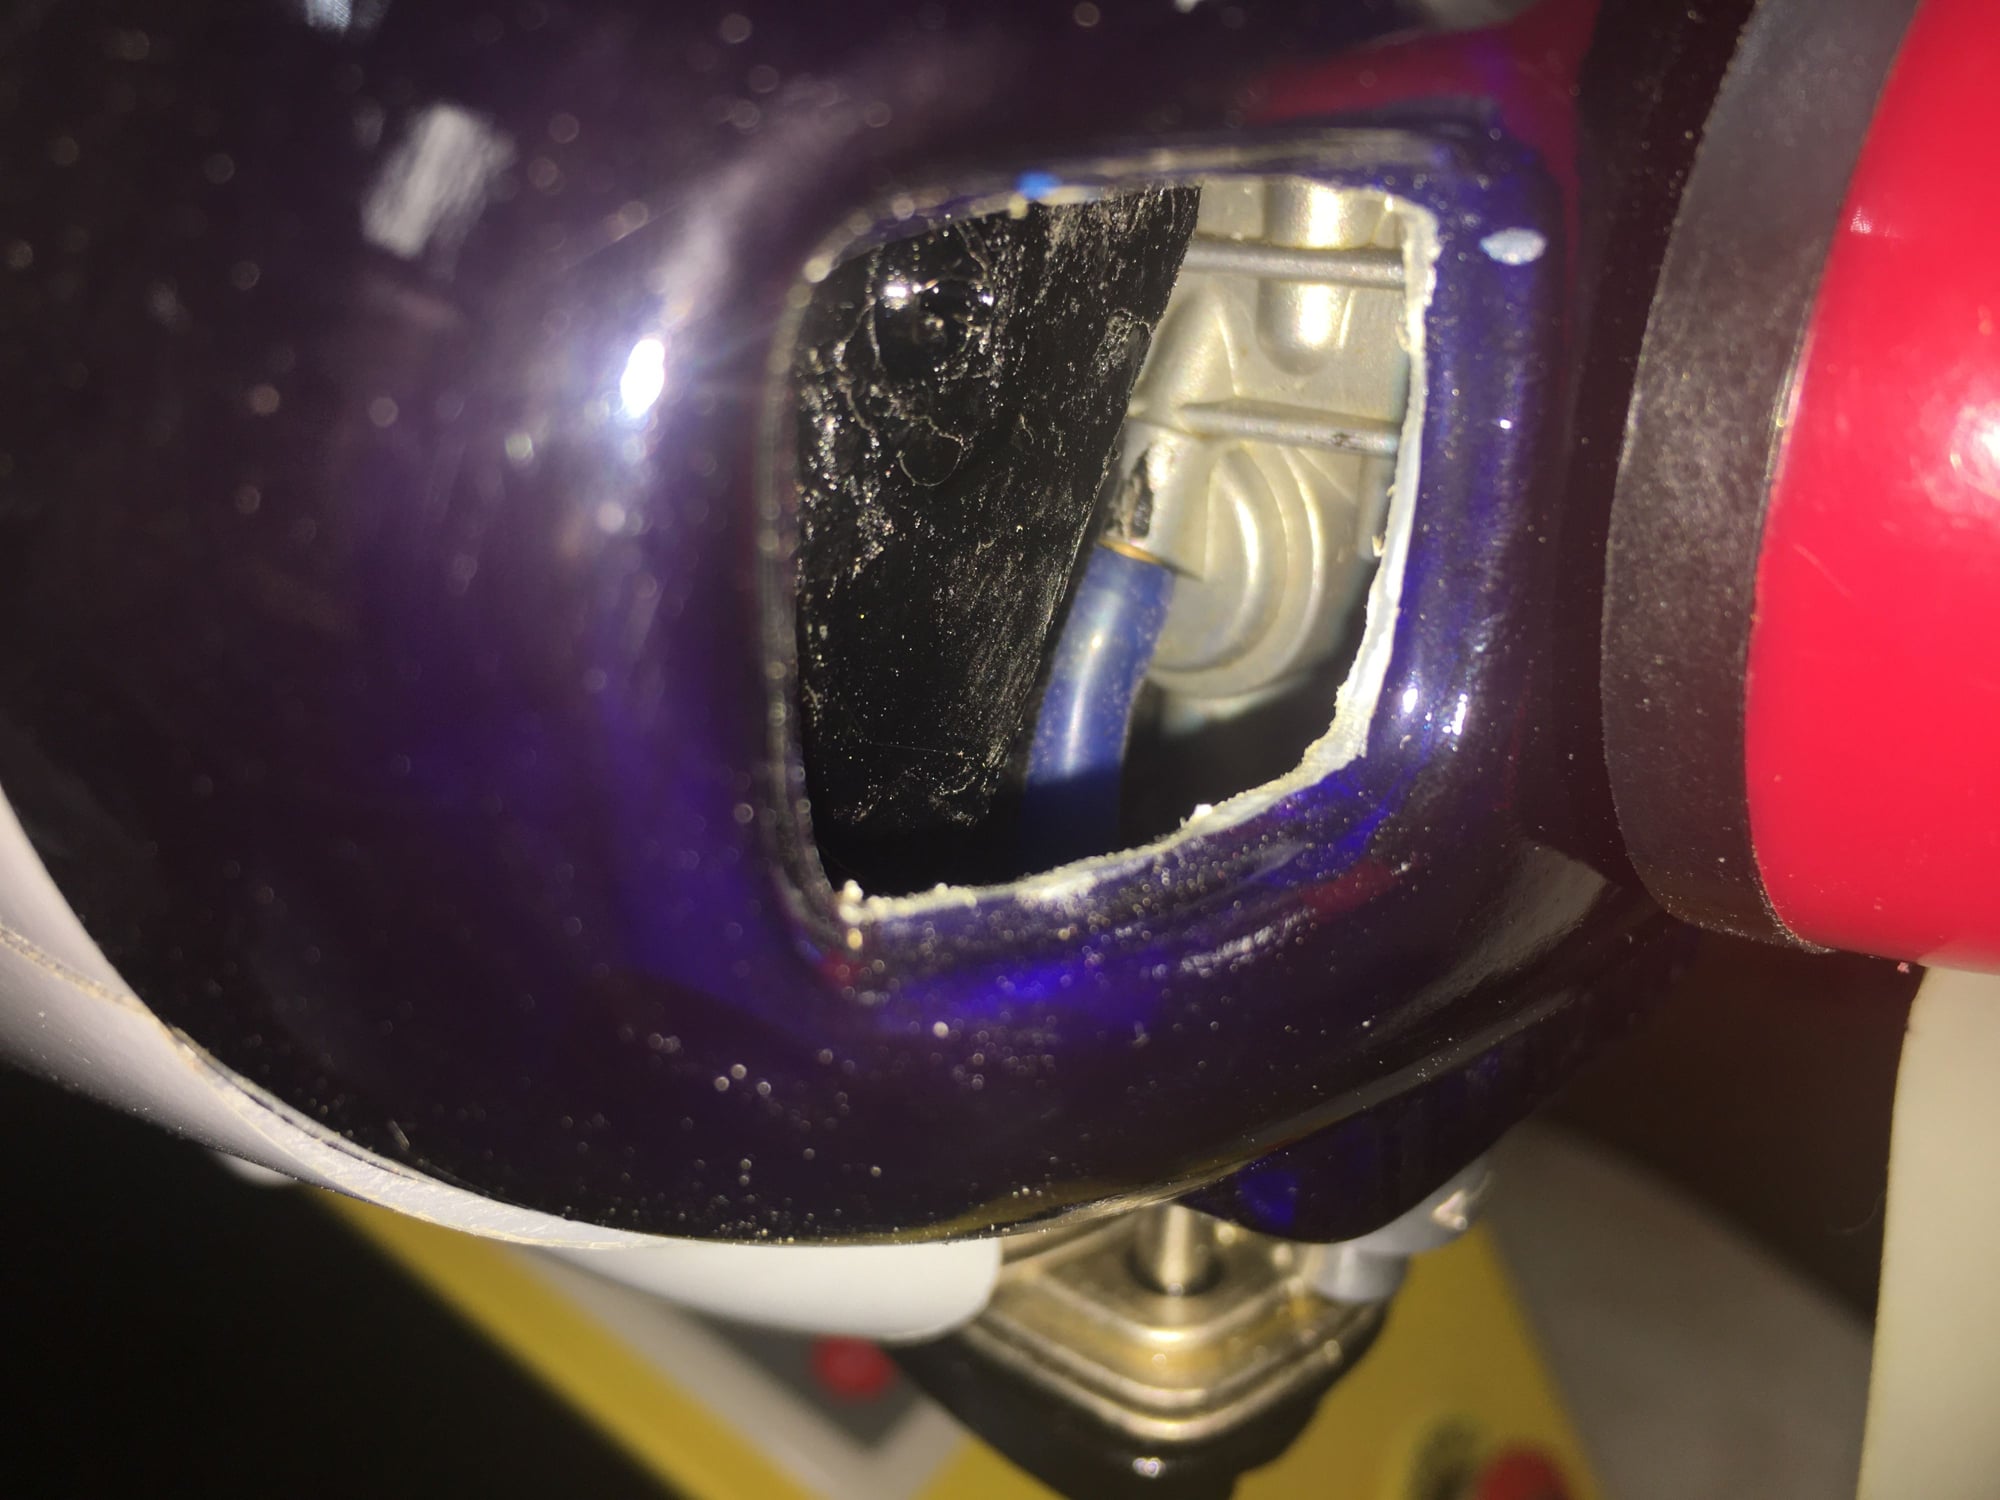
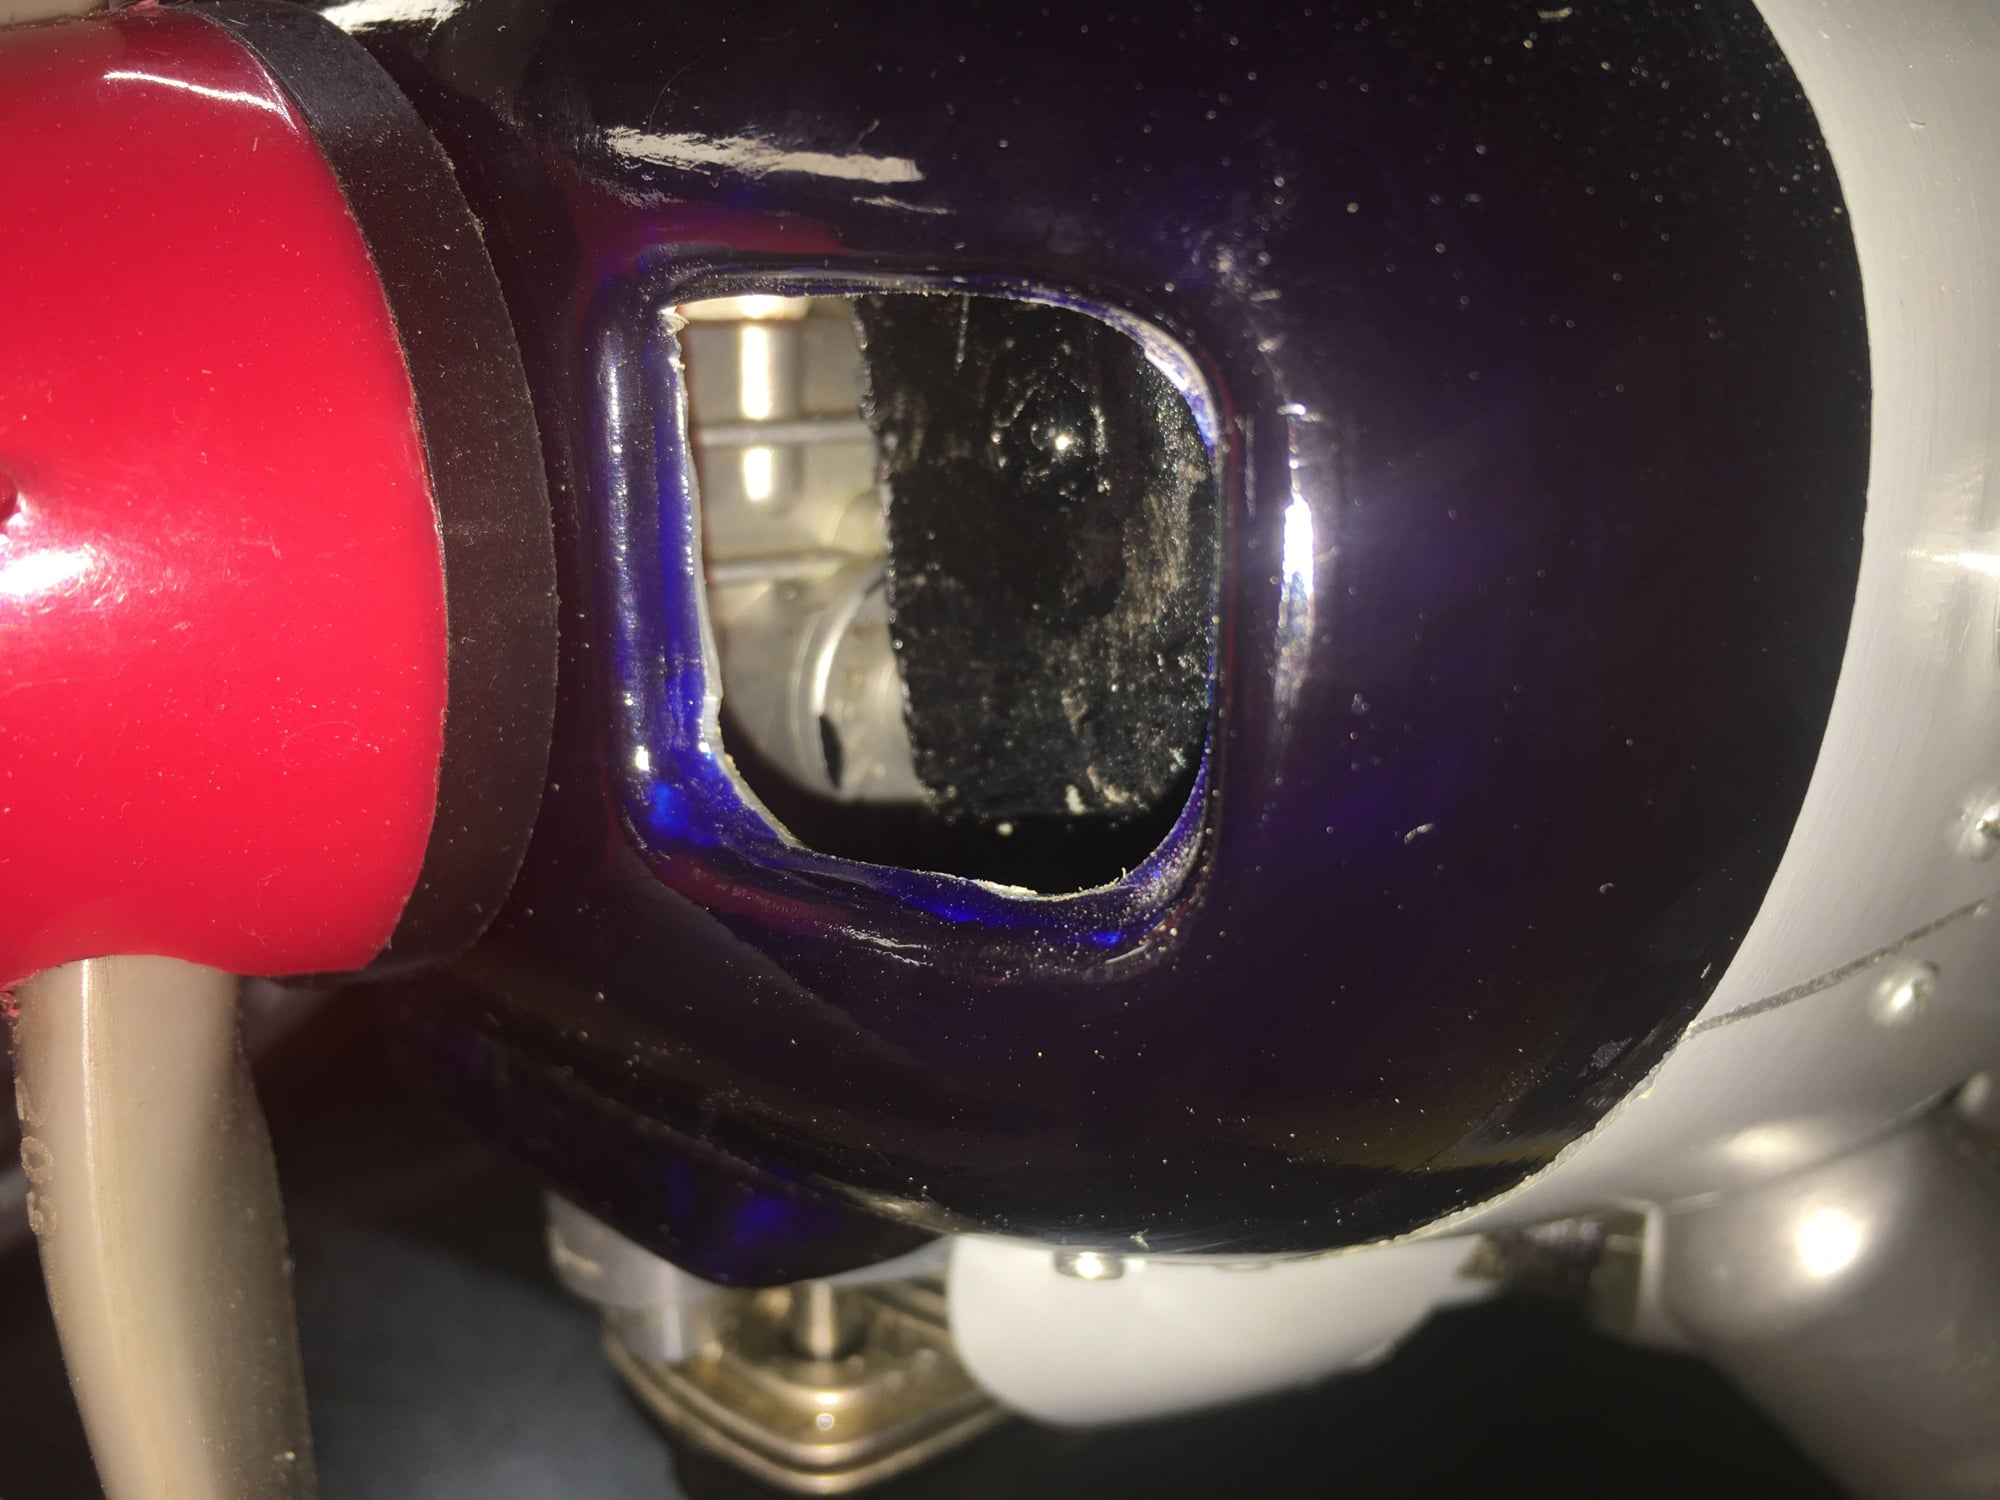
In fact the 120R3 is fully enclosed in the cowl so I have to baffle it properly and work on the cowl ring to get maximum exit room to keep it cool. I happen to have a dummy engine for it, so that makes it easier and I can cut the baffle out to get it very close to the fins, using the laser.
In fact the 120R3 is fully enclosed in the cowl so I have to baffle it properly and work on the cowl ring to get maximum exit room to keep it cool. I happen to have a dummy engine for it, so that makes it easier and I can cut the baffle out to get it very close to the fins, using the laser.
Last edited by acdii; 11-15-2020 at 12:11 PM.
11-15-2020, 01:03 PM

My Feedback: (102)

Join Date: Dec 2001
Location: Colonial Beach, VA
Posts: 20,370
Likes: 0
Received 25 Likes
on
25 Posts
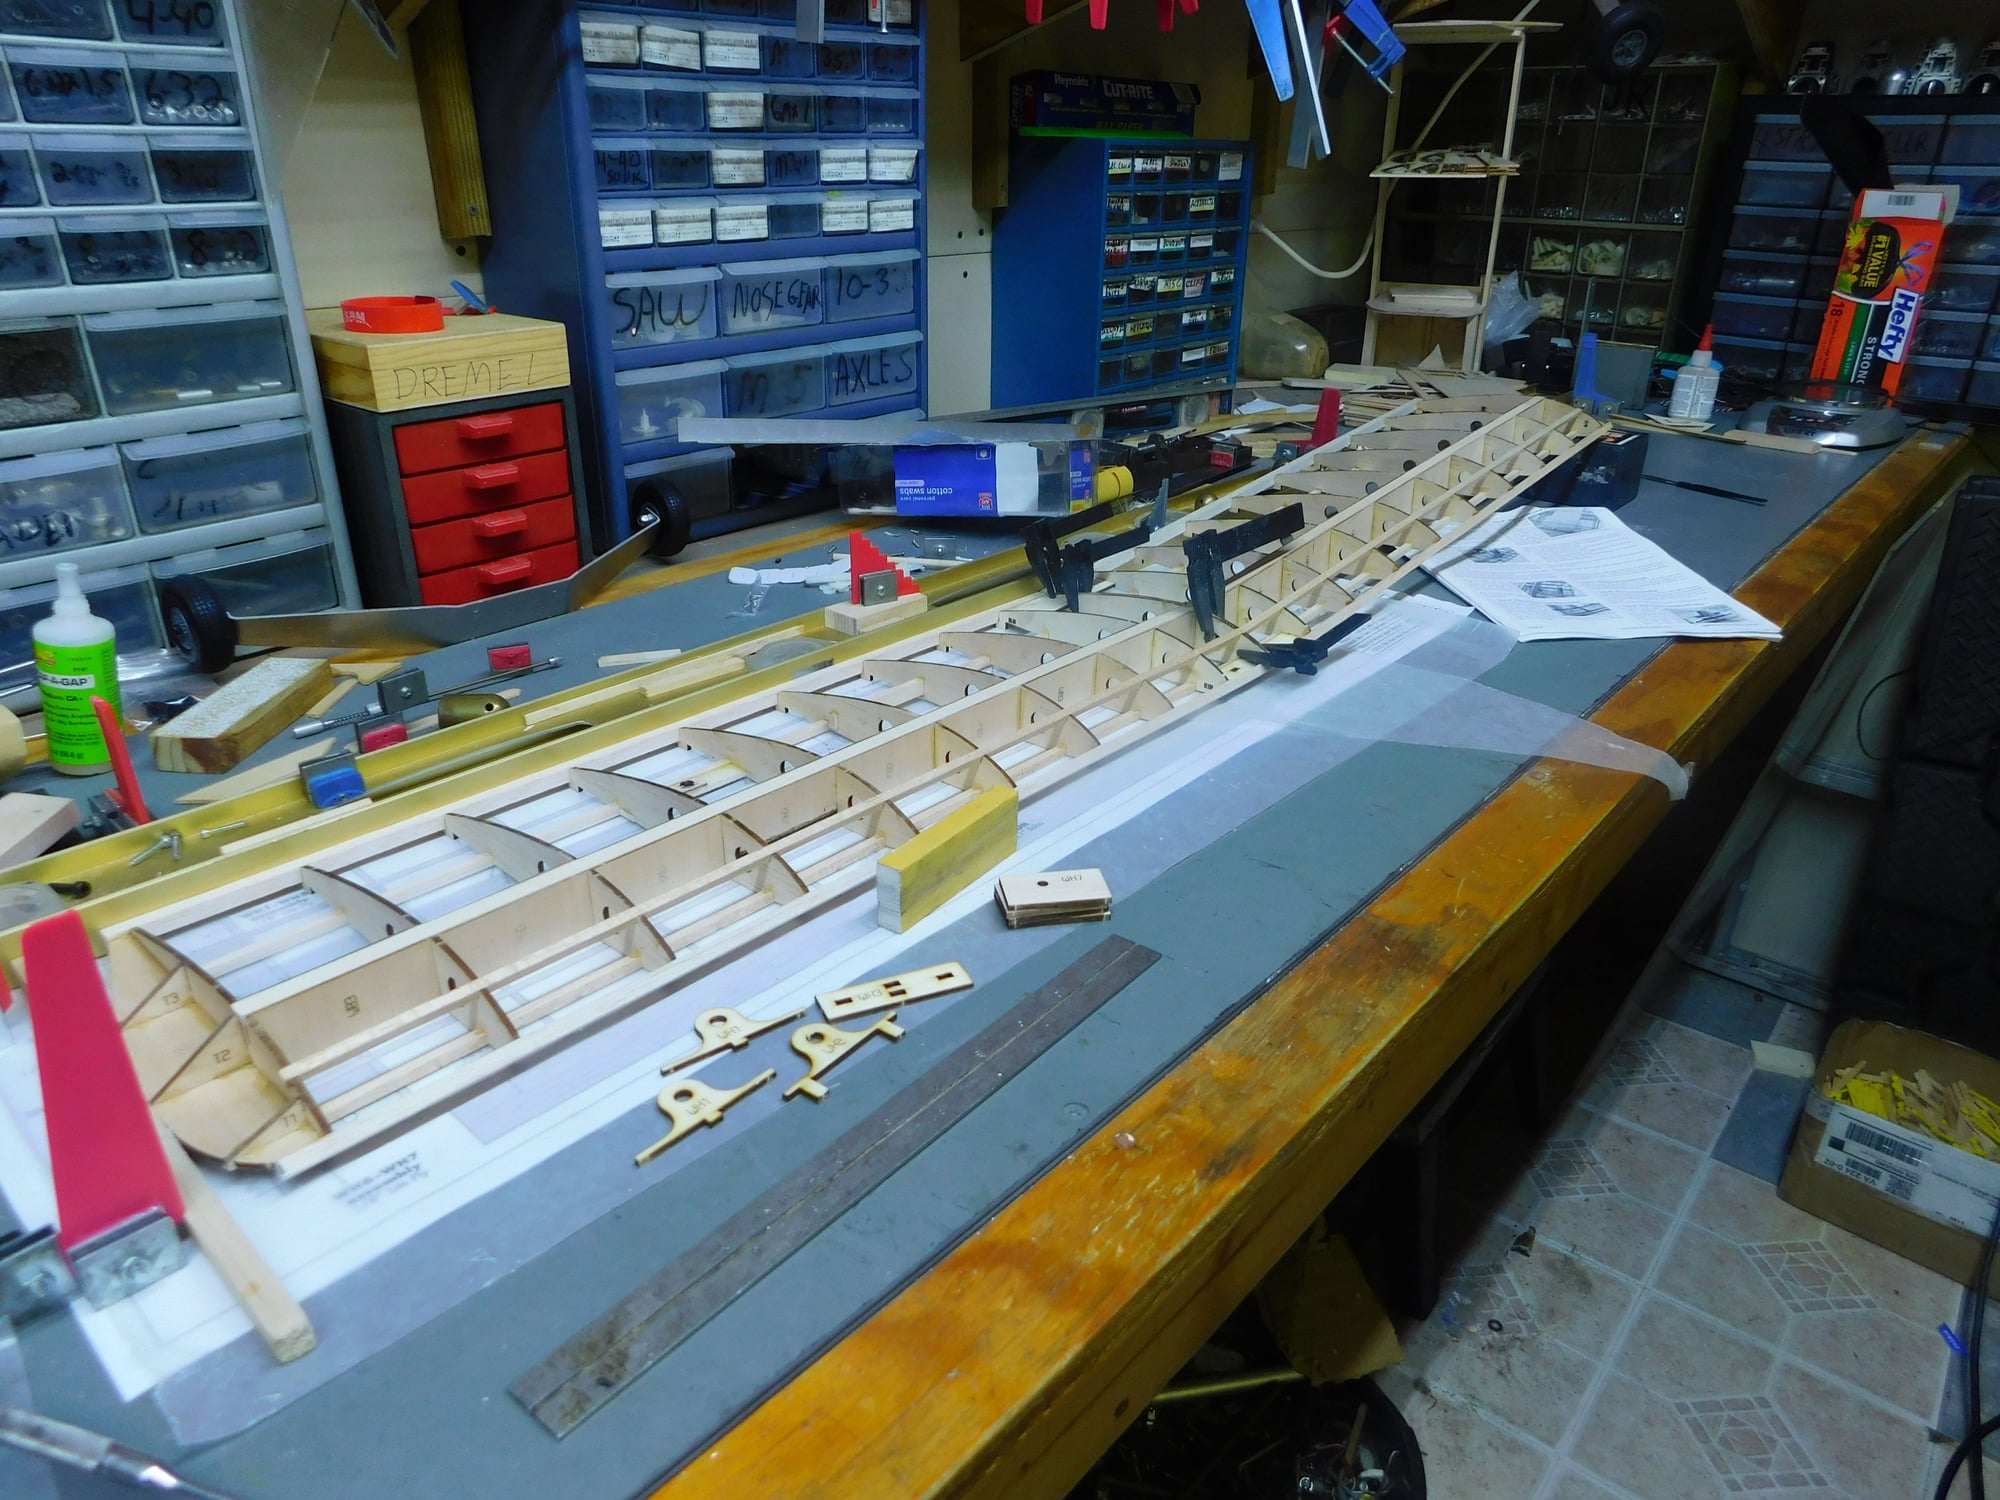
Thanks all, the biggest part of the wing is built, still two or three parts to add, the buildups to the bolt block and the wing mount pin in the front. Every part has it's name burned onto it. The instructions tell you what sheet the parts are in and whether balsa or ply. The sheets are labeled also. The wing mount pin goes in those goofy looking things laying there. The aileron servos mount on plates that screw to the wing.
Last edited by Hobbsy; 11-15-2020 at 01:08 PM.
11-15-2020, 02:32 PM
Acdii, what plane is that with the YS?
Dave, looking good. That "D-Tube" design makes for a very strong wing, especially if the LE is sheeted back to the spars. I used shear webbing like that in all my builds, even when not called for. Had to move the lower spar at times to do that but its worth it.
Wish I had time to build another plane.
Andy's Robin Hood 80 looked great on his video for Model Aviation. The night shots with onboard lights was neato frito.
Last edited by Glowgeek; 11-15-2020 at 03:19 PM.
11-15-2020, 03:34 PM
Acdii, what plane is that with the YS?
Dave, looking good. That "D-Tube" design makes for a very strong wing, especially if the LE is sheeted back to the spars. I used shear webbing like that in all my builds, even when not called for. Had to move the lower spar at times to do that but its worth it.
Wish I had time to build another plane.
Andy's Robin Hood 80 looked great on his video for Model Aviation. The night shots with onboard lights was neato frito.
Dave, looking good. That "D-Tube" design makes for a very strong wing, especially if the LE is sheeted back to the spars. I used shear webbing like that in all my builds, even when not called for. Had to move the lower spar at times to do that but its worth it.
Wish I had time to build another plane.
Andy's Robin Hood 80 looked great on his video for Model Aviation. The night shots with onboard lights was neato frito.
Example, my Liberty Sport Baffles.
11-15-2020, 06:00 PM
My Feedback: (102)
Join Date: Dec 2001
Location: Colonial Beach, VA
Posts: 20,370
Likes: 0
Received 25 Likes
on
25 Posts
Thanks Mike and Lonnie, those shear webs have four little tabs on the ends, (two on each end), that go into tiny square slots in the ribs. Some were a pain to get in there and being 1/16" you couldn't push very hard, but I didn't break any. The little tabs went half way through the rib and met in the rib center. I built the entire wing using Super Phatic glue.
11-15-2020, 06:27 PM

My Feedback: (1)
Thanks Gary, I look forward to playing some more.
Mike C. I'm going to run the 120-s one more time, but on the S&W 15% just to limber it up some more.
I see a Urologist tomorrow am for a high PSA count.
We still have lakes everywhere where there aren't supposed to be any, pine trees falling over all over the place.
I managed to keep dry and build the left half of the Robin Hood 25 wing and 75% of the right half. It's a great kit, so precise.
JIm, what is the hole spacing on that OS engine? Thanks
Jim
Last edited by the Wasp; 11-15-2020 at 06:36 PM.
11-15-2020, 06:54 PM

Dave,
Not sure about the new kit: I remember buying the original Robinhood kit for $20 on payday (Friday) and flying it on Monday morning. Covered in burgundy Monokote with light tan trim. Real pretty in the air.
Hope your urology visit goes well. Feel free to call me if you have any questions.
Not sure about the new kit: I remember buying the original Robinhood kit for $20 on payday (Friday) and flying it on Monday morning. Covered in burgundy Monokote with light tan trim. Real pretty in the air.
Hope your urology visit goes well. Feel free to call me if you have any questions.
11-15-2020, 08:43 PM
Thanks Mike and Lonnie, those shear webs have four little tabs on the ends, (two on each end), that go into tiny square slots in the ribs. Some were a pain to get in there and being 1/16" you couldn't push very hard, but I didn't break any. The little tabs went half way through the rib and met in the rib center. I built the entire wing using Super Phatic glue.
11-15-2020, 10:05 PM
My Feedback: (1)
yes, but the plane is a 60 size yet has a 40 size cowl and the OS engine fits very well in the cowl.
as for the OS 60muffler. the 40 size cowl is too small for a 60 size Pitts muffler, and the stock muffler needs an 90% extension.
Jim
.
as for the OS 60muffler. the 40 size cowl is too small for a 60 size Pitts muffler, and the stock muffler needs an 90% extension.
Jim
.
11-16-2020, 03:40 AM
My Feedback: (102)
Join Date: Dec 2001
Location: Colonial Beach, VA
Posts: 20,370
Likes: 0
Received 25 Likes
on
25 Posts
Dave,
Not sure about the new kit: I remember buying the original Robinhood kit for $20 on payday (Friday) and flying it on Monday morning. Covered in burgundy Monokote with light tan trim. Real pretty in the air.
Hope your urology visit goes well. Feel free to call me if you have any questions.
Not sure about the new kit: I remember buying the original Robinhood kit for $20 on payday (Friday) and flying it on Monday morning. Covered in burgundy Monokote with light tan trim. Real pretty in the air.
Hope your urology visit goes well. Feel free to call me if you have any questions.
Thanks, I should know something by 11:00 AM. The not knowing is the hard part. I am seeing a Polish gentleman named, Dr. Szlyk, pronounced like slick.
11-16-2020, 05:13 AM
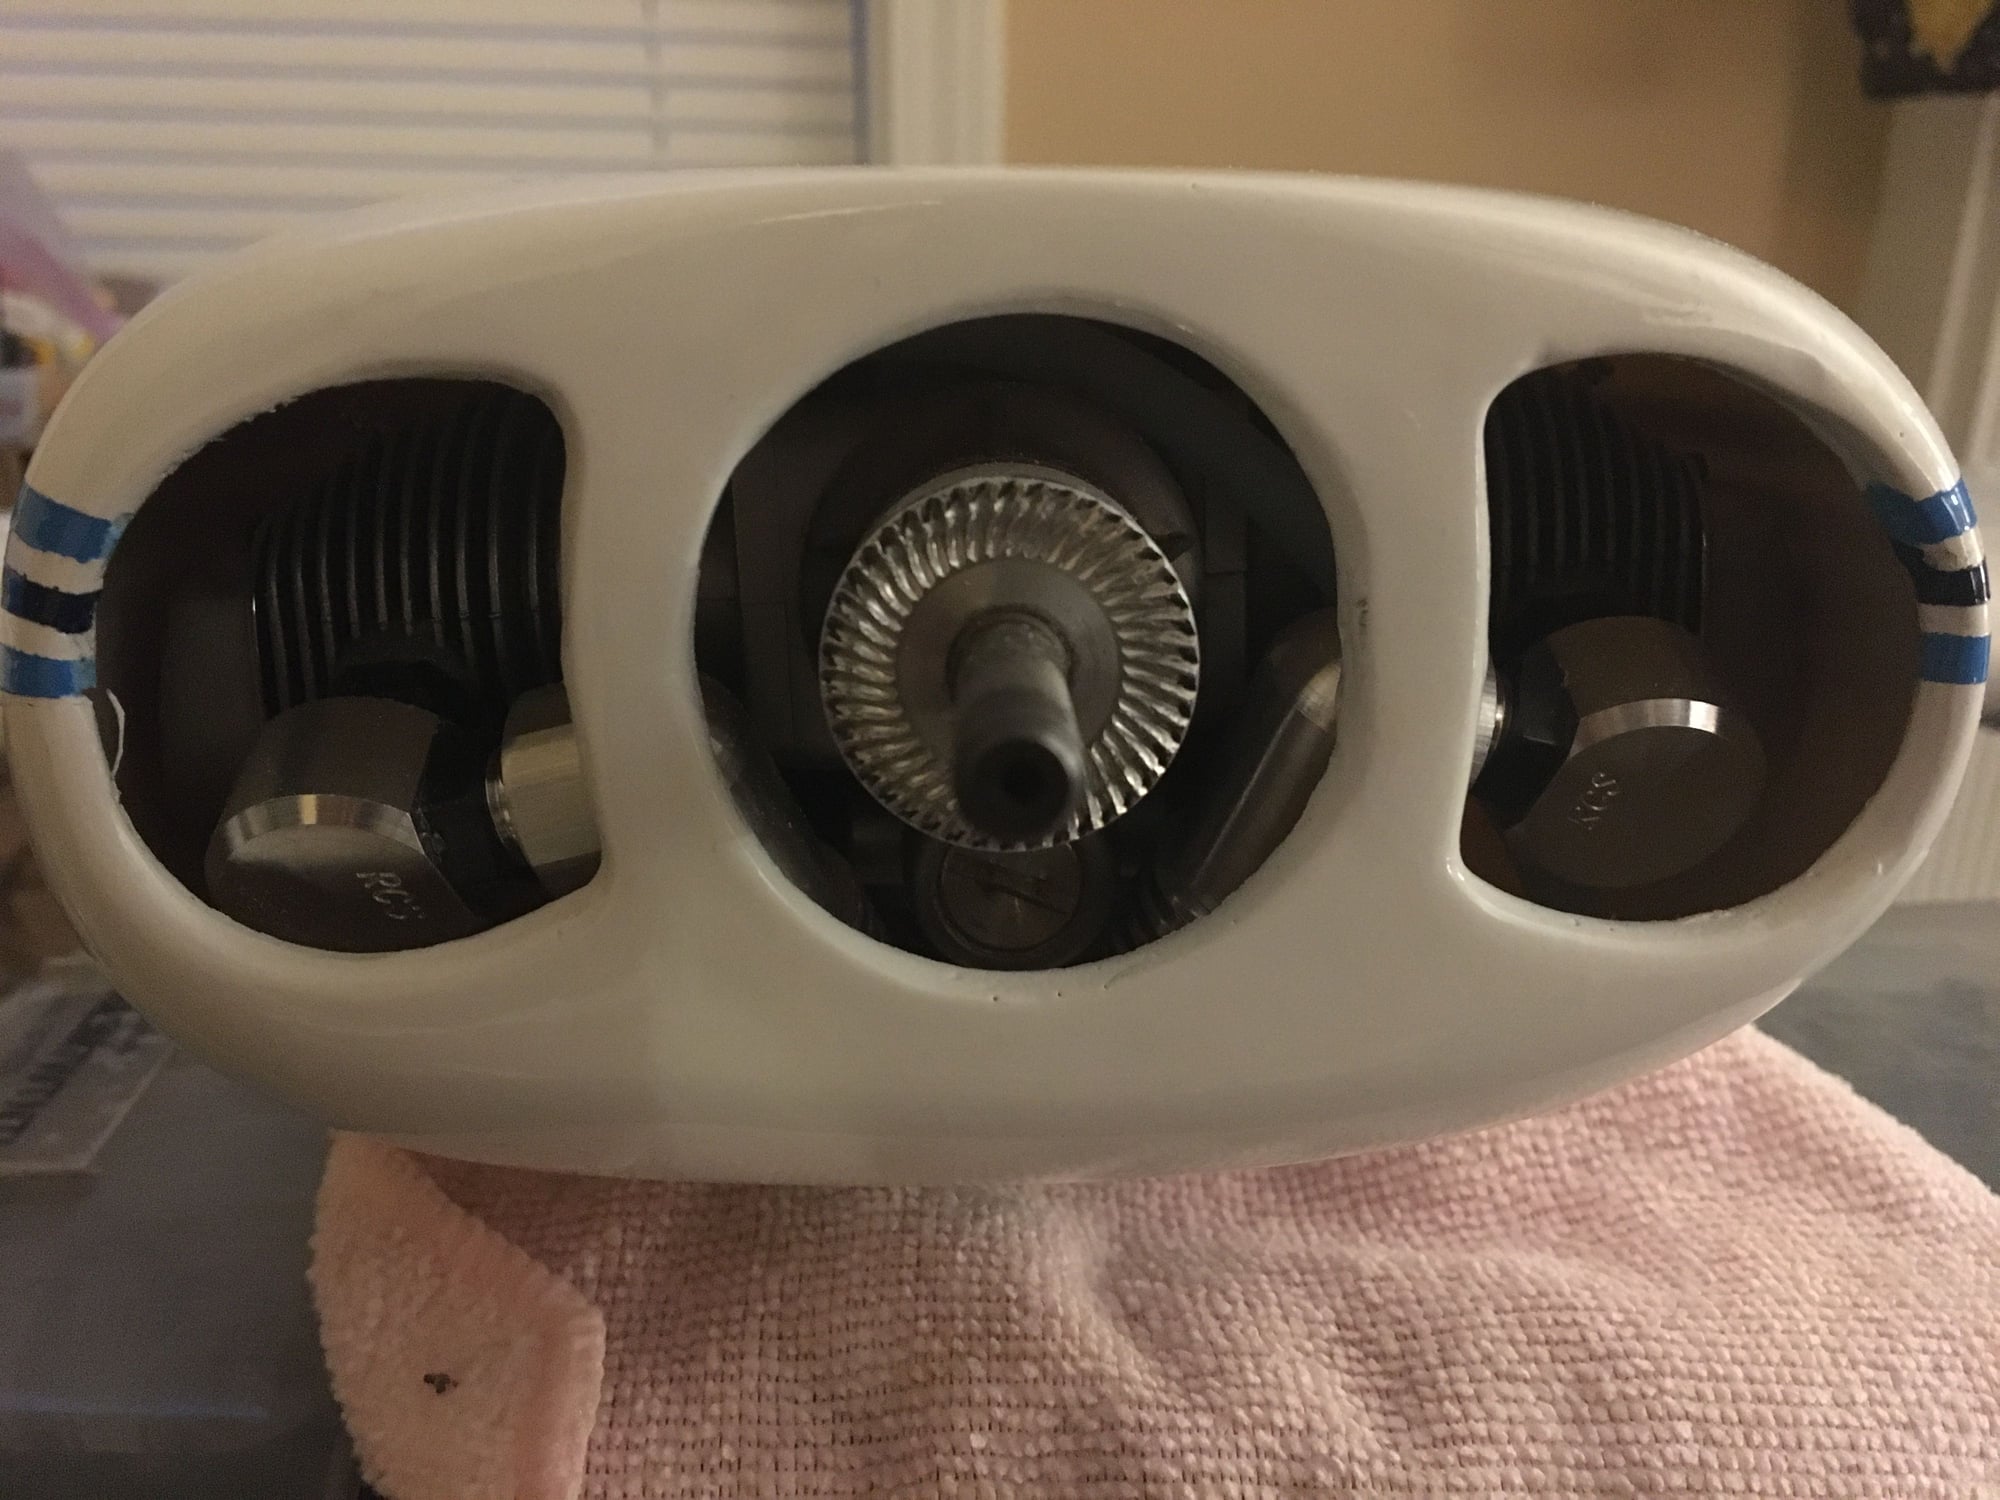
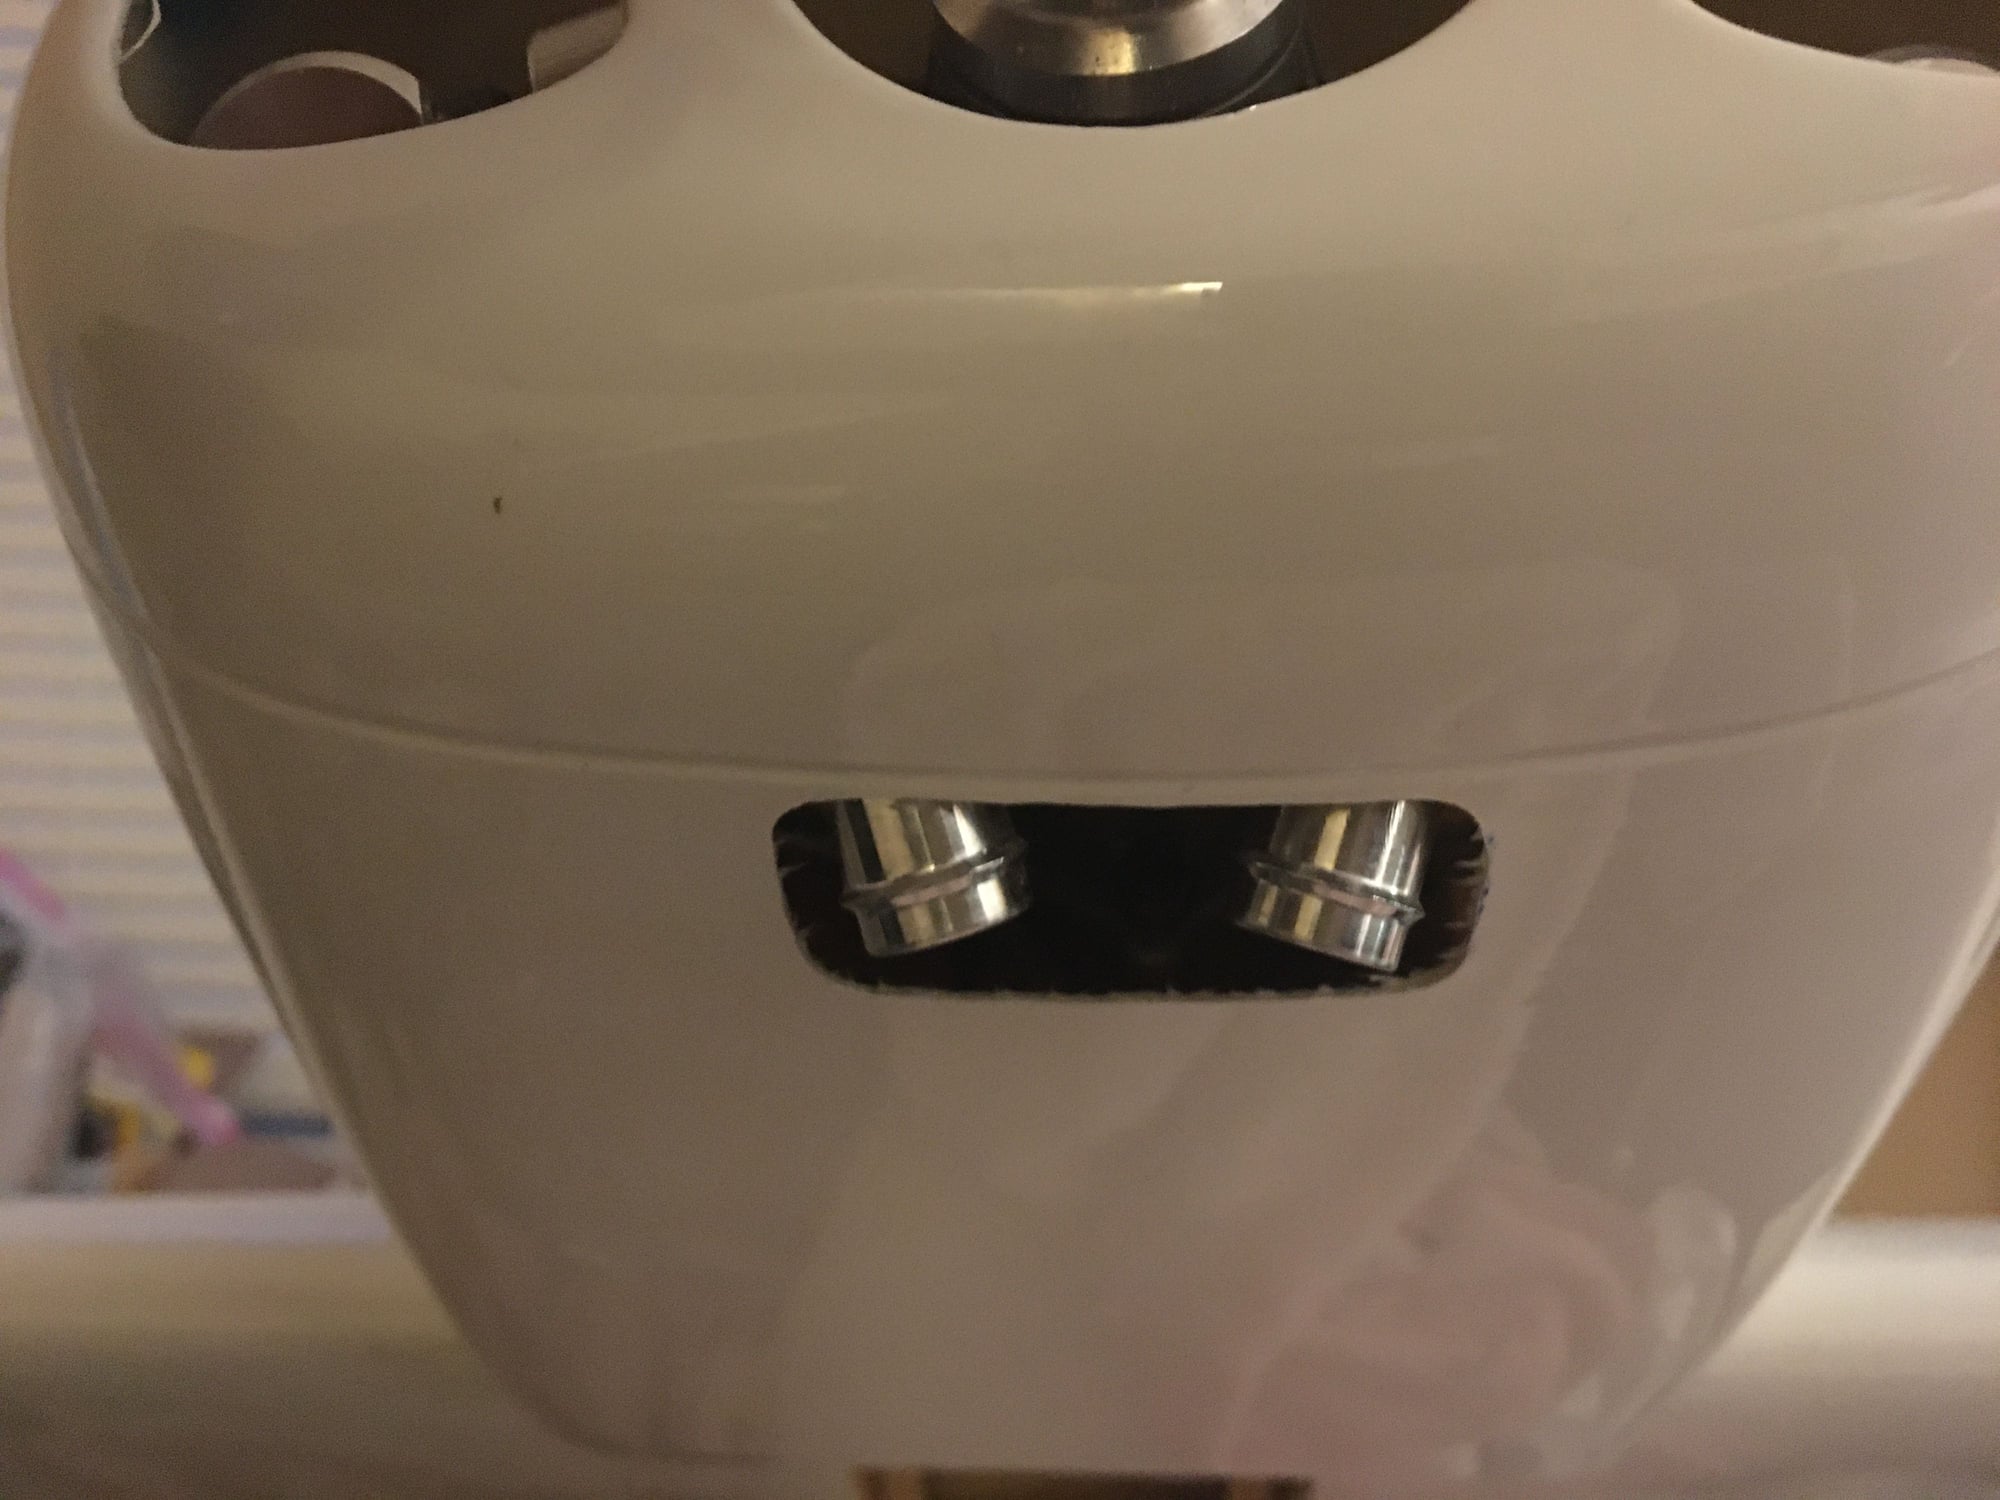
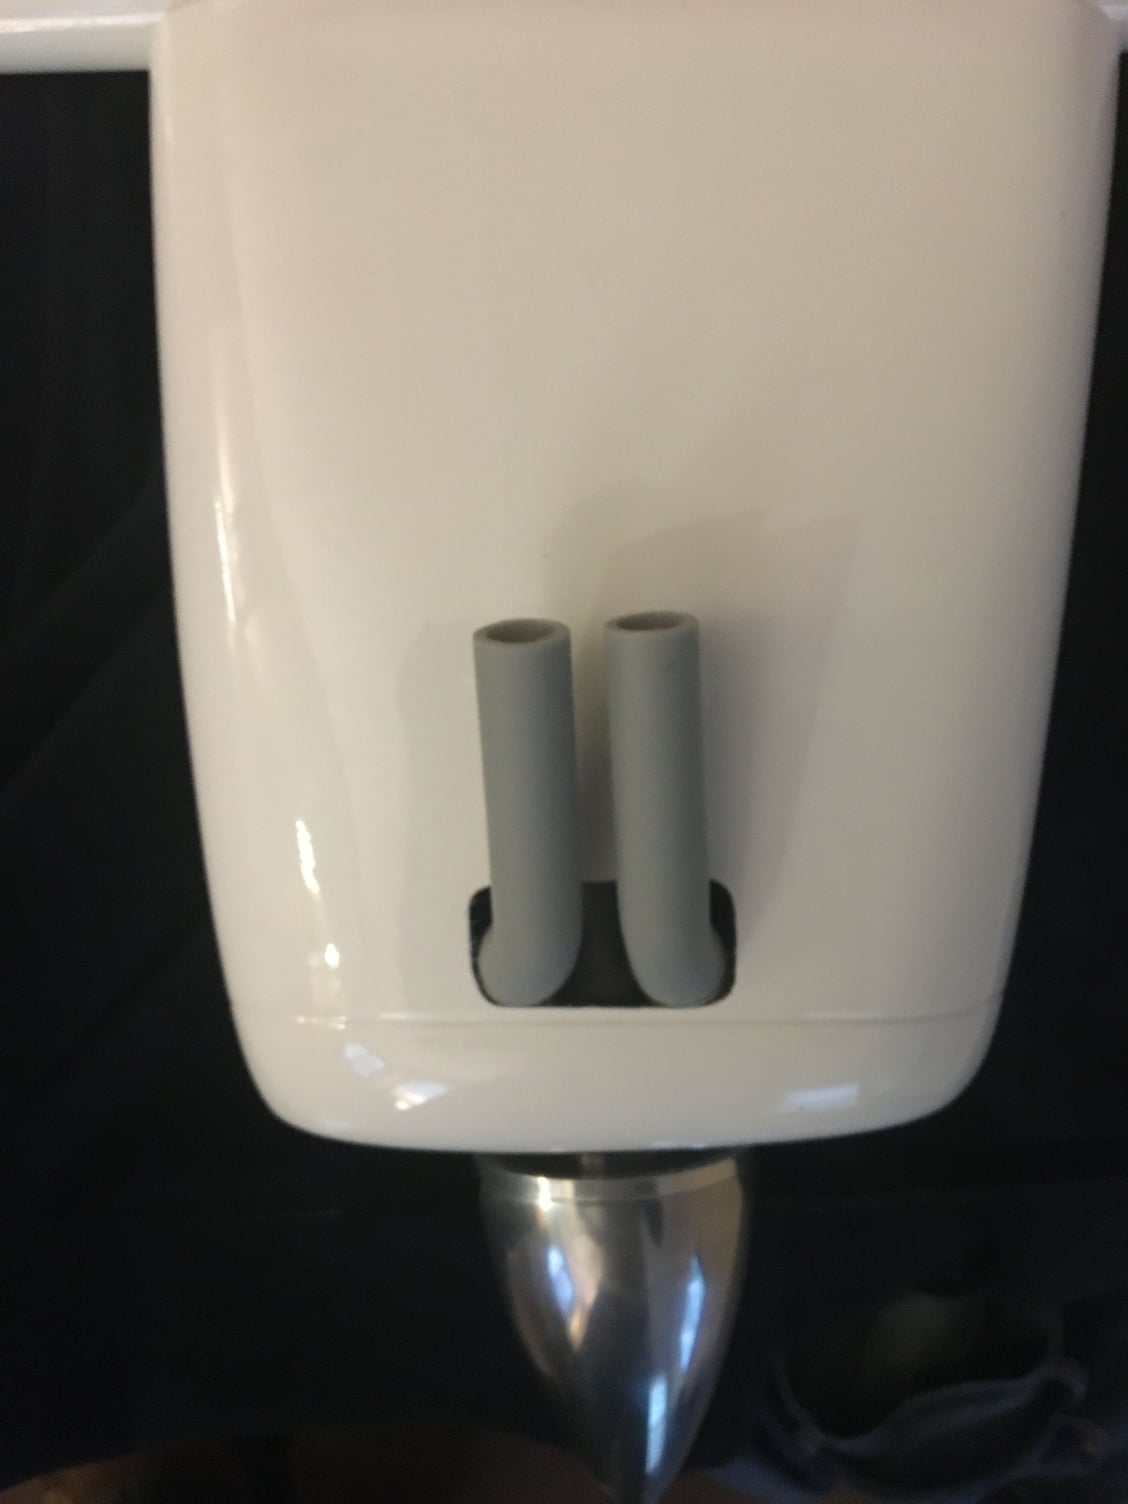
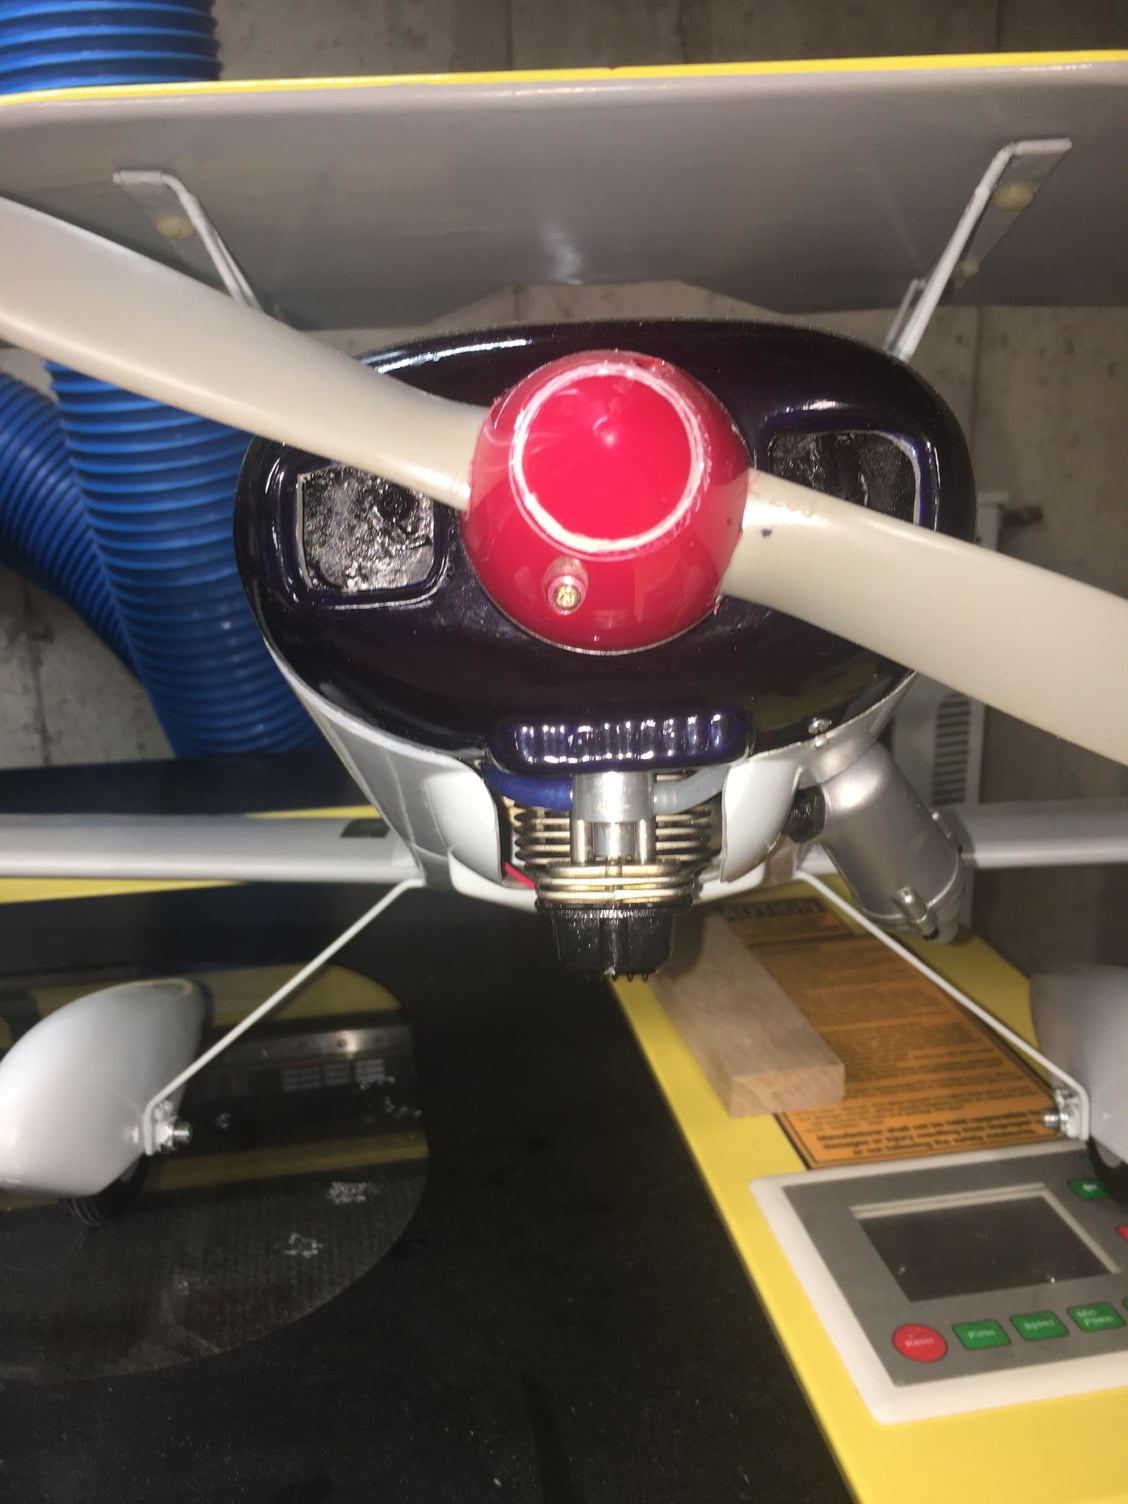
Rowdog, here's an simple illustration of how an air dams works to remove pressurized air from within a cowl.
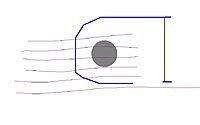
A simple rear opening cutout helps to remove hot air from the cowl and works in some applications, especially in those situations where the engine head is protruding from the cowl. In cases where the engine head is fully enclosed within the cowl pressurized hot air can build up in the cowl and cause overheating issues.
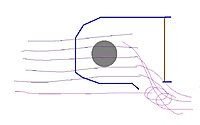
The use of an air dam in front of a rear opening in the cowl will create a turbulent low pressure zone which literally pulls hot air from the cowl. Even though implementing an air dam is more difficult than a simple cutout the size of the air dam cutout can be much smaller. Where the size of a simple cutout needs to be 2 to 3 times the area of the air inlet of the cowl for good cooling an exit cutout when using an air dam only has to be 1 times the area of the air inlet.
As acdii indicated, the use of inlet air baffles to direct airflow through the engine cooling fins is a very good thing.
A simple rear opening cutout helps to remove hot air from the cowl and works in some applications, especially in those situations where the engine head is protruding from the cowl. In cases where the engine head is fully enclosed within the cowl pressurized hot air can build up in the cowl and cause overheating issues.
The use of an air dam in front of a rear opening in the cowl will create a turbulent low pressure zone which literally pulls hot air from the cowl. Even though implementing an air dam is more difficult than a simple cutout the size of the air dam cutout can be much smaller. Where the size of a simple cutout needs to be 2 to 3 times the area of the air inlet of the cowl for good cooling an exit cutout when using an air dam only has to be 1 times the area of the air inlet.
As acdii indicated, the use of inlet air baffles to direct airflow through the engine cooling fins is a very good thing.
Last edited by Glowgeek; 11-16-2020 at 05:42 AM.
11-16-2020, 11:57 PM

You must be slightly clairvoyant mike, or have huge crystal balls. A flying mate and i were unloading some of his home brewed tequila we call 'snake eye' and i dropped a carton on my big toe, it took a half bottle of 190 proof to put the fire out and the hangover lasted for days.
ps rowdog, good cooling advice above if you need it.
11-17-2020, 06:29 AM
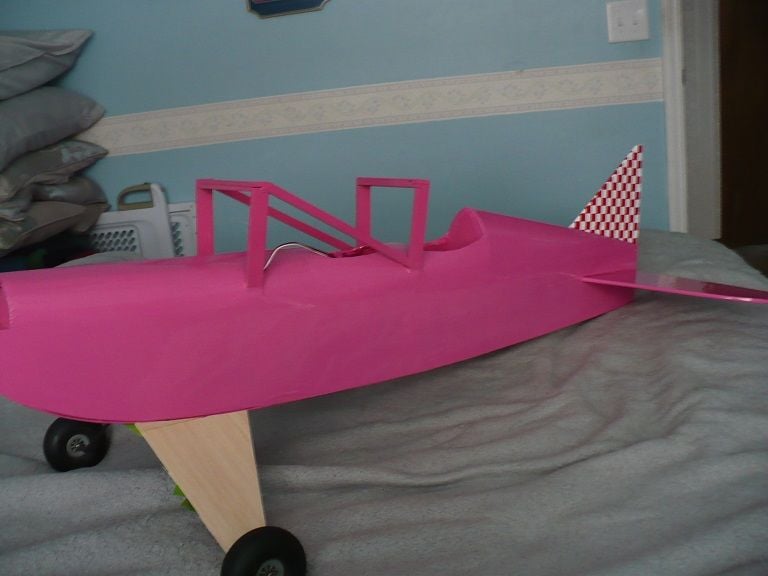
Hey good luck with the pink panther i'll be watching it's progress. What size, a pink saito fa56?
You must be slightly clairvoyant mike, or have huge crystal balls. A flying mate and i were unloading some of his home brewed tequila we call 'snake eye' and i dropped a carton on my big toe, it took a half bottle of 190 proof to put the fire out and the hangover lasted for days.
ps rowdog, good cooling advice above if you need it.
 You are correct Pinky Saito is a .56 and she is a real gem!
11-17-2020, 01:38 PM
You are correct Pinky Saito is a .56 and she is a real gem!
11-17-2020, 01:38 PM
My Feedback: (102)
Join Date: Dec 2001
Location: Colonial Beach, VA
Posts: 20,370
Likes: 0
Received 25 Likes
on
25 Posts
On occasion the parts your gluing get glued to the wax paper, have the perfect tool for freeing them from the wax paper. My 56's are missing, I didn't happen to have given them to some of you and forgot, did I. Thanks
I go January 8th for a biopsy, it doesn't sound very pleasant. Tomorrow I can re-run the 120-S and get it sent.
PS, it's wearing one of the FireBall plugs.

I go January 8th for a biopsy, it doesn't sound very pleasant. Tomorrow I can re-run the 120-S and get it sent.
PS, it's wearing one of the FireBall plugs.
Last edited by Hobbsy; 11-17-2020 at 01:40 PM.
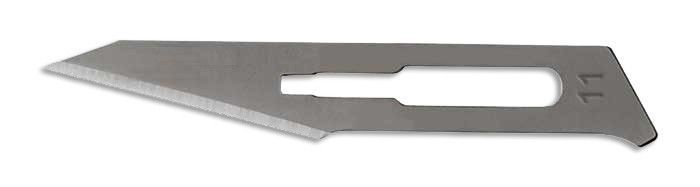
11-17-2020, 02:00 PM
I ,like the removal tool! For a lot of my finer cutting work I have gone from a Xacto knife and a No. 11 blade to a No. 5 scapel handle and blades I picked up from Brodak.