


DynaFlite Super Decathlon Kit Bash and Build

 11-27-2013, 08:38 AM
#52
Matt,
I've been following your progress and would like to see your covering ideas. I'm almost to covering stage on mine and while the star burst is classic, it is dated. I'm debating some sort of update on it myself. I built the tail to plans with lightning holes, moved the servos to the cabin to move the weight forward as much as possible. Power will be os 200 4stroke
I've been following your progress and would like to see your covering ideas. I'm almost to covering stage on mine and while the star burst is classic, it is dated. I'm debating some sort of update on it myself. I built the tail to plans with lightning holes, moved the servos to the cabin to move the weight forward as much as possible. Power will be os 200 4stroke
11-27-2013, 08:48 AM
#53
Couple ideas I have for the bottom. I've always liked the look on the left , had it on a sig wonder about 10 years ago.. it really makes the bursts pop out of the wing. the right is a variation on the standard decathlon scheme to make it look like a flag…
I'm very undecided on these parts as of yet...
Last edited by mattnew; 11-27-2013 at 08:49 AM. Reason: left/right backwards
11-27-2013, 10:01 AM
#54

My Feedback: (4)
Join Date: Oct 2008
Location: Owatonna,
MN
Posts: 167
Likes: 0
Received 0 Likes
on
0 Posts
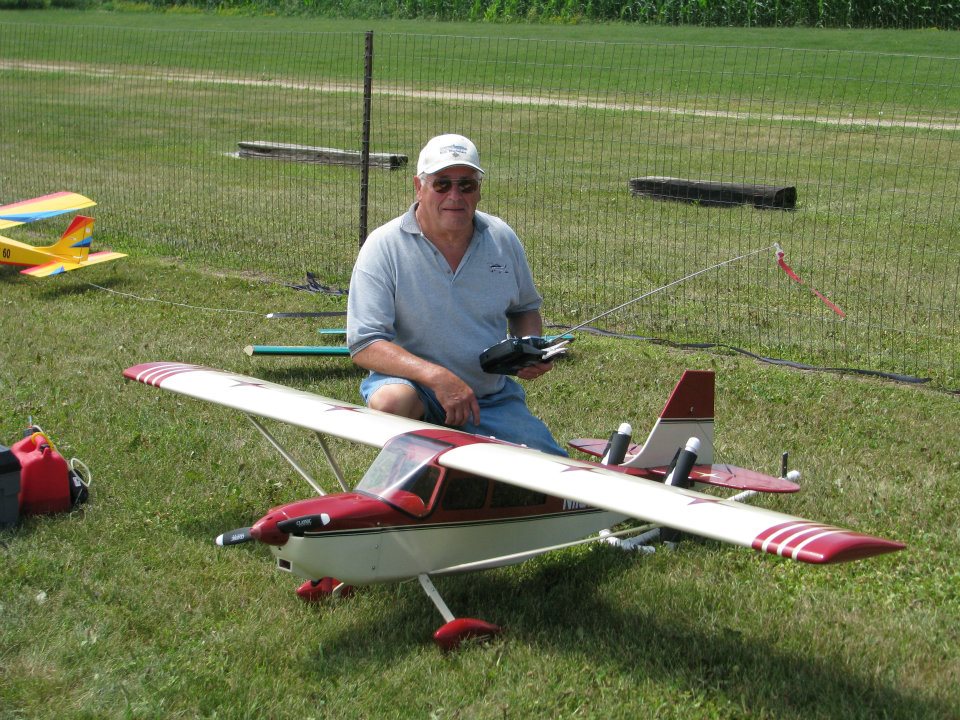
Here is my Decathlon with non-traditional paint scheme taken (in part) from a Canadian registered airplane. Mine has been flying since 2010 and started life with a 25cc converted Homelite. I later came by a 30cc Homlite and two years ago installed a DLE-30. I don't remember the weight needed up front to balance the airplane but I made a contoured box out of balsa to hold an appropriate amount of BB's. That box was then filled with epoxy and then secured on the lower edge of the firewall. The box is only 1/2 inch wide and follows the contour of the bottom edge of the firewall so it doesn't look like just a lump of weight in there. Course you can't see it anyway with the cowl on. This model weighed in at a rather hefty 18# but it was covered with Sig Koverall, and painted with Krylon. Although the airframe appears to be over-built as was pointed out earlier, it is a tough bird. Before I had the DLE installed, I had a flame out during climb-out. The inevitable stall resulted in a heart wrenching thud as it angled into the ground. The damage was limited to a bent wing joiner tube, an aileron servo mount pulled loose, and the port side strut mounts pulled loose. Repairs were easy to make and she flies very nicely. If you are flying off a less than smooth field I suggest reinforcing the landing gear by simply making another gear but without the bends for the wheel pants and wheels. Fasten the two together using machine screws. The stock gear tends to bend on even a slightly rough landing -- although if you can bring weight into the 14 - 16# range as the specs indicate, the stock gear may be ok.
11-27-2013, 12:21 PM
#55
Member
My Feedback: (1)
Join Date: Dec 2004
Location: Rantoul,
IL
Posts: 36
Likes: 0
Received 0 Likes
on
0 Posts
Couple ideas I have for the bottom. I've always liked the look on the left , had it on a sig wonder about 10 years ago.. it really makes the bursts pop out of the wing. the right is a variation on the standard decathlon scheme to make it look like a flag…
I'm very undecided on these parts as of yet...
Nice change, I vote fit the one on the left as it is different than the standard wing bottom but still ties into the overall design of the model. How did you create these drawings?
11-27-2013, 04:14 PM
#57
Join Date: Sep 2013
Posts: 171
Likes: 0
Received 0 Likes
on
0 Posts
I have one framed up and made some changes along the way. Reading that this plane comes out tail heavy, I redesigned the area in front of the cabin. Not a structural redesign mind you. My camera is on the blink, but getting a new one. Will post pics. soon.
Anyways, the little turtledeck behind the firewall to the front of the cabin is removable with buttonhead screws.That was just WAAAY too much space to have ONLY the fuel tank in. They way the plans have it, that area is also inaccessible once sheeted in. The upper area I have located battery packs (3300ma receiver pack, battery for on board glow & another for full set if LED nav lights) Undo some more button head screws and that upper deck comes out to access fuel tank. Undo 4 screws inside and the fuel tank deck comes out. Under that is located throttle servo and another servo for parachute drop that I built inside fuse. Rudder servo w pull-pull setup is forward of CG line, as are 2 servos for elevators. Purchased a carbon fiber tailwheel assembly to further reduce tailweight.
As soon as I have tailfeathers finished & mounted, and put the Saito 1.80 up front I will check the balance & weight.
11-27-2013, 05:48 PM
#58
Member
Join Date: Feb 2004
Location: Barrington,
IL
Posts: 63
Likes: 0
Received 0 Likes
on
0 Posts
Loop,
I'm using koverall, nitrate to afix, polycrylic and krylon paint.
What was your process? This is my first attempt with the poly. I did one previous plane in fabric with all dope still learning the process
I'm using koverall, nitrate to afix, polycrylic and krylon paint.
What was your process? This is my first attempt with the poly. I did one previous plane in fabric with all dope still learning the process
12-05-2013, 08:49 AM
#59
@funnotcrazy:
I did something similar with the nose:
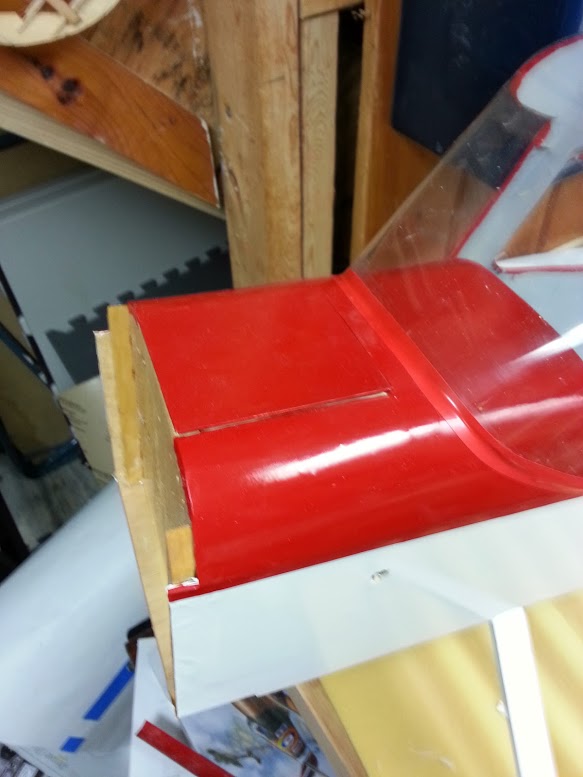
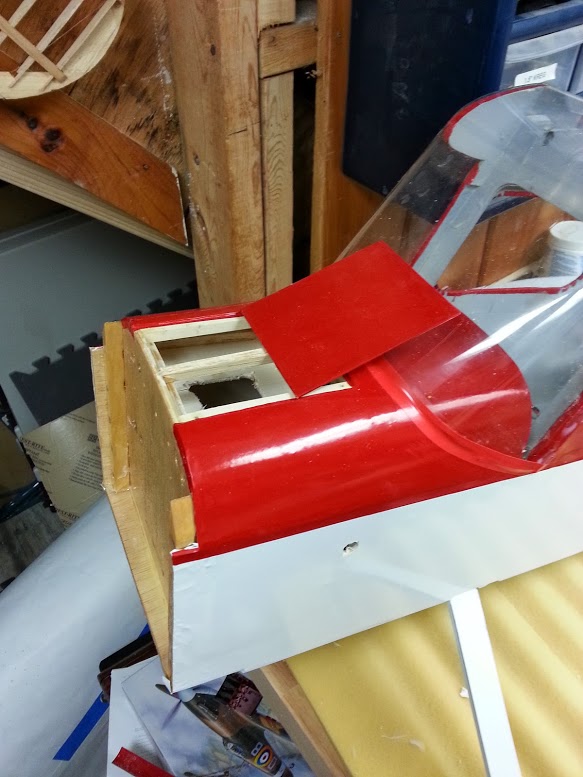
The intent here is that I'll mount the ignition device in here and have somewhat easy access to it should it be needed. It may never be needed but the option is there. Its also accessible from the bottom through a drilled access hole.
I did something similar with the nose:
The intent here is that I'll mount the ignition device in here and have somewhat easy access to it should it be needed. It may never be needed but the option is there. Its also accessible from the bottom through a drilled access hole.
12-10-2013, 09:24 PM
#61
Senior Member
Join Date: Jul 2004
Location: Lindenwold,
NJ
Posts: 155
Likes: 0
Received 0 Likes
on
0 Posts
MattneW your build looks awesome! Congrats! Can you please measure the distance between the ground and the highest point on the fuse with the plane sitting on its landing gear? Also the width of the fuselage at its widest point.
I would like to build one of these but need to know if I can fit it in my car first.
I would like to build one of these but need to know if I can fit it in my car first.
12-11-2013, 07:07 AM
#63
Thanks for the kind words Scotty
with 3.5" wheels the body sits at 19.5" tall at the top of the front canopy/cockpit
Width wise the body is about 7.5" at its widest, with the landing gear being ~16" wide.
These numbers are within an inch… I just rough eyeballed it with a tape measure, hopefully its close enough for you.
with 3.5" wheels the body sits at 19.5" tall at the top of the front canopy/cockpit
Width wise the body is about 7.5" at its widest, with the landing gear being ~16" wide.
These numbers are within an inch… I just rough eyeballed it with a tape measure, hopefully its close enough for you.
12-11-2013, 08:59 PM
#64
Senior Member
Join Date: Jul 2004
Location: Lindenwold,
NJ
Posts: 155
Likes: 0
Received 0 Likes
on
0 Posts
Thank you very much! This helps a lot. Could you also please measure the highest point on the vertical stabilizer from the ground and the length of the fuselage that is behind the main landing gear legs? This will help me determine if I need to build it with a removable tail.
Thanks for the kind words Scotty
with 3.5" wheels the body sits at 19.5" tall at the top of the front canopy/cockpit
Width wise the body is about 7.5" at its widest, with the landing gear being ~16" wide.
These numbers are within an inch… I just rough eyeballed it with a tape measure, hopefully its close enough for you.
with 3.5" wheels the body sits at 19.5" tall at the top of the front canopy/cockpit
Width wise the body is about 7.5" at its widest, with the landing gear being ~16" wide.
These numbers are within an inch… I just rough eyeballed it with a tape measure, hopefully its close enough for you.
12-13-2013, 01:39 PM
#65
Thank you very much! This helps a lot. Could you also please measure the highest point on the vertical stabilizer from the ground and the length of the fuselage that is behind the main landing gear legs? This will help me determine if I need to build it with a removable tail.
vertical stab is 18ish
again, sorry on the -ish numbers, but I don't have the rudder connected yet.. but those should be close enough.
I'm not sure you want the added weight a detachable tail brings with it….
Just weighed my covered body and wings, 6.5lbs. I'm starting to get close to my goal limits… I am really hoping to come in under 12….
12-13-2013, 05:25 PM
#67
Member
Join Date: Feb 2004
Location: Barrington,
IL
Posts: 63
Likes: 0
Received 0 Likes
on
0 Posts
Your covering looks good mattnew. Your weight sounds incredible. I've had to change my plans. Preped the plane for covering, waited til everyone was in bed, and went out to the garage with my dope. I was happily applying my first coat of nitrate to the first wing half when my wife came to the door and informed me I was stinking up the whole house. So I'm going to use solartex and paint instead. I've been away from the hobby for about 7 years and I really don't remember dope being that bad. Oh well, there are other methods. Just out $150 for dope and koverall....
12-14-2013, 12:11 PM
#68
I had originally planned to go with solartex. In some ways I wish I had. .. But with the tower discounts I ended up going with Coverite due to cost. .. I already have more into this plane than I originally expected.
Last edited by mattnew; 12-14-2013 at 12:15 PM.
12-14-2013, 08:58 PM
#69
Member
Join Date: Feb 2004
Location: Barrington,
IL
Posts: 63
Likes: 0
Received 0 Likes
on
0 Posts
I'm with you there. I enjoy building scale most of all and this is sort of a trial run back into it. Hence the dope and now solartex and paint. I originally going to power this plane with a g26 I had. Its vanished some how, in a move or something. So I found a os 200 relatively cheap I'm going to use. Many other items I thought I had, have had to replace. Oh well, I'm still enjoying every minute! I can't believe I gave this up for so long. Worth the price of readdmission! On a small break now to finish a cabinet, then ill be back at it. Ill post some pics then. Next up hostetler wedell williams
12-15-2013, 10:07 AM
#70
Funny, I took about an 8-10 year break that I've only recently broken where the only times I was flying was when I went to my parents and flew Dad's planes. Through college and most of my 20's I didn't have much time for hobbies...Now that I have kids of my own I've started it up again in the hopes of giving them an interest in planes and hoping to pass on everything my dad had given me over the years that we had build and flew together.
The Decathlon is my first "giant scale" and my 2nd full build since I got back to the hobby... I guess by today's standards it isn't giant anymore… but it is my easy build to get a large plane experience under my belt… and larger plane experience when it comes to flying… though that part isn't really too new to me...
I ended up replacing almost everything I had.. I still have it.. but 10 years in an attic is hell on electronics and whatnot… and I love buying new toys :-)
Since you like scale, you might like the other plane I have on my bench at the moment.. I'm trying to get the decathlon finished so I can get this one done this winter as well...
I know I've posted pics of this before… but I love it and can't wait to have it done.
12-21-2013, 08:56 PM
#72
Junior Member
Join Date: Dec 2012
Location: Kamloops,
BC, CANADA
Posts: 4
Likes: 0
Received 0 Likes
on
0 Posts
Subscibed
New to forum so apologise ahead of time for possible mistakes.Been following and enjoying your thread.
Just never subscibed before. Thank you for your thread
bsheridan you shouldn't get air from your garage into your home!! This is a potential carbon monoxide (exhaust) threat to you and your family.
You should determine the cause of the leak and repair it ASAP. My modeling room is in my home and to avoid the smell getting into the rest of the house I have a small variable speed window fan on while modeling to create a negative pressure in my room. It isn't 100% effective but better than not having it. Maybe once the leak into your home is repaired this will help you as well.
Dan
Your covering looks good mattnew. Your weight sounds incredible. I've had to change my plans. Preped the plane for covering, waited til everyone was in bed, and went out to the garage with my dope. I was happily applying my first coat of nitrate to the first wing half when my wife came to the door and informed me I was stinking up the whole house. So I'm going to use solartex and paint instead. I've been away from the hobby for about 7 years and I really don't remember dope being that bad. Oh well, there are other methods. Just out $150 for dope and koverall....
12-22-2013, 08:17 AM
#73
B-17 is the old Royal kit. My dad had started it in the 70's and never had gotten a chance to finish it, mainly b/c .19 sized engines just weren't reliable enough back then, and with no engines.. not a whole lot of point in finishing the plane. I'm converting it to e-flite power 15's and finishing it in flite metal ( if my order ever arrives… another story entirely… ) and hoping to have it flying by the spring. 77" wing span, hope to have it come in at under 10 lbs… more likely it will be 12 lbs when finished though.
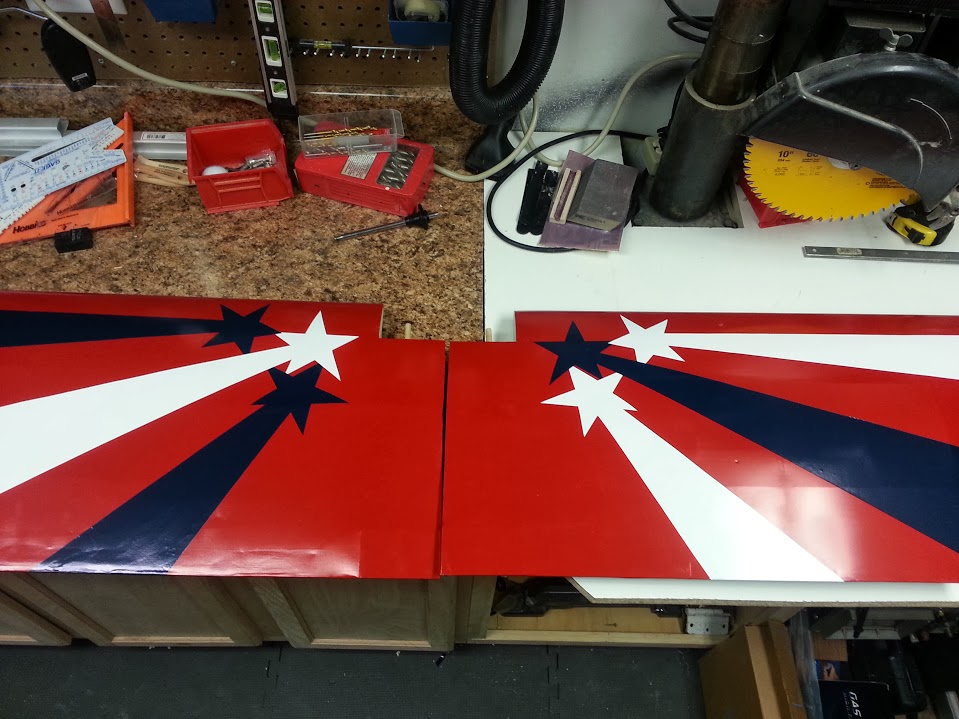
still have to put outline tape around the stars, but here is the top of the wing, more or less done. I think it came out pretty good.
still have to put outline tape around the stars, but here is the top of the wing, more or less done. I think it came out pretty good.
01-03-2014, 10:42 AM
#74
Junior Member
Join Date: Feb 2012
Location: AlexandriaVA
Posts: 4
Likes: 0
Received 0 Likes
on
0 Posts
A previous post mentioned that the thread wasn't generating a lot of interest... Well, I'm interested! Maybe back in November most guys hadn't started their winter build project.
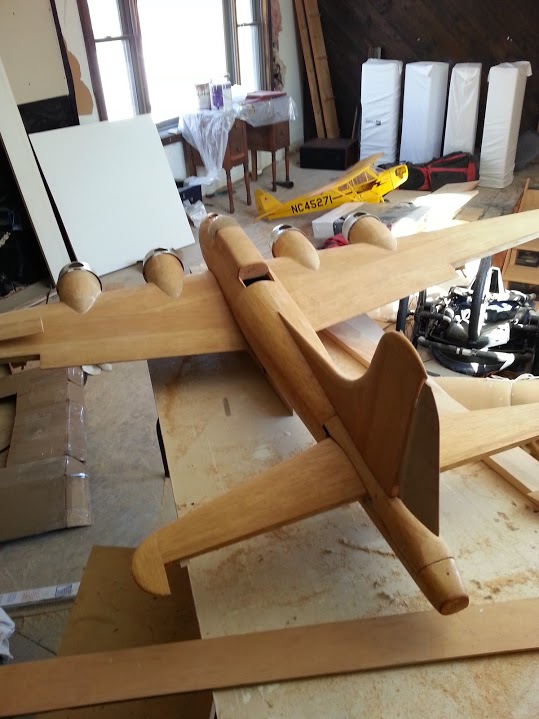
I just started a build of this kit. I am planning on using an O.S. GT33 in it... I've completed the tail pieces and am mostly done with the first wing. Was just about to start sheeting the bottom.
Has anyone noticed that the manual does not include a step to install the aft spar on the underside of the wing?
(This is my first true kit, so I'm trying to cover all my bases and not miss something. The notches for the aft spar are there, it seems like there is enough lumber with the kit to do 2 aft spars on each wing.)
01-03-2014, 11:09 AM
#75
Oso M
Step 14, page 10: Glue the 1/8" x 3/8" x 42" basswood bottom aft spar in place, being careful to keep the ribs straight over the plans.
There should be a top aft spar and a bottom aft spar...
… The wing construction instructions leave a lot to be desired, as you have to go over steps multiple times for each wing and backtrack. Its quite easy to lose your spot.
OS GT33 is my engine of choice as well..
more pictures shortly, I'm trying to finish getting things covered. Wings 90% done, body details need to be buttoned up.