


DynaFlite Super Decathlon Kit Bash and Build
 05-19-2013, 03:08 PM
#26
Thats it... we are getting new wood and redoing the tail.... 
ORIGINAL: RCKen
Sorry that it took me so long to get the numbers on the weight for my tail feathers. I built them straight off the plans. The only modifications I did was to install Robart Hinge Points for my hinges. The weight of the vertical stabilizer, rudder, horizontal stabilizer, elevators, and all the hinges was 9.125 oz. This weight is before I have sanded the surfaces.
Sorry that it took me so long to get the numbers on the weight for my tail feathers. I built them straight off the plans. The only modifications I did was to install Robart Hinge Points for my hinges. The weight of the vertical stabilizer, rudder, horizontal stabilizer, elevators, and all the hinges was 9.125 oz. This weight is before I have sanded the surfaces.
Hope this helps
Ken
 05-21-2013, 10:17 AM
#27
Not much progress... my dog took up my weekend...

tried something new though... ambroid. Ok, new to me.. there had been so many people recommending it for sheeting that i decided it was worth a try... and my LHS carries it.


tried something new though... ambroid. Ok, new to me.. there had been so many people recommending it for sheeting that i decided it was worth a try... and my LHS carries it.
10-15-2013, 05:56 PM
#28

My Feedback: (9)
Join Date: Nov 2008
Location: SunShineState FL
Posts: 12
Likes: 0
Received 0 Likes
on
0 Posts
Ouch, poor dog, he looks like Indian Chieftain, I hope he/she Ok and well by now...
How is your experiment with building 13-14Lb Decathlon going? Did you finish building? Did you fly it already? I've got DL-50 laying around, so doing research before I buy kit... Love the way Decathlon fly, awesome plane. Any opinion on that?
Here what inspired me to look at this Decathlon kit:
http://www.youtube.com/watch?v=jIT5c-99ung
Not sure what kind of kit is that, but SPE-40 is defiantly is not enough Omph to hover, but Ok to fly around, so thinking that DL-50 might just "fit the bill". Any thoughts or comments is greatly appreciate.
Last edited by cap3Der; 10-15-2013 at 07:39 PM.
10-22-2013, 06:57 AM
#29
I haven't posted in a while.... Life got in the way. I crashed my dad's Ultimate and I live by the "you break it you fix it" motto so I had to go and repair that plane....


but I have made some progress....
for example the wing is very close to done.... just need to mount some servos.

The wingtips are going to get a short cap on them... similar to the new decathlon extreme.
and we got an engine for the plane....

we have started on the body as well, and should have some pictures shortly of that process.
fewer changes in the design as I have gone along...
- I cheated and used some CA... deciding there was a time and place for everything. There were a couple components to building the wing where pinning up and using slow curing glue wasn't practical. that and it wasn't an area I'd be sanding later made me opt for the quick cure CA over the titebond I'd been using. By and large though I'm still mainly using titebond as my glue of choice.
Servos for the plane came in as well. I got the last batch of Futaba's S3051HV servos, which are a high voltage, high torque metal gear servo with ~ 140oz/in of torque and only 40 bucks... its too bad they discontinued them. I need 2 more still... Futaba has a 3071HV that I might spring for to finish off the plane with, but they are $20 more b/c they are SBUS compatible... Annoying...I've also been watching for reviews of Tactic's new line of servos... they seem like they could be promising...
but I have made some progress....
for example the wing is very close to done.... just need to mount some servos.
The wingtips are going to get a short cap on them... similar to the new decathlon extreme.
and we got an engine for the plane....
we have started on the body as well, and should have some pictures shortly of that process.
fewer changes in the design as I have gone along...
- I cheated and used some CA... deciding there was a time and place for everything. There were a couple components to building the wing where pinning up and using slow curing glue wasn't practical. that and it wasn't an area I'd be sanding later made me opt for the quick cure CA over the titebond I'd been using. By and large though I'm still mainly using titebond as my glue of choice.
Servos for the plane came in as well. I got the last batch of Futaba's S3051HV servos, which are a high voltage, high torque metal gear servo with ~ 140oz/in of torque and only 40 bucks... its too bad they discontinued them. I need 2 more still... Futaba has a 3071HV that I might spring for to finish off the plane with, but they are $20 more b/c they are SBUS compatible... Annoying...I've also been watching for reviews of Tactic's new line of servos... they seem like they could be promising...
10-22-2013, 07:07 AM
#30
Ouch, poor dog, he looks like Indian Chieftain, I hope he/she Ok and well by now...
How is your experiment with building 13-14Lb Decathlon going? Did you finish building? Did you fly it already? I've got DL-50 laying around, so doing research before I buy kit... Love the way Decathlon fly, awesome plane. Any opinion on that?
Here what inspired me to look at this Decathlon kit:
http://www.youtube.com/watch?v=jIT5c-99ung
Not sure what kind of kit is that, but SPE-40 is defiantly is not enough Omph to hover, but Ok to fly around, so thinking that DL-50 might just "fit the bill". Any thoughts or comments is greatly appreciate.
How is your experiment with building 13-14Lb Decathlon going? Did you finish building? Did you fly it already? I've got DL-50 laying around, so doing research before I buy kit... Love the way Decathlon fly, awesome plane. Any opinion on that?
Here what inspired me to look at this Decathlon kit:
http://www.youtube.com/watch?v=jIT5c-99ung
Not sure what kind of kit is that, but SPE-40 is defiantly is not enough Omph to hover, but Ok to fly around, so thinking that DL-50 might just "fit the bill". Any thoughts or comments is greatly appreciate.
Thanks, the dog is fine, we spent the night in the puppy ER... but he was fine less than 24 hours later.
Still building...I haven't weighed anything lately though... but I still think I'm going to be under 15lbs when its all done.
DL-50... the plane was originally designed to fly on a 1.20 four stroke... which is 2.5x smaller than a DL-50. For the weight you add going to a DL-50 I'd start worrying about the wing loading.
10-26-2013, 04:42 AM
#31
My Feedback: (9)
Join Date: Nov 2008
Location: SunShineState FL
Posts: 12
Likes: 0
Received 0 Likes
on
0 Posts
Mattnew, thanks for posting, looking at the build with a great interest. I think Decathlon in the vid is RC Guys from Canada:
http://www.rcguys.com/decathlon.htm
Thanks for posting, once again, build looks really awesome!
http://www.rcguys.com/decathlon.htm
Thanks for posting, once again, build looks really awesome!
10-26-2013, 05:01 AM
#32
My Feedback: (9)
Join Date: Nov 2008
Location: SunShineState FL
Posts: 12
Likes: 0
Received 0 Likes
on
0 Posts
Yes, you're right, power and dimensions wise, but weight, since this kit was designed back in the days when Fuji and Zenoah engines had a magneto for ignition and weighted actually more the a DL-50! And no, of cause I don't want to yank out firewall out of the plane that was designed to fly around engine with 1/2 the power, so I was thinking to bash this kit to made it to accommodate larger 50CC brute. So if you going to build fuse next post some pictures, I'd be greatly appreciate! And good luck and best wishes with a build.
10-26-2013, 02:08 PM
#33
Member
My Feedback: (1)
Join Date: Dec 2004
Location: Rantoul,
IL
Posts: 36
Likes: 0
Received 0 Likes
on
0 Posts
Just read this build thread and will follow along. I have one of these kits in the garage that was started by someone then they quit on it. I purchased at an auction for a little money, but haven't started the building process yet. It is in bad shape, I am not sure what happened but the whole fuse has glue all over it and the tail is broken in pieces. I think this will be my winter project here in the cold mid-west.
This fall I really wanted a Decathlon so I purchased a used RC Guys Decathlon and will be picking it up tomorrow. Will be using an OS GT 33 for power. I want to get it in the air before winter hits.
Hope your plane is in the air soon.
kman
This fall I really wanted a Decathlon so I purchased a used RC Guys Decathlon and will be picking it up tomorrow. Will be using an OS GT 33 for power. I want to get it in the air before winter hits.
Hope your plane is in the air soon.
kman
10-27-2013, 05:57 PM
#34
Ask and you shall receive.....
Did some weighing today
tail 9 oz
wings 2 x 1lb 2 oz
body so far 1lb 5oz,
engine 42 oz = 2 lbs 10oz
radio 12 oz ( receiver + 6 servos )
add it all up and I'm currently at 7lbs 8oz... I still need covering/paint,pilot,gas tank,wheels,canopy, smoke... and a couple hinges... I think the body will be close to 2lbs when finally done.... maybe a little bit more.. The main components are installed... its all the pretty stuff that is left.
@cap3der: At the end of the day I guess you have to decide what your expectations are... I don't really see the Decathlon being someone's favorite 3D ship as its original roots are as an aerobatic trainer and not an unlimited class aerobatic plane. ( I have nothing against 3d... I have a funtana as well for that... ) But maybe. You also have to think about cost though too... Your talking about a $700 dollar 50cc vs $350 for the 33cc engine. Since they recommend a 25cc lead weight from yesteryear ... you gotta think the new 30cc classes of engines would make this plane a bit ballistic on their own...
The other comment I'd make is this plane is smaller than its wingspan implies.... smaller than my fathers 1/4 scale clipped wing cub ( sig )... to give you an idea.
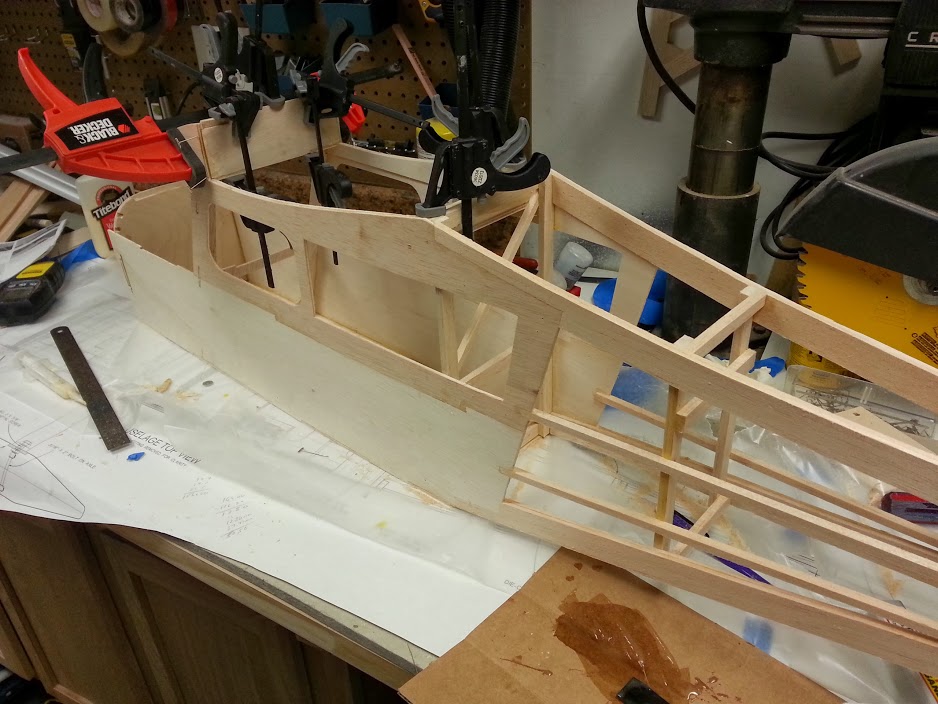
@kman.... the body is tricky to put together... if you follow the instructions they go something like this...
- frame everything up as a mock up, ensuring things are square.
- glue the sides to the 3 main formers.
- glue the bottom to the sides.
.... well... if you've mocked everything up, and glued the sides to the formers... its awful hard to get the glue on the bottom sheet thats pinned under everything...I have a feeling thats where the "glue went everywhere" step happened since people newer to building may not realize the complications involved here until they have the glue out...
I actually mocked everything up and then took some time to think about how to get things glued, I ended up
- gluing formers to left side at 90 degrees
- mock up body again, glue left side + formers to bottom plate, with right side present and mocked up to ensure straightness
- once dry, remove right side, glue up and repositioned.
Things turned out great... took a bit longer but we are straight and everything is nice and perpendicular.
The tail of the body was similar... it took a bit of effort to keep everything square and get things glued up. Lets face it.. light ply warps and you have to figure out how to unwarp it and clamp it while it dries.
I think I got a bit lucky here but overall I'm happy with the results.
Did some weighing today
tail 9 oz
wings 2 x 1lb 2 oz
body so far 1lb 5oz,
engine 42 oz = 2 lbs 10oz
radio 12 oz ( receiver + 6 servos )
add it all up and I'm currently at 7lbs 8oz... I still need covering/paint,pilot,gas tank,wheels,canopy, smoke... and a couple hinges... I think the body will be close to 2lbs when finally done.... maybe a little bit more.. The main components are installed... its all the pretty stuff that is left.
@cap3der: At the end of the day I guess you have to decide what your expectations are... I don't really see the Decathlon being someone's favorite 3D ship as its original roots are as an aerobatic trainer and not an unlimited class aerobatic plane. ( I have nothing against 3d... I have a funtana as well for that... ) But maybe. You also have to think about cost though too... Your talking about a $700 dollar 50cc vs $350 for the 33cc engine. Since they recommend a 25cc lead weight from yesteryear ... you gotta think the new 30cc classes of engines would make this plane a bit ballistic on their own...
The other comment I'd make is this plane is smaller than its wingspan implies.... smaller than my fathers 1/4 scale clipped wing cub ( sig )... to give you an idea.
@kman.... the body is tricky to put together... if you follow the instructions they go something like this...
- frame everything up as a mock up, ensuring things are square.
- glue the sides to the 3 main formers.
- glue the bottom to the sides.
.... well... if you've mocked everything up, and glued the sides to the formers... its awful hard to get the glue on the bottom sheet thats pinned under everything...I have a feeling thats where the "glue went everywhere" step happened since people newer to building may not realize the complications involved here until they have the glue out...
I actually mocked everything up and then took some time to think about how to get things glued, I ended up
- gluing formers to left side at 90 degrees
- mock up body again, glue left side + formers to bottom plate, with right side present and mocked up to ensure straightness
- once dry, remove right side, glue up and repositioned.
Things turned out great... took a bit longer but we are straight and everything is nice and perpendicular.
The tail of the body was similar... it took a bit of effort to keep everything square and get things glued up. Lets face it.. light ply warps and you have to figure out how to unwarp it and clamp it while it dries.
I think I got a bit lucky here but overall I'm happy with the results.
10-27-2013, 06:03 PM
#35
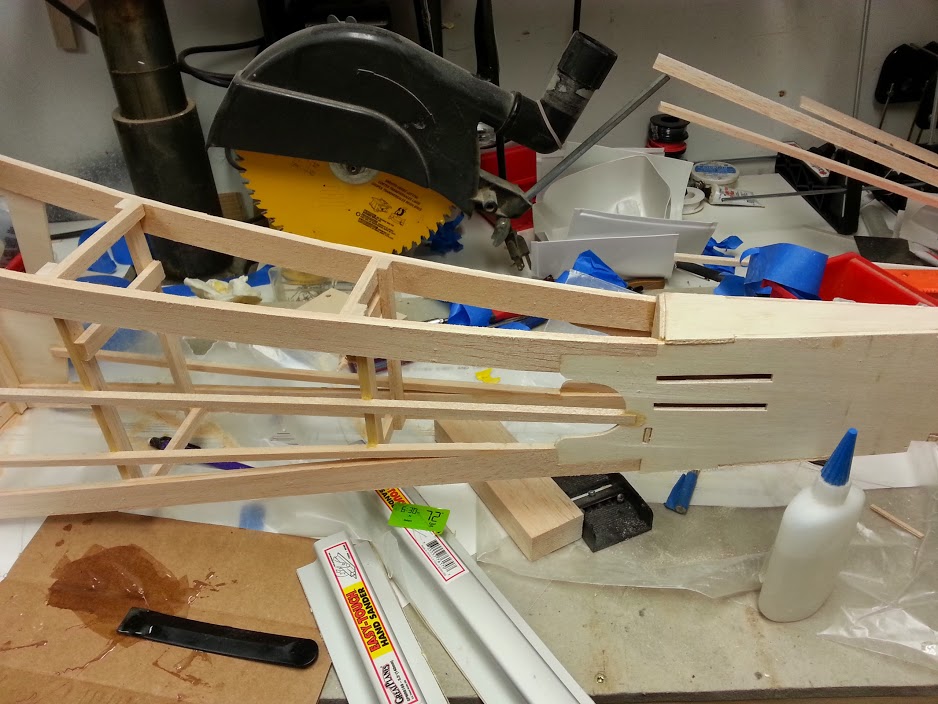
One thing I changed that added some weight....There are a bunch of sections where the instructions start with "laminate the 2 1/8" light ply formers together" .... I swapped those out for Midwest 1/4" ply.
Why?
- because no matter how much weight I used to flatten out that 1/8" lite ply... two warped piece of laminated ply = 1 warped former. I had no luck flattening these out.
- even laminated...the lite ply was super flexible... I didn't trust it for things like my engine mount area.
So, the 1/4" ply was flatter and heavier than the 2 pieces of light ply.. but it seemed stronger too... We'll see if it makes a difference... probably not.
oh, btw.... 1/8" light ply is actually 3/32" thick in this kit... so I had to account for the changes in thickness here as well
10-28-2013, 05:09 PM
#37
...
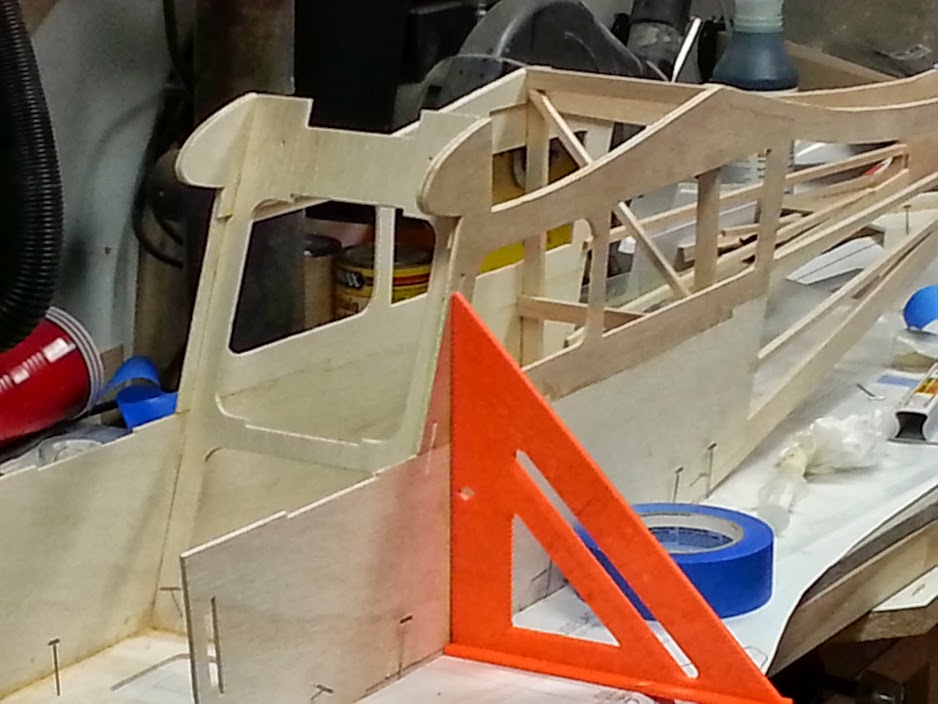
There are a number of threads that discuss the size of formers 5 and 6 of the body and how they differ between the overhead plan view of the body and the individual former buildup views. I think general consensus on this was the overhead view was right, the former drawings by themselves were wrong.
I followed this, made the formers to fit the overhead view.....the thing about that is that the overhead view for this portion is really at an angle from what reality is, since this portion of the plane doesn't sit level on the plan, it is raised up. I tried it , I fiddled with it, I had to do some serious clamping since the formers were smaller to get things to go together correctly, in the end the smaller formers put some torque onto the body so that while the bottom was straight as an arrow and the tail was inline with the body, the center section top became twisted... and not to my liking. since I knew my body was straight prior to installed the formers I started popping joints to see where the stress was and sure enough, it was being caused by the formers 5 & 6.
Anyway, I remade the formers using the larger former plans for 5 and 6 and things slid together 10 times easier.. .no clamping required, just a couple pins to ensure good contact while the glue dried.
Just something for people to think about. The dimensions are different between the two.. but I think the former plans are the ones you should go with.
10-30-2013, 05:15 PM
#38
My Feedback: (9)
Join Date: Nov 2008
Location: SunShineState FL
Posts: 12
Likes: 0
Received 0 Likes
on
0 Posts
Thank you for numbers mattnew. The build looks really good. I've got Dle 50 already, but I can see how it would probably be too big for this aircraft, thanks to your pictures I've got some idea about its dimensions. I also got glow OS 120AX, will this engine be too small for this Decathlon, provided that I'm going to take my chance and not do a "laminated" tail feathers, and lets say use cable pull-pull system on both Rudder and Elevator?
10-31-2013, 07:32 AM
#39
Thank you for numbers mattnew. The build looks really good. I've got Dle 50 already, but I can see how it would probably be too big for this aircraft, thanks to your pictures I've got some idea about its dimensions. I also got glow OS 120AX, will this engine be too small for this Decathlon, provided that I'm going to take my chance and not do a "laminated" tail feathers, and lets say use cable pull-pull system on both Rudder and Elevator?
Well, if you already have the DLE50... :-)
Here is a review from Dynaflite's site
http://www.dynaflite.com/reviews/gpma0510-rce.html
"Dynaflite recommends engines sizes from 1.08 to 1.80 2-stroke, 1.20 to 1.60 4-stroke, and 1.5 to 2.1 gas. The instructions provide firewall details to install an O.S. 1.20 and the U.S. Engines 25 cc power plants. Installation of servos, battery, etc. is designed mid-way back in the fuselage tail section to offset the weight of the larger engines."
so your 120AX is right in the middle of the range of glow engines. The largest gas engine they recommend is 35cc ( 2.1ci ). I think the 120AX wouldn't be a bad choice, though it probably wouldn't give you unlimited vertical. It all depends on what you want....
10-31-2013, 08:26 AM
#40
Member
My Feedback: (1)
Join Date: Dec 2004
Location: Rantoul,
IL
Posts: 36
Likes: 0
Received 0 Likes
on
0 Posts
Thank you for numbers mattnew. The build looks really good. I've got Dle 50 already, but I can see how it would probably be too big for this aircraft, thanks to your pictures I've got some idea about its dimensions. I also got glow OS 120AX, will this engine be too small for this Decathlon, provided that I'm going to take my chance and not do a "laminated" tail feathers, and lets say use cable pull-pull system on both Rudder and Elevator?
I would say the 120 would be a better choice than the DLE50. It would be a lighter engine and not require as much additional weight to balance. If you go with the DLE, I would do some serious reinforcing of the firewall.
10-31-2013, 05:19 PM
#41
My Feedback: (9)
Join Date: Nov 2008
Location: SunShineState FL
Posts: 12
Likes: 0
Received 0 Likes
on
0 Posts
Yeah, if I could only use pipe there, then with 17X4W APC prop I get a 20Lb 1 Oz of static thrust... BTW thank you all for a links, but they are not mentioning which 120 they are using there, it very well might be a heavier 4-stroke Surpass...
Last edited by cap3Der; 10-31-2013 at 05:22 PM.
11-01-2013, 12:42 AM
#42

Join Date: Feb 2002
Location: Houston, TX
Posts: 1,329
Likes: 0
Received 0 Likes
on
0 Posts
In my case a lighter engine would not have helped. My SD came out tail heavy. That said, an 18" prop was about maximum for me unless I wanted to do some grass cutting. That may not be enough prop on the DLE50 unless you go with a 3-blade.
Have fun!
Bedford
Have fun!
Bedford
11-01-2013, 05:30 AM
#44
tail heavy is something I have been struggling with avoiding throughout the build... more pics shortly, But in short... my tail feathers currently weigh 9 oz.. and my engine weighs 43oz... the ratio of tail moment to engine moment from the CG is 3:1 so 9 oz on the tail balances 27oz at the engine. But I haven't included covering or the body that extends behind the CG,and that is going to easily be a lb or so. which means my tail is going to be heavier than my engine.... I will have to work to keep the plane balanced as I go forward.
11-03-2013, 06:10 PM
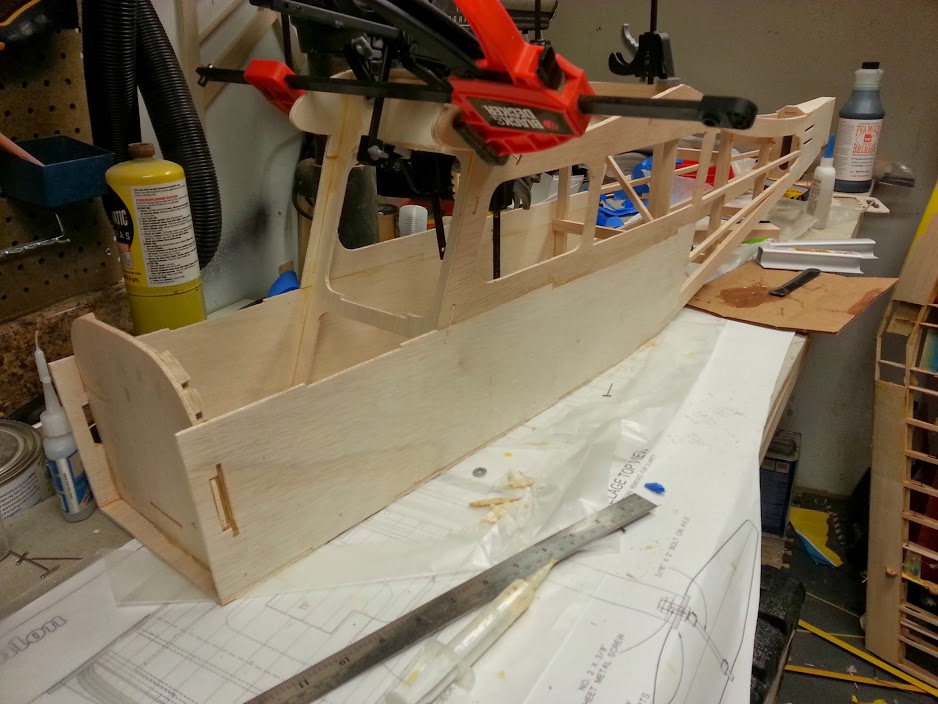
#45
Body and wings done, ready for covering. Here's something different:

outside of needing to shape the LE of the elevator , this is ready to cover... anybody see the difference from stock? :-)
actually I take that back.. I have to sheet the front deck in that picture. I did that today, just not in the photo.
ready to cover with engine and gas/smoke tanks installed ... 8lbs 8oz. So far I'm happy.
 11-27-2013, 06:54 AM
#49
Will do. the thread isn't generating a ton of interest it seems, however I'm going to finish it up since I started it. The final look will be mostly stock decathlon, red/white/blue, however I'm going to mix up some things with the stars that I think is going to make it look a bit more interesting… more to come as I get to it.
11-27-2013, 08:00 AM
#50
Member
Join Date: Feb 2004
Location: Barrington,
IL
Posts: 63
Likes: 0
Received 0 Likes
on
0 Posts
Matt,
I've been following your progress and would like to see your covering ideas. I'm almost to covering stage on mine and while the star burst is classic, it is dated. I'm debating some sort of update on it myself. I built the tail to plans with lightning holes, moved the servos to the cabin to move the weight forward as much as possible. Power will be os 200 4stroke
I've been following your progress and would like to see your covering ideas. I'm almost to covering stage on mine and while the star burst is classic, it is dated. I'm debating some sort of update on it myself. I built the tail to plans with lightning holes, moved the servos to the cabin to move the weight forward as much as possible. Power will be os 200 4stroke