


Remount Engine Orientation Question
 07-08-2016 | 07:35 AM
#1

Thread Starter

Joined: Mar 2011
Posts: 304
Likes: 0
Received 0 Likes
on
0 Posts
From: Goshen, IN
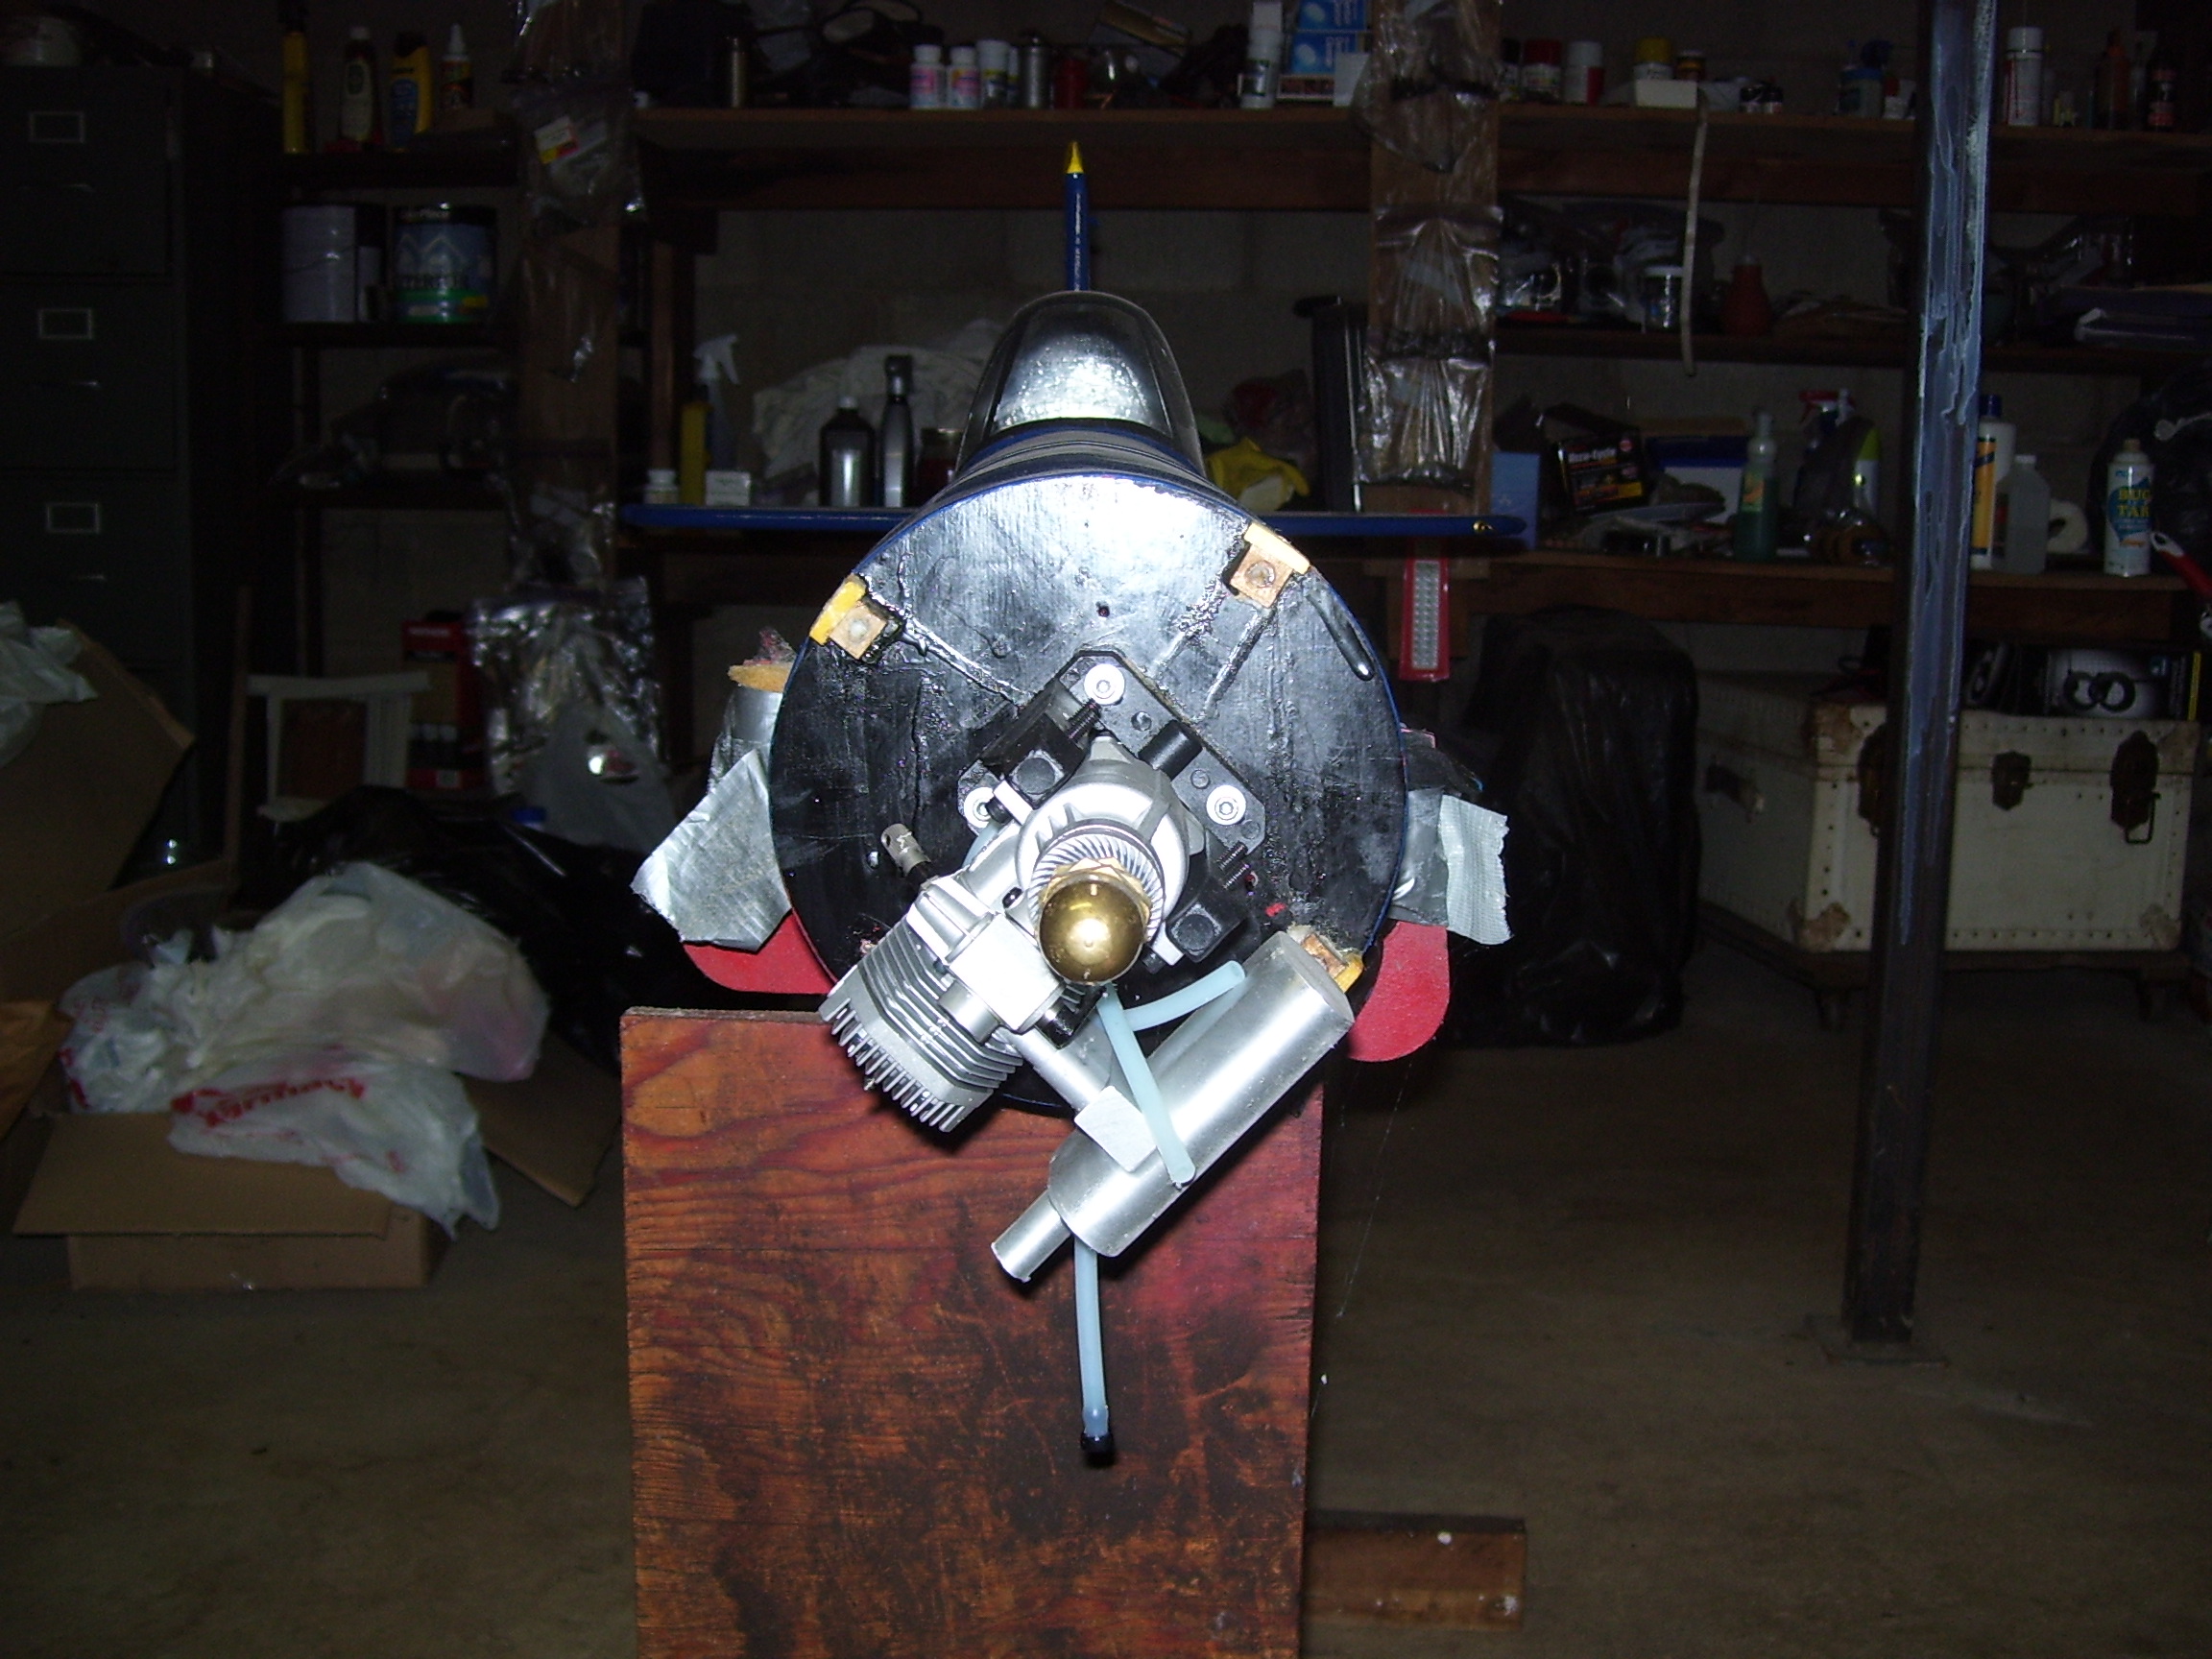
Several people on this site has suggested that the engine orientation be changed. Some prefer the engine to be mounted on it's side instead of upside down. Mine is mounted at an upside down angle. I didn't mount it this way because I prefer it. I mounted it this way because TF suggested mounting it that way. I think it's ok that it's mounted this way. But every time people make this suggestion to me, I scratch my head. How does a person take an existing firewall, that is already drilled out, blind nuts epoxied in place, and then the firewall is glued permanently to the fuselage, and then change it so that the engine mount can be screwed into it into a different orientation? If there is a method that some of you builders use, I haven't been able to find anything through google searches. I think a giant scale model, you could probably reach in behind the firewall and install different blind nuts. But on a 60 or 40 size model you hand probably won't fit. That means you might haft to cut the firewall off, somehow, make a new firewall, and then try and glue on another one. Cross your fingers because it might not hold right, since the wood can't interlock like it originally did.
Anyone that has experience with the Top Flite Corsair 60 who decided to change the engine mounting orientation is who I would prefer to hear from the most. Secondly would be people who has built 40 to 60 size models, mounted the engine and then later on realized that the way the manufacture suggested didn't workout so well.
Note the Engine Muffler System has been changed to what you see in the picture. The reason it was changed is because the Muffler System suggested by top flite is only for a 60 size engine. The engine in my picture is a 91
Last edited by gregoryshock; 07-08-2016 at 07:46 AM.
 07-08-2016 | 11:28 AM
#2
Senior Member
Joined: Jan 2008
Posts: 608
Likes: 0
Received 0 Likes
on
0 Posts
Its when I've either switched or replaced engines with something different that I have done it. Remove old engine. Remove engine mount screws approximately halfway out. Tap on screw heads with hammer and drift punch (wood dowel) to knock the inside t-nuts loose. It may be necessary to relocate or remove the fuel tank to avoid injury to the tank. Once t-nuts are loosened, remove engine mount screws, engine mount, and fuel tank. Filll the mounting holes with the size larger hardwood dowel you can find. Re-drill hole to match .Use a strong two part epoxy and make the dowel length the same as the firewall thickness.
Start engine orientation and mounting process over.
Good luck!
Start engine orientation and mounting process over.
Good luck!
Last edited by Clay Walters; 07-08-2016 at 11:33 AM. Reason: omission
07-09-2016 | 03:44 AM
#3
Thread Starter
Joined: Mar 2011
Posts: 304
Likes: 0
Received 0 Likes
on
0 Posts
From: Goshen, IN
Its when I've either switched or replaced engines with something different that I have done it. Remove old engine. Remove engine mount screws approximately halfway out. Tap on screw heads with hammer and drift punch (wood dowel) to knock the inside t-nuts loose. It may be necessary to relocate or remove the fuel tank to avoid injury to the tank. Once t-nuts are loosened, remove engine mount screws, engine mount, and fuel tank. Filll the mounting holes with the size larger hardwood dowel you can find. Re-drill hole to match .Use a strong two part epoxy and make the dowel length the same as the firewall thickness.
Start engine orientation and mounting process over.
Good luck!
Start engine orientation and mounting process over.
Good luck!
07-09-2016 | 04:17 AM
#4

Gregory,
I actually mount engines on that inverted angle intentionally. Keeps the exhaust on the bottom of the plane..Particularly when using stock mufflers.
I realize it is controversial with the majority. I have no problems. I have (and had) many 40 and 51 size engines mounted that way. As well as 90's That beast of an OS 91 should not care about that angle either... Just make sure the fuel tank is at the right height (middle of tank more or less at the middle of spray-bar)
To answer your question as to how to get the T-nuts in place.....
You can use 4-40 metal control rods, "ny-rod" even thick sting.
Fish your rod/string though the new hole and get it to fall out of the wing access area...or whatever hatch you may have..
Now put the new t-nut over the rod/string. Make sure it's in the correct direction.
If using metal rod now place nut and washer (ny rod ad a piece of 4-40 all thread then washer and nut
If using string tie a washer on the end
Carefully pull the t-nut into place and gently set it enough to stay in place. Let the rod/string fall back through the fuse access hole
Now insert the proper screw and washer from the front and gently set the t-nut permanently
If you desire place a little 30 minute epoxy on the t-nut before pulling it into place
07-11-2016 | 12:35 AM
#5

There are many reasons to rotate the engine mounting. One is to get the carb and fuel tank in alignment. The needle valve spray bar should be at the same level as the center of the tank, from the side. As for surgery. It's surgery. Long tweezers, screws threaded in from the back of the t nut just enough to lower it until it can be threaded from the front side. A corsair fuselage is pretty big around. You have got to have pretty big hands not to get down inside even a little bit. If that is true, you will just have to engineer tools to get inside. Patience and a little inventiveness will get it. It's not instant gratification.
07-11-2016 | 07:43 AM
#6
Thread Starter
Joined: Mar 2011
Posts: 304
Likes: 0
Received 0 Likes
on
0 Posts
From: Goshen, IN
Gregory,
I actually mount engines on that inverted angle intentionally. Keeps the exhaust on the bottom of the plane..Particularly when using stock mufflers.
I realize it is controversial with the majority. I have no problems. I have (and had) many 40 and 51 size engines mounted that way. As well as 90's That beast of an OS 91 should not care about that angle either... Just make sure the fuel tank is at the right height (middle of tank more or less at the middle of spray-bar)
To answer your question as to how to get the T-nuts in place.....
You can use 4-40 metal control rods, "ny-rod" even thick sting.
Fish your rod/string though the new hole and get it to fall out of the wing access area...or whatever hatch you may have..
Now put the new t-nut over the rod/string. Make sure it's in the correct direction.
If using metal rod now place nut and washer (ny rod ad a piece of 4-40 all thread then washer and nut
If using string tie a washer on the end
Carefully pull the t-nut into place and gently set it enough to stay in place. Let the rod/string fall back through the fuse access hole
Now insert the proper screw and washer from the front and gently set the t-nut permanently
If you desire place a little 30 minute epoxy on the t-nut before pulling it into place
I actually mount engines on that inverted angle intentionally. Keeps the exhaust on the bottom of the plane..Particularly when using stock mufflers.
I realize it is controversial with the majority. I have no problems. I have (and had) many 40 and 51 size engines mounted that way. As well as 90's That beast of an OS 91 should not care about that angle either... Just make sure the fuel tank is at the right height (middle of tank more or less at the middle of spray-bar)
To answer your question as to how to get the T-nuts in place.....
You can use 4-40 metal control rods, "ny-rod" even thick sting.
Fish your rod/string though the new hole and get it to fall out of the wing access area...or whatever hatch you may have..
Now put the new t-nut over the rod/string. Make sure it's in the correct direction.
If using metal rod now place nut and washer (ny rod ad a piece of 4-40 all thread then washer and nut
If using string tie a washer on the end
Carefully pull the t-nut into place and gently set it enough to stay in place. Let the rod/string fall back through the fuse access hole
Now insert the proper screw and washer from the front and gently set the t-nut permanently
If you desire place a little 30 minute epoxy on the t-nut before pulling it into place
That seems to make sense to me. lol That would make a great tutorial youtube video. Perhaps you could make a video about that and generate some extra pocket change for yourself?
Getting the Epoxy to stay on the nut while it falls into place would be tricky at best.
Last edited by gregoryshock; 07-11-2016 at 07:46 AM.
07-11-2016 | 12:31 PM
#7

My Feedback: (4)
You do know the holes in the firewall need to be large enough for the shank on the blind nut to seat within. Which is usually a size or so larger then the screws. Test it on some scrap to be sure... but the above method works well. It does take some patience, but its very effective and doable. Good luck with it.
PS... If you don't have an available wheel collar, you can just make a small 90degee bend in the wire to capture the blind nut, then back the wire out of the radio compartment instead of the firewall ... I hope this makes sense... It works either way.
07-13-2016 | 04:25 AM
#8
Thread Starter
Joined: Mar 2011
Posts: 304
Likes: 0
Received 0 Likes
on
0 Posts
From: Goshen, IN
Take a wire, usually about the size of a pushrod... even a coat hanger.. Make it plenty long to easily reach from the firewall to the radio compartment... a bit longer is better.. After you have your holes drilled for your mount.., (the tank can't be in the plane obviously, as you need the access).. insert the wire into the hole from the front through the tank compartment to the point you can see and reach the end that you inserted... Put your blind nut on the end of the wire(make sure its facing the correct direction so it seats properly..).. Put a wheel collar on the end of the wire.. to capture the blind nut... then carefully pull the wire back out the way you inserted it.. You should be able to seat the blind nut enough to start a screw into it to seat in completely.
You do know the holes in the firewall need to be large enough for the shank on the blind nut to seat within. Which is usually a size or so larger then the screws. Test it on some scrap to be sure... but the above method works well. It does take some patience, but its very effective and doable. Good luck with it.
PS... If you don't have an available wheel collar, you can just make a small 90degee bend in the wire to capture the blind nut, then back the wire out of the radio compartment instead of the firewall ... I hope this makes sense... It works either way.
 Doing without the glue makes sense. Doing it with glue sounds like a recipe for disaster.
 Keeping the glue on the nut as you drop into the fuse would be hard. Good chance the glue will run off or down the rod. If you did it the other direction. Allow the nut to sit on the collar and pull up. Good chance the glue will run off the nut and and onto the collar. Either way I can't see how you could manage to glue the blind nut into place. The only result I can for see is a mess of glue getting onto things you don't want, and the blind nut never getting glued to the inside of the firewall. More over I would think anyone doing this method wouldn't even try to glue the nuts in place.
You do know the holes in the firewall need to be large enough for the shank on the blind nut to seat within. Which is usually a size or so larger then the screws.
Of course!
Unless the Muffler causes me issues with the Cowling I'm not going to be changing the Engine Orientation. But it's good to know that I could if needed too.
Last edited by gregoryshock; 07-13-2016 at 04:44 AM.
07-13-2016 | 04:57 AM
#9

"Getting the Epoxy to stay on the nut while it falls into place would be tricky at best."
One way to keep epoxy in place on a T-nut is to thicken it with a little micro balloons or if that
isn't available, steal a teaspoon of baking soda or flour from the wife or girl friend. After mixing,
it will be just thick enough to stay in place on the front side of the T-nut, it doesn't require much but will
do the trick and doesn't effect the curing of the epoxy. (usually just a tiny bit on the end of the stirring
stick is enough)
Last edited by Bill Diedrich; 07-13-2016 at 05:01 AM.
07-13-2016 | 05:17 AM
#10
Thread Starter
Joined: Mar 2011
Posts: 304
Likes: 0
Received 0 Likes
on
0 Posts
From: Goshen, IN
"Getting the Epoxy to stay on the nut while it falls into place would be tricky at best."
One way to keep epoxy in place on a T-nut is to thicken it with a little micro balloons or if that
isn't available, steal a teaspoon of baking soda or flour from the wife or girl friend. After mixing,
it will be just thick enough to stay in place on the front side of the T-nut, it doesn't require much but will
do the trick and doesn't effect the curing of the epoxy. (usually just a tiny bit on the end of the stirring
stick is enough)
One way to keep epoxy in place on a T-nut is to thicken it with a little micro balloons or if that
isn't available, steal a teaspoon of baking soda or flour from the wife or girl friend. After mixing,
it will be just thick enough to stay in place on the front side of the T-nut, it doesn't require much but will
do the trick and doesn't effect the curing of the epoxy. (usually just a tiny bit on the end of the stirring
stick is enough)
07-13-2016 | 03:10 PM
#11

"Getting the Epoxy to stay on the nut while it falls into place would be tricky at best."
One way to keep epoxy in place on a T-nut is to thicken it with a little micro balloons or if that
isn't available, steal a teaspoon of baking soda or flour from the wife or girl friend. After mixing,
it will be just thick enough to stay in place on the front side of the T-nut, it doesn't require much but will
do the trick and doesn't effect the curing of the epoxy. (usually just a tiny bit on the end of the stirring
stick is enough)
One way to keep epoxy in place on a T-nut is to thicken it with a little micro balloons or if that
isn't available, steal a teaspoon of baking soda or flour from the wife or girl friend. After mixing,
it will be just thick enough to stay in place on the front side of the T-nut, it doesn't require much but will
do the trick and doesn't effect the curing of the epoxy. (usually just a tiny bit on the end of the stirring
stick is enough)
07-13-2016 | 03:40 PM
#12
Senior Member
Just put the epoxy bottles in the fridge, it will be a bugger to squeeze out, but it will be plenty thick and tacky, plenty should stay on to do the job.
You could use a long stick to dab some globs of it through the inside of the fuse onto the firewall holes, that will depend on how good the access is.
Or do both.
You could use a long stick to dab some globs of it through the inside of the fuse onto the firewall holes, that will depend on how good the access is.
Or do both.


