


Top Flite 1/7 P-51 Build

 05-05-2016, 06:00 AM
#3302


The only thing I don't see is the bottom view, you have everything else. Full plans are still available from Top Flite. P516P01R, ROLLED FUSE & WING PLAN, $17.26 US.
I think I did these for you, but here you go again.
As for the covering, I have Aluminum MonoKote and I'm debating the nose checkered finish which is gonna depend on whether I have that much patience and confidence. I kind of worry about the corners of the little checkers coming loose and the whole project getting a premature hanger rash look if they do. I don't know of any way to effectively seal down the edges other than heat which distorts the lines sometimes and then the plastic film separates from the color so you get all these little warped lines and corner curlie things. People have told me to use Windex with ammonia and I have......with limited success. There is also an edge sealing product that I haven't tried cause it's ridiculously expensive for a little bottle. If there was a good way to put a clear "top coat" over that kind of detail work to preserve it I'd be more inclined to just say Ya, I'm gonna just follow the kit color scheme. For right now my answer is.....I'll follow the basic scheme and then decide on those checkers when I get there.
05-05-2016, 06:25 AM
#3303


Join Date: Apr 2016
Location: Czech Republic
Posts: 262
Likes: 0
Received 0 Likes
on
0 Posts
05-05-2016, 11:13 PM
#3305
Join Date: Apr 2016
Location: Czech Republic
Posts: 262
Likes: 0
Received 0 Likes
on
0 Posts
highlights from yesterday: i had to separate rudder and stab due to invalid angle. stripped aft top fuse sheeting, found that it was 1/16 instead of 1/4. found that the fin has been made from 1/8 single balsa instead of ply and double balsa. the rudder has been glued by few drops of CA. a ton of filler all around. Minefield indeed 
05-06-2016, 05:33 AM
#3306

highlights from yesterday: i had to separate rudder and stab due to invalid angle. stripped aft top fuse sheeting, found that it was 1/16 instead of 1/4. found that the fin has been made from 1/8 single balsa instead of ply and double balsa. the rudder has been glued by few drops of CA. a ton of filler all around. Minefield indeed
05-08-2016, 05:12 PM
#3308
Whoever it was that suggested reducing the elevator throw to prevent snaps, THANK YOU!!! Plane flies great now! Need struts to keep the gear straight, but by slipping a shim on the rear mount of the gear, it put the wheels forward of the leading edge, and it is less nose over prone, still will nose over, but tall grass had everything to do with that. My landing was pretty good, smooth all the way down, until it grabbed grass, then plopped on its nose. No broken prop, so Im happy with it.
05-09-2016, 12:57 AM
#3309
Join Date: Apr 2016
Location: Czech Republic
Posts: 262
Likes: 0
Received 0 Likes
on
0 Posts
Whoever it was that suggested reducing the elevator throw to prevent snaps, THANK YOU!!! Plane flies great now! Need struts to keep the gear straight, but by slipping a shim on the rear mount of the gear, it put the wheels forward of the leading edge, and it is less nose over prone, still will nose over, but tall grass had everything to do with that. My landing was pretty good, smooth all the way down, until it grabbed grass, then plopped on its nose. No broken prop, so Im happy with it.
05-10-2016, 08:05 PM
#3311
Getting Closer 
https://www.youtube.com/watch?v=OE6FBWGYes4&feature=youtu.be Weeks of staring at the wing, trying an idea, modifying and re-trying and modifying again has culminated in at least this much success
https://www.youtube.com/watch?v=OE6FBWGYes4&feature=youtu.be Weeks of staring at the wing, trying an idea, modifying and re-trying and modifying again has culminated in at least this much success
Last edited by BigTeeEldorado; 05-10-2016 at 08:24 PM.
 05-15-2016, 03:55 PM
#3315
Junior Member
Join Date: Mar 2015
Posts: 9
Likes: 0
Received 0 Likes
on
0 Posts
And I made this silly video of the build if you're interested...
"https://www.youtube.com/embed/aqORknoivhE"
"https://www.youtube.com/embed/aqORknoivhE"
Last edited by asjwalsh; 05-15-2016 at 04:04 PM.
 05-15-2016, 04:11 PM
#3317
Aw dangit, I knew there was something else I wanted to do today, yank the struts off my kit wing for the ARF. Got busy working on two other planes today, an Ultimate Bipe I picked up, missing the wing struts, have to make new ones, and the plywood sheets I got for them are too short, need at least a 13" x 8" sheet to make them.
The other plane is my Biper Cub, got the left wings finished, the top right wing finished, now painting the strut, and got the lower wing aileron covered up. I fixed the lower ailerons, just using the top ones, so I covered in the lower ones with a slight bit of down to create a little more drag knowing how well the SIG Cub can sit in the air at a slow speed. Just have to finish painting it, open the cowl up for the motor, and set the blocks to secure it, balance, secure the radio and battery after balancing, then go fly it. The real trick will be figuring out how to transport and assemble it.
Once I get the robarts struts attached to my ARF, I will be ready to fly it again, this time though I don't think I will be shaking as badly as the first time I re-flew it. Now that I know I cured the nasty snap roll, and as long as the grass is short, this should be a fun plane.
05-15-2016, 07:57 PM
#3318
Again Congrats on a really nice airplane.
05-16-2016, 01:29 AM
#3319
Join Date: Apr 2016
Location: Czech Republic
Posts: 262
Likes: 0
Received 0 Likes
on
0 Posts
asjwalsh: impressive job !! would you mind sharing more photos somewhere on g+ ? how did you made the cockpit? would you share your jpg for dashboard with us ?
i am still in the phase of puting pieces together, now on hinging phase


i am still in the phase of puting pieces together, now on hinging phase
05-16-2016, 05:40 AM
#3320

Aw , you did the HO L CORRECTLY on one side but if one looks at some books one would find that on the left side it
Would be HO stars & bars then
The L and on the right side it would be H stars & bars then
OL
Would be HO stars & bars then
The L and on the right side it would be H stars & bars then
OL
05-16-2016, 06:29 AM
#3321
Junior Member
Join Date: Mar 2015
Posts: 9
Likes: 0
Received 0 Likes
on
0 Posts
My research showed that this was the 487th Sqn color scheme (Blue Nosed *******s of Bodney no less) and the L should be on the tail. But heck, only purists would object!
Panel Lines: Used a panel pen and panel template from Tower Hobbies. Used the P51 Mustang book by Grinsell/Watanabe printed by Crown to try to copy the panel lines. There is a significant amount of poetic license
I'll try to get some more pics for you guys
Thanks for the compliments. The key for me is to not rush! It took 15 months....
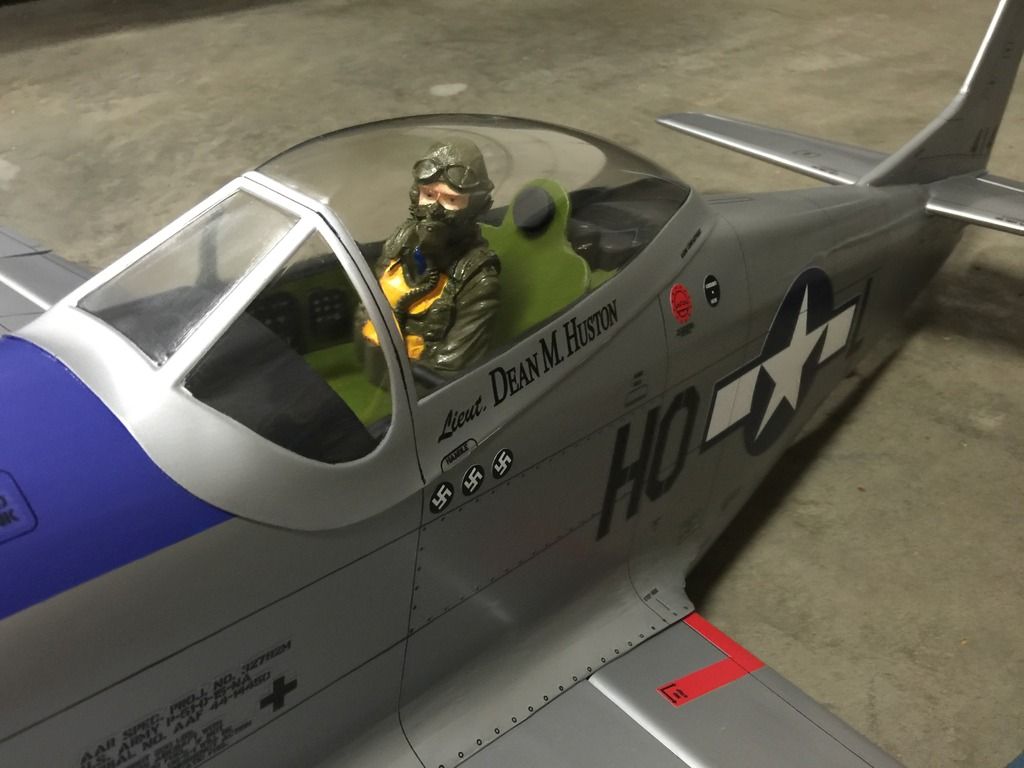
 05-16-2016, 06:23 PM
#3325
Junior Member
Join Date: Mar 2015
Posts: 9
Likes: 0
Received 0 Likes
on
0 Posts
I made the cockpit up from pictures on the web. Page 14/17 of this thread has the most beautiful kit construction, including an amazing pilot and cockpit. I was inspired by this, but never achieved his amazing finish.