


Aerodynamic clear plastic light covers
 04-13-2014 | 05:38 PM
#1
Thread Starter

My Feedback: (57)
 Aerodynamic clear plastic light covers
Anyone have any ideas of something that can be used for this? The L-39 has them on the wingtips. Been on the look out for anything I can use, I've even tried to buy clear plastic easter eggs to use the pointier half, but have had no luck
Last edited by BlueBus320; 04-13-2014 at 05:40 PM.

 04-13-2014 | 06:57 PM
#4
Thread Starter
My Feedback: (57)
Sysiek, if stretching over my existing piece works, that would be perfect. I've read about vacuum forming plastic canopies, but it seems more involved than just heating & stretching & requires an oven (other than the one my family eats from). Have you tried it before?
04-14-2014 | 09:26 AM
#7
Sysiek is right .... best method and cheap. Dont even bother buying lexan. Use a used soda bottle. Heat it with a heat gun , and pull down over wingtip. Use a cloth to press down over it so you don't burn your hand. This is less hassle than vacuum forming. We have a vacuum former set up in the shop, and don't eve bother with it for things like tip lights, unless we need to do a run of several copies 
all best,
Voy
all best,
Voy
04-15-2014 | 09:08 AM
#8


My Feedback: (5)
I molded up some light covers (lenses) last night and took some pics of the process hoping that this might answer some questions as to how to make custom formed lenses.
These lenses are for the navigation lights on a BVM Rafale and are located near the root chord of the wing. The tight bend radius at the leading edge posed a bit of a problem as did finding a way to attach the covers. The wingskins are a composite of carbon fibre, with a balsa core, and a layer of fiberglass on the exterior. They are about 1/16" thick. After making the cutout in the wing, I used a small file to file away the CF inner skin around the hole until the skin thickness was about .040 (the approximate thickness of the lexan sheet I bought at my local hobby shop). Then I glued a piece of .005" thick polyply to the inside skin and then ground the polyply away the make a 1/16" wide flange around the cutout to which the light cover will be glued.
Pieces of lite-ply were sanded to shape and glued into the wing to line the cutout and to hold the light. The ply was sealed with primer then painted white to better reflect the light. A hole was ground into the lite-ply to mount the light (from Electrodymanics - see http://www.electrodynam.com/store/SunVis.html) which was CA'd in placed.
The light cover (lens) itself was formed by heating a 2" x 2" square of Lexan. It seemed like too much work to splash a female mold of the leading edge of the wing so I just sanded a piece of balsa to the approximate shape for a male plug. I "sealed" the plug to prevent the balsa grain from leaving impressions on the Lexan by taping a sheet of paper over the plug. The Lexan was held with a pair of pliers and heated with a heat gun until it was very soft and would flap in the stream of air from the heat gun. Then it was QUICKLY draped over the plug. Another piece of paper and a piece of a file folder were QUICKLY placed over the Lexan and I manually formed the Lexan over the plug.
The formed Lexan was offered up to the wing and a fine tip Sharpie marker was used to trace the rough outline of the cutout. A Dremel was used to grind away the excess material. This is a bit of a grind/check/grind iterative process so take your time or you might grind away too much and have to start over.
After the lens was a good fit, I masked the outside of the lens and sprayed the inside with Tamiya translucent spray paint. It took two coats to get the right paint thickness/coverage. The lens was then glued to the polyply flange using canopy glue (flexible, clear, and will allow the lens to be removed in the future if necessary). Some putty will be used to fill the slight gap around the lens and aluminum tape circles will be added to the lens to simlate the fasteners used to hold the lens in place on the full scale aircraft.
Regards
Jim


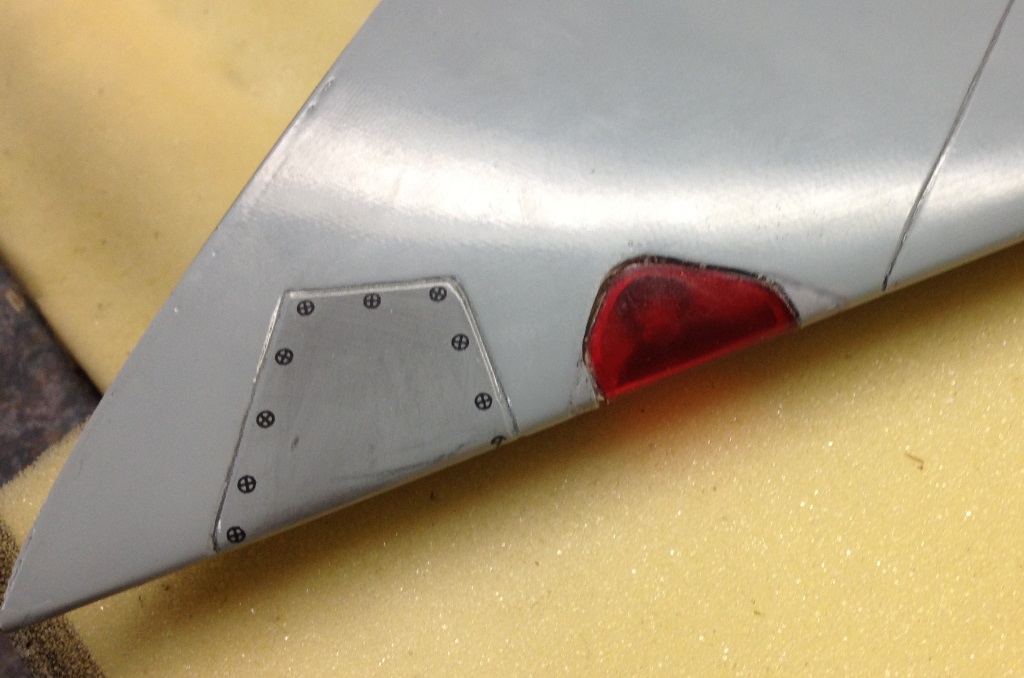
These lenses are for the navigation lights on a BVM Rafale and are located near the root chord of the wing. The tight bend radius at the leading edge posed a bit of a problem as did finding a way to attach the covers. The wingskins are a composite of carbon fibre, with a balsa core, and a layer of fiberglass on the exterior. They are about 1/16" thick. After making the cutout in the wing, I used a small file to file away the CF inner skin around the hole until the skin thickness was about .040 (the approximate thickness of the lexan sheet I bought at my local hobby shop). Then I glued a piece of .005" thick polyply to the inside skin and then ground the polyply away the make a 1/16" wide flange around the cutout to which the light cover will be glued.
Pieces of lite-ply were sanded to shape and glued into the wing to line the cutout and to hold the light. The ply was sealed with primer then painted white to better reflect the light. A hole was ground into the lite-ply to mount the light (from Electrodymanics - see http://www.electrodynam.com/store/SunVis.html) which was CA'd in placed.
The light cover (lens) itself was formed by heating a 2" x 2" square of Lexan. It seemed like too much work to splash a female mold of the leading edge of the wing so I just sanded a piece of balsa to the approximate shape for a male plug. I "sealed" the plug to prevent the balsa grain from leaving impressions on the Lexan by taping a sheet of paper over the plug. The Lexan was held with a pair of pliers and heated with a heat gun until it was very soft and would flap in the stream of air from the heat gun. Then it was QUICKLY draped over the plug. Another piece of paper and a piece of a file folder were QUICKLY placed over the Lexan and I manually formed the Lexan over the plug.
The formed Lexan was offered up to the wing and a fine tip Sharpie marker was used to trace the rough outline of the cutout. A Dremel was used to grind away the excess material. This is a bit of a grind/check/grind iterative process so take your time or you might grind away too much and have to start over.
After the lens was a good fit, I masked the outside of the lens and sprayed the inside with Tamiya translucent spray paint. It took two coats to get the right paint thickness/coverage. The lens was then glued to the polyply flange using canopy glue (flexible, clear, and will allow the lens to be removed in the future if necessary). Some putty will be used to fill the slight gap around the lens and aluminum tape circles will be added to the lens to simlate the fasteners used to hold the lens in place on the full scale aircraft.
Regards
Jim
Last edited by rcjets_63; 04-15-2014 at 09:41 AM. Reason: Added pics
04-15-2014 | 09:33 AM
#9

My Feedback: (11)
When I bought my lights for my F-100, Dan has some light covers just like you describe, clear, tear drop shaped that would fit on wing tips.
Look at the bottom of this page:
http://www.details4scale.com/MWPROstore.htm
Give Dan a call, I bet he'll have what you want.
But what these guys suggest would be super easy to do as well it sounds!
Look at the bottom of this page:
http://www.details4scale.com/MWPROstore.htm
Give Dan a call, I bet he'll have what you want.
But what these guys suggest would be super easy to do as well it sounds!
04-15-2014 | 10:37 AM
#10
Thread Starter
My Feedback: (57)
Thanks guys! rcjets63, that came out awesome. Dan has the L-39 wingtip lenses that I could probably use, but I'm going to try to make them. I'm going to use the tip of my drop tank (rounded a lil) & try to vacuum form a clear lens, that way it will be perfect & I love the idea of being able to make & manipulate canopies anytime I want. I modified my Boomerang sprint to be more aerodynamic, & really thought about vacuum forming a new canopy then, but ended up using wood. This time I'm giving this a shot
Jay
Jay
04-15-2014 | 11:13 AM
#11
Joined: Jun 2007
Posts: 321
Likes: 0
Received 0 Likes
on
0 Posts
From: Sao PauloSao Paulo, BRAZIL
Take a look how I did mine.
http://www.e-voo.com/forum/viewtopic...=asc&start=150
I'ts not in english but the pics may help.
http://www.e-voo.com/forum/viewtopic...=asc&start=150
I'ts not in english but the pics may help.
04-15-2014 | 11:21 AM
#12
Thread Starter
My Feedback: (57)
Take a look how I did mine.
http://www.e-voo.com/forum/viewtopic...=asc&start=150
I'ts not in english but the pics may help.
http://www.e-voo.com/forum/viewtopic...=asc&start=150
I'ts not in english but the pics may help.
 04-15-2014 | 02:01 PM
#15
Thread Starter
My Feedback: (57)
No worries syseik, I have a toddler & one on the way, everything with the hobby is an uphill struggle. This has been a VERY useful thread for me I'll take a page from Wojtek & buy a 64oz soda to use the plastic. If I remember, I'll post a pic of my finished product. Thanks again guys, this is why I still love RCU
I'll take a page from Wojtek & buy a 64oz soda to use the plastic. If I remember, I'll post a pic of my finished product. Thanks again guys, this is why I still love RCU
04-15-2014 | 05:36 PM
#16
My Feedback: (38)
Joined: Jan 2002
Posts: 1,452
Likes: 0
Received 0 Likes
on
0 Posts
From: Nashville, TN,
I have a friend that has a vacuum form machine. He made a plug for his small futura wing tips and they also fit my L-39 top tanks.
he may be persuaded to pull a couple if you don't find a solution.
he may be persuaded to pull a couple if you don't find a solution.


