


Skymaster 1/5 Scale F16 Build Thread


 04-08-2015, 11:40 AM
#55

Thread Starter
My Feedback: (4)
Join Date: Aug 2009
Location: Kennesaw ,
GA
Posts: 107
Likes: 0
Received 0 Likes
on
0 Posts
Hello all,
Sorry for the long absence from the thread. Been super busy here lately! I do have some work complete on the F16 and Ill share some photos and building advise later this evening.
Craig
Sorry for the long absence from the thread. Been super busy here lately! I do have some work complete on the F16 and Ill share some photos and building advise later this evening.
Craig
 04-09-2015, 06:09 AM
#61
Thread Starter
My Feedback: (4)
Join Date: Aug 2009
Location: Kennesaw ,
GA
Posts: 107
Likes: 0
Received 0 Likes
on
0 Posts
Hello all,
I have a few pictures and some build progress. Ive started at the back of the jet and moving forward.
Elevon Servo Installation:
This was pretty straight forward, make sure you take your time and align the servo arm perfectly with the root of the elevon (not the side of the fuse) I had to slightly shim both sides to achieve a good fit. Disregard the instructions on gluing in the Elevon bearing block as the wood rib is already installed and you simply have to screw the block down. Make sure the mounting surface is clean and flat. Use the supplied bearings and washers, making sure the bearings turn freely after everything is tightened up. I used a MPI servo arm and a JR 8711HV servo. Be careful when drilling the countersink in the servo arm for the bearing bolt as it is easy to remove to much and weaken the attachment. Move the surface up and down and ensure you have free movement with no binding along the entire travel.
Rudder Servo Installation:
I had to do a little cutting here as the rudder tray on my airframe was 5 mm to far aft, and 1.5 mm to low. I made a cutout to move the servo forward and some shims to elevate the the ball into the proper position into the rudder. I used a Secraft 15mm servo arm which fit perfectly, and a JR 8711HV servo. Make sure to clean out the paint in the metal slot on the rudder to achieve a nice smooth action.
Flap Servos:
This was the easiest servo install so far. The servos fit without any modification with 4 screws here. With the JR 8711HV's I again used the MPI servo arm here and it fits good but is also very close to the side of the fuse. Make sure to check you have the proper engagement into the Flap slot with the wing on. I drilled and tapped the arm to accept the ball and used red lock tight to hold in place. Once again make sure to clean out the paint in the metal block to get a nice smooth action.
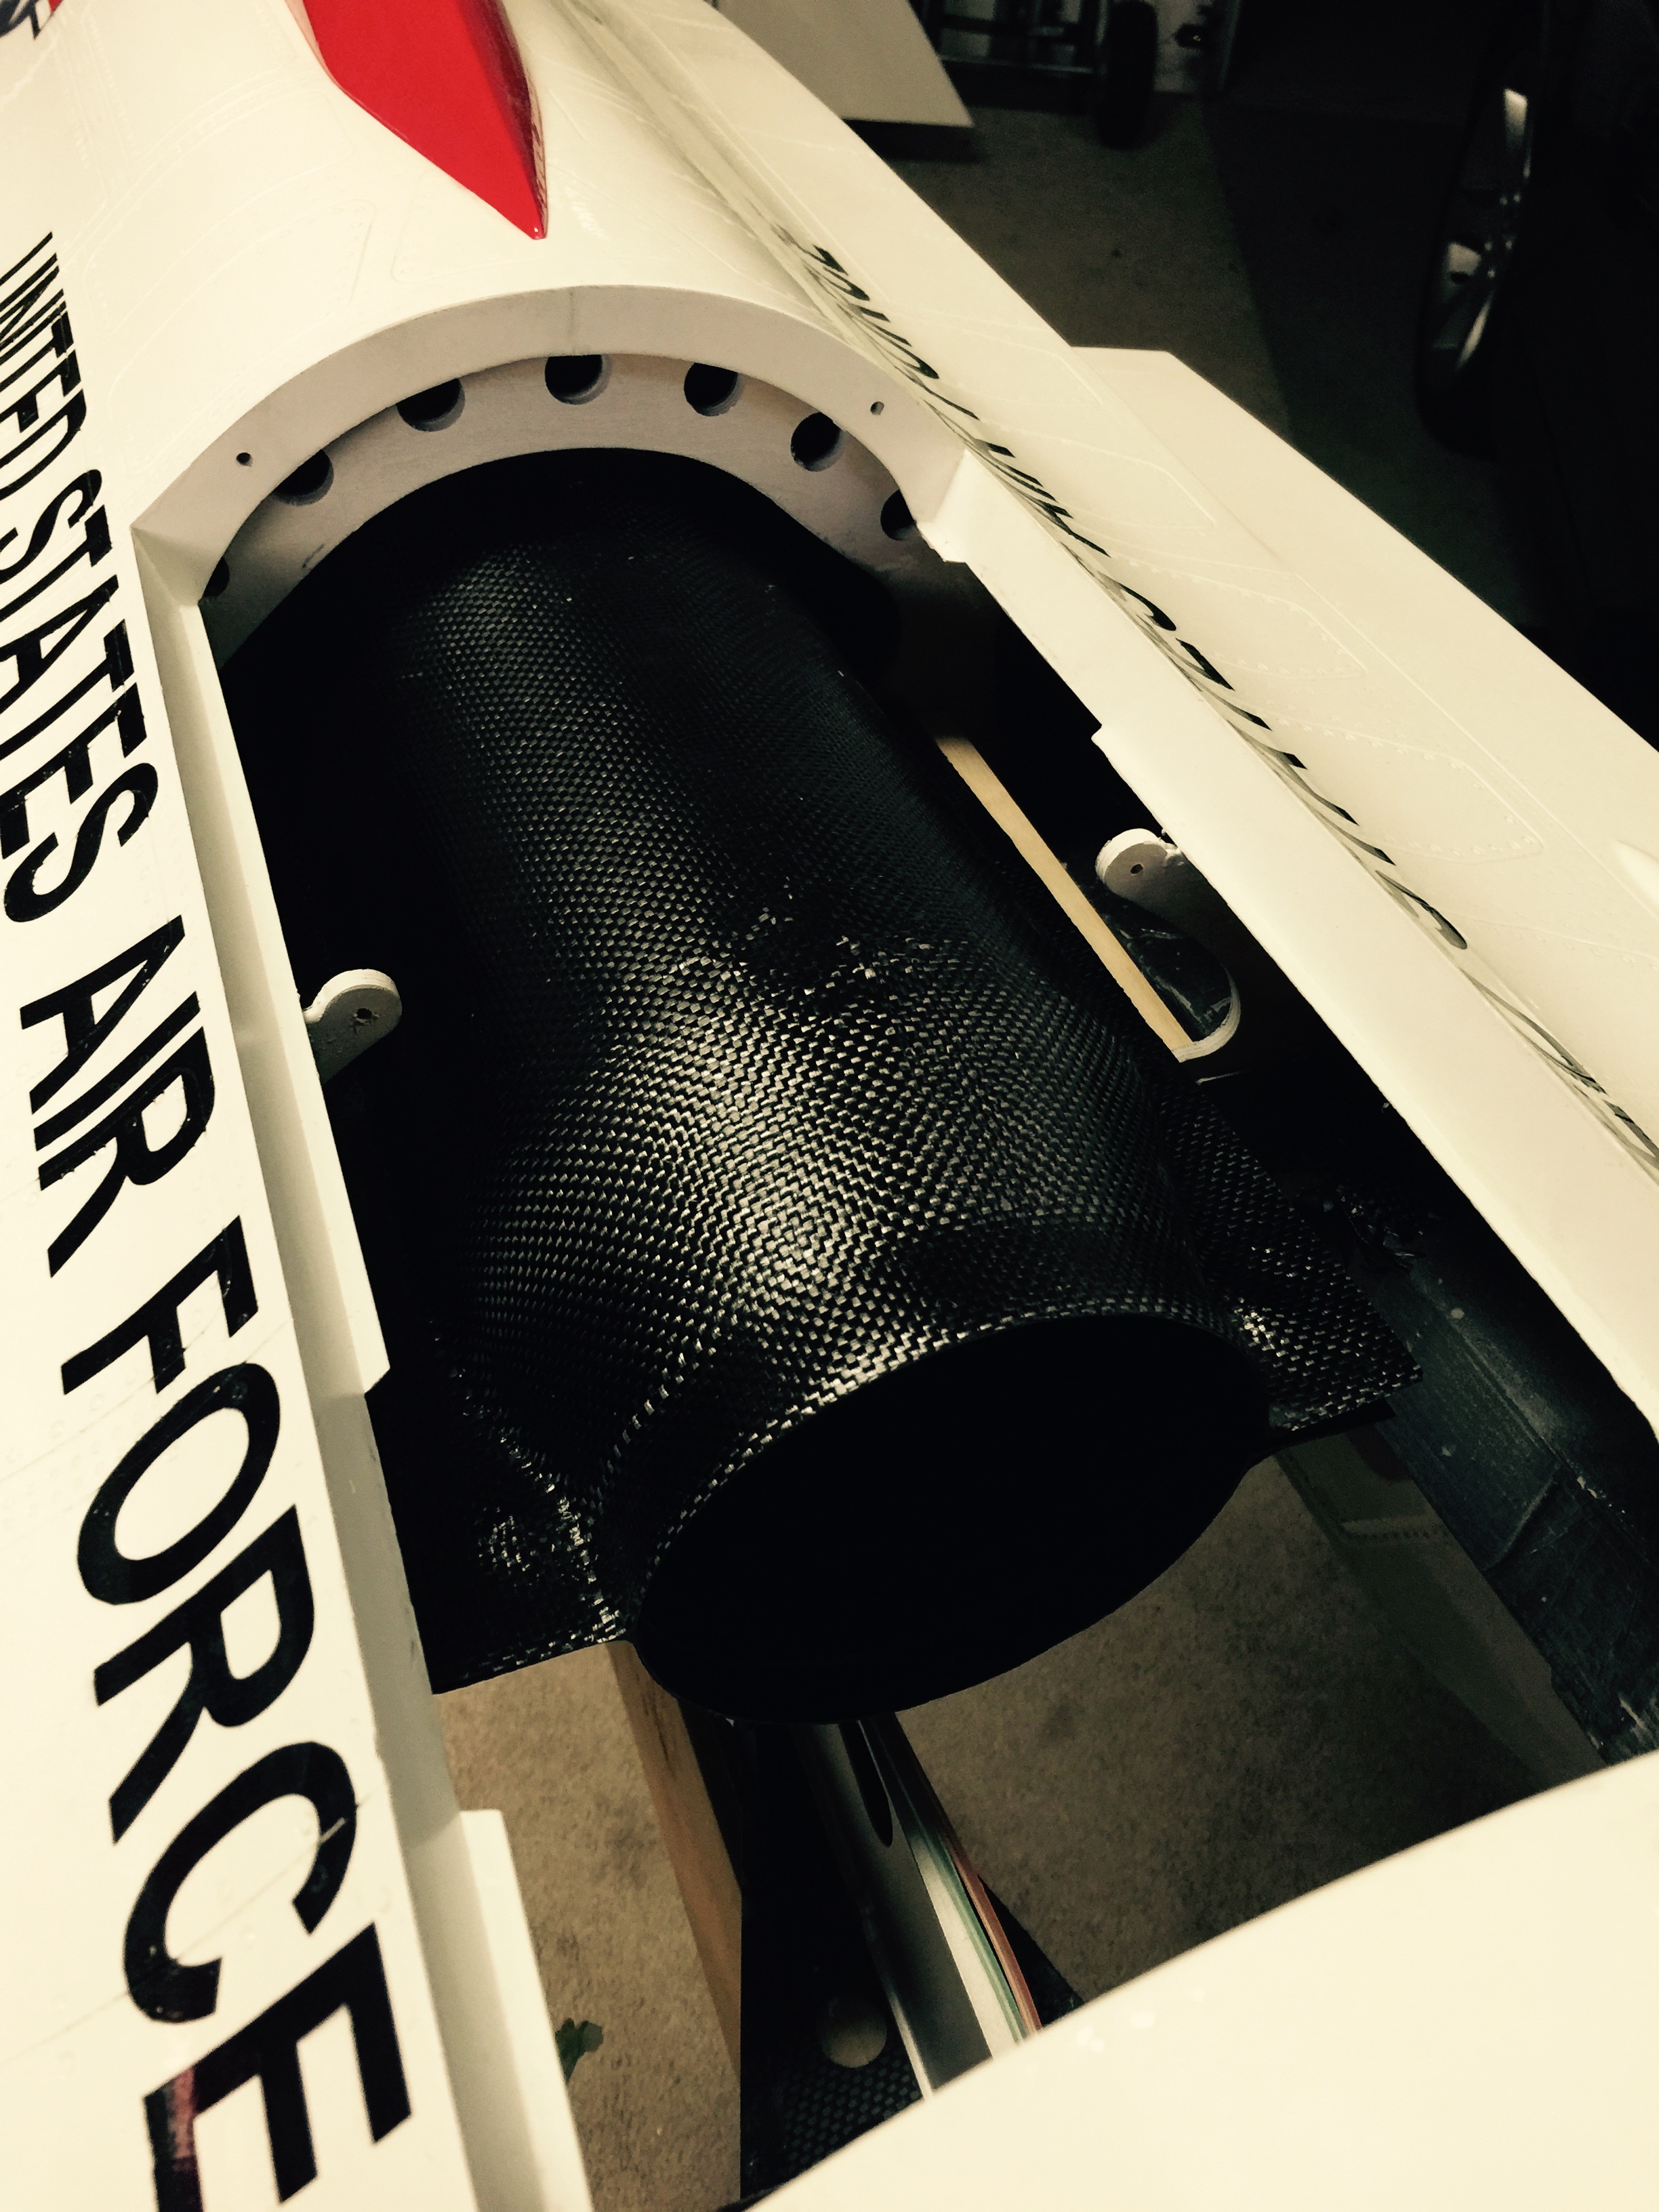
Bypass and tailpipe: (For Kingtech 210 Install)
When your looking at the various pictures in the manual this can be a bit confusing as some show the bypass fully forward of the aft bulkhead and some show aft. I wanted the aft end of the pipe to sit about 1/2 inch from the end of the exhaust cone so after some quick measuring the bypass needs to be setback 1.5 inches aft of the rear bulkhead. Make a cut on both sides of the bypass to clear the bulkhead. The bell mouth of the pipe mounts to the outside of the bypass. You will need to cut away the flat sides on the rear to allow the bell mouth to push up onto the bypass. Do some careful sanding here to achieve a good fit. Once happy, drill 5 holes through the bell mouth and secure it to the lower section of the bypass.
Ill be working on the wings this evening, Installing slat servos and lights.
More to come.


I have a few pictures and some build progress. Ive started at the back of the jet and moving forward.
Elevon Servo Installation:
This was pretty straight forward, make sure you take your time and align the servo arm perfectly with the root of the elevon (not the side of the fuse) I had to slightly shim both sides to achieve a good fit. Disregard the instructions on gluing in the Elevon bearing block as the wood rib is already installed and you simply have to screw the block down. Make sure the mounting surface is clean and flat. Use the supplied bearings and washers, making sure the bearings turn freely after everything is tightened up. I used a MPI servo arm and a JR 8711HV servo. Be careful when drilling the countersink in the servo arm for the bearing bolt as it is easy to remove to much and weaken the attachment. Move the surface up and down and ensure you have free movement with no binding along the entire travel.
Rudder Servo Installation:
I had to do a little cutting here as the rudder tray on my airframe was 5 mm to far aft, and 1.5 mm to low. I made a cutout to move the servo forward and some shims to elevate the the ball into the proper position into the rudder. I used a Secraft 15mm servo arm which fit perfectly, and a JR 8711HV servo. Make sure to clean out the paint in the metal slot on the rudder to achieve a nice smooth action.
Flap Servos:
This was the easiest servo install so far. The servos fit without any modification with 4 screws here. With the JR 8711HV's I again used the MPI servo arm here and it fits good but is also very close to the side of the fuse. Make sure to check you have the proper engagement into the Flap slot with the wing on. I drilled and tapped the arm to accept the ball and used red lock tight to hold in place. Once again make sure to clean out the paint in the metal block to get a nice smooth action.
Bypass and tailpipe: (For Kingtech 210 Install)
When your looking at the various pictures in the manual this can be a bit confusing as some show the bypass fully forward of the aft bulkhead and some show aft. I wanted the aft end of the pipe to sit about 1/2 inch from the end of the exhaust cone so after some quick measuring the bypass needs to be setback 1.5 inches aft of the rear bulkhead. Make a cut on both sides of the bypass to clear the bulkhead. The bell mouth of the pipe mounts to the outside of the bypass. You will need to cut away the flat sides on the rear to allow the bell mouth to push up onto the bypass. Do some careful sanding here to achieve a good fit. Once happy, drill 5 holes through the bell mouth and secure it to the lower section of the bypass.
Ill be working on the wings this evening, Installing slat servos and lights.
More to come.
04-09-2015, 01:04 PM
#63

My Feedback: (2)
Join Date: Dec 2008
Location: CORAL GABLES,
FL
Posts: 234
Likes: 0
Received 0 Likes
on
0 Posts
I wonder why they did not map a cover for the aileron servos and mount from the outside which would make service and changing of servo much easier in the future,
J.C.
J.C.
04-09-2015, 02:00 PM
#65
Thread Starter
My Feedback: (4)
Join Date: Aug 2009
Location: Kennesaw ,
GA
Posts: 107
Likes: 0
Received 0 Likes
on
0 Posts
I have no bolt in aft post, 5mm bolt came with hardware...only one. I don't think a 5mm bolt is used for anything else. I do have a forward bolt (and hole in fuselage to tighten/loosen) and it is not metric. I think it is 4/40 since a standard hex fits to tighten/loosen.. I removed the forward bolt and attempted to insert a 2 and 3mm bolt but didn't fit....threads did not match. I find it odd that they used a standard bolt?? I wish the aft bolt was installed since I cant get it installed from the inside. I guess I will have to enlarge outside hole to be able to insert bolt 
Both of my bolts came uninstalled, I cut off a small section of the 5mm bolt to allow me to insert it from the inside and not enlarge the hole. The other smaller bolt in the front was easy to install with the standard length.
04-10-2015, 09:15 AM
#69

Be honest with you I dislike that setup alltogether. If the idea was to save one servo lead connection during setup, I could live with that. But I think a conventional setup with the servo inside the wing and a solid linkeage is still far more robust. Besides, dont you have to hook up the LE Flap servo lead anyway?
David

