


Foamie jet for X45/K45 ?

 05-19-2020, 03:44 PM
#53

My Feedback: (20)
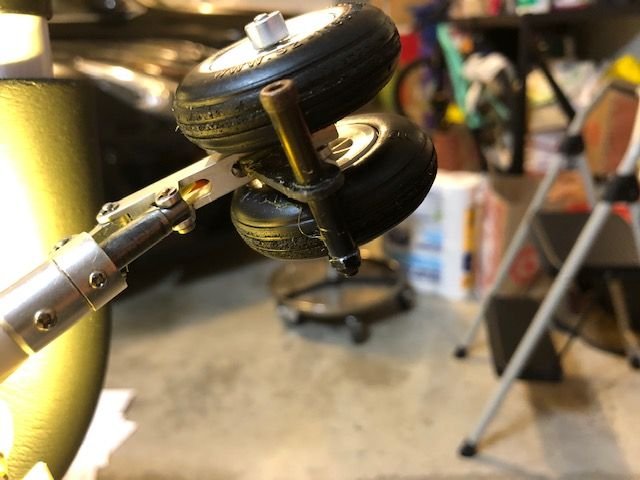
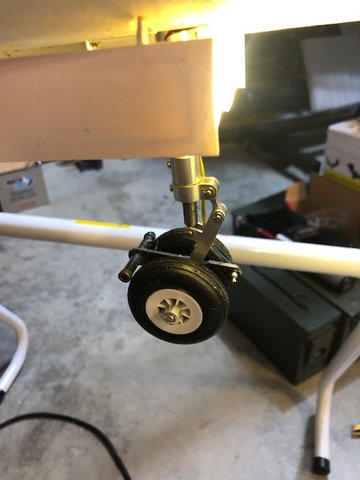
Yes, I have installed JP brakes on all 3 of my foamy jets now. I'm running them on the FW F-22, F-4, and Mig-21, all using the K-45G3. The brakes work well but the controller is poor. Its basically an on off switch that I can not program to have soft or anti skid braking despite trying several times and different ways. I have only flown the foamies on grass so it has not been a big problem so far. On pavement the controller would not work very well. I have seen videos that say the Xicoy brake controller is much better but I have not tried it. Since I have only flown the foamies on grass, the brakes are not really needed, except to comply with AMA rules, but if on pavement it would be a necessity for sure because idle thrust will start it rolling pretty fast.
If anybody has had luck getting the JP brake controller to give soft or anti skid braking please let me know how you did it.
Thanks,
Gary

If anybody has had luck getting the JP brake controller to give soft or anti skid braking please let me know how you did it.
Thanks,
Gary
05-19-2020, 03:57 PM
#54

Yes, I have installed JP brakes on all 3 of my foamy jets now. I'm running them on the FW F-22, F-4, and Mig-21, all using the K-45G3. The brakes work well but the controller is poor. Its basically an on off switch that I can not program to have soft or anti skid braking despite trying several times and different ways. I have only flown the foamies on grass so it has not been a big problem so far. On pavement the controller would not work very well. I have seen videos that say the Xicoy brake controller is much better but I have not tried it. Since I have only flown the foamies on grass, the brakes are not really needed, except to comply with AMA rules, but if on pavement it would be a necessity for sure because idle thrust will start it rolling pretty fast.
If anybody has had luck getting the JP brake controller to give soft or anti skid braking please let me know how you did it.
Thanks,
Gary
If anybody has had luck getting the JP brake controller to give soft or anti skid braking please let me know how you did it.
Thanks,
Gary
05-19-2020, 04:18 PM
#55
My Feedback: (20)
Thanks for the tip. I'll give that technique a try on the JP brakes. I also considered just a NW brake and my friend Keith 3D printed a servo operated drag brake but I wanted to try the JP brakes. I think just a drag brake on the nose wheel would probably work if it would not get too hot at high speeds.
05-19-2020, 04:33 PM
#56
My Feedback: (2)
I have not had much success with the controllers on JP brakes. I did find that with the simple on/off controller that if you have uneven braking you can reduce the braking on the heavier of the two buy polishing the mating surfaces of the brake. With these lighter foamies a high polish on both brakes should give a gentler stop on a paved runway. I will try this and let you know how it goes.
05-20-2020, 01:53 AM
#58
Not really a brake, but a 1-2mm long piece of silicone fuel tubing on the axle pushing up against the wheel hub works really well. The power of the turbine overcomes the drag easily on take-off but slows it down nicely on landing, but probably not suitable in countries where brakes are required on turbine aircraft. Also, on my jets where I do have brakes, I use some light grease on the O-ring and it stops the brake grabbing.
05-20-2020, 08:12 AM
#60
My Feedback: (20)
Yep, the silicone tube drag brake is a good practical idea that would work ok but unfortunately the AMA rule says you must be able to come to a controlled stop “on command”. So I just opted for the electric brakes. Anyway the JP system works ok on grass but would need a better controller on pavement. Paul recommends the Xicoy controller and it works well in his videos.
05-20-2020, 01:46 PM
#62
https://www.dubro.com/products/e-z-brake-system
05-20-2020, 02:42 PM
#63
My Feedback: (20)
05-20-2020, 03:54 PM
#64
Hi All, here are pictures of the break design i did for the nose of the stinger. it works great wit one micro servo. I hope you can use it. The pull cable is from Pull Pull system. I cut the sleeve of it to 10mm pieces so it is really flexible but still works well.
05-22-2020, 02:27 PM
#67
Did anyone happen to see the YT videos of the FMS SU27 and SU30 with 45 size turbines (/KT and Xicoy)?
One of them had a very nice small VT unit on the tail.
https://www.youtube.com/watch?v=oJx_HOwuBII
https://www.youtube.com/watch?v=qyrXC4CAqUo
https://www.youtube.com/watch?v=zKLN8xwjfok
One of them had a very nice small VT unit on the tail.
https://www.youtube.com/watch?v=oJx_HOwuBII
https://www.youtube.com/watch?v=qyrXC4CAqUo
https://www.youtube.com/watch?v=zKLN8xwjfok
G-VECTOR MINI - GRUMANIA JETS
05-22-2020, 02:33 PM
#68
My Feedback: (3)
I like how he eventually ended up with a single central external kero tank as opposed to the dual kero tanks in each inlet
It looks like he 3D printed a Cover for the fuel tank to minimize drag
Nice conversion plane
I can’t purchase the F22 and have looked at the YF23 frim
LX models but haven’t come up a x45 install tgat looks like it would work
I’d give anything for a turbine YF-23 model ...
It looks like he 3D printed a Cover for the fuel tank to minimize drag
Nice conversion plane
I can’t purchase the F22 and have looked at the YF23 frim
LX models but haven’t come up a x45 install tgat looks like it would work
I’d give anything for a turbine YF-23 model ...
05-22-2020, 04:23 PM
#69
I like how he eventually ended up with a single central external kero tank as opposed to the dual kero tanks in each inlet
It looks like he 3D printed a Cover for the fuel tank to minimize drag
Nice conversion plane
I can�t purchase the F22 and have looked at the YF23 frim
LX models but haven�t come up a x45 install tgat looks like it would work
I�d give anything for a turbine YF-23 model ...
It looks like he 3D printed a Cover for the fuel tank to minimize drag
Nice conversion plane
I can�t purchase the F22 and have looked at the YF23 frim
LX models but haven�t come up a x45 install tgat looks like it would work
I�d give anything for a turbine YF-23 model ...
Aluminium engine cover.
Inlet blanks to reduce drag.

Fly-screen engine cover.
05-23-2020, 09:15 AM
#70
My Feedback: (2)
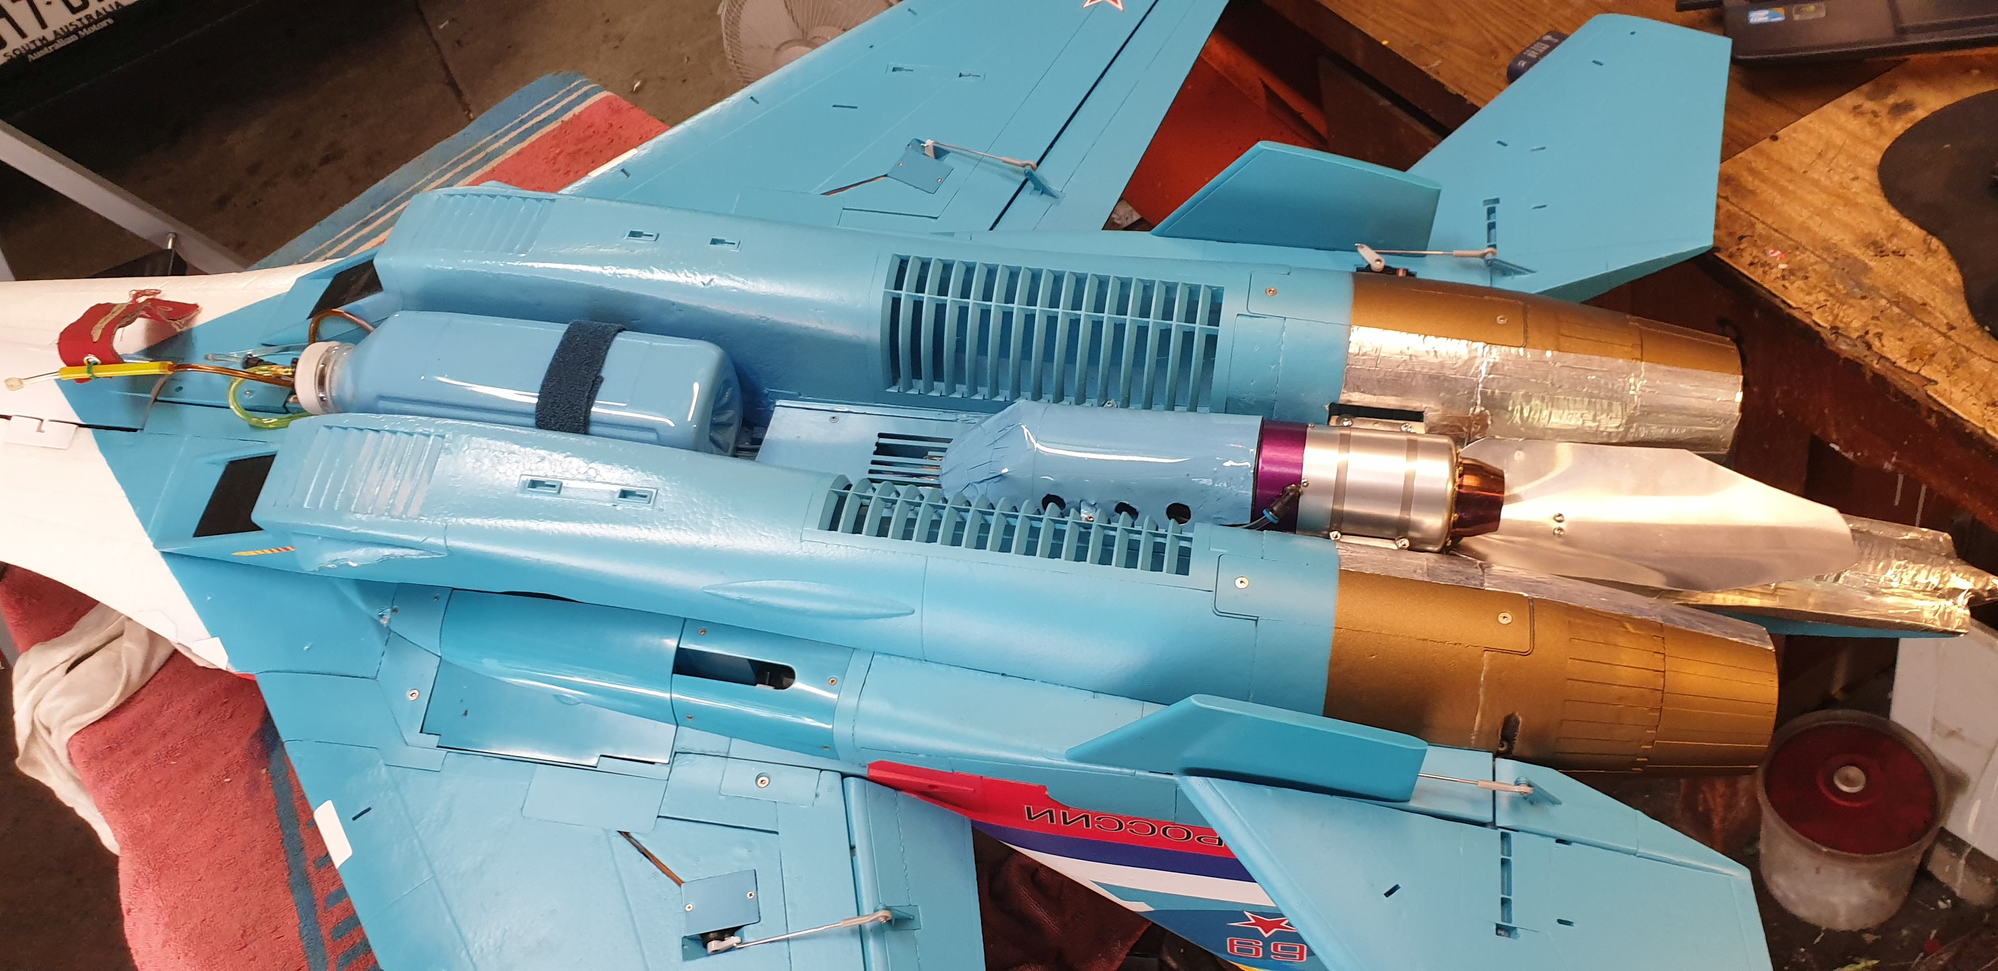
Gotta love all this "seat of the pants" engineering on these turbine EDF conversions! Looking forward to starting on my project. The F22 has arrived and is ready to maiden as soon as the wind lays down some at our field. Will start out on the book CG then move it back and try Gary's set up. Will be good to get some stick time on it before starting the conversion. The X45 should show up this coming week. Map UAT, BEC and JP wheels and brakes on the way. Am wondering about the trust line for the turbine. Same as the EDF or down a little?
05-24-2020, 08:09 AM
#71
My Feedback: (2)
A question about fuel tank placement in the F22. The jets I am currently flying have the tank just forward of the CG. Balance is done with dry tank and full UAT. So on takeoff they are nose heavy and at landing still a little nose heavy with a quarter or third tank remaining. I have a 32 oz Dubro tank (950cc) on hand that will fit with the aft end of the tank against the CF spar. this puts the center of the tank about 2 inches forward of the book CG. I could get to the CG using two 16 oz tanks sitting over the spar. Seems like typical jet setups put the tank just forward of the CG. Any thoughts on this??
05-24-2020, 03:21 PM
#72
My Feedback: (20)
On my F-22 thrust line I basically "eyeballed" it using highly sophisticated seat of the pants TLAR (that looks about right) technology. So far its been "about right". On the F-4 I used TLAR to align the the panel line on the side of the fuse with a carbon rod from the old fan mount out the center of the twin nozzles. Once again, it was about right.
If I could, I would put the fuel on the CG as much as possible. If for other reasons, cost, effort, parts on hand, time, etc you want to put the fuel ahead of the CG I would use the technique of balancing the model at landing fuel. For me thats 25-30% remaining. Then your not so nose heavy on TO and during the first part of the flight. I have found most of the "book" CGs are very nose heavy. I usually start a little farther aft and fly. Then I adjust it from there to my comfort and preference.
On my 8S F-22 I was flying around with about 4 oz of lead on the tail. See my post #15 in this thread. Was the same for the F-4. So I just checked it on my Xicoy CG machine and used that as a target for the turbine conversion.
The bottom line for me is the weight has not been that big of a deal. I may have been able to save a couple of oz by using a pipe and ultra light everything but it really didn't matter. I mounted the turbine in the tail, battery in the nose plus some extra weight, CTU, airspeed module, later added JP brakes, and they all flew great. Just wasn't a big deal. So my advice is to just put your stuff in there and fly it. It's a blast. Just watch the speed as you can get going real fast, real fast. No need for a foam explosion.
Just my two cents worth.
Gary
05-24-2020, 03:57 PM
#73
My Feedback: (20)
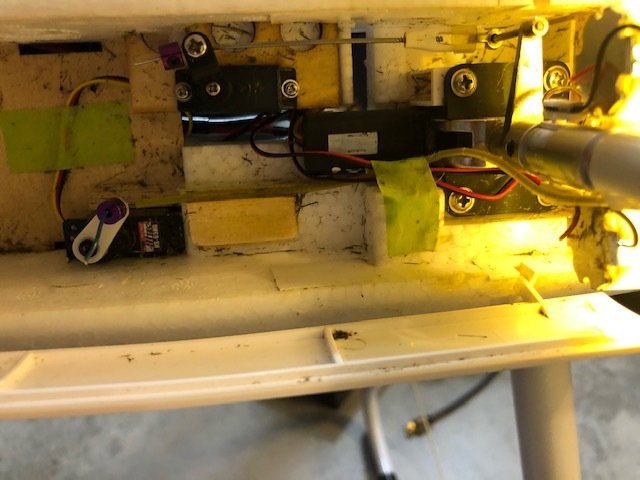
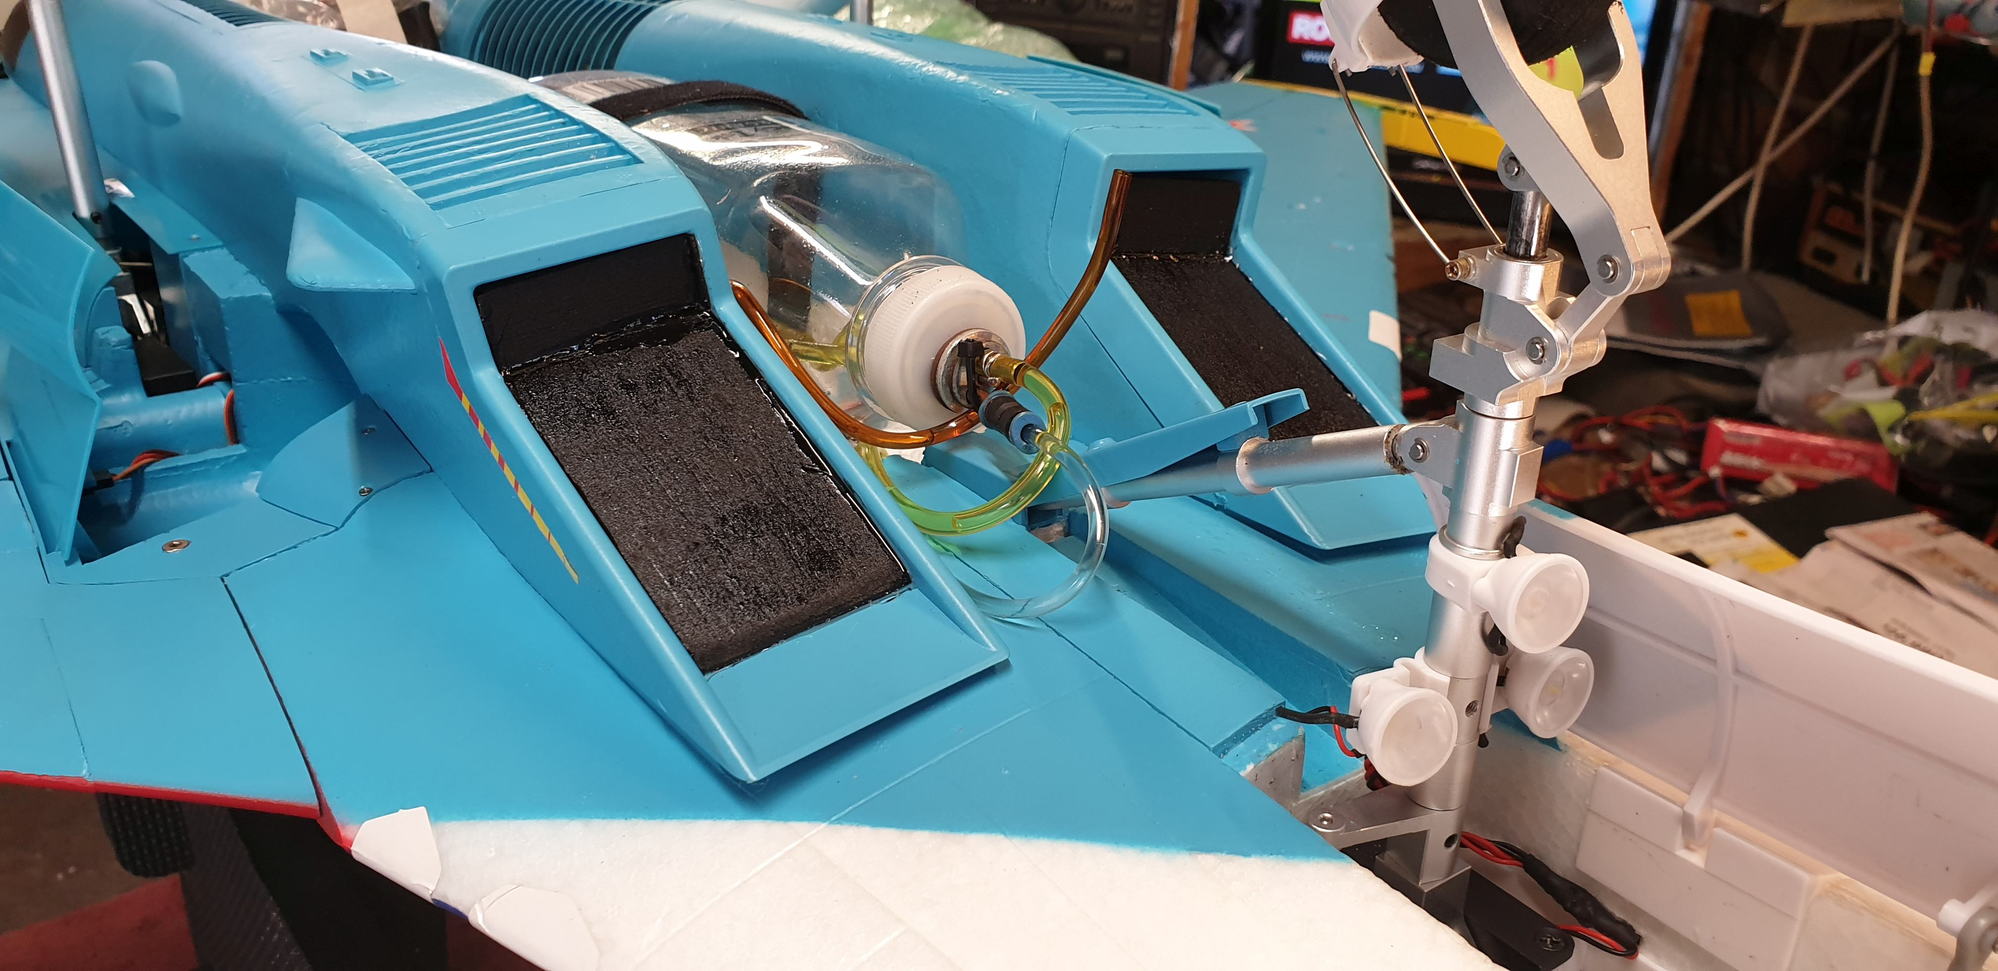
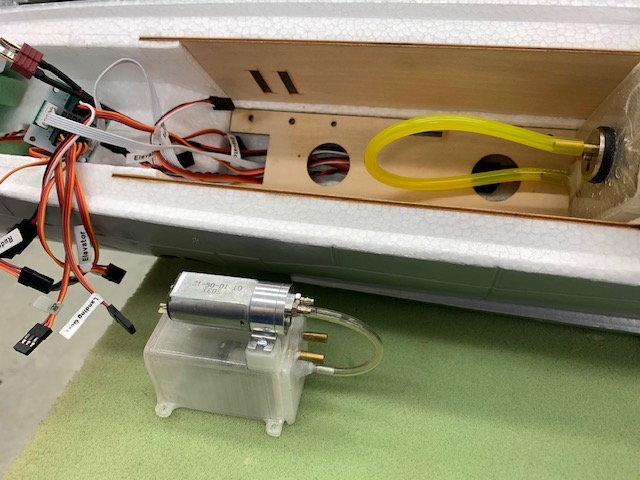
Here is the latest one I did back in March. Its the 90mm FW MIG-21. I got the already converted airframe from my friend Keith (Yellowbird911). He had been flying it on a K-45. He 3D printed the tank to sit on the CG, and installed an HAB single wall pipe. I dropped my K-45G3, Jeti REX12A, CTU, airspeed module, and JP brakes. I also used the new 3D printed air trap tank and pump mount that Keith made for me. See photo below.
It flies well but is quite exciting since I have to really focus and concentrate to see it and tell which way its pointed. I don't have the same issue with either the F-22 or the F-4. Not quite like cruising around with the big Havoc that I can see very well, but have to have a wheeled dolly to move it around!
I think its cool but it will be looking for a new home soon because I have a used FW 90mm F-16 on the shelf for my next foamie project using one of Paul's custom fiberglass tanks.
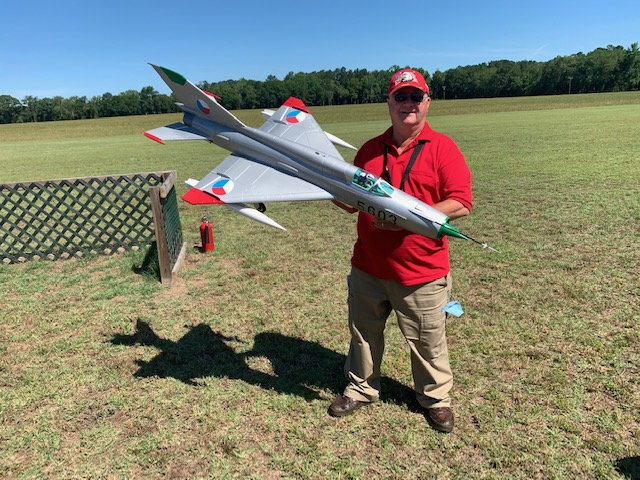
It flies good but hard for me to see and keep oriented.
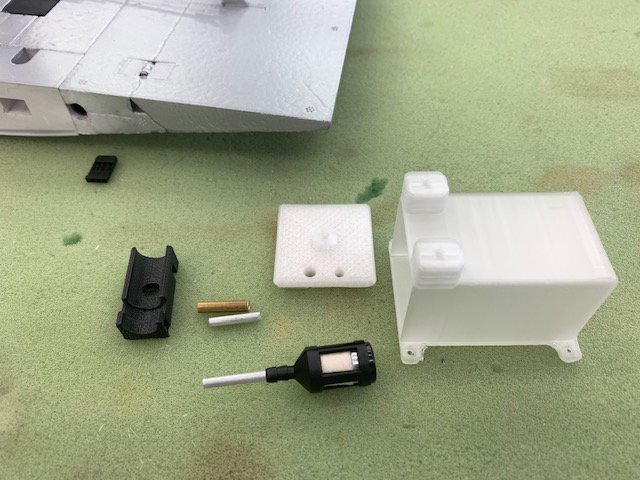
3D printed air trap and K-45 pump mount with internal parts. The black part to the left is Keith's 3D printed festo ball valve mount.
Tank is 3D printed, then the tubes and filter are epoxied in the cap. Then the tank is coated inside and out with laminating epoxy, and the cap is glued on using Hysol. When cured it is leak tested under water.
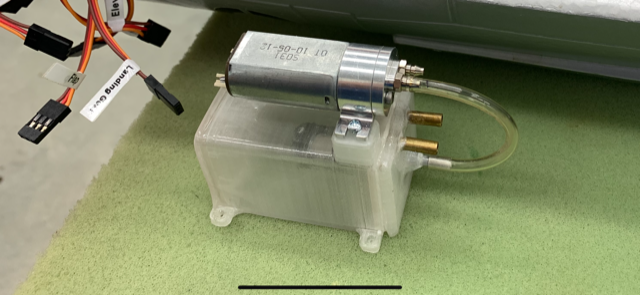
Pump is mounted on top. It makes a real cool way to save limited real estate in the foamies for a combo air trap and pump mount.
It flies well but is quite exciting since I have to really focus and concentrate to see it and tell which way its pointed. I don't have the same issue with either the F-22 or the F-4. Not quite like cruising around with the big Havoc that I can see very well, but have to have a wheeled dolly to move it around!
I think its cool but it will be looking for a new home soon because I have a used FW 90mm F-16 on the shelf for my next foamie project using one of Paul's custom fiberglass tanks.
It flies good but hard for me to see and keep oriented.
3D printed air trap and K-45 pump mount with internal parts. The black part to the left is Keith's 3D printed festo ball valve mount.
Tank is 3D printed, then the tubes and filter are epoxied in the cap. Then the tank is coated inside and out with laminating epoxy, and the cap is glued on using Hysol. When cured it is leak tested under water.
Pump is mounted on top. It makes a real cool way to save limited real estate in the foamies for a combo air trap and pump mount.
The following users liked this post:
dwr302 (05-24-2020)
05-24-2020, 05:25 PM
#74
My Feedback: (2)
Thanks for the response Gary. Good points to consider. I will sort it all out when all the parts and pieces are here and see what it all looks like on the Xicoy scales. That UAT/pump mount looks like a great idea. Your friend might be able to sell a bunch of those. I went ahead and installed the JP brakes on the F22 while still waiting on the turbine. Very easy drop in job. Even the power leads were more than long enough. I will use a little 430mah 2S lipo to power it for the EDF maiden. Just waiting on the weather to improve a little before putting it up.
Last edited by dwr302; 05-24-2020 at 05:29 PM.