BOOMERANG ELAN - New Build & Setup Thread!
 12-02-2020, 07:25 PM
#526


I should have taken a better picture of this before I installed it. This is the sbus hub, it is a central spot where I send all of the runs. The port layout in the previous pic (Terminal Box BUS) is the physical port assignments. All the leads are neatly secured with a dab of hot-glue. The hope is to never have to remove it, although it is a small (painted) board that is removable, secured by 2 screws to wooden rails I hysol'd to the base of the fuse.
Note: the tank will get installed over this, so it will be hidden.
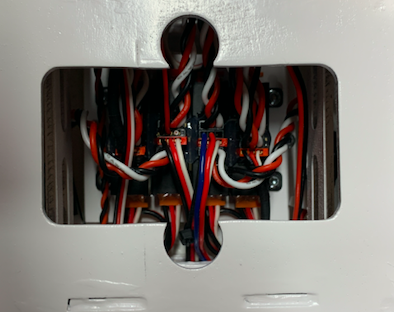
Note: the tank will get installed over this, so it will be hidden.
Last edited by skunkwurk; 12-02-2020 at 07:32 PM.
 12-02-2020, 07:25 PM
#527


I had an older Elan with a P100-RX, Mercury SRS, JetCat mini GSU, etc. Flew just fine, but for this build I'm going for simple, light and reliable. PB Pioneer with iGyro SAT & two PBR-26D Rx's. Planning for a P130-RX, but I have a couple of P100's in the shop, so may start with one of those. After 30 years with Futaba, I now have a Core and LOVE it. You'll never look back.
The following users liked this post:
Spad Dad (12-09-2020)
12-02-2020, 07:30 PM
#528
Once I had the hub in, I started installing gear at the rear and began moving forward. I started by making a custom mount for the AB ring. It is secured with steel wire and is removable if it needs to be replaced. I used a thin layer of BVM heat paint for protection. I also made my own mini-pipe. I am hoping to start a trend with this, we'll see.
Note: I plan on replacing the socket head screws with button heads. I did not have any on-hand and did not want to get distracted. ugh...
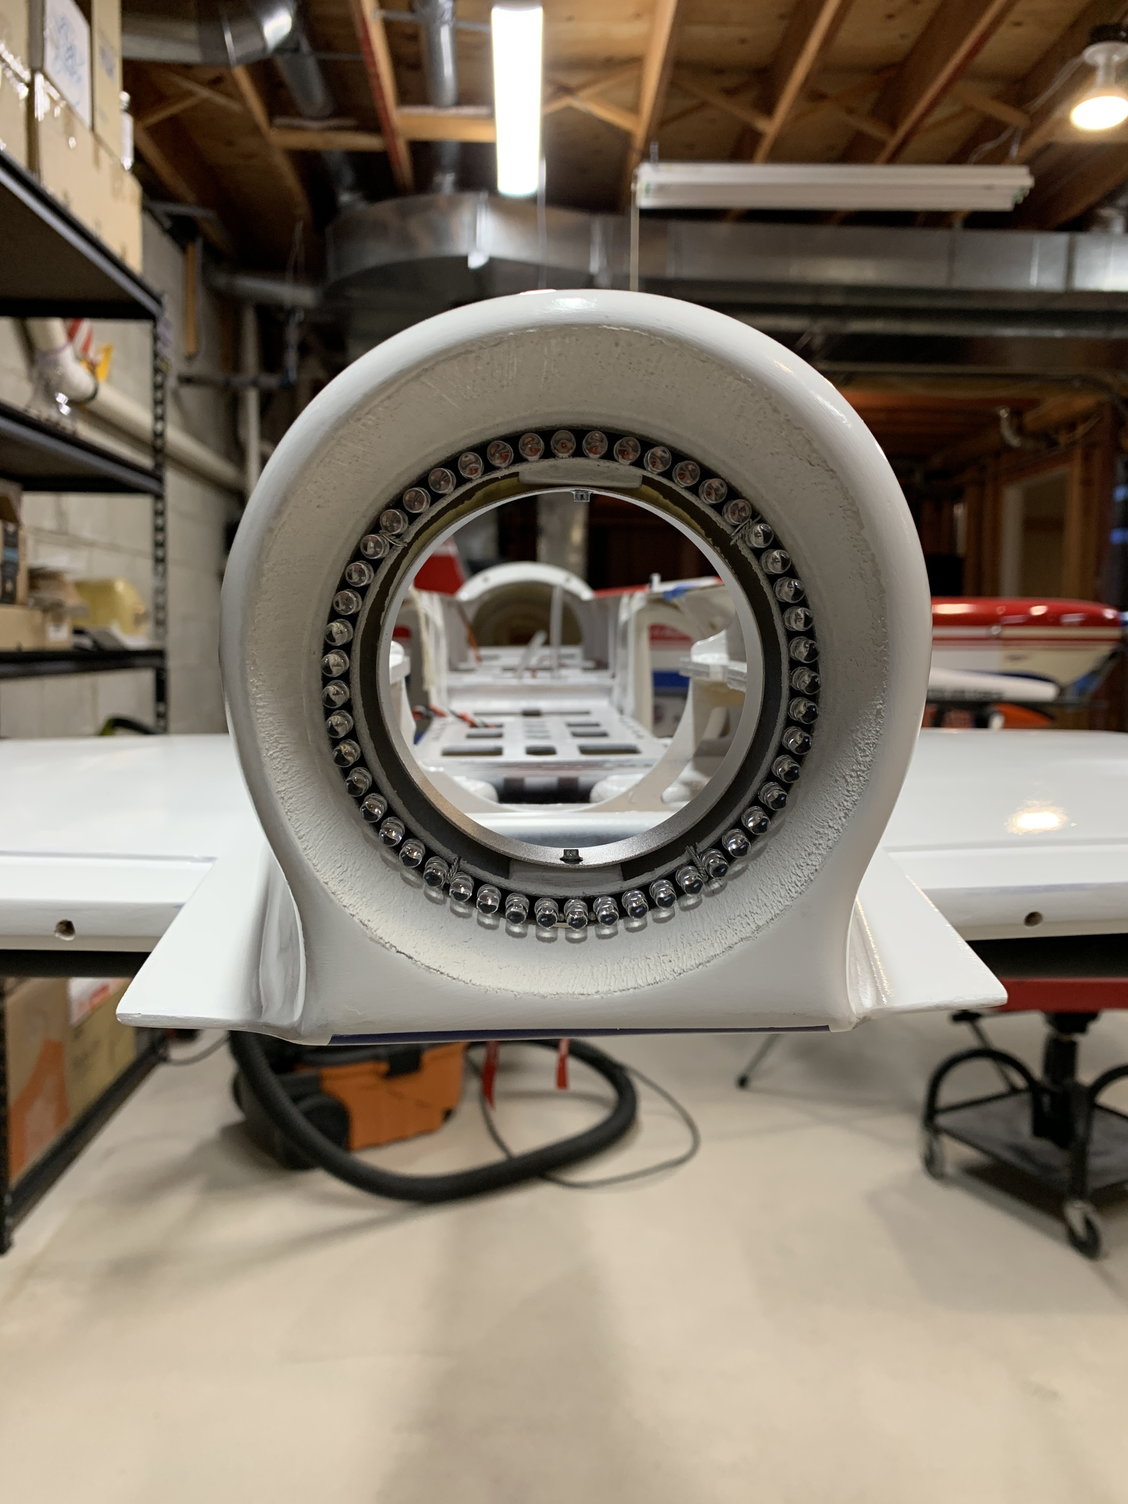
Note: I plan on replacing the socket head screws with button heads. I did not have any on-hand and did not want to get distracted. ugh...
Last edited by skunkwurk; 12-02-2020 at 07:50 PM.
12-02-2020, 07:38 PM
#529
I decided not to hard mount the JP controller. It is velco'd in and I installed it in the aft section (easy access). I am hoping it does not give me any problems, but if I have to remove it, I have a plan for that.
Note: don't look at the wire mess in the fuse, I plan on cleaning those up.

Note: don't look at the wire mess in the fuse, I plan on cleaning those up.
 12-02-2020, 07:47 PM
#531
I had an older Elan with a P100-RX, Mercury SRS, JetCat mini GSU, etc. Flew just fine, but for this build I'm going for simple, light and reliable. PB Pioneer with iGyro SAT & two PBR-26D Rx's. Planning for a P130-RX, but I have a couple of P100's in the shop, so may start with one of those. After 30 years with Futaba, I now have a Core and LOVE it. You'll never look back.
The following users liked this post:
patniven (12-02-2020)
12-03-2020, 06:36 AM
#532
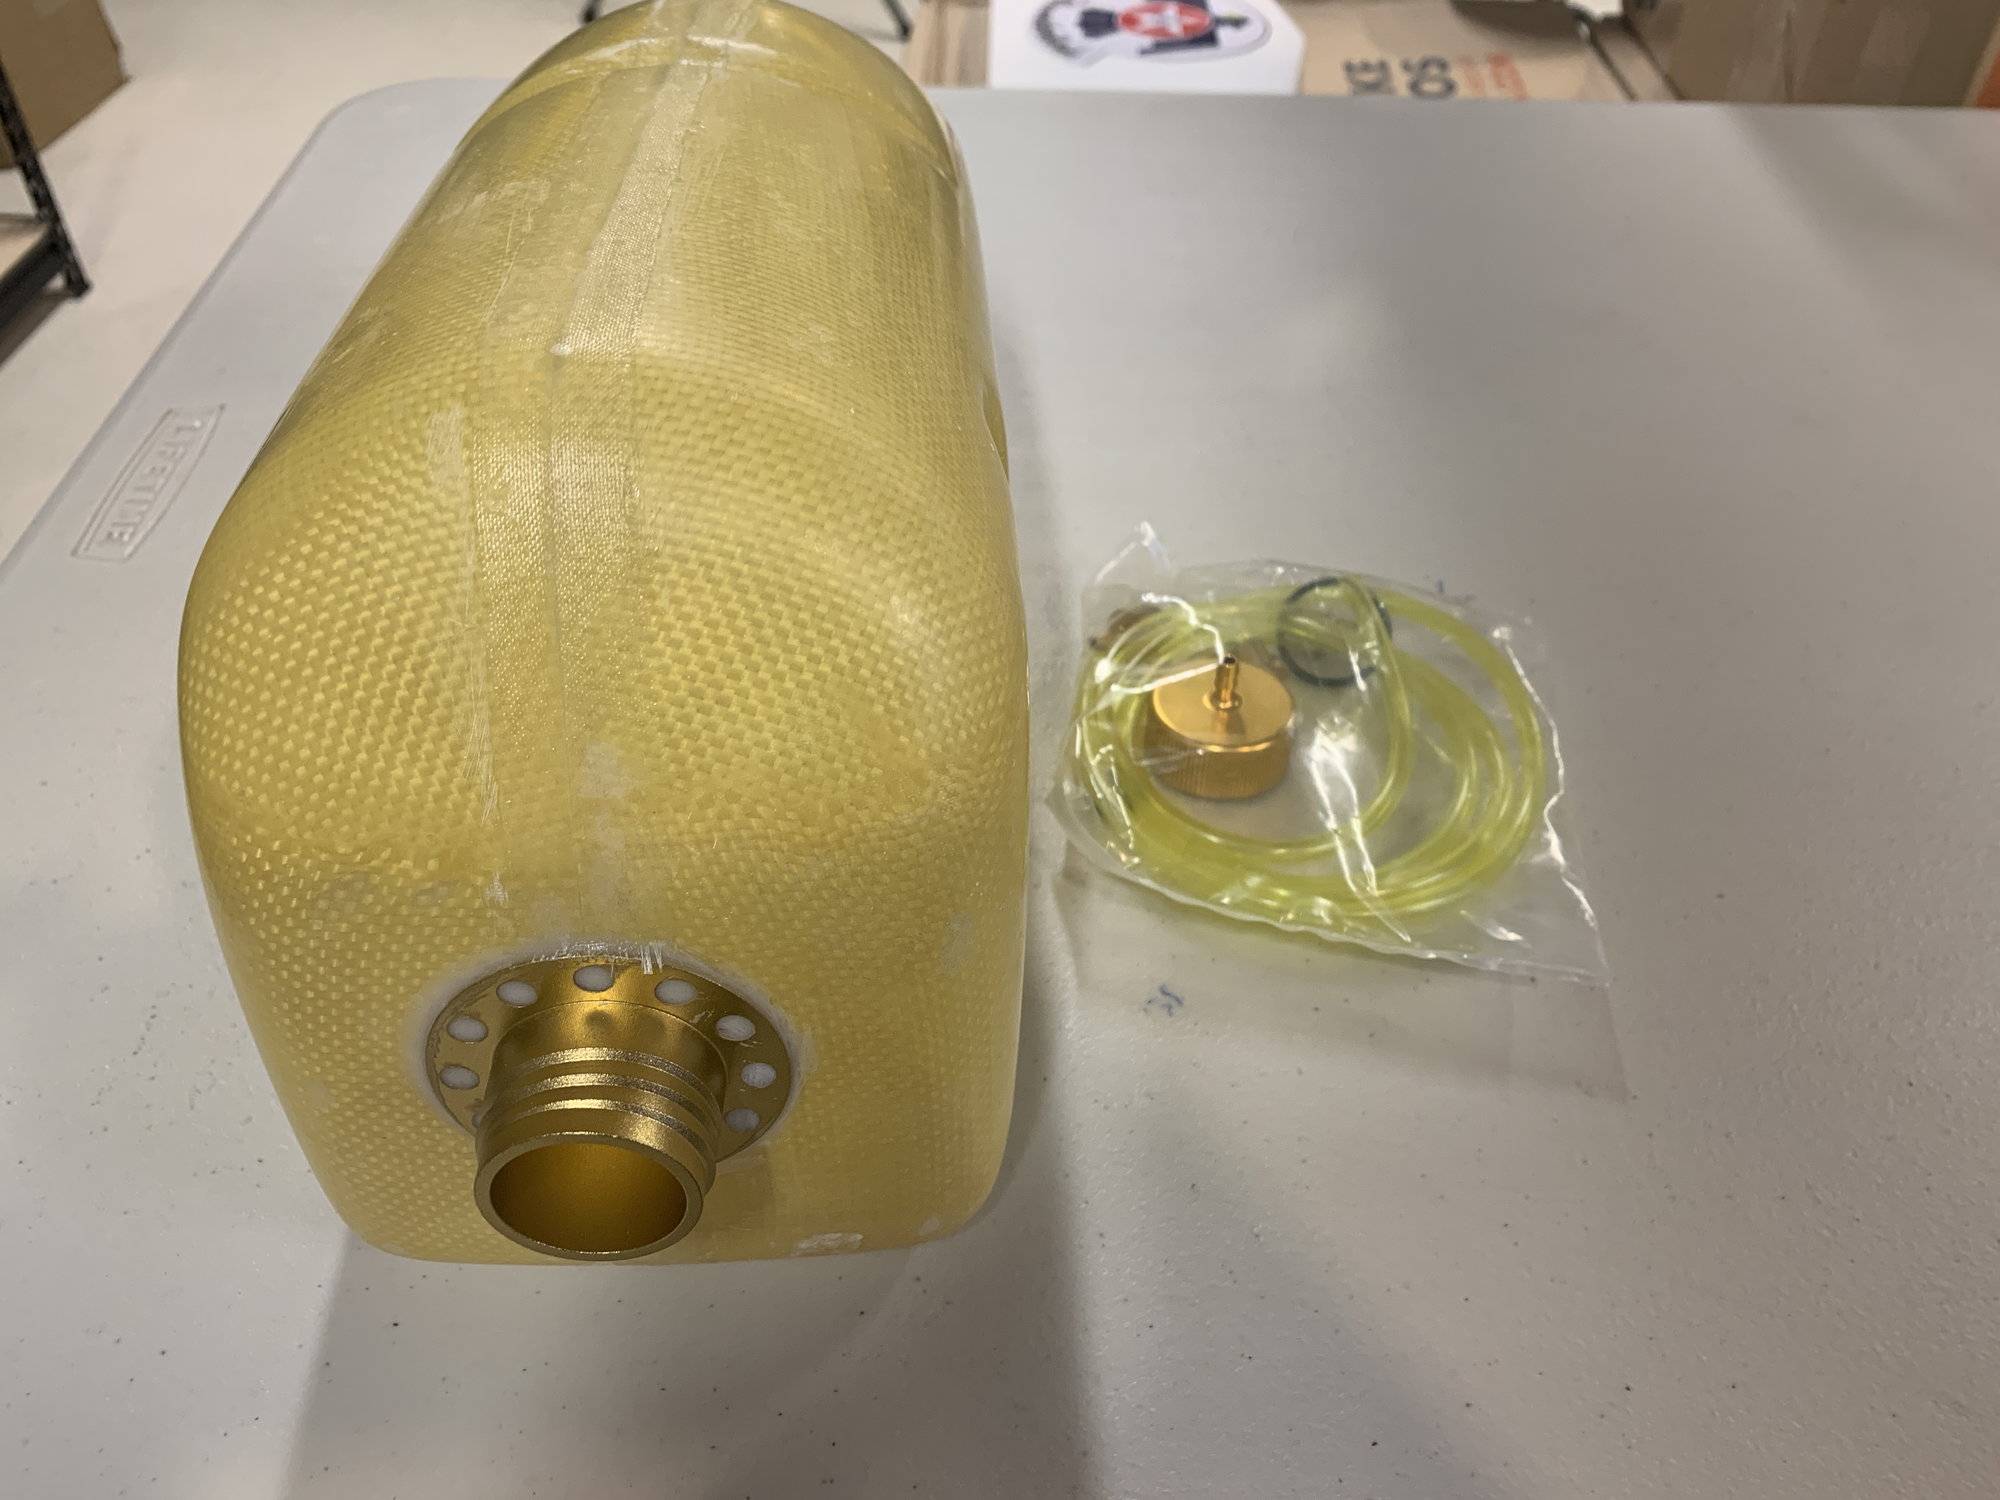
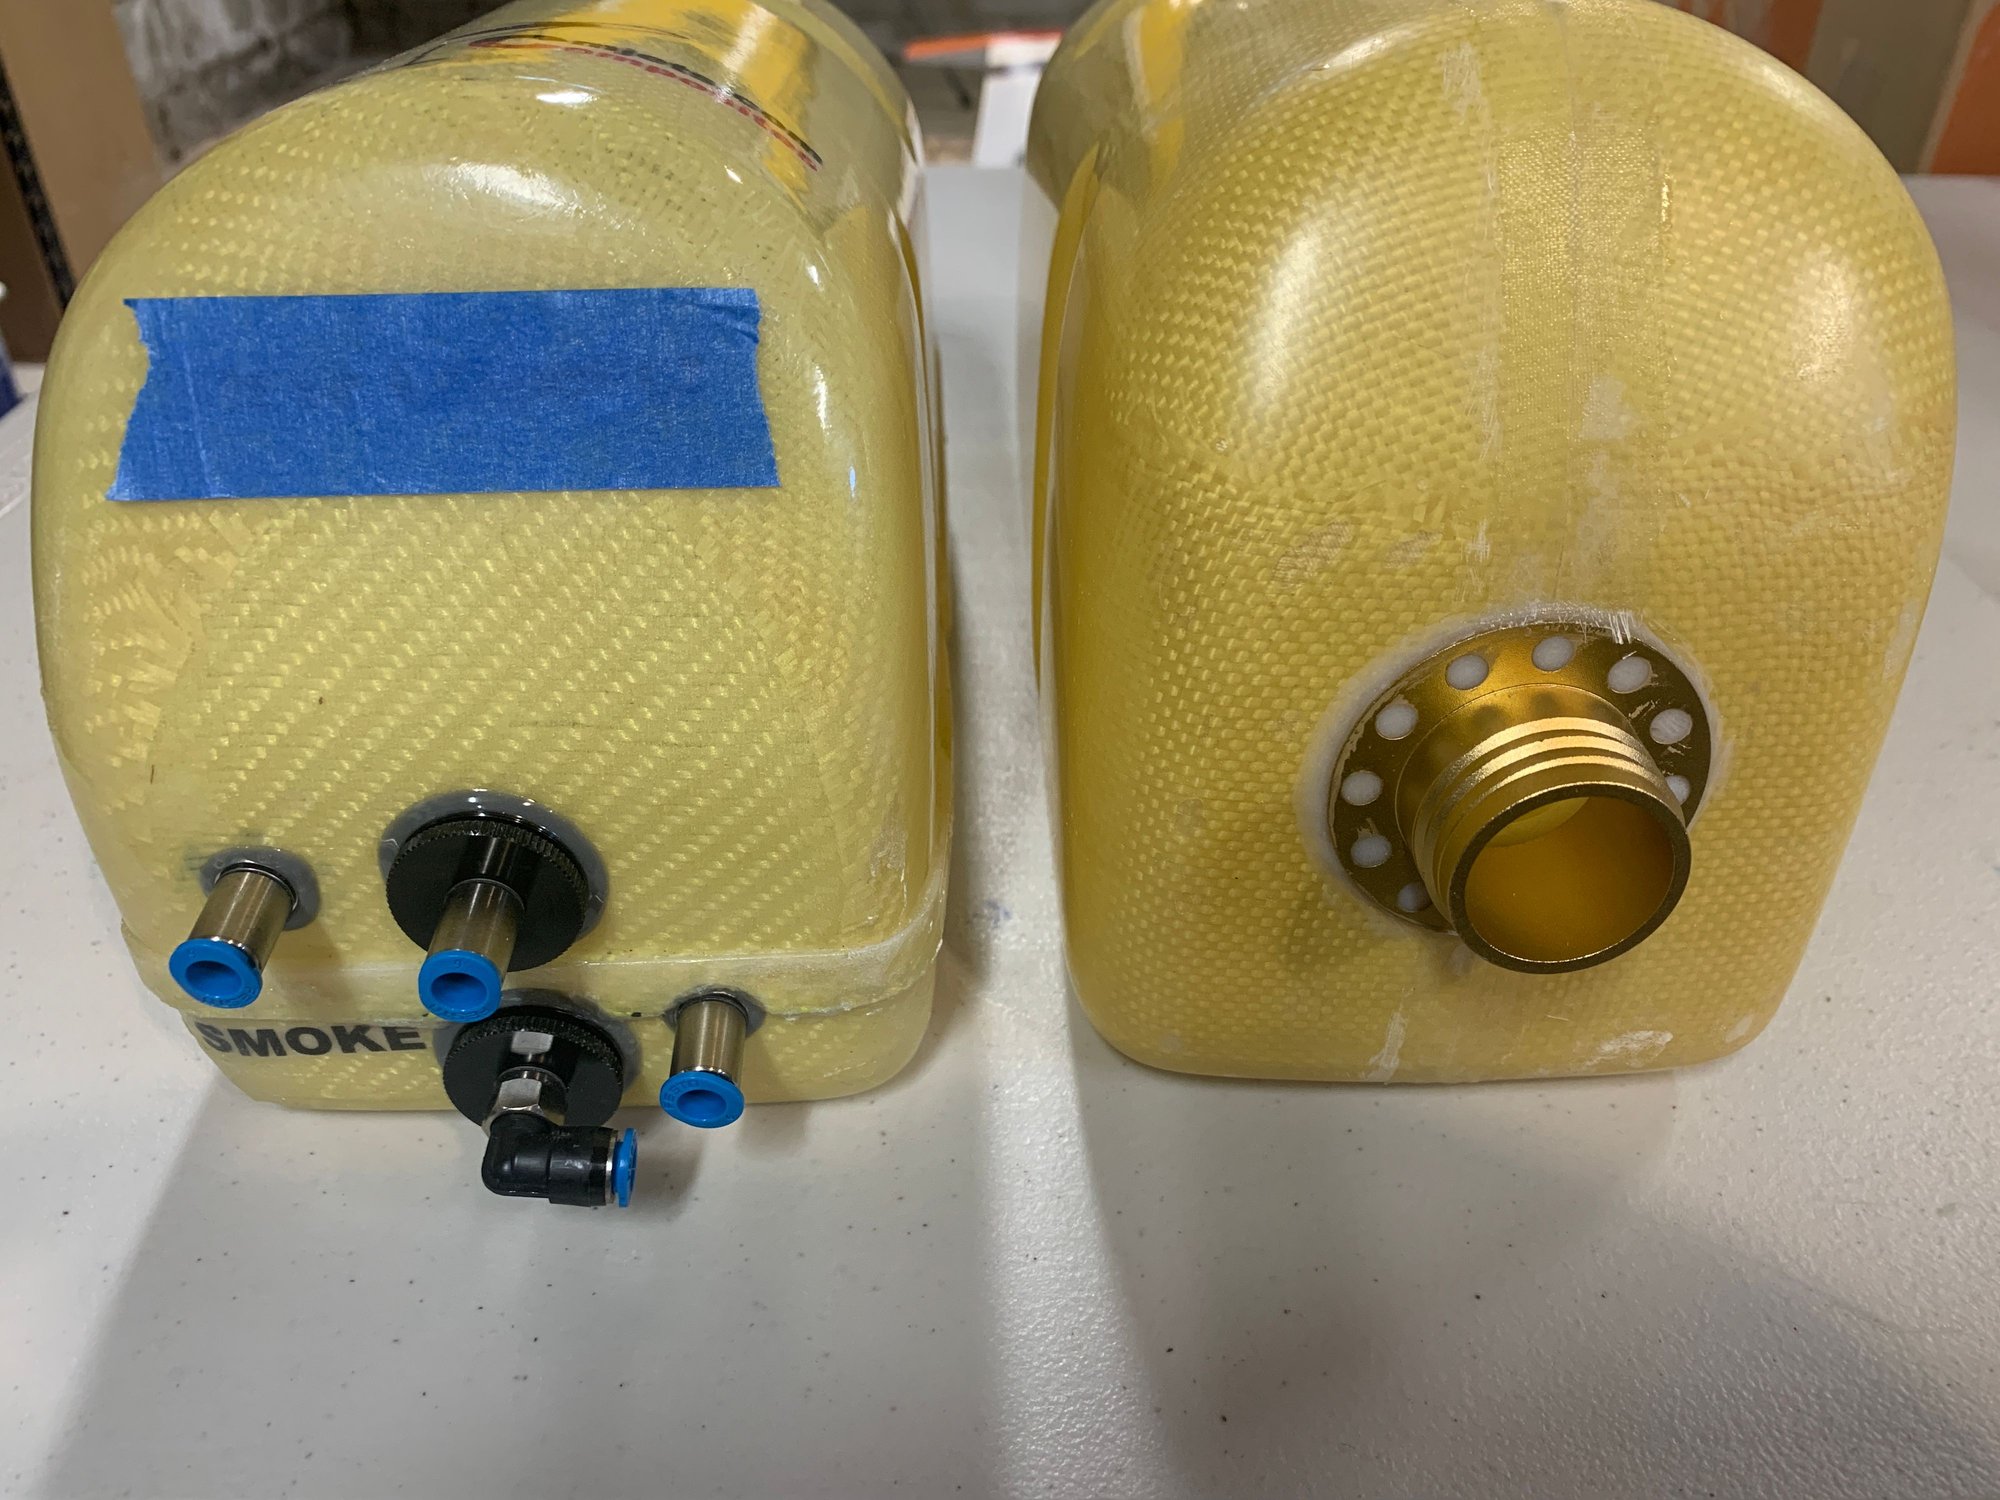
This is the tank the jet comes with. If you remember, there used to be a Sullivan tank that was available as an option from Boomerang. It did not come with the jet but it was an optional part, and it fit perfectly. I used it in a Sprint and it worked well. This tank is so much better, again another improvement Larry has included as part of this new version. That said, I am not going to be using it as I opted to install a smoke system.
Last edited by skunkwurk; 12-03-2020 at 11:19 AM.
12-03-2020, 06:52 AM
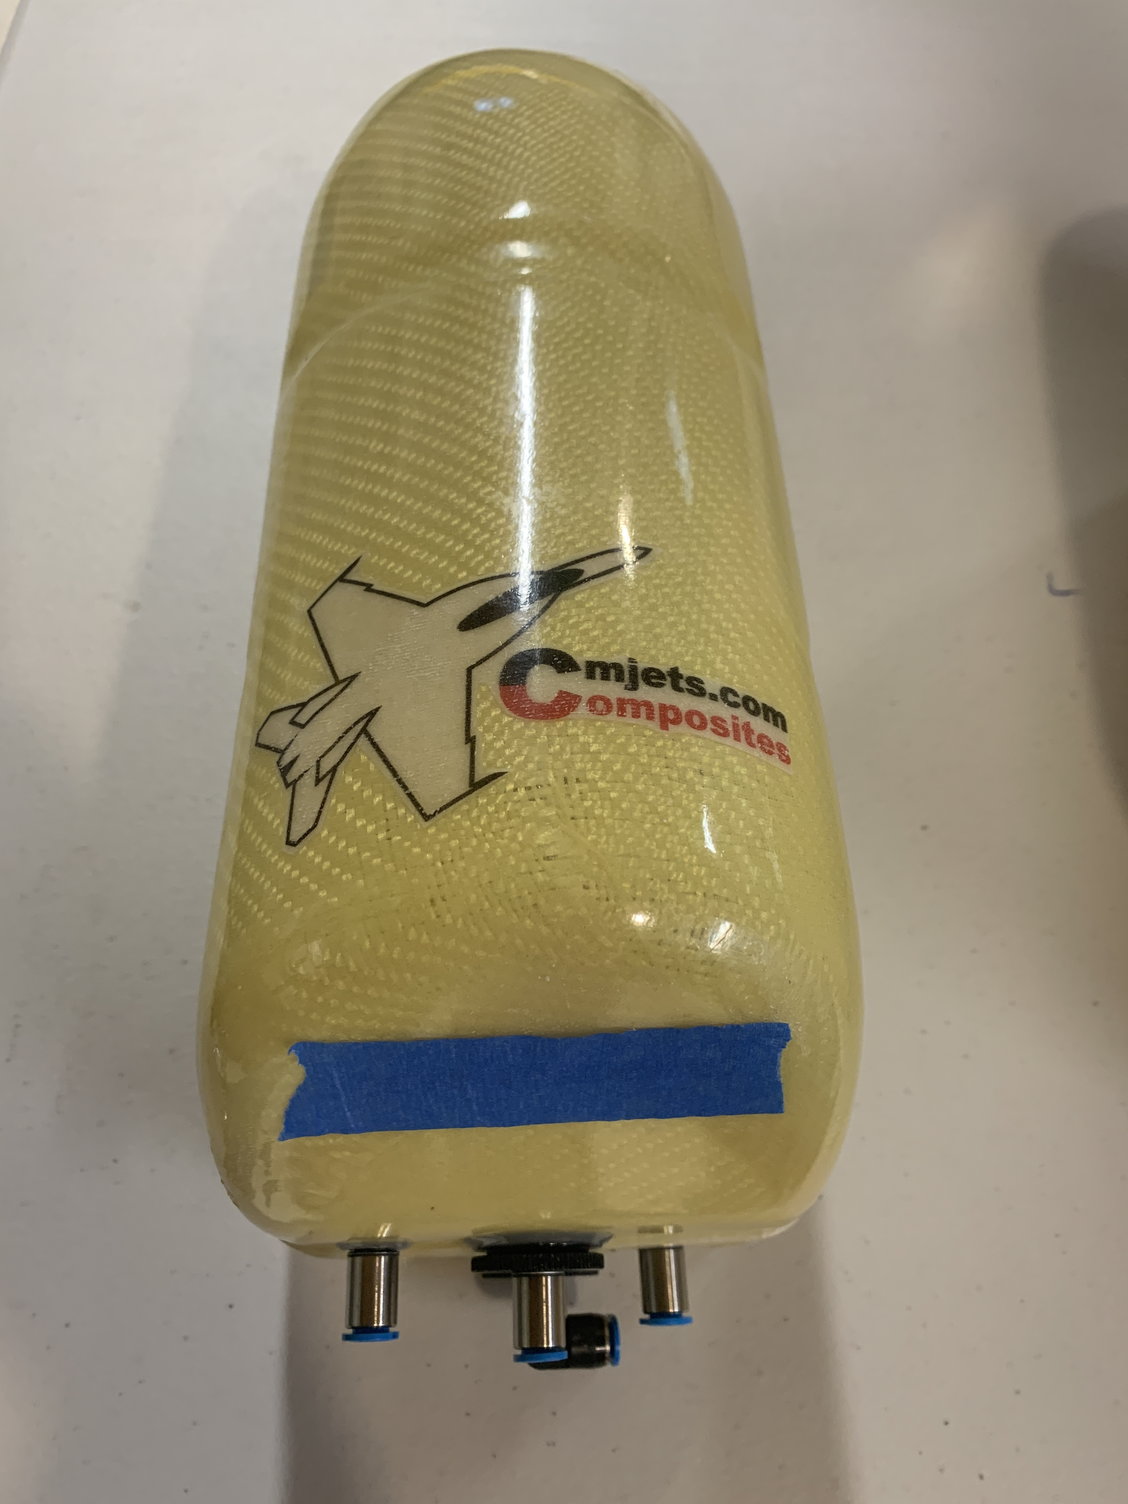
#533
Like any accessory, there are many options out there. For this jet I decided to reach out to Carlos at CMJets. I had a very positive experience dealing with him before, he is a good guy. I installed a set of his tanks in a Pirotti Rebel. There is a separate thread for that jet where I show them installed. That jet has two tanks, one for fuel and one for smoke oil. For the Elan I wanted a combo tank. I saw that CM had a nice setup where both the fuel and smoke tanks are built into a single combo tank.
I sent Carlos a quick drawing asking if he could adjust some of the fittings based on my setup and he was very accommodating. I would not hesitate to recommend using CMJets.
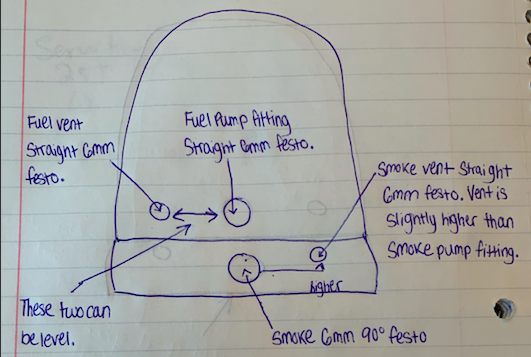
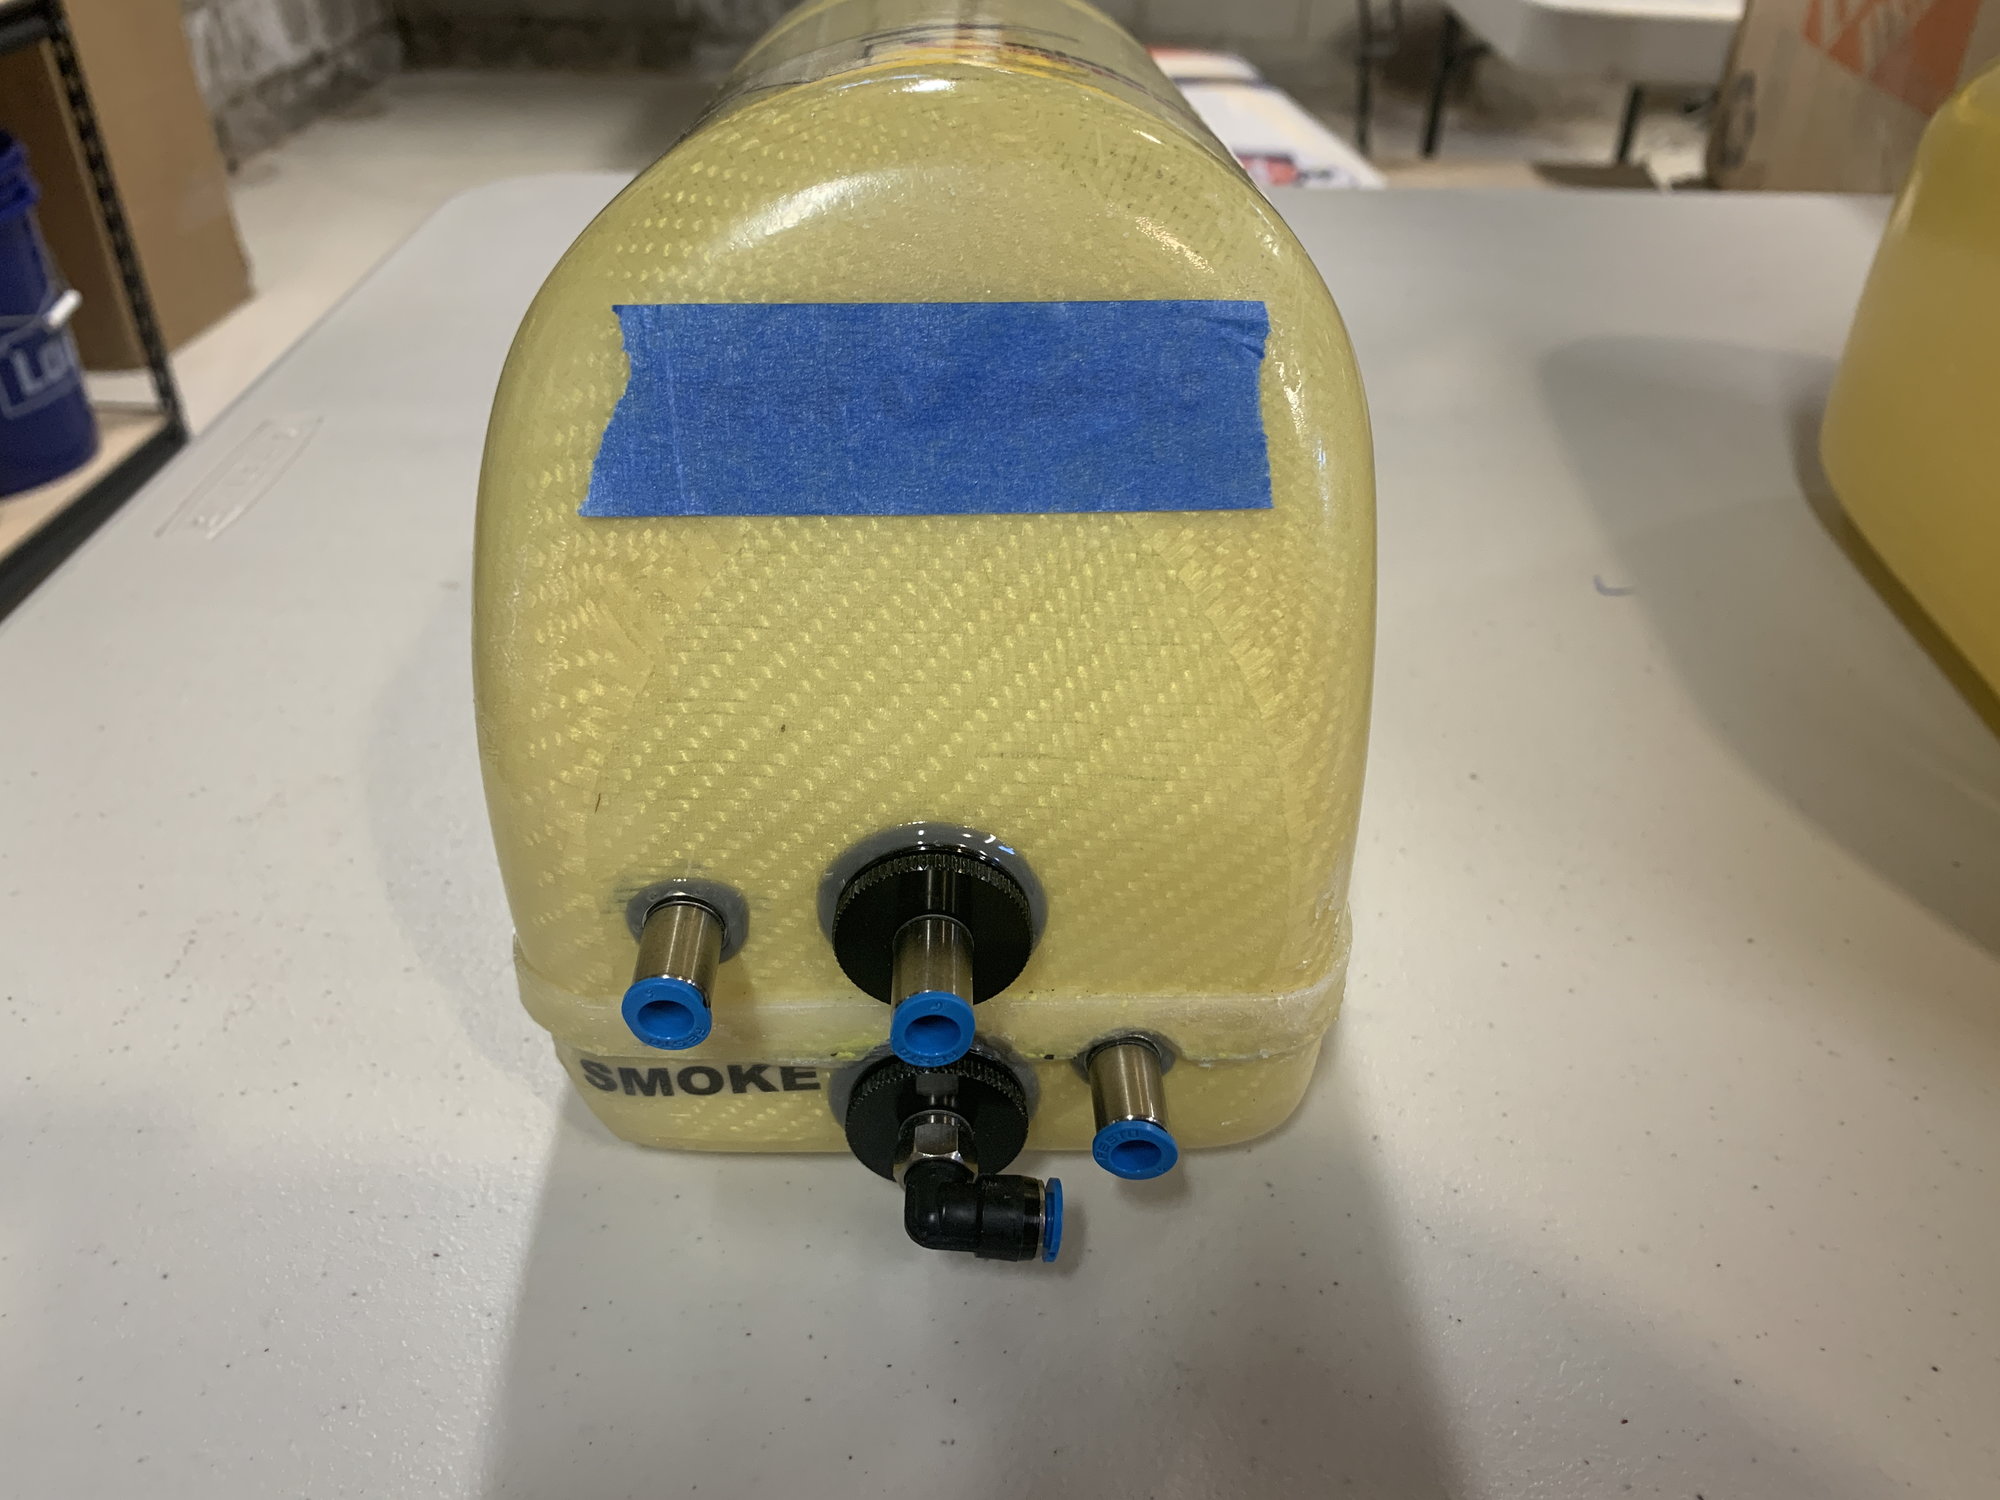
I know - pretty crude drawing. I could have been more specific with my measurements. But I knew what I needed and the tolerances I am dealing with. Carlos made it perfectly.
Note: before someone comments about the fuel vent not going to work, there is internal tubing that properly places the end of the vent up-high in the tank. I am a little apprehensive about this approach, but I figured I would give it a try. If it works well, it should prove to be a nice clean setup. Plus, I can always add a fitting up higher on the tank if I run into a problem.
I sent Carlos a quick drawing asking if he could adjust some of the fittings based on my setup and he was very accommodating. I would not hesitate to recommend using CMJets.
I know - pretty crude drawing. I could have been more specific with my measurements. But I knew what I needed and the tolerances I am dealing with. Carlos made it perfectly.
Note: before someone comments about the fuel vent not going to work, there is internal tubing that properly places the end of the vent up-high in the tank. I am a little apprehensive about this approach, but I figured I would give it a try. If it works well, it should prove to be a nice clean setup. Plus, I can always add a fitting up higher on the tank if I run into a problem.
Last edited by skunkwurk; 12-03-2020 at 07:37 AM.
12-03-2020, 07:16 AM
#534
This is a side by side view of the boomerang tank and the CMjet tank. They are pretty close in size, I am going to have to sand the sides a bit, specifically the kevlar band that is wrapped around the tank. I don't want any pressure on the fiberglass inlets of the jet, an easy fix will be to sand it down a bit. I will seal it with clear resin or an epoxy mix.
Note: I pay for all of my parts, so any recommendation or opinion I share with the community is sincere and unbiased, based on first-hand/personal experience.
Note: I pay for all of my parts, so any recommendation or opinion I share with the community is sincere and unbiased, based on first-hand/personal experience.
12-03-2020, 08:09 AM
#535
I planned on taking PTO today, I was going to join a few fellow pilots at the field and fly this little beauty. It is so nice - I have (4) batteries for it and it is just fun fun fun fun - no drama. Unfortunately, it was 28 degrees this morning, that and with Covid surging I decided to stay home. brrrrrr. I may put a little work into the Elan or just save the PTO day.
Last edited by skunkwurk; 12-03-2020 at 08:27 AM.
12-03-2020, 08:27 AM
#536
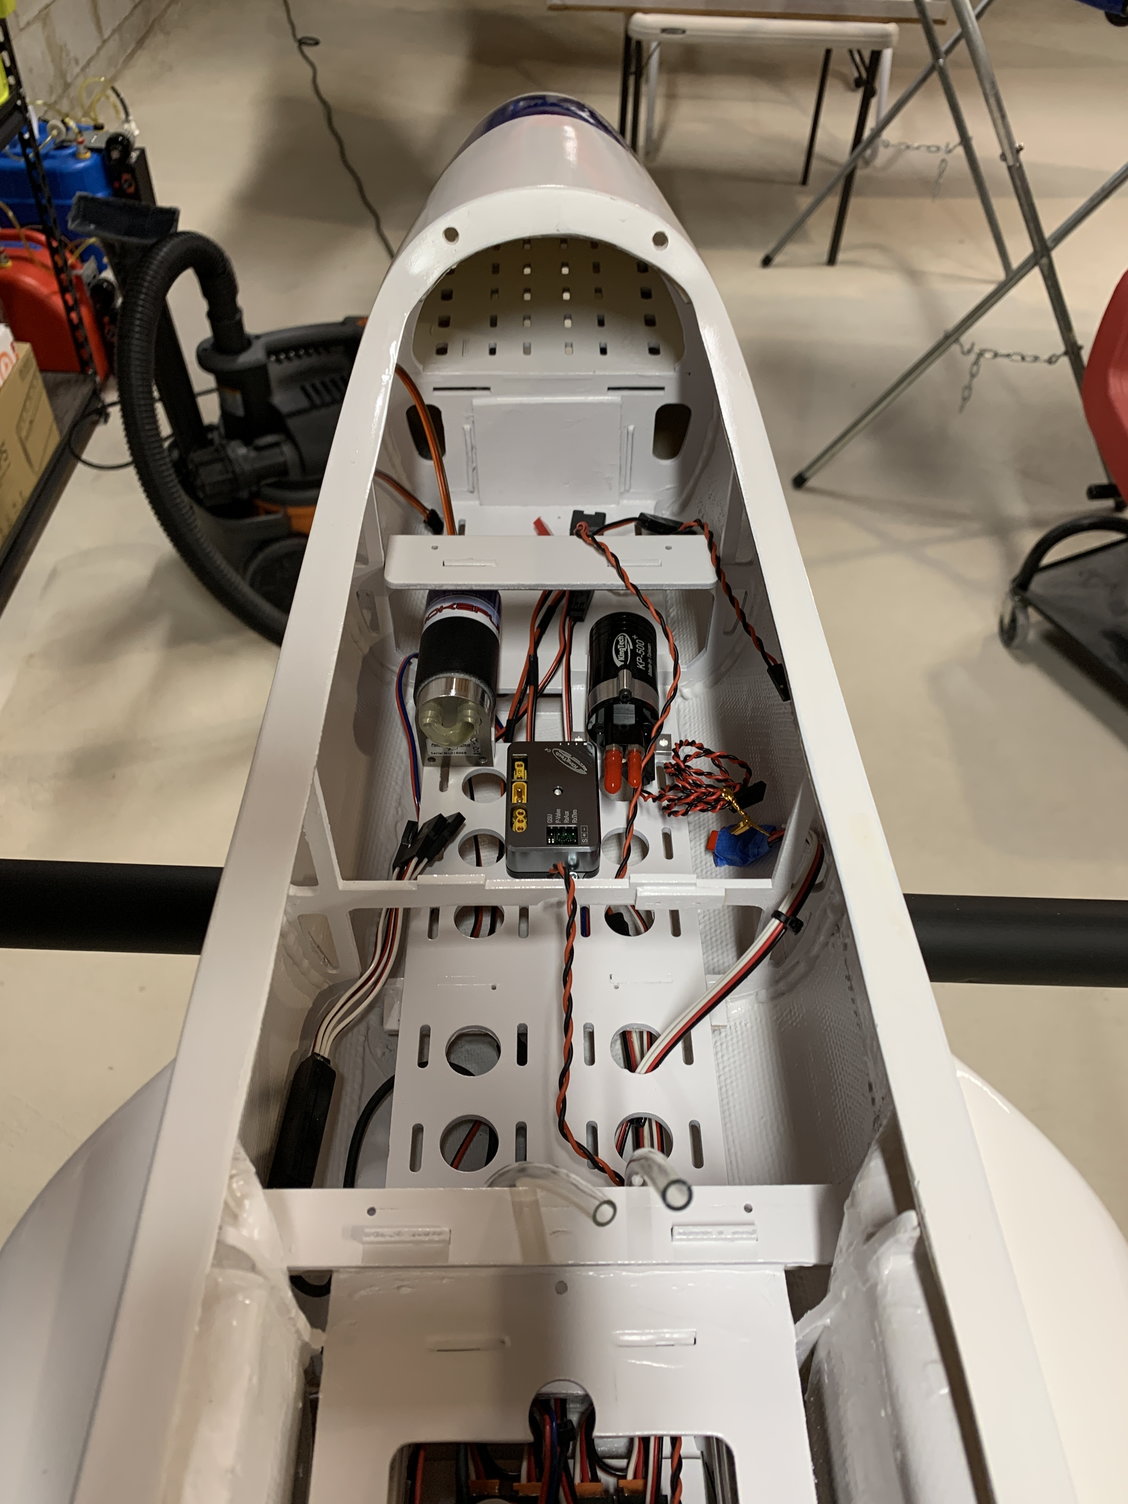
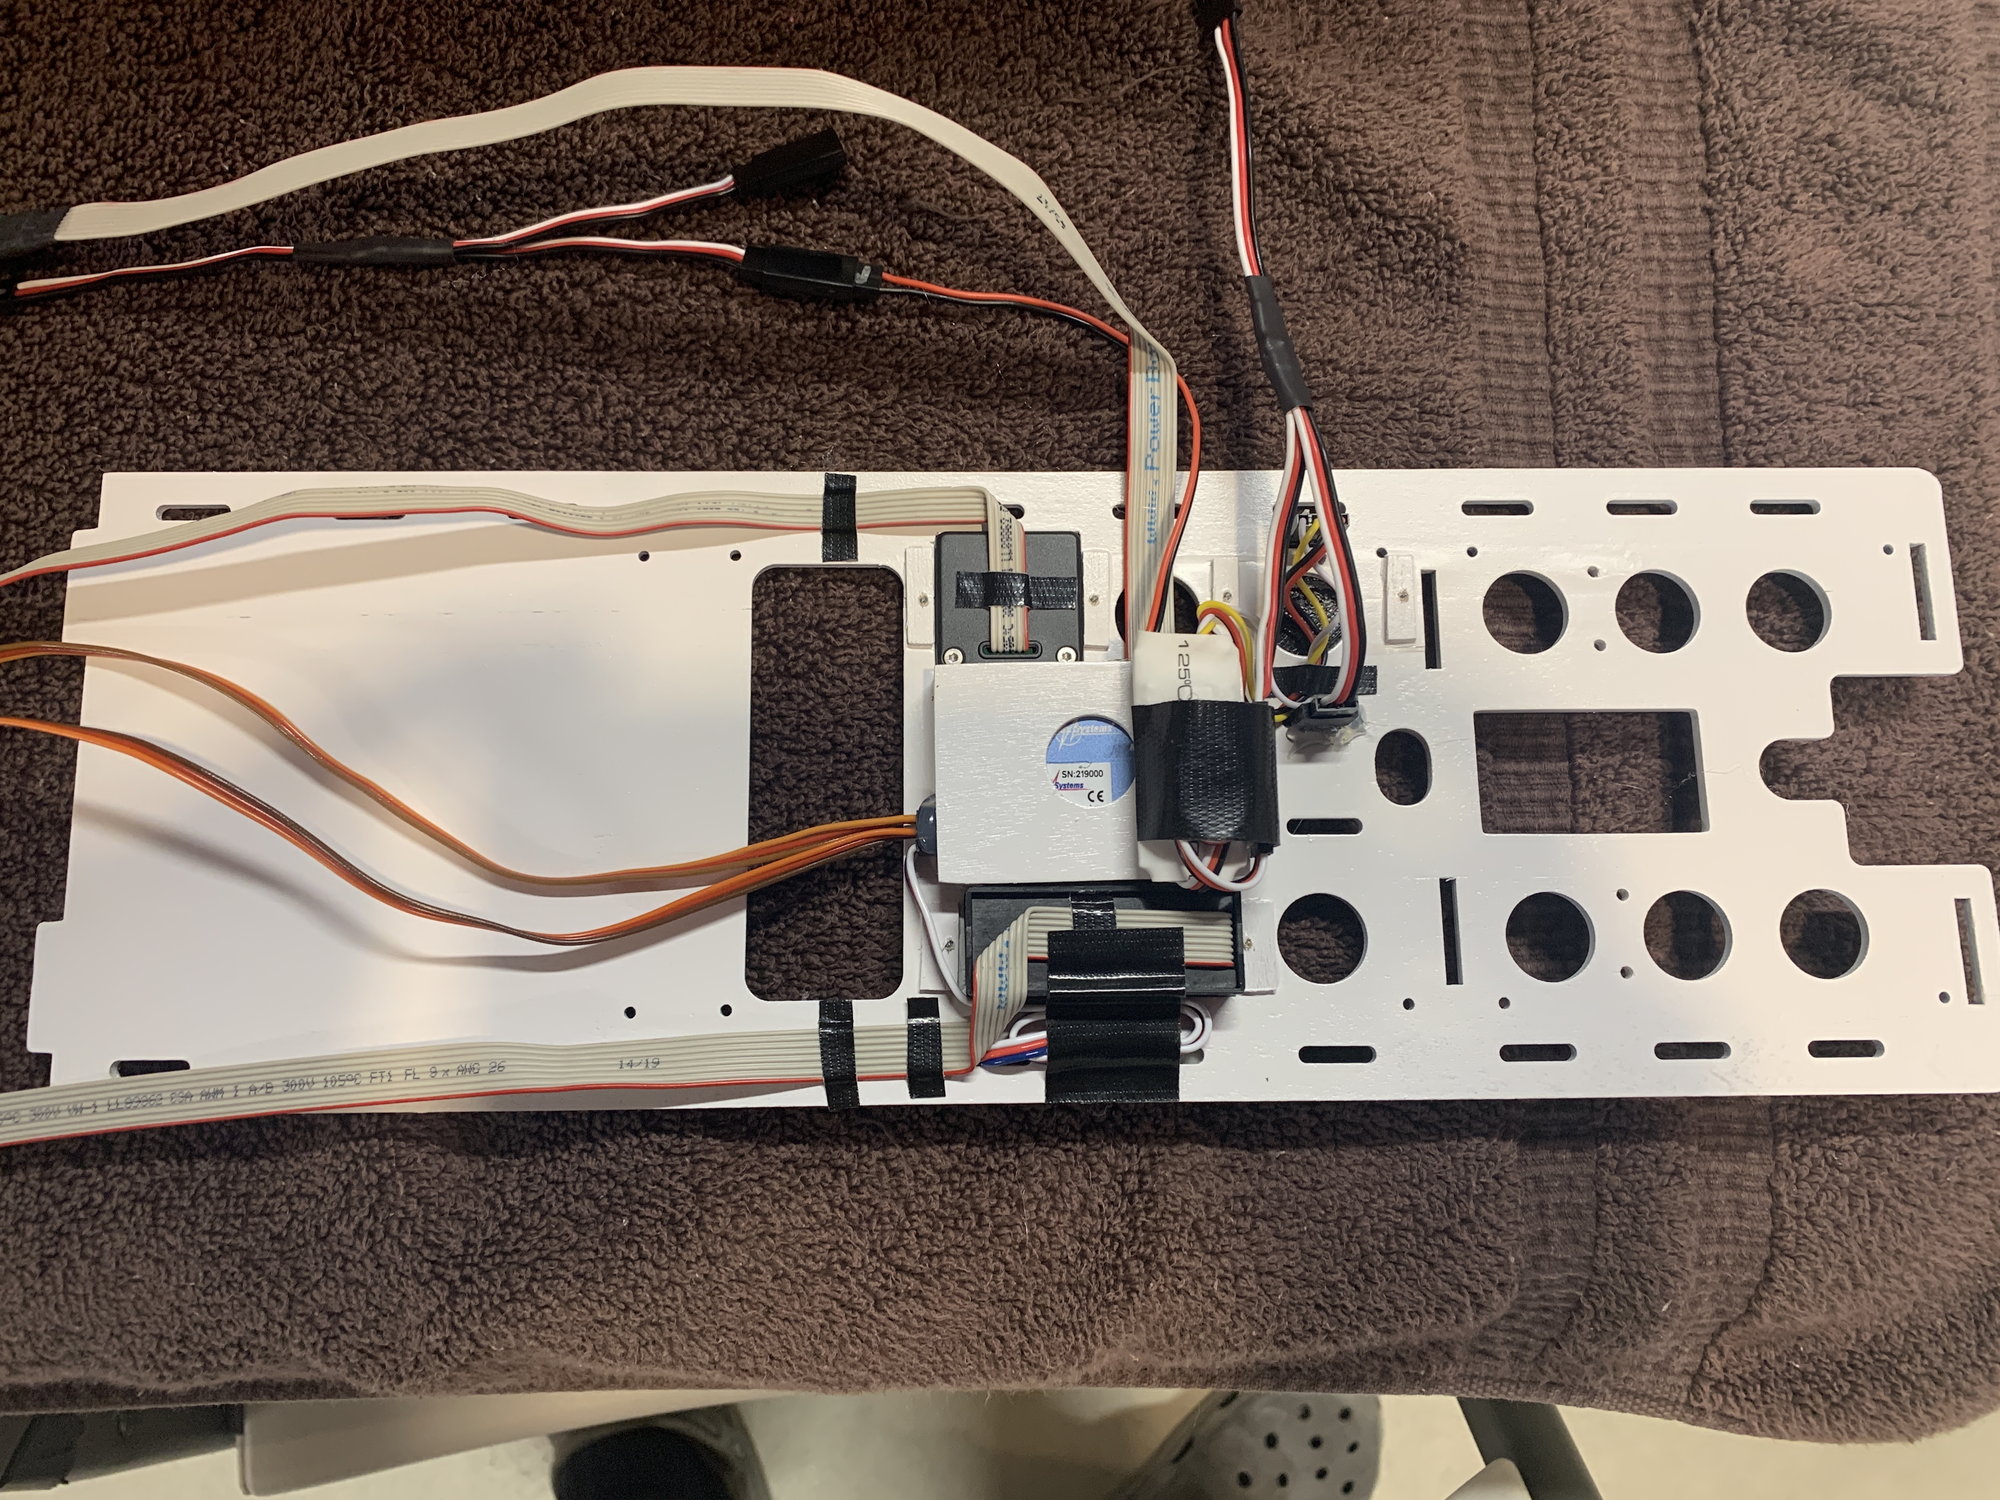
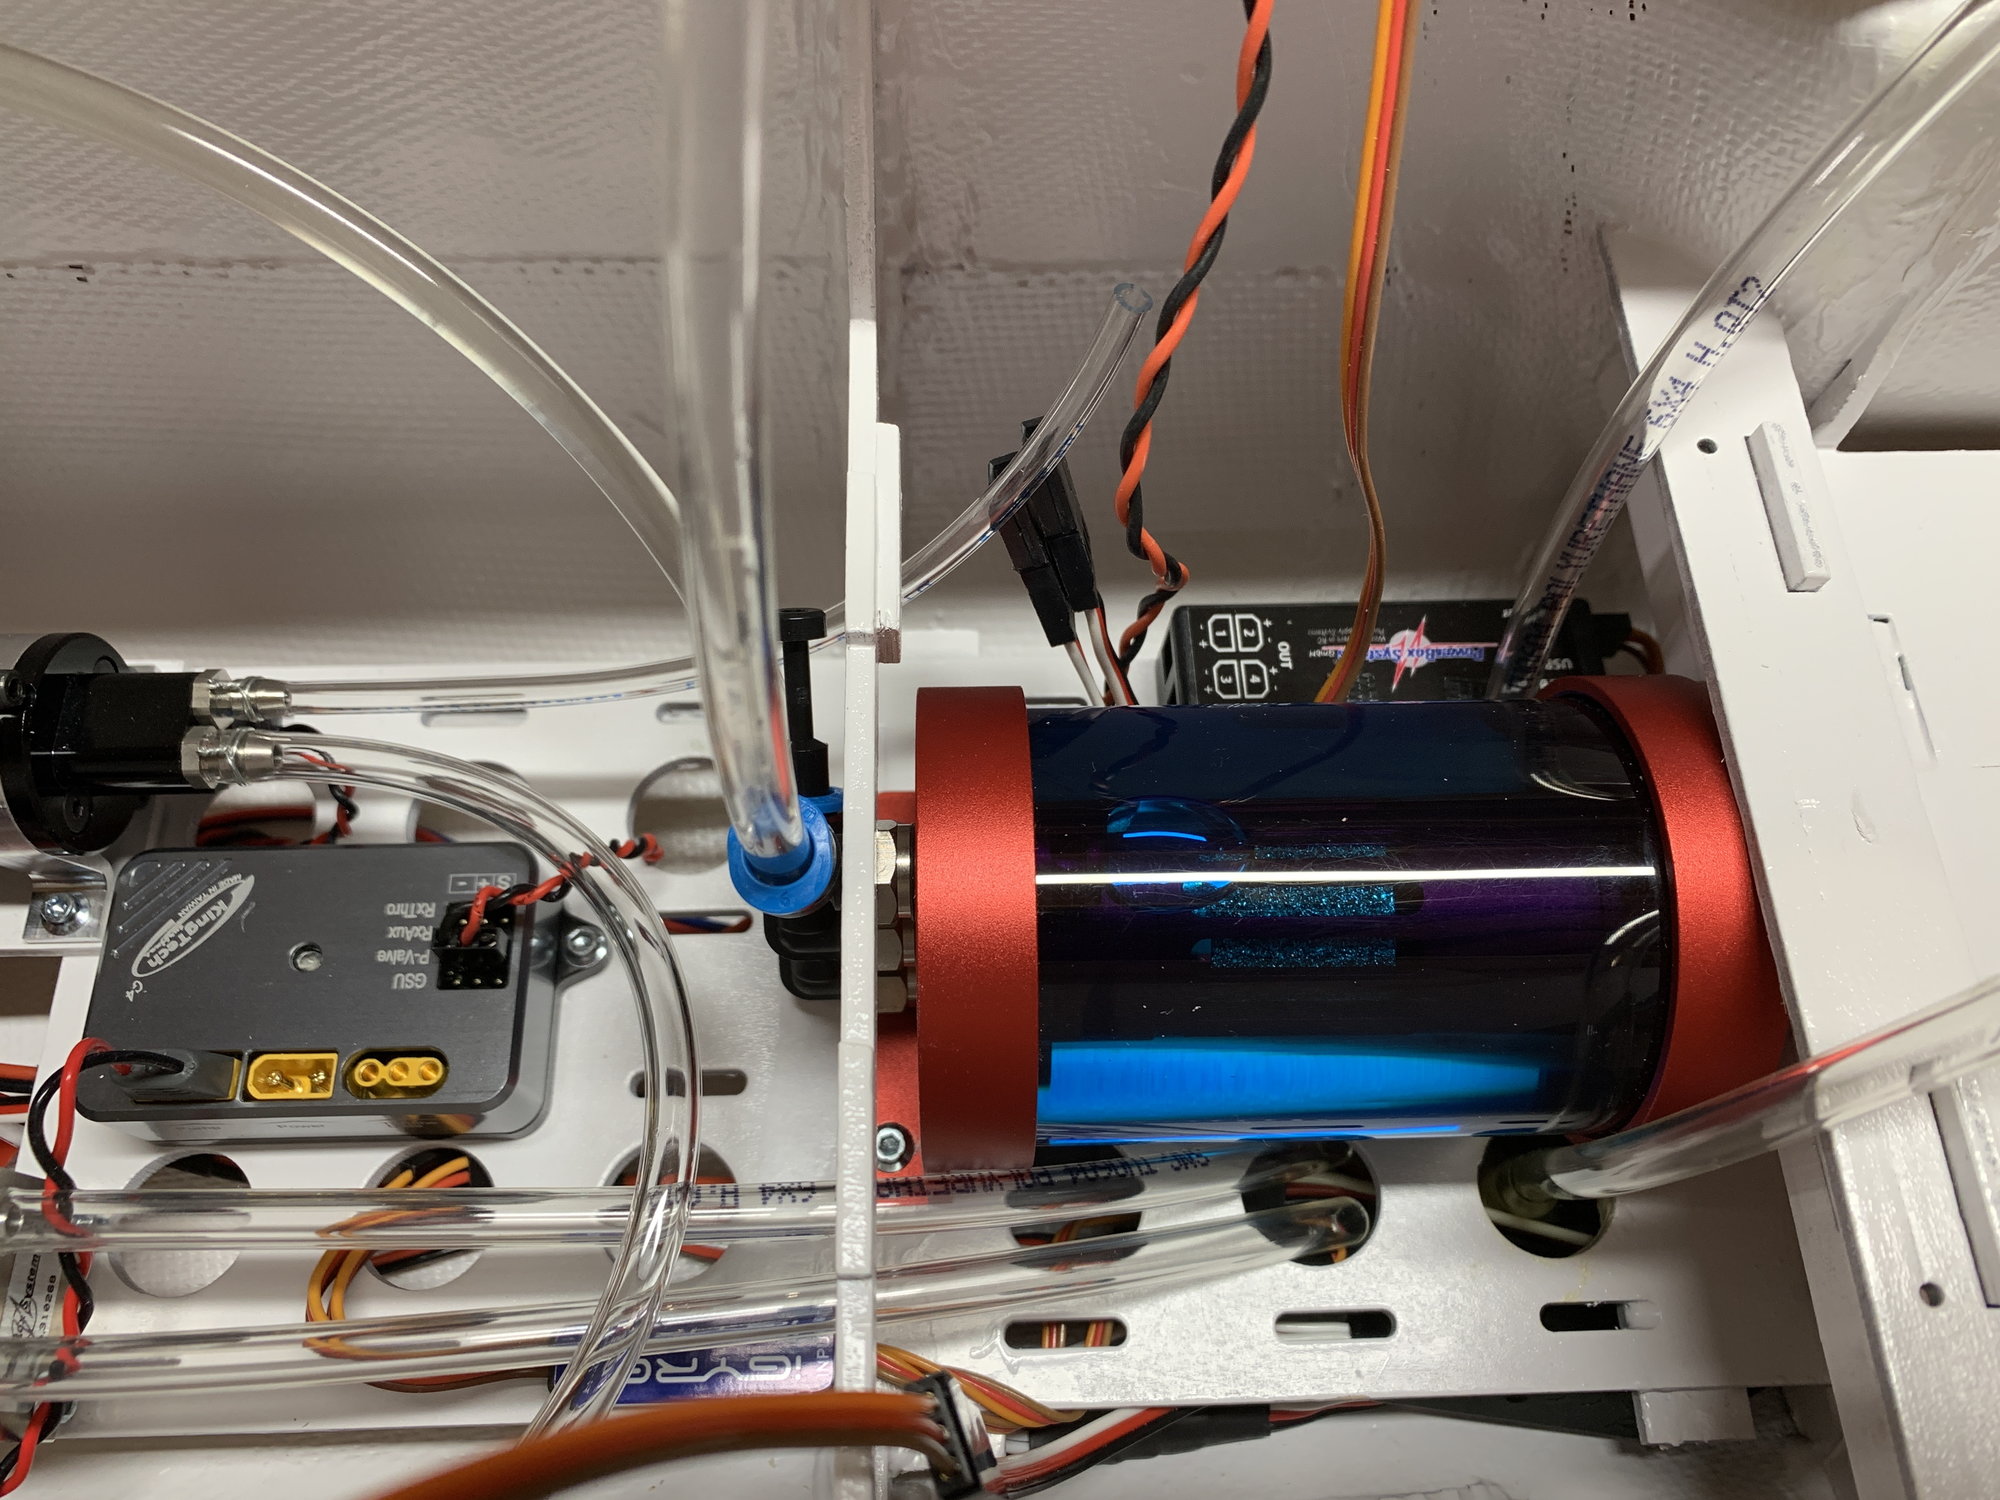
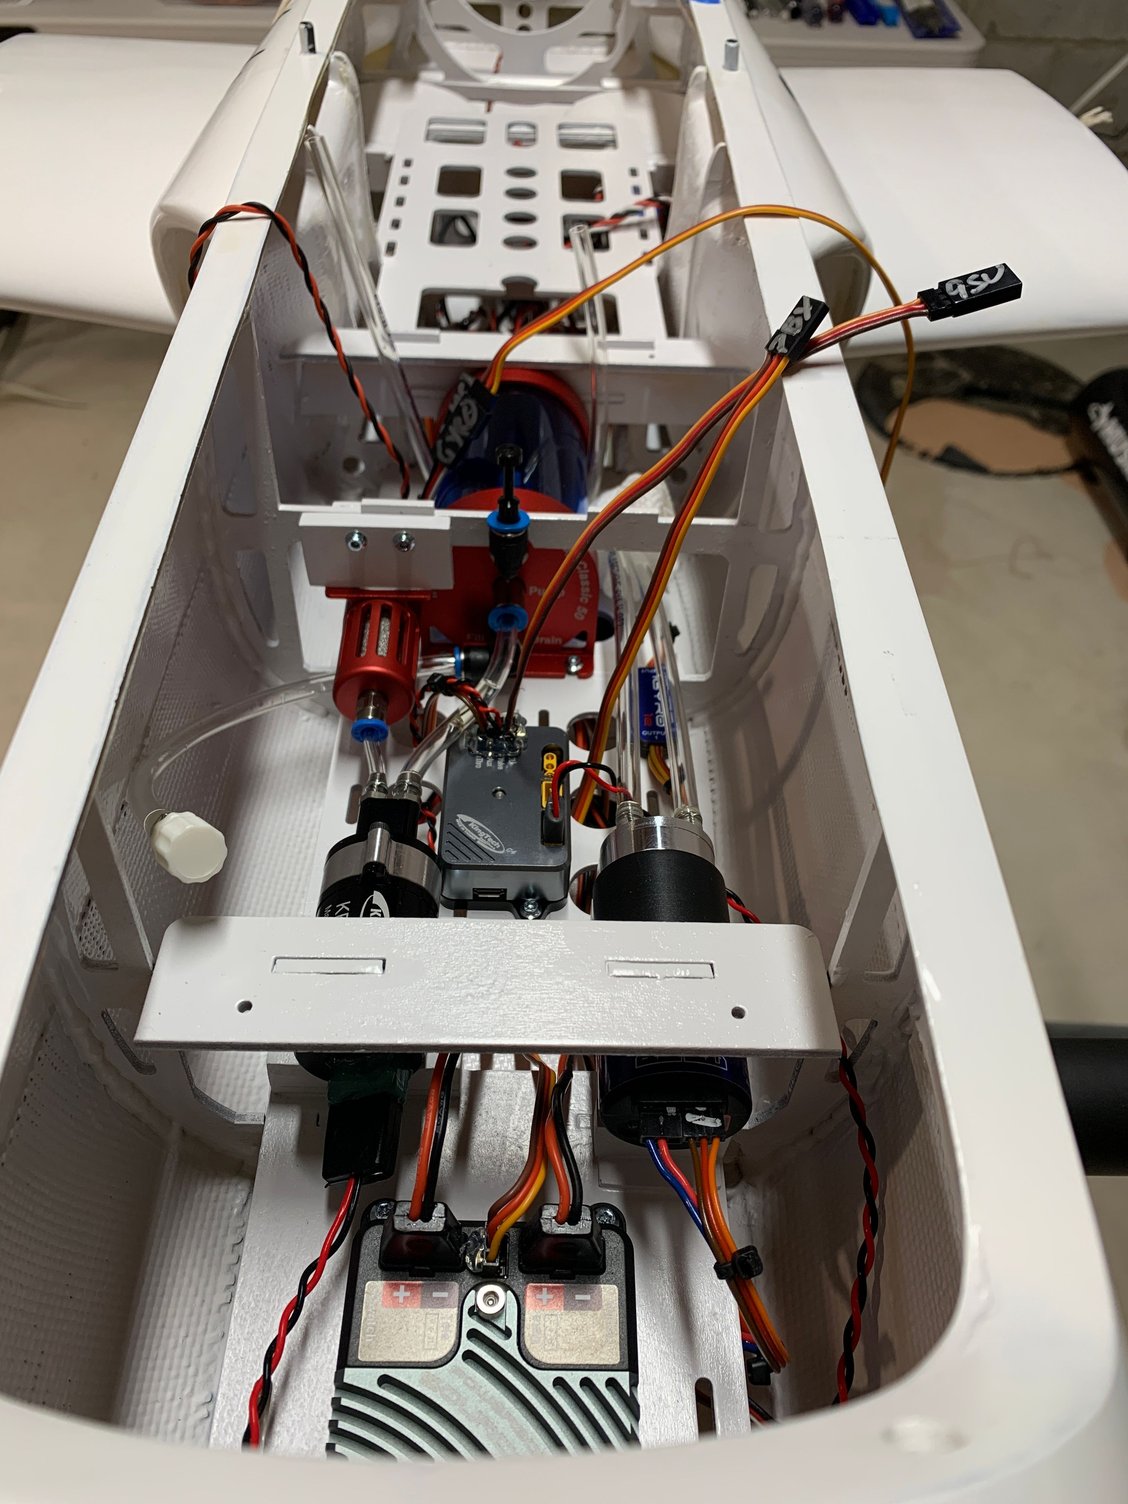
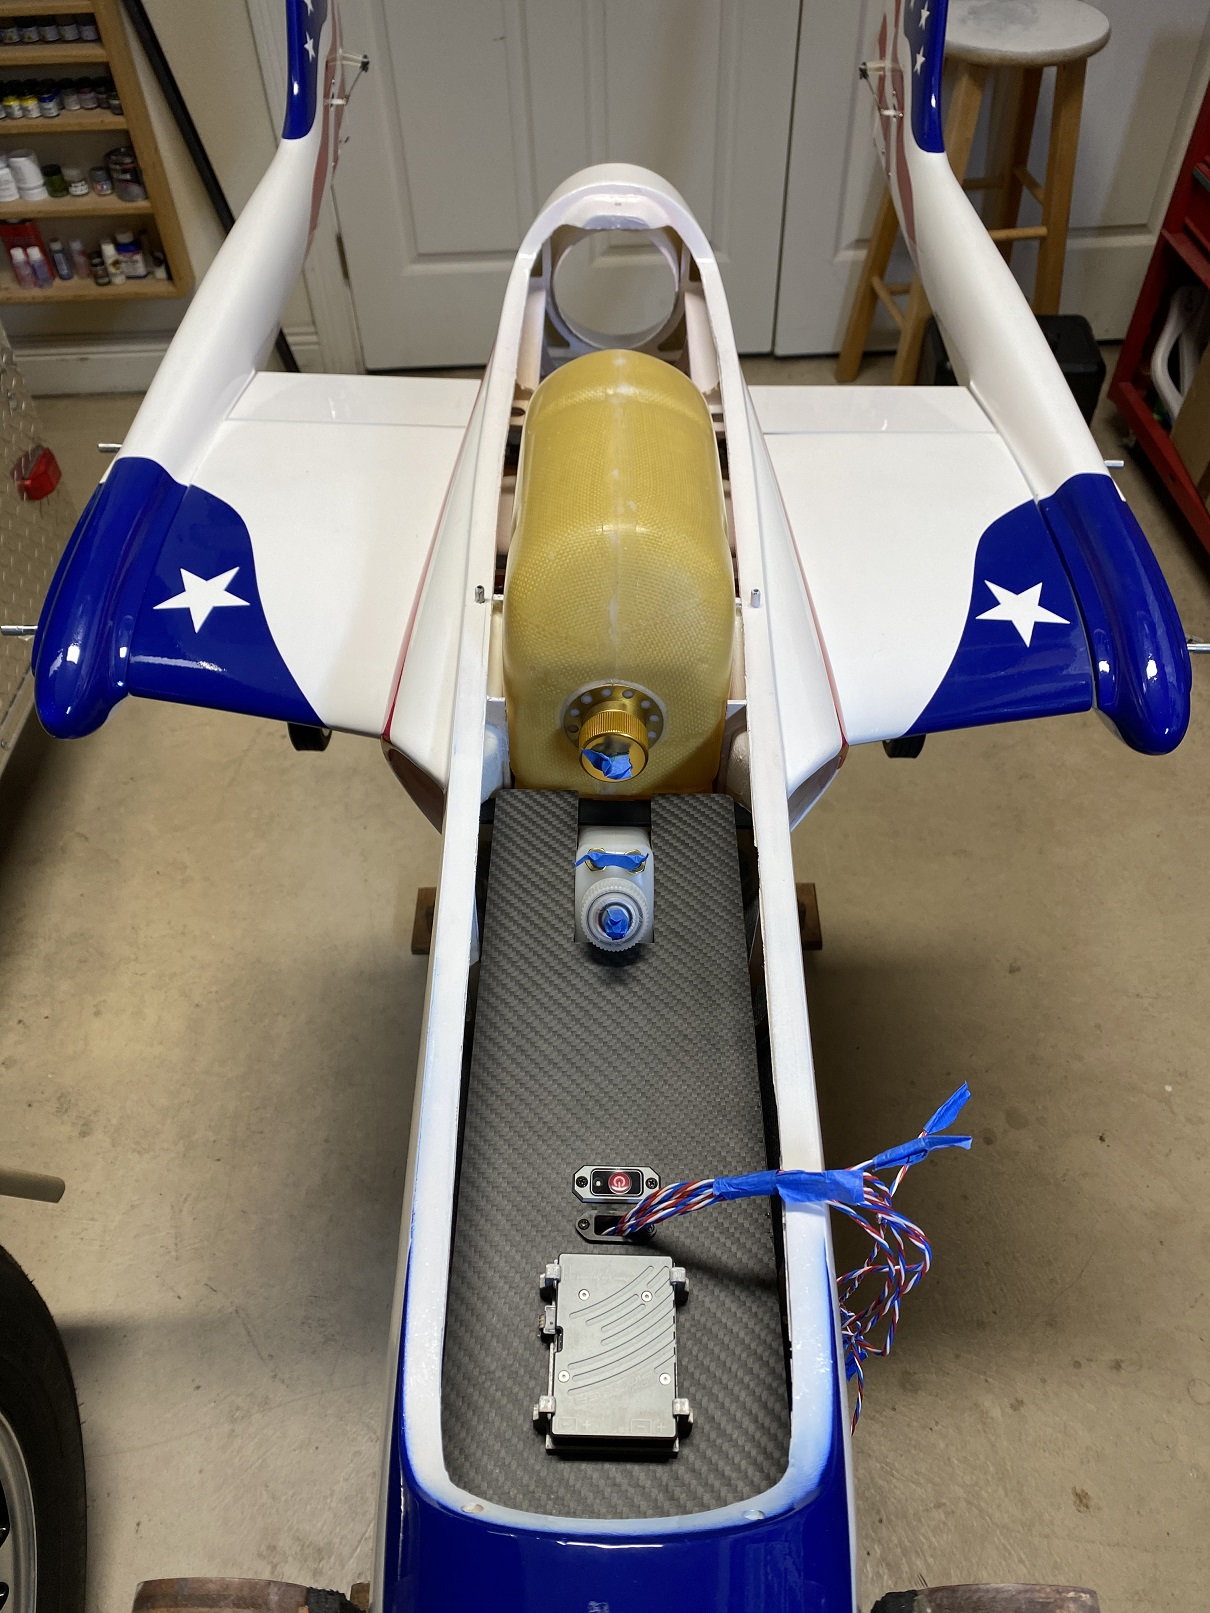
I put a little extra time into the board, just cleanup of wires and I added the GPS. I may end up moving it, I'm not fully decided on the spot. The idea of this install is to be able to look at one area of the board and see everything quickly. I want to be able to perform a go/no-go check before each flight. I will be able to quickly spot-check (left to right) the UAT, GSU, Batteries, Gyro, and GPS with a glance. Seeing the status LED on the GPS is the driver for the spot.
I would like to be able to remove the board without having to disconnect too many connections, this is hard to do. I am also trying to stay away from the white space to the right, it is reserved space for batteries. But I need to check the CG of the jet before I think of fitting batteries. For now, it is just reserved space.
As I begin to install the board and integrate the board with the fuel system, it will become evident why there are so many openings and small holes on the board.
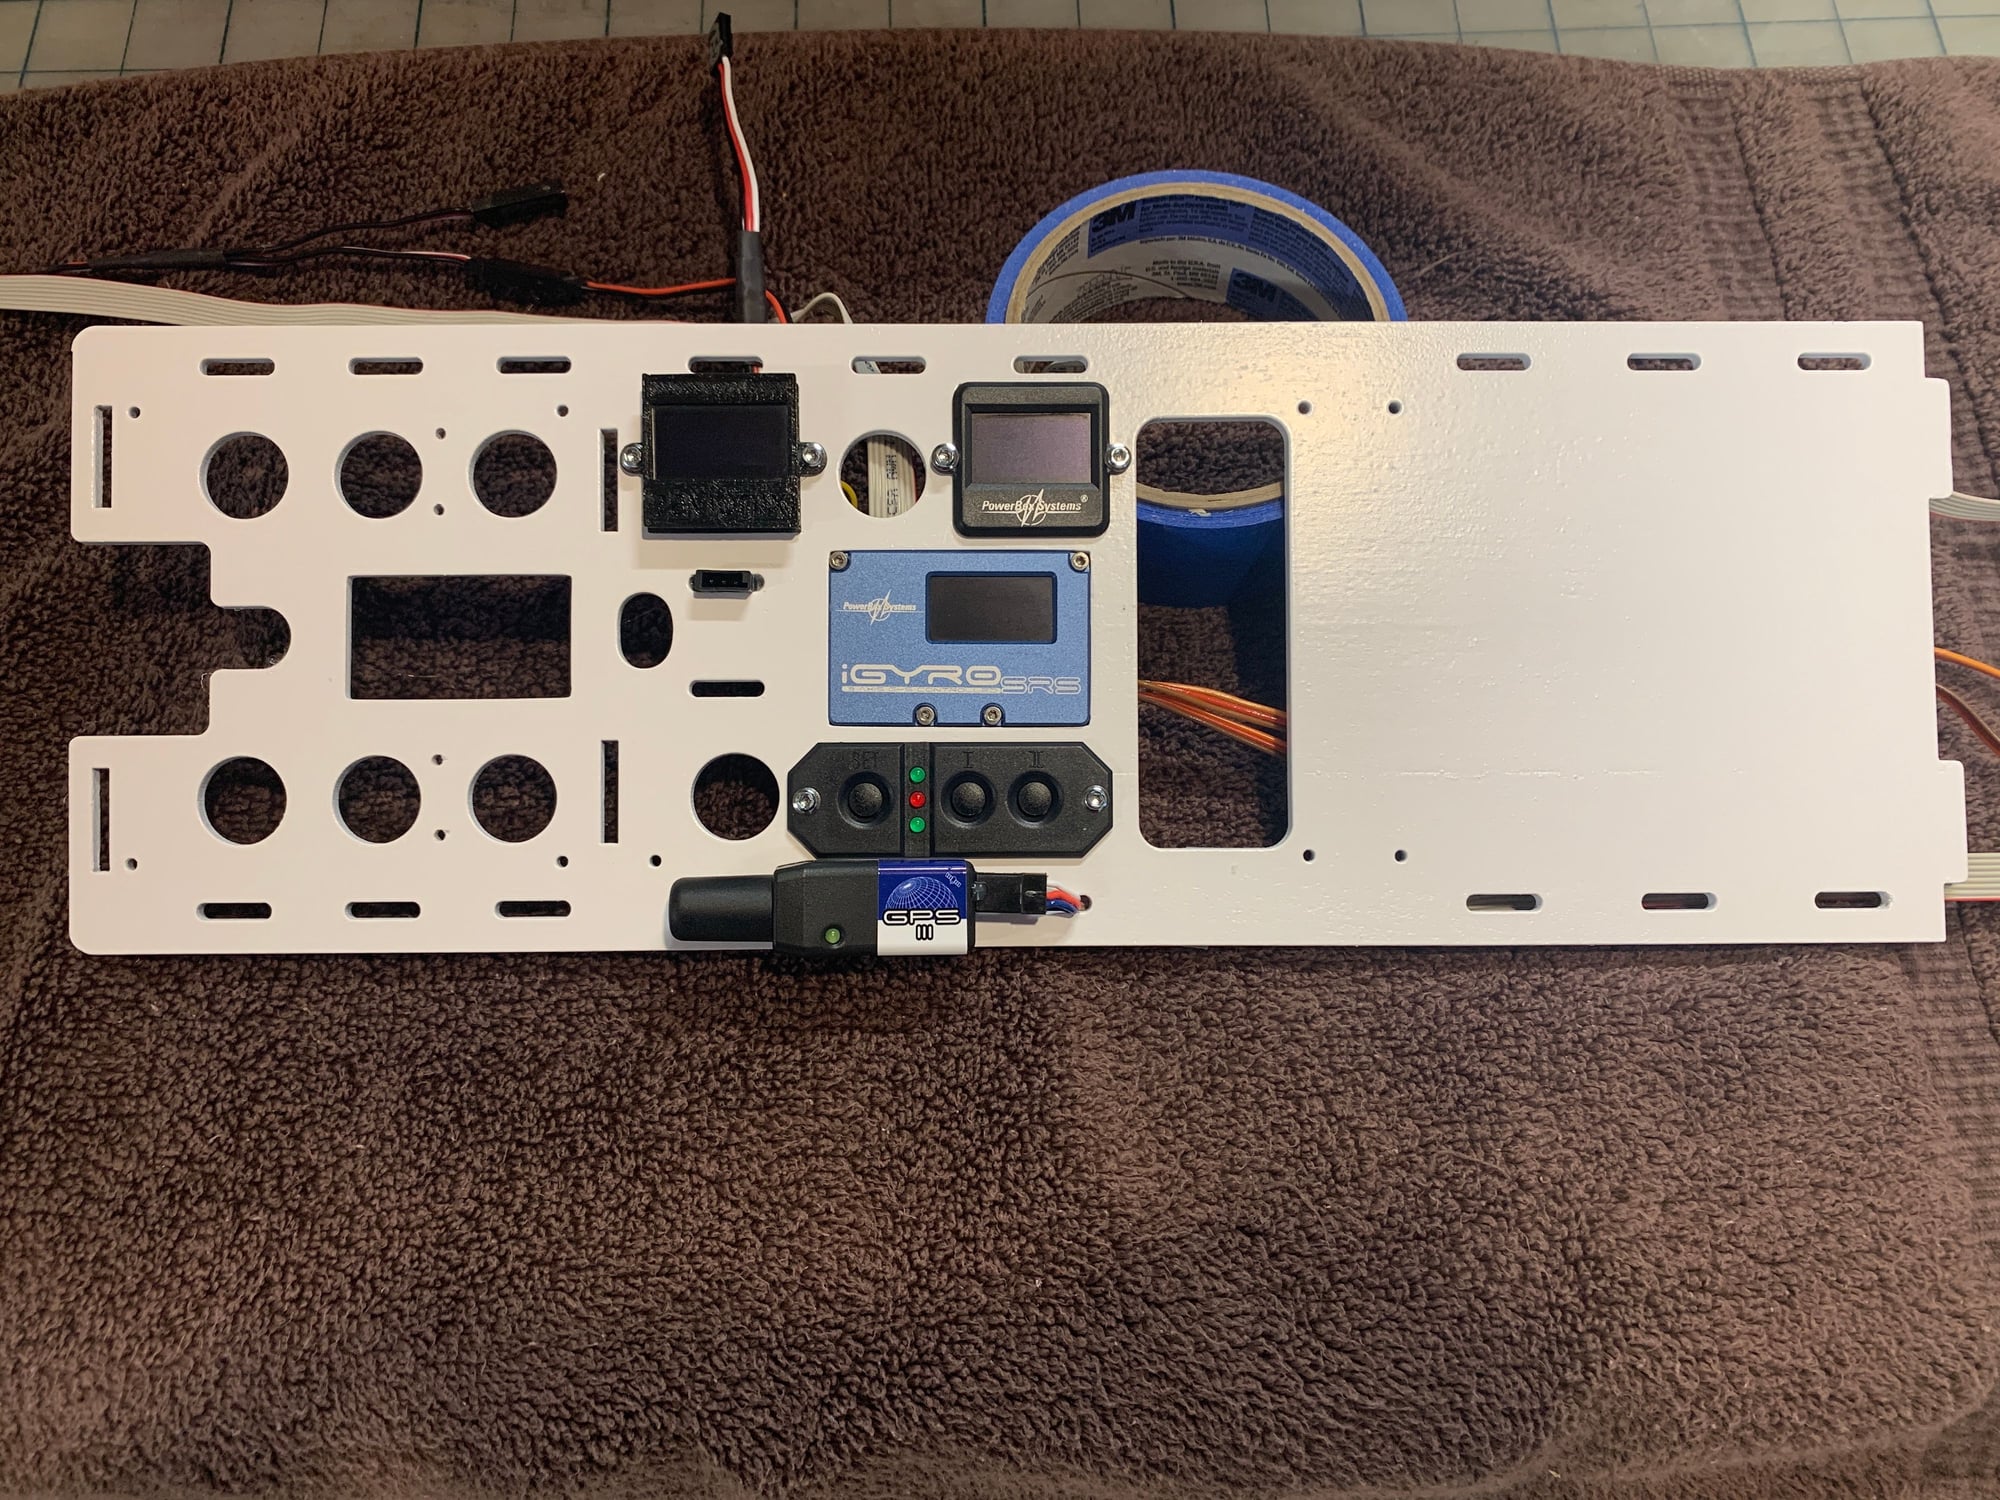
Not in love with the tape but it should hold up. I don't like wires hanging everywhere. All of the screws are backed up by a second layer of aircraft ply and thin CA on threads.
I would like to be able to remove the board without having to disconnect too many connections, this is hard to do. I am also trying to stay away from the white space to the right, it is reserved space for batteries. But I need to check the CG of the jet before I think of fitting batteries. For now, it is just reserved space.
As I begin to install the board and integrate the board with the fuel system, it will become evident why there are so many openings and small holes on the board.
Not in love with the tape but it should hold up. I don't like wires hanging everywhere. All of the screws are backed up by a second layer of aircraft ply and thin CA on threads.
Last edited by skunkwurk; 12-03-2020 at 11:24 AM.
12-03-2020, 08:52 AM
#537
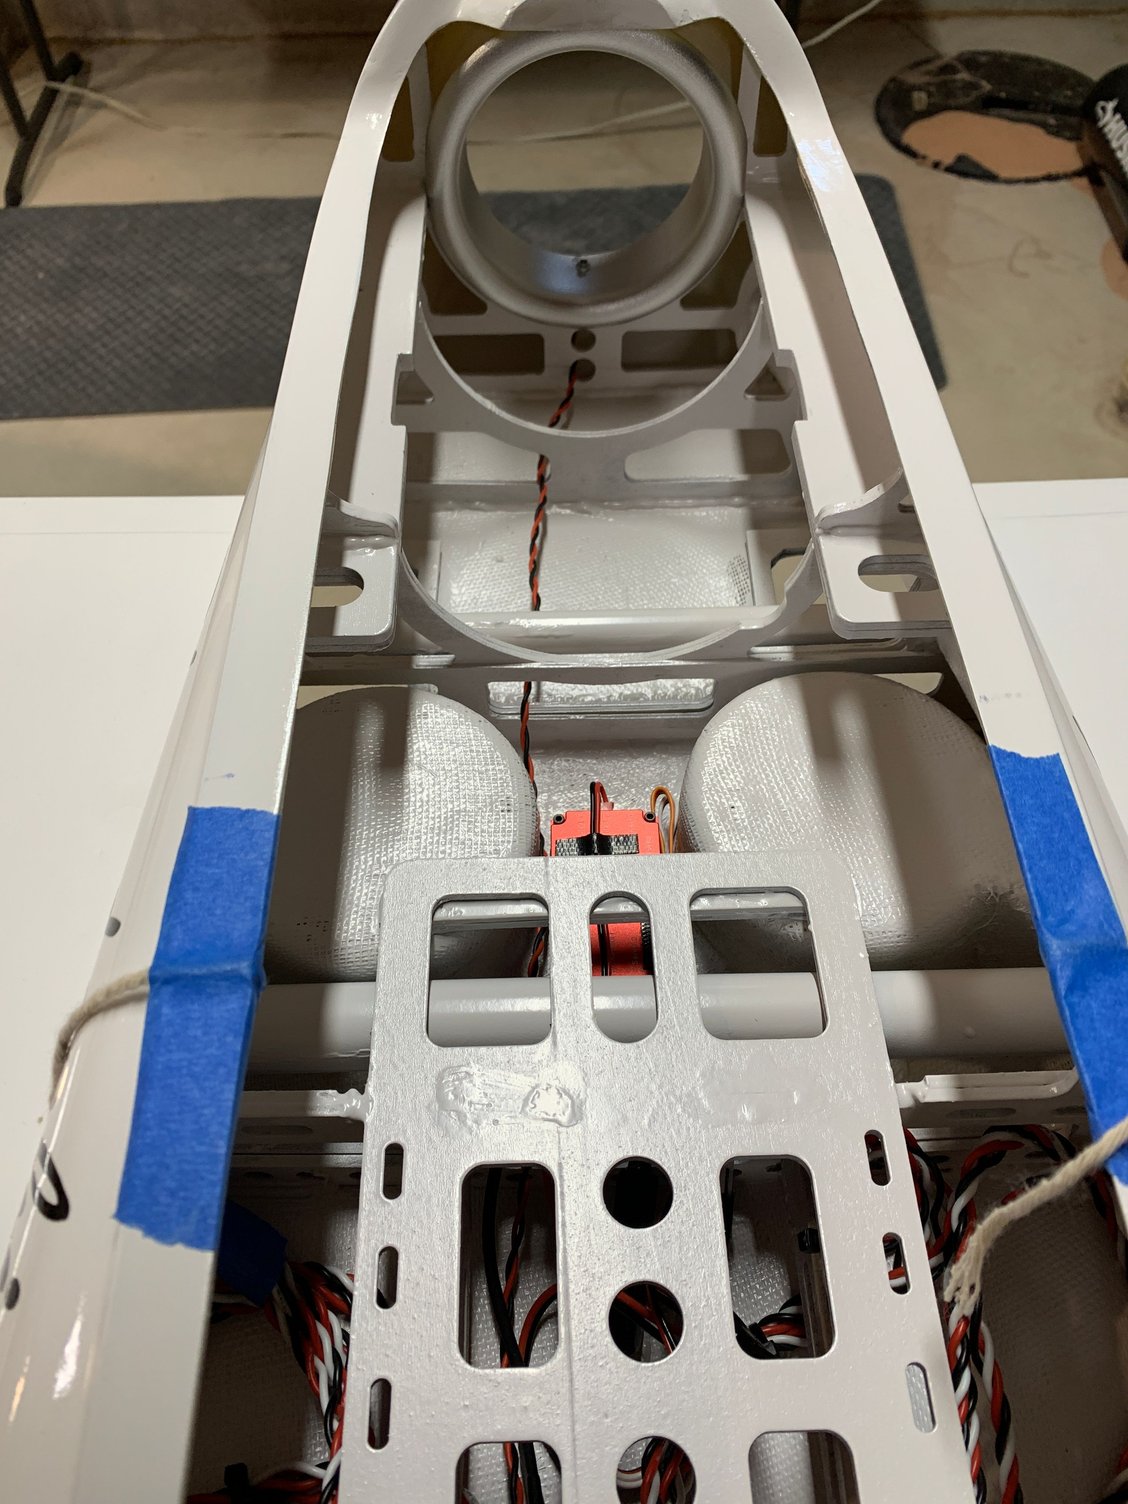
The fuse is slow-moving. I did not secure the pumps before so I pulled them back out. Most of the runs will come up through the main (large) opening in the lower board. In order to keep things clean as I go, I decided to secure the 1e, light controller and the batt-backer instead. They are in!
Note: I had planned to cover all of the wiring in the jet with black snake-skin. I bought it and started covering some of the wires but ultimately decided not to use it. I remembered I ran into a problem with my Rebel. I had to replace the motor for the nose gear (Electron retract) and all of the wires are buried in snake-skin covering. It was a major PITA to perform that service on the jet. I may use it again in the future, but I left it out of this jet.
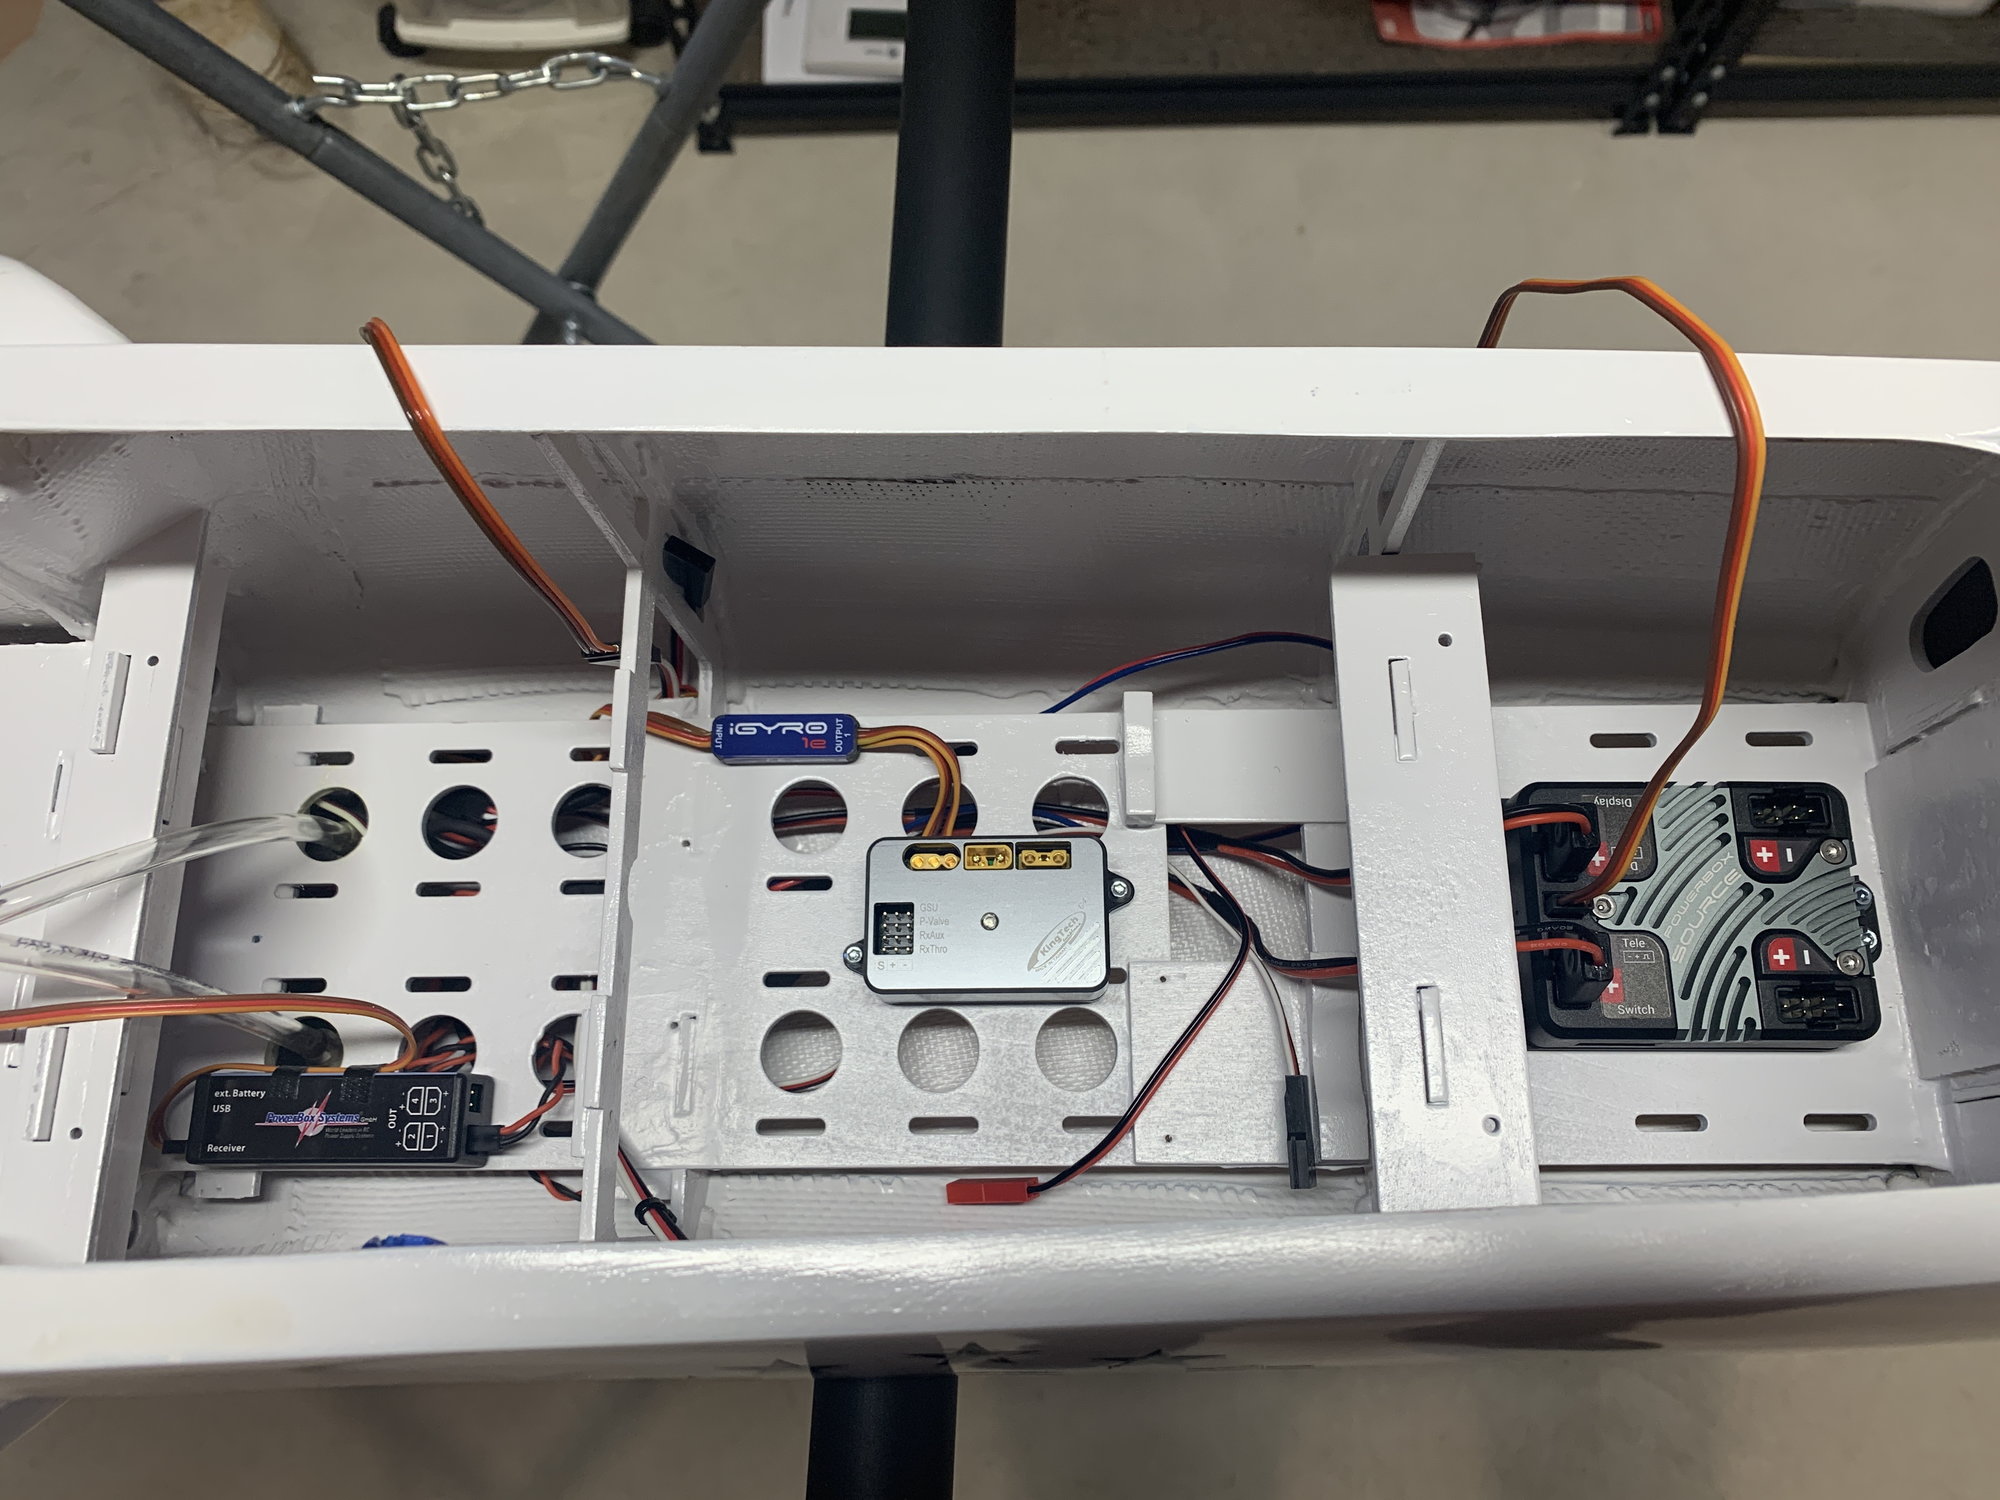
Note: I had planned to cover all of the wiring in the jet with black snake-skin. I bought it and started covering some of the wires but ultimately decided not to use it. I remembered I ran into a problem with my Rebel. I had to replace the motor for the nose gear (Electron retract) and all of the wires are buried in snake-skin covering. It was a major PITA to perform that service on the jet. I may use it again in the future, but I left it out of this jet.
Last edited by skunkwurk; 12-03-2020 at 10:38 AM.
12-04-2020, 08:42 PM
#538
I was able to get a little work in this evening
I reinstalled the pumps. Secured, safety-wired and connected.
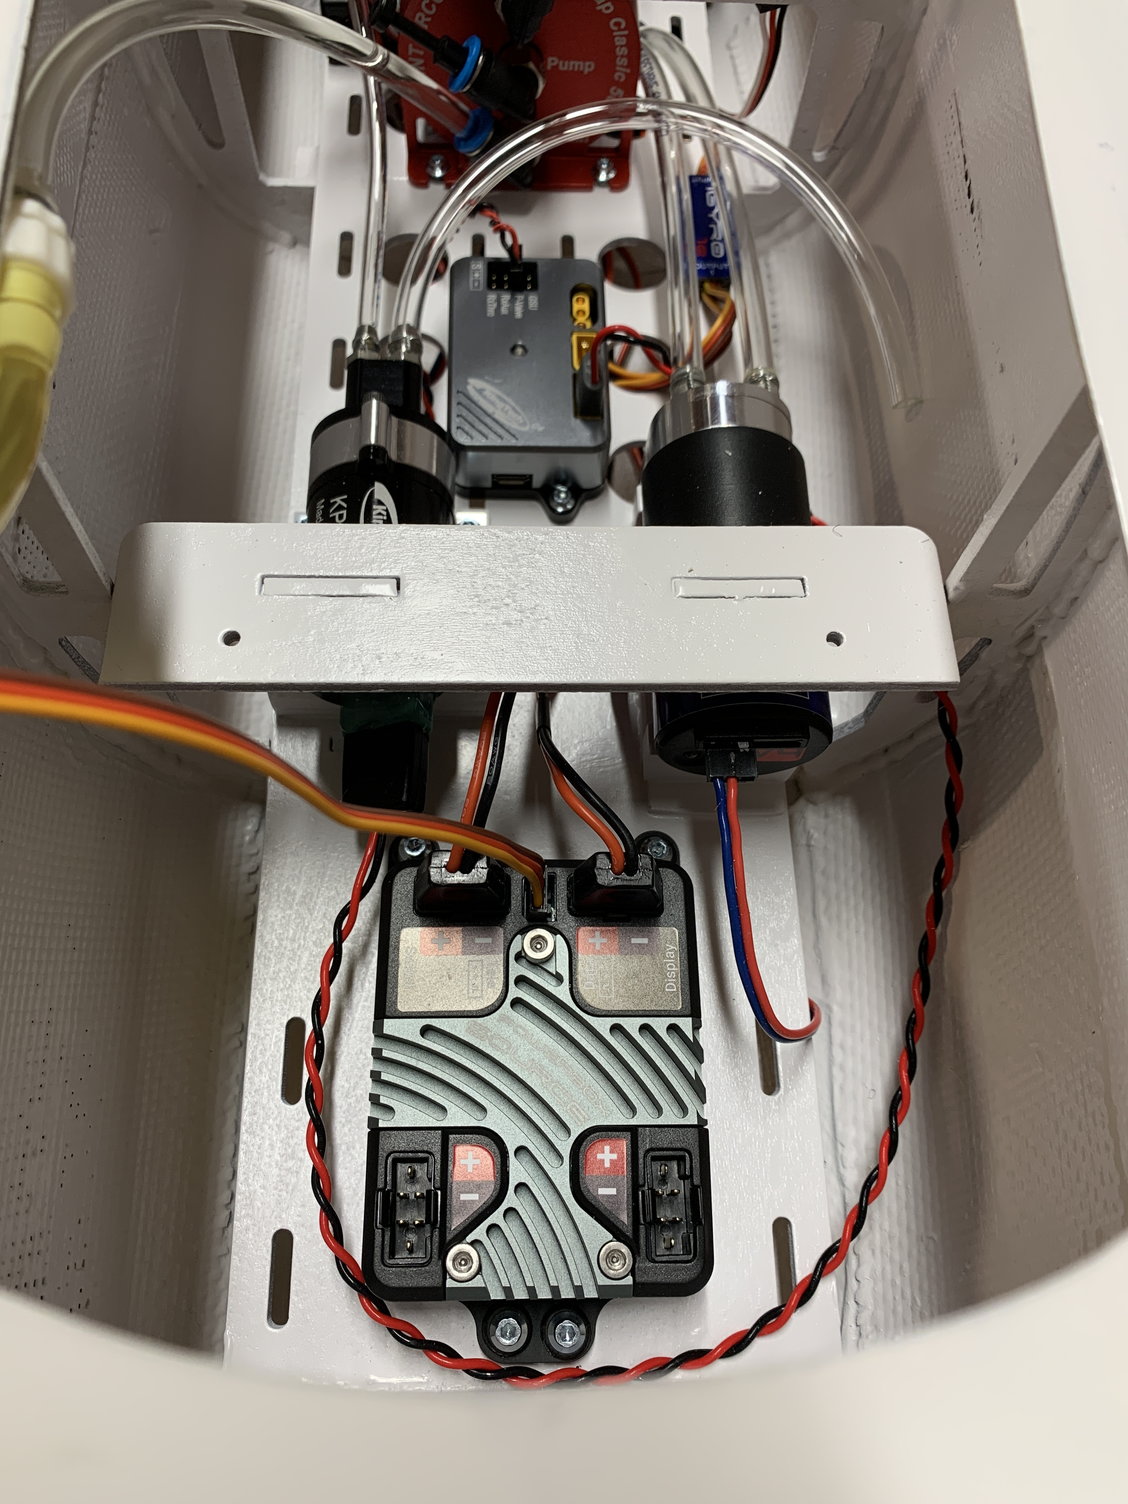
I also installed the UAT. I am now running a leak test. There are three fittings which all can leak and of course a manufacturer defect of the unit. I don't rule anything out, so I test as I go. I made the mount for the filter but was not able to install it as I painted it, will need to wait for it to dry.
I let this setup sit for 30-mins to an hour.
I keep an eye on the air bubble, If it gets any bigger it is an indication of a problem. I obviously also check for wetness and smell.
I reinstalled the pumps. Secured, safety-wired and connected.
I also installed the UAT. I am now running a leak test. There are three fittings which all can leak and of course a manufacturer defect of the unit. I don't rule anything out, so I test as I go. I made the mount for the filter but was not able to install it as I painted it, will need to wait for it to dry.
I let this setup sit for 30-mins to an hour.
I keep an eye on the air bubble, If it gets any bigger it is an indication of a problem. I obviously also check for wetness and smell.
Last edited by skunkwurk; 12-05-2020 at 08:44 AM.
 12-04-2020, 09:29 PM
#540
Leak test passed, woo hoo! I hate leaks. I'm going to try and make time to work on it more over the weekend. I would like to get the board installed and seal up the lower level
Note: In case anyone is wondering why I did not perform the leak test on the bench rather than in the jet. There is a sequence when installing this UAT in the jet. In order to achieve the look and fit I wanted, I had to make specific clearance notches for the fittings. One of the fittings needs to be installed after the UAT is mounted.
Note: In case anyone is wondering why I did not perform the leak test on the bench rather than in the jet. There is a sequence when installing this UAT in the jet. In order to achieve the look and fit I wanted, I had to make specific clearance notches for the fittings. One of the fittings needs to be installed after the UAT is mounted.
Last edited by skunkwurk; 12-05-2020 at 08:46 AM.
12-05-2020, 10:34 PM
#541
Completed the nose retract today. Programmed the 1e, installed the steering servo per my usual settings, installed the retract itself and ran all the wires.
Nose current setup: LD= steering trim, RD= 1e gain
note: added logic so that the 1e is only active when the gear is down and in flight mode 1 or 2. It will automatically deactivate if switched into flight mode 0 or gear is up.
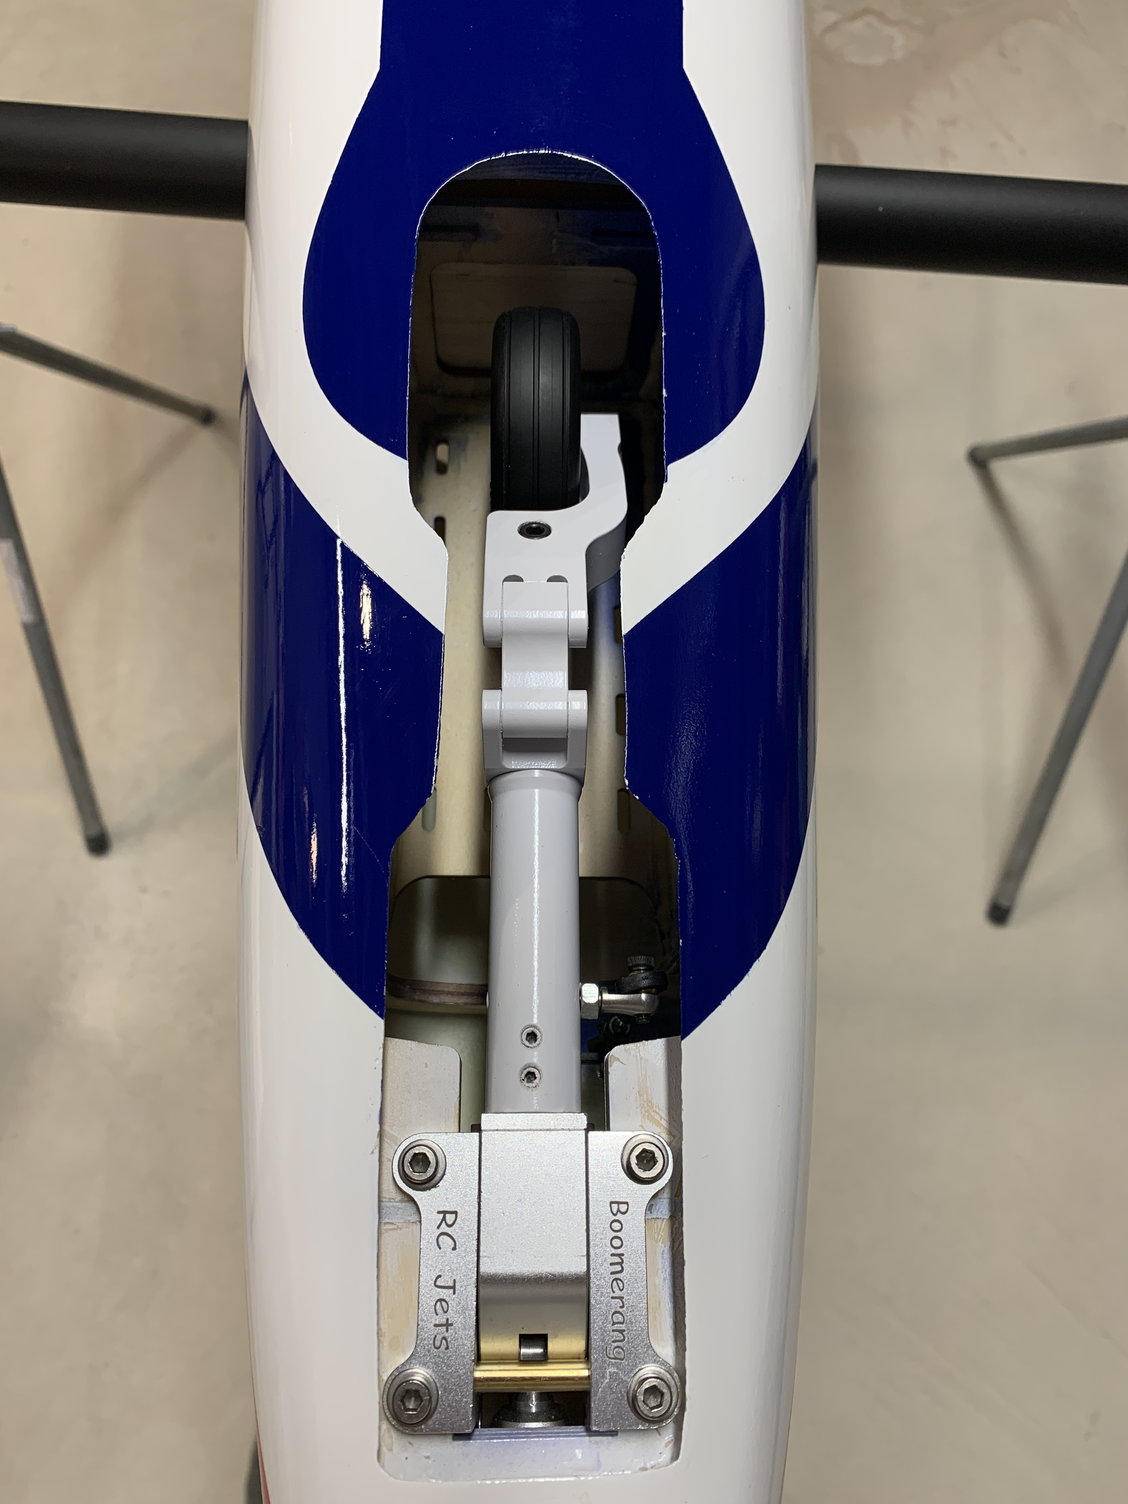
You see anything wrong with this picture? Unfortunately the rails are not installed correctly and the retract is off by about ~10-15 degrees.
I added a couple washers to correct the problem. Simple fix.
Nose current setup: LD= steering trim, RD= 1e gain
note: added logic so that the 1e is only active when the gear is down and in flight mode 1 or 2. It will automatically deactivate if switched into flight mode 0 or gear is up.
You see anything wrong with this picture?
Unfortunately the rails are not installed correctly and the retract is off by about ~10-15 degrees.I added a couple washers to correct the problem. Simple fix.
Last edited by skunkwurk; 12-05-2020 at 10:38 PM.
12-05-2020, 10:44 PM
#542
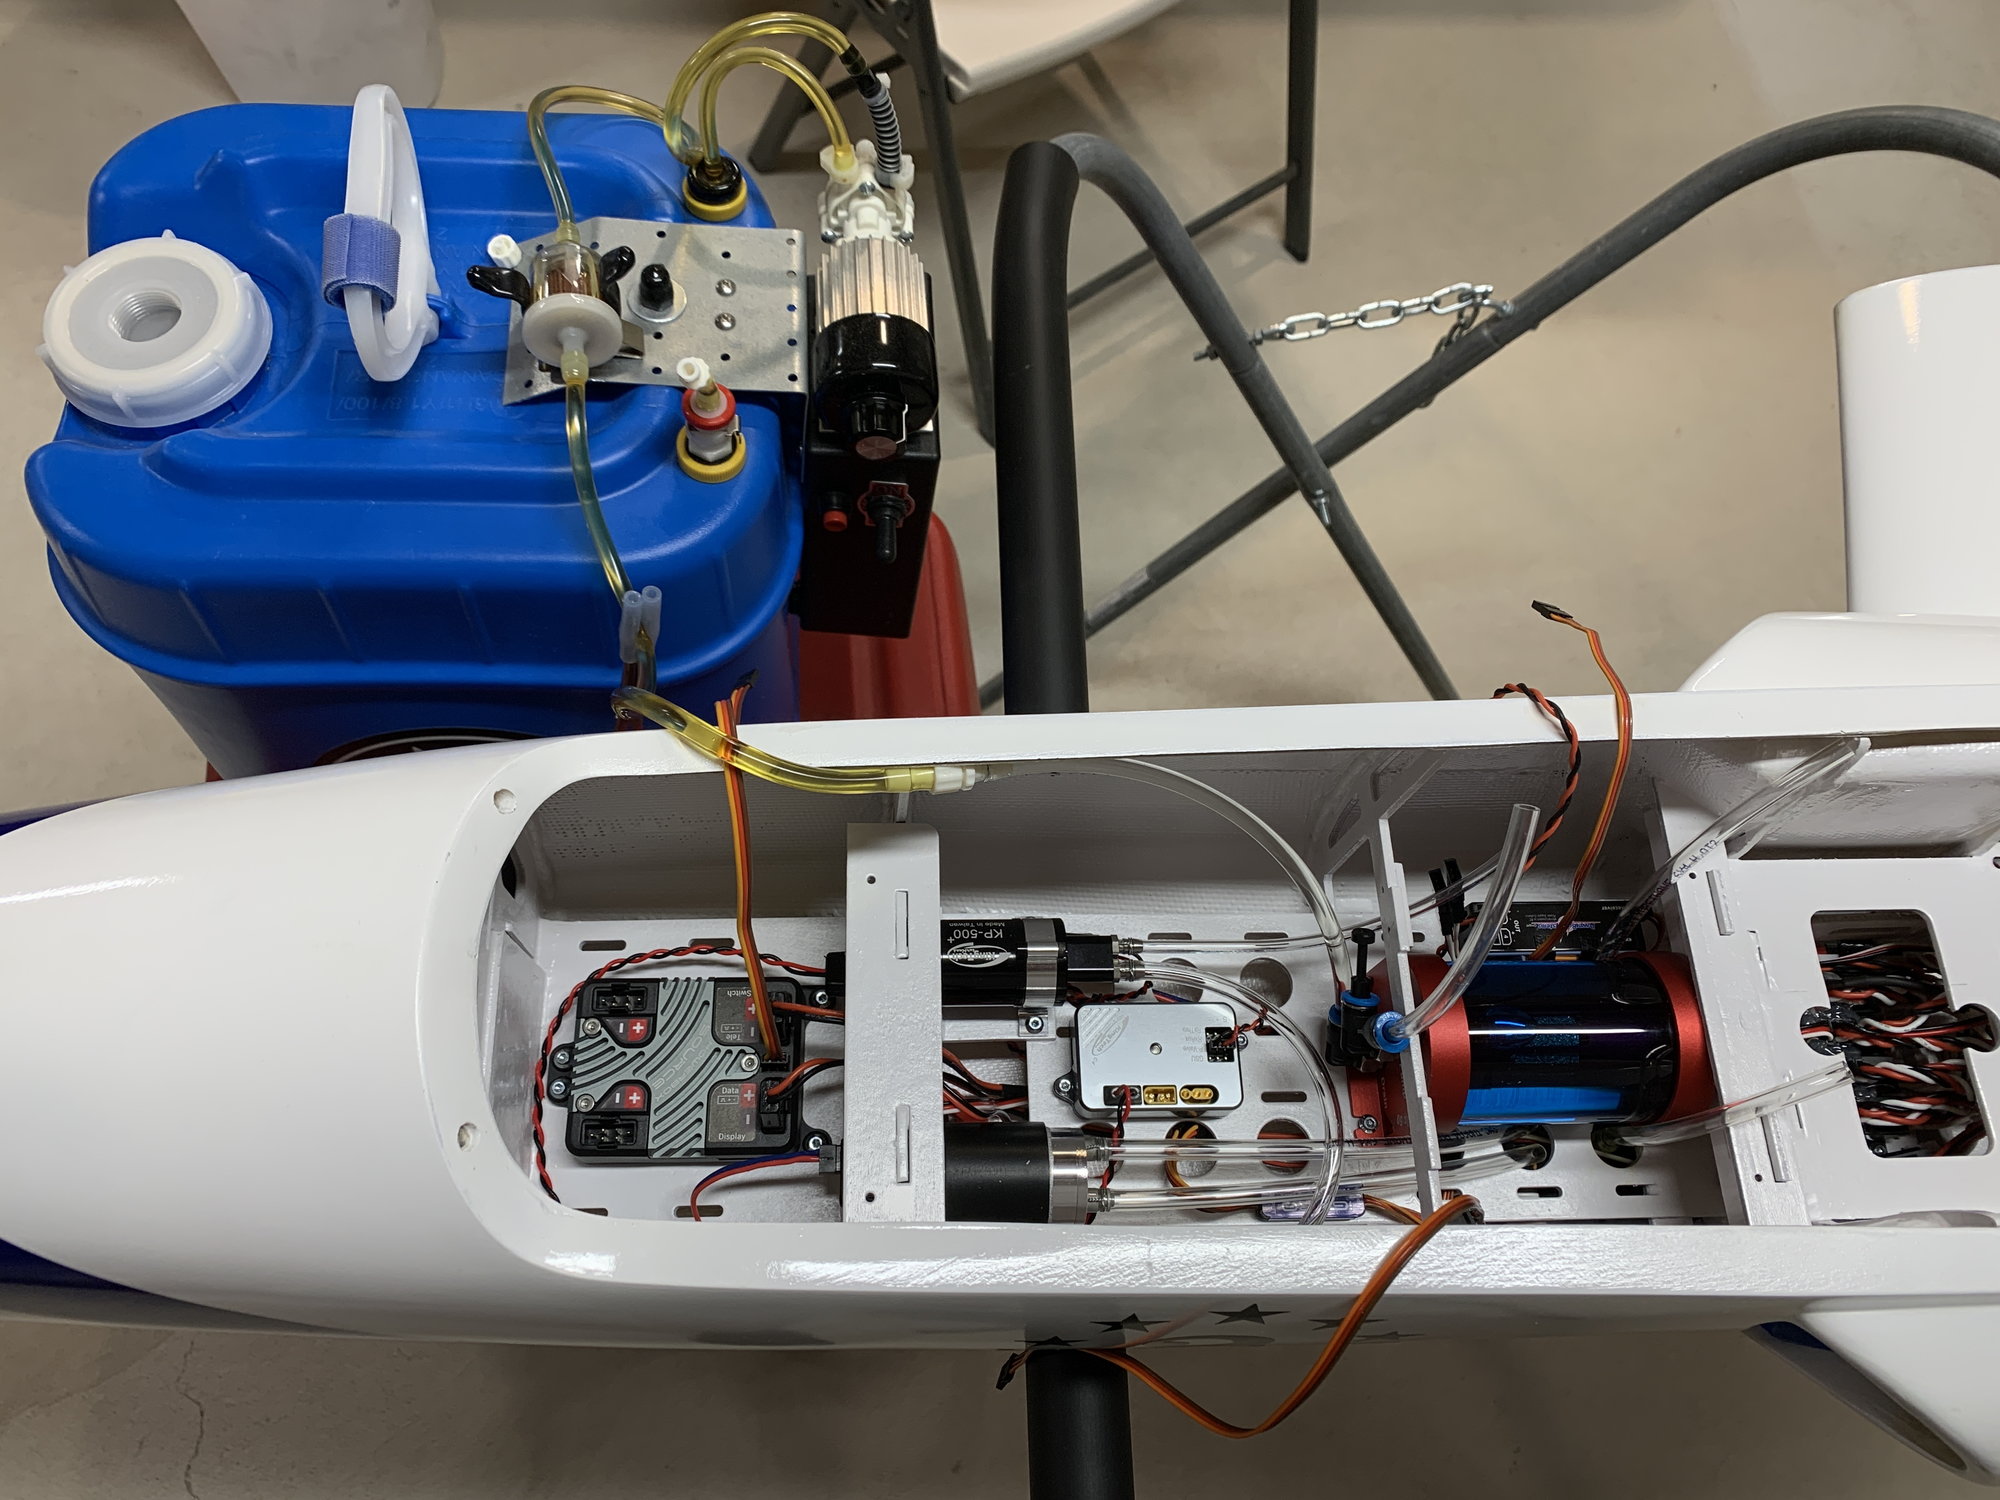
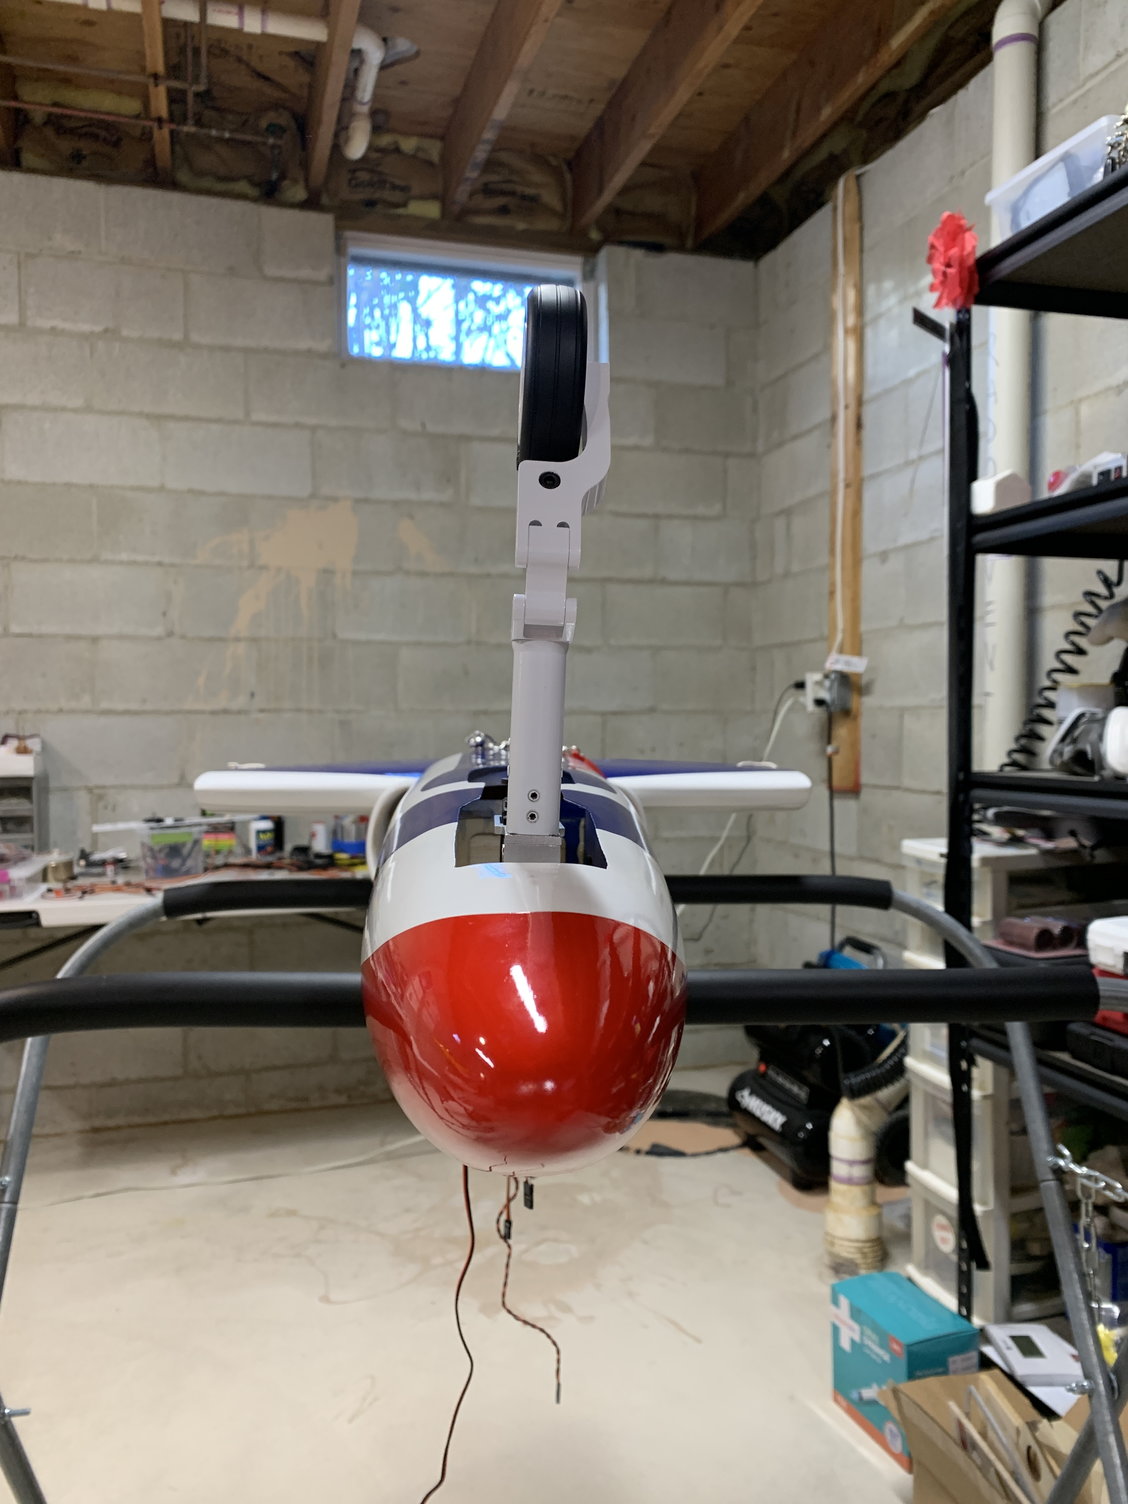
I also made additional progress to the fuse. I'm getting closer to being able to drop the main board in. I cleaned up wires and plumbing for the fuel and smoke system. I tested the smoke pump, ensured the program in the radio worked as desired. I still have a few more steps, I'm missing two male/male servo leads - bummer. Work Stopage!
Front view
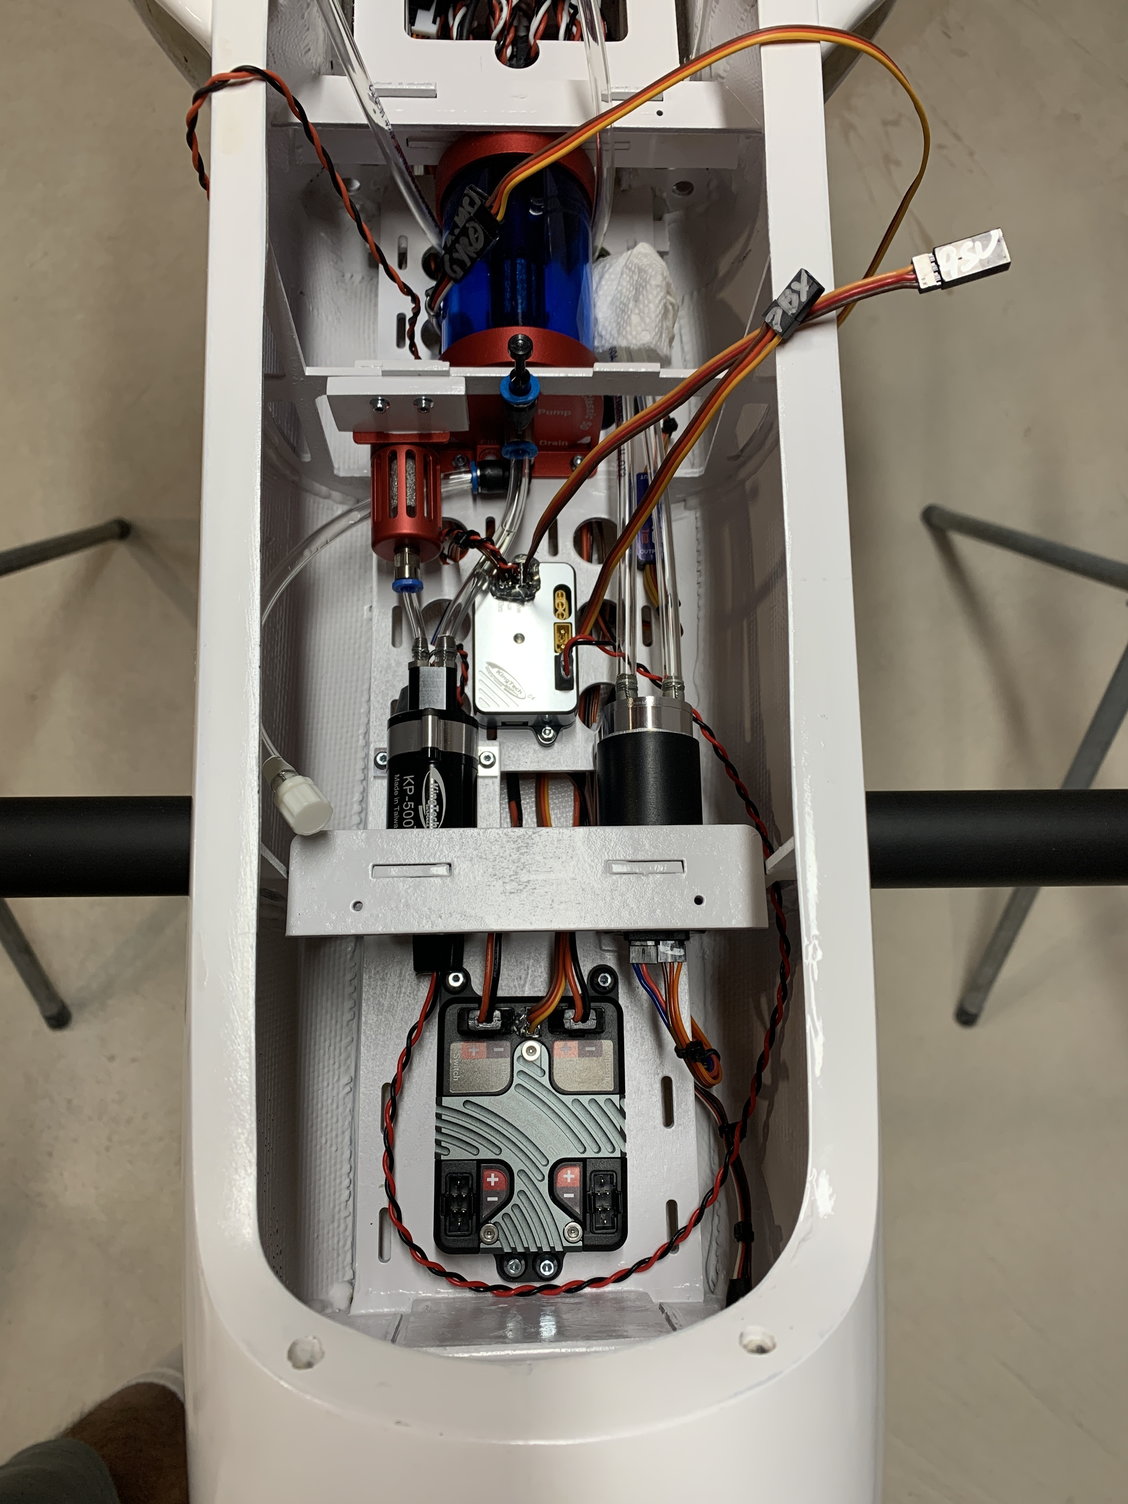
Top view
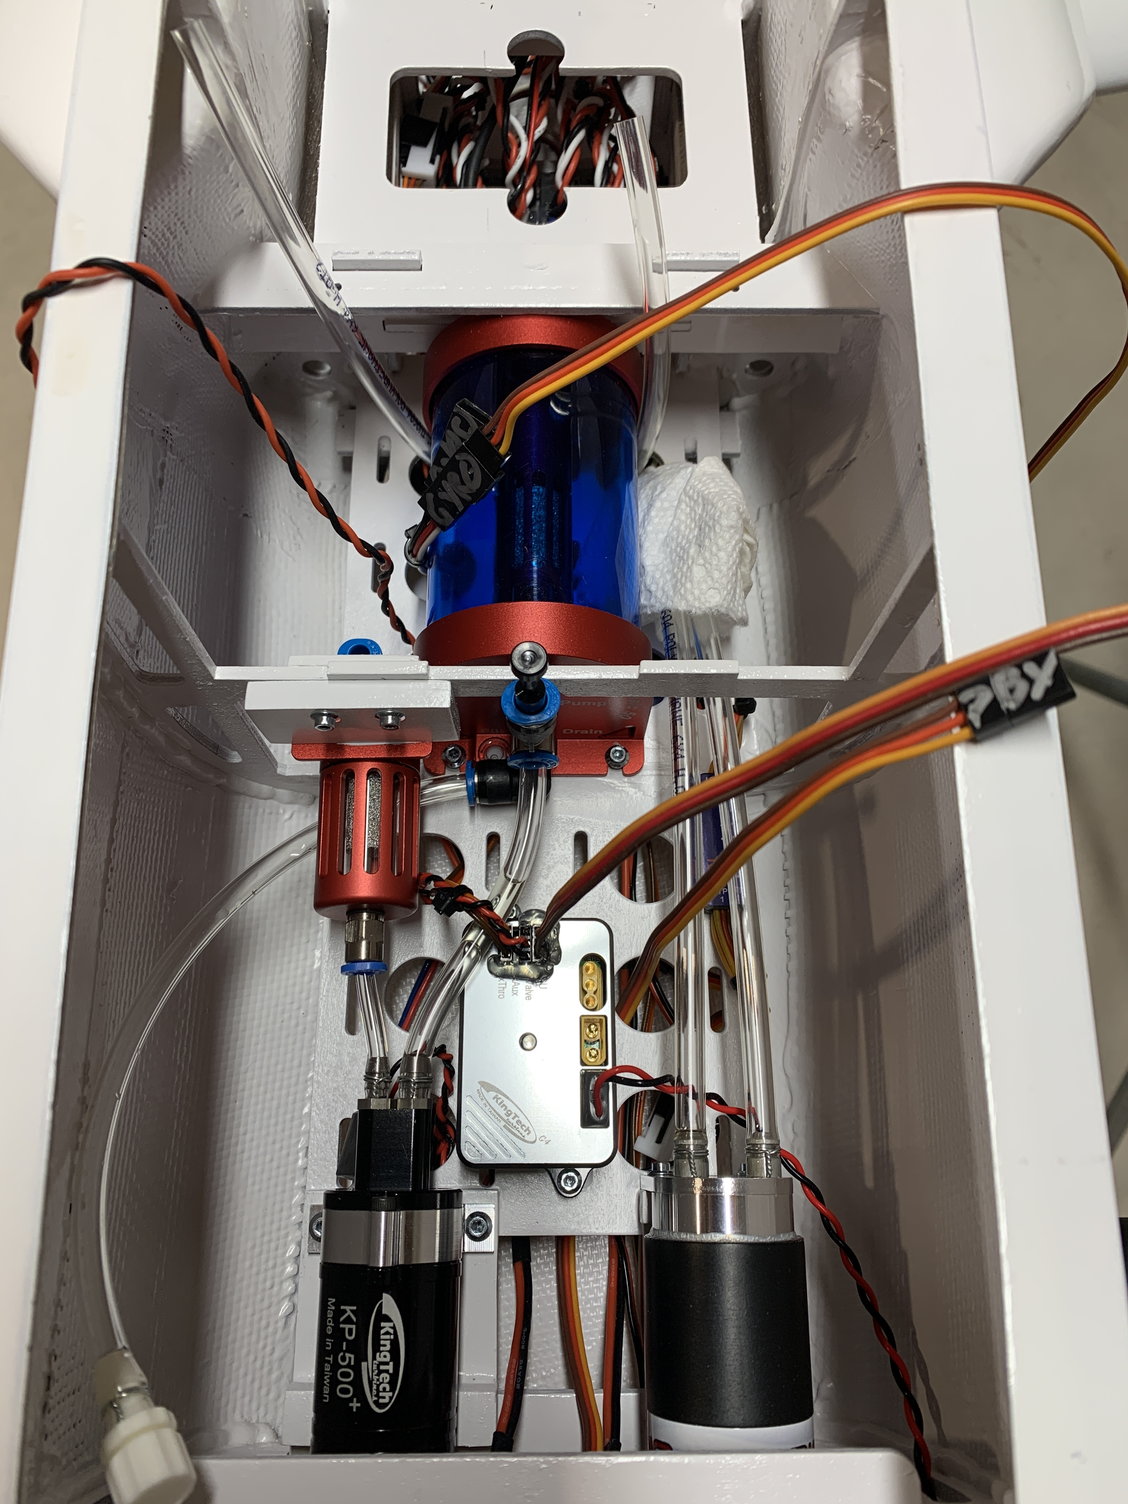
top view too
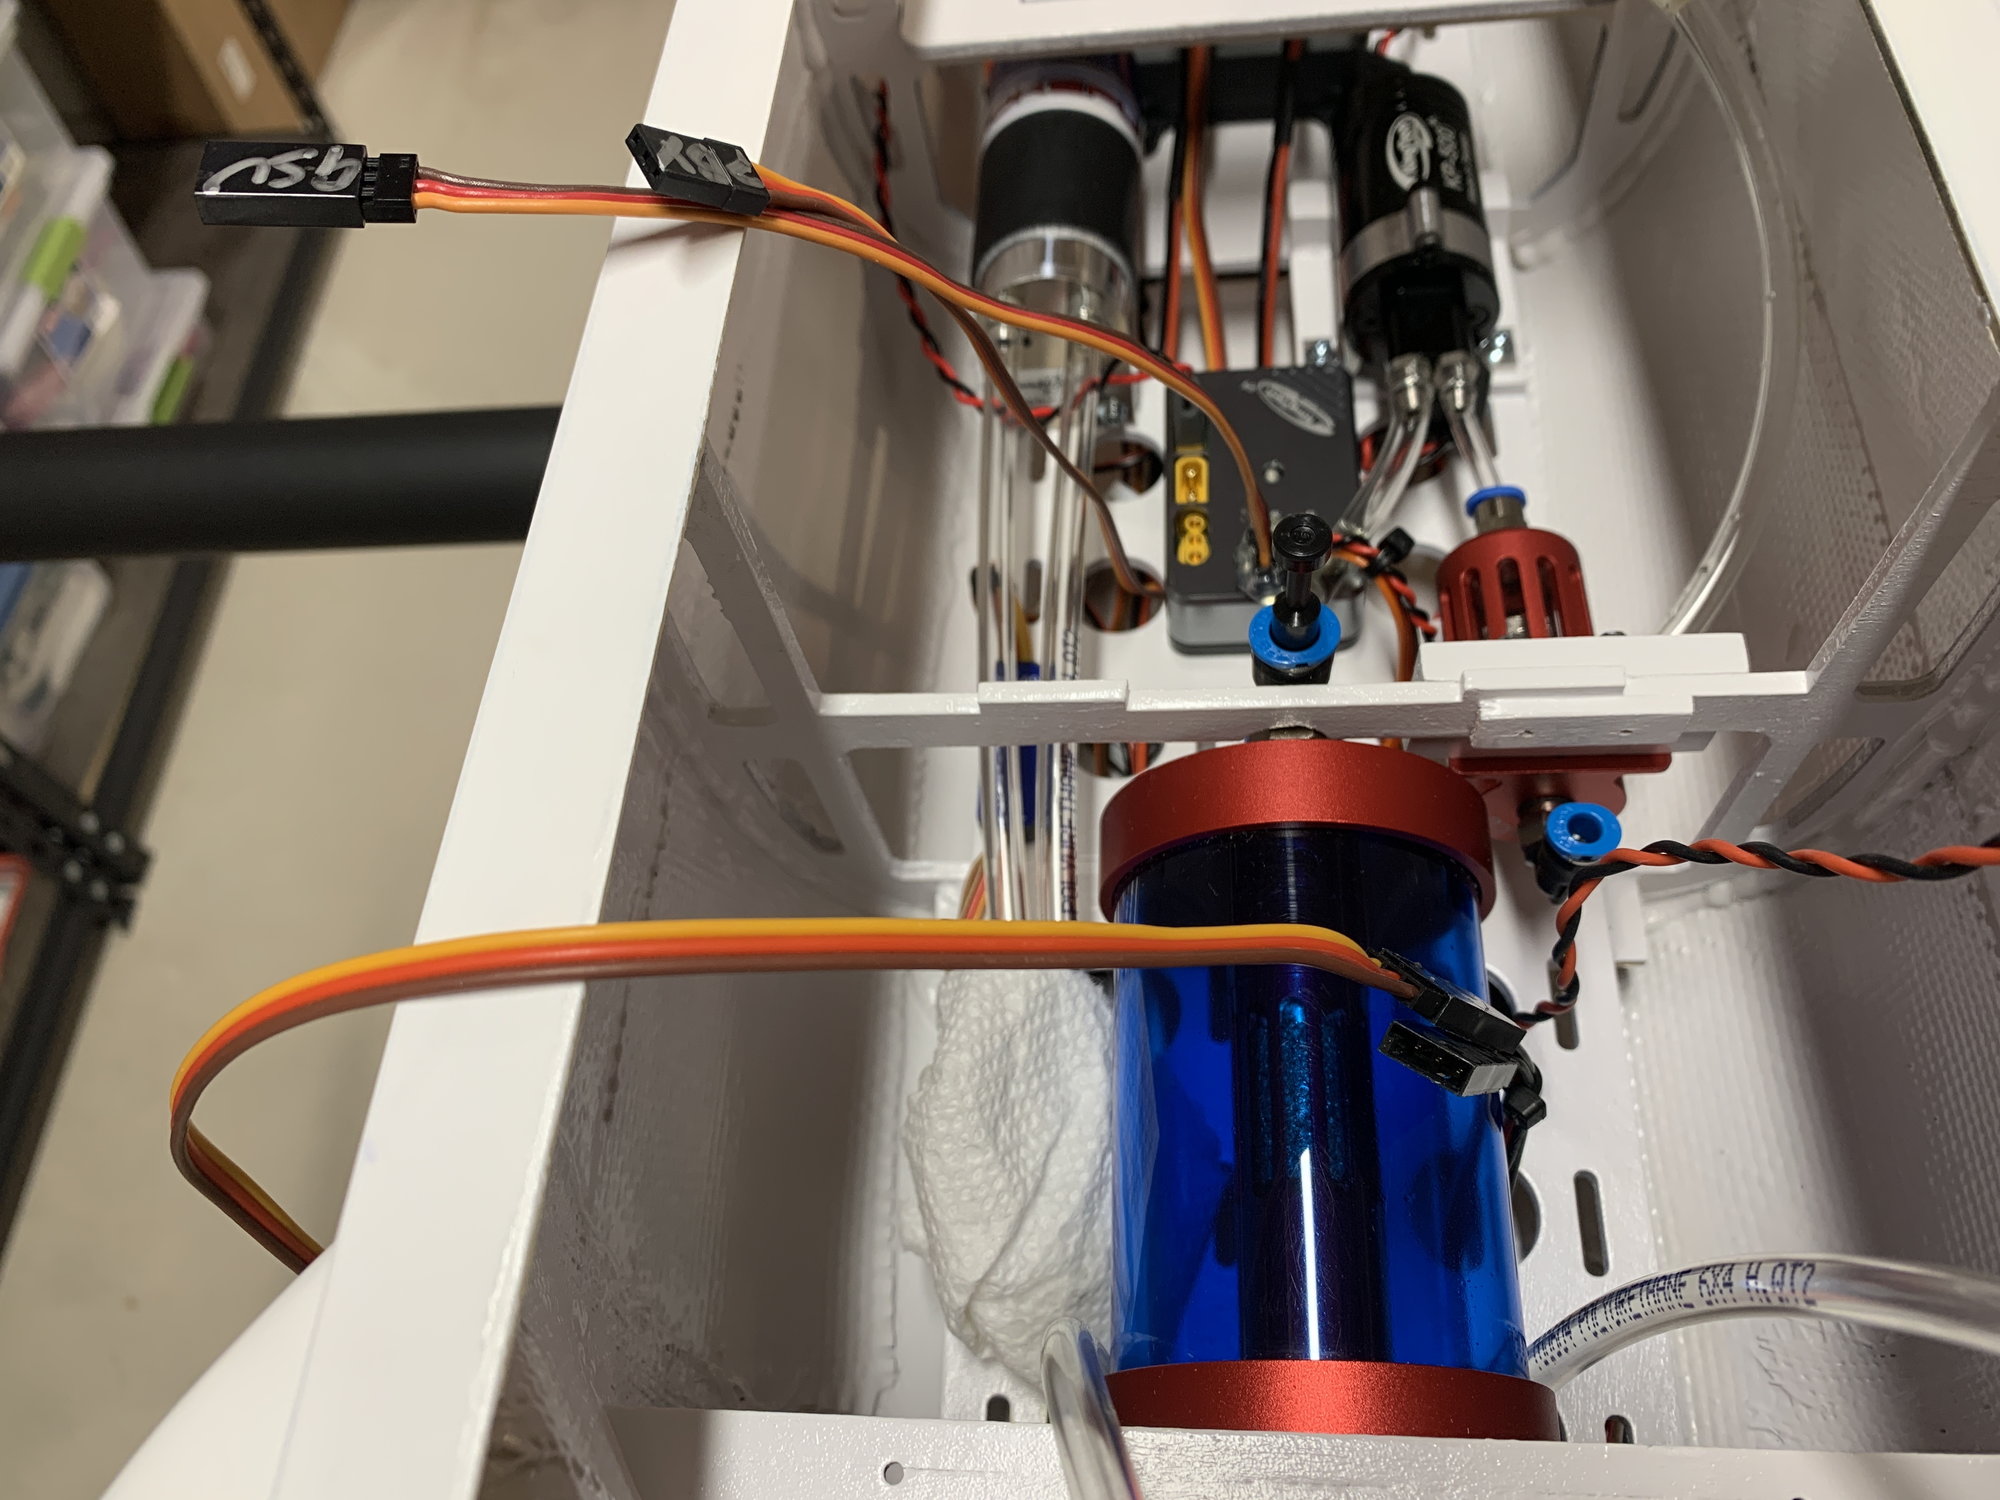
rear view
Front view
Top view
top view too
rear view
Last edited by skunkwurk; 12-05-2020 at 10:51 PM.
12-07-2020, 07:42 AM
#543
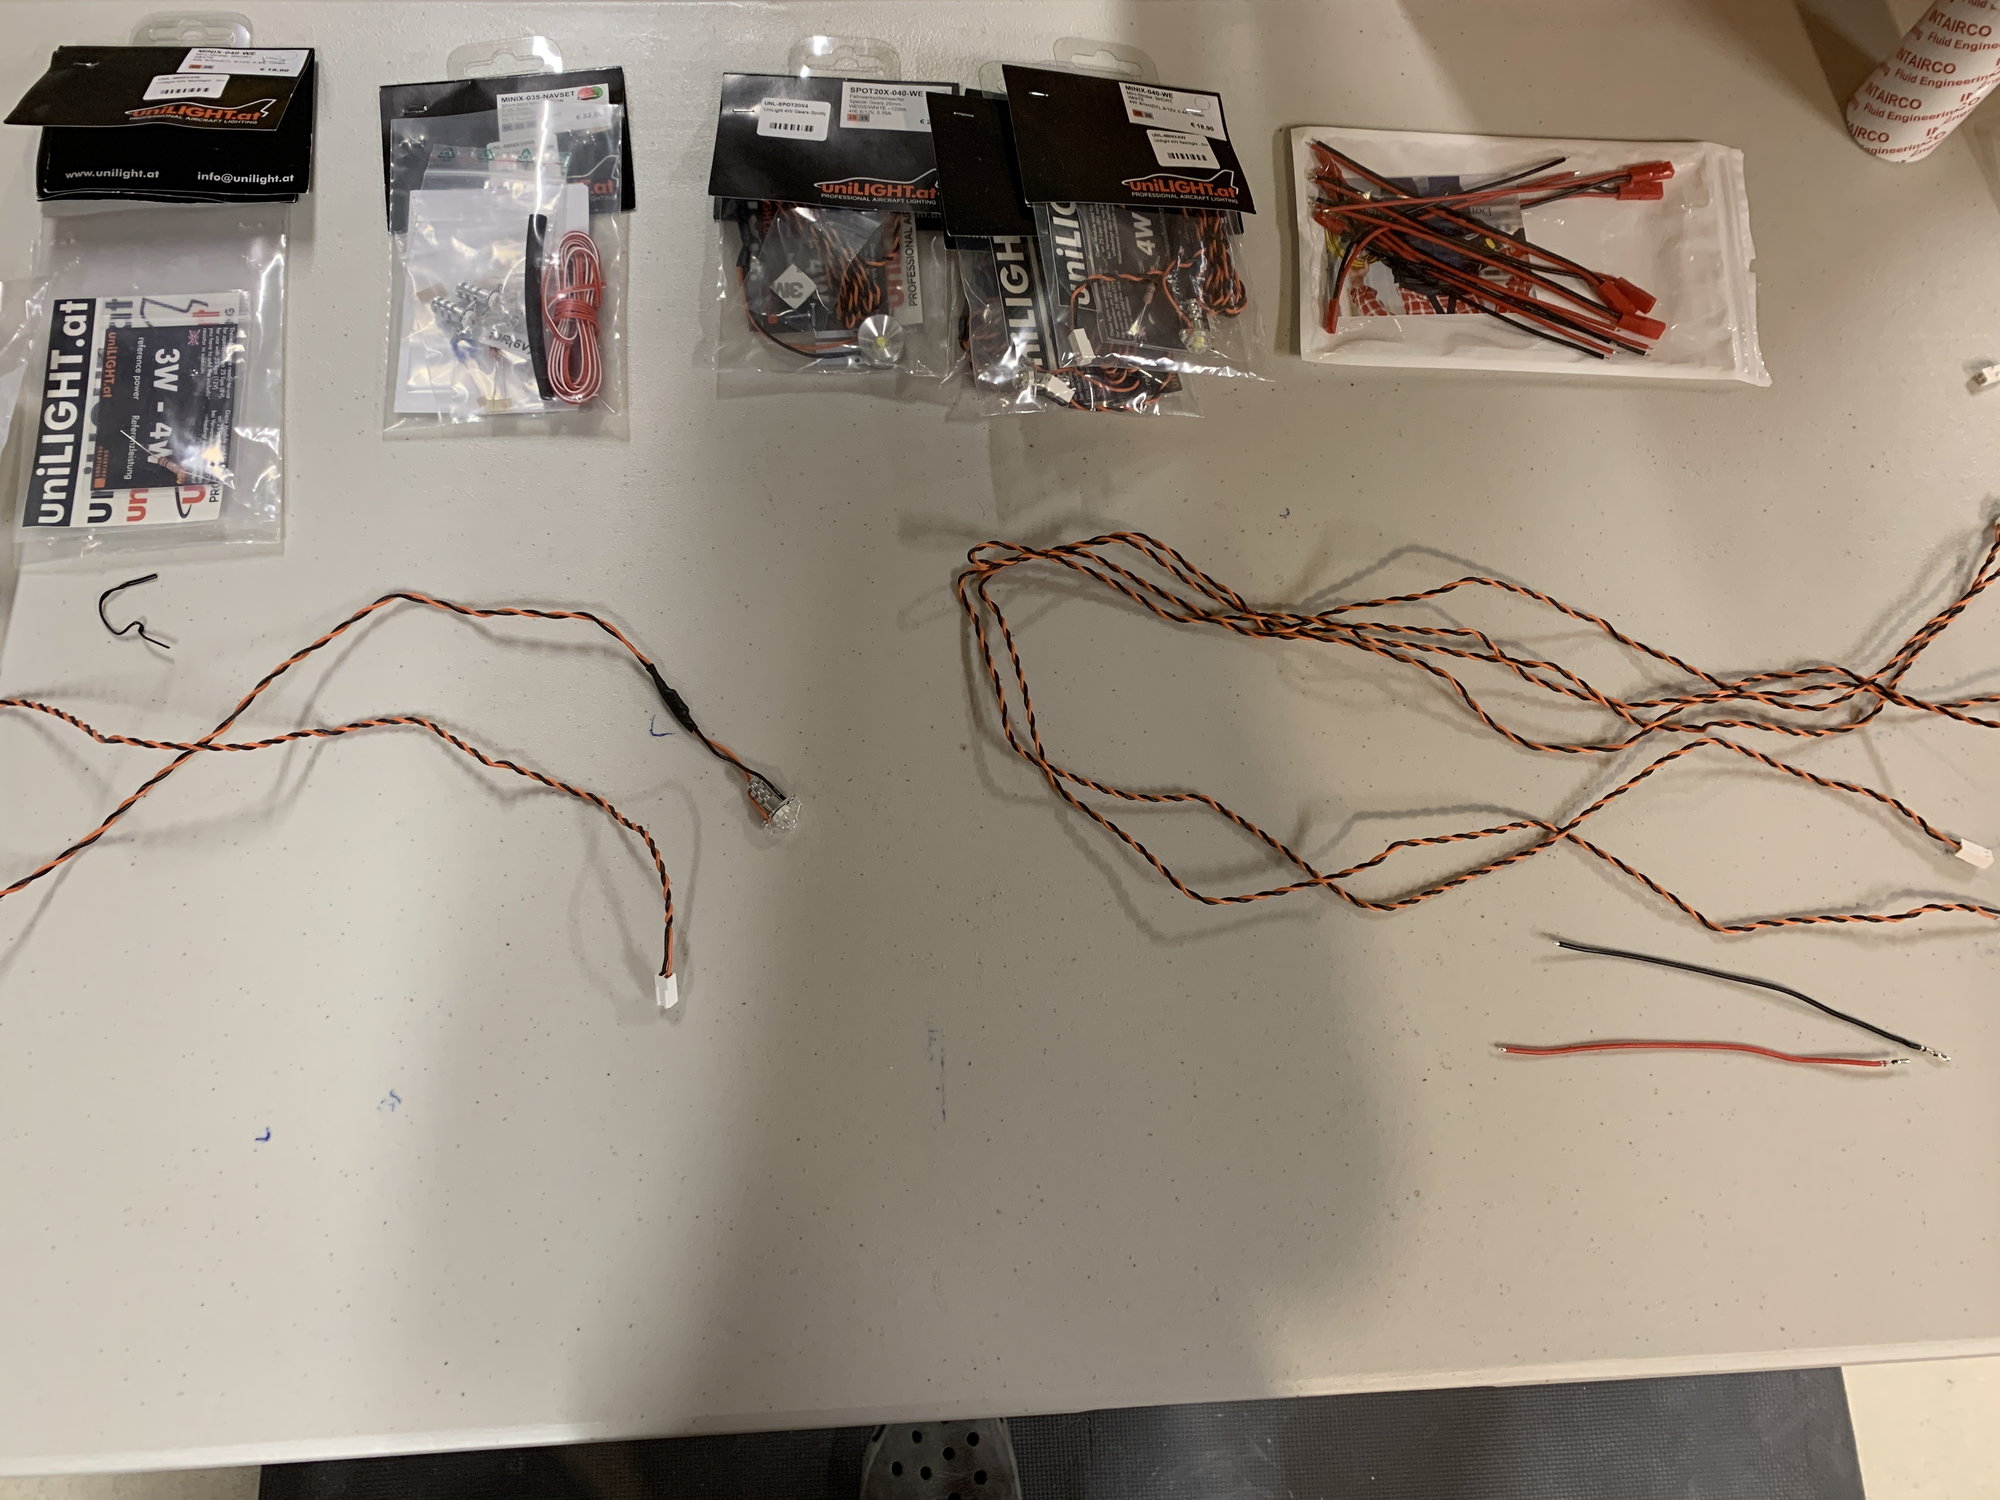
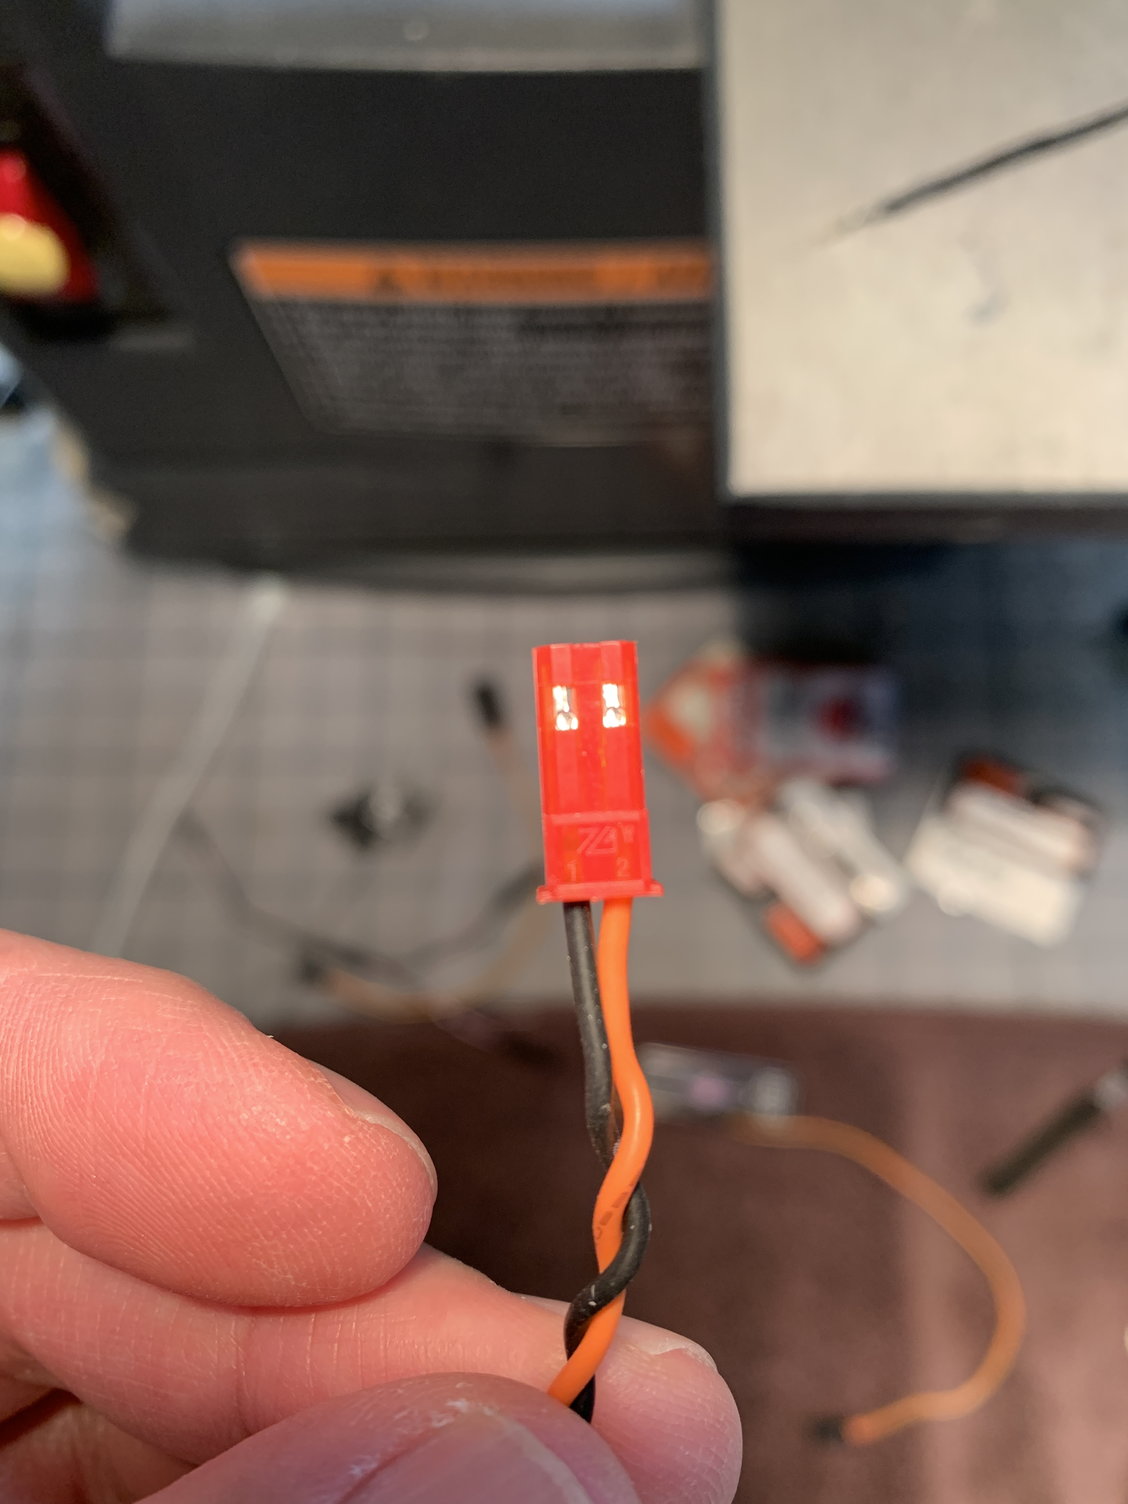
Light system harnesses complete. I use uni-light bulk wire and crimp connectors supported by the controller in the fuse, I will probably use servo or Ashlock connectors at the wing-joint/stab-joint. I refer to each function as a zone, this jet will have four zones. All zones have their own TX logic but are activated and can be shut-off by one main switch.
Zones: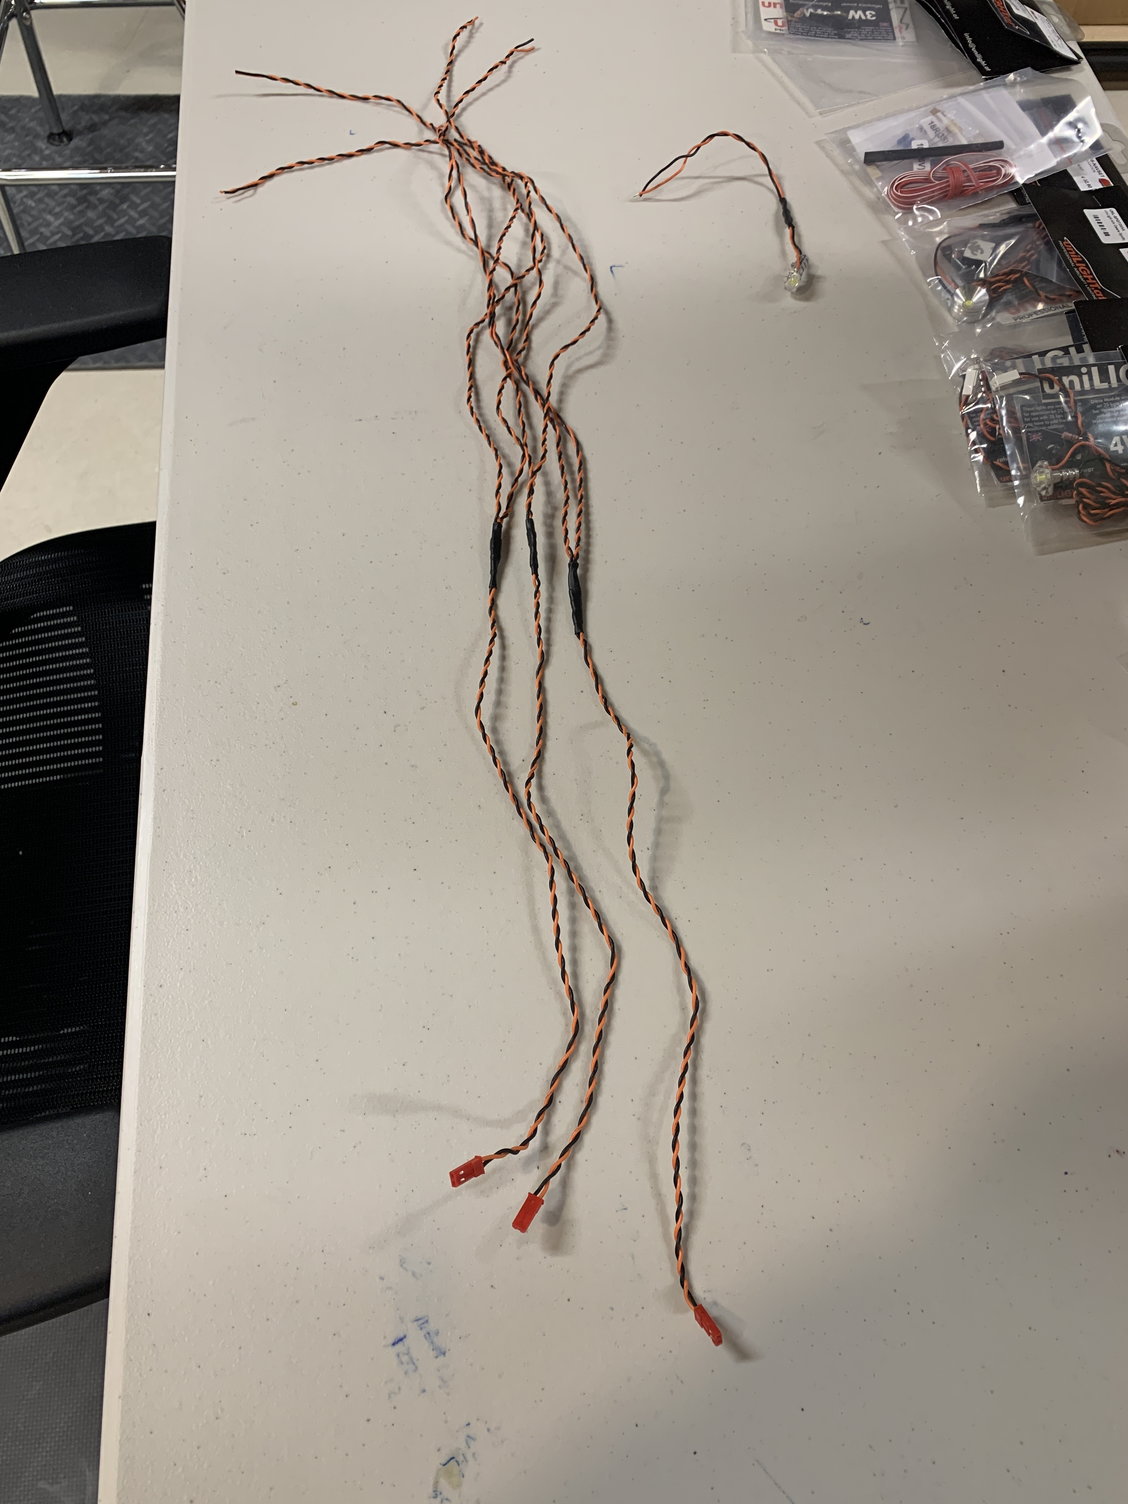
Zones:
- Afterburner - activated by main switch + throttle position trigger
- Navigation/Position - activated by main switch
- Anti-Collision - activated by main switch
- Landing - activated by main switch + gear is down
Last edited by skunkwurk; 12-07-2020 at 01:05 PM.
The following users liked this post:
patniven (12-07-2020)
12-07-2020, 08:50 AM
#544
You're making great progress there in the SkunkWurks shop! Nice, neat work as well. I built a SM A-4 a few months ago using the Unilight 8 channel controller. That thing is awesome - practically unlimited light arrangements and sequences. For now, my second Elan build is on pause. This whole "job" thing is getting in the way of my hobby!
12-07-2020, 08:59 AM
#545
Thank you for the kind words - I appreciate it. I try to put a little time into it when I can. With three kids virtual learning and being on zoom calls most of the day, I only get a little time in the evenings most days.
I like your Stars&Bars scheme, it looks like you have made good progress as well. You have already completed the linkages. I installed the nose gear but have not even started installing servos anywhere else or control horns. That is going to be an epoxy/hysol marathon for me. I'm going to leave all control horn and hinge-point work for a weekend.
I like your Stars&Bars scheme, it looks like you have made good progress as well. You have already completed the linkages. I installed the nose gear but have not even started installing servos anywhere else or control horns. That is going to be an epoxy/hysol marathon for me. I'm going to leave all control horn and hinge-point work for a weekend.
Last edited by skunkwurk; 12-07-2020 at 09:35 AM.
12-07-2020, 09:13 AM
#546
Thank you for the kind words - I appreciate it. I try to put a little time into when I can. With three kids virtual learning and being on zoom calls most of the day, I only get a little time in the evenings most days.
I like your Stars&Bars scheme, it looks like you have made good progress as well. You have already completed the linkages. I installed the nose gear but have not even started installing servos anywhere else or control horns. That is going to be an epoxy/hysol marathon for me. I'm going to leave all control horn and hinge-point work for a weekend.
I like your Stars&Bars scheme, it looks like you have made good progress as well. You have already completed the linkages. I installed the nose gear but have not even started installing servos anywhere else or control horns. That is going to be an epoxy/hysol marathon for me. I'm going to leave all control horn and hinge-point work for a weekend.
 12-07-2020, 09:47 AM
#547
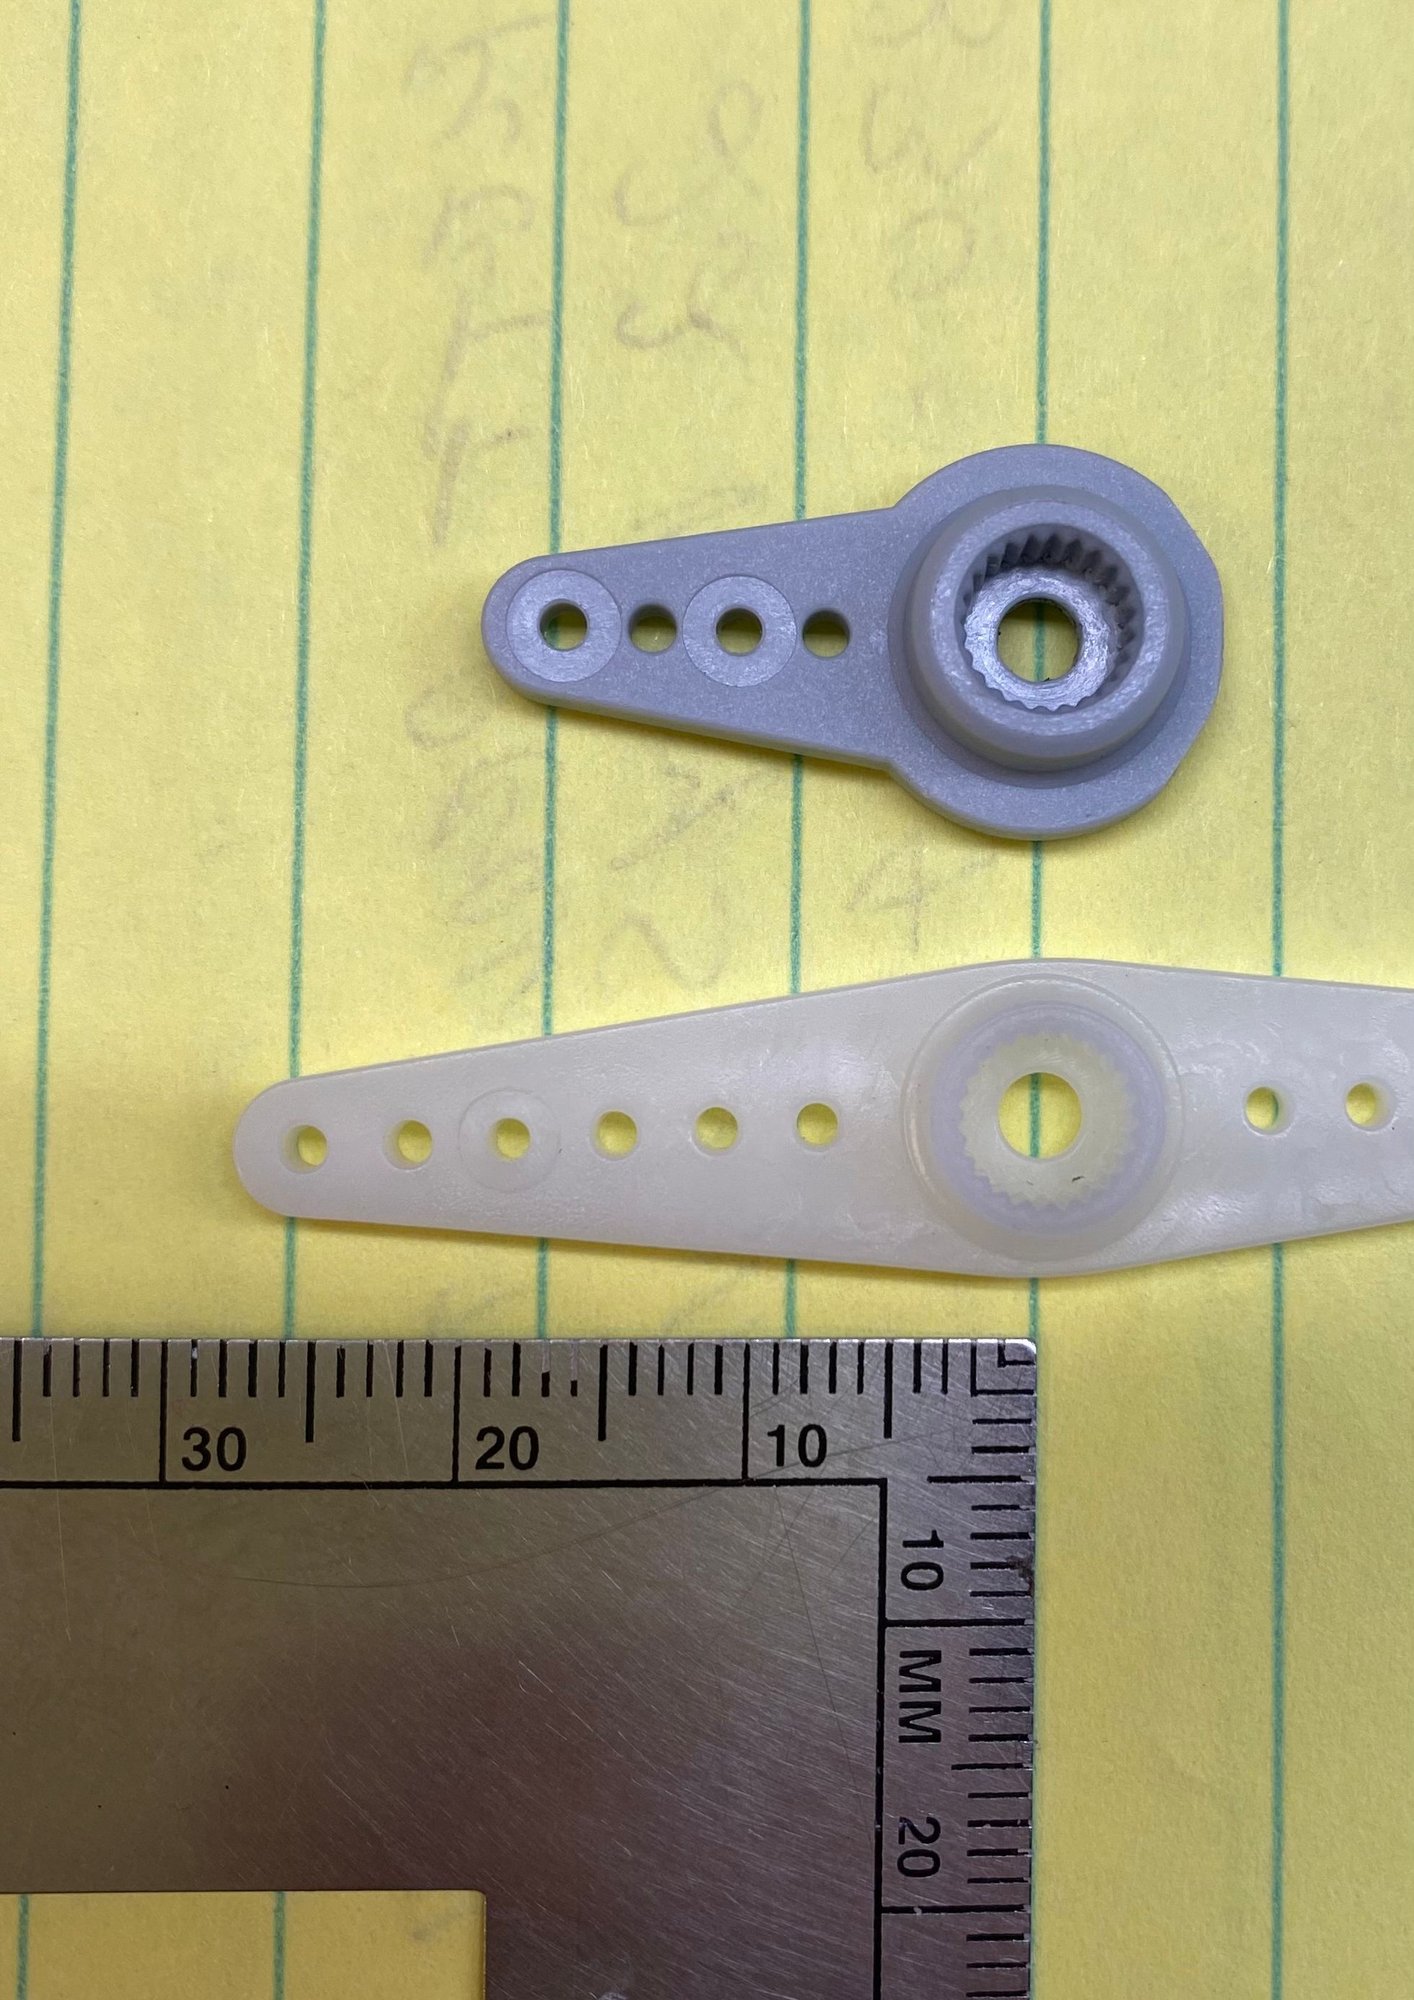
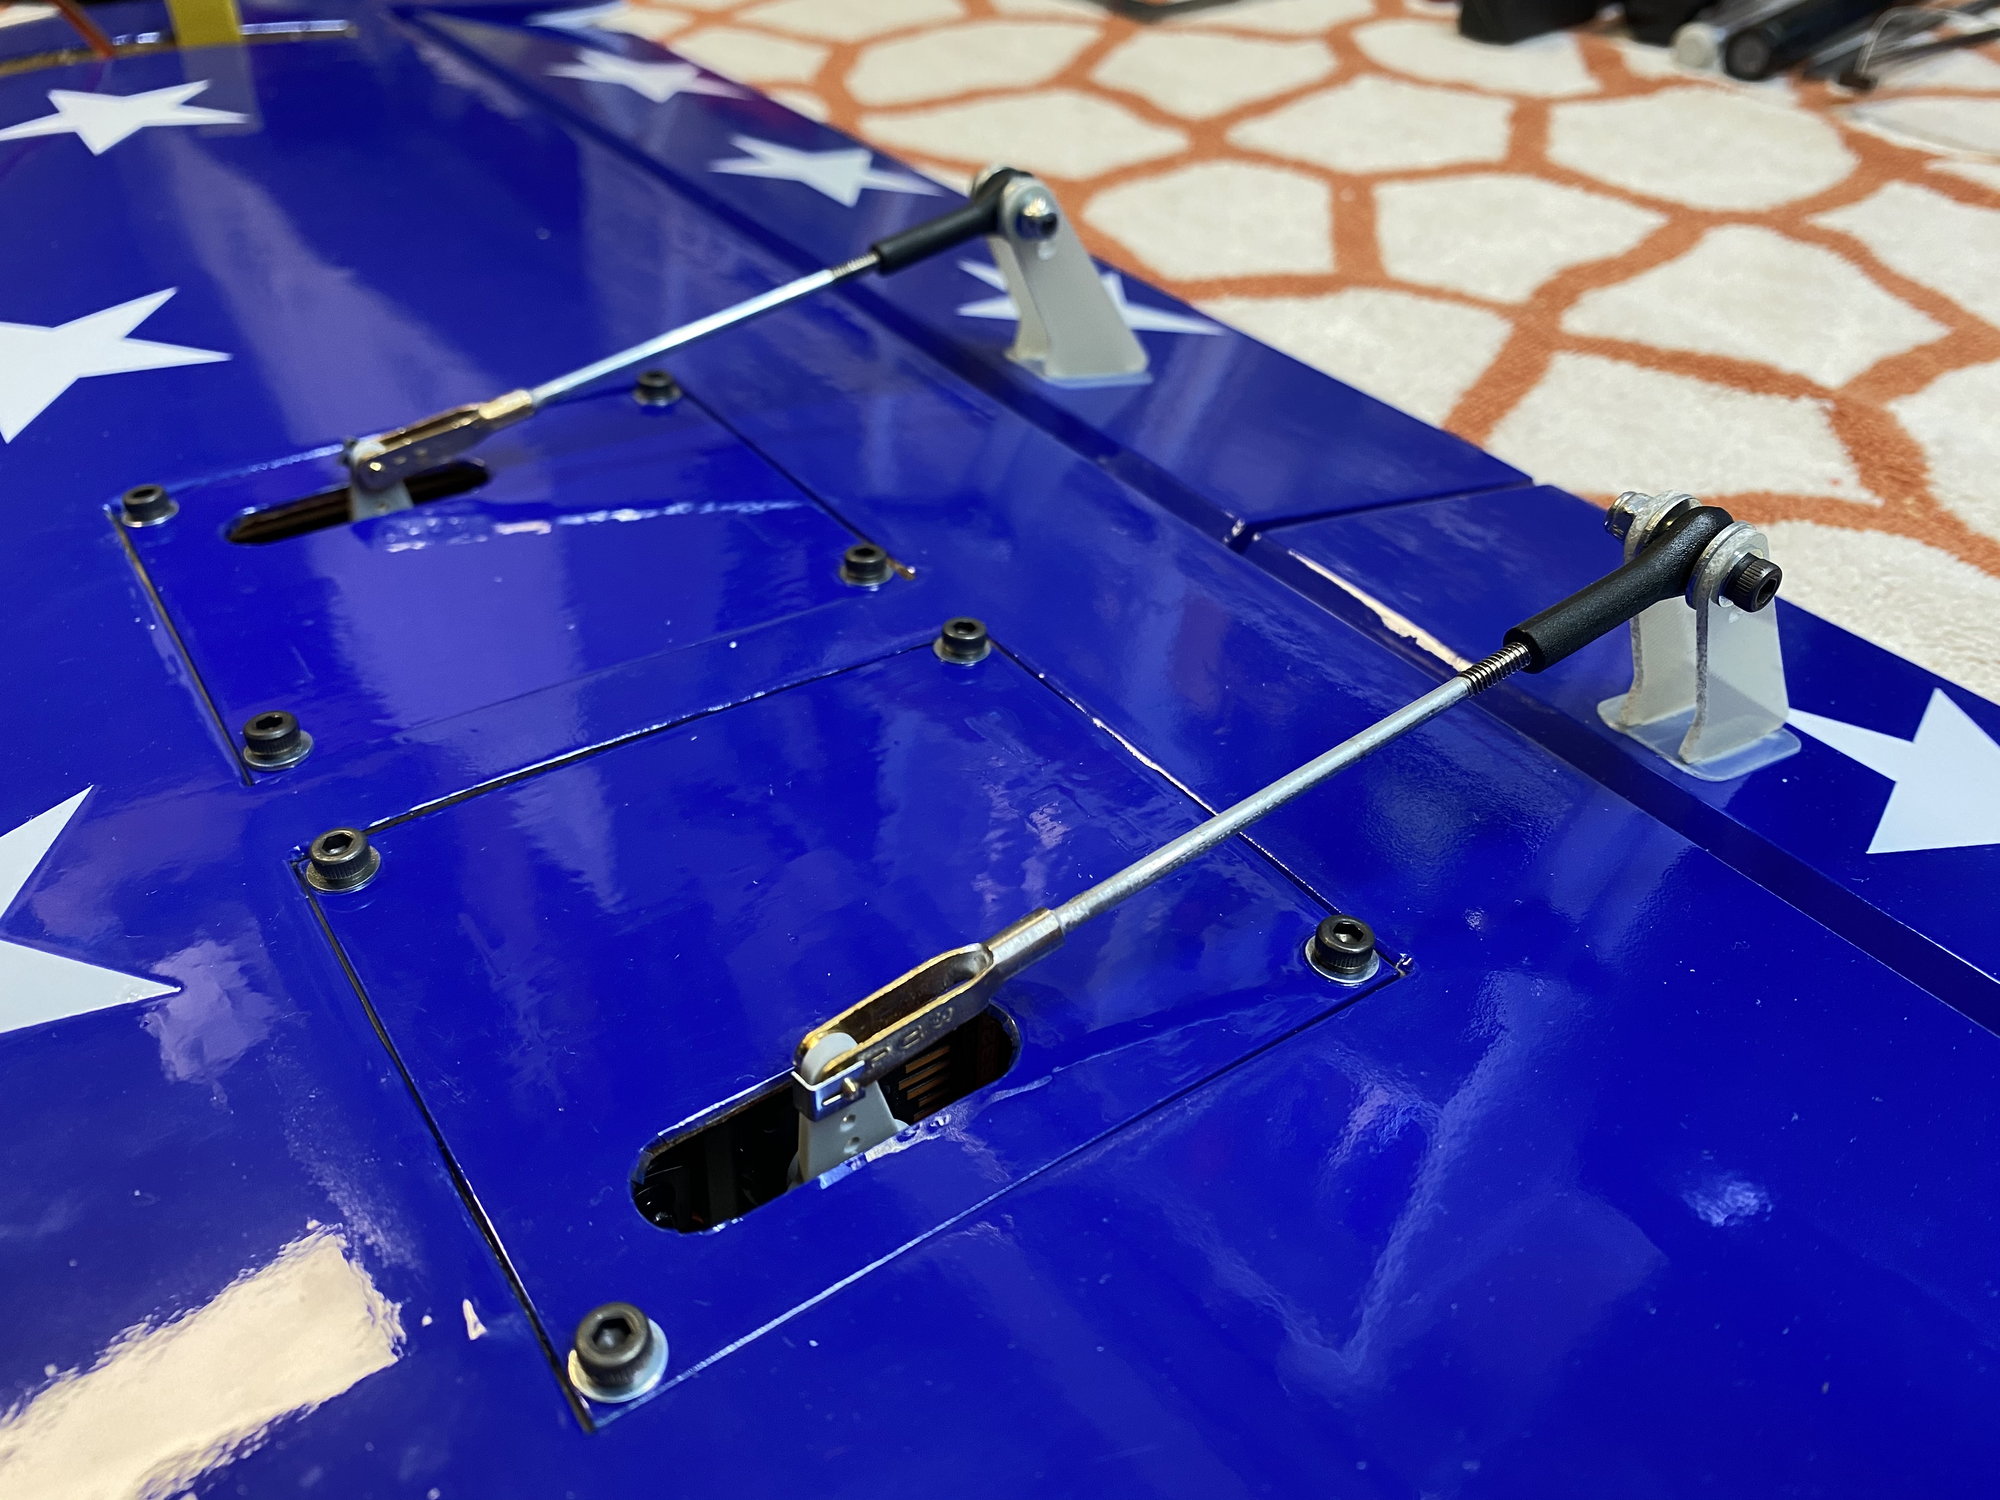
Yep. All servos installed (Spektrum A6320 Brushless), gear/controller installed and wired. I found that the supplied control surface linkage did not work with my Spektrum servo arms and although I have a million Dubro HD servo arms in the shop, they are all sized for a different spline! I went with the stock arms and replaced the spherical rod ends on the servo arm side with Golden Clevises soldered to bulk 4-40 rods. All of the supplied rods were either too short or too long to be used. If you haven't built a twin-boom before, I'd recommend you break up the servo wires in the booms with connectors at the fuse/boom joint; otherwise, if you ever have to remove a boom, you'll be doing some major surgery. Don't ask me how I discovered this...at the FIELD!
I have built a boomer before, and I do plan on having a connection for both servo and light connections at the wing-joint and at the joint between the stabilizer and the vertical fins as well. I do not plan on removing the booms for transport, but I do plan for unfortunate eventualities that may come up. But thank you for the heads up. In fact, if you see anything that looks amiss or want to share ideas, please feel free. I'm always open to learning how others do things. That is exactly why I share on RCU, it may help someone.
The following users liked this post:
patniven (12-07-2020)
12-07-2020, 10:03 AM
#548
Actually, I have a couple questions for ya, I hope you don't mind. What length servo arms did you use? I'm trying to use the smallest that will give me full/recommended throws.
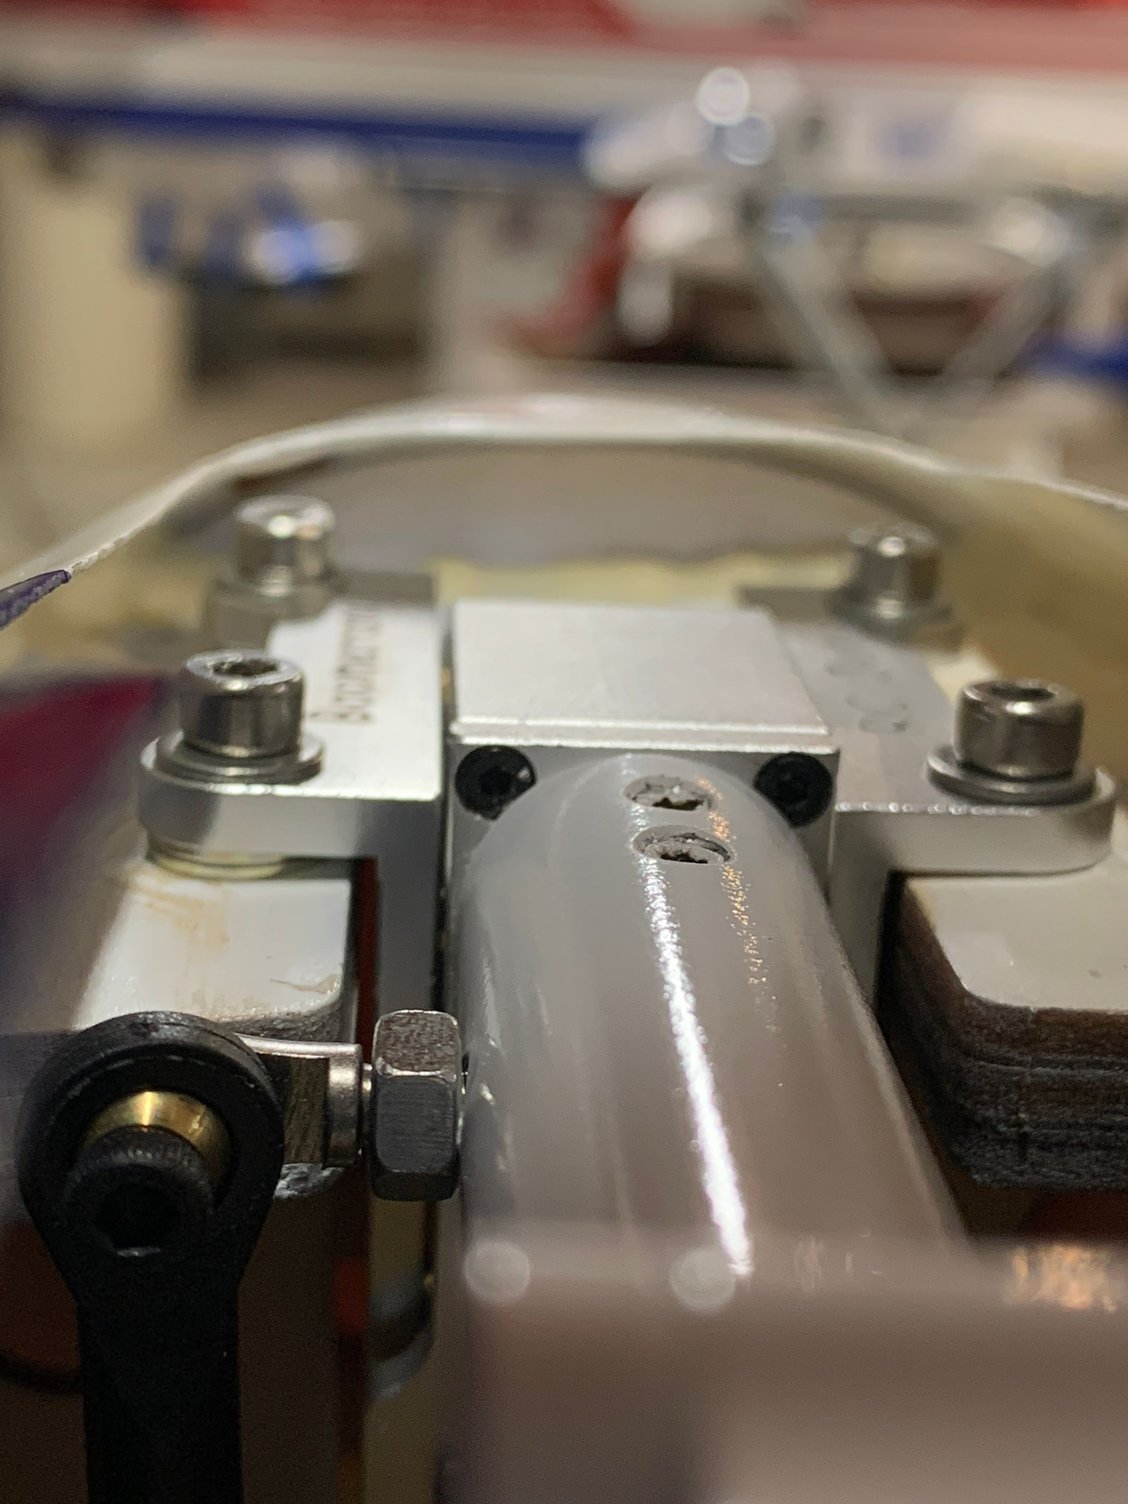
Did you run into any problems with the installation of the control horns? I have already cut mine to the correct depth and have them fitted for all surfaces. I just need to dedicate two days for all of the epoxy work and curing times. But when going through the process, I noticed some do not sit straight at 90 degrees. I obviously intend to install a ball-link with a bolt through the horns when I epoxy them to the surface, but were yours angled inwards like some of mine? I am thinking the two red lines should never intersect. I think the slots in the base-plate are cut too close, but curious if you or others have run into this. Thanks in advance.
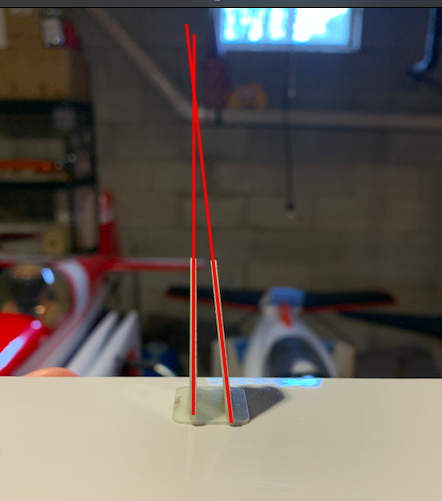
Did you run into any problems with the installation of the control horns? I have already cut mine to the correct depth and have them fitted for all surfaces. I just need to dedicate two days for all of the epoxy work and curing times. But when going through the process, I noticed some do not sit straight at 90 degrees. I obviously intend to install a ball-link with a bolt through the horns when I epoxy them to the surface, but were yours angled inwards like some of mine? I am thinking the two red lines should never intersect. I think the slots in the base-plate are cut too close, but curious if you or others have run into this. Thanks in advance.
Last edited by skunkwurk; 12-07-2020 at 03:32 PM.
12-07-2020, 02:41 PM
#549
Actually, I have a couple questions for ya, I hope you don't mind. What length servo arms did you use? I'm trying to use the smallest that will give me full/recommended throws.
Did you run into any problems with the installation of the control horns? I have already cut mine to the correct depth and have them fitted for all surfaces. I just need to dedicate two days for all of the epoxy work and curing times. But when going through the process, I noticed some do not sit straight at 90 degrees. I obviously I intend to install a ball-link with a bolt through the horns when I epoxy them to the surface, but were yours angled inwards like some of mine? I am thinking the two red lines should never intersect. I think the slots in the base-plate are cut too close, but curious if you or others have run into this. Thanks in advance.
Did you run into any problems with the installation of the control horns? I have already cut mine to the correct depth and have them fitted for all surfaces. I just need to dedicate two days for all of the epoxy work and curing times. But when going through the process, I noticed some do not sit straight at 90 degrees. I obviously I intend to install a ball-link with a bolt through the horns when I epoxy them to the surface, but were yours angled inwards like some of mine? I am thinking the two red lines should never intersect. I think the slots in the base-plate are cut too close, but curious if you or others have run into this. Thanks in advance.