


SAP 180 (Syssa Performance)
 03-25-2010 | 08:37 PM
#676

Joined: Jul 2006
Posts: 2,819
Likes: 0
Received 0 Likes
on
0 Posts
From: Ossining,
NY
Matt,
I'm not really sure what the prop is intended for. It says 18x10PN on the prop, but Anthony R saw it and told me it is an older discontinued design. Does indeed have a totally different profile and looks a heckuva lot more like a sport prop when compared to the more recent pattern props, which I got from Central Hobbies.
I don't recall exactly where I got the 18x10PN... maybe/probably from Tower, when I bought the header. My buddy Rob has a recent-vintage 18.1x10 pattern prop he has offered to lend me for testing, so I think we will give that one a try as soon as our schedules converge.
If that doesn't happen soon, it is likely I will try the 17x12W and the 18.1x12 pattern just for the heck of it. Up until now I haven't been interested too much in the tachometer because of the exhaust issues (the depressed rpm's were depressing me!), but now that those are behind me it is time to get some serious numbers.
 03-25-2010 | 10:38 PM
#677
Thread Starter
Senior Member
That's different than what I had in mind.
Nearly all of my early flights were done with the 18.1x10 pattern prop. It worked fine.
Started to work on the Extra, fitting the engine first. Firewall had to be moved back 1 1/4" to accomodate the soft mount and stand offs. Just for grins I weighed the firewall....85 gramsa real whopper.
A similarly sized piece made from cross grained balsa and carbon will weigh 20 grams. I don't think I'm going to make this thing stock after all.
Sorry guys I just can't resist the tinkerbell
Matt
03-26-2010 | 06:30 AM
#678
Joined: Jul 2006
Posts: 2,819
Likes: 0
Received 0 Likes
on
0 Posts
From: Ossining,
NY
A similarly sized piece made from cross grained balsa and carbon will weigh 20 grams. I don't think I'm going to make this thing stock after all.
Sorry guys I just can't resist the tinkerbell
Sorry guys I just can't resist the tinkerbell

I saw your comments in the other thread and was wondering if it would really roll out of your shop box-stock.
03-26-2010 | 07:05 AM
#679
Thread Starter
Senior Member
ORIGINAL: cmoulder
HA!
I saw your comments in the other forum and was wondering if it would really roll out of your shop box-stock.
HA!
I saw your comments in the other forum and was wondering if it would really roll out of your shop box-stock.
I am working on a new method for laminating the wood/carbon props that is simpler and more straight forward than anything else I've done.
Ed, don't work on the second prop yet. The husks are the trickiest part to fashion and the new technique doesn't use them.
Matt
03-26-2010 | 07:10 AM
#680
Senior Member
My Feedback: (3)
Joined: Sep 2009
Posts: 1,300
Likes: 0
Received 0 Likes
on
0 Posts
From: Bedford,
NH
Well then, get to work on the carb on the Syssa! You can cut off the idle stop, at least 1/2 of the throttle arm on the back side, and make a vented reference plate out of carbon/epoxy with a nipple. You could use the steel stamped part as a mold for the new one.
03-26-2010 | 07:36 AM
#681
Joined: Jul 2006
Posts: 2,819
Likes: 0
Received 0 Likes
on
0 Posts
From: Ossining,
NY
That's funny Bob, just love to tinker. The landing gear will be replaced too along with the wing tube. The TBM carbon tube is a drop in fit and shaves 50 grams, (1.8 ozs). 2 ozs here and 2 ozs there, I think this thing can be built at under 11 pounds fairly easily. The canopy is really heavy at 10 ozs. Making a mold from dental stone and casting one in glass will be straight forward.
I am working on a new method for laminating the wood/carbon props that is simpler and more straight forward than anything else I've done.
Ed, don't work on the second prop yet. The husks are the trickiest part to fashion and the new technique doesn't use them.
I am working on a new method for laminating the wood/carbon props that is simpler and more straight forward than anything else I've done.
Ed, don't work on the second prop yet. The husks are the trickiest part to fashion and the new technique doesn't use them.
And man, is that a heavy canopy! The Focus canopy wasn't extremely heavy right out of the box (unlike the Focus sport canopy that weighs a ton), but still I shaved off about 1.5 oz by cutting out the deck, making the attachment ears smaller and using nylon bolts. Comes in now at 4.58 oz.
I've still got those 2 virgin Xoar e-props, and the way you keep refining and distilling the carbonification process pretty soon even I will be able to do it.
 03-26-2010 | 07:49 AM
#682
Joined: Jul 2006
Posts: 2,819
Likes: 0
Received 0 Likes
on
0 Posts
From: Ossining,
NY
and make a vented reference plate out of carbon/epoxy with a nipple
FWIW, yesterday was the "acid test" of the static nipple since everything was grooved in and my engine was running at full song. There was zero change in performance with full-throttle negative maneuvers, so this is a modification that many aerobatic models will benefit from.
03-26-2010 | 10:20 PM
#684
Joined: Jul 2006
Posts: 2,819
Likes: 0
Received 0 Likes
on
0 Posts
From: Ossining,
NY
The lightened metering diaphragm cover (Walbro's term - I was wondering what they actually call it) won't reduce the weight more than 3-4 grams perhaps, but as I learned from doing this model "the right way" - trying to keep it light at every step - every gram counts. It occurred to me that the standard Tygon tube I routed inside the fuse is heavier and longer than necessary, so I have already come up with a lighter alternative, reducing the weight by yet another few grams.
My tail gear is far more robust - and therefore several grams heavier - than most, but that is by choice because of my experience flying off rough grass fields. This thing really absorbs a lot of shock and complements the main gear to reduce stress on the airframe. I make my own tail gear (sometimes using the stock bracket) from 5/64" piano and one of those cheapo wire bending tools I got from Tower. Better than any straight commercial tail gear I have used yet. My model's weight is still comfortably under 5 kg, so it is a small weight penalty I can afford.
At some point, there has to be a balance between light weight and durability.
04-02-2010 | 04:15 PM
#685
Thread Starter
Senior Member
ORIGINAL: cmoulder
The lightened metering diaphragm cover (Walbro's term - I was wondering what they actually call it) won't reduce the weight more than 3-4 grams perhaps, but as I learned from doing this model ''the right way'' - trying to keep it light at every step - every gram counts. It occurred to me that the standard Tygon tube I routed inside the fuse is heavier and longer than necessary, so I have already come up with a lighter alternative, reducing the weight by yet another few grams.
My tail gear is far more robust - and therefore several grams heavier - than most, but that is by choice because of my experience flying off rough grass fields. This thing really absorbs a lot of shock and complements the main gear to reduce stress on the airframe. I make my own tail gear (sometimes using the stock bracket) from 5/64'' piano and one of those cheapo wire bending tools I got from Tower. Better than any straight commercial tail gear I have used yet. My model's weight is still comfortably under 5 kg, so it is a small weight penalty I can afford.
At some point, there has to be a balance between light weight and durability.
Here's a snap of the gear I fashioned from .078 music wire for the Extra. Used the a portion of the stock bracket which was very light and stiff carbon. The tiller arm is a 1/2" 4-40 bolt with a piece of nitrile tubing, which will get pinned to the rudder. It saved 40% the weight of the original gear, (around 8 grams....doesn't sound like much but it is).
I have the engine just about mounted. I'll take a pic of the final assembly when it's ready
04-03-2010 | 09:51 PM
#686
My Feedback: (5)
Joined: Apr 2005
Posts: 123
Likes: 0
Received 0 Likes
on
0 Posts
From: Tavares,
FL
ORIGINAL: cmoulder
Pipe tunnel
Guys, thanks for the pipe mounting ideas!
There's no way the stock FG pipe tunnel was going to work for the ES pipe, so today I made the channel a little larger and lined it with 1/16" balsa sheet. Much lighter than the FG actually, though I didn't weigh it. I will use a small section of the FG tunnel for the forward part, which will be attached with screws so that I can access the area for the landing gear and behind the firewall.
The hard part was getting the channel portion of all the formers the same so that the damp balsa sheet would fit all of them. For some strange reason none of them were the same shape, so I modified the center one and made a little template of it which was used to shape the others.
I made a hard point for the pipe mount on one of the formers which was as Ed suggested about 2/3 of the way down the pipe. I have the DB Hush mount but it sticks out too far, so I will borrow you guys' ideas and come up with something now that I understand the principle.
Here are some photos, in no particualr order...
Is there a chance that the remaining portion of your fiberglass tunnel is available for purchase or scrounging? Like you, I cut my tunnel longer and would like to make an extension. Using your leftovers will be easier than molding my own. That is if you can entertain my request. Thanks.
David
04-04-2010 | 02:06 PM
#687
Thread Starter
Senior Member
The EF Extra 78" was completed...11# 5 ozs all up. Missed my goal of 11#s or less by very little. Of course I modified some parts to get the plane down this far: namely, a carbon balsa firewall, a new carbon landing gear, new wheel pants and aluminum axles and very lightweight wheels. Also changed out the gas tank from the 550cc tank supplied to a 14 oz sullivan. This move wasn't made so much for weight savings (which was considerable) but rather to keep my flying buds from getting on my case for being an air hog
A fiberglass canopy and new foam balsa stab would remove another 8 ozs or so, but I won't do that any time soon. I have my regular pattern model to finish still.
The SAP 30 cc is light in this plane...the plane came out ever so slightly tail heavy. A foam balsa stab would make sense rather than add nose weight...For now, the plane will just fly. I need to get going on finishing my pattern plane, also for the SAP 30 cc on ES pipe
04-05-2010 | 03:52 AM
#688
Joined: Jul 2006
Posts: 2,819
Likes: 0
Received 0 Likes
on
0 Posts
From: Ossining,
NY
Matt, congrats on getting your Extra ready to fly so quickly! I hope you got to fly yesterday, or will do so in the next couple of days, what with the spectacular weather.
Looks like one of your custom props, and I'm wondering if you will go with something with a little less pitch for the Extra. I can imagine the thrust (and prop noise) generated by an 18x6 or 18x8 with the tuned pipe.
Looks like one of your custom props, and I'm wondering if you will go with something with a little less pitch for the Extra. I can imagine the thrust (and prop noise) generated by an 18x6 or 18x8 with the tuned pipe.
04-05-2010 | 04:03 AM
#689
Joined: Jul 2006
Posts: 2,819
Likes: 0
Received 0 Likes
on
0 Posts
From: Ossining,
NY
Bob,
Is there a chance that the remaining portion of your fiberglass tunnel is available for purchase or scrounging? Like you, I cut my tunnel longer and would like to make an extension. Using your leftovers will be easier than molding my own. That is if you can entertain my request. Thanks.
David
Is there a chance that the remaining portion of your fiberglass tunnel is available for purchase or scrounging? Like you, I cut my tunnel longer and would like to make an extension. Using your leftovers will be easier than molding my own. That is if you can entertain my request. Thanks.
David
In any event, if you use the stock tunnel with the ES pipe, the pipe is going to stick way out on the bottom of the plane. It is a bit of a challenge to reshape the formers and make the tunnel (channel, actually) wider and deeper and line it with 1/16" balsa sheet, but well worth the effort. The blue Ultracote color for covering the is mentioned somewhere in the thread.
04-05-2010 | 08:58 AM
#690
Thread Starter
Senior Member
Guys,
what if you got an appropriate length of 2 1/2" PVC pipe from Cheapo depot, monokoted it, waxed it and then laid up some 3 oz glass cloth over that to cover around 200 degrees of circumference. This will weigh very little and you can make it as long as necessary
Matt
what if you got an appropriate length of 2 1/2" PVC pipe from Cheapo depot, monokoted it, waxed it and then laid up some 3 oz glass cloth over that to cover around 200 degrees of circumference. This will weigh very little and you can make it as long as necessary
Matt
04-05-2010 | 10:24 AM
#691
Joined: Jul 2006
Posts: 2,819
Likes: 0
Received 0 Likes
on
0 Posts
From: Ossining,
NY
ORIGINAL: MTK
Guys,
what if you got an appropriate length of 2 1/2'' PVC pipe from Cheapo depot, monokoted it, waxed it and then laid up some 3 oz glass cloth over that to cover around 200 degrees of circumference. This will weigh very little and you can make it as long as necessary
Matt
Guys,
what if you got an appropriate length of 2 1/2'' PVC pipe from Cheapo depot, monokoted it, waxed it and then laid up some 3 oz glass cloth over that to cover around 200 degrees of circumference. This will weigh very little and you can make it as long as necessary
Matt
04-05-2010 | 10:35 AM
#692
Thread Starter
Senior Member
ORIGINAL: cmoulder
Sounds like a good alternative. Still would have to hog out the formers to make it fit.
ORIGINAL: MTK
Guys,
what if you got an appropriate length of 2 1/2'' PVC pipe from Cheapo depot, monokoted it, waxed it and then laid up some 3 oz glass cloth over that to cover around 200 degrees of circumference. This will weigh very little and you can make it as long as necessary
Matt
Guys,
what if you got an appropriate length of 2 1/2'' PVC pipe from Cheapo depot, monokoted it, waxed it and then laid up some 3 oz glass cloth over that to cover around 200 degrees of circumference. This will weigh very little and you can make it as long as necessary
Matt
04-05-2010 | 11:35 PM
#693
Thread Starter
Senior Member
ORIGINAL: cmoulder
Matt, congrats on getting your Extra ready to fly so quickly! I hope you got to fly yesterday, or will do so in the next couple of days, what with the spectacular weather.
Looks like one of your custom props, and I'm wondering if you will go with something with a little less pitch for the Extra. I can imagine the thrust (and prop noise) generated by an 18x6 or 18x8 with the tuned pipe.
The kit is very pre-fabbed and all hardware one would need is included...a big time saver. It took me longer than typical actually because I'm crazy and like to do things my way, like new landing gear and new firewall. Am also in process of casting a mold for the canopy so I'll make this part from glass and 1/32" balsa. I estimate this will save about 5 ozs over the stock part. Some time in the future I'll build another stab for it too, probaly foam since it's faster.
The fuse is light otherwise and worth the extra effort.
I am in process of finishing another 18x12 hybrid. Also will be laminating a 20x10 hybrid later in the week. I ran the 18.1x10 in the maiden. I have a 19x10 already made...so there's a variety of props to try
Matt
04-06-2010 | 07:09 PM
#696
Thread Starter
Senior Member
ORIGINAL: cmoulder
The most recent updated info from Matt's tuning tests is [link=http://www.rcuniverse.com/forum/fb.asp?m=9536834]Post #575[/link].
The most recent updated info from Matt's tuning tests is [link=http://www.rcuniverse.com/forum/fb.asp?m=9536834]Post #575[/link].
BTW, I am going with the ES40G in the Extra. There's plenty of room in the tunnel for this. The internals are identical to the 30G I have on hand, but I need the 30G for my pattern plane. Going to learn something either way.
I am staying with the fiberglass tape coupler for now. But I am very interested in what you find out with the turbo hose. I've drilled and tapped the pipe stem and header for a 4-40 button head screw as Ed Skorepa suggested, which will work like a barb and hold the coupler material better. I am using the tape alone with stainless steel wire ties. It needs cooling air over it to keep the silicone adhesive cool enough so it can provide a good seal and not melt.
04-06-2010 | 08:06 PM
#697
Senior Member
My Feedback: (3)
Joined: Sep 2009
Posts: 1,300
Likes: 0
Received 0 Likes
on
0 Posts
From: Bedford,
NH
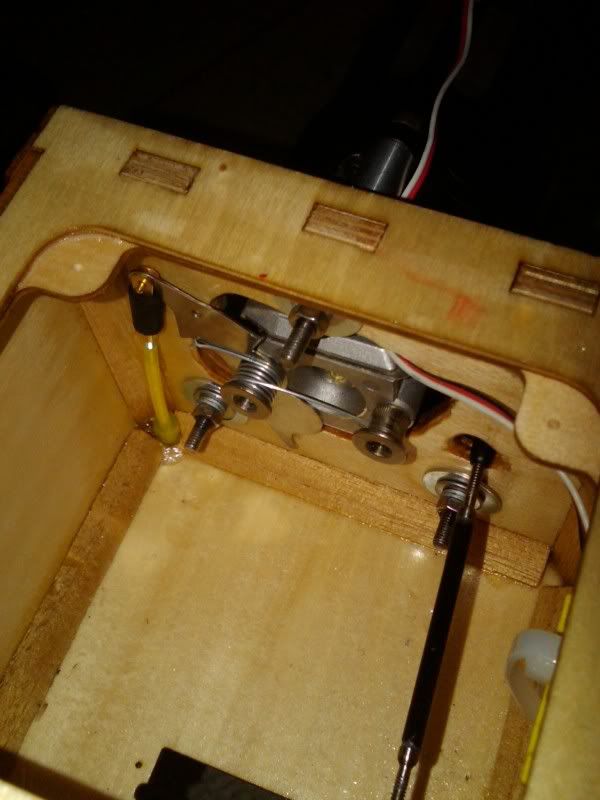
<span style="font-family: tahoma, verdana, geneva, lucida, 'lucida grande', arial, helvetica, sans-serif; font-size: 13px; white-space: pre-wrap; ">I am getting close on my EF Extra, here are some views of the choke setup as well as the throttle. I wanted to make a plenum out of the engine box so I put in a thin plywood bulkhead and used a JR aileron servo with a carbon/T1 pushrod (I know, but I had it and it is so easy to make). I am assuming that it will be tail heavy so I have not cut off the excess threads on the through bolts for the engine mounts, and am going to use the big 3200 LiFe. If I need to reduce the front end mass, I can do so later. There is industrial Velcro under the ignition and it really dampens the vibrations well if you don't crush it too much. Someone mentioned grommets, and I thought it was a good idea, so I ran the ignition wires through the firewall with a rubber grommet. 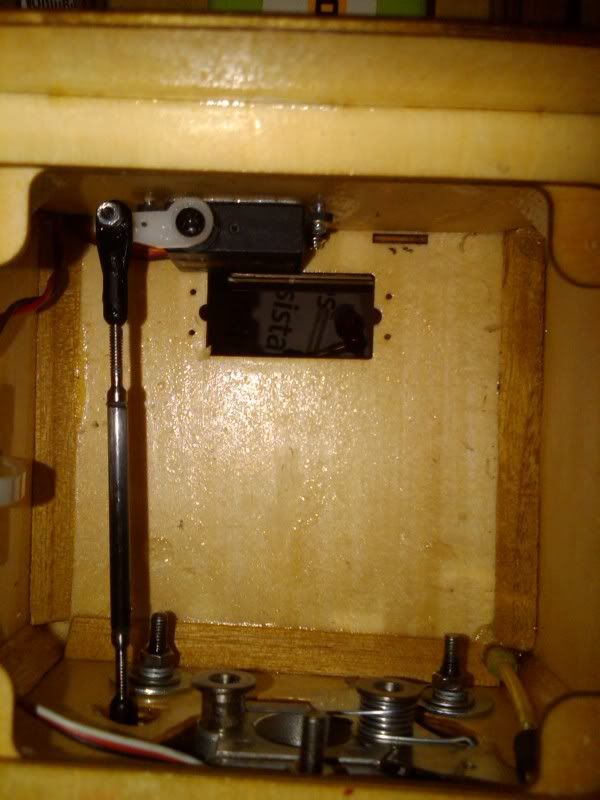

 </span>
</span>
04-06-2010 | 09:51 PM
#699
Senior Member
My Feedback: (3)
Joined: Sep 2009
Posts: 1,300
Likes: 0
Received 0 Likes
on
0 Posts
From: Bedford,
NH
I got it at Hobbico, $59.95, it is 6.6 volts, 205 grams. The Syssa IBEC regulates it to 5.8 into the ignition, but the Rx and servos see 6.6V.
04-07-2010 | 04:25 AM
#700
Joined: Jul 2006
Posts: 2,819
Likes: 0
Received 0 Likes
on
0 Posts
From: Ossining,
NY
BTW, I am going with the ES40G in the Extra. There's plenty of room in the tunnel for this. The internals are identical to the 30G I have on hand, but I need the 30G for my pattern plane. Going to learn something either way.
I am staying with the fiberglass tape coupler for now. But I am very interested in what you find out with the turbo hose. I've drilled and tapped the pipe stem and header for a 4-40 button head screw as Ed Skorepa suggested, which will work like a barb and hold the coupler material better. I am using the tape alone with stainless steel wire ties. It needs cooling air over it to keep the silicone adhesive cool enough so it can provide a good seal and not melt.
_____________________________
Regards,
MattK
Seems as if we are in somewhat new territory here, with soft mounted gassers and tuned pipes in pattern planes. Precious few references when searching RCU and elsewhere.
It'll be interesting to see what Dan (Gungadin) finds with his hard-mounted engine. Probably less stress on the coupler, but perhaps more on the header/exhaust flange(?)... or perhaps not?
I toyed with the idea of a fully-enclosed pipe with the Focus, with the pipe tunnel completely inside the fuse, and it could be done with some more serious carpentry. Much tighter fit for the servos and other components. This fuse isn't nearly as roomy as those of your modern wide-bodies!

