


SE5a alignment problems

 03-17-2014 | 03:08 AM
#327


Joined: Jun 2012
Posts: 4,002
Likes: 0
Received 0 Likes
on
0 Posts
From: Bristol, CT
Yeah, us working folk don't get to enjoy the hobby like the retired folk. I always find myself a bit envious of the older gentleman who's daily routine includes three hours of flying. That being said though, my hobby is more building than flying, so at least I get to do that for an hour or two a night. On he weekends that I DO get to the field is just a bonus. I do love to fly though and wish there was more time for it.
03-17-2014 | 03:46 AM
#329
Joined: Jun 2012
Posts: 4,002
Likes: 0
Received 0 Likes
on
0 Posts
From: Bristol, CT
Your right Abu, in my opinion, a WWI model should puff and smoke and spit, not whine. But to each his own. I'm not knocking the electric guys, just our opinion.i have a couple of little electrics just so when I'm really itching to fly I can go next door to the school and fly a bit, but I rarely ever do. I like my big gas and glow planes.
03-17-2014 | 04:09 AM
#330

Senior Member
My Feedback: (3)
Abu
If you go by what is on that thread the only differences between the A and B are a back plate and cam housing. Nothing that would alter the operating characteristics. If the "B" runs differently than the "A" there are other changes that just aren't obvious ie compression change cam profile/lift or crankshaft dynamic balance. The thread wasnt info from a company source but rather hobbiests opinions. Since it seems you are finding improvement on your own just by continuing to work with it then you should do just that till it's well and truly broken in and adjusted. then mount it on the Cub ARF and fly it. Then later if you so choose go ahead and do whats necessary to mount it to the Snipe (if you want) or save it for a future project. It's not that much bigger than the 72 and though I dont know the horsepower ratings the gain is likely to be unworth the hassle. Your wing loading is very light and though the power loading is as much as I'd want to work with I still think with some altitude you will find you can slow the airplane down and learn to enjoy flying it. It's always a bit of a strain getting comfortable with a model you have spent so much time and maybe money on when comitting aviation but once you do begin to relax with it you'll have a lot more fun.
Doc
03-17-2014 | 05:52 AM
#332
Joined: Jun 2012
Posts: 4,002
Likes: 0
Received 0 Likes
on
0 Posts
From: Bristol, CT
I have the same trust issues with going to idle. Even though all my engines are trust worthy and reliable, I still feel that way. Mine stems from when I was still learning to tune them. Lots and lots of crashes and dead sticks. The only times I don't get worried is models with on board glow driver.
03-17-2014 | 08:43 AM
#333

One factor to getting a nice idle on your four stroke is finding the right plug. The nicest plug I ever found for my Saito 45 was the Champion VG-2. It's a 50's produced item, but you see them NOS on ebay fairly often and the price isn't much different from a modern premium plug. The VG-2's are quite hot, so the idle is excellent. And I think they must have been made before manufacturers learned how to make them more cheaply, because they seem to last forever.
Abu, if you can tolerate a 14" prop on your Snipe the greater diameter will make for a more reliable idle as well as a more efficent power transfer.
Dick
Abu, if you can tolerate a 14" prop on your Snipe the greater diameter will make for a more reliable idle as well as a more efficent power transfer.
Dick
03-17-2014 | 07:13 PM
#335
Dick
03-18-2014 | 03:40 AM
#338

Thread Starter
So now that I've decided on the engine, it's time to revisit the flight reports:
http://www.rcuniverse.com/forum/rc-s...-build-74.html
So does this sound familiar?
"Almost immediately it banked to the left and it became clear that massive and continuous right aileron was needed. While holding in considerable right stick I took it up high (out of camera range) to work on the trims: EMERGENCY trims! After applying all the right trim available, I still needed to hold in right aileron on the stick but it was manageable, particularly since I was making counter-clockwise circuits of the field."
http://www.rcuniverse.com/forum/rc-s...-build-78.html
Looks like some right thrust is called for on this model also. It's not going to be easy.
Last edited by abufletcher; 03-18-2014 at 03:56 AM.
03-18-2014 | 04:56 AM
#340
One of the problems of WW1 models is that being tall it practically trips over its self. Pretty much why the gears get moved for sport; taller more forward. old free flight models fron the 30s pretty much had the gear inline with the prop. With no control, the plane had to not nose over and be at the best angle to take off by its self. More control, the further back the gear can be. With the high angle of attack that a WW1 plane sits at, the wings and tail are at a stall angle. Air blowing on the tail may be deflected, but it is not aerodynamically flowing around the elevator like in flight mode. As the tail is coming up there is really a short time where there is almost no control, especially on a smaller model. Those crucial seconds of getting control without over control is key.
03-18-2014 | 02:21 PM
#344
Senior Member
My Feedback: (3)
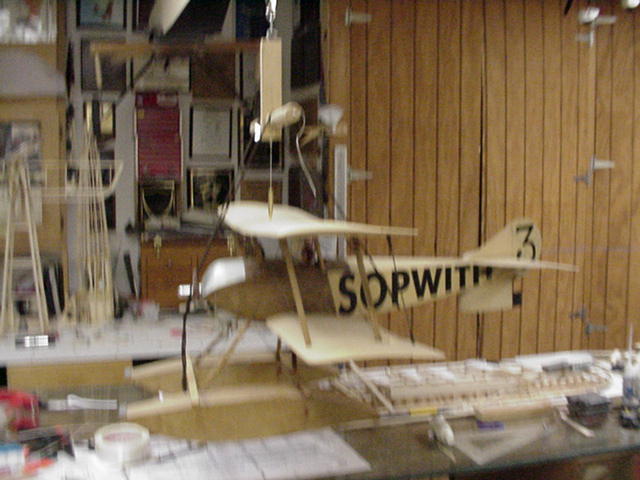
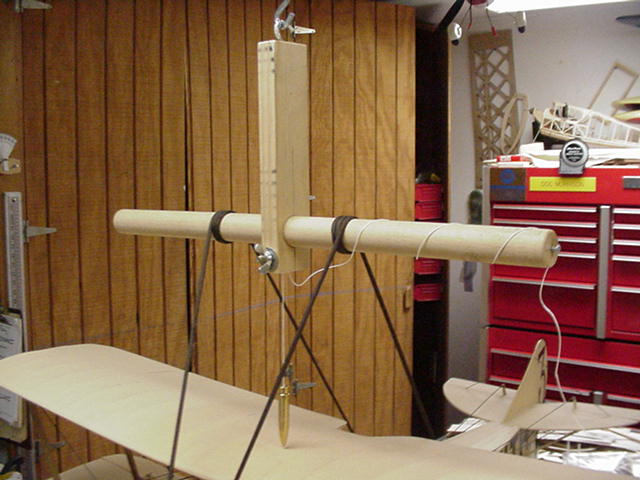
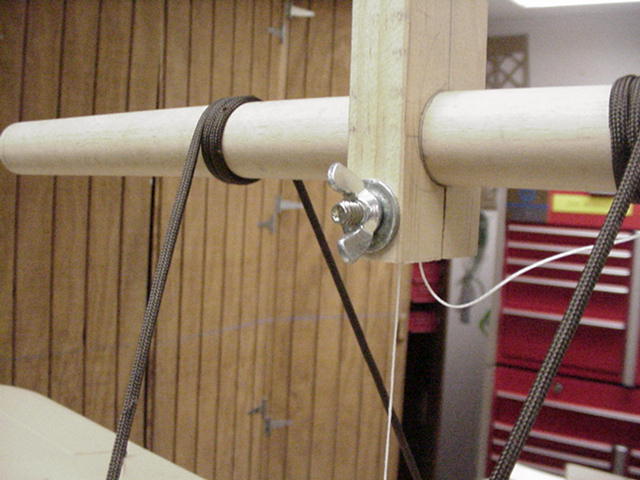
This is what it looks like. The vertical part is poplar 1 x 2 x 8 inches long. The dowel is 1" but a piece of a broom handle would work, about 14" to 18" long. The hole should be made to allow the dowel to slide easily through the vertical part. A slit is sawed from the hole to the bottom and a bolt hole cross drilled to allow adjusting the tension of the dowel. It needs to rotate but with some resistance. Theres a hook in the top to hang it from a little homemade block and tackle I made from hardware store pulleys so I can set it up on the bench then hoist it up easily. I use 550 paracord for the suspension harness but any nylon cord or even cotton sash cord will work fine. the suspension harness doesnt have to be any place specific, Ive moved it all the way to the tail and under the landing gear and it works the same. Make a plumb out of a sharpened bolt with a hole or find a small plumb at the iron mongers. I hang mine from the tension bolt so it is off just a tad but I can figure it out. Use at least three turns of cord around the dowel so it has a grip, you will rotate the dowel to raise or lower the nose/tail if the model and when you get it level (or a tad nose down) where the plumb is pointing is the CG. It's fool proof easy to make and accurate, balancing models with your finger tips is for trainers NOT SCALE AIRCRAFT. Build one you'll love it.
03-18-2014 | 03:27 PM
#347
Joined: Jun 2012
Posts: 4,002
Likes: 0
Received 0 Likes
on
0 Posts
From: Bristol, CT
Personally, I feel that anyone who builds airplanes, weather from kit or plans could benefit from it, but I'm not trying to push it on anyone. Just a lot of good info in it. At least I thought so.
03-18-2014 | 04:45 PM
#348
Senior Member
Nosing over on take off doesn't indicate anything about the c.g. The 'vanessa rig' and all of that jazz is nice but you don't need it. Just measure your MAC and calculate. Do this: put a bubble level on your stab at 'zero'. Use a triangle to measure where LE of fwd most wing and TE of rearward most wing are located on the table normal to the line of flight. It doesn't matter if your wings are staggered. Calculate the balance point at 25% from LE of the combined wings LE to TE measurement. That's it! If you have plenty of elevator throw and area then move the balance point forward a little. Short coupled aircraft or those with tiny stabs (think sailplanes) required a little more accuracy. 25% MAC is a good starting point.

