


Scale control surface


 05-08-2020, 01:51 PM
#27

I have always used a smear of dishwasher soap (Dawn, whatever.) as an indicator for how much heat to apply to "anneal" (that's what it's called) the aluminum for easier forming. One can overdo this and end up ruining the material but it really isn't that hard. A drawback is that annealed metal is very soft and easily damaged.
As a builder of WW-I taildraggers, I am always trying to cut tail weight and slapping on another layer of material doesn't appeal to me so I would return to the idea of adding wood strips to get the texture, at least on a part that gets painted anyway. The appearance would be identical.
As a builder of WW-I taildraggers, I am always trying to cut tail weight and slapping on another layer of material doesn't appeal to me so I would return to the idea of adding wood strips to get the texture, at least on a part that gets painted anyway. The appearance would be identical.
 05-08-2020, 01:54 PM
#28

Just thought of another source of thin sheet aluminum!
If you have a sign shop in your vicinity, you have access to aluminum sheets in almost any size, because that is basic sign material. The only thing about sign aluminum is that it comes prepainted, usually white on one side and yellow on the other side. This could be an advantage since the factory paint coating is bonded to the aluminum far better than any workshop process is likely to produce and even if you have to paint over it, paint sticks to paint far better than it does to bare aluminum.
If you have a sign shop in your vicinity, you have access to aluminum sheets in almost any size, because that is basic sign material. The only thing about sign aluminum is that it comes prepainted, usually white on one side and yellow on the other side. This could be an advantage since the factory paint coating is bonded to the aluminum far better than any workshop process is likely to produce and even if you have to paint over it, paint sticks to paint far better than it does to bare aluminum.
Last edited by airsteve172; 05-08-2020 at 01:58 PM.
05-09-2020, 10:25 AM
#29

Cheers Paul, love the pictures and the utter simplicity process.
I hadn't thought about using a simple cut channel for the female and the corner of a block to form the 45deg V.
Nice!
All the discussion about alluninium sheet. There's a real different between sheet and foil and it not just the thicknesses, which can apply to both.
Foil is softer, more pliable... it wants to cooperate. Plate doesn't. It wants top remain flat untill heat or force or both is applied.
Which is fine but require far to much effort and tooling up costs for a model.
Scroll down to the bottom of this page and see the film. Towards the end he presents a 200 microm foil thats perfect for what im after.
Last is the 300 micron verson, it's on the edge of being sheet. not as cooperative as the 200um.
https://www.aluxfoil.com/en/webshop-...l-alufoil.html
I would never have walked down the road unless I'd seen what Paul had achieved.
Cheers mate.
Last edited by David Bathe; 05-09-2020 at 12:26 PM.
05-09-2020, 12:51 PM
#30
Sharing ideas is what this site is all about. I hope this tip is useful!
If I build another Cessna I will search for a slightly thicker foil in order to keep the weight down but the choice of material would depend on the scale.
Cheers David and please share your results!
Paul
If I build another Cessna I will search for a slightly thicker foil in order to keep the weight down but the choice of material would depend on the scale.
Cheers David and please share your results!
Paul
05-09-2020, 01:10 PM
#31
Cheers Paul, love the pictures and the utter simplicity process.
I hadn't thought about using a simple cut channel for the female and the corner of a block to form the 45deg V.
Nice!
All the discussion about alluninium sheet. There's a real different between sheet and foil and it not just the thicknesses, which can apply to both.
Foil is softer, more pliable... it wants to cooperate. Plate doesn't. It wants top remain flat untill heat or force or both is applied.
Which is fine but require far to much effort and tooling up costs for a model.
Scroll down to the bottom of this page and see the film. Towards the end he presents a 200 microm foil thats perfect for what im after.
Last is the 300 micron verson, it's on the edge of being sheet. not as cooperative as the 200um.
https://www.aluxfoil.com/en/webshop-...l-alufoil.html
I would never have walked down the road unless I'd seen what Paul had achieved.
Cheers mate.
I hadn't thought about using a simple cut channel for the female and the corner of a block to form the 45deg V.
Nice!
All the discussion about alluninium sheet. There's a real different between sheet and foil and it not just the thicknesses, which can apply to both.
Foil is softer, more pliable... it wants to cooperate. Plate doesn't. It wants top remain flat untill heat or force or both is applied.
Which is fine but require far to much effort and tooling up costs for a model.
Scroll down to the bottom of this page and see the film. Towards the end he presents a 200 microm foil thats perfect for what im after.
Last is the 300 micron verson, it's on the edge of being sheet. not as cooperative as the 200um.
https://www.aluxfoil.com/en/webshop-...l-alufoil.html
I would never have walked down the road unless I'd seen what Paul had achieved.
Cheers mate.
Although soda can gauge aluminum has the slightest amount of structural strength, I would suspect that anyone who finds it excessively difficult to manipulate, is suffering from either a severe lack of muscle tone or ingenuity.

Last edited by airsteve172; 05-09-2020 at 01:55 PM.
05-09-2020, 06:24 PM
#33
05-09-2020, 07:50 PM
#34
When I first suggested this method my buddies thought the thin foil would never hold up in use. That it has worked so well and held up over time confirms the idea that a very thin foil surface will work for a detail like this. My “pie tin” parts were applied over solid balsa surfaces and carry very little load. The big concern is damage while transporting or storage. I would suggest starting with disposable cookware because it is cheap, easy to work, very light, and can provide large enough pieces for many model parts.
I would like to see other experiments with other types of thin aluminum from various sources. If you do please share your results!
Paul
I would like to see other experiments with other types of thin aluminum from various sources. If you do please share your results!
Paul
05-10-2020, 04:33 AM
#35
Throughout the history of aviation, aircraft have been built from a variety of materials. It started with sticks and fabric, moved on to aluminum and eventually composites were introduced to the construction of airplanes. Presently aluminum is the dominant material in aviation as it has been for some time, yet it seldom (if ever) gets involved in the world of scale model building.
I agree that aluminum has not been totally absent from modelling as it has made its appearance in the form of adhesive backed aluminum foil as a means of representing the look of a bare metal surface, but in my opinion this method doesn't quite hit the bullseye. In fact, I think it misses the target altogether. Riveted sheet aluminum has a definite dimensional characteristic, a texture, a glass smooth yet dimpled wavy irregular surface that a piece of foil applied to a dead flat surface cannot begin to duplicate. Additionally, foil has the unfortunate characteristic of transferring the texture of the adhesive to the foil as it gets burnished down giving the foil a look of orange peel that is never seen in aluminum of a full size aircraft. Efforts are usually made to minimize this appearance by scuffing the surface with steel wool or some other abrasive, but the end results (creative as they may be) again look like nothing that I've ever seen on a real aircraft.
I think pie pan or soda can grade of aluminum sheet or foil (call it what you will) can be used as individual panels on an airframe in much the same manner that the soft sticky foil is used, but these panels would have the advantage of having actual sheet metal characteristics such as having dimples at rivet locations and a slight waviness that sheet metal riveted over an open frame has. Whether painted or polished, the skin of a model done in this manner would have the unmistakable look of a real aircraft without having to resort to weathering or any other form of visual deception in order to be more convincing.
Without a doubt, this kind of process wouldn't be for everybody, but for those who carefully map out every panel line and rivet on an airframe, this would probably be the ultimate realistic effect.
Last edited by airsteve172; 05-10-2020 at 04:39 AM.
05-10-2020, 10:01 AM
#36
No problems with using thin sheet metals on models Airsteve, been used literally 10s of thousands of times. If you where able to search long back on this site (I think) you'd find an increadable thread from a Finish scale modeller/sheet metal worker who was building the 1/4 scale spitfire. Every single panel and fairing was individually cut out and formed from litho plate, hand hammered using special hammers and sand bags, and rivets punched in before attaching each and every piece to the airfarme. It was a pains takingly LONG proceedure but the finished effect was so remarkable, it was used to make a mold for some carbon fiber kit producer, which thinking back, was his original intention/brief. What created the Wow effect was the fact that not one panel was straight/flat. Everone had that tell-tale buckle that catches the light. Its an effect that can't be formed form anything else. Pure magic! For him, making Cessna type corrigations would be a walk in the park, but for us lesser mortals, (well certainly me) we need all the help we can get.
The new generation of super thin beer can alliminium is certainly an idea I'll be trying out using Pauls method
Peace and love.
The new generation of super thin beer can alliminium is certainly an idea I'll be trying out using Pauls method
Peace and love.
05-11-2020, 04:56 AM
#37
No problems with using thin sheet metals on models Airsteve, been used literally 10s of thousands of times. If you where able to search long back on this site (I think) you'd find an increadable thread from a Finish scale modeller/sheet metal worker who was building the 1/4 scale spitfire. Every single panel and fairing was individually cut out and formed from litho plate, hand hammered using special hammers and sand bags, and rivets punched in before attaching each and every piece to the airfarme. It was a pains takingly LONG proceedure but the finished effect was so remarkable, it was used to make a mold for some carbon fiber kit producer, which thinking back, was his original intention/brief. What created the Wow effect was the fact that not one panel was straight/flat. Everone had that tell-tale buckle that catches the light. Its an effect that can't be formed form anything else. Pure magic! For him, making Cessna type corrigations would be a walk in the park, but for us lesser mortals, (well certainly me) we need all the help we can get.
The new generation of super thin beer can alliminium is certainly an idea I'll be trying out using Pauls method
Peace and love.
The new generation of super thin beer can alliminium is certainly an idea I'll be trying out using Pauls method
Peace and love.
05-13-2020, 07:59 AM
#38
The suggestions in this thread is pretty good. I have been using flight metal, Try this, cut the shape of the part from balsa sheet, use coffee stirrers or kabob skewers glued to the shaped part to form corrugations then cover with flight metal or aluminum duct tape.
I hope this isn't too simplified.
I hope this isn't too simplified.
05-13-2020, 08:47 AM
#39
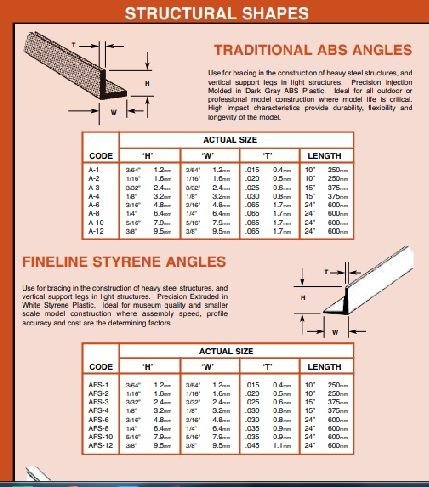
As terrifying as it is I have been thinking again. If any of you have built the Top Flite Cessna 182 you may recall the flaps and ailerons have corrugations and top Flite includes an styrene extrusion (I think it is "T" shaped) to glue to the surface before covering. It seems to me if you took a half round or a small "T" shaped styrene stick and applied it to the surface it would provide a base to support the shape of a foil tape, AeroFoil, or FliteMetal applied over it. Half rounds get as small as .040 wide X .020 thick and T shaped strips go as small at .035 wide. FliteMetal is pretty light and AeroFoil even lighter so on tail surfaces where you don't won't additional weight there is an advantage. I have seen scale corrugated rib roofing that might work as well if you want a panel.
Last edited by FlyerInOKC; 05-13-2020 at 08:50 AM.
05-13-2020, 09:48 AM
#40
The suggestions in this thread is pretty good. I have been using flight metal, Try this, cut the shape of the part from balsa sheet, use coffee stirrers or kabob skewers glued to the shaped part to form corrugations then cover with flight metal or aluminum duct tape.
I hope this isn't too simplified.
I hope this isn't too simplified.
The thing that unsettles the Cessna crowd is the fact you can see UNDER the corrigation at the leading edge and especially at the trailling edge where the top and bottom corrigations meet and form a cute (some would say, staggeringly beautiful) open diamond.
I fear making the corrications out of a solid material would leave many in a state of nausia, mentally unhinged and damned difficult to be around. Thus the interest in the thread and, Pauls foil approach.
Years of head scratching, time consuming experiments and generally turning-over every stone on earth, looking for the solution... solved with a pie tin and slot! Genius.
PS. By the time the Cessna is ready it will most certainly be powered by electric. Guess thats all we'll be allowed to fly by then!
Last edited by David Bathe; 05-13-2020 at 10:15 AM.
05-13-2020, 01:07 PM
#41
As terrifying as it is I have been thinking again. If any of you have built the Top Flite Cessna 182 you may recall the flaps and ailerons have corrugations and top Flite includes an styrene extrusion (I think it is "T" shaped) to glue to the surface before covering. It seems to me if you took a half round or a small "T" shaped styrene stick and applied it to the surface it would provide a base to support the shape of a foil tape, AeroFoil, or FliteMetal applied over it. Half rounds get as small as .040 wide X .020 thick and T shaped strips go as small at .035 wide. FliteMetal is pretty light and AeroFoil even lighter so on tail surfaces where you don't won't additional weight there is an advantage. I have seen scale corrugated rib roofing that might work as well if you want a panel.
05-13-2020, 11:30 PM
#42
As David describes, I guess I qualify as being a member of the Cessna crowd although I personally really couldn't care less about what shortcuts fellow modelers choose to take on their "scale" builds. If I even get on the track to getting unhinged, it would be on one of those days when my forehead inevitably gets a surprise encounter with one of the aforementioned trailing edges (full scale), soon to be followed by tripping over the landing gear. On a particularly bad day one couldn't get away without getting a good poke in the ribs from a horizontally parked propeller blade also.
Still, such things are ultimately more likely to provoke a good laugh than cause me to get unhinged.
Still, such things are ultimately more likely to provoke a good laugh than cause me to get unhinged.
 05-17-2020, 07:58 PM
#44
Has anyone been successful in using the Top Flite L plastic strips and heat shrink film covering?
You would probably need to cover using many film strips cord wise, but wondering if anyone has actually succeeded?
You would probably need to cover using many film strips cord wise, but wondering if anyone has actually succeeded?
05-17-2020, 11:16 PM
#45
For any color other than white, I would still cover the control surfaces first. The color of the strips would then have to be matched. If the correct color paint can be obtained, this would be the best method of coloring the strips before gluing them down to the surface.
Using film on the strips for color, while not impossible, would be a very tedious process, to say the least.
Since the strips are styrene plastic and therefore sensitive to heat, they may be affected by the temperatures necessary to apply film.
Be warned that whether you choose the most successful method of installing the corrugations or you're going to experiment with your own technique, it's a slow and painstaking process, but the results can be very rewarding.
Although it goes without saying, check on the real aircraft for the quantity and exact positioning of the strips. I've seen gross inaccuracies in this area even on elaborate giant scale ARFs.
I am personally not using film, but still prefinishing the control surfaces prior to adding corrugations and I can say that these styrene strips do work quite well!
Last edited by airsteve172; 05-17-2020 at 11:27 PM.
05-18-2020, 12:52 PM
#48
My own suggestion re. installation of corrugation strips is as follows:
When using a film covering, cover the control surfaces first before attaching the strips. Before installing the strips, make sure there are no surface contaminants by thoroughly wiping down the surfaces with isopropyl (rubbing) alcohol and don't touch those surfaces with bare fingers. Thin CA glue does an excellent job of gluing the strips to the film.
For those who are using more traditional finishing methods including fiberglassing, I would highly recommend that all finishing work, short of painting, be completed before attaching the strips. It becomes infinitely more difficult to fiberglass, smooth and finish the intricate surfaces after the strips are attached. Do all the finishing first and when the surfaces are ready for paint, attach the strips immediately before painting. After the strips are installed, if something is not quite perfect it's a lot easier just to do the corrections now instead of trying to do finishing work on all the complex surfaces at this stage.
If you do a clean gluing job, there should be very little to do before paint.
05-18-2020, 03:15 PM
#50