


Scale control surface
 04-24-2020 | 01:07 PM
#1
Thread Starter

Hi there, Does anybody know how to make scale control surfaces, corrugated aluminiun ribs?
I'm working on muy Cessna 140, and the plans show some SIG plastic corrugated product. Is ther a trick to home made those, in a realistic way??
Regards!!
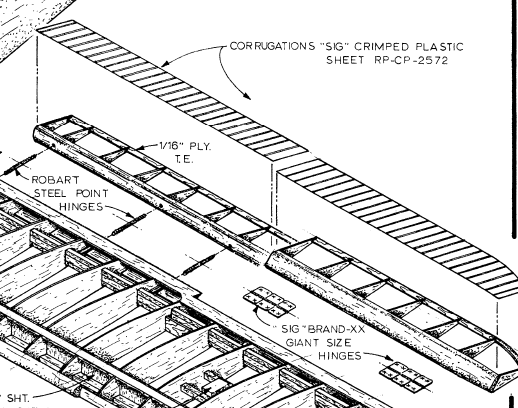
I'm working on muy Cessna 140, and the plans show some SIG plastic corrugated product. Is ther a trick to home made those, in a realistic way??
Regards!!
 04-24-2020 | 04:27 PM
#2
Before going any further, I hope you realize that to accurately duplicate the appearance of what you have in the picture, it takes considerable experience in model building or a great aptitude for materials, mechanics and engineering. Preferably both. It would also be safe to say that perhaps 99.9% of RC modelers would not or could not even attempt this.
Now let's get on with how to do this.
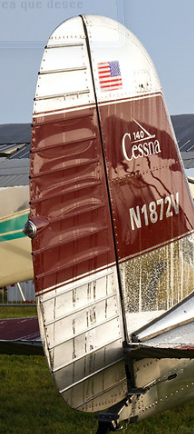
The only way I know of achieving this polished aluminum look as you see it in the picture is to use litho plate used in the printing trade. It is very thin aluminum sheet that can be shaped exactly like the control surfaces on the full size plane, but in miniature. To do this will require ingenuity in making a jig that will stamp out the corrugations. As far as I can imagine, the device would probably need to stamp one corrugation at a time into the aluminum sheet and then have a means of locking in the spacing or interval between the next corrugation to be stamped. It's actually not so complex as it may seem at first, but it does require a good bit of patience and understanding of what you're doing. The results from this technique could be nothing short of amazing! It should be noted that if you want the polished aluminum look, you need to first replicate every aluminum panel on the plane in litho plate, polish it, then apply it to the surface before going on to the rivet detail.
For those who are not the most skilled of model builders, the easiest (if you want to call it that) way to replicate corrugations is by using styrene L channel. These come in different sizes and are simply cut to length and glued down to the conrol surface in the right places. Such plastic shapes are made by Evergreen or Plastruct etc. and generally available from hobby shops or hobby suppliers. I think you mentioned that Sig has this stuff also. Of course you will be modelling a painted surface rather than polished aluminum, but if carefully done, the effect can be quite convincing.

Last edited by airsteve172; 04-24-2020 at 04:41 PM.
04-24-2020 | 08:33 PM
#3

My Feedback: (60)
My preferred method of duplicating something like this would be to vacuum form it. In my opinion that would be the simplest and lightest method of achieving something that is accurate in appearance. Assuming of course that you are not looking to duplicate the polished metal appearance. It could also be accomplished with 3d printing if you can, or know someone who can, create the 3d computer model required for the task.
04-25-2020 | 01:43 AM
#4
I hadn't considered vacuum forming, but it is indeed a practicable method of accomplishing corrugations and many other features. As with any method, they all have their advantages and disadvantages.
Some of the advantages include light weight, a continuous detailed surface that's ready for finishing and repeatability. Repeatability is a fantastic characteristic to have in a process if you need multiple identical parts and with vacuum forming such parts can be made quickly and relatively easily. This comes at a cost however, being that you have to fashion an exact replica of the part you want (a plug) so it may or may not be worth while to use this process if only a single part is needed.
Another disadvantage to this process is that there is always some loss of detail or at least the crispness of the detail. The amount of detail loss will be directly proportional to the thickness of the material used.
On a positive note, vacuum formed parts always seemed to me like they are begging to be painted and this is a great characteristic for a base material to have if you are going to be bold enough to explore the possibility of chrome paint. Yes, I said CHROME PAINT.
No, no, no, no, no!!! I am NOT talking about a spray can of Krylon or Rustoleum from the hardware store!!!
There are now and have been for some time, processes available that let you literally spray on a chrome finish that's virtually indistinguishable from real chrome! You can learn more about it on YouTube.
Of course, now we're talking about chrome and not polished aluminum, but the appearance has a striking similarity to polished aluminum and the effect can be far more realistic than other methods such as FliteMetal can ever achieve.
If you do a bit of research, you will find that there are a few different products and processes available to achieve that coveted "chrome" look. You will also discover that it's not so cheap or simple to do and you might even consider it crazy to go to such efforts... as crazy as what some model builders go through to achieve an authentic looking model.
Last edited by airsteve172; 04-25-2020 at 01:51 AM.
04-25-2020 | 07:58 AM
#5

One thought on vac-forming... Generally people will make a positive form and then draw plastic over it but on shallow parts like these, a (female) cast of the original can be made for vacuum forming. Then the formed plastic can pick up tiny details, even rivets and panel lines, regardless of the plastic thickness. Of course any little holes in the tool for the air vacuum may get picked up too.
04-25-2020 | 09:07 AM
#6
One thought on vac-forming... Generally people will make a positive form and then draw plastic over it but on shallow parts like these, a (female) cast of the original can be made for vacuum forming. Then the formed plastic can pick up tiny details, even rivets and panel lines, regardless of the plastic thickness. Of course any little holes in the tool for the air vacuum may get picked up too.
As far as the pinhole issue involved in vacuum forming to a negative mold, happily a Cessna skin has lots of rivets that can double up as vent holes! In cases where vent holes are needed on a smooth surface, it's easy enough to remove the resultant bumps with a bit of wet sandpaper and a very small sanding block!
 04-25-2020 | 09:38 AM
#7
My vac-forming experience is very limited but I have seen others do amazing things, especially with a combination of vacuum and PRESSURE. Obviously Chad has a lot of experience and I would love to hear more about his process.
On the bright finishes, there was a company that did metalizing and produced some really impressive work. I don't know if they are still around.
On the bright finishes, there was a company that did metalizing and produced some really impressive work. I don't know if they are still around.
Last edited by allanflowers; 04-25-2020 at 09:40 AM.
04-25-2020 | 10:36 AM
#8

My Feedback: (29)
I can see where it would be fairly easy to do corrugated panels in fiberglass. Maybe a 24"x36" panel could be laid up on a female mold after spraying down a coat of epoxy primer in the mold. A couple layers of 3/4oz cloth st 45 and 135 degrees and then placed into a vacuum bag made of Strechlon bagging film. Having it molded with a primer surface means all it would take is a couple minutes with a scuff pad to be paint ready.
 04-25-2020 | 10:51 AM
#9
My vac-forming experience is very limited but I have seen others do amazing things, especially with a combination of vacuum and PRESSURE. Obviously Chad has a lot of experience and I would love to hear more about his process.
On the bright finishes, there was a company that did metalizing and produced some really impressive work. I don't know if they are still around.
On the bright finishes, there was a company that did metalizing and produced some really impressive work. I don't know if they are still around.
If I had been the one who built and finished that plane, I'd be super proud without any modesty! As far as I was concerned, in terms of workmanship, that was the best looking plane in the whole show, BUT as much as I loved the model, there is no way that I can say that it looked anything like any natural aluminum on an airplane that I've ever seen. The finish was a beautiful REPRESENTATION of natural aluminum and nothing more. I didn't for a moment think, "How was that model built out of aluminum?".
My greatest respect and admiration goes to the quality of workmanship followed closely by authenticity, but in the absence of good workmanship, authenticity really means little to me.
Last edited by airsteve172; 04-25-2020 at 10:53 AM.
04-26-2020 | 12:45 PM
#10
My Feedback: (1)
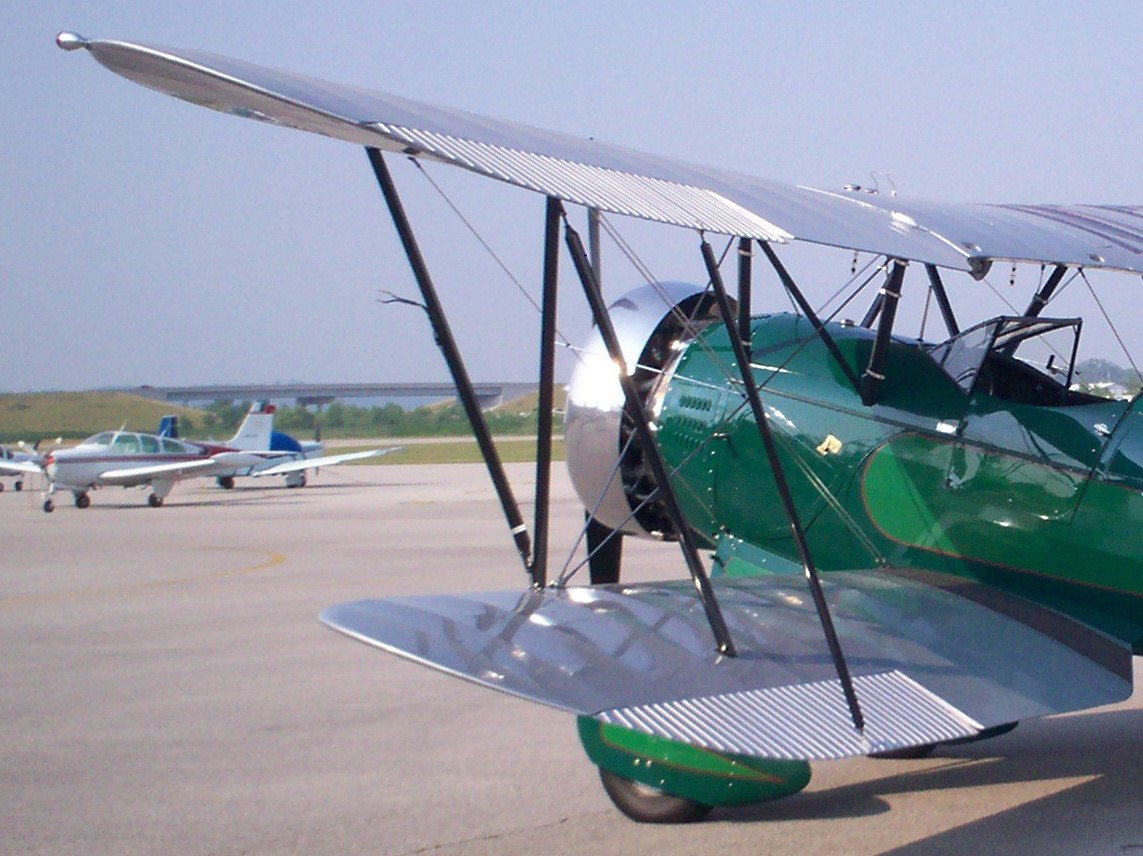
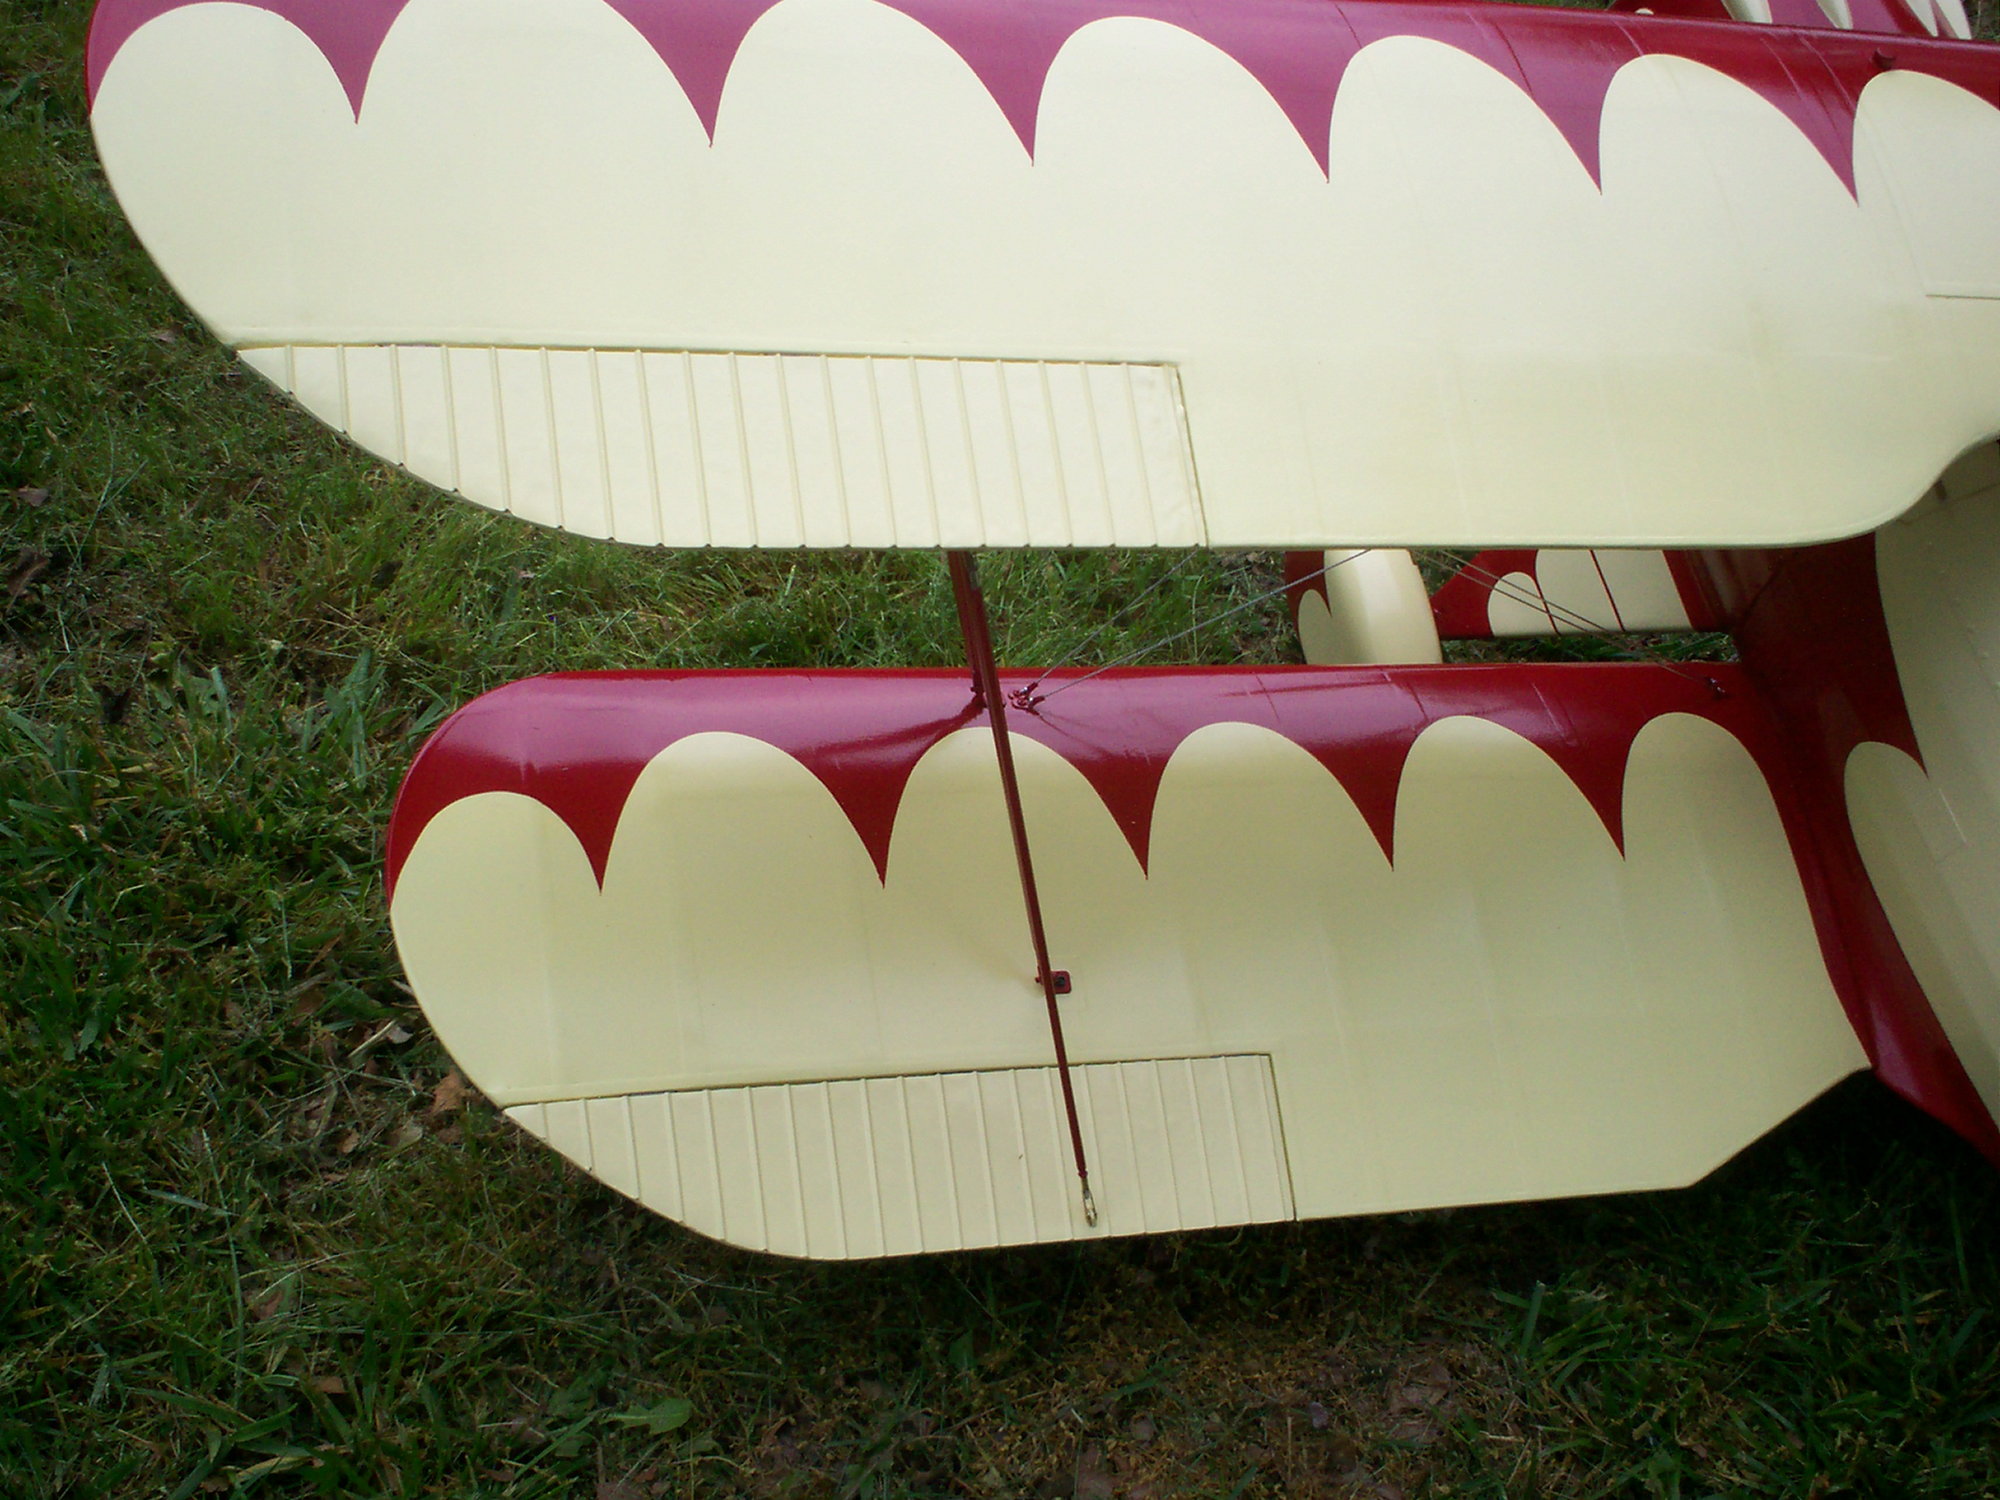
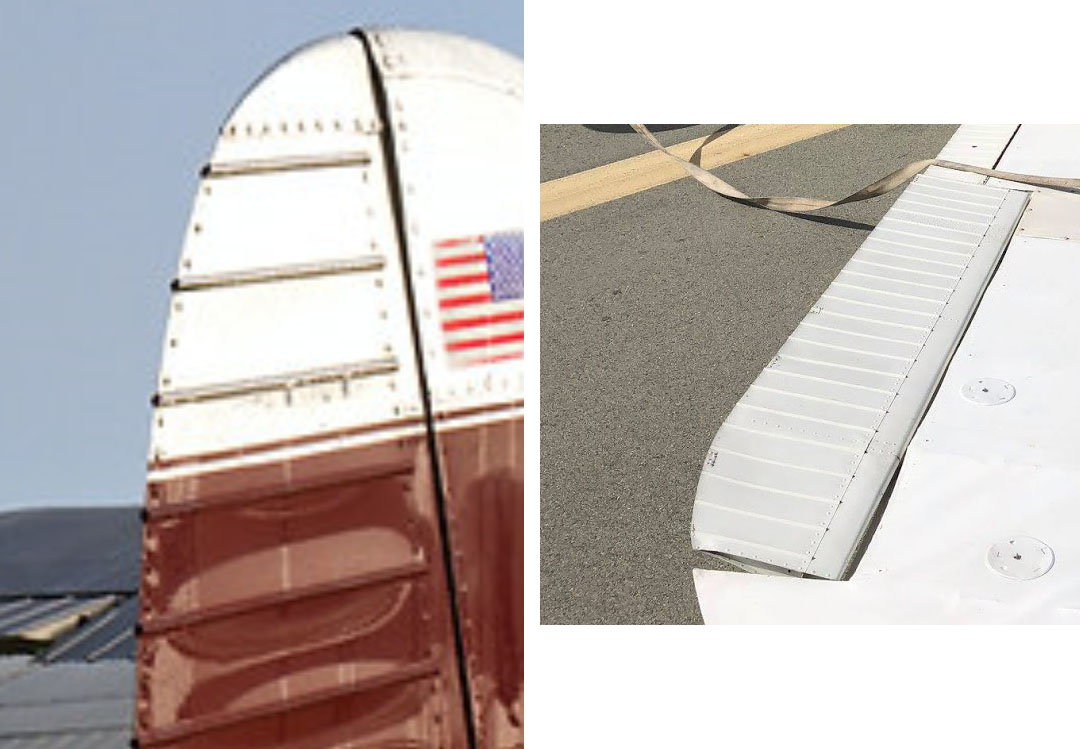
For smaller scales, you can sometime find the corrugated material very close to what you want. The spacing might not be perfect, but close enough for effect. Here are ailerons I made for a 1/5 scale WACO biplane. Full scale picture is the silver-winged UBA, my model is the yellow and red winged UMF. I found the plastic with the corrugations already molded.
You can use aluminum HVAC tape and apply it over semi-finished balsa to mimic aluminum sheeting. I'd only use that in a larger scale due to the added weight. It works great to cut and apply in panels, like a full-scale would be built. Burnish it with a plastic fid, a Sharpie barrel works well. Then use a very small diameter piece of brass tubing, and press the end into the surface, just enough to make circles to indicate flush rivets. Any fine detailing will take much patience and a lot of time and effort, but in the end is worth all the work.
Last edited by khodges; 04-26-2020 at 12:56 PM.
04-26-2020 | 01:49 PM
#11
I think that for the purpose of the Original Poster, just sheeting the control surface with balsa and adding little square section strips would serve quite well in 98 percent of applications.
04-26-2020 | 02:24 PM
#12
I'm not sure if someone who posts an image of a mansion will be satisfied with replicating a mud hut.
04-26-2020 | 04:46 PM
#13
I think khodges touches on a critical point, the scale of the model, a big model requiring a more careful solution to look convincing than a little one. When I look at the photos of the tail, the section looks round, so khodges idea would work well although rather labor intensive. The photo of the wing looks like the section is more triangular, where wood sections on a smallish model would be just fine. Also, is the model generally stand-off scale or totally museum scale?
If one is motivated enough, he could find an actual plane to look at but the answer lies in the OP's goals for his model. Just because some of us are anal retentive doesn't mean the OP is.
If one is motivated enough, he could find an actual plane to look at but the answer lies in the OP's goals for his model. Just because some of us are anal retentive doesn't mean the OP is.
05-01-2020 | 08:58 PM
#15
I made a Cessna 120 a while back to a smaller scale and formed the fluted surfaces in thin aluminum. It was quick and easy and has proven sturdy enough for the job.
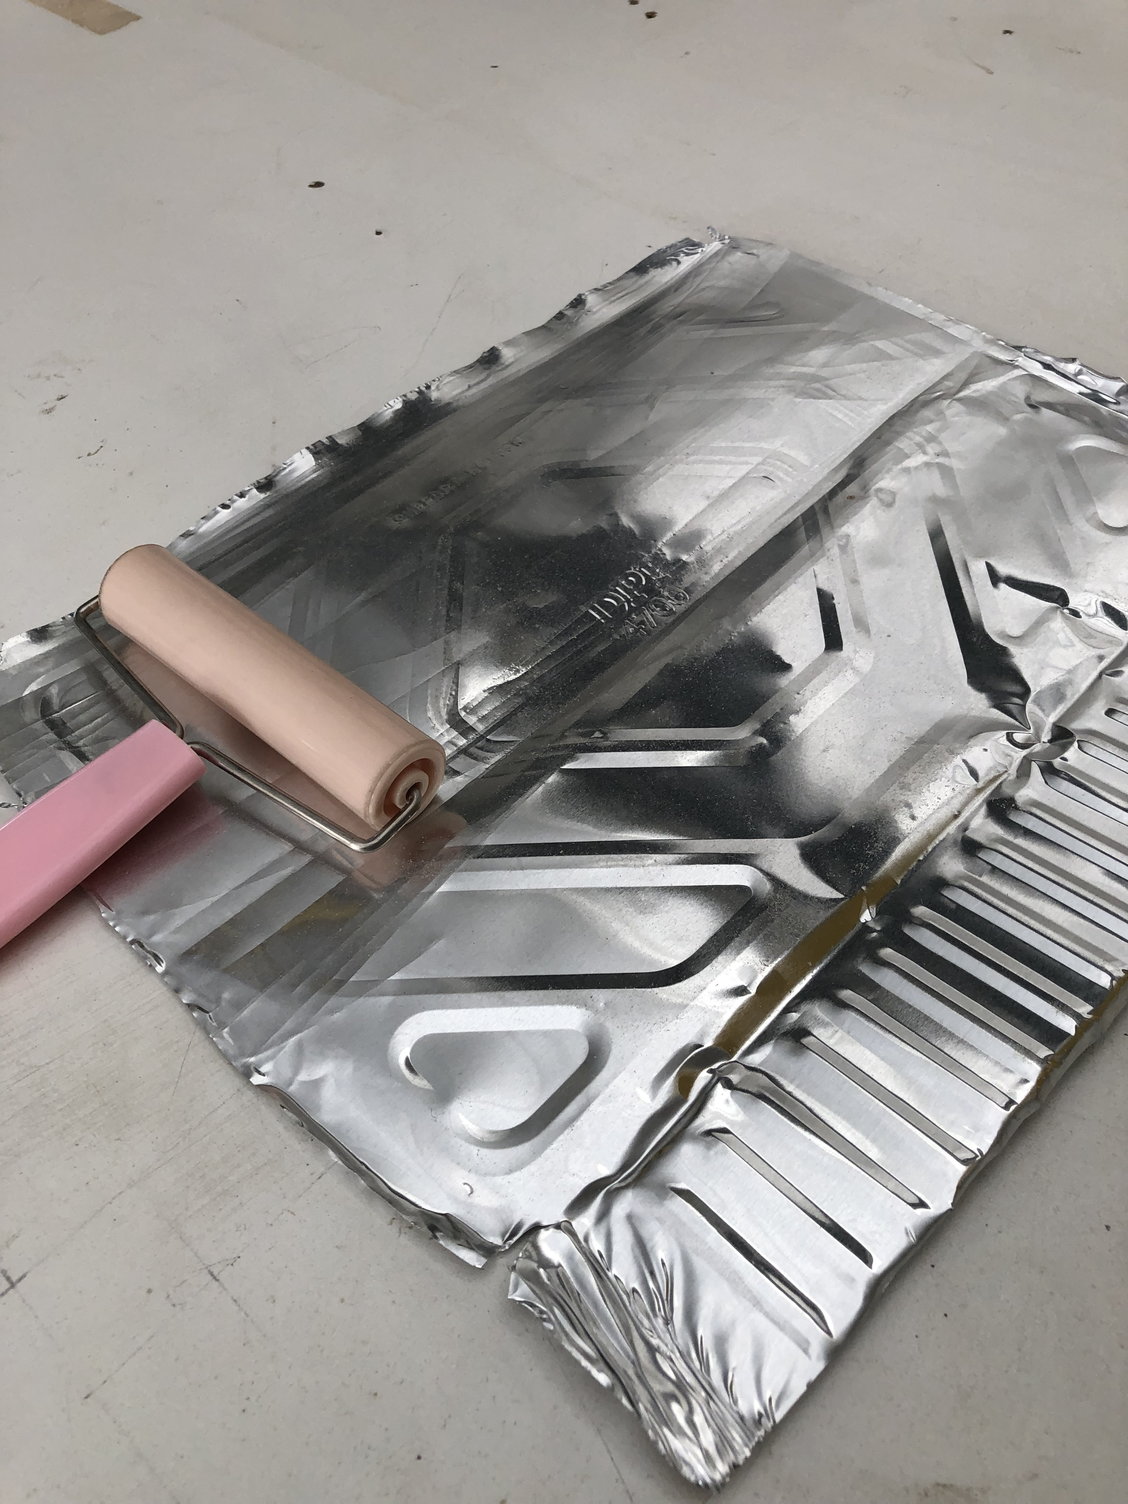
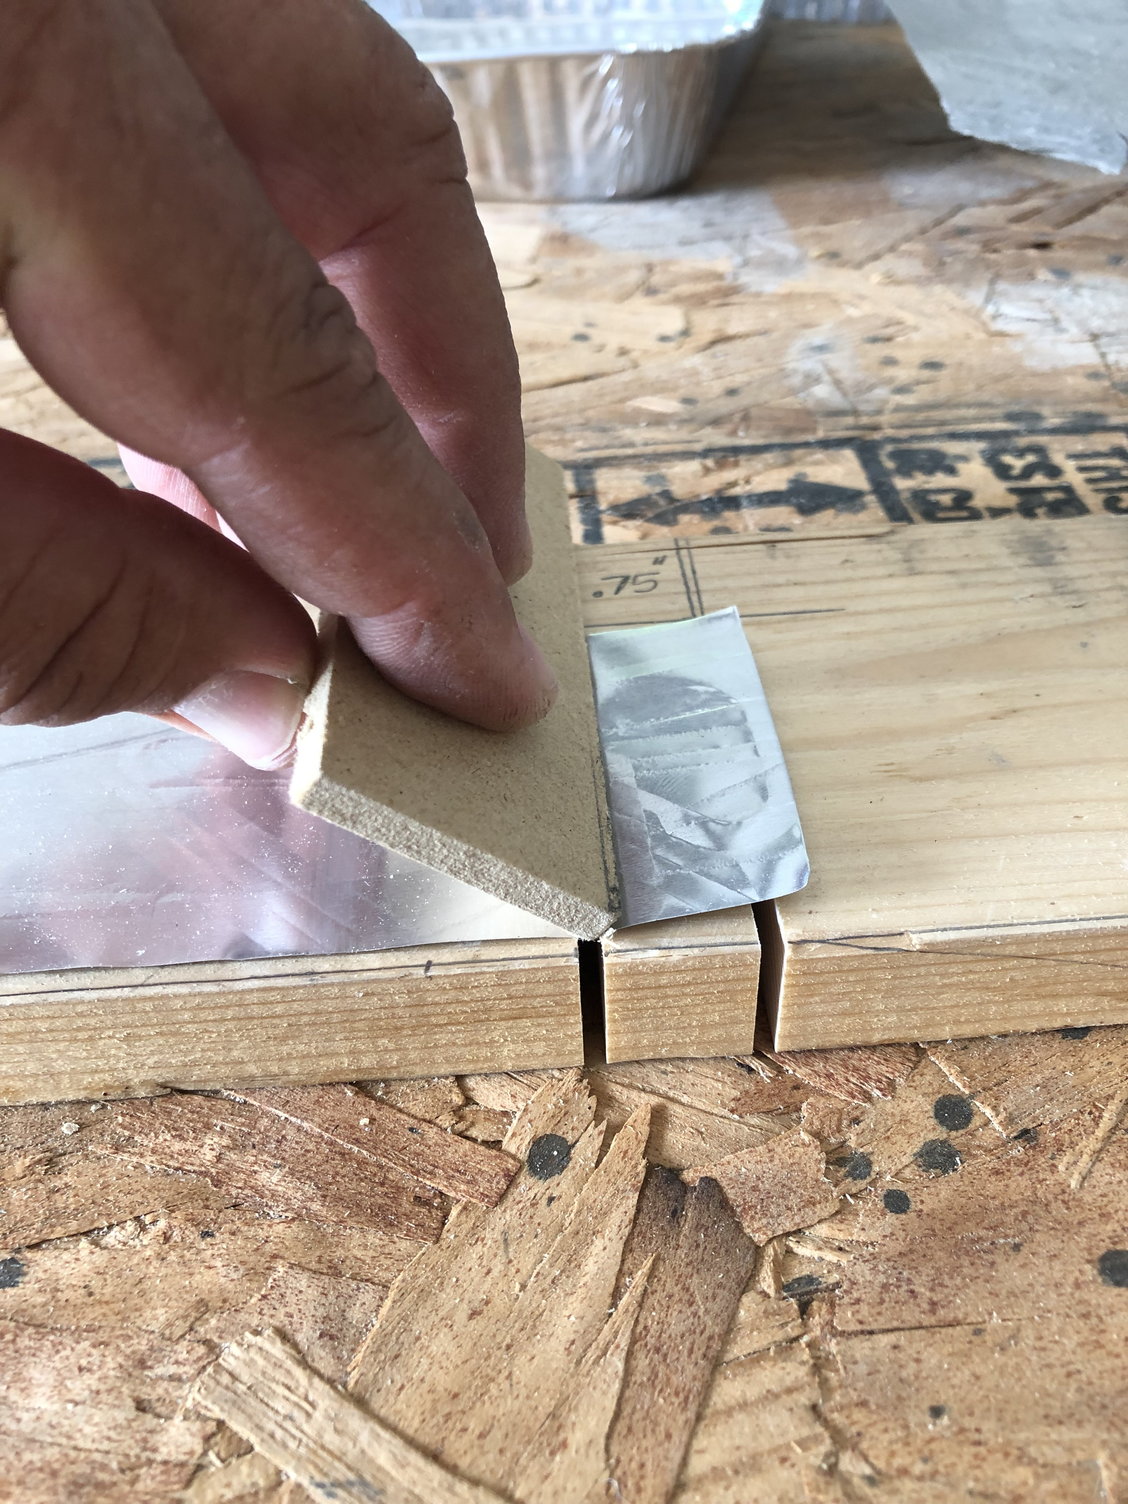
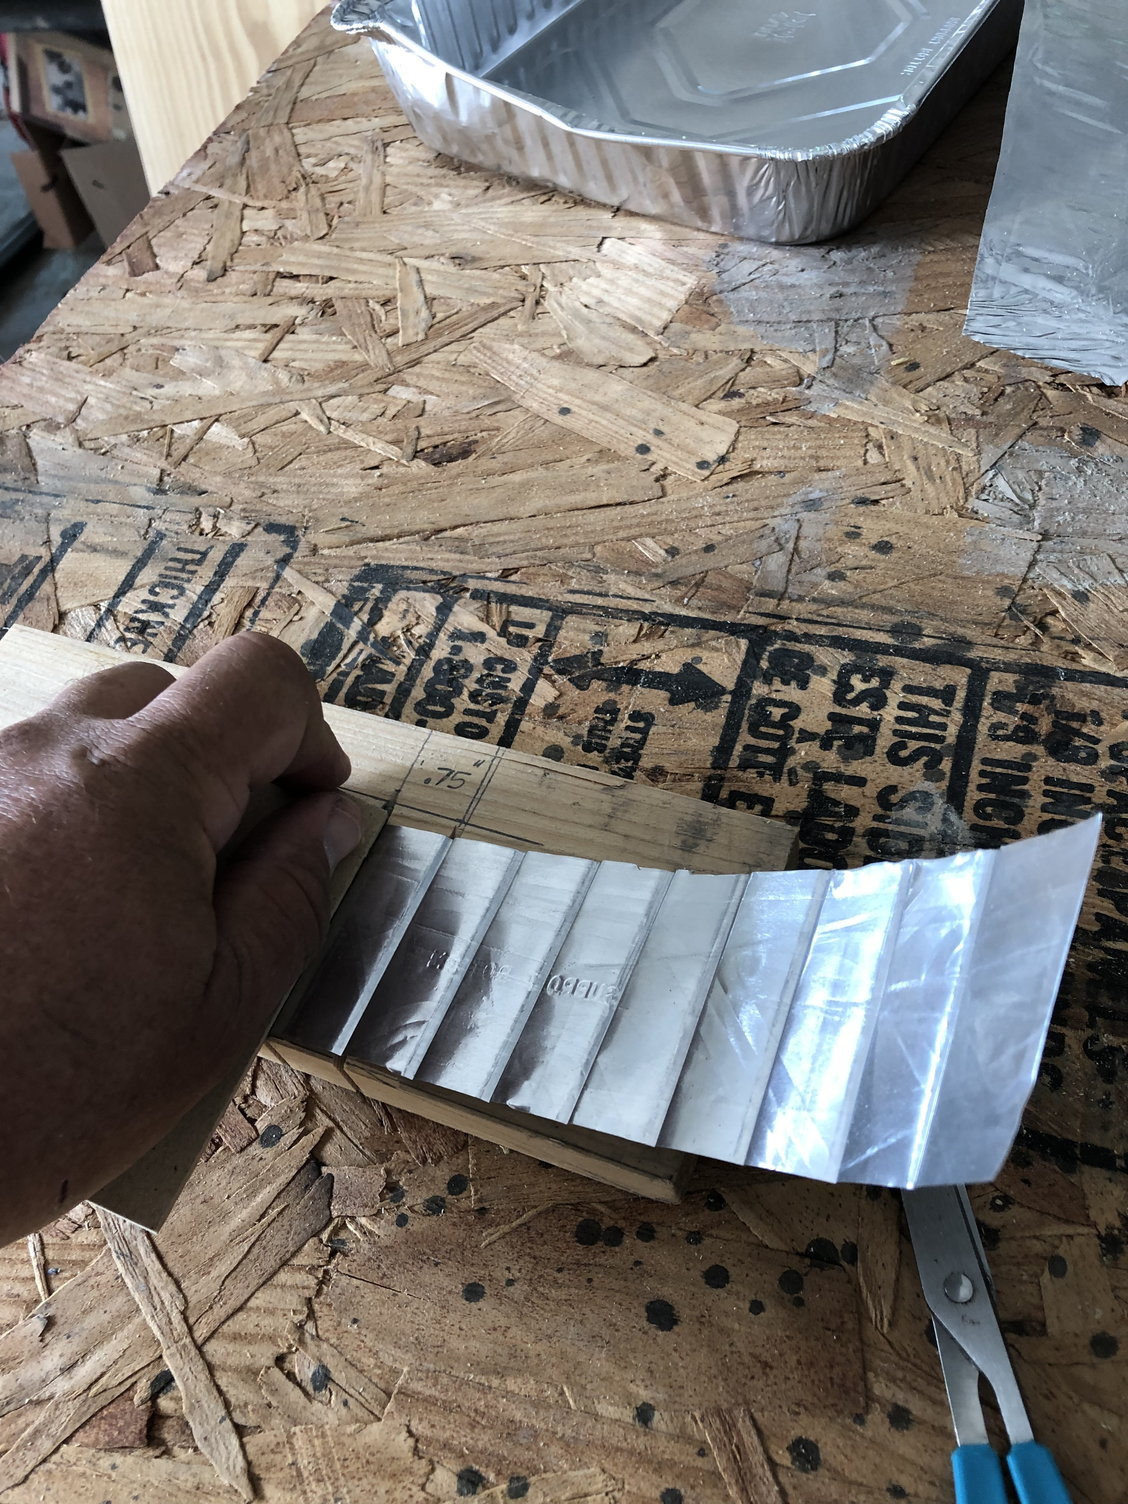
I cut two slots in a board about 1/2 inch thick at the proper spacing. Then using an oversized piece of aluminum from a pie "tin" placed over the slots I burnished the flutes with
another small piece of wood turned at an angle such that the corner of the wood pushed the aluminum into the slot to form a V shape. Once the first flute was made it was
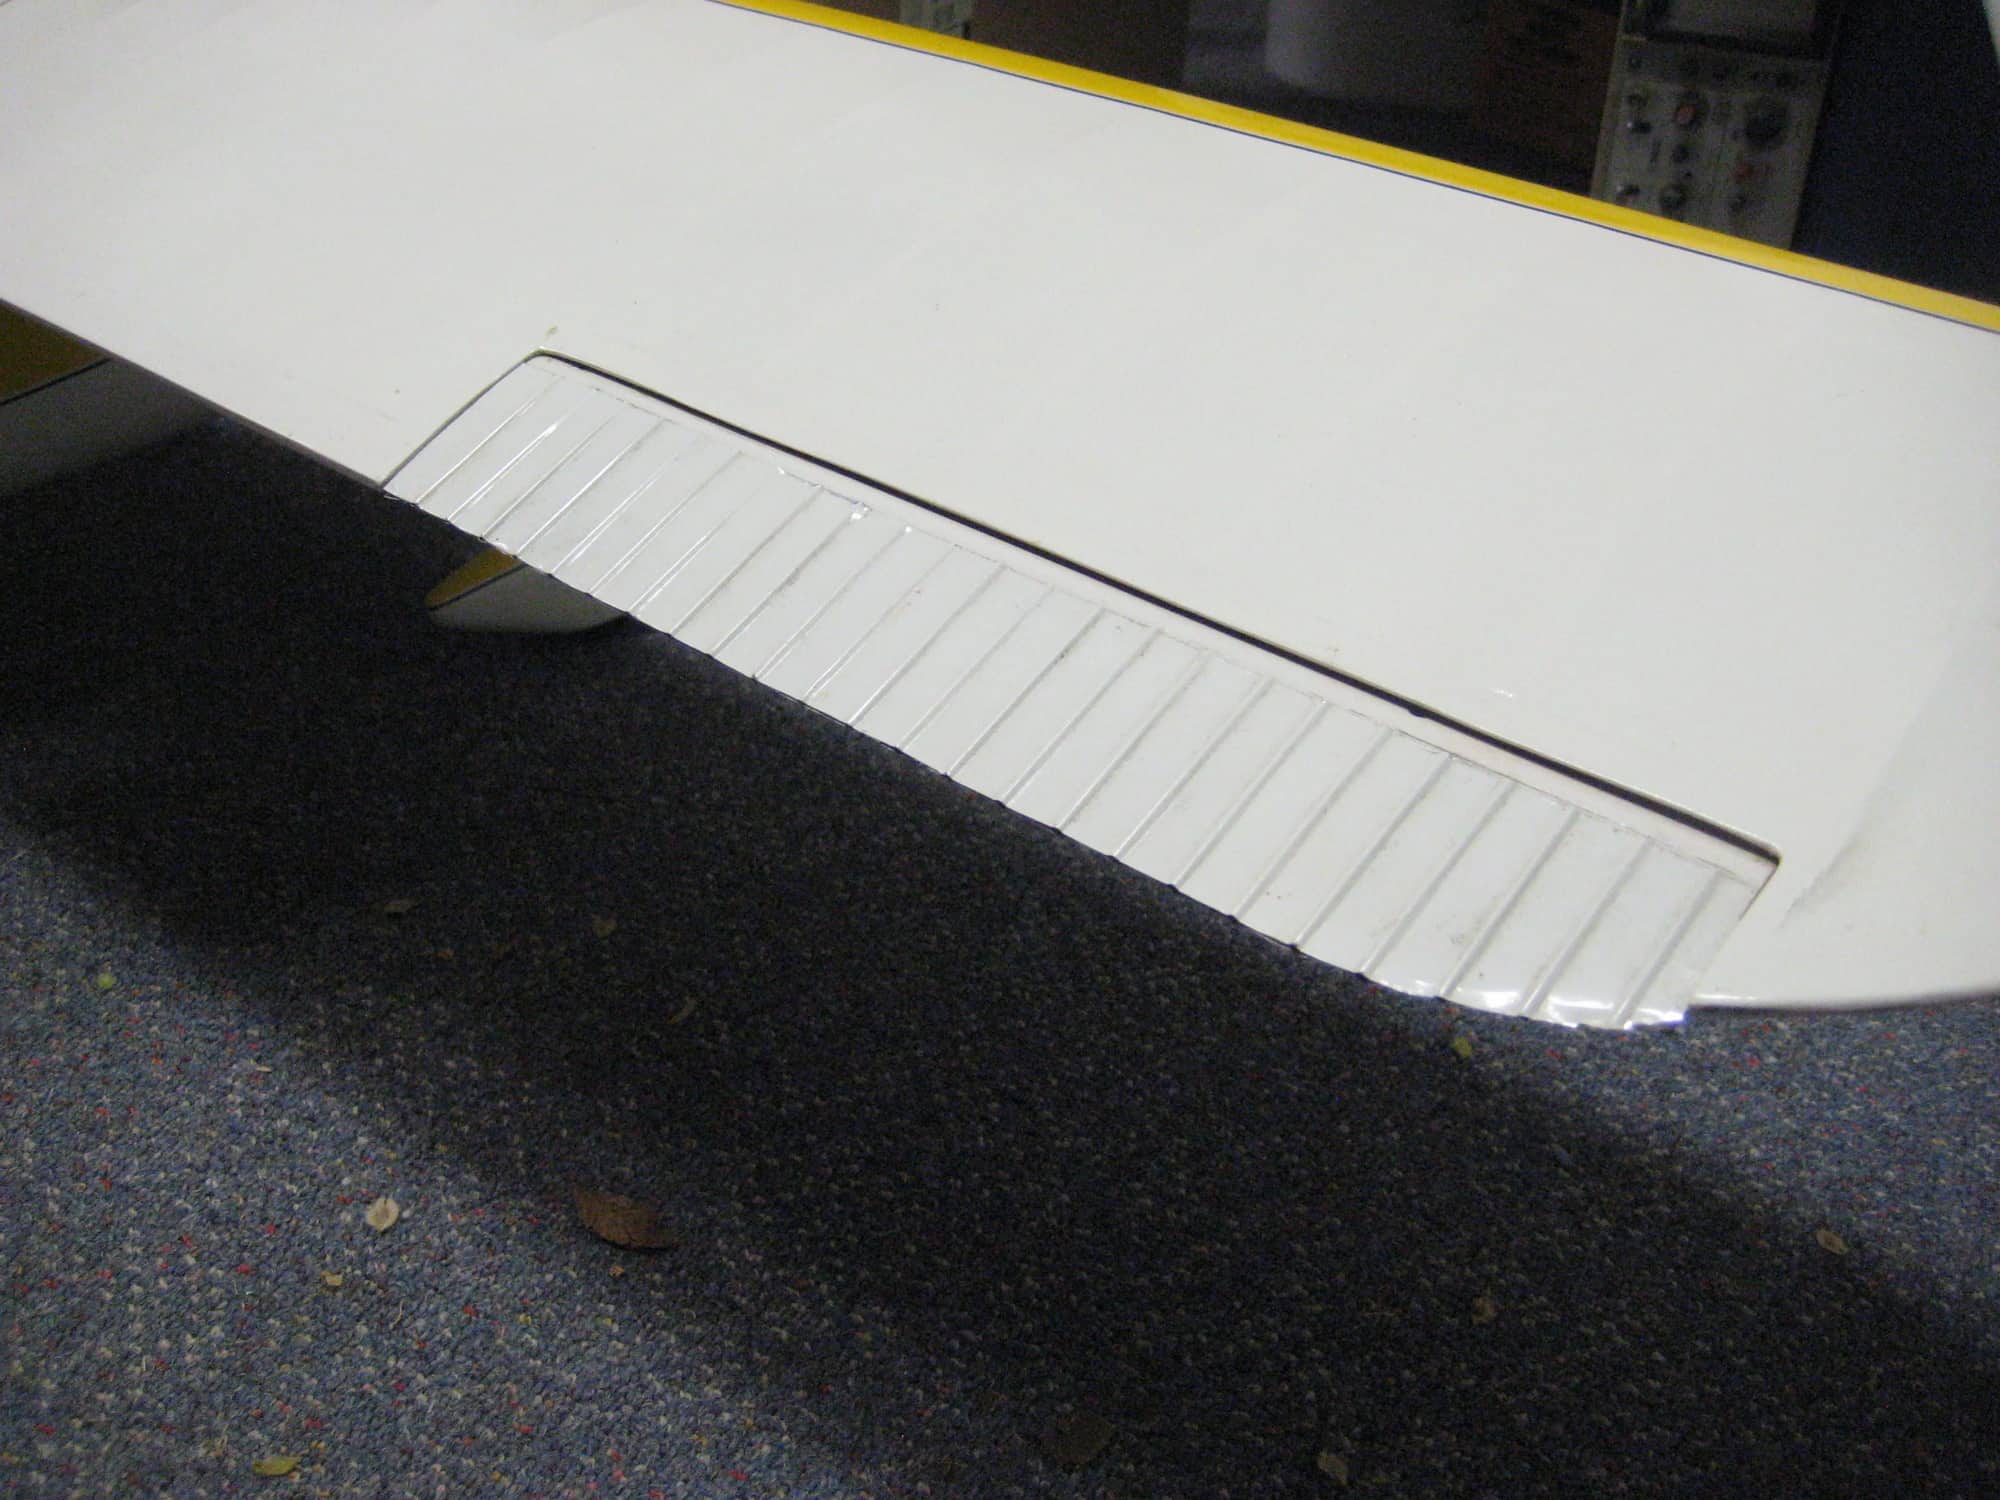
moved into the second slot
to establish the spacing and the next flute was made. It went very quickly and the spacing was constant.
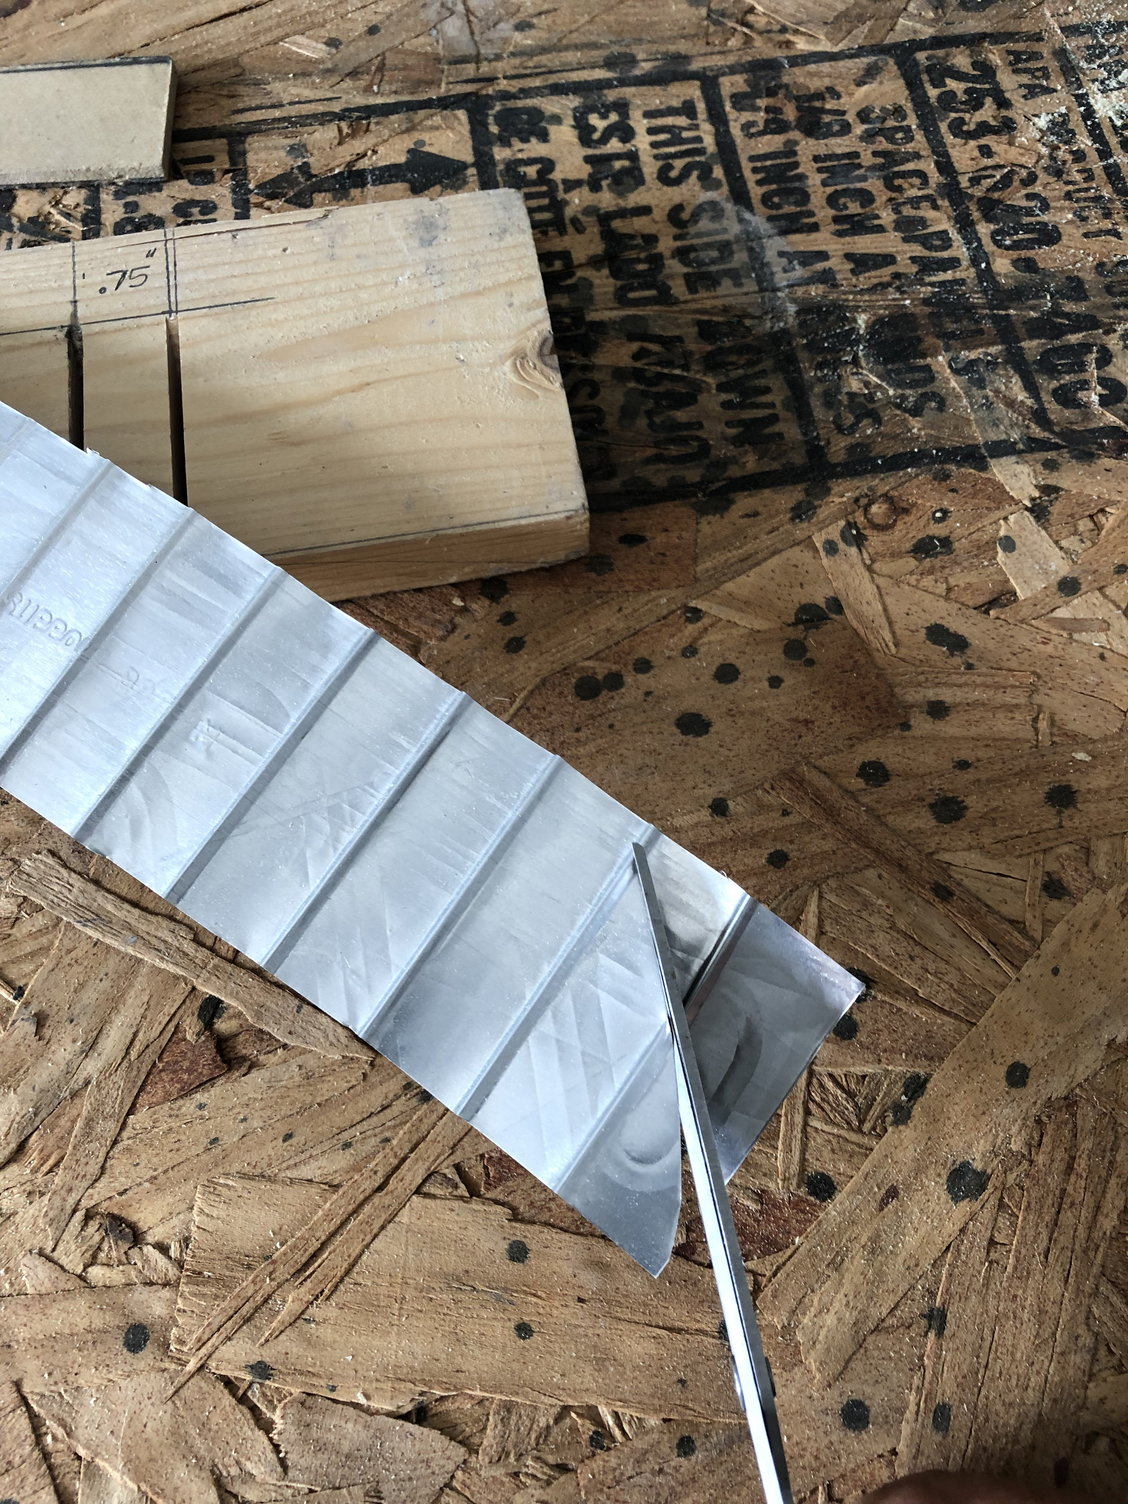
After the part was made it was trimmed with scissors to shape. After trimming the flutes needed to be reformed in the tool where the part was cut.
The parts were attached to the surfaces with contact cement.
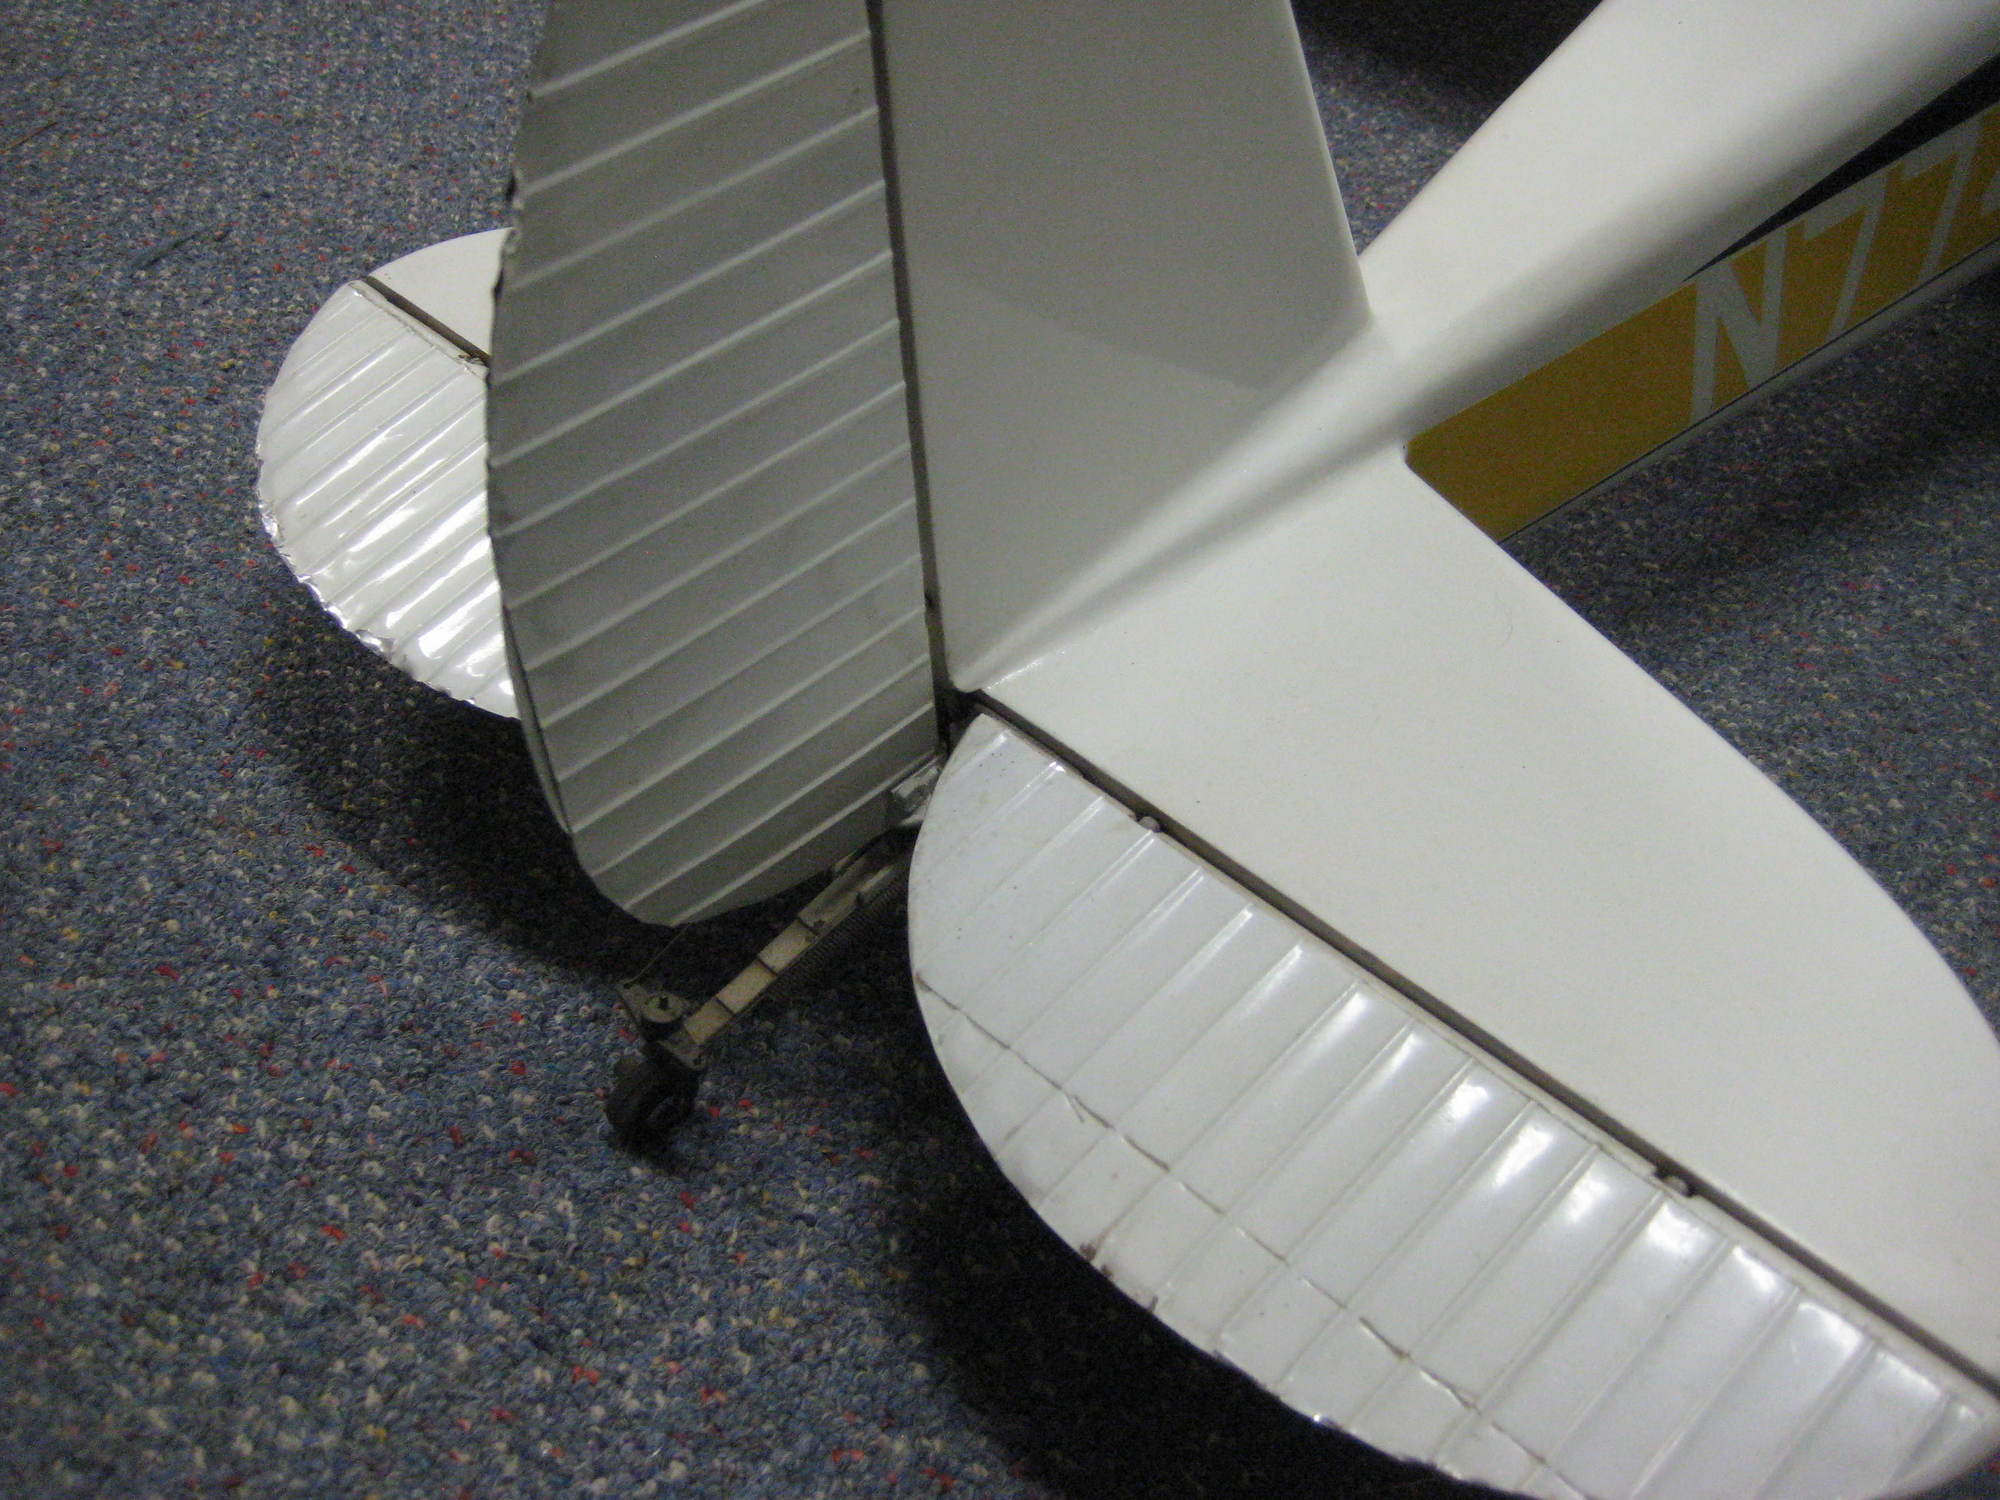
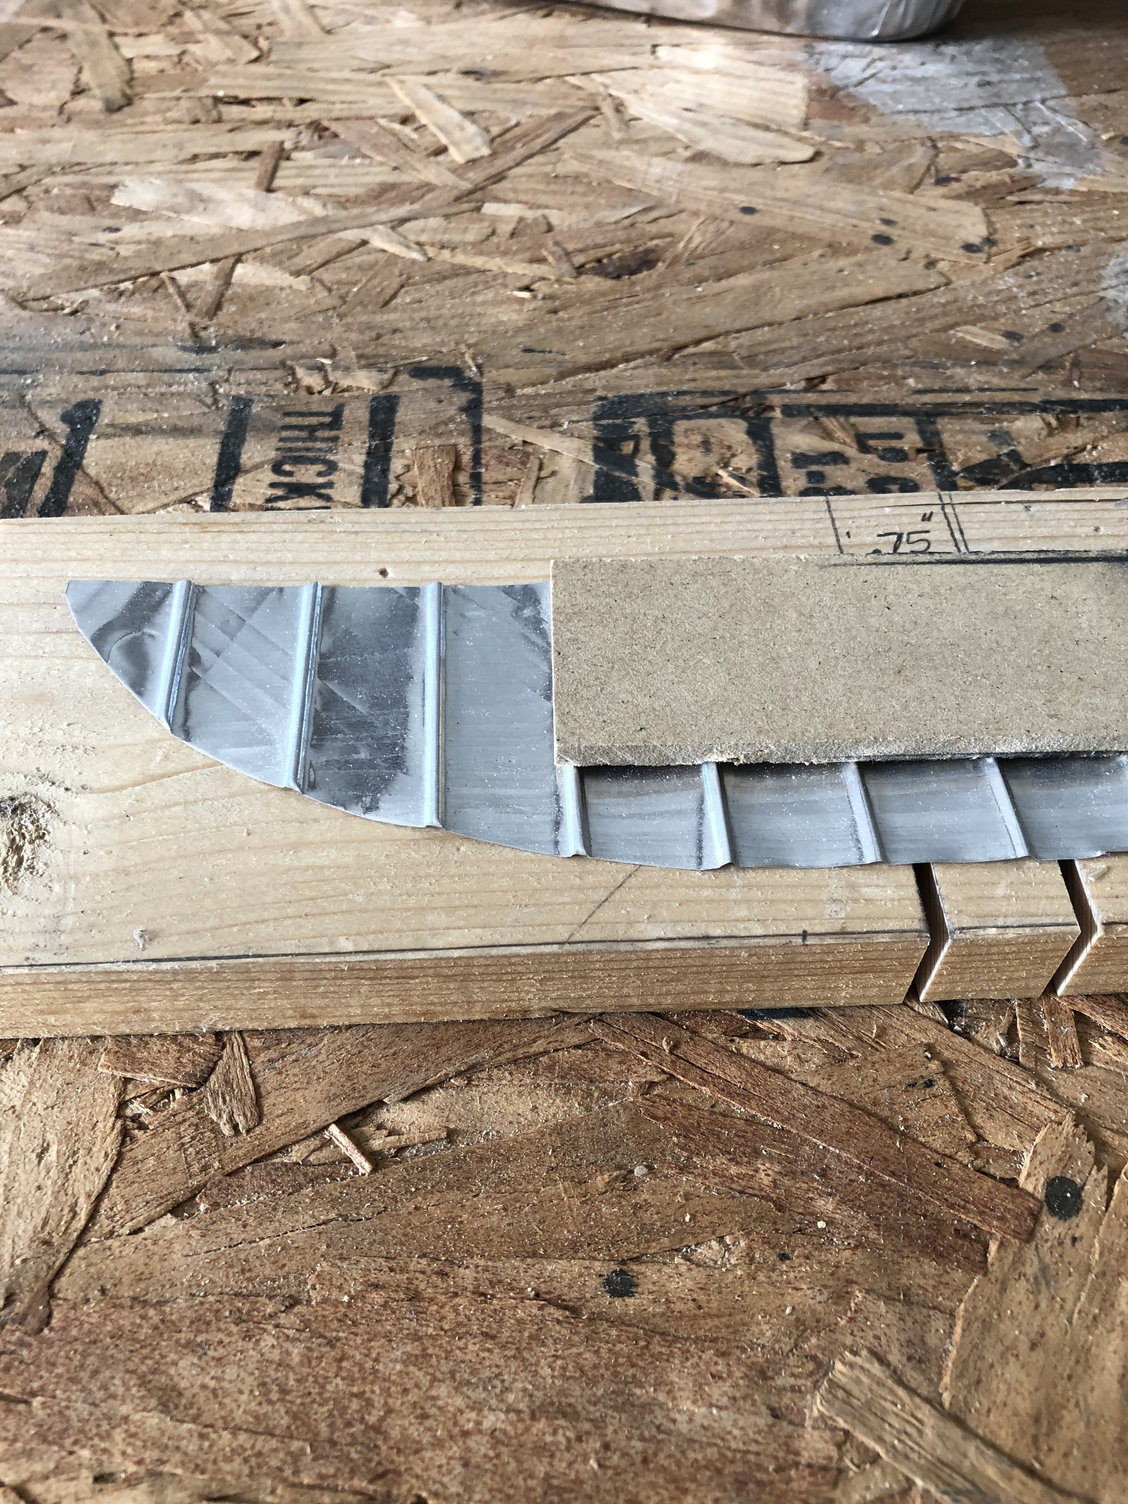
Because the spacing was just right the trailing edges of the sheets formed a diamond shape at each flute, just like the full size. I also added a small flat piece on the rudder to simulate
the fixed trim tab.
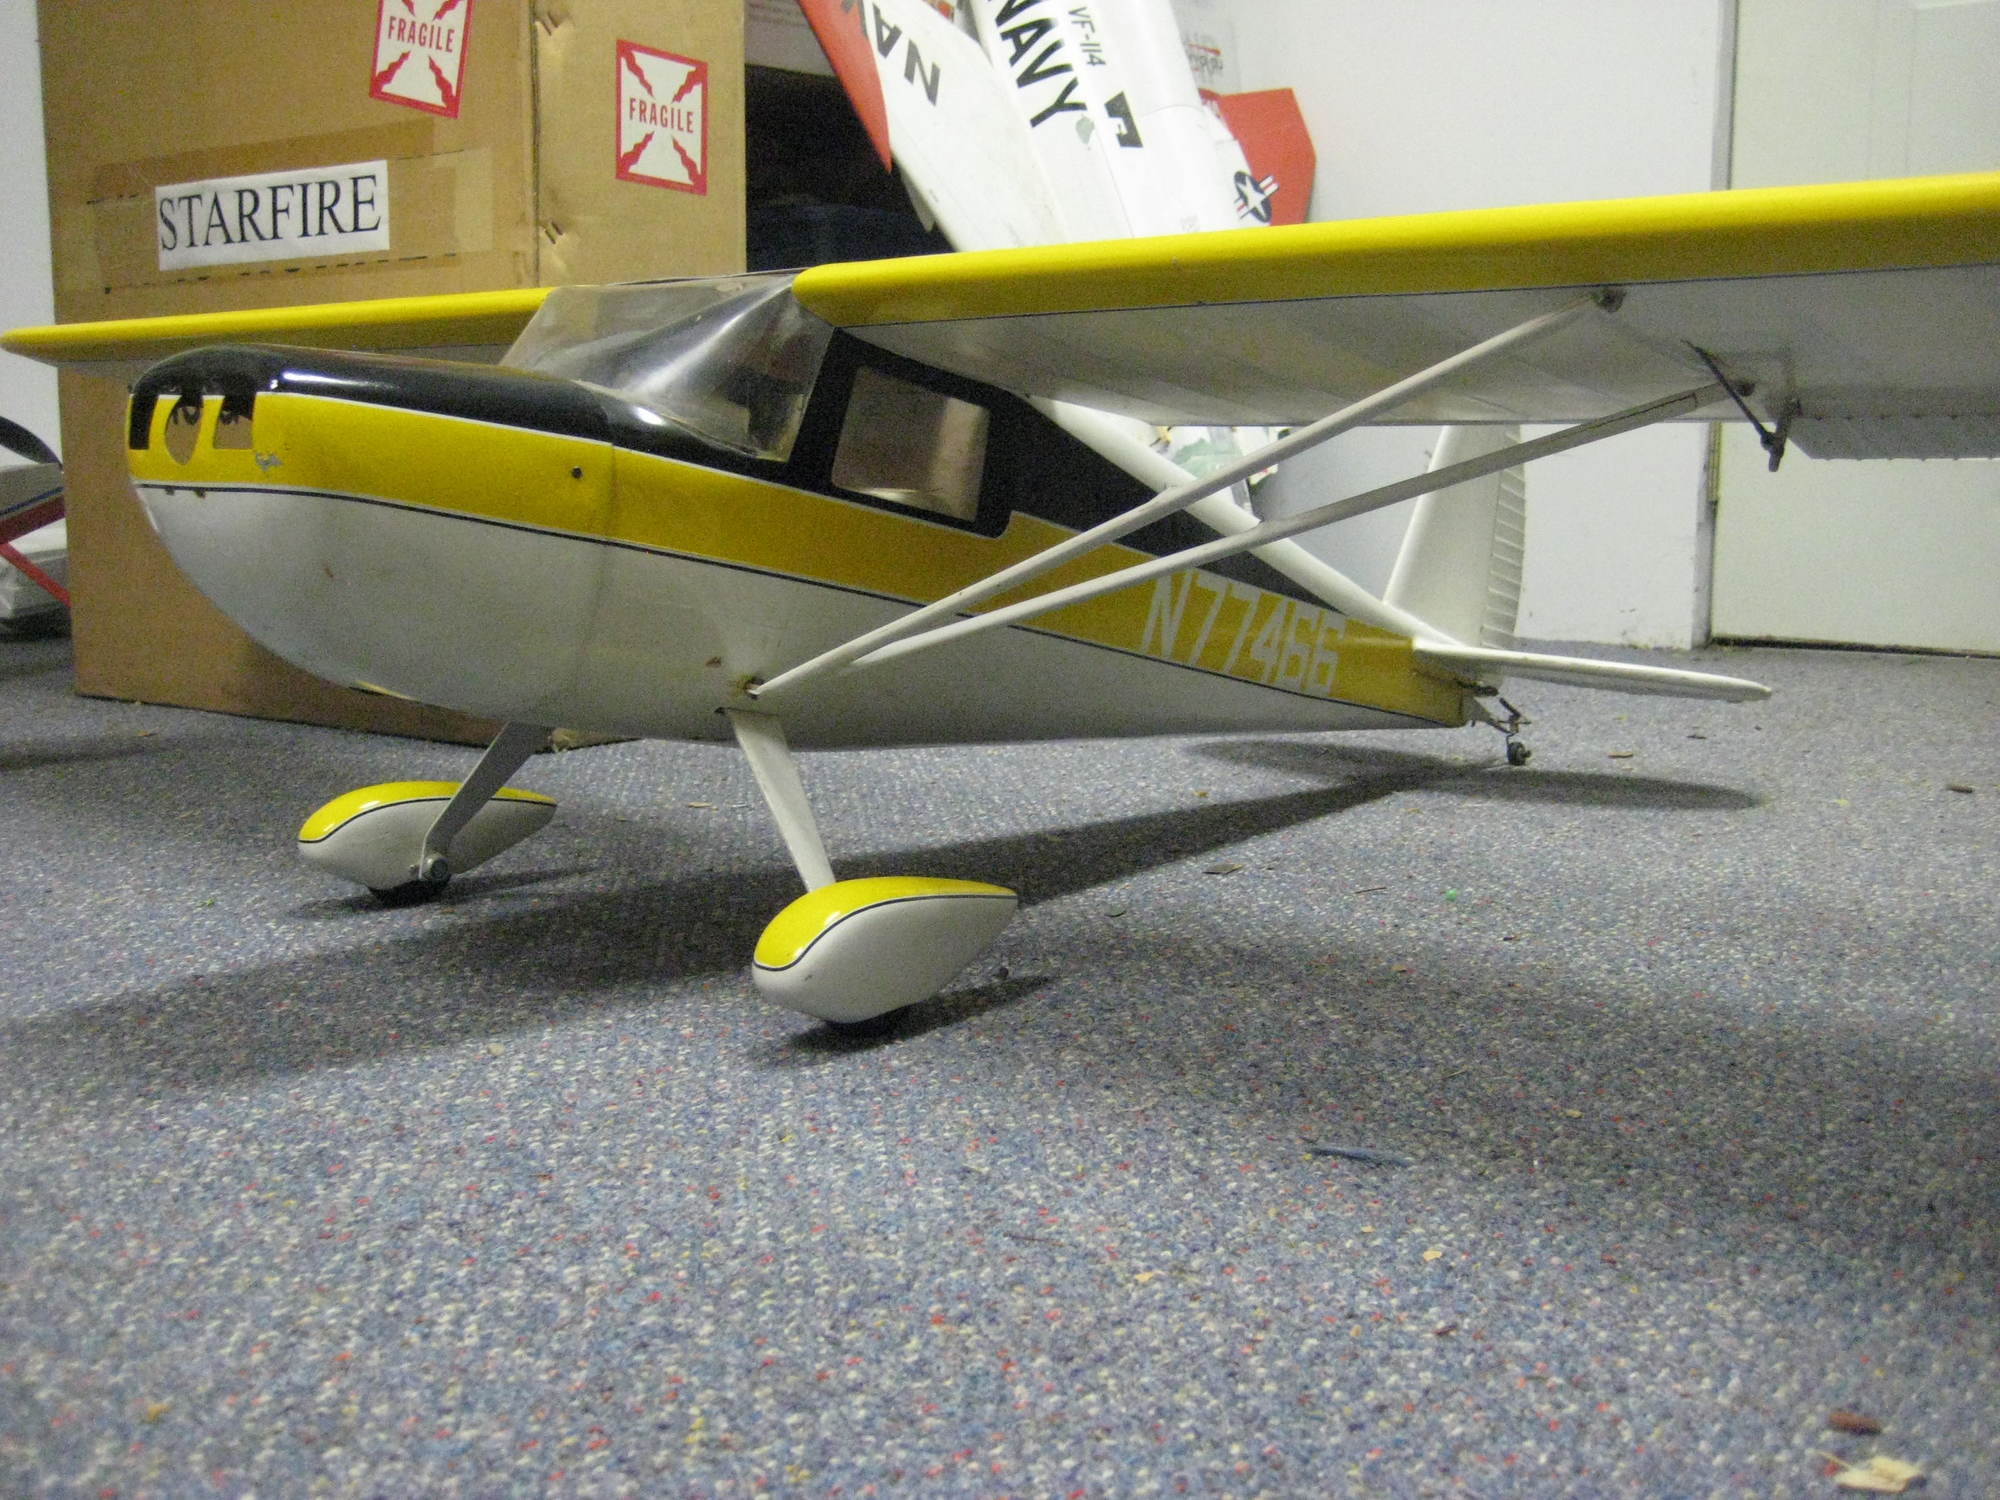
The model in these photos is many years old and the surfaces still look pretty nice, even if it has taken some abuse from storage.
Maybe this process would work at a larger scale?
Paul
I cut two slots in a board about 1/2 inch thick at the proper spacing. Then using an oversized piece of aluminum from a pie "tin" placed over the slots I burnished the flutes with
another small piece of wood turned at an angle such that the corner of the wood pushed the aluminum into the slot to form a V shape. Once the first flute was made it was
moved into the second slot
to establish the spacing and the next flute was made. It went very quickly and the spacing was constant.
After the part was made it was trimmed with scissors to shape. After trimming the flutes needed to be reformed in the tool where the part was cut.
The parts were attached to the surfaces with contact cement.
Because the spacing was just right the trailing edges of the sheets formed a diamond shape at each flute, just like the full size. I also added a small flat piece on the rudder to simulate
the fixed trim tab.
The model in these photos is many years old and the surfaces still look pretty nice, even if it has taken some abuse from storage.
Maybe this process would work at a larger scale?
Paul
Last edited by ps2727; 05-01-2020 at 09:08 PM. Reason: typo
05-01-2020 | 10:49 PM
#16
I made a Cessna 120 a while back to a smaller scale and formed the fluted surfaces in thin aluminum. It was quick and easy and has proven sturdy enough for the job.
I cut two slots in a board about 1/2 inch thick at the proper spacing. Then using an oversized piece of aluminum from a pie "tin" placed over the slots I burnished the flutes with
another small piece of wood turned at an angle such that the corner of the wood pushed the aluminum into the slot to form a V shape. Once the first flute was made it was
moved into the second slot
to establish the spacing and the next flute was made. It went very quickly and the spacing was constant.
After the part was made it was trimmed with scissors to shape. After trimming the flutes needed to be reformed in the tool where the part was cut.
The parts were attached to the surfaces with contact cement.
Because the spacing was just right the trailing edges of the sheets formed a diamond shape at each flute, just like the full size. I also added a small flat piece on the rudder to simulate
the fixed trim tab.
The model in these photos is many years old and the surfaces still look pretty nice, even if it has taken some abuse from storage.
Maybe this process would work at a larger scale?
Paul
This is one of the rarest examples of scale modelling in RC aircraft and it looks real because it IS real although in miniature. Even with paint covering the surface, it has the look of sheet metal because that's what it really is and from my perspective, I can't even begin to say how amazing it looks.
If this material had been polished instead of painted, it would look like the full scale photo previously posted, plain and simple!
Ironically there's a bit of damage to the trailing edge which I'm sure was not intentional, yet it looks infinitely more authentic than any weathering effects I've ever seen applied to any model.
Last edited by airsteve172; 05-01-2020 at 11:34 PM.
The following users liked this post:
tailskid (05-07-2020)
05-02-2020 | 09:43 AM
#17
Airsteve,
Thanks for your kind words, I wanted to post so someone might give this a try. It really was easy to do and looks convincing. Maybe I should do a video.
The model is old and has been banged up but still looks okay. It was made from the Brian Taylor plan and it flew very well.
Paul
Thanks for your kind words, I wanted to post so someone might give this a try. It really was easy to do and looks convincing. Maybe I should do a video.
The model is old and has been banged up but still looks okay. It was made from the Brian Taylor plan and it flew very well.
Paul
05-04-2020 | 06:20 AM
#18
This is the type of material I used on my 120. It is thin and very soft which makes it easy to form, but is easy to damage. Considering that the model is about 25 years old it has held up very well.
I only used material from the bottom and it needed to be flattened by rolling over a hard surface (I think I used a wooden roller on a glass sheet).
I applied the formed sheets over solid balsa control surfaces but I think it would work on a built up surface as shown in the original post. Probably worth sanding the back side before forming to help the glue to adhere.
Best part it is very inexpensive!
paul
05-06-2020 | 12:09 PM
#19

Great thread.
I too have been faced with an identical problem replicating the corrigated surfaces on a 1/4th scale Cessna 195.
I have made numerouse attempts using litho plate... forget it! Too hard to create the sharp detailed triangle corrigation.
For every one corrigation that turns out resonably OK(ish), there's 20 total failures.
BTW, Even at 1/4 scale, the corriagtions should actually be tiny, the litho plate appears far thicker than scale IMO.
Thats possibly due to the fact you cant easily form the beautiful details, in that material, with any finess.
So, I like PS2727 approach. It sounds simpler, makes more sense and looks exectly correct. Awsome actually!
I've searched around and 0.2 - 0.3mm (200-300microns) foil is available in sheets and would be ideal and using Pauls method.
Thick enough to retain some ridgidity, but soft enough form nice sharp corrigations.. without sweating a shed load.
Cheers Paul!
Last edited by David Bathe; 05-06-2020 at 12:19 PM.
05-06-2020 | 04:38 PM
#20
Great thread.
I too have been faced with an identical problem replicating the corrigated surfaces on a 1/4th scale Cessna 195.
I have made numerouse attempts using litho plate... forget it! Too hard to create the sharp detailed triangle corrigation.
For every one corrigation that turns out resonably OK(ish), there's 20 total failures.
BTW, Even at 1/4 scale, the corriagtions should actually be tiny, the litho plate appears far thicker than scale IMO.
Thats possibly due to the fact you cant easily form the beautiful details, in that material, with any finess.
So, I like PS2727 approach. It sounds simpler, makes more sense and looks exectly correct. Awsome actually!
I've searched around and 0.2 - 0.3mm (200-300microns) foil is available in sheets and would be ideal and using Pauls method.
Thick enough to retain some ridgidity, but soft enough form nice sharp corrigations.. without sweating a shed load.
Cheers Paul!
I too have been faced with an identical problem replicating the corrigated surfaces on a 1/4th scale Cessna 195.
I have made numerouse attempts using litho plate... forget it! Too hard to create the sharp detailed triangle corrigation.
For every one corrigation that turns out resonably OK(ish), there's 20 total failures.
BTW, Even at 1/4 scale, the corriagtions should actually be tiny, the litho plate appears far thicker than scale IMO.
Thats possibly due to the fact you cant easily form the beautiful details, in that material, with any finess.
So, I like PS2727 approach. It sounds simpler, makes more sense and looks exectly correct. Awsome actually!
I've searched around and 0.2 - 0.3mm (200-300microns) foil is available in sheets and would be ideal and using Pauls method.
Thick enough to retain some ridgidity, but soft enough form nice sharp corrigations.. without sweating a shed load.
Cheers Paul!
Consider how tedious it would be to manually cut holes precisely in a piece of paper so it would fit in a loose leaf notebook, yet there are relatively simple tools that let you accomplish this easily and repeatedly without the need for any skills at all.
Admittedly, engineering and making a tool requires imagination, perseverance, patience and skill, but this is what's involved in BUILDING a model rather than ASSEMBLING a prefabricated kit.
Of no lesser importance is material selection for a project!
05-07-2020 | 03:34 PM
#21
Thanks David
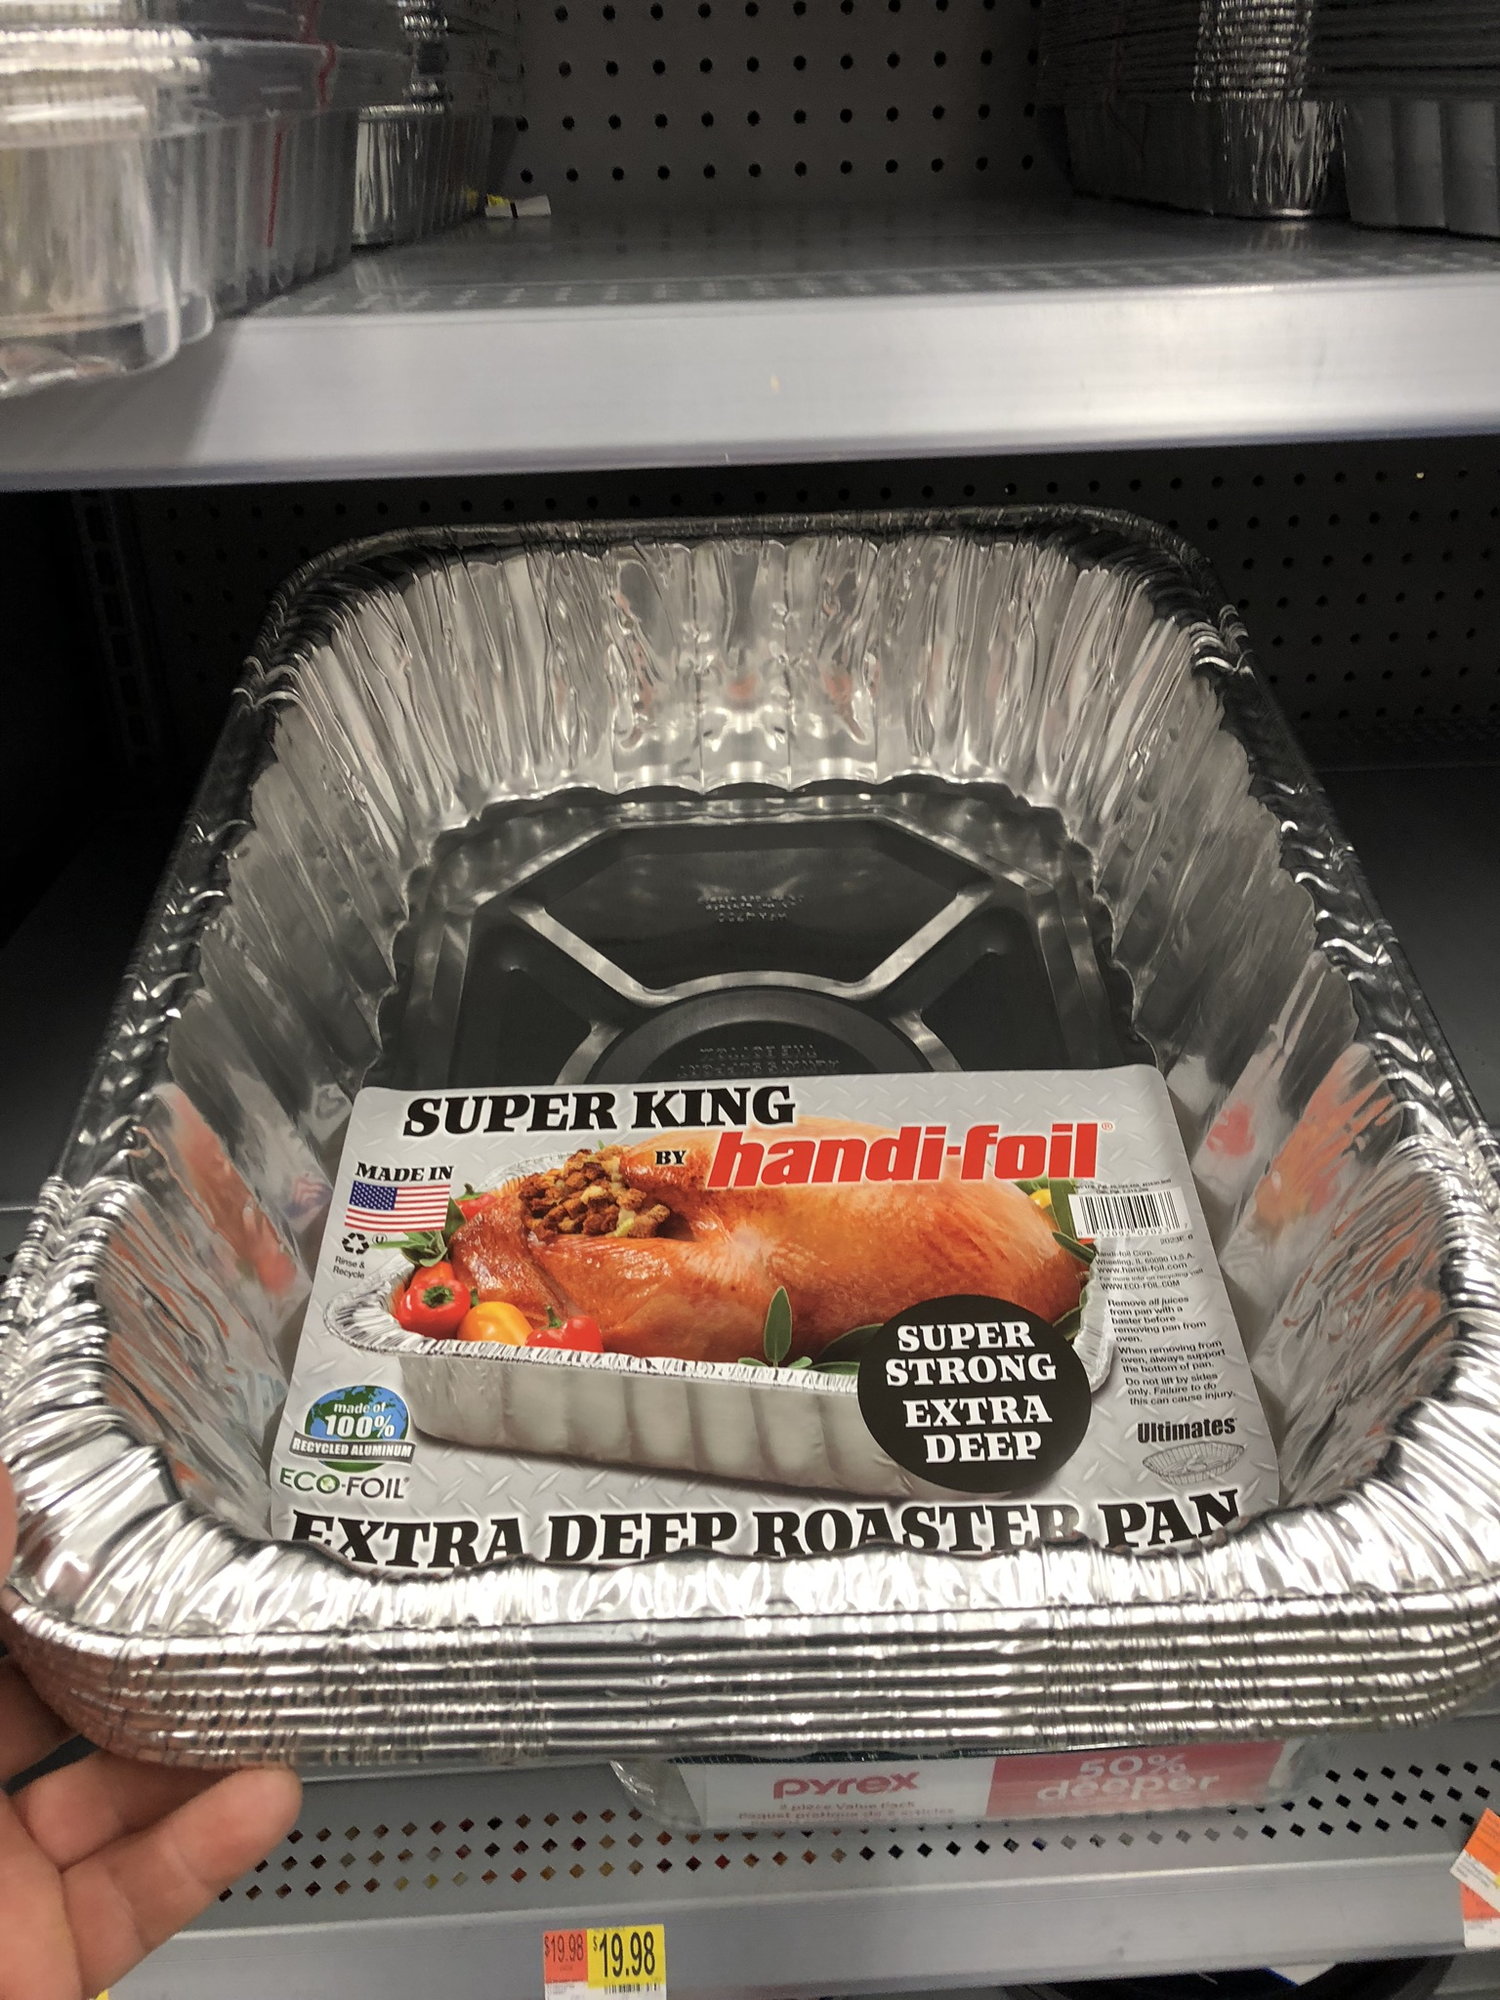
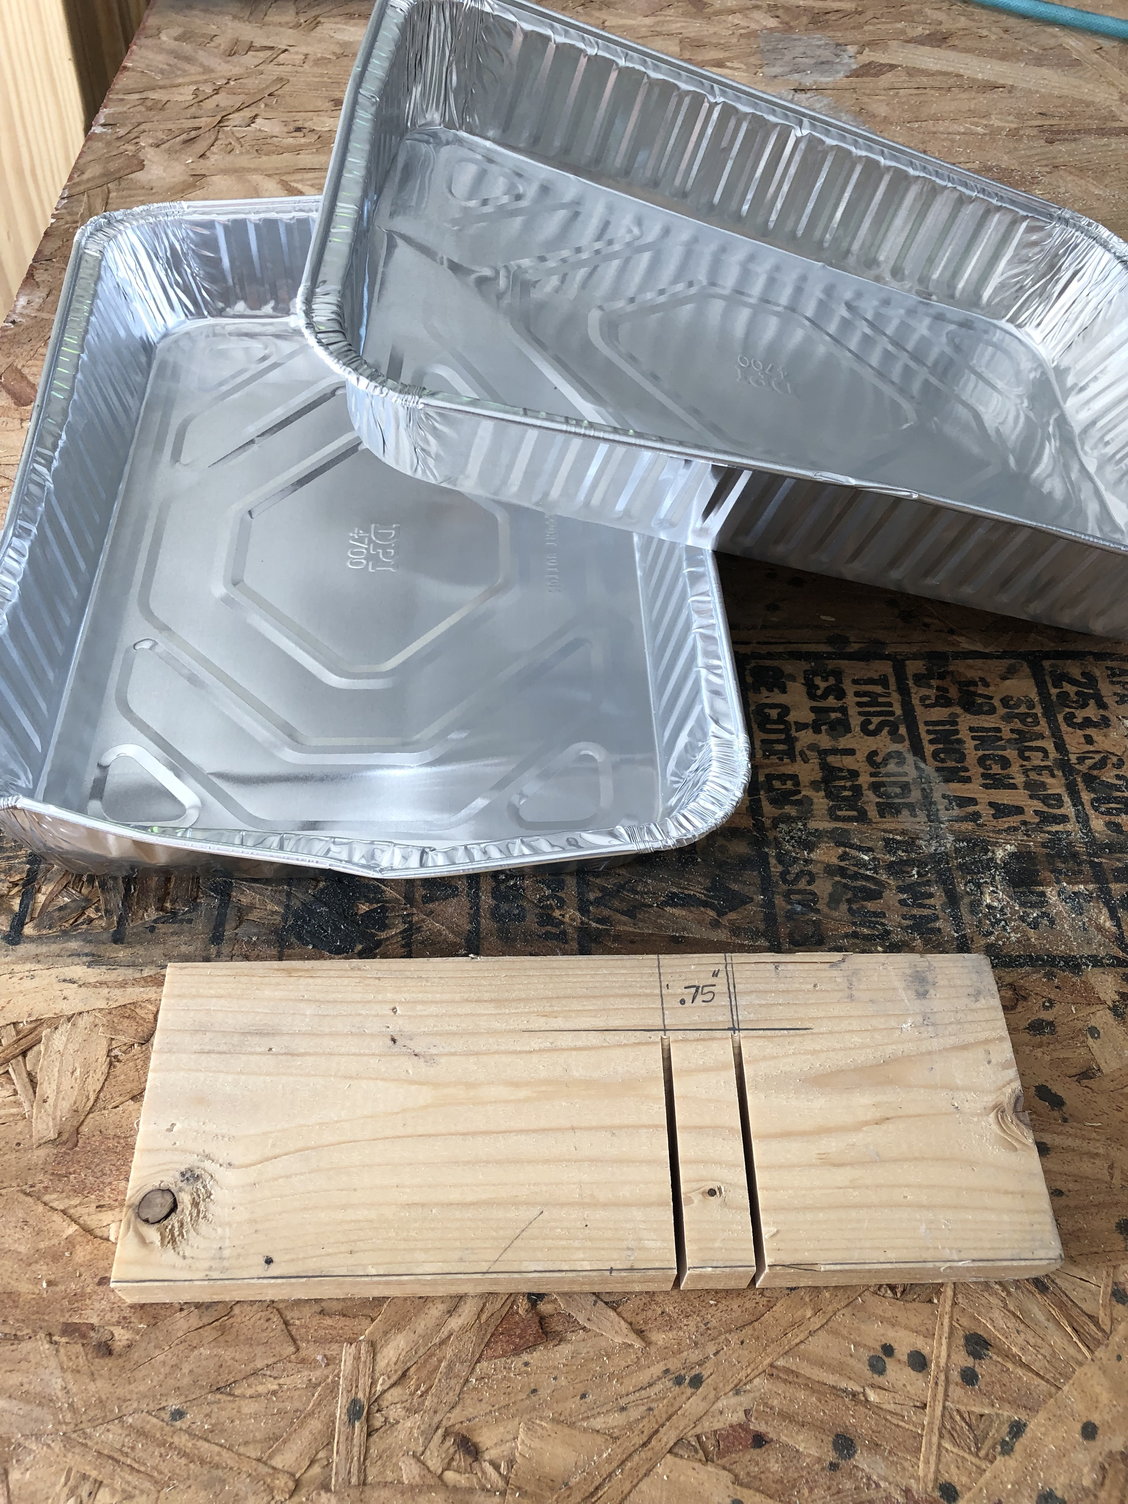
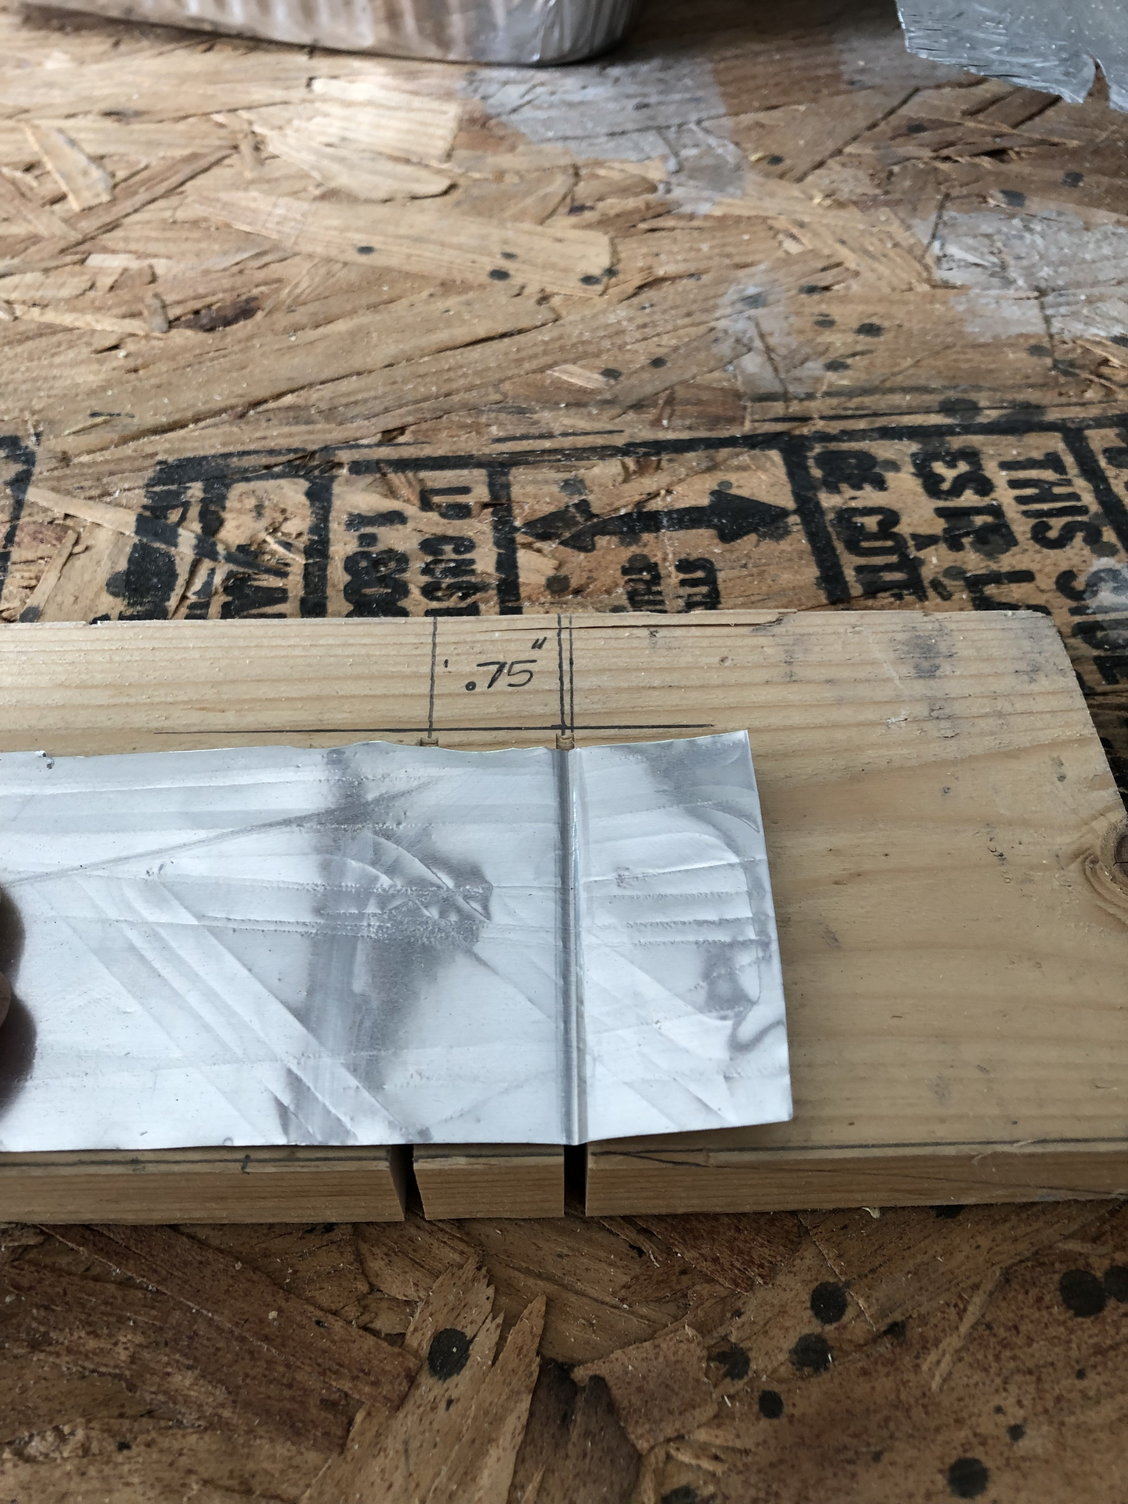
i was at the dollar store today and found a set of disposable aluminum cookware. I got 2 for a dollar along with a plastic roller. I made a sample tool with spacing at .75 inches.
The whole ole thing took 15 minutes including the tool.
A larger 1/4 scale model may need slightly heavier material but the process is easy and quick.
I hope some builders try it!
05-07-2020 | 04:12 PM
#22
Thanks David
i was at the dollar store today and found a set of disposable aluminum cookware. I got 2 for a dollar along with a plastic roller. I made a sample tool with spacing at .75 inches.
The whole ole thing took 15 minutes including the tool.
A larger 1/4 scale model may need slightly heavier material but the process is easy and quick.
I hope some builders try it!
Another possible source of aluminum sheet that's a slight bit thicker is roof flashing. It has the advantage of being absolutely flat clean material as well as being a little more durable.
Last edited by airsteve172; 05-07-2020 at 04:35 PM.
05-08-2020 | 12:21 PM
#24
Here's a little tip if you are trying to shape the aluminum but it feels stiffer than you'd like it to be.
To make the metal softer or more malleable, it needs to be heated to a specific temperature and allowed to cool. The trick to this is to first coat the aluminum piece with soot which can be done by moving the piece over a candle flame. When it's covered in black soot, get a propane torch and apply the torch flame to the soot long enough for the soot to disappear. When the torch has cleaned off all the soot, the metal has been softened and should be easier to work with.
Since aluminum melts suddenly if you get it too hot, the soot method is a good way to apply enough heat to do the job without the risk of overdoing it. Now you'll be able to bend and shape it far more easily!


