


Winter Project
 09-22-2014 | 11:51 AM
#1
Thread Starter

Joined: Sep 2009
Posts: 520
Likes: 0
Received 0 Likes
on
0 Posts
From: Elliot Lake ON, CANADA
Like it or not, winter is coming.
So it's the best time for me to start a new built.
I choose the Heng Long Panzer IV F2 ( something with that apple shape muzzle break)...
Haven't decided yet of the camo pattern but I will incorporate some of the modifications proposed by " philipat" on his Panzer IV thread:http://www.rcuniverse.com/forum/rc-t...l#post11870997
One thing for sure, the electronic's gonna be a Clark/Benedini combo like I have in my Pershing.
Since I already had a TBS mini on hand, I created some sound files using video footages of Panzer IV auf.G # 413 :http://youtu.be/HhE0aAeV-os
I then coupled the TBS mini to my last "acoustic smoker " design and started some tests ( king of like killing two birds with one stone).
So here's step 1: SMOKE & SOUND
http://youtu.be/hg5E644v8Ak?list=UUo...Z1uGnVnrbH3GxQ
Last edited by strmnd54; 09-23-2014 at 04:38 AM.
 09-22-2014 | 12:11 PM
#2

Senior Member
That looks so good. I have yet to hookup power to the smoke unit you sent me. After seeing that I am inspired to get off my butt and give that a try. It looks very convincing.
That idea of yours, using the sound waves to drive the smoke is brillliant, and one of the gems on this board.
That idea of yours, using the sound waves to drive the smoke is brillliant, and one of the gems on this board.
Last edited by YHR; 09-22-2014 at 12:13 PM.
09-22-2014 | 12:34 PM
#3
 09-22-2014 | 04:08 PM
#5
Thread Starter
Joined: Sep 2009
Posts: 520
Likes: 0
Received 0 Likes
on
0 Posts
From: Elliot Lake ON, CANADA
That looks so good. I have yet to hookup power to the smoke unit you sent me. After seeing that I am inspired to get off my butt and give that a try. It looks very convincing.
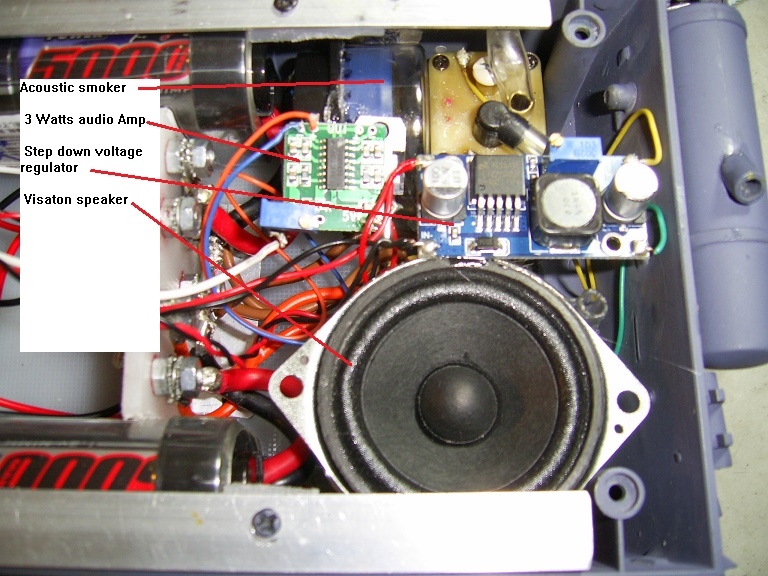
Your unit is equipped with a step-up voltage regulator powering a 24 Ohms 2 Watts resistor at around 12.5 Volts
For the latest design, I went opposite by using a step down voltage regulator powering a 5.49 Ohms resistor at 4.8 Volts...
I also turn the speaker around a 180 degrees to get more pumping and eliminate the tubing, meaning that the speaker can operate at lower volume; thus the possibility to use a 3 Watts 5 Volts mini audio amp.
Due to the use of voltage regulators; both designs will supply a constant smoke output from 8.4 Volts to 7.0 Volts...
That single baffle muzzle brake is often referred to as a'globular muzzle brake'.
Thanks Jeff, I always liked the model F2. It was an interim design and few of them were built compare to other ones...
I have set my eyes on this particular one:
Niiiiiiiiiiiice!
I'm surprised it didn't set off the smoke alarms!!!
I'm surprised it didn't set off the smoke alarms!!!
 09-23-2014 | 02:48 AM
#6
ME TOO! I bought the HL PIV for my Sturmpanzer Brummbar Sd Kfz 166 project and it just happened to have that muzzle brake, so now it's a keeper!

Jeff
10-15-2014 | 08:09 AM
#7
Thread Starter
Joined: Sep 2009
Posts: 520
Likes: 0
Received 0 Likes
on
0 Posts
From: Elliot Lake ON, CANADA
Project update:
- stripping the lower hull: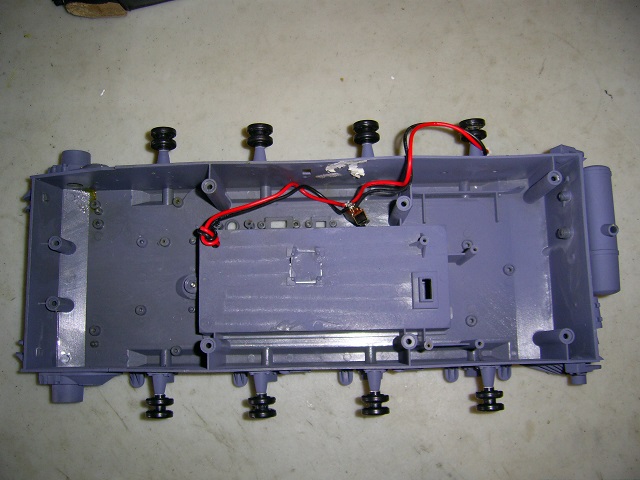
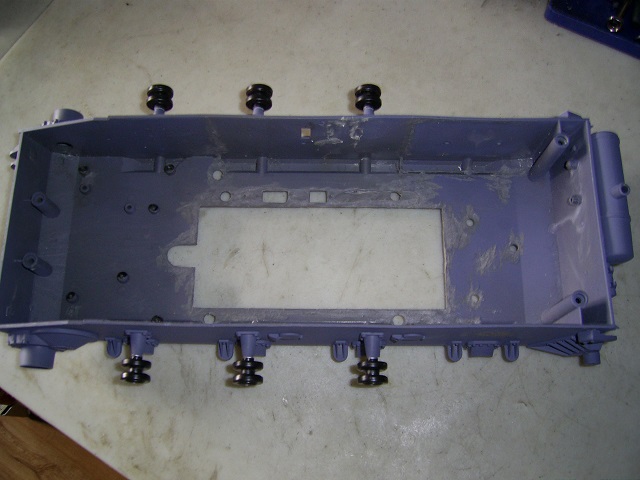
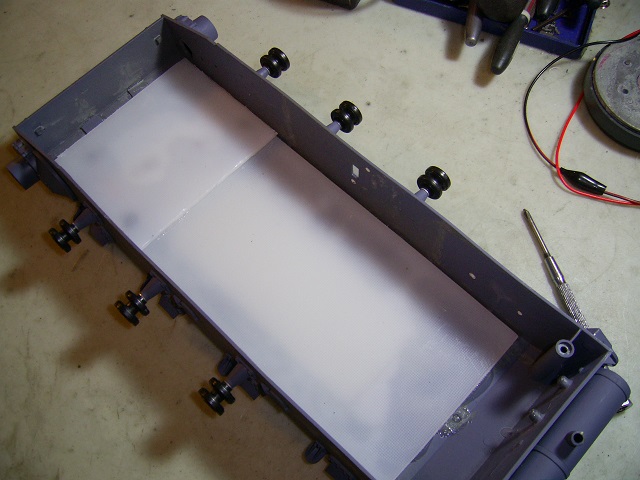
-Re-enforcing the lower hull:
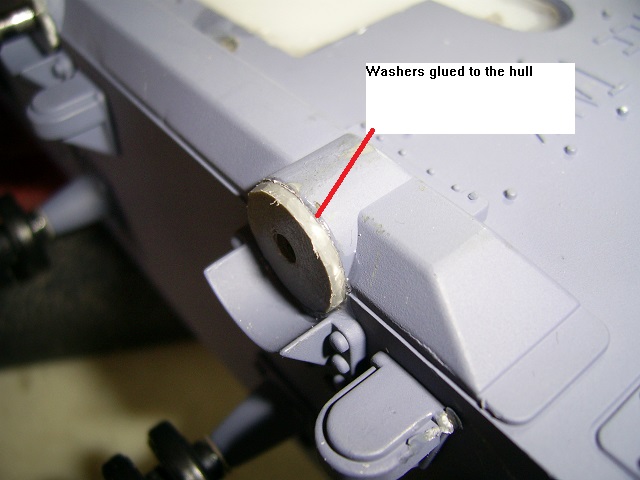
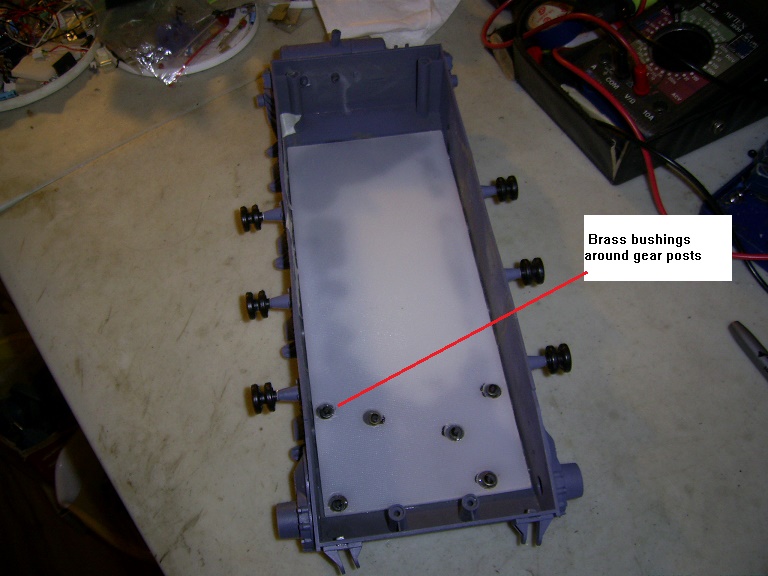
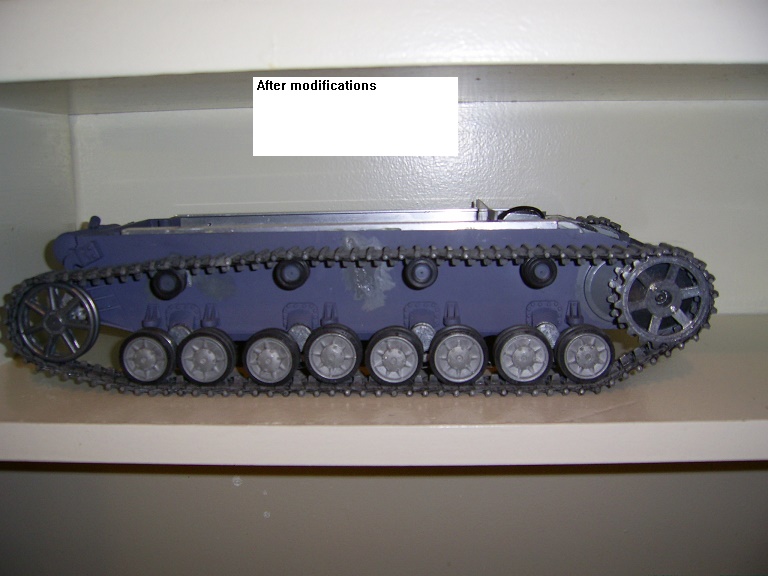
-Installing the Asiatam metal suspension: I had to make some plastic washers using left-overs from the battery box; so the road wheels would align with the return rollers...
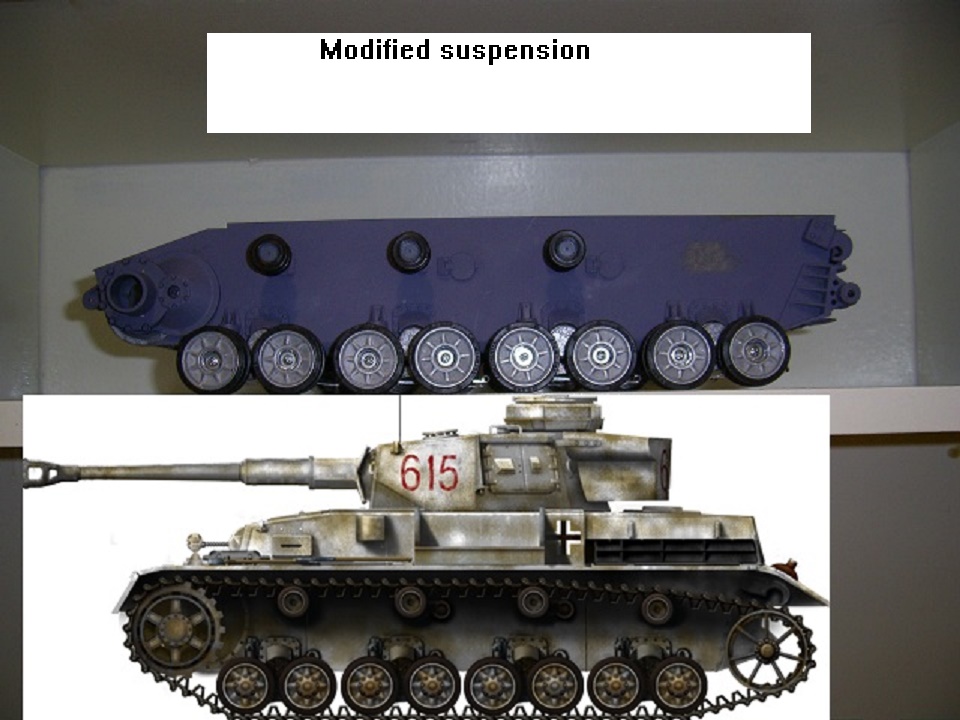
-MODIFYING THE ASIATAM SUSPENSION
I believe this mod. can also apply to the Taigen suspension since they look the same and probably share the same flaws...
-THE SUSPENSION IS TOO RIGID AND SITS TOO LOW: There's too much space between the wheels of each posts, leaving not enough between the wheels of the next post; for flexing...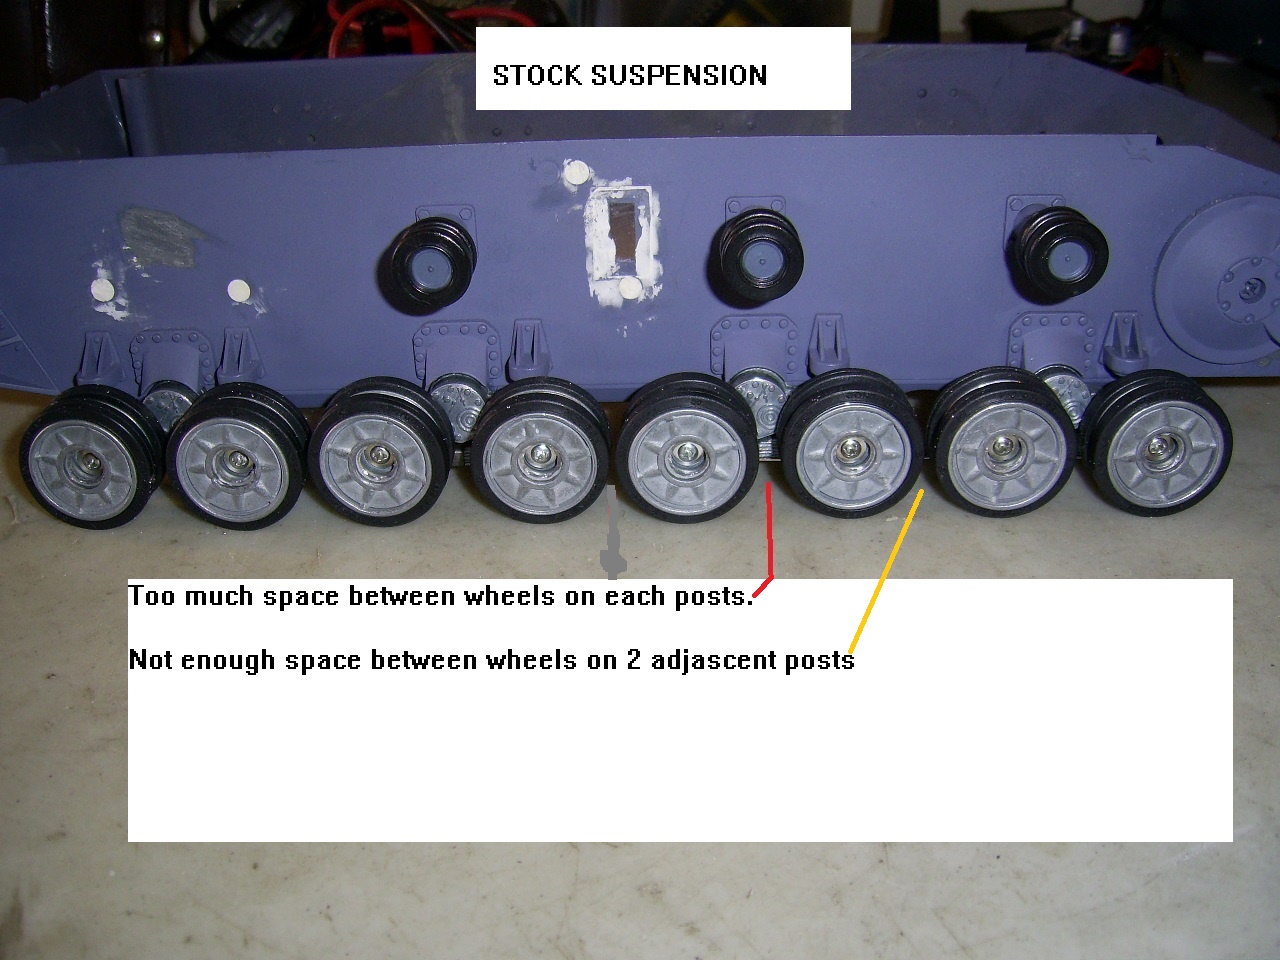
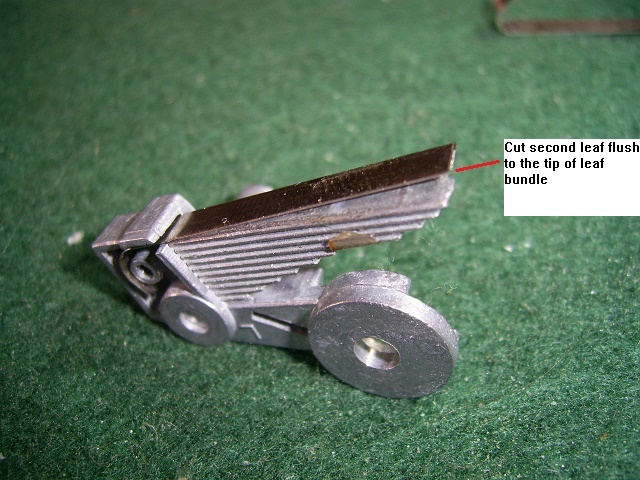
-So I decided to fix the problem: Here's some pictures with comments...


Here's a short video to show how the modified suspension is flexing: https://www.youtube.com/watch?v=2x3AKPkdBa0&list=UUoWjHTJi7Z1uGnVnrbH3GxQ
- stripping the lower hull:
-Re-enforcing the lower hull:
-Installing the Asiatam metal suspension: I had to make some plastic washers using left-overs from the battery box; so the road wheels would align with the return rollers...
-MODIFYING THE ASIATAM SUSPENSION
I believe this mod. can also apply to the Taigen suspension since they look the same and probably share the same flaws...
-THE SUSPENSION IS TOO RIGID AND SITS TOO LOW: There's too much space between the wheels of each posts, leaving not enough between the wheels of the next post; for flexing...
-So I decided to fix the problem: Here's some pictures with comments...
Here's a short video to show how the modified suspension is flexing: https://www.youtube.com/watch?v=2x3AKPkdBa0&list=UUoWjHTJi7Z1uGnVnrbH3GxQ
10-15-2014 | 11:16 AM
#8

Hey Strmnd,
Been a long time since I worked on tanks and smokers. But at it again. YHR posted about audio exciters. I'm not sure what you're doing with your sound driven smoker, but it looks awesome. Wonder if you could use the audio exciters instead of a speaker.
I just rebuilt my KT with servo driven elevation and recoil, a slip ring, etc etc, and since I don't have anyone to IR battle with, I fitted the barrel with a socket for a BP-firing module or for plugging in a superbright LED. But I still think the best would be a smoker type gunshot simulation. Are you still working on that?
Always interesting to see your creativity.
Best.
10-15-2014 | 02:52 PM
#9
Thread Starter
Joined: Sep 2009
Posts: 520
Likes: 0
Received 0 Likes
on
0 Posts
From: Elliot Lake ON, CANADA
Hi Dan! Glad to see you back.
I've been following YHR audio exciters thread closely since I don't know yet if I should use one of them or a regular speaker for my panzer IV....
As for the acoustic smoker, my last design revolves around a 1 inch 3 Watts Aura speaker for pumping the smoke; and a 5.49 OHMS 1 Watts wire wound resistor, driven by a step down adjustable voltage regulator; to generate the smoke....
I haven't given up on the smoking gun idea; I just felt asleep on it...
The wake-up call came last week from Don (Torpedochief) When He posted this thread:http://www.rcuniverse.com/forum/rc-t...nventions.html
Don is the one who planted that crazy idea in my head back in 2011...
I can tell you that I have some 32 gauge Kanthal wire and 2 mm silica wick coming in the mail...( Something to do with filling up a smoke chamber within 3 sec.)
I've been following YHR audio exciters thread closely since I don't know yet if I should use one of them or a regular speaker for my panzer IV....
As for the acoustic smoker, my last design revolves around a 1 inch 3 Watts Aura speaker for pumping the smoke; and a 5.49 OHMS 1 Watts wire wound resistor, driven by a step down adjustable voltage regulator; to generate the smoke....
I haven't given up on the smoking gun idea; I just felt asleep on it
...The wake-up call came last week from Don (Torpedochief) When He posted this thread:http://www.rcuniverse.com/forum/rc-t...nventions.html
Don is the one who planted that crazy idea in my head back in 2011...
I can tell you that I have some 32 gauge Kanthal wire and 2 mm silica wick coming in the mail...( Something to do with filling up a smoke chamber within 3 sec.)
10-16-2014 | 09:58 PM
#10
Interesting suspension mod...I like it. A few questions...
- Do you have the length for each leg of the V on the second leaf?
- The longer leaf looks like it extends a long way out of the suspension. Any concerns with it snagging on the ground as the carriage rotates when going over uneven terrain?
- Why did you need the plastic washer in the carriage assembly? Is the Asiatam carriage narrower than the HL?
10-17-2014 | 07:14 AM
#11
Thread Starter
Joined: Sep 2009
Posts: 520
Likes: 0
Received 0 Likes
on
0 Posts
From: Elliot Lake ON, CANADA
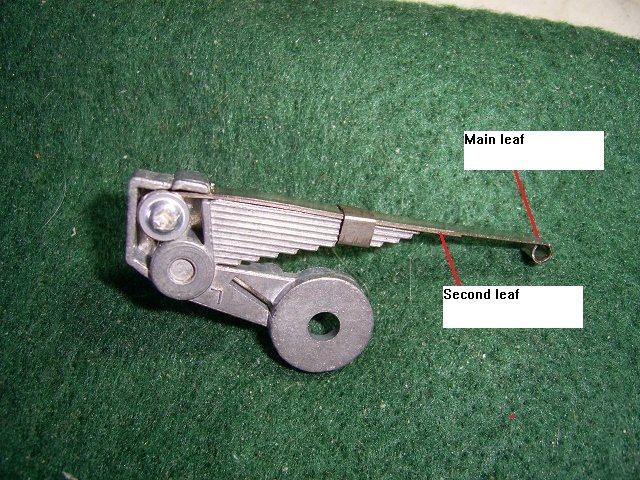
- The first leg of the "V" is about 5 mm and the angle is around 45 degrees:
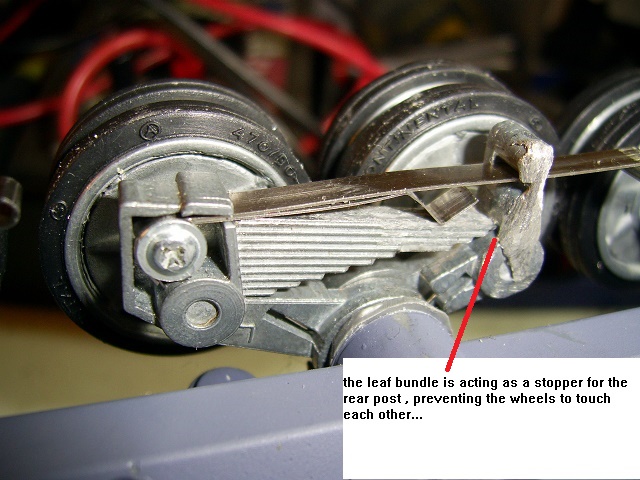
- The main leaf is the same length than the H.L. one...I never had any snagging problems with my old panzer IV; except for a leaf falling off the post of the rear wheel and snagging on the track when I went backward...I modified the H.L. plastic suspension to remedy the problem: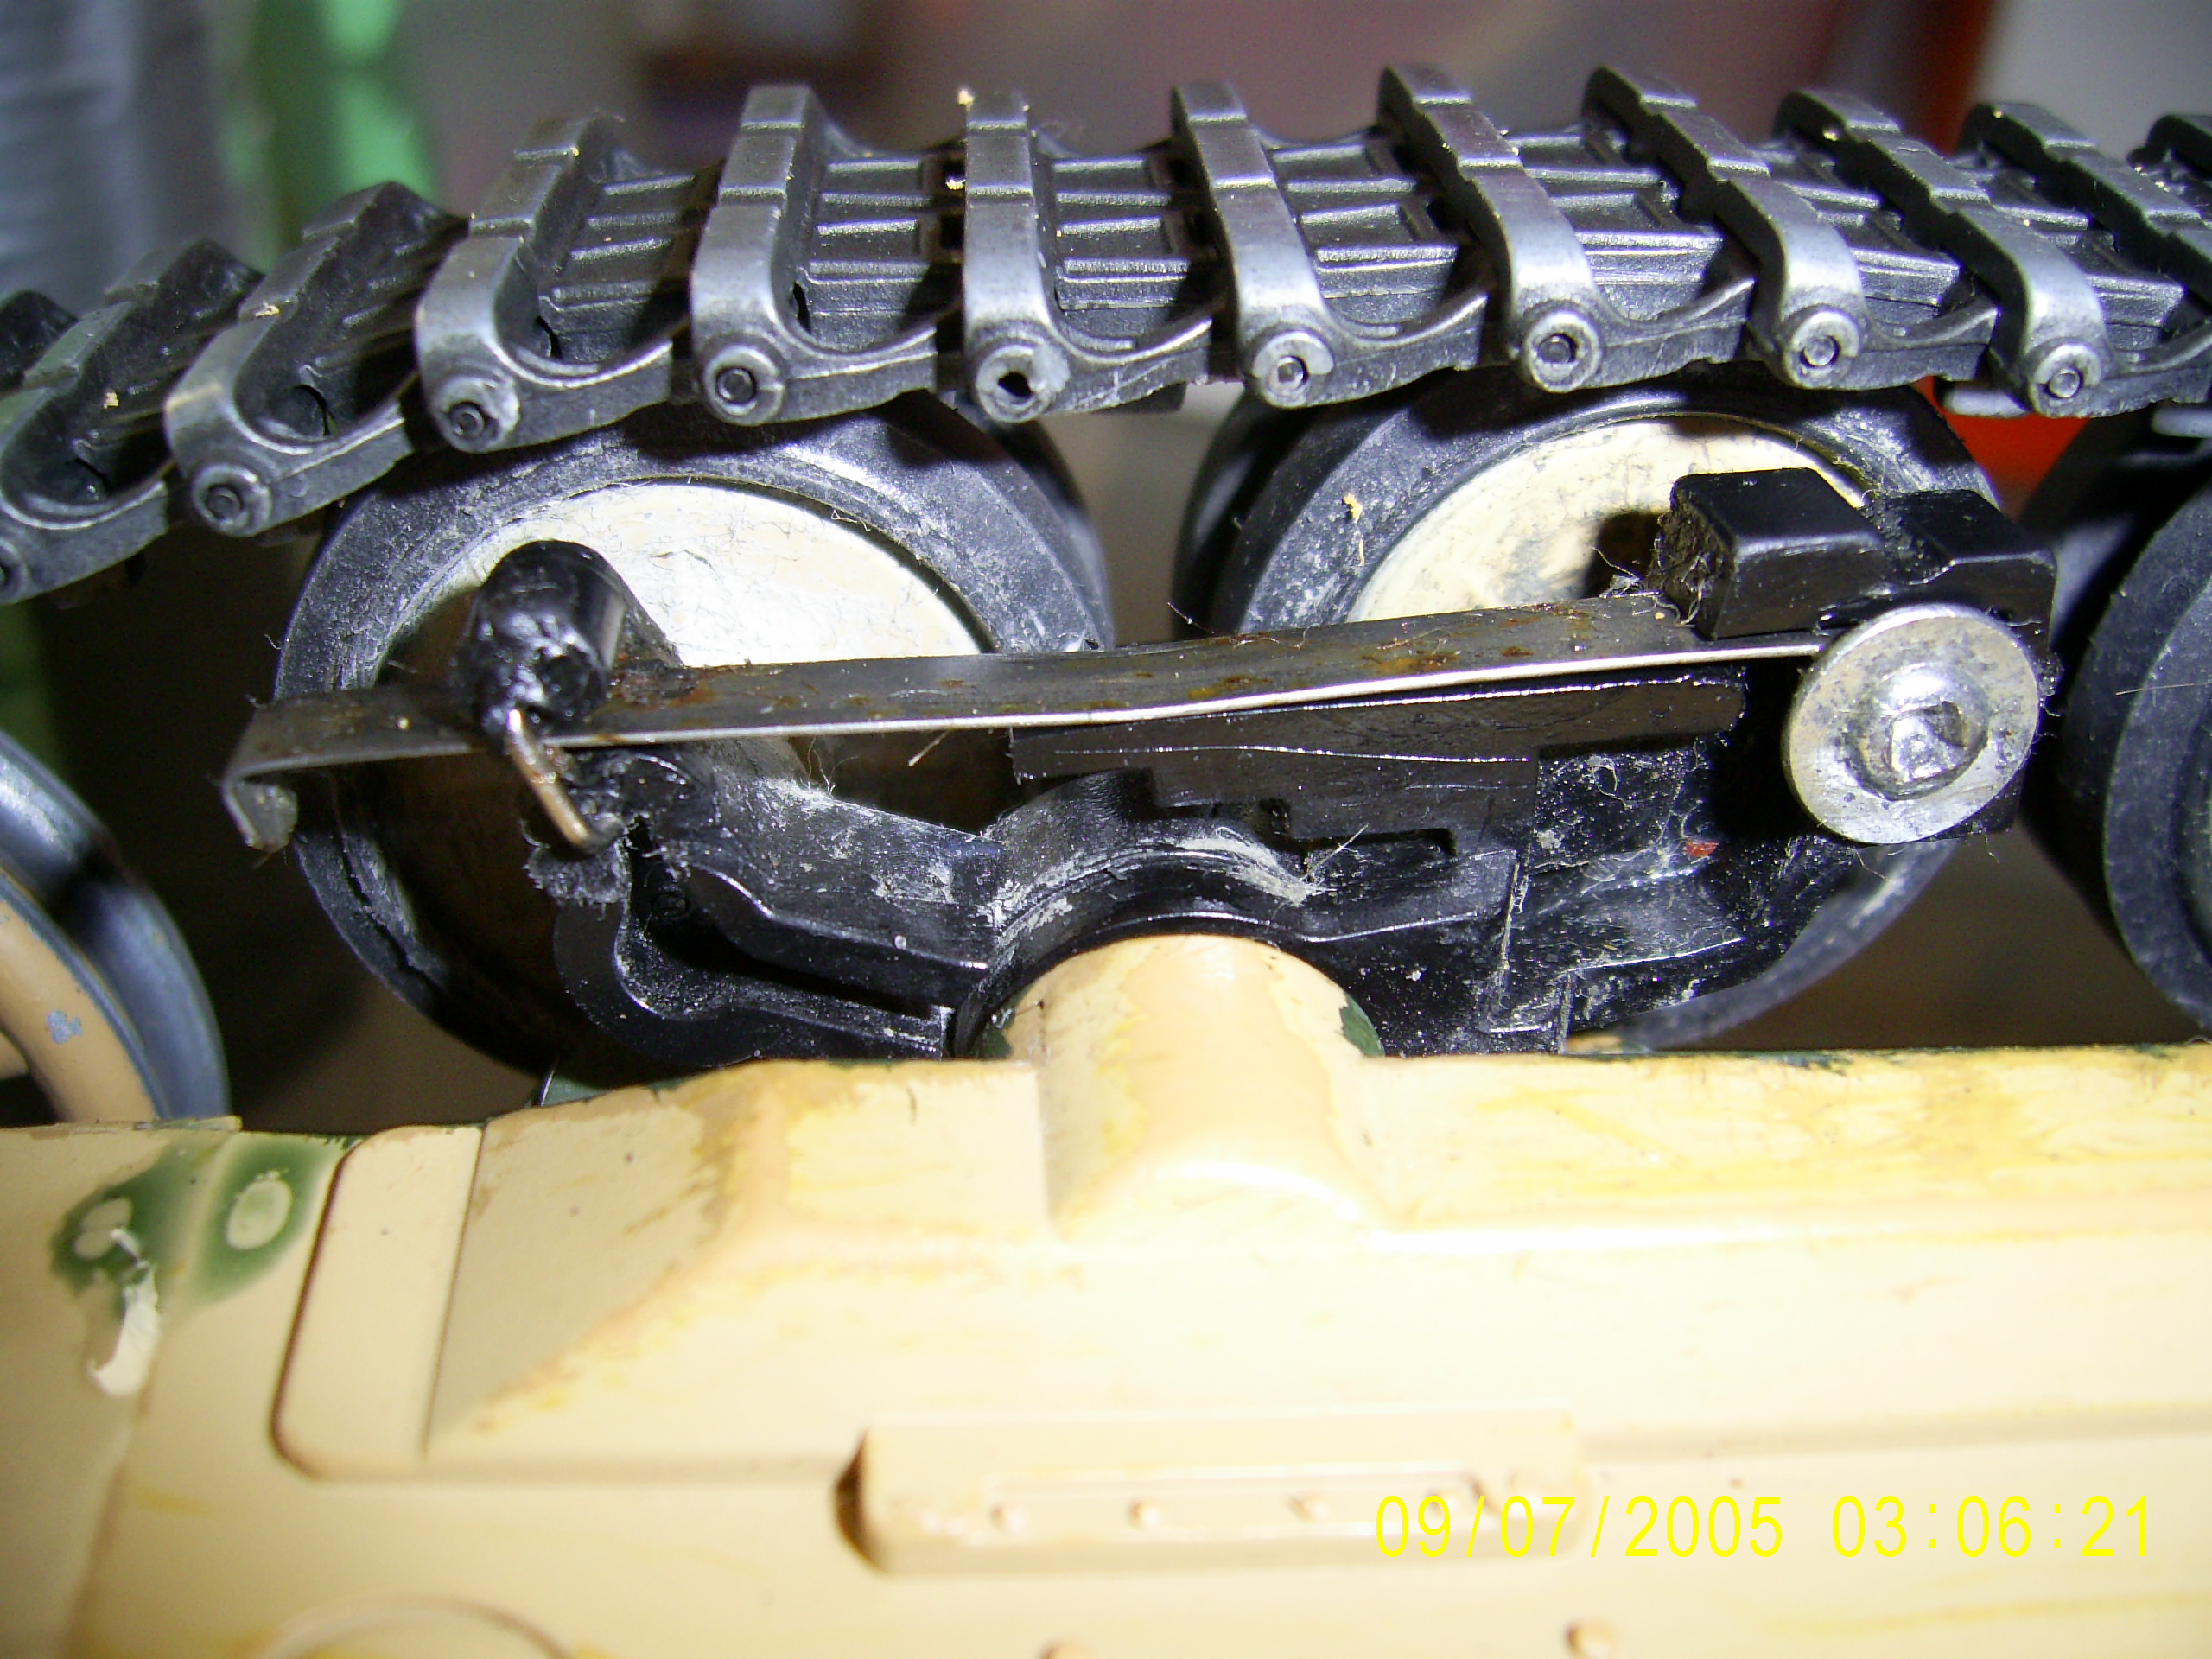
- I used the return rollers as a reference when I installed the Asiatam suspension and noticed that the wheels were sitting too close from the hull...
Shimming the posts with plastic washers solved the problem for me...
I'm not the first one who had problems with the alignment of the Panzer IV suspension:http://www.rcuniverse.com/forum/rc-t...uspension.html
12-16-2014 | 02:04 PM
#13
Thread Starter
Joined: Sep 2009
Posts: 520
Likes: 0
Received 0 Likes
on
0 Posts
From: Elliot Lake ON, CANADA
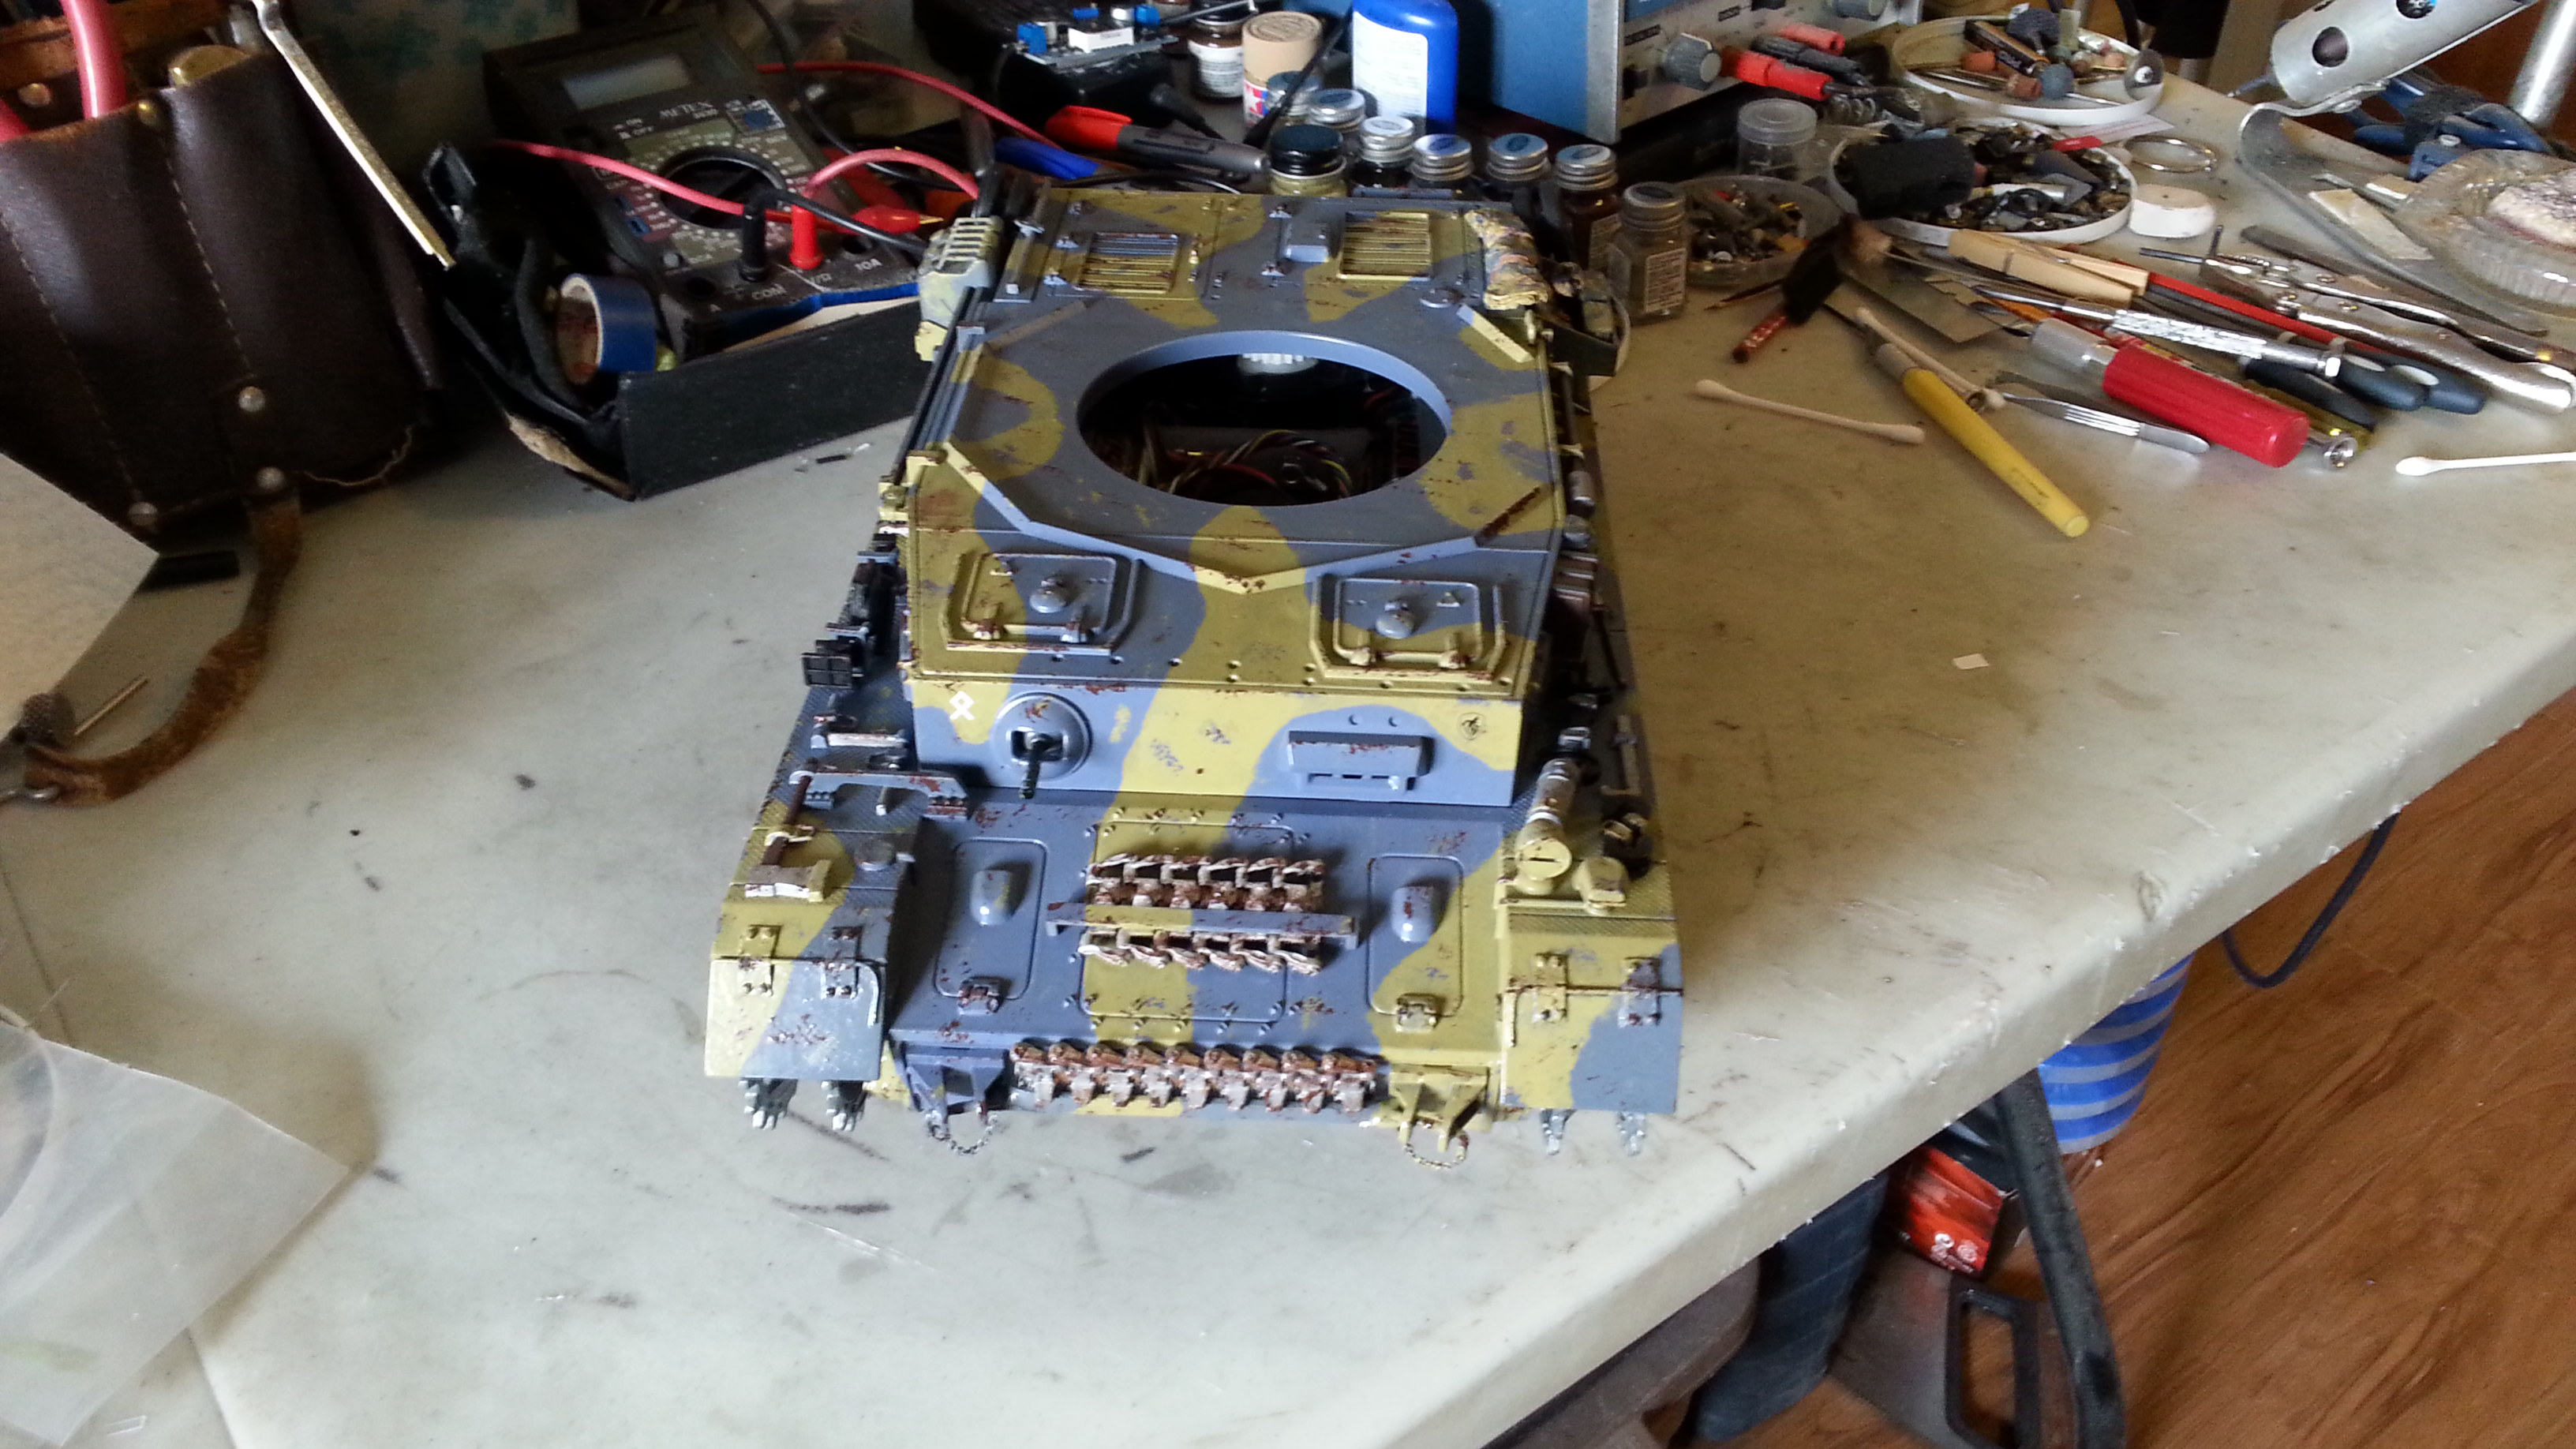
Here's an update on my panzer IV F2:
I got the lower hull up and running...
- I had a period of indecision as to the kind of gearboxes to use...
I first tried a set of Mato brass gearboxes that I bought on sale a couple years ago...But even after they had been broken down and lubricated, they were still too noisy for my taste...
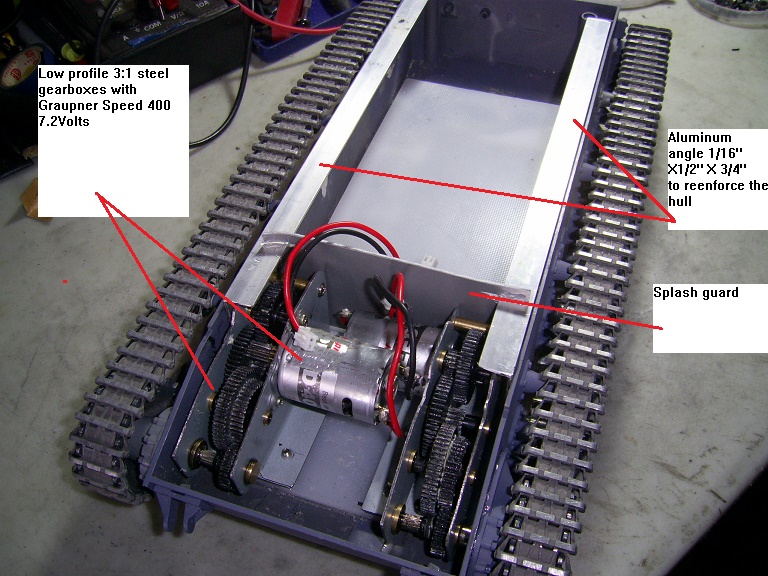
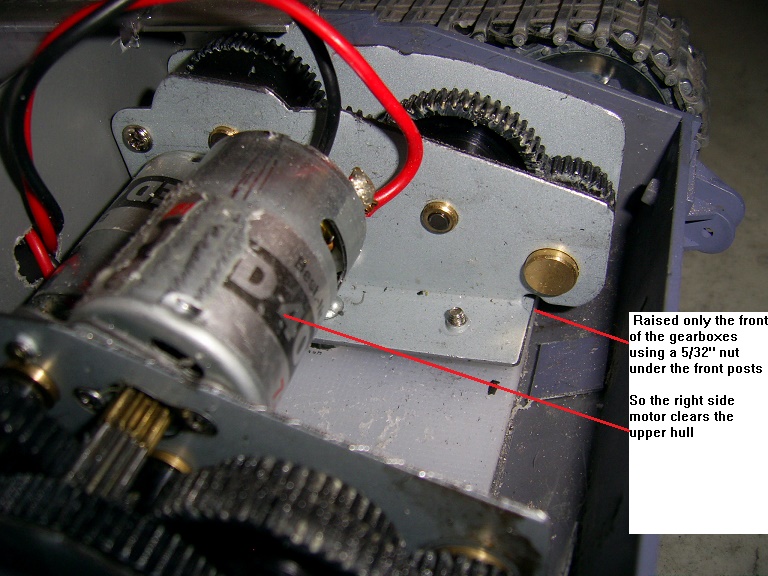
So I switch to a set of 3:1 low profile steel gearboxes, equipped with a pair of Graupner speed 400 7,2 Volts motors,,,The motors themselves were worth the switch...
I also had problems with the Asiatam tracks adjusters; but It was all my fault...They didn't come with instructions and I didn't know what to do with those little notches on the side of the shafts; so I " dremmel" them out... 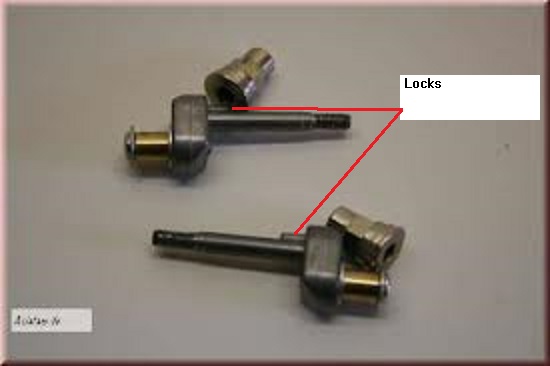 When I tried to use lock washers and tightening the nut to lock the adjusters; I ended up breaking them...
The bright side of my mistake is that I made my own track adjusters; and I kind of like them better...http://www.rcuniverse.com/forum/rc-t...panzer-iv.html
The rest of the build took a while but was incident free...Here's some pics with commentaries...


And a short test video: http://youtu.be/et8iG8SJf6A?list=UUoWjHTJi7Z1uGnVnrbH3GxQ
I got the lower hull up and running...
- I had a period of indecision as to the kind of gearboxes to use...
I first tried a set of Mato brass gearboxes that I bought on sale a couple years ago...But even after they had been broken down and lubricated, they were still too noisy for my taste...
So I switch to a set of 3:1 low profile steel gearboxes, equipped with a pair of Graupner speed 400 7,2 Volts motors,,,The motors themselves were worth the switch...
I also had problems with the Asiatam tracks adjusters; but It was all my fault...They didn't come with instructions and I didn't know what to do with those little notches on the side of the shafts; so I " dremmel" them out...
The bright side of my mistake is that I made my own track adjusters; and I kind of like them better...http://www.rcuniverse.com/forum/rc-t...panzer-iv.html
The rest of the build took a while but was incident free...Here's some pics with commentaries...
And a short test video: http://youtu.be/et8iG8SJf6A?list=UUoWjHTJi7Z1uGnVnrbH3GxQ
12-16-2014 | 06:34 PM
#14
Looks really good. A few questions that will help on my build, if I may...
- Looks like you raised the sprockets by about 4-mm. How much did you lower the rear return rollers?
- How did you wire the charging port? I've looked at the stereo option, but I'm not sure how to wire it (in the tank and on the charger) and then include the on/off switch. Any concerns with charging the two batteries together (I assume they're in parallel to the TK board)? Or, do you isolate them while charging them? Would love a circuit diagram or wiring diagram for this mod. There are transmitter charging leads that I've considered using for the charger side, but wouldn't know how to wire the tank side correctly (proper placement of positive and negative).
12-16-2014 | 07:37 PM
#15
Thread Starter
Joined: Sep 2009
Posts: 520
Likes: 0
Received 0 Likes
on
0 Posts
From: Elliot Lake ON, CANADA
The last return roller was lowered by 4 mm...
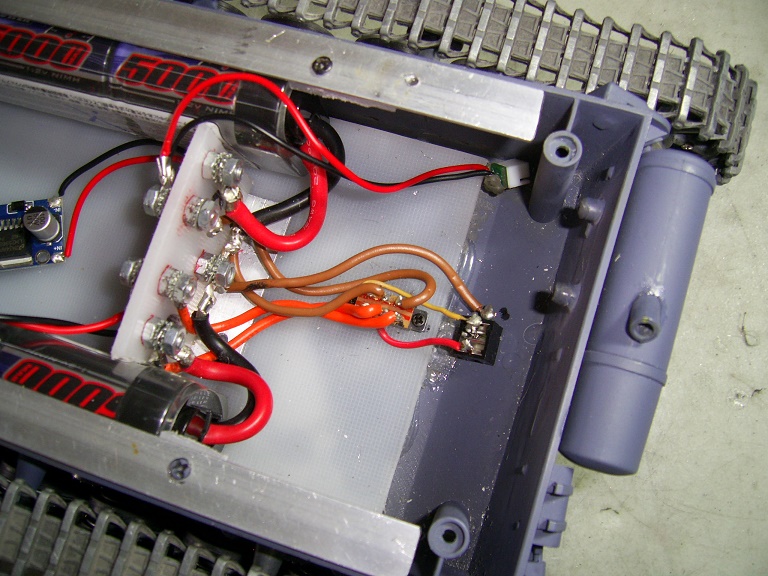
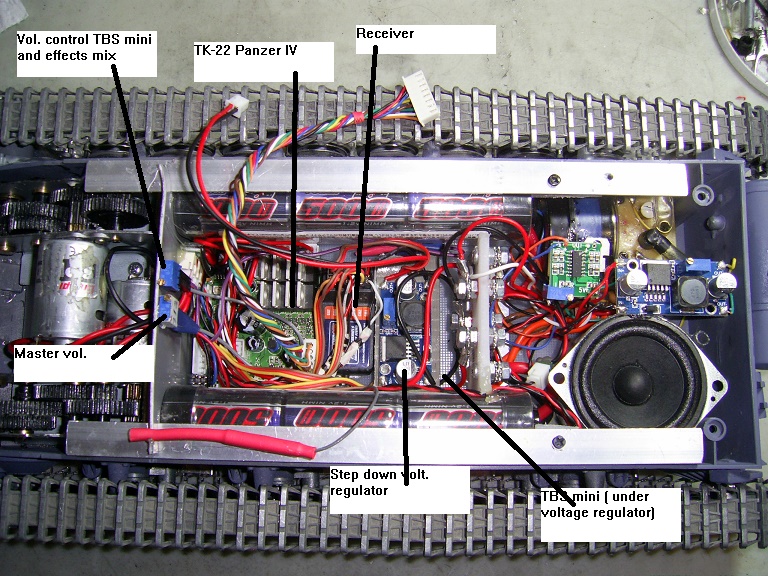
The 2 batteries are not connected in parallel, they each power a different load and share a common ground...
I'm using 2 chargers and each battery is charged individually....
Here's the wiring diagram for my H.L. Pershing ( witch is basically the same):
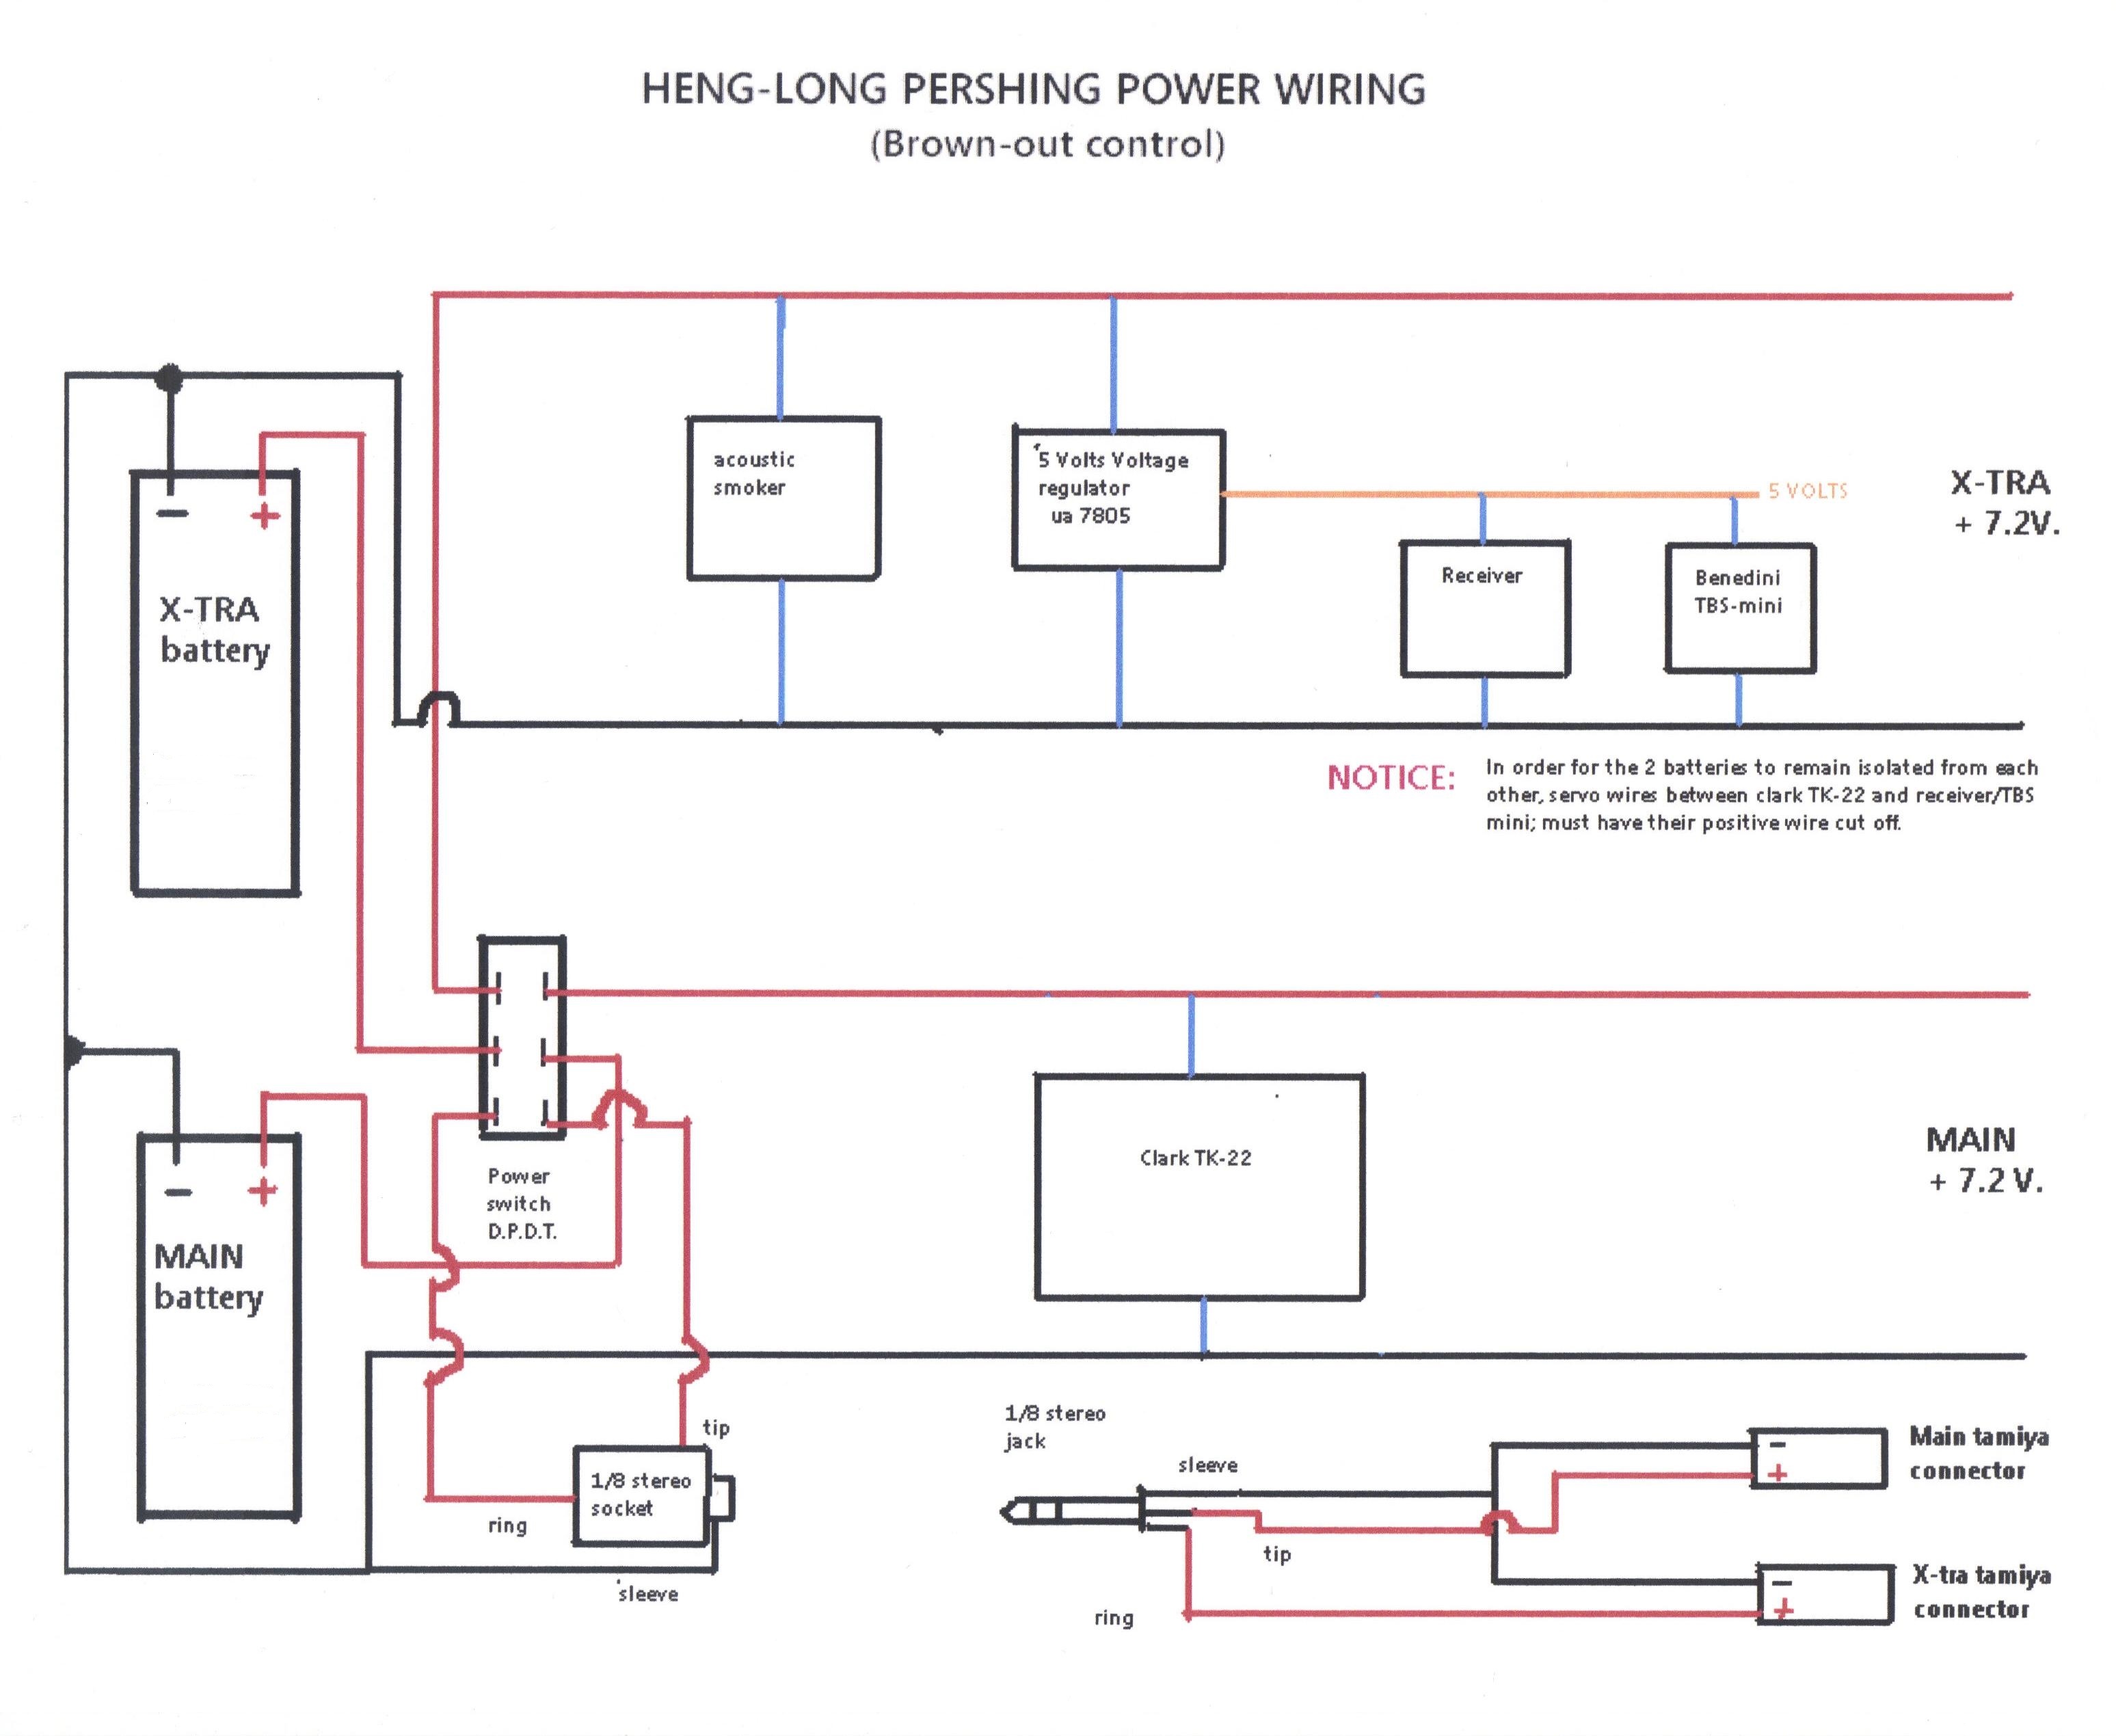
The 2 batteries are not connected in parallel, they each power a different load and share a common ground...
I'm using 2 chargers and each battery is charged individually....
Here's the wiring diagram for my H.L. Pershing ( witch is basically the same):
02-17-2015 | 09:14 AM
#18

 Might be a good idea to put a stopper on the inside of the tow hook, even a drop of silicone to stop it from sliding out. My problem was the tall grass pushing the rear ones into the tracks and getting ripped off.
") 04-09-2015 | 08:42 PM
04-09-2015 | 08:42 PM
#21
Thread Starter
Joined: Sep 2009
Posts: 520
Likes: 0
Received 0 Likes
on
0 Posts
From: Elliot Lake ON, CANADA
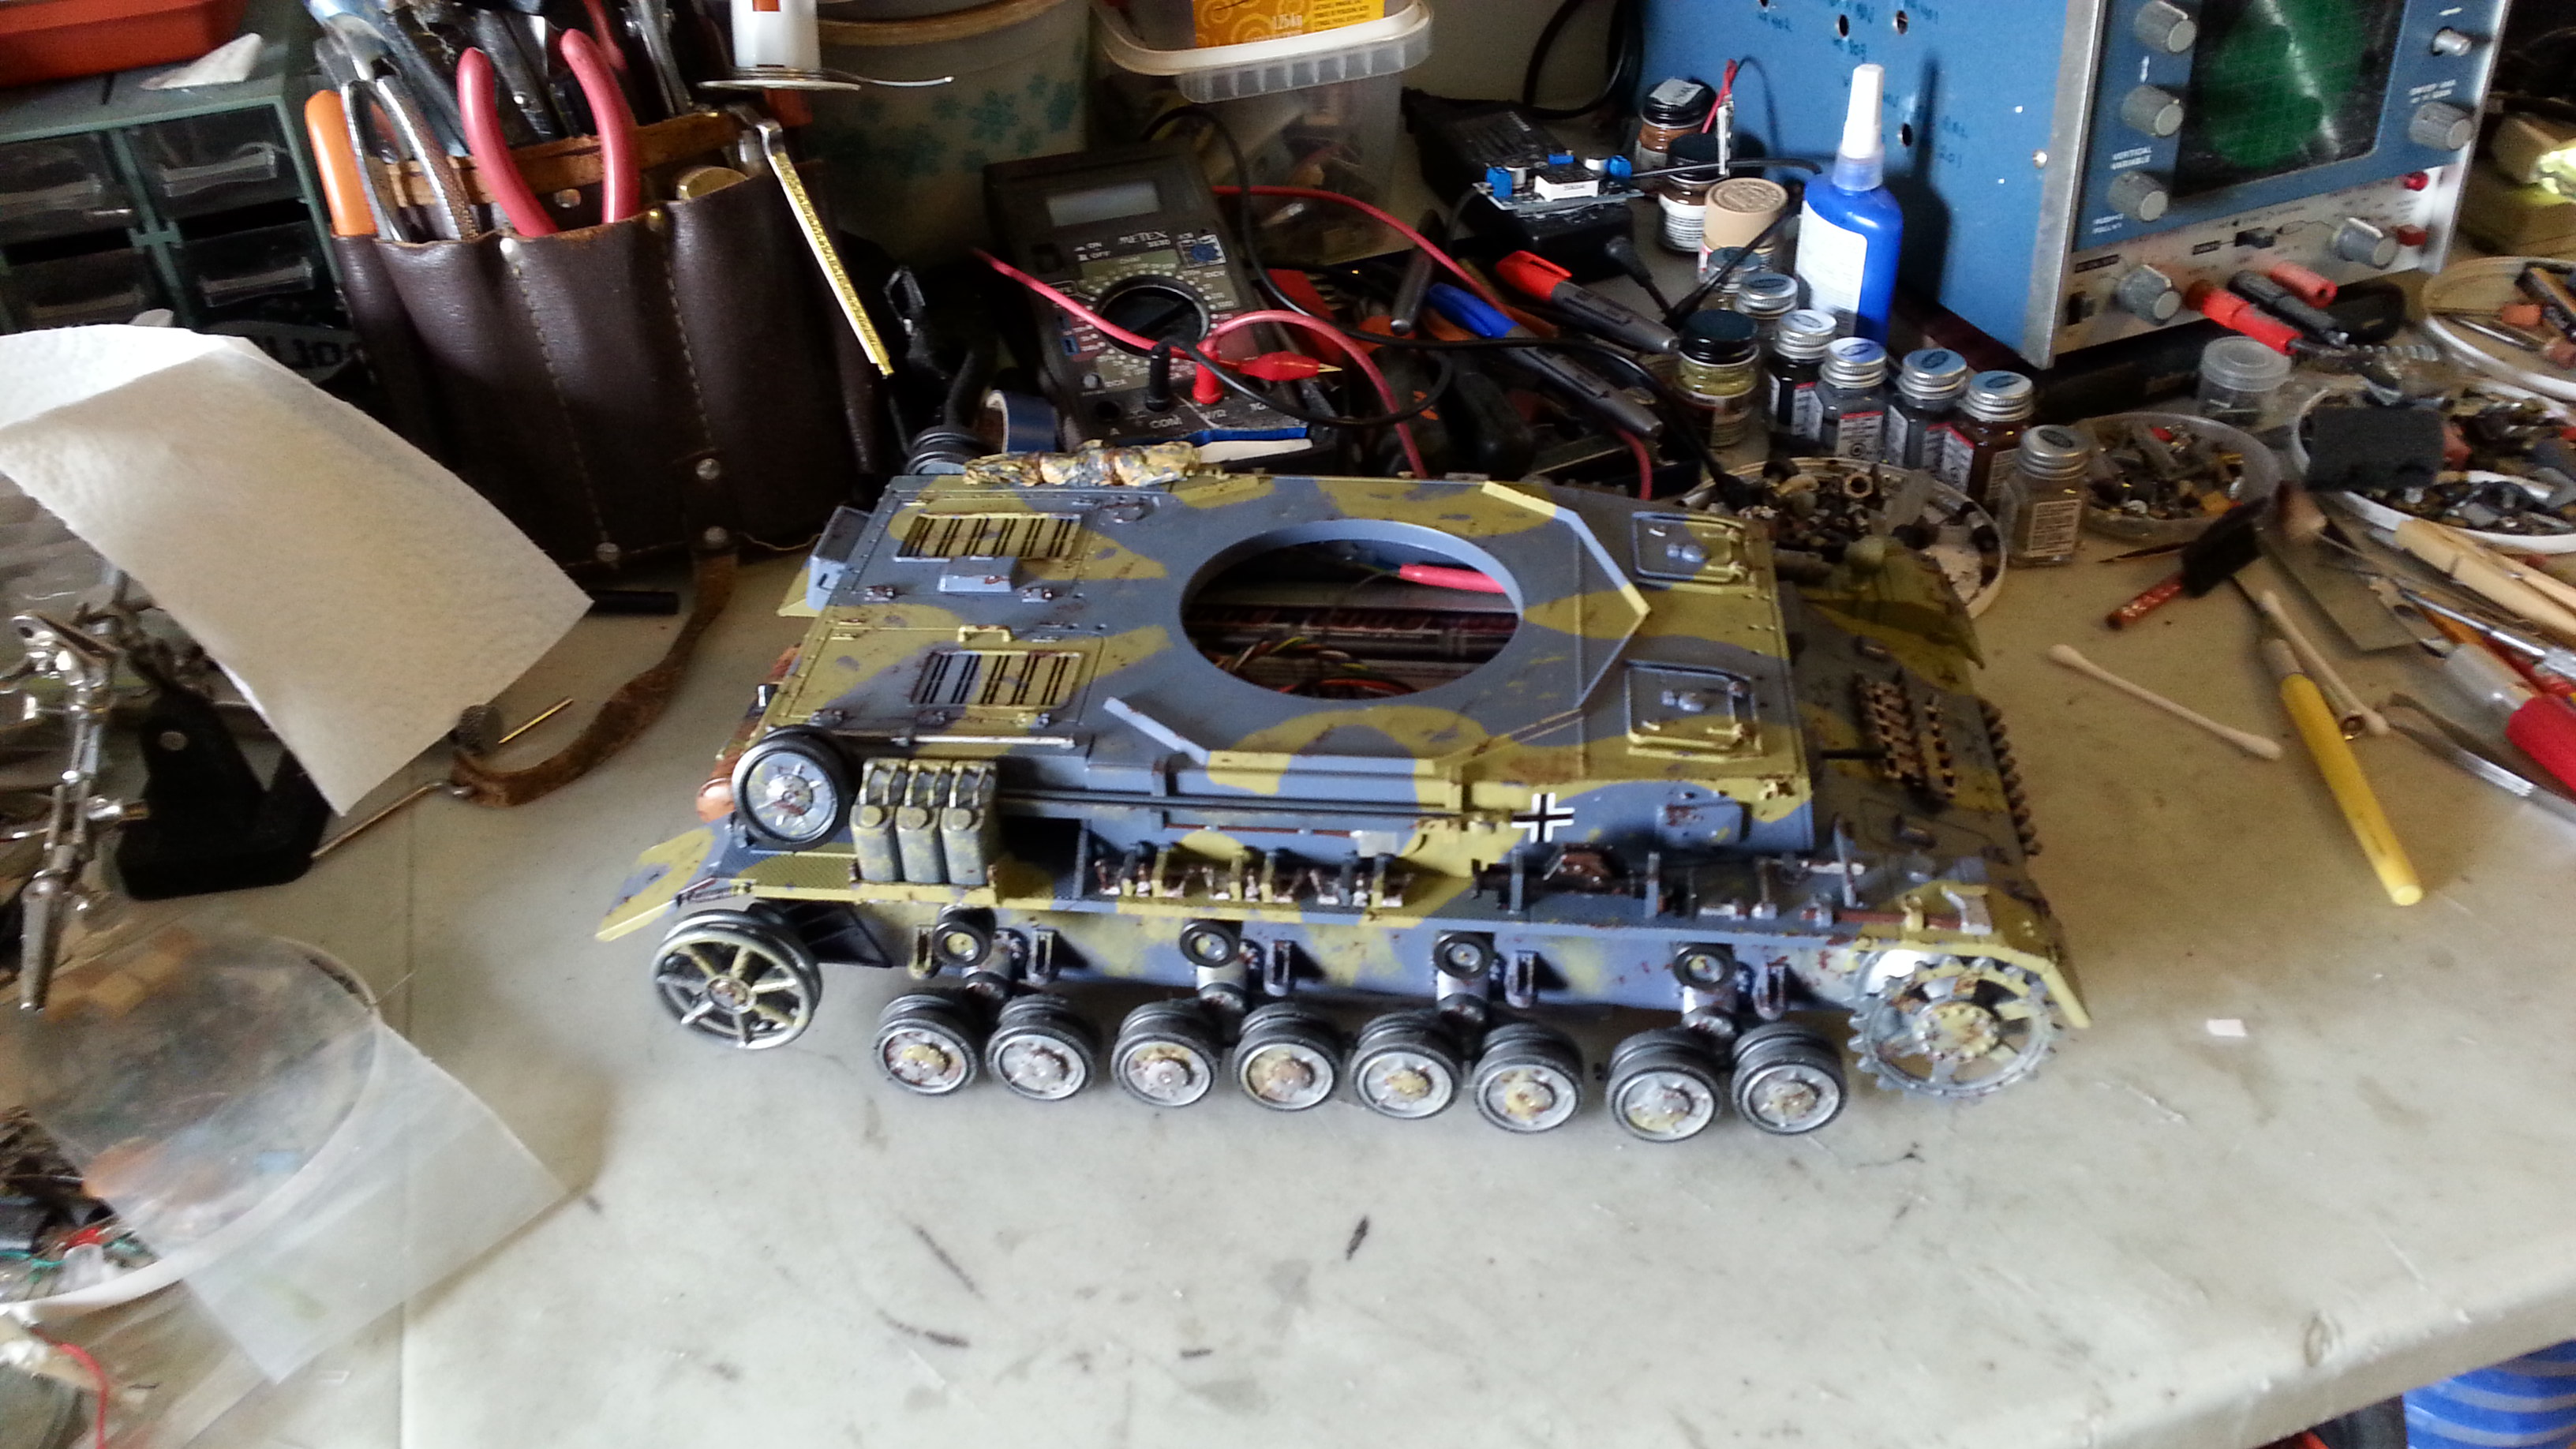
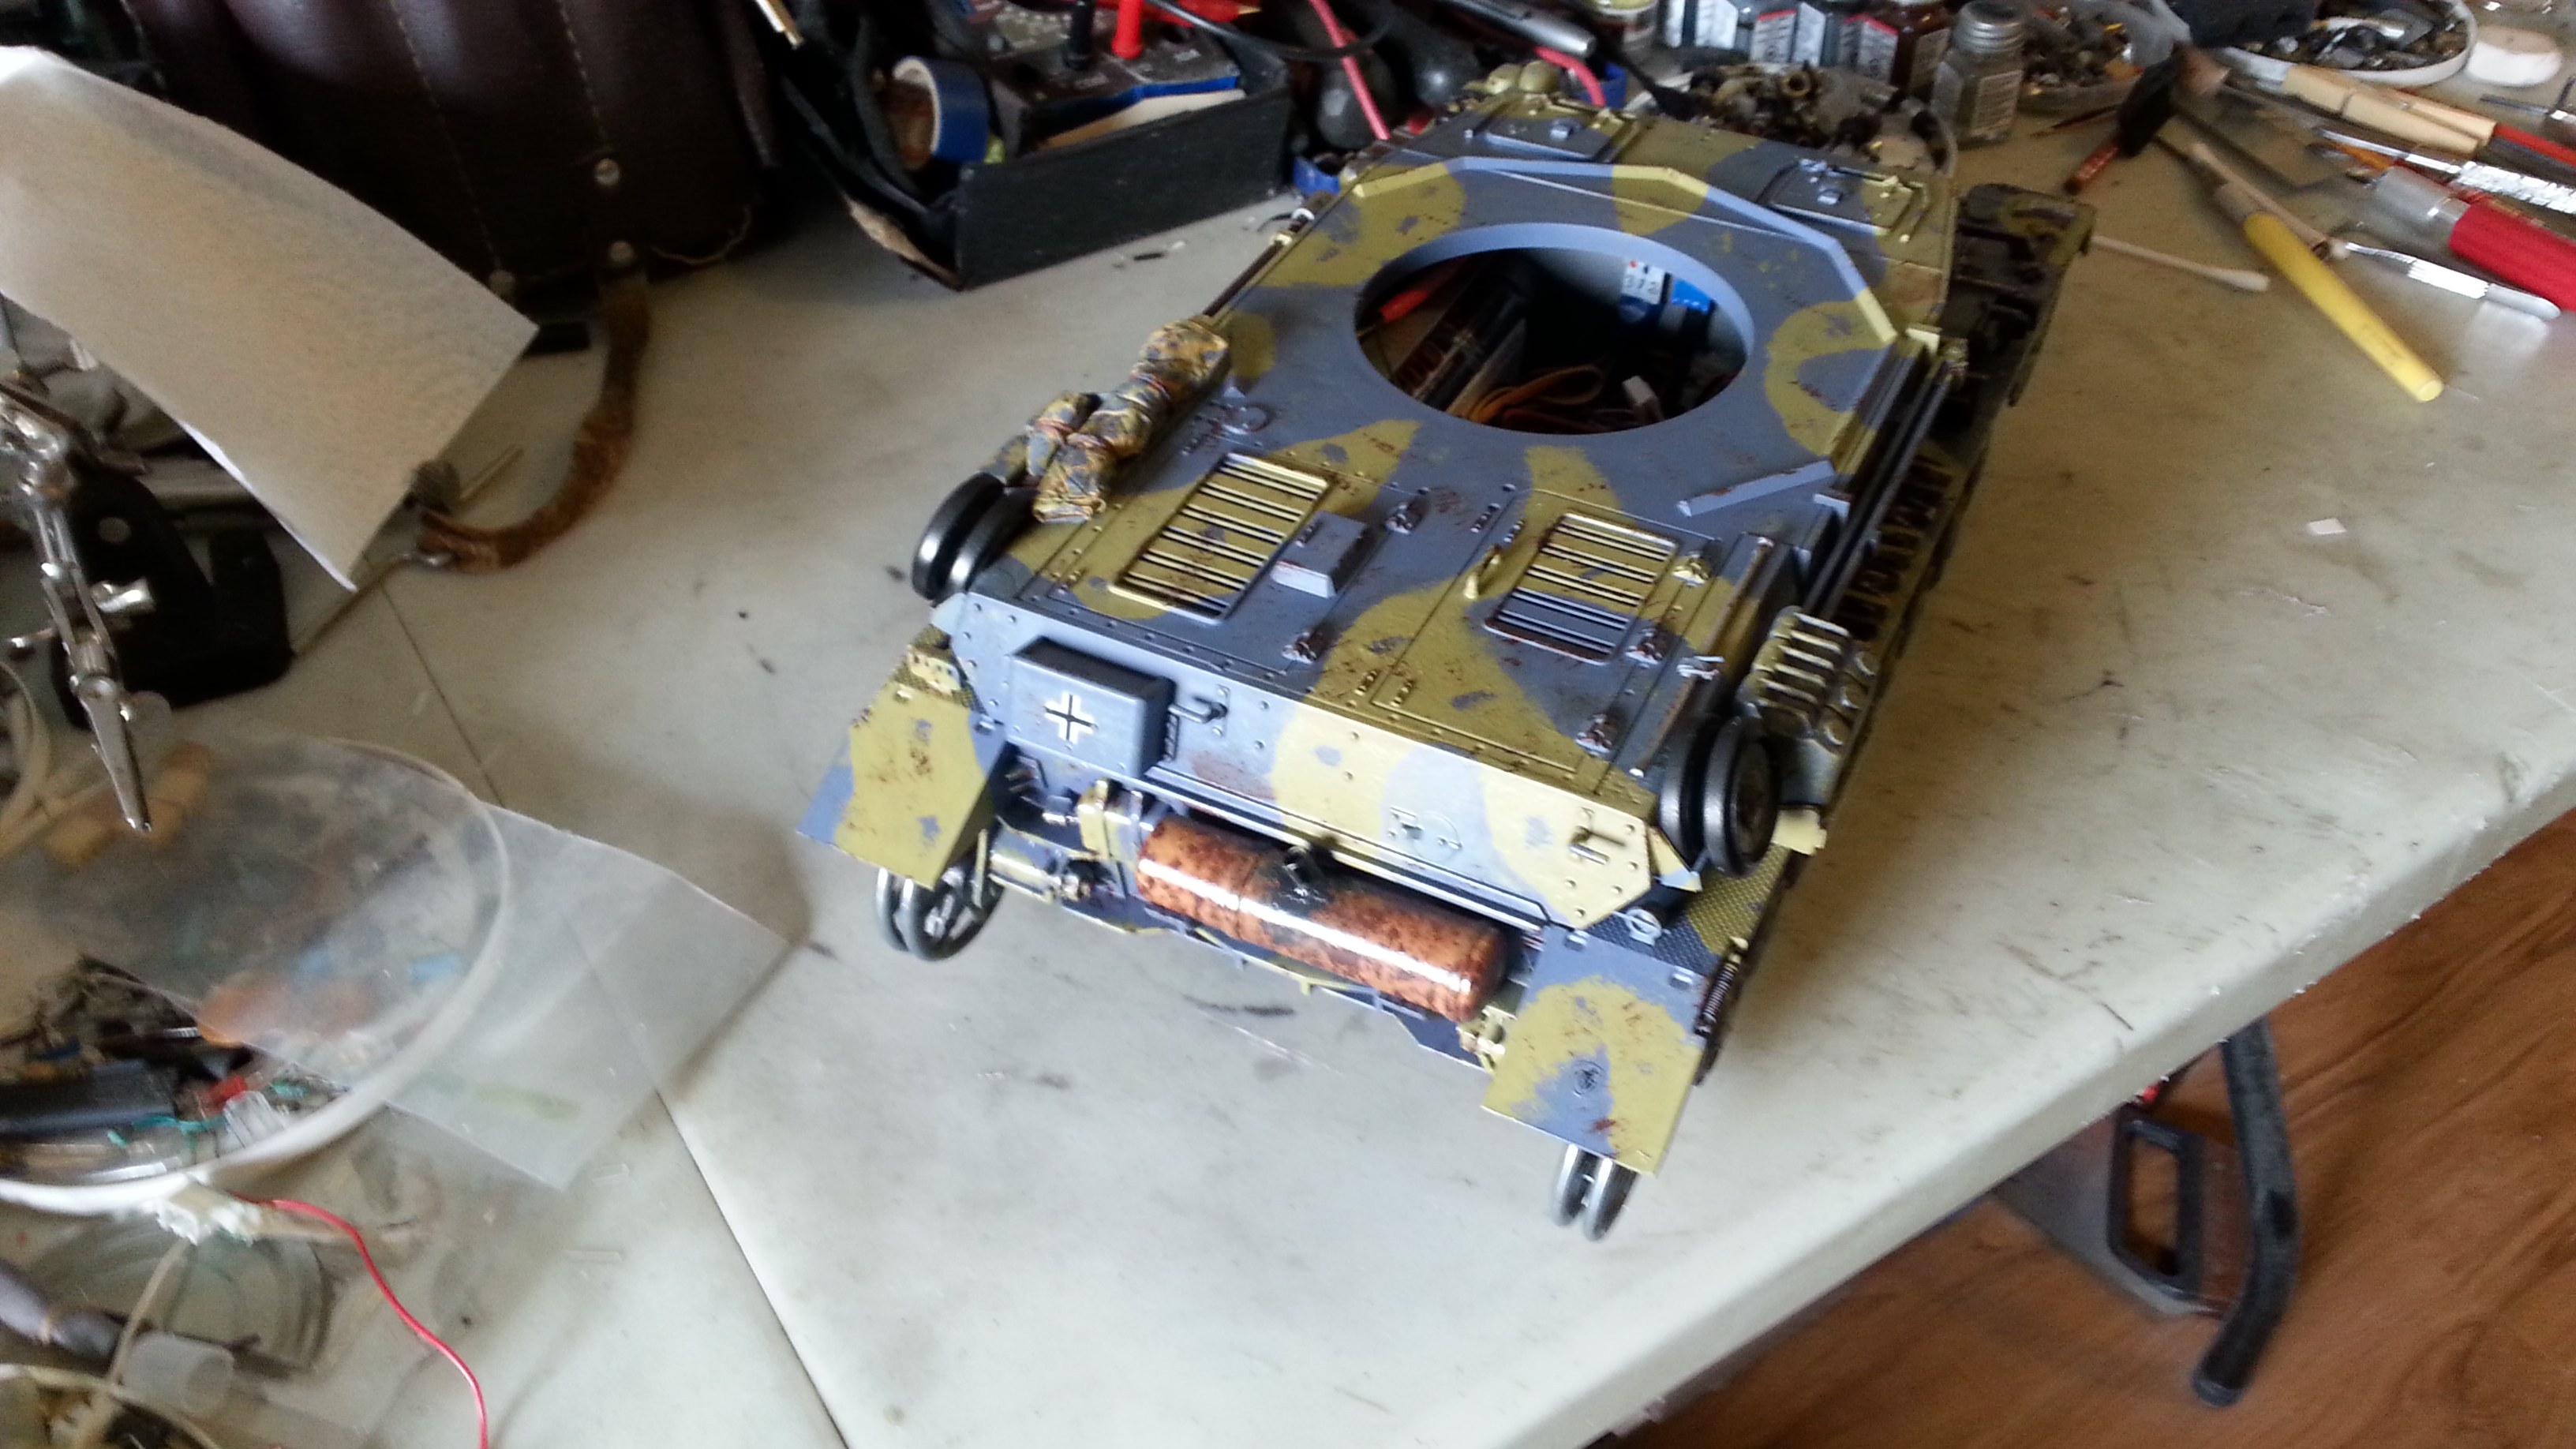
Well progress has been slow but steady, I'm almost ready to work on the turret...
My tank won't be anywhere close to yours as for the detailing; but that's good enough for me...

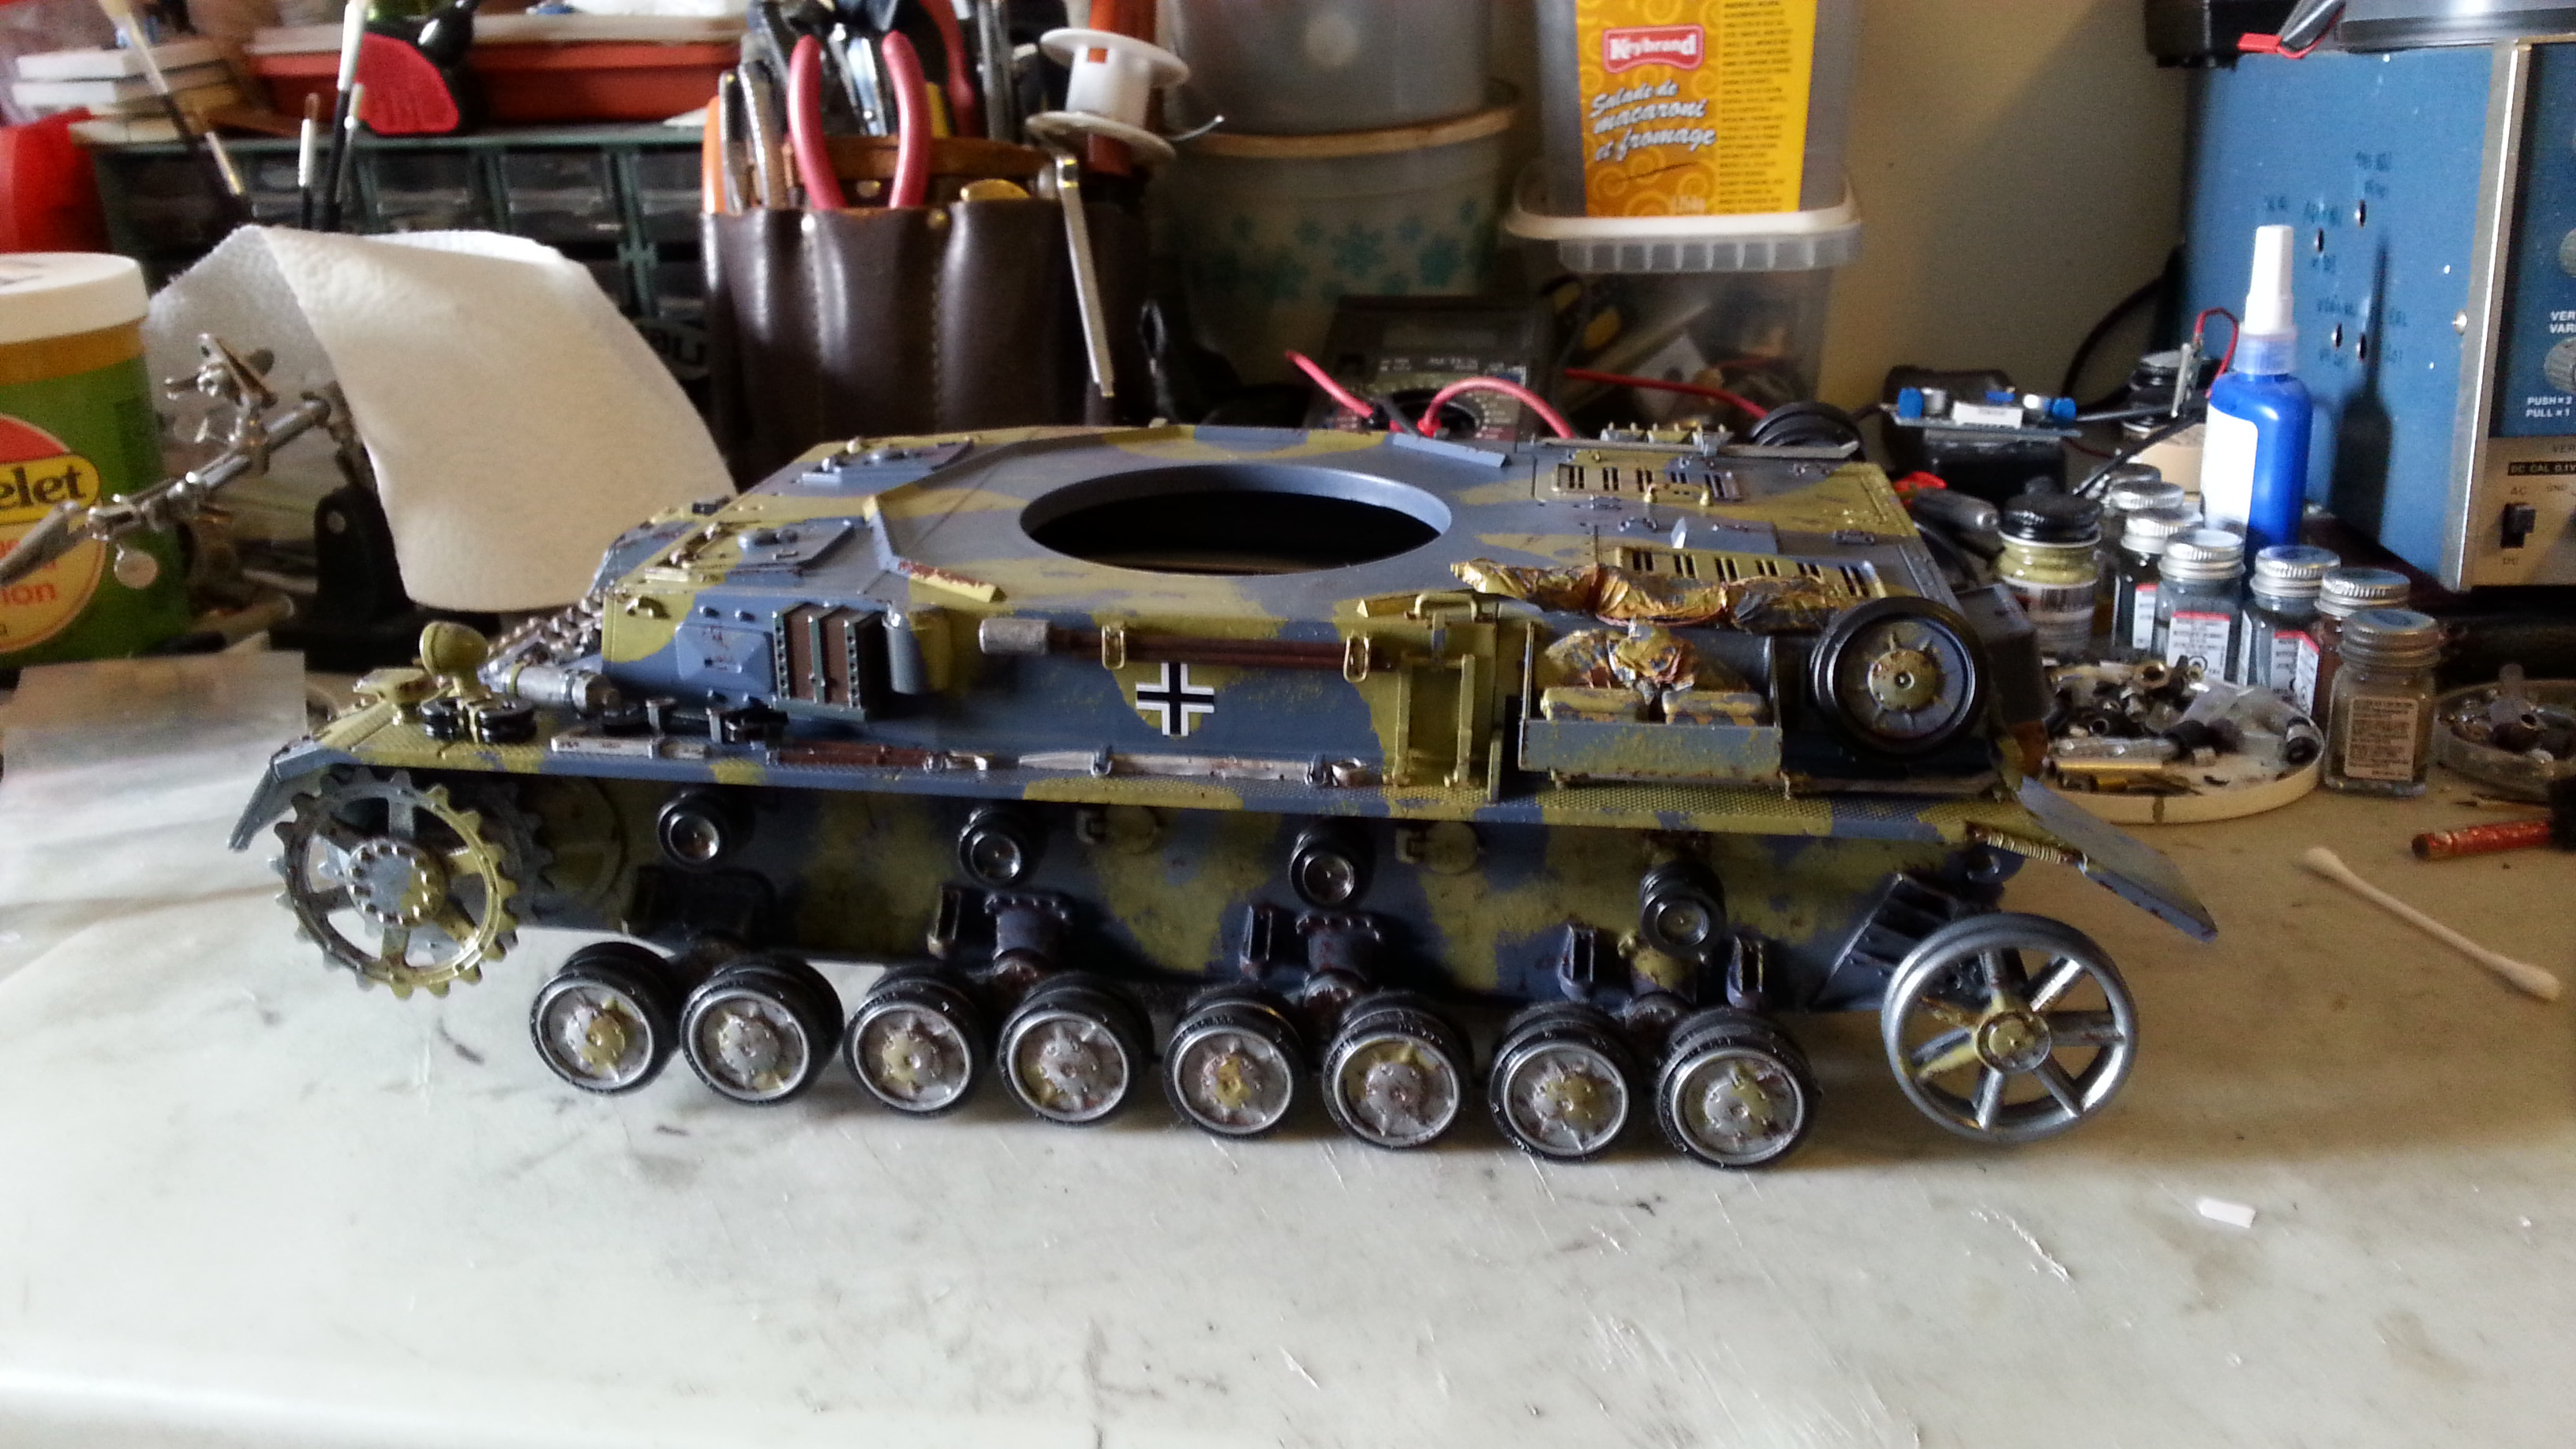
My tank won't be anywhere close to yours as for the detailing; but that's good enough for me...
04-10-2015 | 06:38 AM
#22
Looks good so far!!!!
04-10-2015 | 05:54 PM
#23
Looking good so far. I've been working on my suspension using your work as a guide. If the tracks are still off, do you have any photos of how the road wheels and return rollers line up relative to the sprockets? Something looking down the line of wheels at the sprocket? Or, so how much the bogie sticks out from the plastic cover (rounded portion over the bogie)? I'm thinking that I need to add the spacer like you did and want to compare what I'm seeing to what you've done.
04-11-2015 | 07:02 AM
#24
Thread Starter
Joined: Sep 2009
Posts: 520
Likes: 0
Received 0 Likes
on
0 Posts
From: Elliot Lake ON, CANADA
I started with the concept that the original plastic suspension and return rollers were lined up with the sprockets...Then I used washers to align the Asiatam suspension with the return rollers witch in turn gave the alignment with the front sprockets...
The last thing to align was the rear idlers....
The last thing to align was the rear idlers....
04-11-2015 | 07:03 PM
#25
I started with the concept that the original plastic suspension and return rollers were lined up with the sprockets...Then I used washers to align the Asiatam suspension with the return rollers witch in turn gave the alignment with the front sprockets...
The last thing to align was the rear idlers....
The last thing to align was the rear idlers....

